Showing 3440 items
matching city of ballarat
-
 City of Ballarat Libraries
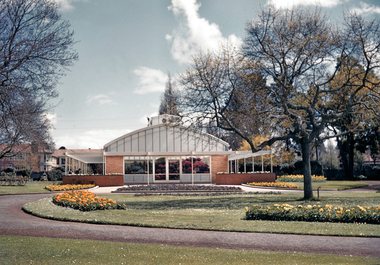
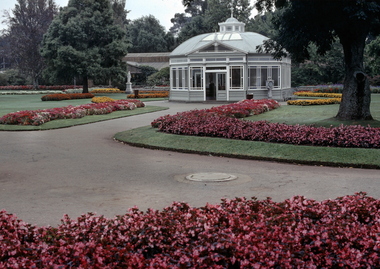
35mm Slide, Cuthbert house, Ballarat Botanical Gardens circa 1960s
... City of Ballarat Libraries Eureka Centre Eureka Street ...Cuthbert House, erected in 1959 as a display house for the famous Ballarat begonias. It replaced the earlier Keel House. The conservatory was not open to the public, but the flowers could be viewed through the windows. It was replaced in 1995 with the current Robert Clark Conservatory. The former Lakeside Hospital can be seen in the background. Mrs Bon Strange and her husband Bert were well known Ballarat residents. When Mrs Strange died some years ago, her extensive slide collection was sorted through and those relevant to Ballarat were gifted to the Ballarat Library. greenhouse, botanical gardens, lake wendouree, lakeside hospital, hothouse, ballarat, conservatory, begonias -
 City of Ballarat Libraries
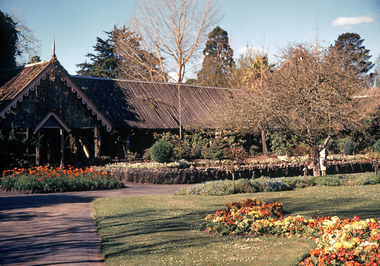
35mm Slide, Fernery, Ballarat Botanical Gardens, circa 1950s
... City of Ballarat Libraries Eureka Centre Eureka Street ...Mrs Bon Strange and her husband Bert were well known Ballarat residents. When Mrs Strange died some years ago, her extensive slide collection was sorted through and those relevant to Ballarat were gifted to the Ballarat Library. fernery, botanical gardens, lake wendouree, ballarat -
 City of Ballarat Libraries
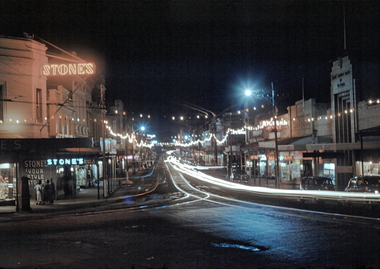
35mm Slide, Bridge Street Ballarat circa late 1950s
... City of Ballarat Libraries Eureka Centre Eureka Street ...A night exposure of Bridge Street looking west. The tram tracks are clear, one set going straight ahead up Victoria St hill, the other set turning along Main Road. Stone's at Stones Corner was a select ladies dress shop for many years. Mrs Bon Strange and her husband Bert were well known Ballarat residents. When Mrs Strange died some years ago, her extensive slide collection was sorted through and those relevant to Ballarat were gifted to the Ballarat Library. bridge street -
 City of Ballarat Libraries
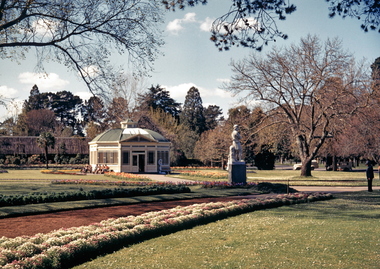
35 mm Slide, Wallace Statue and Statuary Pavilion, Ballarat Botanical Gardens, circa late 1950s
... City of Ballarat Libraries Eureka Centre Eureka Street ...This image perfectly captures the Botanical Gardens in late afternoon light. The Statuary Pavilion was built following a bequest from James Russell Thompson, who was originally from Scotland. The Wallace Statue was purchased with money remaining in the bequest after the Pavilion was established. Mrs Bon Strange and her husband Bert were well known Ballarat residents. When Mrs Strange died some years ago, her extensive slide collection was sorted through and those relevant to Ballarat were gifted to the Ballarat Library. statues, statuary pavillion, botanical gardens, lake wendouree, william wallace statue, charles summer, james russell thompson -
 City of Ballarat Libraries
35mm Slide, St Andrew's Kirk, Ballarat circa late 1950s
... City of Ballarat Libraries Eureka Centre Eureka Street ...St Andrew's Kirk faces into Sturt St, but this photograph is taken at an unusual angle from Dawson St. Architecturally this church is of great importance being part of the group of churches in Dawson St which includes St Patrick Cathedral, and the former Congregational and Baptist churches. The cast iron fence was erected after 1900. Mrs Bon Strange and her husband Bert were well known Ballarat residents. When Mrs Strange died some years ago, her extensive slide collection was sorted through and those relevant to Ballarat were gifted to the Ballarat Library. -
 City of Ballarat Libraries
35 mm Slide, Statuary Pavilion, Ballarat Botanical Gardens circa late1950s
... City of Ballarat Libraries Eureka Centre Eureka Street ...James Russell Thompson (1818-1886) a successful mining investor and stockbroker of the Ballarat Stock Exchange, gifted the pavilion and the statues within, as a 10,000 pound bequest to the City in his will. The pavilion, designed by architect T.E. Molloy on an octagonal plan with a convex curved roof, was constructed in 1887, and houses the statues Flight from Pompeii, Rebekah, Susannah, Modesty and Ruth. The pavilion is a major feature of the Ballarat Botanical Gardens, and unique in Victoria. It is a favourite subject for photographers, and Mrs Strange has captured it surrounded by massed small begonias. Mrs Bon Strange and her husband Bert were well known Ballarat residents. When Mrs Strange died some years ago, her extensive slide collection was sorted through and those relevant to Ballarat were gifted to the Ballarat Library. botanical gardens, lake wendouree, james russell thompson, statuary pavilion, weighing machine -
 City of Ballarat Libraries
35mm Slide, Eureka Stockade Memorial, Ballarat East circa 1950s
... City of Ballarat Libraries Eureka Centre Eureka Street ...The memorial to those who fell at the Eureka Stockade in 1854, erected in 1884. Mrs Bon Strange and her husband Bert were well known Ballarat residents. When Mrs Strange died some years ago, her extensive slide collection was sorted through and those relevant to Ballarat were gifted to the Ballarat Library. eureka stockade, eureka stockade memorial, eureka street, ballarat east -
 City of Ballarat Libraries
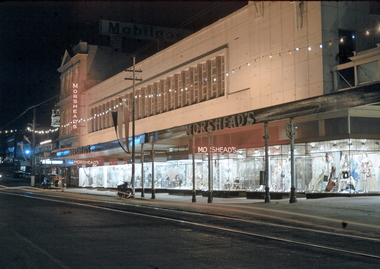
35mm Slide, Morshead's Department Store, Bridge Street Ballarat, circa 1950s
... City of Ballarat Libraries Eureka Centre Eureka Street ...Morshead's was a popular department store in the 1950s and 1960s. In this night exposure the famous window displays can be clearly seen. Also at the extreme right of the photograph the verandah over 'the bridge' can be seen - the creek is covered over making an arcade. Also the verandah posts which were all removed in the 1960s and cantilevered verandahs installed throughout Ballarat. Mrs Bon Strange and her husband Bert were well known Ballarat residents. When Mrs Strange died some years ago, her extensive slide collection was sorted through and those relevant to Ballarat were gifted to the Ballarat Library. bridge street, department store, trams, illuminations, shop windows, advertising -
 City of Ballarat Libraries
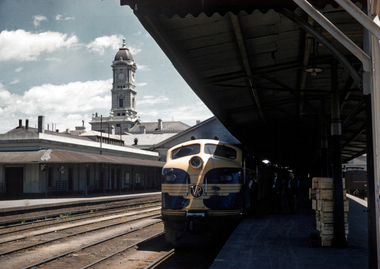
35mm Slide, Ballarat Railway Station circa 1950s
... City of Ballarat Libraries Eureka Centre Eureka Street ...Ballarat Railway Station photographed from Platform 2. The tower can be seen without the clock which was only installed after a fire in the 1980s. The B class diesels were the first mainline diesel locomotives built for the Victorian Railways, in 1952-3. They were unusual in having a streamlined drivers cab at each end. Mrs Bon Strange and her husband Bert were well known Ballarat residents. When Mrs Strange died some years ago, her extensive slide collection was sorted through and those relevant to Ballarat were gifted to the Ballarat Library. ballarat train station, victorian railways, diesel locomotive, clock tower, b class locomotive -
 City of Ballarat Libraries
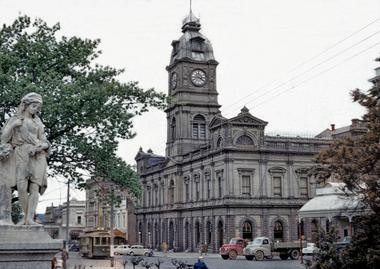
35mm Slide, Ballarat Town Hall circa 1950s
... City of Ballarat Libraries Eureka Centre Eureka Street ...Ballarat Town Hall erected 1870-72 at a cost of 17,976 pounds, on the south east corner of Sturt and Armstrong Streets. The raised corner pavilions in the design of the building make it unique in the State. This photograph shows a busy Ballarat intersection on a typical working day. Mrs Bon Strange and her husband Bert were well known Ballarat residents. When Mrs Strange died some years ago, her extensive slide collection was sorted through and those relevant to Ballarat were gifted to the Ballarat Library.ballarat town hall, sturt street, council trucks, tram, illuminations, street furniture, statues, verandahs -
 City of Ballarat Libraries
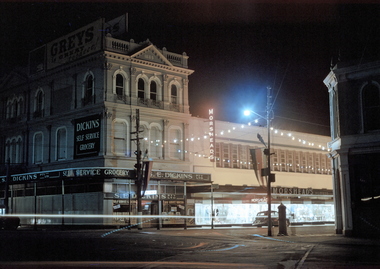
35mm Slide, Morshead's Department Store, S.E. Dickins Self Service Grocery, corner Grenville Street and Bridge Street, Ballarat circa 1950s
... City of Ballarat Libraries Eureka Centre Eureka Street ...This interesting photograph shows how a presently unprepossesing corner of Ballarat once looked. Also included is the Buck's Head hotel at the extreme right, which closed in 1960 and was demolished. The Morshead's department store windows were famous for their displays. Mrs Bon Strange and her husband Bert were well known Ballarat residents. When Mrs Strange died some years ago, her extensive slide collection was sorted through and those relevant to Ballarat were gifted to the Ballarat Library.grenville street, bridge street, department store, grocery store, illuminations, letterbox -
 City of Ballarat Libraries
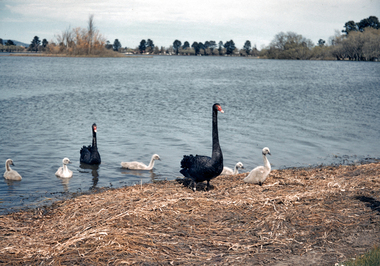
35mm Slide, Swans and Cygnets at Lake Wendouree circa 1950s
... City of Ballarat Libraries Eureka Centre Eureka Street ...Mrs Bon Strange and her husband Bert were well known Ballarat residents. When Mrs Strange died some years ago, her extensive slide collection was sorted through and those relevant to Ballarat were gifted to the Ballarat Library.lake wendouree, swans, ballarat -
 City of Ballarat Libraries
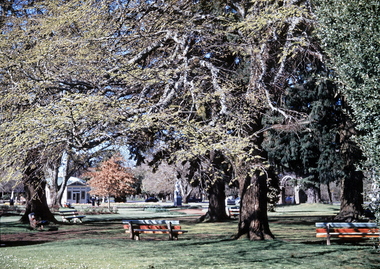
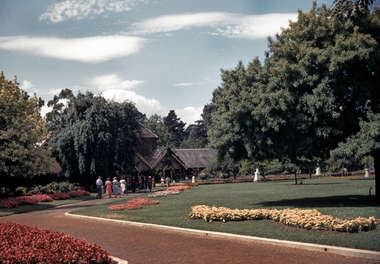
35mm Slide, Botanical Gardens, Ballarat circa 1950s
... City of Ballarat Libraries Eureka Centre Eureka Street ...Mrs Strange has captured the Gardens looking their leafy best, probably early Autumn, in this slide featuring colourful garden seating once a feature of the Gardens. Mrs Bon Strange and her husband Bert were well known Ballarat residents. When Mrs Strange died some years ago, her extensive slide collection was sorted through and those relevant to Ballarat were gifted to the Ballarat Library.botanical gardens, lake wendouree, statuary pavillion, william wallace statue, garden furniture -
 City of Ballarat Libraries
35mm Slide, Keel Glasshouse at the Botancal Gardens circa mid 1950s
... City of Ballarat Libraries Eureka Centre Eureka Street ...A delightfully framed shot of the Botanical Gardens in the mid to late 1950s. We can be reasonably sure of the date of this image because it shows the Keel House conservatory. Designed and fabricated in England, it was then re-assembled in the Ballarat Gardens in 1906. It was purely for display, only allowing public viewing through glass windows at either end. It became known as the Keel House because the roofline resembled a boat hull. The Keel House was replaced in 1959 by Cuthbert House, another conservatory which also did not allow public access. Cuthbert House was replaced in 1995 by the present Robert Clark conservatory, which allows public access for the first time. Note other details in this photograph, the sprinkler at full bore and the little boy hiding behind the sundial. Mrs Bon Strange and her husband Bert were well known Ballarat residents. When Mrs Strange died some years ago, her extensive slide collection was sorted through and those relevant to Ballarat were gifted to the Ballarat Library.greenhouse, glasshouse, keel glasshouse, garden, building, public building, ballarat botanical garden -
 City of Ballarat Libraries
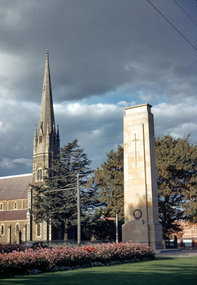
35mm Slide, Cenotaph and St Andrew's Kirk, Ballarat circa 1950s
... City of Ballarat Libraries Eureka Centre Eureka Street ...The Cenotaph is one of the collection of war memorials in Sturt St, Ballarat, and was erected in 1948. St Andrew's Kirk was first constructed in 1862-4, and the spire added in 1884. This beautifully composed photograph shows Sturt St looking its best in late afternoon light. Mrs Bon Strange and her husband Bert were well known Ballarat residents. When Mrs Strange died some years ago, her extensive slide collection was sorted through and those relevant to Ballarat were gifted to the Ballarat Library.church, sturt street, cenotaph -
 City of Ballarat Libraries
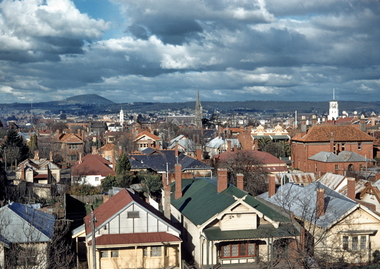
Slide, View east over houses from Ballarat Hospital circa late 1950s
... City of Ballarat Libraries Eureka Centre Eureka Street ...This image appears to have been taken from Ballarat Base Hospital, looking east over Drummond Street to Mt Warrenheip. The City Fire Brigade tower painted white can be seen to the right, while St Andrew's Kirk dominates the middle ground of the photograph. Many photographs over the years have been taken from this viewpoint, and are interesting to compare. Mrs Bon Strange and her husband Bert were well known Ballarat residents. When Mrs Strange died some years ago, her extensive slide collection was sorted through and those relevant to Ballarat were gifted to the Ballarat Library.mount warrenheip, ballarat east -
 City of Ballarat Libraries
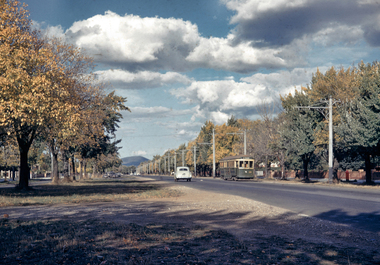
35mm Slide, Sturt Street West, Ballarat circa late 1950s
... City of Ballarat Libraries Eureka Centre Eureka Street ...A lovely shot of the western end of Sturt Street, looking east to Mt Warrenheip. Not much traffic today! Just a tram and an early Holden, yet at the time of this photograph, this was the main highway through to Adelaide. Mrs Bon Strange and her husband Bert were well known Ballarat residents. When Mrs Strange died some years ago, her extensive slide collection was sorted through and those relevant to Ballarat were gifted to the Ballarat Library.sturt street, trams -
 City of Ballarat Libraries
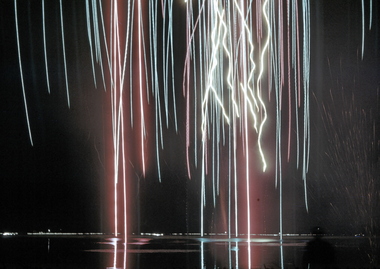
Slide, Fireworks over Lake Wendouree circa late 1950s
... City of Ballarat Libraries Eureka Centre Eureka Street ...An interesting night exposure. Unfortunately it is not known what event these fireworks were supporting. Mrs Bon Strange and her husband Bert were well known Ballarat residents. When Mrs Strange died some years ago, her extensive slide collection was sorted through and those relevant to Ballarat were gifted to the Ballarat Library.fireworks, lake wendouree -
 City of Ballarat Libraries
Slide, Parade Float, North Western Victorian Regiment Ballarat circa late 1950s
... City of Ballarat Libraries Eureka Centre Eureka Street ...A series of photographs showing a street parade, these may be from an early Begonia Festival Parade. Mrs Bon Strange and her husband Bert were well known Ballarat residents. When Mrs Strange died some years ago, her extensive slide collection was sorted through and those relevant to Ballarat were gifted to the Ballarat Library. north western victorian regiment, parade, ballarat voluntary riflemen -
 City of Ballarat Libraries
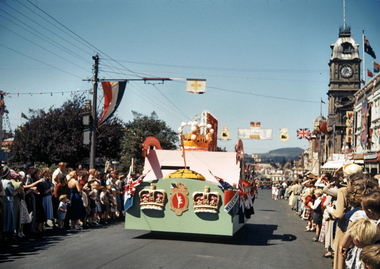
Slide, Parade Float, Sturt Street Ballarat circa late 1950s
... City of Ballarat Libraries Eureka Centre Eureka Street ...A series of photographs showing a street parade, it may be an early Begonia Festival Parade. Because of the bunting, Union Jacks, and crowns, it may be dated to 1954 when Queen Elizabeth II visited Ballarat at the time of the Begonia Festival. This float may be the float of the Queen of Begonias. Mrs Bon Strange and her husband Bert were well known Ballarat residents. When Mrs Strange died some years ago, her extensive slide collection was sorted through and those relevant to Ballarat were gifted to the Ballarat Library. parade, sturt street, royal visit -
 City of Ballarat Libraries
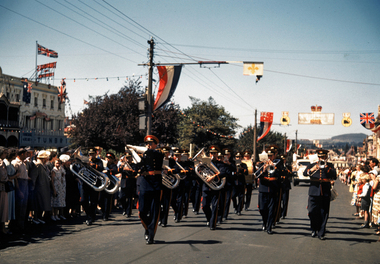
Slide, Brass Band Parade Sturt Street Ballarat circa late 1950s
... City of Ballarat Libraries Eureka Centre Eureka Street ...A series of photographs showing a street parade, it may be an early Begonia Festival Parade. Because of the bunting, Union Jacks, and crowns, it may be dated to 1954 when Queen Elizabeth II visited Ballarat at the time of the Begonia Festival. Mrs Bon Strange and her husband Bert were well known Ballarat residents. When Mrs Strange died some years ago, her extensive slide collection was sorted through and those relevant to Ballarat were gifted to the Ballarat Library. brass band, parade, sturt street, royal visits, ballarat -
 City of Ballarat Libraries
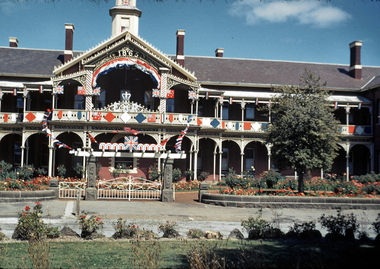
35mm Slide, Ballarat Orphanage
... City of Ballarat Libraries Eureka Centre Eureka Street ...Ballarat Orphanage, Victoria Street, Ballarat East, decked in flags probably for the Queen's visit in 1954. Mrs Bon Strange and her husband Bert were well known Ballarat residents. When Mrs Strange died some years ago, her extensive slide collection was sorted through and those relevant to Ballarat were gifted to the Ballarat Library. -
 City of Ballarat Libraries
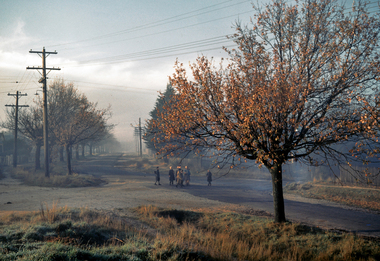
Slide - 35mm Slide, Children in Clayton Street, on their way to school circa 1950s
... City of Ballarat Libraries Eureka Centre Eureka Street ...Mr and Mrs Strange lived in Clayton Street, Ballarat East. This photograph is likely taken from their home, and it may be their children and friends heading off to school one morning. Bon Strange titled this slide "Autumn Morn" Mrs Bon Strange and her husband Bert were well known Ballarat residents. When Mrs Strange died some years ago, her extensive slide collection was sorted through and those relevant to Ballarat were gifted to the Ballarat Library.autumn, children, ballarat, clayton street, ballarat east -
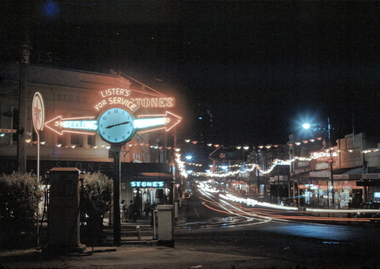 City of Ballarat Libraries
35mm Slide, Neon lights and traffic in the streets of Ballarat circa 1950s
... City of Ballarat Libraries Eureka Centre Eureka Street ...Lister's petrol station at the corner of Main Road and Bridge streets. The petrol station replaced Levy's Vegetable and Fruit Market circa 1940s. Mrs Bon Strange and her husband Bert were well known Ballarat residents. When Mrs Strange died some years ago, her extensive slide collection was sorted through and those relevant to Ballarat were gifted to the Ballarat Library. -
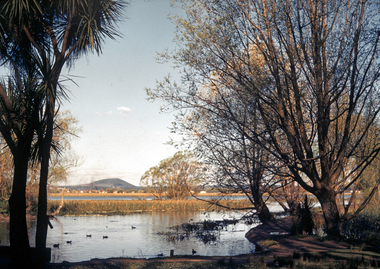 City of Ballarat Libraries
Lake Wendouree, Ballarat Circa 1950's
... City of Ballarat Libraries Eureka Centre Eureka Street ...This may have been Mrs.Strange's favourite spot to photograph the Lake, another image in this series captures the same view in a different mood. Mrs Bon Strange and her husband Bert were well known Ballarat residents. When Mrs Strange died some years ago, her extensive slide collection was sorted through and those relevant to Ballarat were gifted to the Ballarat Library. -
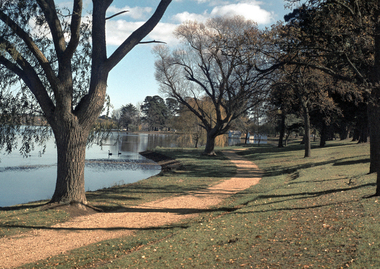 City of Ballarat Libraries
35mm Slide, Lake Wendouree, Ballarat, circa 1950s
... City of Ballarat Libraries Eureka Centre Eureka Street ...Lake Wendouree is often considered the soul of Ballarat according to advertisements from the early 1900's saying "Sydney may have it's Harbour, Melbourne, it's bay but Ballarat has Lake Wendouree." This view shows north shore. Mrs Bon Strange and her husband Bert were well known Ballarat residents. When Mrs Strange died some years ago, her extensive slide collection was sorted through and those relevant to Ballarat were gifted to the Ballarat Library. -
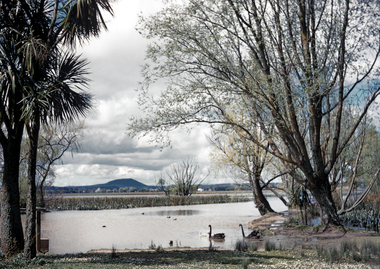 City of Ballarat Libraries
35mm Slide, Lake Wendouree circa 1950s
... City of Ballarat Libraries Eureka Centre Eureka Street ...A view from the "Fairyland" area of the Wendouree Lake showing Mount Warrenheip in the background. Lake Wendouree is often considered the soul of Ballarat according to advertisements from the early 1900's saying "Sydney may have it's Harbour, Melbourne, it's bay but Ballarat has Lake Wendouree." This may have been Mrs.Strange's favorite spot to photograph the Lake, another image in this series captures the same area in a different mood. Mrs Bon Strange and her husband Bert were well known Ballarat residents. When Mrs Strange died some years ago, her extensive slide collection was sorted through and those relevant to Ballarat were gifted to the Ballarat Library.lake wendouree -
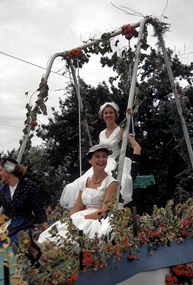 City of Ballarat Libraries
35mm Slide, Miss Carol Penrose, Queen of Begonias (back) Ballarat Begonia Festival, circa 1956
... City of Ballarat Libraries Eureka Centre Eureka Street ...This slide shows the 1956 "Queen of Begonias" in Ballarat, on her float during the Begonia Festival street parade. Miss Carol Penrose, who was crowned by the Prime Minister Robert Menzies, is shown in the background. The runners up that year were Janet Saunders and Hillary Richards, otherwise known as "Princesses", one being pictured here, in front of the Begonia Queen. Mrs Bon Strange and her husband Bert were well known Ballarat residents. When Mrs Strange died some years ago, her extensive slide collection was sorted through and those relevant to Ballarat were gifted to the Ballarat Library.begonia festival, festival, queen of begonias, ballarat, parade -
 City of Ballarat Libraries
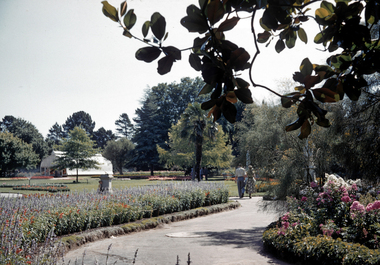
35mm Slide, Ballarat Botanical Gardens, Circa 1956
... City of Ballarat Libraries Eureka Centre Eureka Street ...Botanical Gardens at Ballarat, using bedding begonias which are no longer in use today due to drought conditions. Mrs Bon Strange and her husband Bert were well known Ballarat residents. When Mrs Strange died some years ago, her extensive slide collection was sorted through and those relevant to Ballarat were gifted to the Ballarat Library.botanical gardens, begonias, begonia festival, bedding plants -
 City of Ballarat Libraries
35mm Slide, Highland Pipe Band in Sturt Street, Ballarat, circa 1954
... City of Ballarat Libraries Eureka Centre Eureka Street ...A series of photographs showing a street parade, it may be an early Begonia Festival Parade. Because of the bunting, Union Jacks, and crowns, it may be dated to 1954 when Queen Elizabeth II visited Ballarat at the time of the Begonia Festival. Unfortunately it is not clear which band this is, if you have any further information please comment below. Mrs Bon Strange and her husband Bert were well known Ballarat residents. When Mrs Strange died some years ago, her extensive slide collection was sorted through and those relevant to Ballarat were gifted to the Ballarat Library.