Showing 56349 items matching "crossing-the-line"
-
 Linton and District Historical Society Inc
Journal - Financial Record Book, Independent Order of Rechabites, Money Steward's Book, 1887-1890, 1887
Record found in Doll Museum cellars Ballarat 1980s.Bound exercise book with lined pages, cover of fabric-covered cardboard. I.O.R. Pledge and Declaration pasted to inside back cover. Money Steward's book for I.O.R. Rose of Linton Tent No. 53, 17.4.1887 - 4.9.1890. Records monies received, lists names of financial members.On first lined page: "Money-Steward's Book".documents and records, independent order of rechabites. rose of linton tent no. 53, members' names -
 Port Fairy Historical Society Museum and Archives
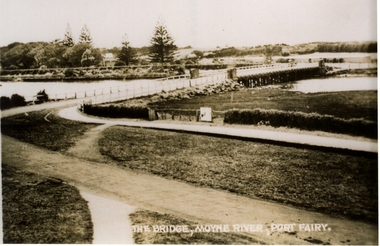
Postcard, Valentine Publishing Co, The Bridge Moyne River Pt Fairy, 10.04.1929
... The Bridge Moyne River Pt Fairy ...Black and white Photograph of the bridge crossing the Moyne river with Gipps street in the foreground cleared land in the background taken for use as a postcardThe Bridge Moyne River Pt Fairymoyne bridge circa 1930, bridge, moyne river, river, road -
 4th/19th Prince of Wales's Light Horse Regiment Unit History Room
Film - DVD, Cambrai 1917 The Trial of The Tanks
... Cambrai 1917 The Trial of The Tanks ...The battle of Cambrai saw the final allied attack on the western front in 1917. DVD in caseTHE ANIMATED MILITARY HISTORY SERIES - CAMBRAI 1917 THE TRIAL OF THE TANKS - LINE OF FIREbattle of cambrai 1917 -
 Kew Historical Society Inc
Photograph - Kew Railway Station, May 1950
The Kew railway was opened in 1887, and diverged from the main (Box Hill–Lilydale) line about half-way between Hawthorn and Glenferrie. From the point of divergence the line was slightly less than one mile long, and it had only one intermediate station — Barker. There were four road over-bridges and two level crossings, including one over the busy Barkers Road. The line supported a passenger and goods service, and was electrified in December 1922, at the same time as the main line to Box Hill. There were a number of peak hour services which ran from Flinders Street station (Melbourne) to Kew, but in 1938 all but one of these were diverted to the Ashburton line, where traffic was growing. This had an adverse effect on Kew traffic, as passengers from Kew needed to cross over a footbridge at Hawthorn to change trains, and the main line trains were usually already crowded by the time they reached Hawthorn. At about the same time the off-peak trains were replaced by road buses. In 1952 all passenger trains were withdrawn, but the road bus service continued for many years. Goods trains were finally withdrawn in 1957, and the railway was dismantled in 1958-59. (Source: Frank Stamford, 'The Hawthorn - Kew Railway')Small black and white snapshot of Kew Railway Station inMay 1950. The photograph, one of 12, is part of a larger album of newspaper clippings, timetables, tickets and photos relating to the Kew Railway Line, taken and compiled by Lachlan Richardson, while a resident of Kew. The album dates from the 1950s. The album is part of a larger subject file on the Kew Line, compiled over time by members of the Kew Historical Society."Kew Railway Station, May 1950"kew railway line, transport -- railways -- kew (vic.), kew branch line, kew railway station -
 Kew Historical Society Inc
Photograph - Kew Railway Station, 1951
The Kew railway was opened in 1887, and diverged from the main (Box Hill–Lilydale) line about half-way between Hawthorn and Glenferrie. From the point of divergence the line was slightly less than one mile long, and it had only one intermediate station — Barker. There were four road over-bridges and two level crossings, including one over the busy Barkers Road. The line supported a passenger and goods service, and was electrified in December 1922, at the same time as the main line to Box Hill. There were a number of peak hour services which ran from Flinders Street station (Melbourne) to Kew, but in 1938 all but one of these were diverted to the Ashburton line, where traffic was growing. This had an adverse effect on Kew traffic, as passengers from Kew needed to cross over a footbridge at Hawthorn to change trains, and the main line trains were usually already crowded by the time they reached Hawthorn. At about the same time the off-peak trains were replaced by road buses. In 1952 all passenger trains were withdrawn, but the road bus service continued for many years. Goods trains were finally withdrawn in 1957, and the railway was dismantled in 1958-59. (Source: Frank Stamford, 'The Hawthorn - Kew Railway')Small black and white snapshot of Kew Railway Station in 1950. The photograph, one of 12, is part of a larger album of newspaper clippings, timetables, tickets and photos relating to the Kew Railway Line, taken and compiled by Lachlan Richardson, while a resident of Kew. The album dates from the 1950s. The album is part of a larger subject file on the Kew Line, compiled over time by members of the Kew Historical Society."Kew Station / 14/51 / 22/4/51 F5"kew railway line, transport -- railways -- kew (vic.), kew branch line, kew railway station -
Glenelg Shire Council Cultural Collection
Photograph - Photograph - Casterton, Victoria, n.d
SOURCED FROM CASTERTON TOWN HALL (FORMER SHIRE OF GLENELG)Black and white photo. Dirt road, railway crossing, man near side of crossing; car on other side of crossing. -
 Doncaster RSL Sub Branch
War In New Guinea, The F.G. Johnstone Publishing Company Sydney, War In New Guinea, Mid 1940s
... The F.G. Johnstone Publishing Company Sydney ...One phase of the Papuan campaign as seen by the camera of George Silk a department of Information photographer, 194240 Page Pamphlet with black and white photograph on front cover of Cpl. F.R.Smith of Queensland, with his tommy gun near Gona Front line.Official War Photographs of the Battle for Australia -
 National Vietnam Veterans Museum (NVVM)
Ceremorial Object - MIA Bracelet - Private Peter Raymond Gillson, The Laeufers LIMA MIA-POW
... The Laeufers LIMA MIA-POW ...The remains of Private Gillson and Lance Corporal Parker were located in southern Vietnam in April 2007. They were repatriated to Australia in June 2007. Stainless steel open-ended bracelet engraved with missing serviceman's full name and date missing. In a buff square velvet satin-lined box.MIA Peter Raymond Gillson 08/11/65mia, peter raymond gillson, missing in action bracelet, australia. army. missing in action, pte peter raymond gillson, 37857, royal australian infantry corps, 1st battalion, the royal australian regiment -
 National Vietnam Veterans Museum (NVVM)
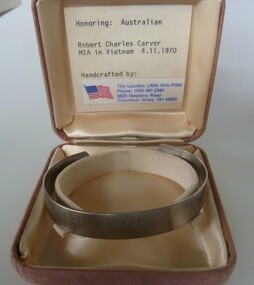
Ceremonial object - Bracelet, Missing in Action (MIA) - Pilot Officer Robert Charles CARVER
... The Laeufers LIMA MIA-POW ...Pilot Officer Robert Charles CARVER, 24, and Flying Officer Michael Patrick John HERBERT, 24, were both career air force officers in No. 2 Squadron, RAAF. On 3 November 1970 their Canberra bomber disappeared from a radar screen while returning from a night bombing mission in the northern I Corps Tactical Zone of South Vietnam. An extensive aerial search of the area failed to find any trace of the aircraft or crew and was called off after three days. In April 2009 the wreckage of the Canberra bomber was located in thick jungle in Quang Nam Province near the Laotian border. Human remains discovered near the site were identified in July 2009 as those of Carver and Herbert and were repatriated to Australia on 31 August 2009 for burial in separate military funerals.Stainless steel open-ended bracelet engraved with missing serviceman's full name and date missing. In a buff square velvet satin-lined box.Robert Charles Carver, 04/11/70mia, robert charles carver, mia 4/11/1970, robert carver mia, royal australian air force, 0119223, pilot officer, no 2 squadron', 1 corps tactical zone, canberra bomber, laotian border, quang nam province -
 National Vietnam Veterans Museum (NVVM)
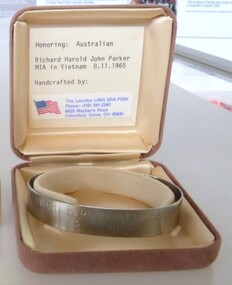
Ceremorial Object - MIA Bracelet - L/Cpl Richard Harold John Parker
... The Laeufers Lima MIA - POW ...The remains of Private Gillson and Lance Corporal Parker were located in southern Vietnam in April 2007. They were repatriated to Australia in June 2007. Stainless steel, open-ended bracelet engraved with the missing serviceman's full name and date missing in a buff square velvet satin-lined box.Richard H J Parkermia - australian, missing in action bracelet, l/cpl richard harold heath, 213963, royal australian infantry corps, 1st battalion, the royal australian regiment -
 National Vietnam Veterans Museum (NVVM)
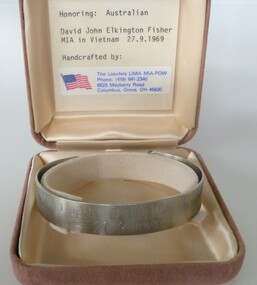
Ceremorial Object - MIA Bracelet - Trooper David John Fisher, The Laeufers LIMA MIA-POW
... The Laeufers LIMA MIA-POW ...In 1969 Private David Fisher, a national serviceman serving with 3 Squadron SAS, became the next soldier declared missing in action. In September 1969 Fisher was second-in-command of a five-man, long range SAS patrol searching for signs of enemy activity near the Nui May Tao massif in south-eastern Long Khanh province. After patrolling for seven days in persistent rain, on 27 September the Australians had a series of sharp contacts with strong groups of Viet Cong. Outnumbered and pursued through the jungle, they called for a helicopter extraction. The helicopters arrived within half an hour, just as the enemy were closing in on the SAS soldiers. During the hectic moments of the "hot" extraction, while under fire and surrounded by the enemy, the members of the patrol clipped on their karabiners and attached themselves to ropes dangling from a helicopter and were lifted clear of the jungle. As the helicopter gathered speed and helicopter gunships moved in to fire on the enemy on the ground, the patrol members suddenly noticed that Private Fisher was missing. He had fallen from his rope from a height of about 30 metres above the tree canopy. It was later suggested that, under pressure, Fisher may have attached his karabiner to the wrong loop on the rope. An air search began within ten minutes of the incident and a ground search began within five hours. A ten-man SAS patrol searched the jungle around the site, joined the following day by rifle companies who searched for the next six days. Fisher's body was never found, and he was declared missing in action, presumed dead. He had only two months remaining of his tour of duty.Stainless steel open-ended bracelet engraved with missing serviceman's full name and date missing. In a buff square velvet satin-lined box.David John Elkington Fisher 27/09/69mia, david john elkington fisher, trooper david john fisher, 2787344, australian national serviceman, royal australian infantry corps, 2nd special air service squadon, 3rd special air service squadron, sas -
 Kew Historical Society Inc
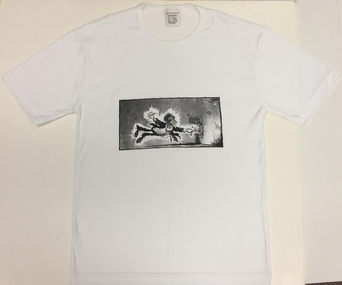
Clothing - Richmond-Brunswick Powerline Campaign tee-shirt, 1984-88
The campaign to save the Yarra Valley from powerlines was a significant environmental campaign in multiple suburbs in the 1980s.White tee-shirt with an image of a man being electrocuted which was produced and sold to raise funds for the campaign to save the Yarra Valley from a proposal to build a massive power line between Richmond and Brunswick. The black and white cartoon printed on the front of the tee-shirt is a cartoon by Jeff. The tee-shirt was donated to the Kew Historical Society by Jill O'Brien, ex councillor and Mayor of the former City of Kew, who was one of the leaders of the campaign.RICHMOND-BRUNSWICK POWER LINErichmond-brunswick powerline, community campaigns - 1980s, yarra valley, jill o'brien -
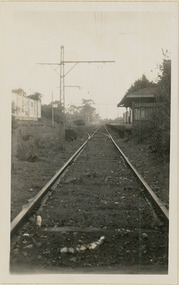
 Kew Historical Society Inc
Photograph - The last train at Barker Station, 1952
The Kew railway was opened in 1887, and diverged from the main (Box Hill–Lilydale) line about half-way between Hawthorn and Glenferrie. From the point of divergence the line was slightly less than one mile long, and it had only one intermediate station — Barker. There were four road over-bridges and two level crossings, including one over the busy Barkers Road. The line supported a passenger and goods service, and was electrified in December 1922, at the same time as the main line to Box Hill. There were a number of peak hour services which ran from Flinders Street station (Melbourne) to Kew, but in 1938 all but one of these were diverted to the Ashburton line, where traffic was growing. This had an adverse effect on Kew traffic, as passengers from Kew needed to cross over a footbridge at Hawthorn to change trains, and the main line trains were usually already crowded by the time they reached Hawthorn. At about the same time the off-peak trains were replaced by road buses. In 1952 all passenger trains were withdrawn, but the road bus service continued for many years. Goods trains were finally withdrawn in 1957, and the railway was dismantled in 1958-59. (Source: Frank Stamford, 'The Hawthorn - Kew Railway')Small black and white snapshot of the last passenger train at Barker Railway Station in 1952. The photograph, one of 12, is part of a larger album of newspaper clippings, timetables, tickets and photos relating to the Kew Railway Line, taken and compiled by Lachlan Richardson, while a resident of Kew. The album dates from the 1950s. The album is part of a larger subject file on the Kew Line, compiled over time by members of the Kew Historical Society."Last train at Barker Station / 1 August 1952"kew railway line, transport -- railways -- kew (vic.), barker railway station, kew branch line -
 Kew Historical Society Inc
Photograph - Barker Station, August 1952
The Kew railway was opened in 1887, and diverged from the main (Box Hill–Lilydale) line about half-way between Hawthorn and Glenferrie. From the point of divergence the line was slightly less than one mile long, and it had only one intermediate station — Barker. There were four road over-bridges and two level crossings, including one over the busy Barkers Road. The line supported a passenger and goods service, and was electrified in December 1922, at the same time as the main line to Box Hill. There were a number of peak hour services which ran from Flinders Street station (Melbourne) to Kew, but in 1938 all but one of these were diverted to the Ashburton line, where traffic was growing. This had an adverse effect on Kew traffic, as passengers from Kew needed to cross over a footbridge at Hawthorn to change trains, and the main line trains were usually already crowded by the time they reached Hawthorn. At about the same time the off-peak trains were replaced by road buses. In 1952 all passenger trains were withdrawn, but the road bus service continued for many years. Goods trains were finally withdrawn in 1957, and the railway was dismantled in 1958-59. (Source: Frank Stamford, 'The Hawthorn - Kew Railway')Small black and white snapshot of the last passenger train at Barker Railway Station in 1952. The photograph, one of 12, is part of a larger album of newspaper clippings, timetables, tickets and photos relating to the Kew Railway Line, taken and compiled by Lachlan Richardson, while a resident of Kew. The album dates from the 1950s. The album is part of a larger subject file on the Kew Line, compiled over time by members of the Kew Historical Society."Barker Station / August 1952"kew railway line, transport -- railways -- kew (vic.), barker railway station, kew branch line -
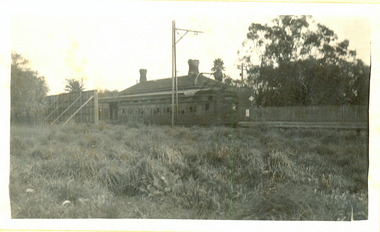
 Kew Historical Society Inc
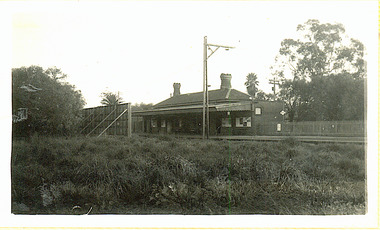
Photograph - Kew Railway Station: Denmark Street entrance, 1952
The Kew railway was opened in 1887, and diverged from the main (Box Hill–Lilydale) line about half-way between Hawthorn and Glenferrie. From the point of divergence the line was slightly less than one mile long, and it had only one intermediate station — Barker. There were four road over-bridges and two level crossings, including one over the busy Barkers Road. The line supported a passenger and goods service, and was electrified in December 1922, at the same time as the main line to Box Hill. There were a number of peak hour services which ran from Flinders Street station (Melbourne) to Kew, but in 1938 all but one of these were diverted to the Ashburton line, where traffic was growing. This had an adverse effect on Kew traffic, as passengers from Kew needed to cross over a footbridge at Hawthorn to change trains, and the main line trains were usually already crowded by the time they reached Hawthorn. At about the same time the off-peak trains were replaced by road buses. In 1952 all passenger trains were withdrawn, but the road bus service continued for many years. Goods trains were finally withdrawn in 1957, and the railway was dismantled in 1958-59. (Source: Frank Stamford, 'The Hawthorn - Kew Railway')Small black and white snapshot of the entrance to Kew Station from Denmark Street in 1952. The photograph, one of 12, is part of a larger album of newspaper clippings, timetables, tickets and photos relating to the Kew Railway Line, taken and compiled by Lachlan Richardson, while a resident of Kew. The album dates from the 1950s. The album is part of a larger subject file on the Kew Line, compiled over time by members of the Kew Historical Society.kew railway line, transport -- railways -- kew (vic.), kew branch line, kew railway station -
 Kew Historical Society Inc
Photograph - Kew Station 22/4/51, F3
The Kew railway was opened in 1887, and diverged from the main (Box Hill–Lilydale) line about half-way between Hawthorn and Glenferrie. From the point of divergence the line was slightly less than one mile long, and it had only one intermediate station — Barker. There were four road over-bridges and two level crossings, including one over the busy Barkers Road. The line supported a passenger and goods service, and was electrified in December 1922, at the same time as the main line to Box Hill. There were a number of peak hour services which ran from Flinders Street station (Melbourne) to Kew, but in 1938 all but one of these were diverted to the Ashburton line, where traffic was growing. This had an adverse effect on Kew traffic, as passengers from Kew needed to cross over a footbridge at Hawthorn to change trains, and the main line trains were usually already crowded by the time they reached Hawthorn. At about the same time the off-peak trains were replaced by road buses. In 1952 all passenger trains were withdrawn, but the road bus service continued for many years. Goods trains were finally withdrawn in 1957, and the railway was dismantled in 1958-59. (Source: Frank Stamford, 'The Hawthorn - Kew Railway')Small black and white snapshot of Kew Railway Station, looking south to Barker Station. The photograph, one of 12, is part of a larger album of newspaper clippings, timetables, tickets and photos relating to the Kew Railway Line, taken and compiled by Lachlan Richardson, while a resident of Kew. The album dates from the 1950s. The album is part of a larger subject file on the Kew Line, compiled over time by members of the Kew Historical Society.kew railway line, transport -- railways -- kew (vic.), kew branch line, kew railway station -
 Kew Historical Society Inc
Photograph - Seven Carriage Train at Barker Station
The Kew railway was opened in 1887, and diverged from the main (Box Hill–Lilydale) line about half-way between Hawthorn and Glenferrie. From the point of divergence the line was slightly less than one mile long, and it had only one intermediate station — Barker. There were four road over-bridges and two level crossings, including one over the busy Barkers Road. The line supported a passenger and goods service, and was electrified in December 1922, at the same time as the main line to Box Hill. There were a number of peak hour services which ran from Flinders Street station (Melbourne) to Kew, but in 1938 all but one of these were diverted to the Ashburton line, where traffic was growing. This had an adverse effect on Kew traffic, as passengers from Kew needed to cross over a footbridge at Hawthorn to change trains, and the main line trains were usually already crowded by the time they reached Hawthorn. At about the same time the off-peak trains were replaced by road buses. In 1952 all passenger trains were withdrawn, but the road bus service continued for many years. Goods trains were finally withdrawn in 1957, and the railway was dismantled in 1958-59. (Source: Frank Stamford, 'The Hawthorn - Kew Railway')Small black and white snapshot of a seven carriage train approaching Barker Railway Station. The photograph, one of 12, is part of a larger album of newspaper clippings, timetables, tickets and photos relating to the Kew Railway Line, taken and compiled by Lachlan Richardson, while a resident of Kew. The album dates from the 1950s. The album is part of a larger subject file on the Kew Line, compiled over time by members of the Kew Historical Society."Seven Carriage Train at Barker Station"kew railway line, transport -- railways -- kew (vic.), barker railway station, kew branch line -
 Kew Historical Society Inc
Photograph - The last train at Kew Station, August 1952
The Kew railway was opened in 1887, and diverged from the main (Box Hill–Lilydale) line about half-way between Hawthorn and Glenferrie. From the point of divergence the line was slightly less than one mile long, and it had only one intermediate station — Barker. There were four road over-bridges and two level crossings, including one over the busy Barkers Road. The line supported a passenger and goods service, and was electrified in December 1922, at the same time as the main line to Box Hill. There were a number of peak hour services which ran from Flinders Street station (Melbourne) to Kew, but in 1938 all but one of these were diverted to the Ashburton line, where traffic was growing. This had an adverse effect on Kew traffic, as passengers from Kew needed to cross over a footbridge at Hawthorn to change trains, and the main line trains were usually already crowded by the time they reached Hawthorn. At about the same time the off-peak trains were replaced by road buses. In 1952 all passenger trains were withdrawn, but the road bus service continued for many years. Goods trains were finally withdrawn in 1957, and the railway was dismantled in 1958-59. (Source: Frank Stamford, 'The Hawthorn - Kew Railway')Small black and white snapshot of the last passenger train at Kew Railway Station in 1952. The photograph, one of 12, is part of a larger album of newspaper clippings, timetables, tickets and photos relating to the Kew Railway Line, taken and compiled by Lachlan Richardson, while a resident of Kew. The album dates from the 1950s. The album is part of a larger subject file on the Kew Line, compiled over time by members of the Kew Historical Society."The last train at Kew Station, August 1952"kew railway line, transport -- railways -- kew (vic.), kew branch line, kew railway station -
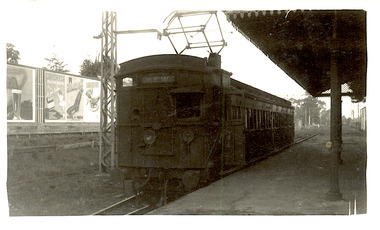
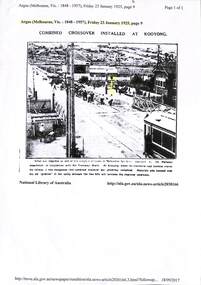 Melbourne Tram Museum
Newspaper, The Argus, "Combined Crossover installed at Kooyong", 23/01/1925 12:00:00 AM
... The Argus ...Photocopy of an article from The Argus, 23/1/1925, page 9 extracted through Trove, titled "Combined Crossover installed at Kooyong" with a photograph of the level crossing, replacement of track leading up to the Tramway or Railway Square. The disc signal for trams has been highlighted in yellow. Item made by Robert Green 18/9/2017trams, tramways, victorian railways, glenferrie road, level crossings, tramway square, trackwork -
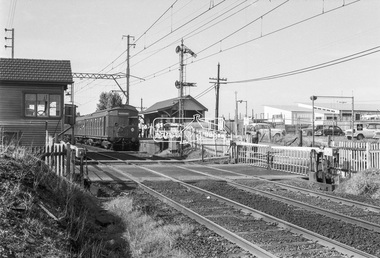 Eltham District Historical Society Inc
Photograph, George Coop, Tait (Red Rattler) train bound for Mordialloc at McKinnon Railway Station, c.Feb. 1964
Tait (Red Rattler) train bound for Mordialloc at McKinnon Road level crossing, McKinnon Railway Station, Frankston line, c. Feb. 1964 The level crossing is the old McKinnon Rd. level crossing right at Mckinnon Railway Station on the Melbourne-Franston line. It no longer exists as the level crossing was amongst the first to be removed in the State Govt. grade separation programme c 2015. The line now runs under Mckinnon Rd in a cutting that holds the new station as well. The folding metal lattice gates were the only ones of their kind in Victoria and fairly rare anywhere else in Australia as well.Digital TIFF file Scan of 35mm Ilford FP3 black and white transparencyfrankston line, george coop collection, level crossing, mckinnon railway station, mckinnon road, mordialloc, red rattler, tait train -
 Melbourne Tram Museum
Slide - Set of 7, John Webster, 17/10/1959 12:00:00 AM
Set of seven Colour slides, Kodak, brown cardboard of the removal of the Elsternwick Level crossing on 28-5-1960 .1 - looking down into he cutting through the old goods yard - has the platform being installed. .2 - X2 675 crossing the new bridge with the level crossing in the background. .3 - L103, to the city, route 4, with the conductor watching the trolley pole. Has an advert for white horse whiskey. .4 - W2 269, route 4 to Carnegie, on the level crossing. Has a building in the background, advertising Esquire car sales. .5 - A Tait train on the crossing no gates in operation. .6 - ditto, to Sandringham .7 - W6 965, route 4 to the City on the crossing. Has two railway hoardings in the background advertising BP Benzol petrol and Saunders Pure Malt extract and part of a sign for Penfolds. The tram has an advert for Porsche cars. Note the tram stop sign on the small post alongside the tram.Hand writing on rear in ink; .1 - 28-5-60 - Railway cutting for underpass at Elsternwick Vic. .2 - ditto, tram 675 on temporary tracks in Glenhuntly Road, Elsternwick Vic. .3 - tram 103 on temporary tracks in Glenhuntly Road, Elsternwick Vic. .4 - tram 269 on temporary tracks in Glenhuntly Road, Elsternwick Vic. .5 - Elsternwick station new crossing .6 - Temporary track Elsternwick Vic .7 - Tram 965 at temporary stop at Elsternwick Vic.trams, tramways, elsternwick, level crossings, railway squares, w2 class, l class, carnegie, south caulfield, glenhuntly rd, w6 class, vr -
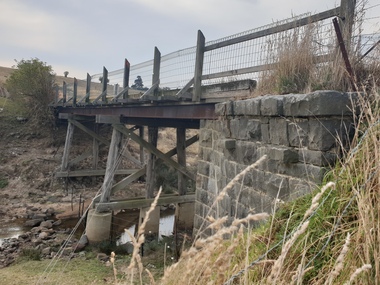 Ballarat Heritage Services
Painting, Clare Gervasoni, Old Bridge over the Woady Yallock River, 26/03/2023
... Old Bridge over the Woady Yallock River ...Colour photographs of an old timber topped bridge crossing the Woady Yalloak River on Golden Lake Road. The bridge has bluestone foundations. bridge, woady yallock river, golden lake road, bluestone -
 Lakes Entrance Historical Society
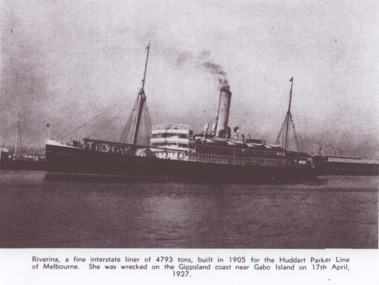
Photograph - Steamer Riverina, 1920 c
She was wrecked on the Gippsland coast near Gabo Island on 17ty April 1927Black and white photograph of the Huddart Parker Line steamer Riverina at an unknown port Australia. Plus second photo when wrecked.Riverina a fine interstate liner of 4793 tons built in 1905 for Huddart Parker Line of Melbourne. ships and shipping, timber industry, jetties -
 Phillip Island and District Historical Society Inc.
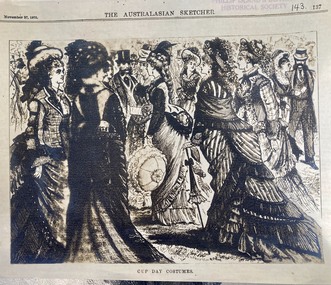
Article, The Australasian Sketcher 1875 'Wollamai wins the Melbourne Cup ", November 27 1875
... The Australasian Sketcher 1875 'Wollamai wins the...The Argus ...The racehorse 'Wollamai" [ or Wollemi ] was bred and trained on Phillip Island by John Cleeland on Phillip Island. It won the Melbourne Cup in 1875. John Cleeland walked the horse to Melbourne to compete.Historical3 photocopies of an article from the sporting section of the Australasian Sketcher describing the Spring meeting of the Victorian Racing Club, large illustration of the crowd and costumes. Article describes the races, horses in very small print.The Australasian Sketcher Sport November 27 1875wollomai, melbourne cup, john cleeland, horse racing, wollemi -
Ringwood and District Historical Society
Newspaper cutting, Barbara Hooks, Cutting from 'The Age' of 22-Jul-1995 "The Complexities of Shopping Centres" (Eastland), 22-Jul-93
... Cutting from 'The Age' of 22-Jul-1995 "The Complexities of...The Age ...Article in newspaper describing the refurbished Eastland in 1993.Cutting from 'The Age' of 22-Jul-1995.; The Complexities of Shopping Centres. Photograph included. -
Ringwood and District Historical Society
Newspaper clipping, The Mail, Ringwood Mail newspaper clipping from 'The Mail' 24-Feb-1949. Report from municipal conference on the proposal for construction of pre-school centres, 1949
... Ringwood Mail newspaper clipping from 'The Mail' 24-Feb...The Mail ...Included in the exercise book recording health details.Clipping from 'The Mail' from 24-Feb-1949. Report from municipal conference on the proposal for construction of pre-school centres. -
 Eltham District Historical Society Inc
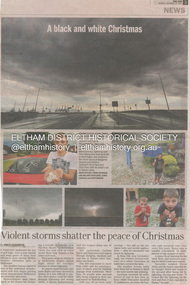
Newsclipping, Vince Chadwick, Violent storms shatter the peace of Christmas, The Age, Monday, December 26, p3, 2011
... Violent storms shatter the peace of Christmas, The Age...The Age ...A late afternoon storm on Christmas Day 2011. A flash flood occurred from significant rain fall and hail, which accumulated along an old waterway with floodwater submerging cars along Valonia Drive then down Grove Street flooding houses, through the Bible Street Reserve where it then submerged Main Road washing away the small railway trestle bridge opposite the reserve then flooding the Judge Book Village before finally entering the Diamond Creek. Widespread damage occured from hail and flash flooding.fay bridge collection, 2011-12-26, eltham, flood damage, floods, grove street, main road, valonia drive -
 Eltham District Historical Society Inc
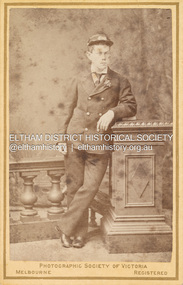
Photograph, The Photographic Society of Victoria, Thomas (Tom) Pearce, only surviving member of the crew of the Loch Ard, 1878
... Thomas (Tom) Pearce, only surviving member of the crew of...The Photographic Society of Victoria ...Special Carte-de-Visite produced by The Photographic Society of Victoria, Melbourne featuring the sole surviving crew member of the wreck of the ship, Loch Ard near Mutton Bird Island on the Shipwreck Coast of Victoria on June 1st, 1878. THE PHOTOGRAPHIC SOCIETY. (1878, October 12). The Age (Melbourne, Vic. : 1854 - 1954), p. 7. Retrieved December 4, 2022, from http://nla.gov.au/nla.news-article199353573 Back of photo is printed: The Photographic Society of Victoria, Melbourne. Registered None Genuine Unless With The Signatures Thus President and signature of A. Antony (?) Vice President and signature of E. Goulter Secretary and signature of Valentine Sharp Stamped in red W. H. COOPER 21 8 23 ROYAL ARCADE CARTE-DE-VISITE (cdv) 1857-1890 Cartes-de-visite (cdv's) are the most common form of photograph from the nineteenth century, generally measuring two and a half inches by four and an eighth inches (6.3 x 10.5 cm) when mounted, sepia toned, mounted on a card which was generally printed with the photographer's name and address on the back or beneath the portrait. - Frost, Lenore; Dating Family Photos 1850-1920; Valiant Press Pty. Ltd., Berwick, Victoria 1991 Inserted loose in album at same page is a 1931 artice from The Age about the wreck featuring the same image The Loch Ard Wreck, The Age, June 6, 1931, p8marg ball collection, 1878, loch ard (ship), shillinglaw family photo album 2, the photographic society of victoria, thomas "tom" r pearce -
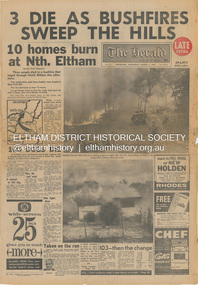 Eltham District Historical Society Inc
Newspaper - Newspaper articles, The Herald, 3 Die as Bushfires Sweep the Hill: 10 homes burn at Nth. Eltham, The Herald, Wednesday, March 3, p1, 1965
... 3 Die as Bushfires Sweep the Hill: 10 homes burn at Nth...The Herald ...Various news articles pertaining to the January 1965 Victorian bushfires specifically with a focus on fires at Eltham North. Specific Eltham Shire districts mentioned include Eltham North and veteran Herald staff photographer Bert Rodda on page 1 • 3 Die as Bushfires Sweep the Hill: 10 homes burn at Nth. Eltham, p1 (Illust.) • 100 dogs die, p1 • Taken on the run, p1 (Illust.) • Fire runs wild at Eltham, p3 (Illust.) • 10-mile front out of control; Gippsland area ablaze, p3 • Trapped, but saved by wind, p3 tom fielding collection, victorian bushfires - 1965, victorian bushfires – 1965, eltham north, bert rodda, glen park road, short road, research (vic.), wattle glen, diamond creek, warrandyte, eltham, gippsland, mrs g. maher, bill dancy, eltham north store, bushfire damage - buildings -
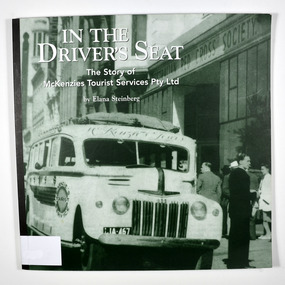 Marysville & District Historical Society
Book, In the Driver's Seat-The Story of McKenzies Tourist Services Pty Ltd, 1999
... In the Driver's Seat-The Story of McKenzies Tourist...The Wilder Group Pty Ltd ...The story of McKenzies Tourist Services Pty Ltd from their beginningPaperback. Front cover has a photograph of an early McKenzie bus with a group of people standing next to it. They are out the front of a building named Australian Red Cross Society.Stamp of Marysville & District / Historical Society Inc / P.O. Box 22 / Marysville 3779mckenzies tourist services, victoria, history