Showing 2476 items matching "view st"
-
 Ballarat Tramway Museum
Photograph - B&W print of donated negative - set of 6, Graham Parry, 1971
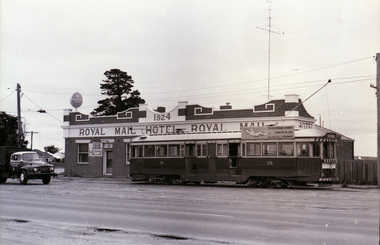
Yields information about the Sebastopol terminus and delivering beer to the HotelSet of six black and white prints and associated negatives of trams in Ballarat during 1971 prior to closure of the system by Graham Parry. All images from the scanned negative. All taken at the Sebastopol tram terminus. .1 - No. 39 at the terminus, soon after arriving. .2 - ditto with a Fosters Lager beer truck alongside. .3 - ditto .4 - end on view of 39 .5 - ditto .6 - ditto looking at the rear of the tram and the other side of Albert St.tramways, trams, sebastopol, royal mail hotel, albert st., tram 39 -
 Ballarat Tramway Museum
Photograph - Digital image, John Ward, 20/08/1971 12:00:00 AM
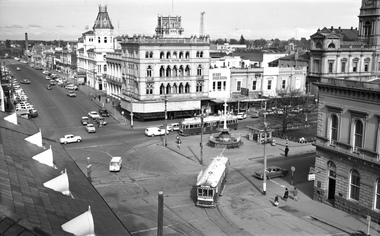
Yields information about the Sturt St and Lydiard St intersection just before closure and tram operations.Digital image of bogie tram 35 turning from Sturt St into Lydiard St North and tram 39 at the south side of the City tram stop at the corner. Has Craig's Hotel, the National Mutual building, Berry Anderson, Gemmola's Pharmacy, the Town Hall and the ANZ bank in the view. An Inspector can be seen near the tram stop. Photo taken from the Post Office tower. Photo by John Ward 20 August 1971. Slide title "04709 200871 7173-G SECV bogie trams 39 & 35 Sturt St to Lydiard St North Ballarat Vic"trams, tramways, sturt st, lydiard st, post office, city terminus, tram 39, tram 35 -
 Ballarat Tramway Museum
Photograph - Black & White Photograph/s, Andrew Howlett?, c1971
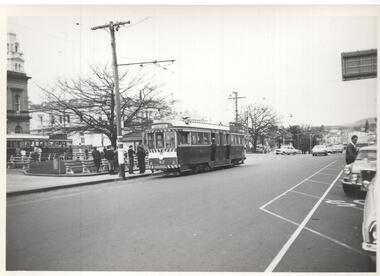
Yields information about the appearance and operation of the main tram stop in the City in Sturt St prior to closure.Black and White photograph print of tram 42 and another bogie car at the City terminus, south side of Sturt St, c1971. Tram has the destination of Sebastopol. The Ballarat Post Office is in the view.trams, tramways, sturt st, tram 42 -
 Ballarat Tramway Museum
Negative, Wal Jack, late 1930's or early 1940's
Yields information about the use of the ex Adelaide tram No. 23 on tram services.Negative and Digital image of the Wal Jack Ballarat Negative file of No. 23 passing Hospital Corner in Sturt St, Gardens via Sturt St West, with a Shell garage, Malpass hairdressers, the Ballarat Model Diary and the Southern Cross Hotel in the view. The tram is well loaded with passengers.trams, tramways, sturt st, hospital corner, tram 23 -
 Ballarat Tramway Museum
Photograph - Black & White Photograph/s, John Henry Harvey, c1890
Black and white print from the State Library of Victoria, of a horse tram (possibly No. 10), turning left from Sturt St. into Armstrong St. enroute for Skipton St. Has City of Ballaarat Town Hall in the background with two other horse drawn cabs in the view. Has the statue of ???? on the left hand side of the photograph. State Library Multimedia Source Catalogue gives the photographer as John Henry Harvey and date of print as 1875c. Actual date is post 1888. State Library Permission required to reproduce the photo.On rear in pencil in bottom left hand corner "Copy of H92 150/408" and in centre along bottom edge "Reproduction Rights Reserved - Copied by State Library of Victoria".trams, tramways, sturt st, armstrong st, horse trams, ballarat town hall, tram 10 -
 Ballarat Tramway Museum
Slide - 35mm slide/s - set of 2, Noel Simons, Nov. 1970
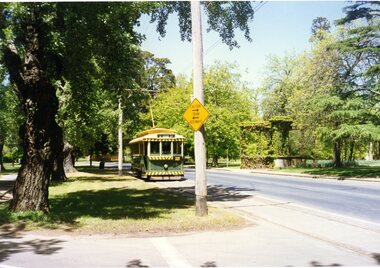
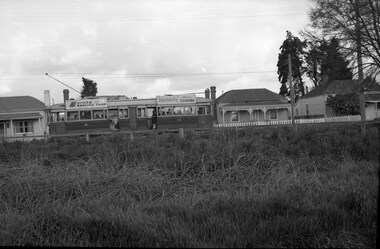
Set of 2 Kodak Ready-mount with slides made from the Association of Railway Enthusiast Provincial Tramways film strip. 1166.1 - No. 31 at the View Point terminus, corner of Wendouree Parade and Macarthur St., shows tram and section arrangements on poles. Also has SEC tramway shelter alongside stop. Tram has destination of "View Point" 1166.2 - No. 38 crossing Albert St. en route to Sebastopol.1166.1 - "No. 21 at View Point terminus. Line of left is that for cars on "Gardens via Drummond St. Nth" route." 1166.2 - "No. 38 crossing Albert St. near Sebastopol terminus" All have date stamp of "Nov. 1970" in blue ink. Writing in blue ink.tramways, trams, view point, wendouree parade, albert st, sebastopol, tram 21, tram 38 -
 Ballarat Tramway Museum
Slide - 35mm slide/s - set of 6, Noel Simons, 27/02/1972 12:00:00 AM
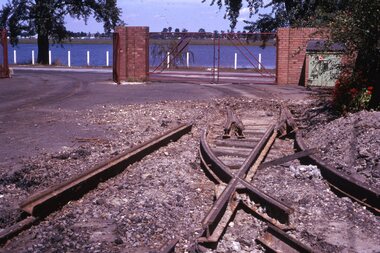
Has a strong association with the early days of the BTPS in preparing to move the tramcars from the depot and working at the former SEC depot itself. Yields information about the work done in the yard to recover materials.Set of 6 transparencies taken on 27/2/1972 on Kodak mounts. 1177.1 - photo of the dismantling of the points leading to "0" road at the SEC depot by the BTPS, looking south to Lake Wendouree. 1177.2 - view across depot front with No. 28 parked slightly outside and No. 40 inside door. Shows trackwork being dismantled and offices at front of depot. 1177.3 - view of No. 40 inside depot. 1177.4 - close up of the point blades leading to "0" road. 1177.5 - view of the front of the depot showing 40 and 28 parked outside, with dismantled point work in the foreground. 1177.6 - view of trackwork at part of Sturt and Drummond Sts. See also Reg Item 3533 for a similar series of photographs.Information written on in blue ink and date stamped on purple ink. 1177.1 - "Depot, Ballarat" 1177.2 - "Depot, Ballarat" 1177.3 - "Depot, Ballarat" 1177.4 - "Depot, Ballarat" 1177.5 - "Depot" 1177.6 - "Sturt and Drummond Sts"tramways, trams, wendouree parade, depot, sturt st, drummond st, pointwork, trackwork, o road, tram 28, tram 40 -
 Ballarat Tramway Museum
Slide - 35mm slide/s - set of 3, Noel Simons, 22/11/1962 12:00:00 AM
Set of 3 transparencies taken on 22/11/1962 on Kodak mounts. 1190.1 - No. 7 (bound for North Bendigo) at the Charing Cross stop with No. 19 just left for Quarry Hill. Has the buildings on the south side of High St. in the background, including RACV building. No. 7 has front dash panel ad for Streets ice cream, and roof ads for Ilford Film and an SEC "Cook with Electricity". Passengers are boarding the tram. 1190.2 - Bendigo No. 2 at Charing Cross with fountain in the background and other buildings on the south side of High St. Tram has two SEC roof ads - good side on view - "Electric Cooking - Matchless" and "Switch to Electric Cooking". 1190.3 - Nos. 19, 2 and 7 at Charing cross with a Austin ? motor car. Has buildings on the south side of High St. in the background, along with SEC and Ilford film roof ads.Information written on in black ink and date stamped on purple ink. 1190.1 - "Nos. 19 and 7 at Alexandra Fountain, Charing Cross, Bendigo" 1190.2 - "No. 2 at Alexandra Fountain, Charing Cross, Bendigo" 1190.3 - "Nos. 19, 2 and 7 at Alexandra Fountain, Charing Cross, Bendigo" tramways, trams, bendigo, charing cross, alexandra fountain, tram 2, tram 7, tram 19 -
 Ballarat Tramway Museum
Slide - 35mm slide/s set of 7, Noel Simons, 1972
Set of 7 transparencies undated on PAKON mounts - appear to be early 1970's. 1212.1 - No. 18 about to enter the Long Gully loop with ESSO service station on the right hand side. 1212.2 - No. 6 in Mitchell Street bound for Charing Cross. Tram has destination of "Rly Station". Has buildings on the east side of Mitchell St. in the background. 1212.3 - No. 7 (North Bendigo) and 29 (Golden Square) crossing. Actual location? 1212.4 - "No 6 showing 'SPECIAL' at Eaglehawk terminus. Has the Foodland store and Fruit shop in the background. 1212.5 - No. 19 at Eaglehawk terminus, on the extension to the normal Eaglehawk terminus. Tram has showing 'Eaglehawk'. Tram has two SEC roof ads. 1212.6 - No. 25 and another Bogie car at Quarry Hill terminus on last day. 1212.7 - No. 18 and 29 at Quarry Hill terminus. No.. 18 showing 'Quarry Hill' - has two SEC roof ads 'Electric Cooking - Matchless' and 'Everything's fine in my all electric kitchen' and No. 29 has a briquettes roof ad.Information typed onto a white label stuck on the slide. 1212.1 - "No. 18 at Long Gully" 1212.2 - "No. 6 in Mitchell Street." 1212.3 - "7 and 29 Lake View Hotel" 1212.4 - "No. 6 at Eaglehawk" 1212.5 - "No. 19 at Eaglehawk Term." 1212.6 - "Last cars Quarry Hill." 1212.7 - "18 & 29 Quarry Hill"tramways, trams, bendigo, long gully, mitchell st., eaglehawk, quarry hill, last tram, tram 6, tram 7, tram 18, tram 19, tram 25, tram 29 -
 Ballarat Tramway Museum
Photograph - Colour Photograph/s, Earl Ewers, 1994
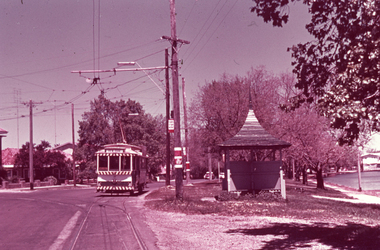
Colour photograph of BTM No. 18 north bound in Wendouree Parade, about to cross Windmill Drive North. Tram showing destination of "St. Aidans Drive". The "Caution Tram Bothways" sign on the pole adjacent to Windmill Drive had recently been positioned, following donation of the signs from St. Georges Road by the City of Northcote. Taken c1994 Has the MacDonald Gates in the view."E E" on back.windmill drive, wendouree parade, road signs, tram 18 -
 Ballarat Tramway Museum
Album - Photo Album, Newstar, 1960s to 1970's
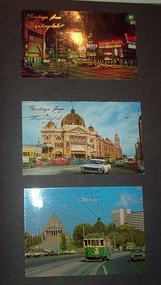
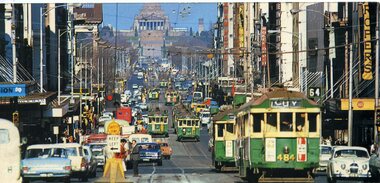
Photographic album containing 39 Colour postcards of Melbourne trams. The album consists of 30 leaves of dark grey heavy paper with three creases on left hand side of sheet, bound into a heavy bluey grey folder, embossed in gold 'Scrap Book" and bound with bluey grey string with two holes. The cover has been embossed with a the blue grey in swirls. Inside of back cover is a white label, "A New Star Product", with a please ask for No. with "425" stamped on. Postcards have been glued into the album. Entries have been kept to a single line - cards are able to be dated from buildings, whether the trams have marker lights, types of motor cars and general Melbourne history. Image files in page number order. Image 15 is of book. All taken with a electronic camera. Page 1 - Night photo - Flinders and Swanston St. - with "Greetings from Huntingdale" embossed in gold. Flinders St. station, with "Greetings from Huntingdale" embossed in gold. (post 1972 ) St. Kilda road with the Shrine of Remembrance in the background and W2 453 inbound on route 6. (post 1974) Page 2 - Bourke St, looking from Parliament House westwards, with Z8 inbound - after 13/8/1975 on route 89. Bourke St, looking east from Queen St., night photo, early 1970's. Princes Bridge looking towards Flinders St. Station Page 3 - Flinders St. Station, from Princes Gate buildings, - Photo E. Ludwig, John Hinde Studios. Bourke St. from Queen St, looking east, late 1960's - all W's. - W7 1026 east bound on route 88. Flinders St and Swanston St. corner, from Princes Bridge - night photo - W5 756 northbound route 15. Page 4 - W2 584 inbound route 64, St. Kilda Road and Nolan St., late 1960s - photograph. Princes Bridge, looking over Yarra River to the east. (pre Concert Hall) St. Kilda Road, with Shine of Remembrance in background, W2 303 inbound route 4D, mid 1960's. Page 5 - Flinders and Swanston St, W2 530 outbound route 8, early 1970's. Swanston and Collins St., W2 596 westbound in Collins St. City Square built - 1st version. (post 1972) St Kilda Road, with Shine in background, W2 298 and others, route 8 and 72. (post 1972) Page 6 - Flinders and Swanston St., W2, inbound route 5 on a wet evening. (mid 1970's) W2 515 outbound, Collins St., late 1960's, with Town Hall in background. (early 1970's, prior to lights) Collins St. looking west at Russell St with W2 637outbound route 42, early 1960's. Page 7 - Swanston St looking south at Little Bourke, W2's 373 route 67 and 374?(route 5), southbound, early 1970's Flinders St. Station, looking west in Flinders St., early 1970's, at dusk. Melbourne Town Hall with City Square from the North West (early 1970's) Page 8 - Bourke St looking east from Queen St. with W7 1005 inbound on route 96 - early 1970's. Bourke St. looking west from Exhibition St. with W6 976 outbound on route 95 - early 1970's. Swanston St. looking south from Lonsdale, with W2 484 on route 64, W2 228 and W2 364 in photo - early 1970's. Page 9 - Swanston looking south from north of Lonsdale St with many tramcars in photo - mid 1970's. St Kilda Road, with Shrine in background, W2 345 outbound route 4, SW6 913 inbound route 4 - prior to 1970. St Kilda Road, with Shrine in background, with trams in photo - early 1970's. (Photo loose in album - National View postcard by Murfett Ltd. Aust.) Page 10 - Postcard - TMSV? of 1041 and cable car set at Preston Workshops. 1041 in Bourke St., looking east from Queen St. - early 1970's - 1974? Collins St. looking east from Elizabeth St. with W2 253 inbound route 11, and W2 224 outbound - rout 47, early 1970's Page 11 - TMSV Postcard, X217 in Dandenong Road with L class in background. Shrine of Remberance from BP building, looking towards the city with St. Kilda Road on the left. Princes Gate and Flinders St. from the SEC buildings in Flinders St. looking south east - mid 1960's. Page 12 - Swanston St. at Flinders St. looking north at dusk. Flinders St. station at Swanston St with trams crossing at intersection - late 1960's Flinders St. station with W2 327 outbound. Page 13 - Temporary City Square at Collins and Swanston St. with tramcars at intersection. Wellington Parade (Mugs Alley), looking towards the City, with W2 546 inbound on route 38 - mid to late 1960's. Page 14 - Swanston St. looking south, at Lonsdale St, W2 432 inbound route 7 - late 1960's or early 1970's. Partly loose in album - National View postcard by Murfett Ltd. Aust. trams, tramways, photo album, melbourne, postcards -
 Ballarat Tramway Museum
Postcard, Murfett Pty Ltd, St. Kilda Road Melbourne
Colour postcard of St. Kilda Road Melbourne with Shrine of Remembrance in background, with W6 913 inbound on route 4, showing 'CITY' and W2 345 outbound on route 4 to "Carnegie". Buildings in view are the BP building and part of Prince Henry's Hospital. Has on rear caption, "National View" by Murfett Pty Ltd. Australia, place for address and stamp. Taken late 60's, prior to route renumbering in 1970.trams, tramways, melbourne, st kilda road, postcards, tram 509 -
 Ballarat Tramway Museum
Postcard, Murfett Pty Ltd, Swanston St. Melbourne
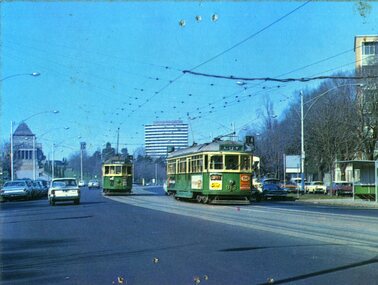
Colour postcard of Swanston St. Melbourne during a busy time, with many trams in view. Taken with a telephoto lens near Latrobe St., looking down at Lonsdale St. Intersection. Front tram is W2 484, showing CITY, inbound on route 64. Other trams are 364, 229. Has about 14 trams in photo. Shrine of Remembrance in far background. Has on rear caption, "National View" by Murfett Pty Ltd. Australia, place for address and stamp. Taken prior to fitting marker lights on the W2's. A wide body car in the background appears to have been fitted with them. Assume photo taken early 1970's.trams, tramways, melbourne, swanston st, postcards -
 Ballarat Tramway Museum
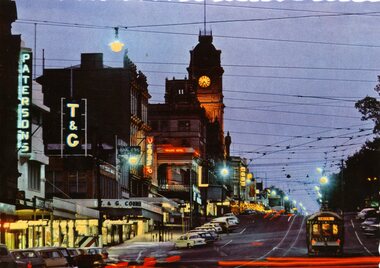
Postcard, Nu-color-vue or Nucolorvue Productions, Sturt St at night, late 1960's or early 1970's
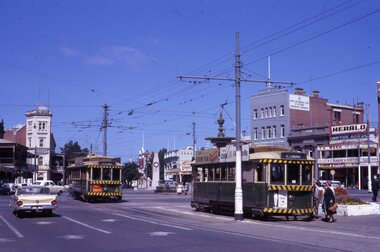
Demonstrates post card making by a major postcard manufacture, late 1960's and yields information about Sturt St at night.Colour postcard with serrated edges of a Ballarat bogie tram at dusk in Sturt St, parked in City Loop. with Town Hall in background. Tram has destination of "CITY". Photo includes illuminated Paterson, T&G, Myer and the Vegas theatre signs. Has many parked cars in Sturt St, with red lines from the tail lights of vehicles moving on image. On rear , printed in dark green ink is the card details etc. "Ballarat, Victoria, Sturt St, Ballarat at dusk looking to the Town Hall." Nucolorvue card, BT 69. 2nd copy - in good order. See also Reg. Item 1176 for colour slide of this view. 960 copy 1 - made by enlarging postcard to an A4 print by colour photocopying and laminated for display purposes. Made July 2000 for the Trams at Night exhibition in the depot. Made by W.Doubleday. Has four Velcro dots on rear. Overall size 208H x 296W. Stored in same box at rear of large photos area in an A4 plastic folder. trams, tramways, ballarat, town hall, sturt st., tram 8 -
 Ballarat Tramway Museum
Photograph - Black & White Photograph/s set of 19, Mar. 1972
Set of 19 black and white prints, all 89mm square of Bendigo trams, date machine printed on print is "Mar 1972". 981.1 - Tram 21 at North Bendigo terminus, with level crossing in background. Has destination "Golden Square" and two SEC roof ads. 981.2 - tram 2? at Eaglehawk, with destination "Depot", two SEC roof ads and "Leo A. Hughes Photographer" on side of building in background. 981.3 - tram 2? at Eaglehawk, side on view. 981.4 - tram 26 at Quarry Hill terminus looking back into city. 981.5 - tram 7 en route to North Bendigo at the site of the Bridge St. loop. Has a Peters Ice Cream truck and Sandhurst Fruit Juices truck on right side of photograph. 981.6 - tram 2 at Quarry Hill terminus. 981.7 - tram 2? at one of the loops on the Eaglehawk line, inbound? 981.8 - bogie tram at Charing Cross with fountain in background. Side on view looking south. 981.9 -trams 7 and 21 on Golden Square/North Bendigo line with bogie tram in background, at Charing Cross. Same as item 972. 981.10 - bogie tram at Charing Cross - has buildings in south west corner in background, including Colonial Mutual Life and an advertisement for the Herald newspaper. 981.11 - trams 25, 7 and two other trams at Charing Cross. 981.12 - trams 2 and 26 and three others at Charing Cross. 981.13 - tram 25 at Golden Square terminus, with Rodda's Golden Square Hotel in the background. Tram showing destination of "Nth Bendigo" 981.14 - tram 24, showing "Special" on depot access track. Has two Johnnie Walker roof ads on side. 981.15 - as above, but tram on bridge outside depot. 981.16 - trams 25 and 28 at depot 981.17 - tram 24 showing "Special" on depot access track with a single truck car in background. 981.18 - trams 2 and 26 at Charing Cross. Has advertisements for "Armstrong Tyre Service" and "Cohn's drinks" on buildings in background. 981.19 - Bendigo 2 at location?, about to enter a loop or double track section. Has hotel in background. On rear of each photo in the top left hand corner is a print number 1 to 19 in ink and location notes, generally "Bendigo"trams, tramways, charing cross, bendigo, golden square, quarry hill, tram 2, tram 21, tram 7, tram 24, tram 26 -
 Ballarat Tramway Museum
Photograph - Black & White Photograph/s, early 1960's
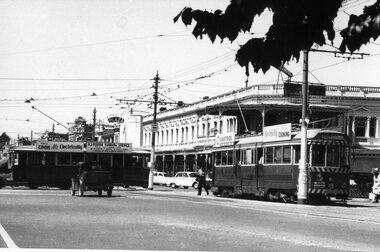
... Bendigo Mitchell St Aerial views tram 18 Black and White print ...Black and White print of an aerial view of Bendigo SECV Bendigo tram 18 at Charing Cross terminus for the Eaglehawk route with another bogie tram and two single truck trams in the background. Trams have dash canopy lights, but no large white strip under the drivers windows. Photo not dated but appears to be at during early 1960's. Tram 18 has White Horse Whiskey ad on front dash panel, SEC Roof ads. Numbers of other trams cannot be determined. All trams have roof ads, including SEC ads and a CASTROL ad. Good view of the fountain and buildings on the north east corner. Has Ezywalkin store, City Club Hotel and other buildings. Shows traffic arrangements for cars to do a right turn from Pall Mall into Mitchell St. On a building in Mitchell St. is an advertisement for "ASTOR Radio"trams, tramways, charing cross, bendigo, mitchell st, aerial views, tram 18 -
 Ballarat Tramway Museum
Document - Photocopy, Signalling Record Society of Victoria, "Safeworking on the Ballarat Electric Tramway System", Jul. 1988
Copy of an article by Peter Barry on the location of loops and operations of the Ballarat Tramway system. From pages 76 to 79 of the July 1988 issue of Somersault. Cover page, page 61 included. Covers running times, loop sections on Sebastopol, Lydiard St and Eastern Routes, Weekdays and Sats. and Suns., View Point, Signalling system, points where trams reversed in the section.trams, tramways, signals, crossing loop, secv, operations -
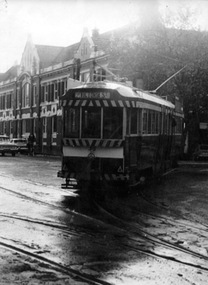
 Ballarat Tramway Museum
Photograph - Black & White Photograph/s, Dave Macartney, 4/08/1968 12:00:00 AM
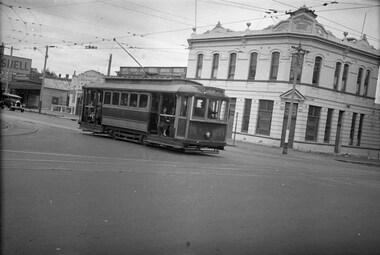
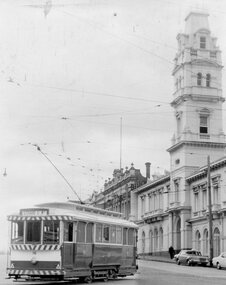
Black and white photograph of SEC tram No. 18 turning from Sturt St. into Lydiard St Nth. with Ballarat Post Office in background. Photo taken after the tram has passed the photographer. Tram has destination of "Lydiard St. Nth". Photo by Dave Macartney - 4/8/1968 Photocopy made 4/1999 for display purposes. See also Reg Item 585 for a wider view of this same photograph.trams, tramways, ballarat post office, ballarat, lydiard st. north, tram 18 -
 Ballarat Tramway Museum
Photograph - Black & White Photograph/s, Dave Macartney, 23/12/1967 12:00:00 AM
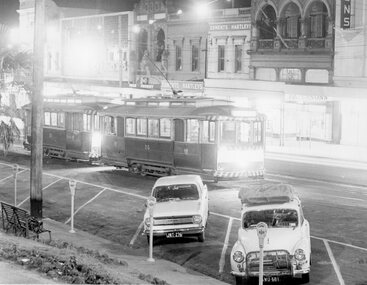
... are the buildings on the south side of Sturt St to the west of Grenville St... of Sturt St to the west of Grenville St. Buildings in view ...Black and white photograph of SEC Trams 26 and 28 in the City Loop on 23.12.1967 in the evening. Both trams have their lights on. Two motor cars parked with parking meters. In rear are the buildings on the south side of Sturt St to the west of Grenville St. Buildings in view are "Edments Hartleys", "Gear Chemist" and "Patersons". Photo by Dave Macartney - 23/12/1967. Copy1 - Photocopy made 4/1999 for display purposes. Copy 2 - made by enlarging photo to an approx. A4 print by colour photocopying and laminated for display purposes. Made July 2000 for the Trams at Night exhibition in the depot. Made by W.Doubleday. Has four Velcro dots on rear. Overall size 203H x 268W. Stored in same box at rear of large photos area in an A4 plastic folder.trams, tramways, sturt st, city loop, night photo, tram 26, tram 28 -
 Ballarat Tramway Museum
Photograph - Black & White Photograph/s, Dave Macartney, 23/12/1967 12:00:00 AM
Black and white photograph of SEC Tram 17 bound for the city turning from Barkly St. into Main St., on the Mt Pleasant route. Photo taken from the tower on the Ballarat Fire Station. Tram painted in the Bridge St. Traders Association Christmas Livery. Shows the view out to Mt Pleasant along Barkly St and the houses along this route. Photo by Dave Macartney - 23/12/1967. Photocopy made 4/1999 for display purposes.trams, tramways, mt pleasant, barkly st., main st, bridge st traders, tram 17 -
 Ballarat Tramway Museum
Postcard, Sturt St floral display
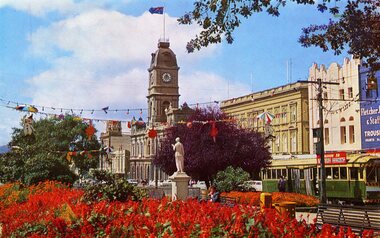
Colour postcard of Sturt St Ballarat looking across a floral display to the Town Hall. Has tram No. 37 travelling westbound along Sturt St. in the right hand side of the view. Also has part of the Fletcher Jones & Staff shop in right hand of the photograph, above the tramcar. Tramcar has an SEC Roof Ad, regarding electric cooking. In blue type under the photograph is the caption "The Gardens and City Hall. Ballarat. Vic." in caps. On the rear of the postcard is "Rose Series Colourview No. 509", published by Rose Stereograph Co. Glen Waverley Vic. Has the outline drawing of a rose in the centre of the postcard. Duplicate of Reg Item - 4279 trams, tramways, sturt st, fletcher jones & staff, gardens, town hall -
 Ballarat Tramway Museum
Newspaper, The Courier Ballarat, "No longer needed", 7/09/1971 12:00:00 AM
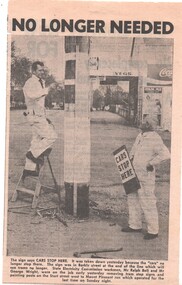
Yields information about the closure of the system and how the various small tasks, eg removal of tram stop signs were undertaken. The newspaper item details the name of the people.Newspaper clipping from The Courier, 7/9/1971 titled ""No longer needed" with a photo of two SEC workmen removing tram stop signs and painting poles on the Mt Pleasant route in Barkly St. Photo taken the previous day, following the closure of the route on Sunday. Has a photo of Mr. Ralph Bell and Mr George Wright. At corner with Cobden St. Has a Milk Bar in the background, advertising Streets Ice creek, Coca Cola, Briquettes and Vincent's Cold and Flu tablets. See Reg Item 3771 for a copy of the original photograph and a larger view of the scene. Second copy added 27/10/05. trams, tramways, mt pleasant, closure, tram stops, barkly st. -
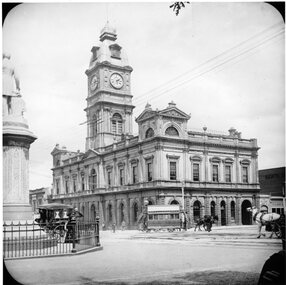
 Ballarat Tramway Museum
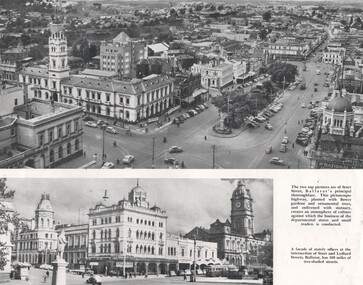
Photograph - Illustration/s, Ballarat Views, 1950's mid
Single sheet of printed paper, collected from a magazine (p59/60) with two black and white photos of Ballarat and one colour of Bendigo. Photo 1 - 260mm long x 122mm high, photo of north east Ballarat from Town Hall, looking out to Black Hill. Photo similar to Reg. No. 102, but buildings on corner of Grenville and Bridge St has a Plume sign instead of a Mobilgas Ad. This indicates early to mid 1950's. One tram in loop in one in Bridge St. Also has a "Neptune" sign in photograph. Photo 2 - 195mm long x 75mm high - from north east corner of Sturt and Lydiard Sts looking towards Town Hall and Craig's Hotel. Photo includes SEC bogie at tram stop and the front end of bus travelling east in Sturt St. Photo 3 - 230mm long x 156mm high - colour printed photo of Pall Mall, Bendigo from west side (by Post Office), looking towards the Shamrock Hotel. Photo includes signs for "COR Motor Spirit", "Tanox Paint" and the rear of a Bendigo to Huntly bus. See item Reg. No. 102trams, tramways, ballarat, bendigo, pall mall, oil companies -
 Ballarat Tramway Museum
Photograph - Black & White Photograph/s - set of 2, Peter Bruce, 1971
Yields information about the Hospital corner view with a tram turning into Sturt St. on a bleak day,Black and white photograph of Ballarat tram No. 35 turning from Drummond Street into Sturt St. at Hospital Corner. Tram has destination of Victoria St . Ballarat Base hospital buildings in background. Photo includes details of the trackwork and road condition at this location. Colour photocopy, laminated, of this photograph on display 4/2000 at 02-02-06 Digital Image of this photo added 7/2010 - see image i2. More detail in the digital image photograph. Peter Bruce Title: "35 Hospital Corner"trams, tramways, ballarat, hospital, sturt and drummond sts. , tram 35 -
 Ballarat Tramway Museum
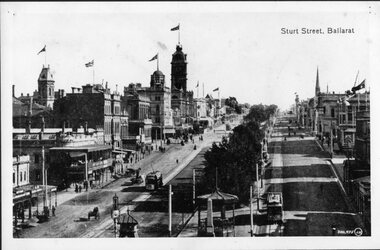
Photograph - Black & White Photograph/s, Victorian Railways (VR), c1940
Yields information about the lower end of Sturt St from the Grenville St intersection show a mid 1940's view - shows types of vehicles, shops and streetscape.Black and white photograph of Sturt St. in the mid 1940's looking from the top of a building in Grenville St. towards the West. Has a number of parked vehicles in kerbs, two people riding horses, a Vacuum Oil Co. truck in the bottom right hand corner and an SEC tram travelling west, just past the City Loop points. Colour photocopy, laminated, of this photograph on display 4/2000 at 02-02-06. Colour postcard of same photograph see Reg Item 2981 and another print see Reg Item 4284. Copy 2 - added 30/7/2007, ex Alan Bradley collection of photographs, to depot 5/2007. State Library of Victoria has negative, VR Collection, Series 2716, Photo Number 842961. See also Reg Item 8329 for a better print. Which shows more detail.trams, tramways, ballarat, sturt st., vr photos, tram 20 -
 Ballarat Tramway Museum
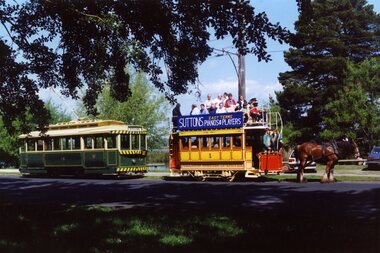
Photograph - Colour Photograph/s set of 3, Carolyn Dean, 7/11/1992 12:00:00 AM
743 - Colour photograph of the of Horse Tram No. 1 on 7 November 1992, at St Aidans Drive., last trip for the day, with tram No. 14 behind. Tram ready for return trip to depot. See November 1992 Fares Please! for more details, re crew and operations. On Fujicolor paper. 743.1 - Ditto - different view. 743.2 - horses being run around at Gardens Loop, Last two photos on AGFA Paper. See November 1992 Fares Please!In blue ink on back of 743.1 "27 7.11.92" and "Photo C. Dean" and 743.2 - "11 7.11.92"horse tram no. 1, tramcars, reconstruction, btps, tram 1, 14 -
 Ballarat Tramway Museum
Photograph - Black & White Photograph/s, 1900's mid to late?
Black and white photograph of Sturt St. Ballarat, east end, taken from a Grenville St. building looking west. Shows two ESCo trams, possibly No. 11 eastbound and 17?, westbound. Street track looks new, flags on many buildings in photo, good view of buildings on the West side of the street. Has caption "Sturt Street, Ballarat" top right hand corner and number "300,975(JW), bottom right hand corner. Photo mounted on black faced cardboard for display purposes. Has had tape on rear card, since removed. Part of photo also used in a Ballarat Business brochure, see Reg. Item No. ?trams, tramways, ballarat, sturt st, street scenes, esco , tram 11 (esco) and 17? (esco) -
 Ballarat Tramway Museum
Photograph - Black & White Photograph/s - set of 3, 13/12/1985 12:00:00 AM
Black and white photograph of the recovery of the body of Horse Tram No. 1 at the Anderson St. Ballarat home of J. Leviston on Friday 13 December 1985. See also Ref. No. 734 and 751. Body yet to be loaded on the trailer. Photos of end views of the tram body. 788.1 - Garry Wood working to slide tram body along a piece of timber east end. 788.2 - end view of body - note piece of timber under frame to enable movement - west end..trams, tramways, horse tram no. 1, btps, tramcars, tram recovery -
 Ballarat Tramway Museum
Photograph - B&W print of donated negative, 29/10/1962 12:00:00 AM
Black and white print of a donated negative. Print made 8/1998. Photo of SEC tram No. 40 in Barkly St., Ballarat, Mt. Pleasant line. Side on view of the tram going up a slight hill, looking across a vacant block of land. Photo taken 29-10-1962. Ron Fluck collection. Has "Eureka Roofing Tiles" and SEC "Electricity Best for Cooking" advertisements on the roof of the tram. High Res scan of negative added 17/1/2019.tramways, trams, mt pleasant, barkly st., ballarat, 40, tram 40 -
 Ballarat Tramway Museum
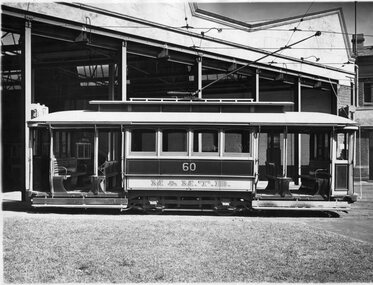
Photograph - Black & White Photograph/s, Sutcliffe Pty Ltd, c1920's
Black and white photograph of MMTB No. H60 at Kew depot. Tram painted in MMTB chocolate and cream colour scheme. Side elevation photo with depot buildings in background. Taken prior to modification of roofs at end of cars to building in destination box. Tram of same class at SEC No. 18 See also Registration No. 555 ( for end view of tram) and 550 for another copy of this print. Has "Sutcliffe Pty. Ltd. Photographers Cromwell buildings 366a Bourke St. Melbourne" stamp in purple on back of photo, different stamp to previous items from the same company.On rear in pencil "P & M", "M&MTB" and "38" in a circle.trams, tramways, mmtb, kew depot, h class, tram 60