Showing 2116 items matching " bendigo south"
-
 Ballarat Tramway Museum
Photograph - Black & White Photograph/s, Chris Wurr, early 1970's
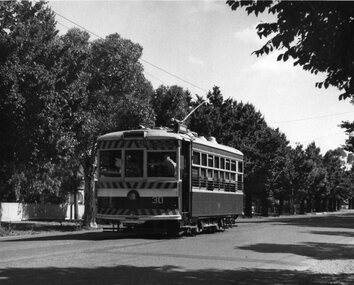
Yields information about the appearance of Bendigo trams early 1970's and the Charing Cross area.Black and White Photograph of SEC Bendigo 30, Birney en route to North Bendigo , possibly in McCrae St. Tram has the destination of North Bendigo. Note conductor at the front of the tram, talking to the driver. Photo Chris Wurr, early 1970's. "Photo by Chris Wurr" stamped on the rear.trams, tramways, bendigo, north bendigo, mccrae st, birney, tram 30 -
 Ballarat Tramway Museum
Photograph - Black & White Photograph/s, Chris Wurr, early 1970's
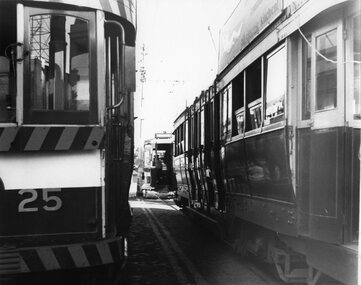
Yields information about the appearance of Bendigo trams early 1970's and the Charing Cross area.Black and White Photograph of three trams at Charing Cross. Photo taken between two bogie cars (25 and one other) on the Eaglehawk line while a Birney crosses in front of them. Possibly No. 29. Photo Chris Wurr, early 1970's. "Photo by Chris Wurr" stamped on the rear.trams, tramways, bendigo, charing cross, tram 25, tram 29 -
 Ballarat Tramway Museum
Photograph - Black & White Photograph/s, Chris Wurr, early 1970's
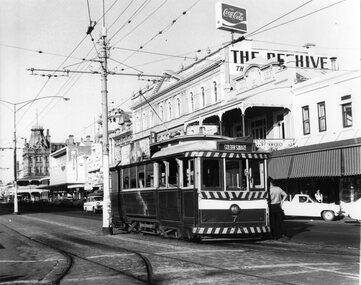
Yields information about the appearance of Bendigo Birney trams early 1970's and the McCrae St area.Black and White Photograph of Bendigo No. 7, in Pall Mall, at Charing Cross, with the destination of Golden Square. An inspector is leaning against the front door of the tram. Has in the background, The Beehive building, Coca Cola advertisement, Myers store and Stoneman's Shamrock Hotel. Photo Chris Wurr, early 1970's. "Photo by Chris Wurr" stamped on the rear.trams, tramways, bendigo, charing cross, pall mall, tram 7 -
 Ballarat Tramway Museum
Photograph - Black & White Photograph/s, Chris Wurr, early 1970's
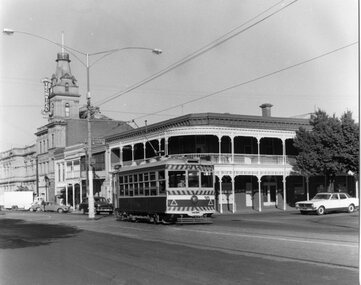
Yields information about the appearance of Bendigo Birney tram No. 11, stored at the depot, following an accident. Was not returned to service until after the SEC closed the tram system.Black and White Photograph of Bendigo No. 30, Birney, inbound to Charing Cross, McRae St, Bendigo, at Baxter St intersection? with the Bendigo Technical College in the background. Note the direction sign for "Heathcote". Tram has the destination of Golden Square. Photo Chris Wurr, early 1970's. "Photo by Chris Wurr" stamped on the rear.trams, tramways, bendigo, mccrae st, tram 30 -
 Ballarat Tramway Museum
Photograph - Black & White Photograph/s, Chris Wurr, early 1970's
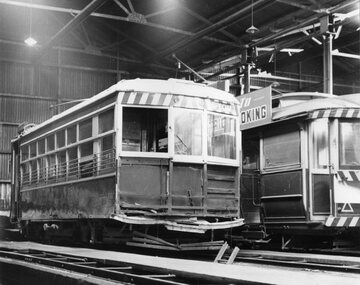
Yields information about the appearance of Bendigo Birney trams early 1970's and the Charing Cross area.Black and White Photograph of Bendigo No. 11, Birney, stored in the Bendigo tram depot, early 1970's following an accident. See Bendigo Tramways excerpt re this tram, ex their web site 9/6/2009. Has another, possibly stored tram along side. Photo shows the damaged end panel removed, distorted bumper bar and broken life guard tray. Photo Chris Wurr, early 1970's. "In 1968, the SECV assessed damage to the tram after an accident with an automobile. Upon inspection, it was found that the side bearers of the tram body had spread, and the centre bearers had been severely distorted because of the impact. Repairs of this nature required costly engineering work and with the closure of the tramway being imminent, it was decided to place Car 11 in storage on 6 road until the cessation of SECV services in 1972. Work commenced on the restoration of this tram in 1975 and it returned to service in 1986, being painted in the SECV livery of the 1950s." See Bendigo Tramway web site, accessed 9/6/2009 for notes re accident damage."Photo by Chris Wurr" stamped on the rear. On rear in pencil "B'go 11"trams, tramways, bendigo, depot, tram 11 -
 Ballarat Tramway Museum
Photograph - Black & White Photograph/s, Chris Wurr, Jan. 1971
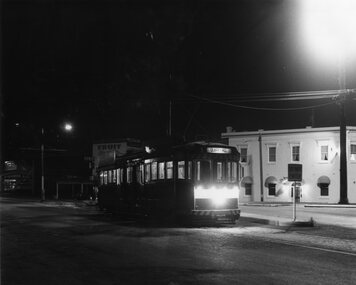
Black and White Photograph of Bendigo No. 2 at the Eagle Hawk terminus, Jan. 1971, night photograph. Tram has the destination of Quarry Hill. In the background is the Foodland Store, a Milk bar. The tram has arrived at the terminus, the trolley pole has been turned, but the headlights and dash canopy lights have yet to be turned. Tram has the destination of Quarry Hill. Photo Chris Wurr, early 1970's. "Photo by Chris Wurr" stamped on the rear. In top left hand corner, in ink "71)" and "Bendigo (SEC) Tramways / 1.1971 / Eaglehawk Terminus"trams, tramways, bendigo, eaglehawk, night photo, tram 2 -
 Ballarat Tramway Museum
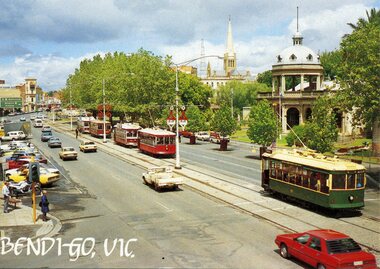
Postcard, Color Offset Marketing Pty Ltd, five Birney trams lined up in Tramways Ave, 1987
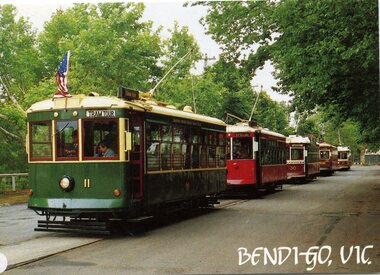
Colour printed postcard of five Birney trams lined up in Tramways Ave, lead by No. 11. Postcard has title "Bendigo Vic" in the bottom right hand corner. Other trams in sequence are 15, 30, 302 (ex 29) and 28. Produced by Color Offset Marketing Pty Ltd, has placed for Stamp and Address box. Photo by Earl Ewers Dec. 1986.Has label on front left hand bottom of card with "1" inked on it.trams, tramways, bendigo, birney -
 Ballarat Tramway Museum
Postcard, Rose Stereograph Co, 1906 view of Charing Cross, Bendigo, 1990's?
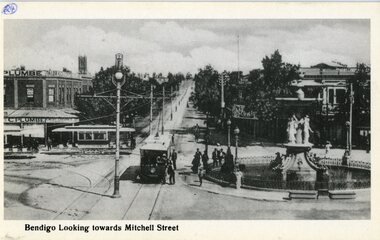
Black and White postcard, c1906 view of Charing Cross, Bendigo looking towards the west - Mitchell St. Has three tram cars in the view, the fountain, centre poles and a tailors shop on the south west corner of the area. Reproduced by the Rose Stereograph Co of Glen Waverley. Photo courtesy of Rod Aikman. Has the Rose Co. symbol on the rear of the car, along with areas for the stamp and address block.Has "24" in a circle in the top left hand corner of the front of the card and on the rear, a "William F Scott" address label on the bottom left hand corner.trams, tramways, bendigo, mitchell st, charing cross -
 Ballarat Tramway Museum
Postcard, Color Offset Marketing Pty Ltd, five Birney trams north bound in Pall Mall, 1987
Colour printed postcard of five Birney trams north bound in Pall Mall, lead by No. 11. Postcard has title "Bendigo Vic" in the bottom left hand corner. Other trams in sequence are 15, 30, 302 (ex 29) and 28. Produced by Color Offset Marketing Pty Ltd, has placed for Stamp and Address box. Photo by Earl Ewers Dec. 1986.Has "47" in a circle in the top left hand corner and a "William F Scott" label in the bottom left hand corner.trams, tramways, bendigo, birney, pall mall, tram 19 -
 Ballarat Tramway Museum
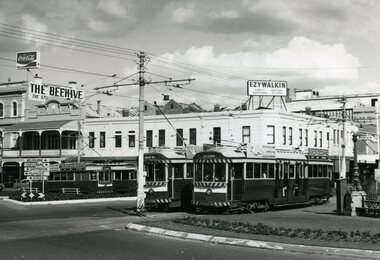
Photograph - Black & White Photograph/s, Andrew Ward, 15/01/1972 12:00:00 AM
Yields information about the appearance of Bendigo electric trams at the time of opening, how passengers could be seated, staff, paint schemes, decorations, and truck arrangements.Black and White photograph of four trams at Charing Cross, taken from the south east corner, looking towards the Beehive building and Ezywalkin stores. Trams 7, 5 and 26 in the photograph. Photo by Andrew Ward 15.1.1972.On rear in ink "Sat 15.1.72" / "single truck car 7 and bogie cars 5 & 26" in the top left hand corner and in a mix of ink and pencil "Bendigo Trust / Andrew C. Ward, Bendigo Vic 3550".trams, tramways, bendigo, charing cross, pall mall, tram 7, tram 5, tram 26 -
 Ballarat Tramway Museum
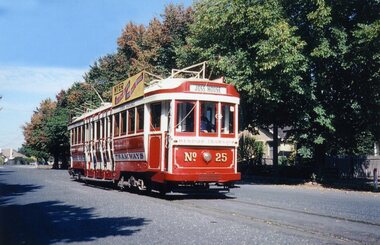
Photograph - Colour Print, William. F. Scott, 1979
Colour photograph of Bendigo 25, in Bendigo Trust talking tram colour livery in Tramways Ave 1979. William F Scott photograph. Has a Myer's roof advertisement on the side. On Canon hyperphoto paper.On rear in ink "Digital print from slide 1979 Bendigo Trust" along top edge and "William F Scott photo" in bottom right hand corner.trams, tramways, bendigo, bendigo trust, tramways ave, tram 25 -
 Ballarat Tramway Museum
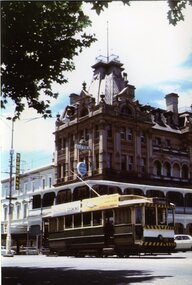
Photograph - Colour Print, Glen Mills, 22/12/1971 12:00:00 AM
Colour photograph of 19, inbound in Pall Mall with Stoneman's Shamrock Hotel in the background. Tram has two SEC roof advertisements and destination of Golden Square. Photo by Glen Mills, ex a slide, printed on Fujifilm, Pictropaper. Dated 22.12.1971On rear in pencil "Glen G Mills / Bendigo 22.12.71 / A 4218 (slide)"trams, tramways, bendigo, pall mall, tram 19 -
 Ballarat Tramway Museum
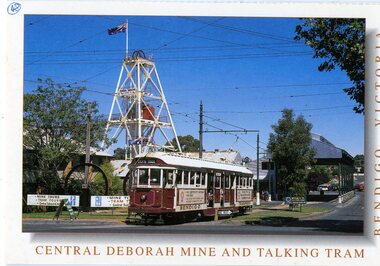
Postcard, Rose Stereograph Co, Bendigo talking tram No. 470, mid 1990's
Colour postcard of Bendigo talking tram No. 470 leaving the Central Deborah Mine, in the Bendigo Talking tram livery with the mine poppet head in the background. Postcard has "Central Deborah Mine and Talking Tram / Bendigo Victoria" around the edges. Two copies held. Ex Melbourne W2 470, later to be renumbered as Bendigo 35 Reproduced by the Rose Stereograph Co of Glen Waverley. Photo courtesy of Neil Cutts. Has the Rose Co. symbol on the rear of the card, along with areas for the stamp and address block. Rose Series Card No. 3157.Copy 2, has "48" in a circle in the top left hand corner of the front of the card and on the rear, the same number, and a "William F Scott" address label on the bottom left hand corner, and inscription "early 1990s" in ink.trams, tramways, bendigo, central deborah, bendigo trust -
 Ballarat Tramway Museum
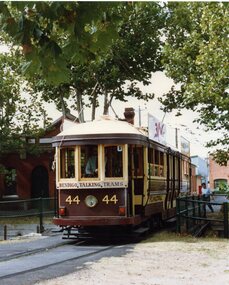
Photograph - Colour Print, William. F. Scott, 1991
Colour photograph of Bendigo 44 leaving the depot, over the bridge before entering Tramways Ave. Photo taken Easter 1991, by William F Scott. Photo printed on Fujicolor paper.On rear in ink "85") in top left hand corner, "Bendigo Trust Easter 1991" in top right hand corner and "William F Scott paper" in bottom right hand corner.trams, tramways, bendigo, bendigo trust, tramways ave, tram 44 -
 Ballarat Tramway Museum
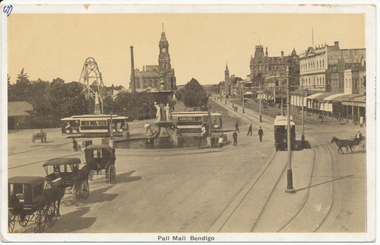
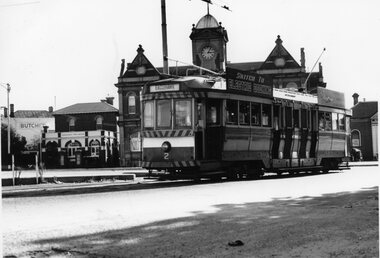
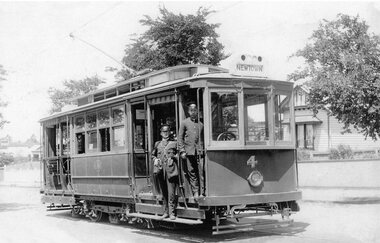
Postcard, Rose Stereograph Co, Charing Cross, Bendigo, mid 1900's
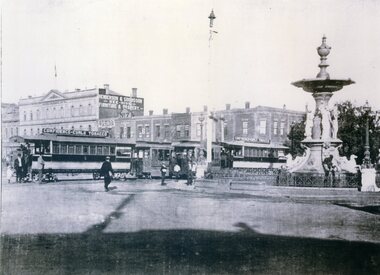
Demonstrates aspects of the development of the Bendigo tramways by ESCo prior to undertaking the Ballarat system. Yields information about Charing Cross soon after the electric tramway was opened.Black and White postcard, early 1900's view of Charing Cross, Bendigo looking towards the north, Pall Mall. Has three tram cars in the view, the fountain, centre poles, horse drawn cabs and vehicles, a poppet head and building on the east side of the Pall Mall. Divided back postcard with areas for message, address, and the stamp. Has "67)" in the top left hand corner of the back of the card, a circled "13" crossed out, "early 1900's" in ink. In the top right hand corner "$8" in pencil. On the front of the card has "67)" in the top left hand corner in ink.trams, tramways, bendigo, pall mall, charing cross, tram 4 -
 Ballarat Tramway Museum
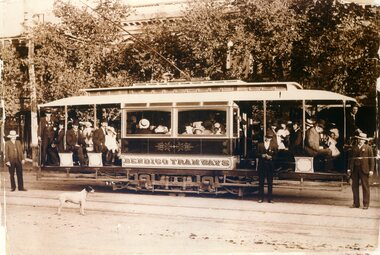
Photograph - Black & White Photograph/s, 8/04/1903 12:00:00 AM
Black and White reproduction (copy by scanning and reprinting) of a sepia toned image of an ESCo Bendigo Electric tramcar at the time of opening trails with many people on board, crews, a dog, in the Ball Mall area. Shows details of the car decoration, painting, crew uniforms, seating arrangements, truck arrangements. Information provided with photographs says "Trial run on route to Golden Square 8.4.1903", copied from Leonard C. Bennetts collection by William Scott. Shows edges and edge damage of original photograph. Two copies held.Copy 1 - has "20)" in the top left hand and right hand corners of the front of the photograph. On the rear "140)" in ink in the top left hand corner. In pencil and ink "Bendigo Tramways (Company electric) / Trial run on route to Golden Square 8.4.1903", "copies from Leonard C. Bennetts Collection" and a "William F Scott" address label in the bottom right hand corner. copy 2- has "12" in a circle on the top left hand front. Back has been covered by a sheet of paper, but has similar notes to copy 1 and cropping instructions.trams, tramways, bendigo, pall mall, golden square, trials, esco -
 Ballarat Tramway Museum
Document - Letter/s, City of Greater Bendigo, 19/12/2003 12:00:00 AM
Yields information about the City of Bendigo and Eaglehawks crests and format of letters 12/2003.Set of four documents - City of Bendigo and Borough of Eaglehawk civic crests/ coat of arms / emblems 4371.1 - Letter dated 19/12/2003, from the City of Greater Bendigo, signed by Daryl Griffiths Director Corporate Services to William F Scott, giving permission to use the City and Borough civic crests in his forthcoming book. .2 - folded piece of paper marked "88") and with a black and white version of the Borough of Eaglehawk Crest and plastic envelope containing three copies of the With Compliments card of the Borough. .3 - City of Bendigo Crest - full colour version on art paper. .4 - City of Bendigo Crest - black and white version.2 - "Bendigo and Eaglehawk coats of arms/emblemstrams, tramways, crests, coat of arms, borough of eaglehawk, city of bendigo, city of greater bendigo -
 Ballarat Tramway Museum
Photograph - Two Bendigo Tramways Co. Ltd steam trams and trailers at Charing Cross, William Ninnis, 1898
Black and White reproduction (copy by scanning and reprinting) of a image of two Bendigo Tramways Co. Ltd steam trams and trailers at Charing Cross. Appears to be trailers 3 and 4. Understood to be 1898. Shown as a William Ninnis photographer, held by the Bendigo Historical Society (crossed out) and Creative Image Photographic Collection, Both trailers have roof advertisements "Confidence-Curls Tobacco" and in the background is Henderson & Goodisson? Beehive building, advertising Furniture and Drapery. Also J. T. Mill Tailor. .1 - Black and White copy print contained within the Wal Jack Bendigo and Geelong Album, see Reg Item 5003 for more details. Added 1/7/2013In pencil "The Fountain 1898 / Bendigo Historic Society Inc Collection (crossed out) / Photographer William Ninnis" and in ink "Creative Image Photographic Collection". .1 - in ink on rear "Steam Trams at the Fountain" and in the bottom right hand corner "P.W. Duckett"trams, tramways, bendigo, steam trams, trailers, charing cross, tram 3, tram 4 -
 Ballarat Tramway Museum
Photograph - Black & White Photograph/s - set of 4, 1890
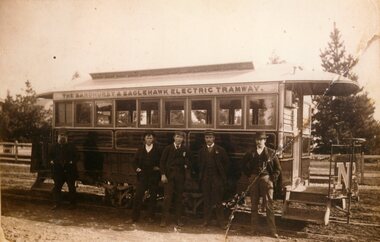
Demonstrates part of the evolution of Ballarat's trams when they were drawn from cable trailers of North Sydney for use as the central section of ESCo's Ballarat trams.4373 - Black and White sepia coloured reproduction (copy by scanning and reprinting) of a image of "The Sandhurst & Eaglehawk Electric Tramway" battery tram, with five men (two in uniform) standing alongside. Cans see the letters "No." Note the unpaved streets. Company operated the battery tram during 1890. 4373.1 - Black and white print - copied by Harris House of Photography - 3 prints and 1 negative - N526 - with tear in image removed. 4373.2 - Negative only - N524 - no people but with one of the battery doors only - negative only - see image. Envelope and other paperwork with the 4373.1 and 4373.2 - with the worksheet file. 3 - Black and White copy print contained within the Wal Jack Bendigo and Geelong Album, see Reg Item 5003 for more details. Added 1/7/2013 .0 In pencil "Basil W Miller Collection" .3 - "PWD" in bottom right hand corner in ink.trams, tramways, bendigo, battery trams, eaglehawk -
 Ballarat Tramway Museum
Ephemera - Menu, Bendigo Tramways, "Cafe Tram", 2000 - 2008
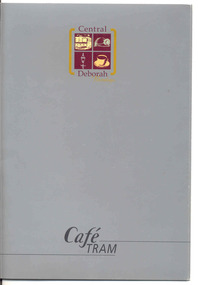
Set of four documents, advertising the Cafe Tram, Bendigo. .1 - Central Deborah - Cafe Tram - menu cover - with photographs and history on the back, c2000 - images 1 and 2 .2 - Pamphlet for above detail times, costs, duration and contact numbers - single sheet, double side, black and white printing - image 3 .3 - Folded colour pamphlet advertising the Cafe Tram and sponsors - image 4 and 5 .4 - Card advertising replacement to the "Cafe Tram", Bendigo "Ninesevensix" - same tram, different marketing etc - double side card - image 6 & 7.4 - has "42" in ink in top right hand corner.trams, tramways, bendigo, bendigo trust -
 Ballarat Tramway Museum
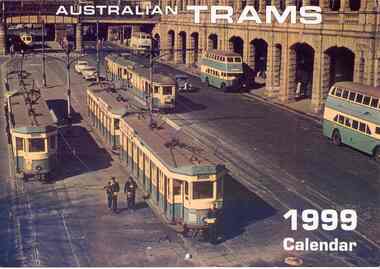
Document - Calendar, Topmill Pty Ltd, "Australian Trams - 1999 Calendar", 1998
Yields information about tramway operations post WW2 throughout Australia tramway cities.Wall Calendar - heavy card covers, 12 gloss art pages inside, titled "Australian Trams - 1999 Calendar" containing cull colour photographs of Sydney, Brisbane, Adelaide, Perth, Bendigo, Ballarat, Hobart, Melbourne, and a list of Australian and New Zealand tramway museums. Ballarat featured in June, 33 in the depot yard during a hail storm - 20/8/1971 - photographer not given. Has a punched hole along the top edge to enable wall use. Provides dates for holidays, school holidays and Pension payment days and phases of the moon. Produced by Topmill Pty Ltd and distributed by Gordon & Gotch Pty Ltd. Photos by Hugh Ballment, Dale Budd, Robert Merchant, Arthur Perry and Sydney Tramway Museum.tramways, trams, ballarat, bendigo, melbourne, adelaide, hobart, brisbane, sydney -
 Ballarat Tramway Museum
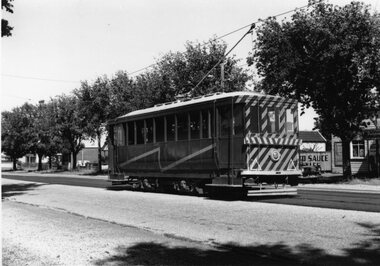
Photograph - Black & White Photograph/s - set of 2, Wal Jack, 28/02/1962 12:00:00 AM
Yields information about Bendigo trams, the Golden Square route in the early 1960's prior to fitting dash canopy lighting.Black and white print of the Ballarat Scrubber tram, at the Bell Street loop, 28/2/1962, Photo by Wal Jack. Two copies. Photo print courtesy of Port Dock Railway Museum, now the National Railway Museum. See worksheet 4311 for letter and details of prints sent to Bill Scott, 19/10/2001. Any photo credit to mention NRM Collection. .1 - same photograph with Doug Colquhoun stamp on rear - see image i2..1 - On rear of copy 1"SEC Ballarat / Scrubber car /Bell St loop / 28/2/62 2125 / Wal Jack " In the top right hand corner "74)" .2 - On rear has Douglas Colquhoun stamp with photograph details - see image i2 trams, tramways, scrubber tram, bell st, tram scrubber -
 Ballarat Tramway Museum
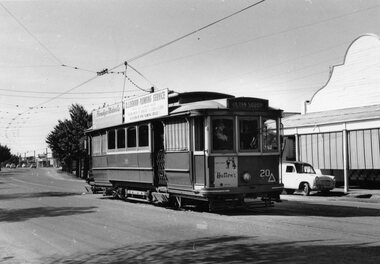
Photograph - Black & White Photograph/s, Doug Colquhoun, 25/04/1960 12:00:00 AM
Yields information about one of Geelong's trams.Black and white print of Bendigo No. 20, enroute to Golden Square. Photo by Doug Colquhoun 25/4/1960. Two copies. Trams has a front dash advertisement for Hutton's hams and roof advertisements for D. J. Osborn Plumbing Service and Bendigo Motor Co. Photo print courtesy of Port Dock Railway Museum, now the National Railway Museum. See worksheet 4311 for letter and details of prints sent to Bill Scott, 19/10/2001. Any photo credit to mention NRM Collection.On rear of copy 1"SEC Bendigo / 20 / Golden Square / 25/5/60 2121 / D A Colquhoun " Copy 2 "DAC" in ink, bottom right hand corner.trams, tramways, bendigo, golden square, tram 20 -
 Ballarat Tramway Museum
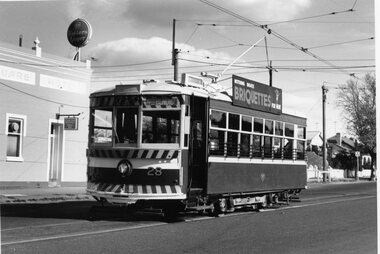
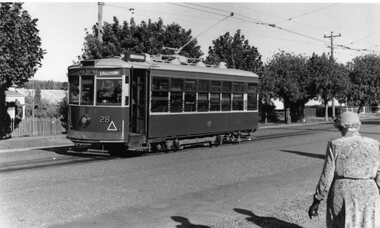
Photograph - Black & White Photograph/s, Doug Colquhoun, 16/05/1971 12:00:00 AM
Yields information about Bendigo's trams in the early 1970's and the Eaglehawk terminus.Black and white print of Bendigo 28 at the Golden Square terminus. Two copies. Photo by Doug Colquhoun, 16/5/1971. Trams has the destination of Nth Bendigo and roof advertisements for Briquettes. Also has the Golden Square hotel in the background. Photo print courtesy of Port Dock Railway Museum, now the National Railway Museum. See worksheet 4311 for letter and details of prints sent to Bill Scott, 19/10/2001. Any photo credit to mention NRM Collection.On rear of copy 1 "SEC Bendigo / 28 /Golden Square / 16/5/71 4187 / D.A. Colquhoun" . Copy 2 "DAC" in ink, bottom right hand corner.trams, tramways, golden square, tram 28 -
 Ballarat Tramway Museum
Photograph - Black & White Photograph/s, Doug Colquhoun, 16/05/1971 12:00:00 AM
Yields information about Ballarat's trams during the late 1950's and the Kenney Murray offices.Black and white print of Bendigo 2 at the Eaglehawk terminus. Two copies. Photo by Doug Colquhoun, 16/5/1971. Trams has the destination of Eaglehawk and two roof advertisements for Electric cooking. Also has the Eaglehawk Town Hall, Eaglehawk Post Office in the background. Photo print courtesy of Port Dock Railway Museum, now the National Railway Museum. See worksheet 4311 for letter and details of prints sent to Bill Scott, 19/10/2001. Any photo credit to mention NRM Collection.On rear of copy 1 "SEC Bendigo / 2 /Eaglehawk / 16/5/71 4203 / D.A. Colquhoun" . Copy 2 "DAC" in ink, bottom right hand corner.trams, tramways, eaglehawk, tram 2 -
 Ballarat Tramway Museum
Photograph - Black & White Photograph/s, Doug Colquhoun, 24/05/1959 12:00:00 AM
Yields information about Bendigo Trust's trams in the late 1970's and the depot.Black and white print of Ballarat 39 at the Gardens Loop terminus. Two copies. Photo by Doug Colquhoun, 24/3/1959. In the background are the Trees of the Gardens, and the tram stop. Photo print courtesy of Port Dock Railway Museum, now the National Railway Museum. See worksheet 4311 for letter and details of prints sent to Bill Scott, 19/10/2001. Any photo credit to mention NRM Collection.On rear of copy 1 "SEC Ballarat / 39/ Lake Wendouree / 24/3/59 5536 / D.A. Colquhoun" . Copy 2 "DAC" in ink, bottom right hand corner.trams, tramways, wendouree parade, gardens loop, tram 39 -
 Ballarat Tramway Museum
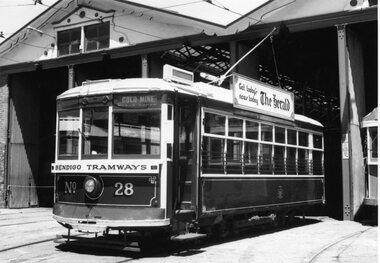
Photograph - Black & White Photograph/s, Doug Colquhoun, 25/01/1978 12:00:00 AM
Yields information about Bendigo Trust's trams in the late 1970's and the depot.Black and white print of Bendigo Trust 28 at the depot. Two copies. Photo by Doug Colquhoun, 25/1/1978. The tram is in the Bendigo Trust "Talking Tram" livery, with a The Herald" roof advertisement. It has the destination of Gold Mine. Photo print courtesy of Port Dock Railway Museum, now the National Railway Museum. See worksheet 4311 for letter and details of prints sent to Bill Scott, 19/10/2001. Any photo credit to mention NRM Collection.On rear of copy 1 "Bendigo Tramways / 28 / Depot / 25/1/1978 6526 / D.A. Colquhoun" . Copy 2 in pencil on left hand edge "Bendigo Trust Car 28 depot 26.1.79 Douglas Colquhoun"trams, tramways, bendigo trust, depot, tram 28 -
 Ballarat Tramway Museum
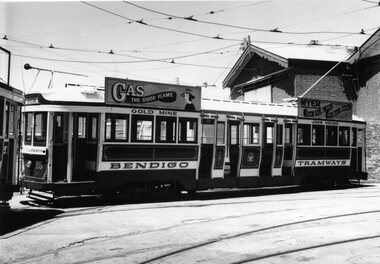
Photograph - Black & White Photograph/s, Doug Colquhoun, 25/01/1978 12:00:00 AM
Yields information about Bendigo trams, ladies fashions in the late 1950's.Black and white print of Bendigo Trust 25 at the depot. Two copies. Photo by Doug Colquhoun, 25/1/1978. The tram is in the Bendigo Trust "Talking Tram" livery, with two Roof Advertisements "Gas the Good Flame" and Myers/ Tram has the destination of "Special" Photo print courtesy of Port Dock Railway Museum, now the National Railway Museum. See worksheet 4311 for letter and details of prints sent to Bill Scott, 19/10/2001. Any photo credit to mention NRM Collection.On rear of copy 1 "Bendigo Tramways / 25 / Depot / 25/1/1978 6529 / D.A. Colquhoun" . Copy 2 in ink "DAC" in the bottom right hand corner.trams, tramways, bendigo trust, depot, tram 25 -
 Ballarat Tramway Museum
Photograph - Black & White Photograph/s, Wal Jack, 12/04/1959 12:00:00 AM
Yields information about Ballarat's trams, and the City centre area and motor vehicles late 1950's.Black and white print of Bendigo 28 at the Quarry Hill terminus, 12/4/1959, photo by Wal Jack. Has a lady walking across to the tram - dressed in gloves and hat. Tram has the destination of Eaglehawk. Photo print courtesy of Port Dock Railway Museum, now the National Railway Museum. See worksheet 4311 for letter and details of prints sent to Bill Scott, 19/10/2001. Any photo credit to mention NRM Collection.On rear of copy "SEC Bendigo #28 / Quarry Hill terminus / 12/4/59 / Wal Jack photo / National Railway Museum.trams, tramways, bendigo, quarry hill, tram 28 -
 Ballarat Tramway Museum
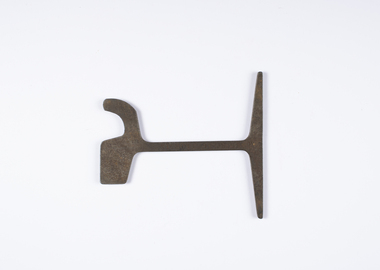
Functional Object - Rail Section, Lorain Steel, 9mm Sawn Cut Rail, 1930's?
Yields information about some of the rail used in Bendigo and demonstrates the type of rail used in tramways and made by the Lorain Steel Co. France.Section of flanged tramway rail - saw cut from rail, smooth finished - Stamped "BENDIGO" stamped into the foot of the rail. On the other side of the rail, "81LBS PERYD", stamped onto the head of the rail. and "LORAIN STEEL CO LORAIN" stamped into the web. FRONT - 8116/yd Morain Steel Co. Lorain BACK - Bendigo trams, tramways, rail, bendigo, rail section