Showing 2440 items
matching goldfields north
-
 Ballarat Tramway Museum
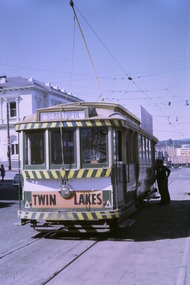
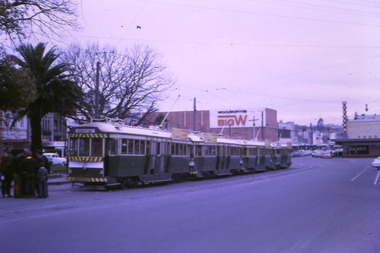
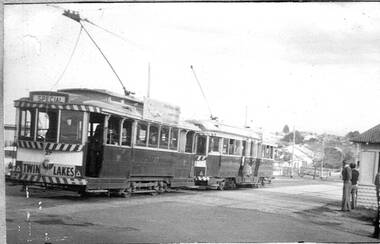
Photograph - Digital image Set of 10, Tony Smith, 5/09/1971 12:00:00 AM
Yields information about Ballarat Tramways and trams prior to the closure of the tramway system.Set of 10 digital images of Ballarat trams prior to closure, scanned from original slides by Tony Smith, 1971 prior to closure of the system. This set of slides, possibly on the last weekend of Mt Pleasant services - closure took place on 5/9/1971. . .1 - 17 at the City terminus, north side. Tram showing the destination of Sebastopol and has a Twin Lakes sign. .2 - 26 at the city terminus, south side with Geommola's Pharmacy and Kodak Film advert and Town Hall in the background. .3 - 43 at the City terminus, north side, with destination of Mt Pleasant. Has a number of men at the tram stop. .4 - 14 leaving Bridge St, crossing Grenville St into Sturt St, with destination of City. Has the Dickins and Woolworths Big W store in the background. .5 - 43 at Mt Pleasant terminus with conductor boarding the tram. Tram has destination of Gardens via Sturt St West. In the background is the corner store with adverts for The Sun, Womens Weekly, Coca Cola and Robur Tea. .6 - 43 and 26 Barkly St, about to arrive at the Grant St loop. Both trams inbound. .7 - 43, 26 and 27 at Grant St loop. .8 - 12 (Lydiard St Nth) and another bogie tram at the city terminus north with the Town Hall in the background. .9 - 39 outbound in Barkly St to Mt Pleasant - note the new bus stop signs on either side of the tram. 10 - 27 (City) and 26 turning from Barkly St into Main St with the Ampol petrol station, a general store advertising Escort cigarettes and The Age in the background . On the right hand side is a fish and chips shop advertising crays and drinks.trams, tramways, sturt st, city, grenville st, bridge st, mt pleasant, barkly st, grant st, main st, closure, tram 17, tram 26, tram 43, tram 14, tram 12, tram 27, tram 39 -
 Ballarat Tramway Museum
Photograph - Digital image Set of 10, Tony Smith, 19/09/1971 12:00:00 AM
Yields information about Ballarat Tramways and trams prior to the closure of the tramway system.Set of 10 digital images of Ballarat trams prior to closure, scanned from original slides by Tony Smith, 1971 prior to closure of the system. This set of slides appears to be the last day of operations - 19/9/1971 .1 - 40 in Drummond St Nth. near Macarthur St, showing Sebastopol. .2 - 35 turning from Drummond St north into Sturt St with the Southern Cross hotel in the background. Note the shoes in the overhead. .3 - 42 in Drummond St North, showing Special, nearing Sturt St. .4 - 42 turning into Sturt St, with the Shell Service station on the left. .5 - 42 reversing on the Lydiard St Nth crossover with the post office in the background. Tram showing Sebastopol. .6 - 39 reversing at Grenville St, tram showing Special. Has the Dickins and the Gasometer in the background. the conductor adjusting the trolley ropes. .7 - 39 running from Bridge St into Sturt St - as above. .8 - 34 and 39? parked in the City Loop. Has Patersons furniture, Gear Chemist and Edments stores in the background. .9 - 43 showing special at the Sturt and Lydiard St stop with 39? about to leave Lydiard St Nth. Has the post office in the background. .10 - 40 at the Lydiard St North terminus, with passengers boarding. Cemetery gates in the background.trams, tramways, drummond st nth, macarthur st, sturt st, closure, lydiard st nth, grenville st, city loop, closure, tram 40, tram 35, tram 42, tram 39, tram 34 -
 Ballarat Tramway Museum
Photograph - Digital image Set of 9, Tony Smith, 19/09/1971 12:00:00 AM
Yields information about Ballarat Tramways and trams prior to the closure of the tramway system.Set of 9 digital images of Ballarat trams prior to closure, scanned from original slides by Tony Smith, 1971 prior to closure of the system. This set of slides appears to be the last day of operations - 19/9/1971 .1 - 40 south bound in Lydiard St Nth, at the Gregory St Loop. .2 - 40 after passing through the loop .3 - 42, north bound in Lydiard St. North at Macarthur St. .4 - 42 southbound at the Railway station level crossing with the Kennedy Murray Pty Ltd General Carriers building at the station yard in the background. .5 - 42 southbound in Lydiard St North after crossing the railway - taken from the signal box (B) with Reids Palace in the background and the Provincial Hotel. .6 - 35 northbound after passing through the level crossing. .7 - bogie tram crossing the tracks with Ballarat Railway Station in the background. .8 - bogie tram entering the double track section in Lydiard St with Reids Palace in the background. Note the new bus stop bay. .9 - 35 and another bogie in Sturt St, with the Town Hall, Golden Star Chinese Cafe and Georges Fish & Chip shop in the background.trams, tramways, lydiard st nth, gregory st, level crossings, ballarat railway station, sturt st, closure, tram 40, tram 42, tram 35 -
 Ballarat Tramway Museum
Photograph - Digital image Set of 10, Tony Smith, 19/09/1971 12:00:00 AM
Yields information about Ballarat Tramways and trams prior to the closure of the tramway system.Set of 10 digital images of Ballarat trams prior to closure, scanned from original slides by Tony Smith, 1971 prior to closure of the system. This set of slides appears to be the last day of operations - 19/9/1971 .1 - Photo taken from Cooks Hotel balcony overlooking three bogie trams parked in the City Loop with Big W and Dickins store in the background. .2 - 42 in Albert St, showing destination of Sebastopol, though could be north bound near Ophir St. .3 - 42 crossing Ophir St to the north. .4 - 42 (Lydiard St Nth), 34 (Sebastopol) crossing at the Bell St loop .5 - 42, 35 and another bogie tram at ditto - note the neat line of photographers and one person (bounding) around. .6 - 34 and 35 leaving the Grey St loop southbound. .7 - 34 and 35 southbound in Albert St passing the Borough of Sebastopol Town Hall .8 - 34 nearing the Sebastopol terminus in Albert St .9 - 35 ditto .10 - 35 ditto after passing the camera looking towards the terminus.trams, tramways, sturt st, sebastopol, albert st, city loop, ophir st, bell st, grey st, borough of sebastopol, closure, tram 42, tram 34, tram 35 -
 Ballarat Tramway Museum
Photograph - Digital image Set of 7, Tony Smith, 19/09/1971 12:00:00 AM
Yields information about Ballarat Tramways and trams prior to the closure of the tramway system.Set of 7 digital images of Ballarat trams prior to closure, scanned from original slides by Tony Smith, 1971 prior to closure of the system. This set of slides appears to be the last day of operations - 19/9/1971 .1 - Four bogie trams parked in city loop with Woolworth's Big W and Dickins in the background. Not well focused. first tram 37 - see Reg Item 6158.6. .2 - 42 at Sturt and Lydiard St, north side, night photo with crew standing by the tram stop sign. Has the post office in the background. .3 - bogie tram at the south side, night photo, has the Commonwealth Bank in the background. .4 - 39 (at the rear of the four bogie trams parked in the City loop), night photo, looking west. .5 - 42 at Sebastopol terminus with the Royal Mail Hotel in the background - night photo. .6 - bogie tram and 39 parked in the city loop - two have now departed. Has Dickins, Gear Chemist and Edments Hartleys stores in the background. .7 - 34 at Sturt and Lydiard St north side.trams, tramways, closure, night photo, city loop, post office, tram 37, tram 42, tram 39, tram 34 -
 Ballarat Tramway Museum
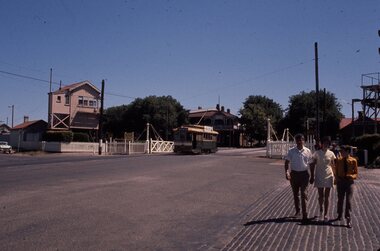
Slide - 35mm slide/s, Chas Bevan, 19/12/1970 12:00:00 AM
Yields information about the Lydiard St railway gates area and the buildings at the time.Colour slide - 35mm - of Ballarat single trucker No. 11? crossing the railway tracks in Lydiard St North with the B single box and Victoria House in the background. Photo taken by Chas Bevan on Saturday 19-12-1970."Ballarat trams 19-12-70 Lydiard St Nth"tramways, trams, lydiard st nth, railway crossing, tram 11 -
 Ballarat Tramway Museum
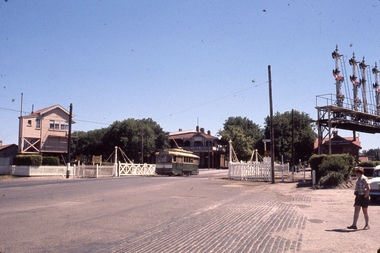
Slide - 35mm slide/s, Chas Bevan, 19/12/1970 12:00:00 AM
Yields information about the Lydiard St railway gates area and the buildings at the time.Colour slide - 35mm - of Ballarat single trucker (No. 26?) crossing the railway tracks in Lydiard St North, north bound with the B single box and Victoria House in the background. Photo taken by Chas Bevan on Saturday 19-12-1970."Ballarat trams 19-12-70 Lydiard St Nth"tramways, trams, lydiard st nth, railway crossing, tram 266 -
 Ballarat Tramway Museum
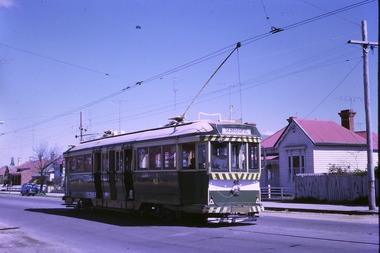
Slide - 35mm slide/s, Chas Bevan, 19/12/1970 12:00:00 AM
Yields information about the turn from Macarthur St into Wendouree Parade at View Point.Colour slide - 35mm - of Ballarat single trucker No. 27 turning from Macarthur St into Wendouree Parade at View Point junction. Has the tram stop signs, shelter in the photo. The tram has a Twin Lakes sign and the destination of Gardens via Drummond St North. Also shows the overhead arrangement for twin trolley wires. Photo taken by Chas Bevan on Saturday 19-12-1970."Ballarat tram 19-12-70 onto lake loop" in ink.tramways, trams, wendouree parade, view point, macarthur st, overhead, shelters, tram 27 -
 Ballarat Tramway Museum
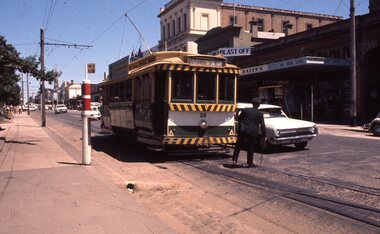
Slide - 35mm slide/s, Chas Bevan, c1970
Yields information about the city junction between Sturt and Lydiard St north and demonstrates the operation at this point by a driver.Colour slide - 35mm - of Ballarat No. 28 at the junction between Sturt St and Lydiard St North, with the driver changing points for Lydiard St North. The tram has the destination for Lydiard St North. Shows the SEC offices in the background, Racey's store, the small tram stop sign and end of section sign and the motor traffic at this point. Photo by Chas Bevan."Ballarat trams" in ink.tramways, trams, lydiard st nth, sturt st, motormen, drivers, city, tram 28 -
 Ballarat Tramway Museum
Slide - 35mm slide/s, Chas Bevan, 19/12/1970 12:00:00 AM
Yields information about No. 13 and the general scene at the City area, corner of Lydiard and Sturt Sts.Colour slide - 35mm - of Ballarat No. 13 and another single trucker at the junction between Sturt St and Lydiard St North. No. 13 has the destination for Mt Pleasant. Shows the SEC offices in the background, Racey's store, the small tram stop sign and end of section sign and the motor traffic at this point. Photo by Chas Bevan 19-12-1970."Ballarat trams 19-12-70 Lydiard St xing of West H'way" in ink.tramways, trams, lydiard st nth, sturt st, tram 13 -
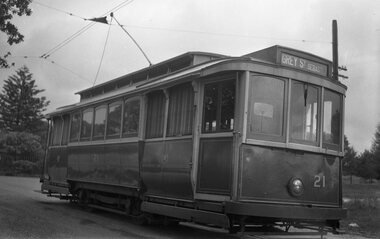 Ballarat Tramway Museum
Negative, mid 1940's
Yields information about the appearance of SEC tram No. 21 in the mid 1940's.Black and white negative of No. 21, at the Lydiard St North terminus? (No buildings in background) Tram has the destination of Grey St Sebastopol. Note the pan in the overhead to assist the trolley pole positioning at night. Negative scanned at hi res 4/6/2020 and image updated.trams, tramways, lydiard st nth, overhead, tram 21 -
 Ballarat Tramway Museum
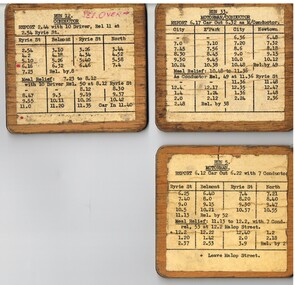
Document - Table Cards (Sheets), State Electricity Commission of Victoria (SECV), Geelong Trams Runs, 1950's
Set of three Typed table card or run card, for Geelong Trams Runs glued and varnished onto a sheet of three ply timber - plywood boards. Gives details for the Motorman and Conductor, starting times, meal times, relief and taken by details. Not known when made - 1950's? .1 - Run 5- Ryrie St - Belmont and North .2 - Run 12 - Ryrie St - Belmont and North with further details on rear. .3 - Run 33 - City - Eastern Park and Newtown for Motorman and Conductor See also Reg Item 3155 and 8134 for other examples and 8135 for a Bendigo example.trams, tramways, secv, forms, timetables, geelong -
 Ballarat Tramway Museum
Slide - 35mm slide/s - set of 6, Campbell Duncan, 19/09/1971 12:00:00 AM
Yields information about the operations of the Ballarat Tramway system on the last day of SEC tramway operations in Ballarat.Set of 6 Kodak - Kodachrome slides - cardboard mounts - all taken on 19/9/1971, last day of operations prior to closure of the SEC operated tramway. .1 - Tram 40, waits at the level crossing gates - the gates are being opened. In the background is the station building and the signal gantry. Tram has the destination of Sebastopol. .2 - No. 42, with destination of Lydiard St north, northbound in Lydiard St, with railway station buildings and VRI in the background. .3 - No. 35 on inbound, Lydiard St North. .4 - No. 35, on inbound service, leaving Skipton St loop with another bogie in the background. .5 - No. 39 on inbound service, Albert St Sebastopol with the Sebastopol boundary sign and Binks Ford in the background. Tram has an everything under control in my all electric kitchen roof advert. .6 - No. 42, with destination of Sebastopol, Albert St Sebastopol.In ink on slide: .1 - Sun 19 Sept 71 - up Lydiard St Nth waits for gates to be opened after fast goods. .2 - Sun 19 Sept 1971, down Lydiard St Nth near VRI. .3 - Sun 19 Sept 1971, Up Lydiard St Nth .4 - Sun 19 Sept 1971, Up Sebastopol (supplementary service) has just crossed down in Skipton St near Drummond St. .5 - Sun 19 Sept 1971, Up Sebas at Ballarat / Sebastopol boundary. .6 - Sun 19 Sept 1971, c5.30pm down Sebas in Sebas shire.tramways, trams, lydiard st nth, railway station, level crossings, skipton st, albert st, sebastopol, closure, last day, tram 40, tram 42, tram 35, tram 39 -
 Ballarat Tramway Museum
Slide - 35mm slide/s - set of 10, Campbell Duncan, Jan. 1971
Set of 10 Ferraniacolor slides - cardboard mounts taken on either 10/1/71 or 16/1/71. .1 - Birney No. 30, Golden Square line, inbound near Cathedral with car yard in background. .2 - ditto, with Cathedral gardens in background. .3 - single trucker, with two SEC roof adverts, entering Nolan St enroute to North Bendigo. Shows the driver sitting in a side on shot. A 4 square store in the background, with a fading advert for "Peeled Tomatoes". .4 - No. 6 turning from Nolan St into McCrae St with 4 square store in background. .5 - No. 26 at Quarry Hill with cemetery in background. .6 - No. 6 at the North Bendigo Terminus .7 - No. 26 outbound to Eaglehawk on the Railway Overbridge, Mt Korong Road. .8 - No. 17 (inbound to City and Quarry Hill) and another bogie crossing at a loop on the Eaglehawk line. Both trams have SEC roof adverts. The driver of the outbound car is boarding the tram. Based on .9, it is No. 3 at Long Gully. .9 - No. 3 waiting at Long Gully Loop . .10 - No. 26 at Quarry Hill terminus, with destination of Eaglehawk.In ink on slide: .1 - "1/2 mile out on Golden Square line - 10/1/71 (Sun)." .2 - "1/2 mile out on Golden Square line - 10/1/71" .3 - "Has just rounded curve near lake Weeroona on North Bendigo line - 10/1/71 (Sun)." .4 - "16/1/71" .5 - " 10/1/71 (Sun)." .6 - "North Bendigo terminus, 16/1/71 (Sat)" .7 - "10/1/71 (Sun) c 3pm" .8 - "Cross Eaglehawk line - 10/1/71 (Sun)." .9 - "Jackson St Loop on E'Hk line awaiting up - 10/1/71 " .10 - "Quarry Hill terminus Bendigo - - 10/1/71"tramways, trams, bendigo, golden square, high st, nolan st, north bendigo, quarry hill, long gully, railway bridge, tram 30, tram 6, tram 26, tram 17, tram 3 -
 Ballarat Tramway Museum
Photograph - Digital image, 1938
Yields information about the appearance and the use of ESCo tram 24 and other single truckers late 1930's and the appearance of the north side of Sturt St near Lydiard St north.Digital Copy of a photograph sourced by Roger Greenwood as part of his work on the production of a Video Tape on Ballarat's trams. Photographer and source details not provided by Roger. See btm6302doc.pdf Image of No. 24 and two other single truckers at the City terminus, 1938. Tram has the destination of Lydiard St North. Shows the appearance of the trams at the time. Has a number of passengers on board. In the background is the ANZ building, Post Office and Whitesides Tailors and Mercers.trams, tramways, sturt st, lydiard st nth, city, tram 24 -
 Ballarat Tramway Museum
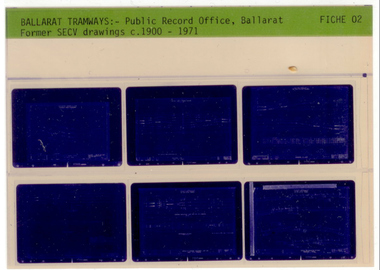
Film - Microfiche, Nova Micrographics, "Former SECV drawings c1900-1971", early 1990's
Yields information about the drawings that were transferred to the Public Records Office Ballarat following closure of the Ballarat Tramways and the demise of the SECV itself. Provides information about the BTPS / BTM microfilm holdings., Yields information about the drawings that were transferred to the Public Records Office Ballarat following closure of the Ballarat Tramways and the demise of the SECV itself. Provides information about the BTPS / BTM microfilm holdings.Set of 82 microfiche of SECV drawings, loaned from the Public Records Office, titled "Former SECV drawings c1900-1971", made by Nova Micrographics, North Carlton, early 1990's. First sheet is the PRO index sheet prior to the listing of the microfiche on a separate copy - see Reg Item 4306. Each Microfiche has the heading "Ballarat Tramways - Public Records Office, Ballarat, "Former SECV drawings c1900-1971" and Fiche No on the right hand edge. Each fiche contained within a separate plastic envelope. Two other copies made, one held by the PRO Melbourne and one in Ballarat. For Listing of Drawings see File "List of PROV Microfilmed SEC drawings" in the BTM Management System. Copy of correspondence c2000, with the PRO what had been done etc, see the related files entry - BTM4307doc.pdf.trams, tramways, drawings, public records office, pro, sec -
 Ballarat Tramway Museum
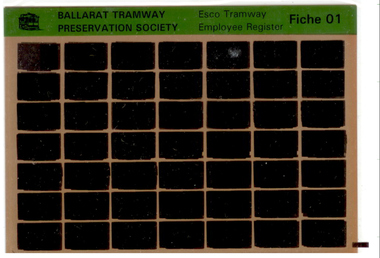
Film - Microfiche, Nova Micrographics, "ESCo Tramway Employee Register", Jun. 1994
Yields information about the ESCo employees register that was donated to the Museum, c1990. Microfiche of this register., Yields information about the ESCo employees register that was donated to the Museum, c1990. Microfiche of this register.Set of 3 microfiche, each in a plastic envelope of the ESCo Employee Register (Reg Item 100), made by Nova Micrographics, North Carlton, early 1994. 10 Copies made, one to Alan Bradley and one to Ballarat Genealogical society 10/1994. Each Microfiche has the heading "Ballarat Tramway Preservation Society, "ESCo Tramway Employee Register" and Fiche No on the right hand edge. Each set of fiche contained within a separate plastic envelope. One set of fiche transferred to Melbourne and held in the negative file - Ntrams, tramways, esco, employees, crews, personnel -
 Ballarat Tramway Museum
Photograph - Black & White Photograph/s, Keith Kings, 30/01/2956 12:00:00 AM
Black and White Photograph of SEC Bendigo Birney 27 in McCrae St and Arnold St, 30/1/1956. Has destination of North Bendigo, and the hotel in the background. Photo Keith Kings, number R(q)(8) Stamp in top right hand corner and handwritten number with "K.S. Kings No. R(q)(8) Copyright reserved". In black ink "Bendigo / Birney 27 in McCrae St and Arnold St, (Now Tramways Avenue) 30/1/1956. On front of photograph in bottom left hand corner, white dot with number "19"trams, tramways, bendigo, birney, mccrae st, tram 27 -
 Ballarat Tramway Museum
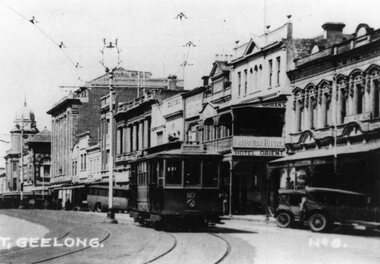
Photograph - Black & White Photograph/s - set of 2, late 1920's, early 1930's
Yields information about the appearance of Geelong's Birney trams during the 1940's.Black and White Photograph of Geelong No. 10, Malop St, travelling north west to the railway station, during the late 1920s, between Gheringhap and Moorabool St. Tram has the destination of "Station", with the National Mutual, Moran's Hotel Orient in the background. Melbourne Bitter advertisement on the hotel. A number of soft top cars parked in the street. Photo probably from a postcard, has the words "T. Geelong. No. 8" along part of the bottom edge. Photo from the Peter Duckett Collection. For a close up of the tram itself see Reg Item 5822. 4335.1 - Black and White print contained within the Wal Jack Bendigo and Geelong Album, see Reg Item 5003 for more details. Added 7/8/2013. This item is the larger image of the two.On rear, stamped in black ink "Photo supplied from P.W. Duckett Collection, All Rights Reserved, 69 Howitt Rd. Nth Caulfield 3161." In hand writing on the rear "47)" in top left hand corner. In the body of the photograph "Malop St travelling NW to Station, between Gheringhap and Moorabool Sts." 4335.1 - in ink on rear. "Geelong No. 10 Original Condition, photo about 1930" and "Please Return"trams, tramways, geelong, malop st, mesco, tram 10 -
 Ballarat Tramway Museum
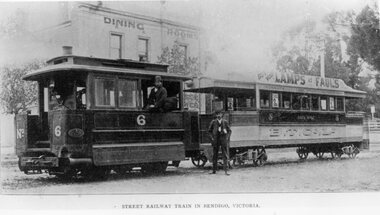
Photograph - Black & White Photograph/s, Peter Duckett, late 1890's?
Yields information about the appearance of Bendigo Birney trams during the 1950's, possibly during enthusiast tour.Black and White Photograph of Bendigo steam tram motor No. 2 and bogie trailer No. 5, 1890's?, photographed with a building marked "Dining Rooms" in the background. Has the driver in the steam tram motor and the conductor standing alongside. Trailer marked "B.T.Co. Ltd", possibly around the turn of the century. Earlier photos have the full company name. Trailer has roof advertisement "Buy your Lamps at Faull's" - oil? or electric? Taken from a postcard or a magazine - has the caption "Street Railway Train in Bendigo, Victoria", possibly North American origin given the language. Peter Duckett Collection.On the front, top left hand corner of the print "26" in ink within a circle. On rear, stamped in black ink "Photo supplied from P.W. Duckett Collection, All Rights Reserved, 69 Howitt Rd. Nth Caulfield 3161." On rear in ink "Motor 6 and Trailer 5" and a "William F Scott" address label.trams, tramways, bendigo, steam tram motors, trailers, tram 6, tram 5 -
 Ballarat Tramway Museum
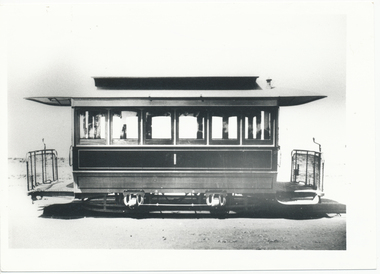
Photograph - Black & White Photograph/s, 1890's
Demonstrates the nature of working of the horse trams in Ballarat when at times three horses were required to take trams from Grenville St to Lydiard St. Yields information about the dress of Gentlemen at the time and the buildings behind the tramcar..Black and White photograph of North Sydney cable tram trailer, No. 1, side on view. From the CB Thomas Collection and published in Sydney tram books. Hi Res of image added 15/7/2014. On rear in ink, cropping marks in the top edge. Along the bottom edge "Trailers of this type were converted to electric cars for the Electric Supply Co. of Victoria tramways in Ballarat. The trailers were from the North Sydney cable try of the early 1890's" and "Nth Sydney cable trailer No. 1, Late CB Thomas collection". "KM2" and a blue sticker with "9" written on it.trams, tramways, cable trams, sydney, esco, tram 1 -
 Ballarat Tramway Museum
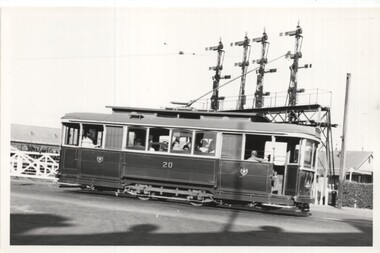
Photograph - Black & White - Tram 20 at Railway level crossing, Keith Kings, 22/1/1955
Shows trams at the Lydiard St level crossing gates and the signal gantry.Yields information about Ballarat tram No. 20 and the locationBlack and White photograph of SEC Ballarat tram No. 20 crossing the railway level crossing in Lydiard St North. Has the signal gantry in the background. Photo by Keith Kings 22/1/1955.On rear has the photographers file number (M)(d)(3)ballarat, lydiard st north, level crossing, railway station, tram 20 -
 Ballarat Tramway Museum
Administrative record - Hansard Extract, "Public Transport at Bendigo and Ballarat", 12/3/1970
Illustrates questions in Parliament about the possibility of closure of the Ballarat and Bendigo systemYields information about the mooted closure of the SEC in Parliament, questions and concession fares.Hansard Extract - two sheets - titled "Public Transport at Bendigo and Ballarat", Question in Parliament from Mr Trezise (Geelong North) to the Minister of Transport Mr Wilcox, regarding the possible abolition of public transport in Ballarat on 12/3/1970. Also a second question regarding concession fares which had been removed when Geelong closed.parliament, tramway closure, ballarat, bendigo -
 Ballarat Tramway Museum
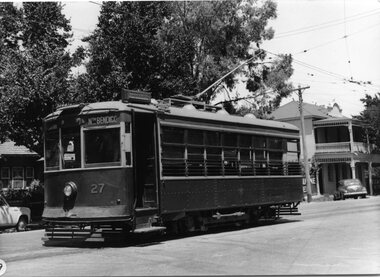
Photograph - Black & White - set of 2 - Ballarat Tram 31, Bob Lilburn, 1950's
Shows the appearance of Ballarat tram 31 during the 1950's.Yields information about the tram appearance during the 1950's prior to being fitted with dash canopy lighting.Black & White Photograph of Ballarat Tram 31 - pre 1960 .1 - At the Lydiard St North terminus .2 - Sturt St at the city terminus.Has notes re location and tram on the rear in ink.ballarat, sturt st, lydiard st north, tram 31, tramways, trams -
 Ballarat Tramway Museum
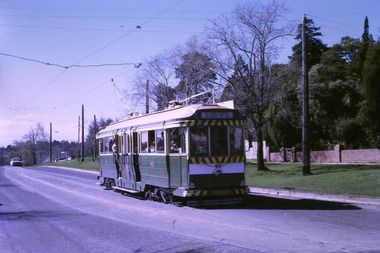
Photograph - Black & White - Series of four photographs of Ballarat tram 39 on tour 1950's, Bob Lilburn, 1950's
Shows the appearance of Ballarat tram 39 at various locations while on a Special tour.Yields information about the tram appearance during the 1950's prior to being fitted with dash canopy lighting.Series of four Black & White Photographs of Ballarat Tram 39 - pre 1960 .1 - at the View Point terminus .2 - at Lydiard St North terminus - two people standing by the tram - the gent could be the photographer. .3 - at the tram depot .4 - at the Gardens terminus in Wendouree Parade. Has notes re location and tram on the rear in ink.ballarat, wendouree parade, view point, lydiard st north, tram 39, tramways, trams -
 Ballarat Tramway Museum
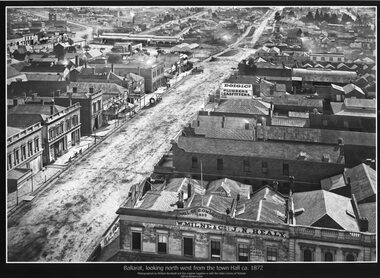
Photograph - Black & White copy, William Bardell, "Ballarat looking north west from the Town Hall ca 1872"
Original photograph by William Bardwell, with the original image held by the State Library of Victoria. Edited by Richard Conn. Purchased by the Museum.Provides information about the appearance of Armstrong St from the Town Hall. Shows the topography of the area, along with many buildings, including W Milne & Cp and J N Healy in the Hall of Commerce and Doig & Co, Plumbers and Gasfitters.Black & White copy photograph aerial view A4 size, titled ""Ballarat looking north west from the Town Hall ca 1872" looking along Armstrong St. Original photo by William Bardwell.ballarat, armstrong st, w milne & co, doig&co, j n healy -
 Ballarat Tramway Museum
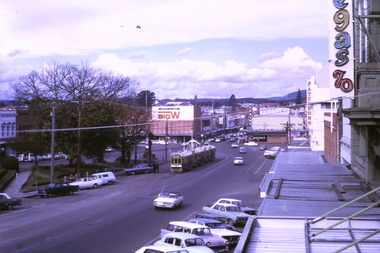
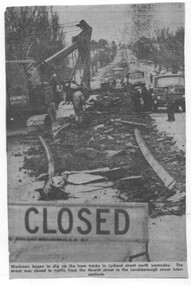
Newspaper - Cutting - track removal Ballarat 1972, The Courier Ballarat
The newspaper cutting shows the nature of the track removal in Lydiard St North, Ballarat following closure of the SEC operated tramway system. Cutting not dated. Date based on an Tender advert on the rear, July 1972.Demonstrates the method of track removal, most likely by the Country Roads Board July 1972 Cutting from The Courier, Ballarat.Newspaper cutting - Cutting - track removal Ballarat 1972, Lydiard St North. track removal, lydiard st north, ballarat, tramways -
 Ballarat Tramway Museum
Photograph - Series of 9 black and white photographs of Ballarat trams, Ellen Butland, 1971
.1 - No. 27 in Lydiard St North at Sturt St. .2 - Scene at Railway station in Lydiard St North following arrival of the ARHS tour train. .3 - Nos. 27, 42, 11 at Sebastopol terminus. .4 - No. 42 in Sturt St .5 - Nos. 27, 42, 11 at Sebastopol terminus. .6 - No. 11 in Sturt St .7 - No. 27 crossing Albert St Sebastopol. .8 - No. 42 in Lydiard St North at Sturt St. .9 - Nos. 27, 42, 11 at Lydiard St. North terminus. Note: - some of the captions under the photos have the wrong locations.Has a strong association with a Melbourne tram driver who assembled the scrap book and series of photos of Ballarat trams at the time of closure. Yields information about the tram operations.Set of nine black and white photographs contained with Reg item 5988, a Stamford Kiwi School Scrap Book - prepared by Ellen Butland of Auckland following the closure of the SEC Ballarat Tramway system."Ballarat, Australia 21-9-71" in ink along the top edge of the sheet.trams, tramways, ballarat, sturt st, sebastopol, tram 27, railway station, tram 42, tram 11 -
 Ballarat Tramway Museum
Photograph - Series of 7 black and white photographs of Ballarat trams, Ellen Butland, 1971
.1 - Nos. 27, 42, at Lydiard St. North terminus. .2 - No. 11 at Lydiard St North terminus .3 - Nos. 27, 42, 11 at Lydiard St. North terminus. .4 - Controls of No. 11 with keys in position .5 - Scene at Railway Station after touring the system .6 - Interior photo of No. 11 .7 - Second convoy at Railway Station unloading - includes No. 39 Note: - some of the captions under the photos have the wrong locations.Has a strong association with a Melbourne tram driver who assembled the scrap book and series of photos of Ballarat trams at the time of closure. Yields information about the tram operations.TRAMSet of seven black and white photographs contained with Reg item 5988, a Stamford Kiwi School Scrap Book - prepared by Ellen Butland of Auckland following the closure of the SEC Ballarat Tramway system.closure, arhs, tours, trams, tramways, ballarat, sturt st, lydiard st nth, sebastopol, tram 27, tram 42, tram 11, tram 39, interiors -
 Ballarat Tramway Museum
Photograph - Series of 6 black and white photographs of Ballarat Trams, Ellen Butland, 1970 and 1971
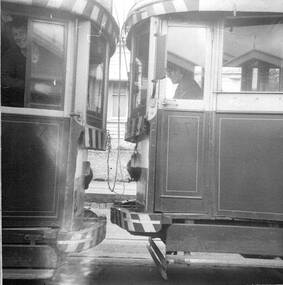
.1 - Close up photo of a single trucker and a bogie tram showing difference in bumper heights. .2 - Photo showing the front of a single trucker (No. 26?) with the motorman leaning out the small window with a cigarette in hand. Photo dated 1970. .3 - No. 34 parked on "0" road. Photo dated 1971. .4 - Similar to .2, driver looking at photographer. .5 - Bogie tram parked on "0" road, photo dated 1970. .6 - No. 27 at Lydiard St North terminus - photo dated 1970. Has a strong association with a Melbourne tram driver who assembled the scrap book and series of photos of Ballarat trams at the time of closure. Yields information about the tram operations.Set of six black and white photographs contained with Reg item 5988, a Stamford Kiwi School Scrap Book - card covers, 23 sheets, spiral bound, titled "Ballarat", prepared by Ellen Butland of Auckland following the closure of the SEC Ballarat Tramway system.closure, trams, tramways, ballarat, lydiard st nth, tram 34, tram 27, depot, crews, motormen