Showing 2117 items matching "loading"
-
 Flagstaff Hill Maritime Museum and Village
Domestic object - Wine Glass Stem and Base, ca 1878
The wine glass has been handblown, as shown by the ripple effect in the stem and base. A brief history of the Loch Ard (1873-1878): - The sailing ship Loch Ard was one of the famous Loch Line ships that sailed from England to Australia. Barclay, Curdle and Co. built the three-masted iron vessel in Glasgow in 1873. It had sailed three trips to Australia and one trip to Calcutta before its fateful voyage. Loch Ard left England on March 2, 1878, under the command of recently married, 29-year-old Captain Gibbs. It was bound for Melbourne with a crew of 37, plus 17 passengers. The general cargo reflected the affluence of Melbourne at the time. Onboard were straw hats, umbrellas, perfumes, clay pipes, pianos, clocks, confectionery, linen and candles, and a heavier load of railway irons, cement, lead and copper. Other cargo included items intended for display in the Melbourne International Exhibition of 1880. The Loch Ard had been sailing for three months and was close to its destination on June 1, 1878. Captain Gibbs had expected to see land at about 3 am but the Loch Ard ran into a fog that greatly reduced visibility and there was no sign of land or the Cape Otway lighthouse. The fog lifted at 4 am and the sheer cliffs of Victoria's west coast were much closer to them than Captain Gibbs expected. He tried to manage the vessel but failed and the ship struck a reef at the base of Mutton Bird Island, near Port Campbell. The top deck loosened from the hull, and the masts and rigging crashed down, knocking passengers and crew overboard. The lifeboat was launched by Tom Pearce but crashed into the side of Loch Ard and capsized. He clung onto its overturned hull and sheltered under it. He drifted out to sea and the tide brought him back to what is now called Loch Ard Gorge. He swam to shore and found a cave for shelter. A passenger, Eva Carmichael, had raced onto the deck to find out what was happening and was confronted by towering cliffs above the ship. She was soon swept off the ship by a huge wave. Eva saw Tom Pearce on a small rocky beach and yelled to attract his attention. He swam out and dragged her to the shelter of the cave. He revived her with a bottle of brandy from a case that had washed up on the beach. Tom scaled a cliff in search of help and followed some horse hoof prints. He came from two men from Glenample Station, three and a half miles away. He told the men of the tragedy and then returned to the gorge while the two men rode back to the station to get help. They reached Loch Ard Gorge and took the two shipwreck survivors to Glenample Station to recover. Eva stayed at the station for six weeks before returning to Ireland by steamship. In Melbourne, Tom Pearce received a hero's welcome and was presented with a medal and some money. Of the 54 crew members and passengers on board, only two survived: the apprentice, Tom Pearce and the young woman passenger, Eva Carmichael, who lost her family in the tragedy. The shipwreck of the Loch Ard is of significance for Victoria and is registered on the Victorian Heritage Register ( S 417). Flagstaff Hill has a varied collection of artefacts from Loch Ard and its collection is significant for being one of the largest accumulation of artefacts from this notable Victorian shipwreck. The collections object is to also give us a snapshot into history so we are able to interpret the story of this tragic event. The collection is also archaeologically significant as it represents aspects of Victoria's shipping history that allows us to interpret Victoria's social and historical themes of the time. The collections historically significance is that it is associated unfortunately with the worst and best-known shipwreck in Victoria's history. Wine glass part, stem and base only. Glass has been hand blown. Recovered from the Loch Ard wreck.Noneflagstaff hill, warrnambool, shipwrecked coast, flagstaff hill maritime museum, maritime museum, shipwreck coast, flagstaff hill maritime village, great ocean road, loch line, loch ard, captain gibbs, eva carmichael, tom pearce, glenample station, mutton bird island, loch ard gorge, wine glass, handmade drinking glass, blown glass -
 Flagstaff Hill Maritime Museum and Village
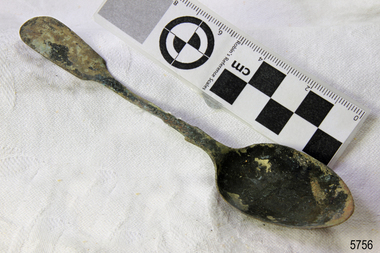
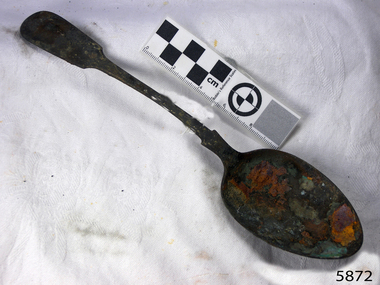
Domestic object - Spoon, c. 1878
Unrestored tea spoon from the wreck of the LOCH ARD. The spoon design has a flattened fiddle-back handle, with a thin stem or shank, flared collar, and elongated bowl. The spoons metallic composition is a thin layer of brass alloy which has partially corroded back to a nickel-silver base metal. HISTORY OF THE LOCH ARD The LOCH ARD belonged to the famous Loch Line which sailed many ships from England to Australia. Built in Glasgow by Barclay, Curdle and Co. in 1873, the LOCH ARD was a three-masted square rigged iron sailing ship. The ship measured 262ft 7" (79.87m) in length, 38ft (11.58m) in width, 23ft (7m) in depth and had a gross tonnage of 1693 tons. The LOCH ARD's main mast measured a massive 150ft (45.7m) in height. LOCH ARD made three trips to Australia and one trip to Calcutta before its final voyage. LOCH ARD left England on March 2, 1878, under the command of Captain Gibbs, a newly married, 29 year old. She was bound for Melbourne with a crew of 37, plus 17 passengers and a load of cargo. The general cargo reflected the affluence of Melbourne at the time. On board were straw hats, umbrella, perfumes, clay pipes, pianos, clocks, confectionary, linen and candles, as well as a heavier load of railway irons, cement, lead and copper. There were items included that intended for display in the Melbourne International Exhibition in 1880. The voyage to Port Phillip was long but uneventful. At 3am on June 1, 1878, Captain Gibbs was expecting to see land and the passengers were becoming excited as they prepared to view their new homeland in the early morning. But LOCH ARD was running into a fog which greatly reduced visibility. Captain Gibbs was becoming anxious as there was no sign of land or the Cape Otway lighthouse. At 4am the fog lifted. A man aloft announced that he could see breakers. The sheer cliffs of Victoria's west coast came into view, and Captain Gibbs realised that the ship was much closer to them than expected. He ordered as much sail to be set as time would permit and then attempted to steer the vessel out to sea. On coming head on into the wind, the ship lost momentum, the sails fell limp and LOCH ARD's bow swung back. Gibbs then ordered the anchors to be released in an attempt to hold its position. The anchors sank some 50 fathoms - but did not hold. By this time LOCH ARD was among the breakers and the tall cliffs of Mutton Bird Island rose behind the ship. Just half a mile from the coast, the ship's bow was suddenly pulled around by the anchor. The captain tried to tack out to sea, but the ship struck a reef at the base of Mutton Bird Island, near Port Campbell. Waves broke over the ship and the top deck was loosened from the hull. The masts and rigging came crashing down knocking passengers and crew overboard. When a lifeboat was finally launched, it crashed into the side of LOCH ARD and capsized. Tom Pearce, who had launched the boat, managed to cling to its overturned hull and shelter beneath it. He drifted out to sea and then on the flood tide came into what is now known as LOCH ARD Gorge. He swam to shore, bruised and dazed, and found a cave in which to shelter. Some of the crew stayed below deck to shelter from the falling rigging but drowned when the ship slipped off the reef into deeper water. Eva Carmichael had raced onto deck to find out what was happening only to be confronted by towering cliffs looming above the stricken ship. In all the chaos, Captain Gibbs grabbed Eva and said, "If you are saved Eva, let my dear wife know that I died like a sailor". That was the last Eva Carmichael saw of the captain. She was swept off the ship by a huge wave. Eva saw Tom Pearce on a small rocky beach and yelled to attract his attention. He dived in and swam to the exhausted woman and dragged her to shore. He took her to the cave and broke open case of brandy which had washed up on the beach. He opened a bottle to revive the unconscious woman. A few hours later Tom scaled a cliff in search of help. He followed hoof prints and came by chance upon two men from nearby Glenample Station three and a half miles away. In a state of exhaustion, he told the men of the tragedy. Tom returned to the gorge while the two men rode back to the station to get help. By the time they reached LOCH ARD Gorge, it was cold and dark. The two shipwreck survivors were taken to Glenample Station to recover. Eva stayed at the station for six weeks before returning to Ireland, this time by steamship. In Melbourne, Tom Pearce received a hero's welcome. He was presented with the first gold medal of the Royal Humane Society of Victoria and a £1000 cheque from the Victorian Government. Concerts were performed to honour the young man's bravery and to raise money for those who lost family in the LOCH ARD disaster. Of the 54 crew members and passengers on board, only two survived: the apprentice, Tom Pearce and the young woman passenger, Eva Carmichael, who lost all of her family in the tragedy. Ten days after the LOCH ARD tragedy, salvage rights to the wreck were sold at auction for £2,120. Cargo valued at £3,000 was salvaged and placed on the beach, but most washed back into the sea when another storm developed. The wreck of LOCH ARD still lies at the base of Mutton Bird Island. Much of the cargo has now been salvaged and some was washed up into what is now known as LOCH ARD Gorge. Cargo and artefacts have also been illegally salvaged over many years before protective legislation was introduced. One of the most unlikely pieces of cargo to have survived the shipwreck was a Minton porcelain peacock - one of only seven in the world. The peacock was destined for the Melbourne International Exhibition in 1880. It had been well packed, which gave it adequate protection during the violent storm. Today, the Minton peacock can be seen at the Flagstaff Hill Maritime Museum in Warrnambool. From Australia's most dramatic shipwreck it has now become Australia's most valuable shipwreck artefact and is one of very few 'objects' on the Victorian State Heritage Register. The LOCH ARD shipwreck is of State significance – Victorian Heritage Register S 417. Flagstaff Hill’s collection of artefacts from LOCH ARD is significant for being one of the largest collections of artefacts from this shipwreck in Victoria. It is significant for its association with the shipwreck, which is on the Victorian Heritage Register (VHR S417). The collection is significant because of the relationship between the objects, as together they have a high potential to interpret the story of the LOCH ARD. The LOCH ARD collection is archaeologically significant as the remains of a large international passenger and cargo ship. The LOCH ARD collection is historically significant for representing aspects of Victoria’s shipping history and its potential to interpret sub-theme 1.5 of Victoria’s Framework of Historical Themes (living with natural processes). The collection is also historically significant for its association with the LOCH ARD, which was one of the worst and best known shipwrecks in Victoria’s history. Unrestored tea spoon from the wreck of the LOCH ARD. The spoon design has a flattened fiddle-back handle, with a thin stem or shank, flared collar, and elongated bowl. The spoons metallic composition is a thin layer of brass alloy which has partially corroded back to a nickel-silver base metal. Approximately 35% of original electroplating remains, with some verdigris. Outlines of three makers marks are visible on the lower rear of handle (Circle, Circle, Diamond) and details of one are legible (Maltese Cross).flagstaff hill maritime museum, shipwreck coast, great ocean road, loch line, loch ard, mutton bird island, electroplated cutlery, loch ard shipwreck, nickel silver, william page & co, birmingham, brass plating, makers marks -
 Flagstaff Hill Maritime Museum and Village
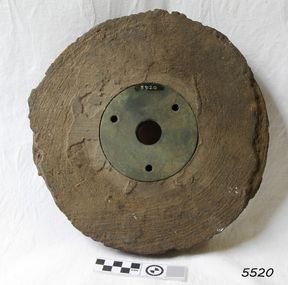
Functional object - Pulley Sheave, 1873
A sheave is a pulley with a grooved wheel for holding a belt, wire rope, or rope. The grooved wheel spins on an axle or bearing inside the frame of the block. This allows the wire or rope to move freely minimizing friction and wear on the cable. Sheaves can be used to redirect a cable or rope, lift loads, and transmit power. The words sheave and pulley are sometimes used interchangeably. The sheave was recovered at the time of the discovery of the Loch Ard wreck site in the 1970s. History of the Loch Ard: The Loch Ard got its name from ”Loch Ard” a loch that lies to the west of Aberfoyle, and the east of Loch Lomond. It means "high lake" in Scottish Gaelic. The vessel belonged to the famous Loch Line which sailed many vessels from England to Australia. The Loch Ard was built in Glasgow by Barclay, Curdle and Co. in 1873, the vessel was a three-masted square-rigged iron sailing ship that measured 79.87 meters in length, 11.58 m in width, and 7 m in depth with a gross tonnage of 1693 tons with a mainmast that measured a massive 45.7 m in height. Loch Ard made three trips to Australia and one trip to Calcutta before its fateful voyage. Loch Ard left England on March 2, 1878, under the command of 29-year-old Captain Gibbs, who was newly married. The ship was bound for Melbourne with a crew of 37, plus 17 passengers. The general cargo reflected the affluence of Melbourne at the time. Onboard were straw hats, umbrellas, perfumes, clay pipes, pianos, clocks, confectionery, linen and candles, as well as a heavier load of railway irons, cement, lead and copper. There were other items included that were intended for display in the Melbourne International Exhibition of 1880. The voyage to Port Phillip was long but uneventful. Then at 3 am on June 1, 1878, Captain Gibbs was expecting to see land. But the Loch Ard was running into a fog which greatly reduced visibility. Captain Gibbs was becoming anxious as there was no sign of land or the Cape Otway lighthouse. At 4 am the fog lifted and a lookout aloft announced that he could see breakers. The sheer cliffs of Victoria's west coast came into view, and Captain Gibbs realised that the ship was much closer to them than expected. He ordered as much sail to be set as time would permit and then attempted to steer the vessel out to sea. On coming head-on into the wind, the ship lost momentum, the sails fell limp and Loch Ard's bow swung back towards land. Gibbs then ordered the anchors to be released in an attempt to hold their position. The anchors sank some 50 fathoms - but did not hold. By this time the ship was among the breakers and the tall cliffs of Mutton Bird Island rose behind. Just half a mile from the coast, the ship's bow was suddenly pulled around by the anchor. The captain tried to tack out to sea, but the ship struck a reef at the base of Mutton Bird Island, near Port Campbell. Waves subsequently broke over the ship and the top deck became loosened from the hull. The masts and rigging came crashing down knocking passengers and crew overboard. When a lifeboat was finally launched, it crashed into the side of Loch Ard and capsized. Tom Pearce, who had launched the boat, managed to cling to its overturned hull and shelter beneath it. He drifted out to sea and then on the flood tide came into what is now known as Loch Ard Gorge. He swam to shore, bruised and dazed, and found a cave in which to shelter. Some of the crew stayed below deck to shelter from the falling rigging but drowned when the ship slipped off the reef into deeper water. Eva Carmichael a passenger had raced onto the deck to find out what was happening only to be confronted by towering cliffs looming above the stricken ship. In all the chaos, Captain Gibbs grabbed Eva and said, "If you are saved Eva, let my dear wife know that I died like a sailor". That was the last Eva Carmichael saw of the captain. She was swept off the ship by a huge wave. Eva saw Tom Pearce on a small rocky beach and yelled to attract his attention. He dived in and swam to the exhausted woman and dragged her to shore. He took her to the cave and broke the open case of brandy which had washed up on the beach. He opened a bottle to revive the unconscious woman. A few hours later Tom scaled a cliff in search of help. He followed hoof prints and came by chance upon two men from nearby Glenample Station three and a half miles away. In a complete state of exhaustion, he told the men of the tragedy. Tom then returned to the gorge while the two men rode back to the station to get help. By the time they reached Loch Ard Gorge, it was cold and dark. The two shipwreck survivors were taken to Glenample Station to recover. Eva stayed at the station for six weeks before returning to Ireland by steamship. In Melbourne, Tom Pearce received a hero's welcome. He was presented with the first gold medal of the Royal Humane Society of Victoria and a £1000 cheque from the Victorian Government. Concerts were performed to honour the young man's bravery and to raise money for those who lost family in the disaster. Of the 54 crew members and passengers on board, only two survived: the apprentice, Tom Pearce and the young woman passenger, Eva Carmichael, who lost her family in the tragedy. Ten days after the Loch Ard tragedy, salvage rights to the wreck were sold at auction for £2,120. Cargo valued at £3,000 was salvaged and placed on the beach, but most washed back into the sea when another storm developed. The wreck of Loch Ard still lies at the base of Mutton Bird Island. Much of the cargo has now been salvaged and some items were washed up into Loch Ard Gorge. Cargo and artefacts have also been illegally salvaged over many years before protective legislation was introduced in March 1982. One of the most unlikely pieces of cargo to have survived the shipwreck was a Minton majolica peacock- one of only nine in the world. The peacock was destined for the Melbourne 1880 International Exhibition. It had been well packed, which gave it adequate protection during the violent storm. Today the Minton peacock can be seen at the Flagstaff Hill Maritime Museum in Warrnambool. From Australia's most dramatic shipwreck it has now become Australia's most valuable shipwreck artifact and is one of very few 'objects' on the Victorian State Heritage Register. The shipwreck of the Loch Ard is of significance for Victoria and is registered on the Victorian Heritage Register ( S 417). Flagstaff Hill has a varied collection of artefacts from Loch Ard and its collection is significant for being one of the largest accumulation of artefacts from this notable Victorian shipwreck. The collections object is to also give us a snapshot into history so we can interpret the story of this tragic event. The collection is also archaeologically significant as it represents aspects of Victoria's shipping history that allows us to interpret Victoria's social and historical themes of the time. The collections historically significance is that it is associated unfortunately with the worst and best-known shipwreck in Victoria's history. Pulley sheave; round wooden block with metal disc in centre. Metal disc has large central machined hole and three equidistant small holes closer to the edge. Part of the rope groove is uneven. Recovered from the wreck of the Loch Ard. Noneflagstaff hill, warrnambool, shipwrecked coast, flagstaff hill maritime museum, maritime museum, shipwreck coast, flagstaff hill maritime village, great ocean road, loch line, loch ard, captain gibbs, eva carmichael, tom pearce, glenample station, mutton bird island, loch ard gorge, pulley sheave, pulley, ship rigging -
 Flagstaff Hill Maritime Museum and Village
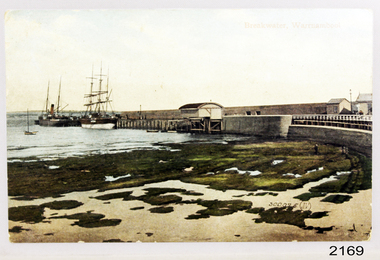
Postcard - Coastal Scene, Joseph Jordan Photographic Studio, Breakwater, Warrnambool, circa 1907
The Port of Warrnambool - In the early years the Port of Warrnambool was a busy port. Steamships and sailing ships were frequent visitors to the port. Steam navigation companies were plentiful, carrying passengers and freighting cargo such as coal, timber, food, livestock, furniture, hardware and haberdashery between Melbourne and the ports along the southwest coast of Victoria, including Warrnambool. The carts would take their loads into the township for distribution. The Breakwater was built (using 32 ton blocks of concrete) between 1874 and 1890 to provide ships with greater protection from the Southern Ocean. The Lifeboat and Rocket House - The coastline of South West Victoria has had over 600 shipwrecks and many lost lives; even in Warrnambool’s Lady Bay there were around 16 known shipwrecks between 1850 and 1905, with eight lives lost. In 1859 the first Government-built lifeboat arrived at Warrnambool Harbour and a shed was soon built to house it, followed in 1864 by a rocket house to safely store the Rocket Rescue equipment. In 1878 the buildings were moved to the Breakwater area, and in 1910 the new Lifeboat Warrnambool arrived with its ‘self-righting’ design. For almost one hundred years the lifeboat and rocket crews, mostly local volunteers, trained regularly to maintain and improve their skills, summoned when needed by alarms, gunshots, ringing bells and foghorns. Some became local heroes but all served an important role. By the end of the 1950s the lifeboat and rescue equipment had become obsolete. Joseph Jordan - Joseph Jordan was born in 1841 in Leicester England. When he was 16 he joined the 7th Queen's Own Hussars and was sent to India at the outbreak of the mutiny. He took part in the relief of Lucknow and remained in India for eleven years. It was during this time, he became interested in photography. He was posted to New Zealand and later came to Victoria, becoming a sergeant major of the Mounted Rifles. In the mid 1880s he came to the Western district where he was responsible for establishing units of the Mounted Rifles in various country towns such as Dunkeld, Mortlake, Panmure, Bushfield, Koroit etc. He resigned from the army in 1889 and set up a professional photography studio in Liebig Street, Warrnambool. He became very well known in the Western District for family photographs, official photographs of local councillors and groups as well as views of local scenery. In 1891 he photographed the wrecked barque "Fiji" at "Wrecks Beach" near Princetown. His business was taken over by his son Arthur around 1917. Joseph was a keen rifle shot and in 1924 he donated the "Jordan Shield" as a prize to the Victorian Rifle Association. He was made a "Life Honorary Member" of the Warrnambool Returned Soldiers League and in 1933 he was recognised as being the oldest living soldier in Victoria. Joseph died in 1935 aged 95. Valentine Publishing Company Pty. Ltd. Valentine and Sons was a printing and photography business based in Dundee, Scotland and Canada. In the early 1900's, at the height of the postcard craze, they published large numbers of postcards in the U.K., Canada, U.S., Australia and South Africa. Valentine postcards have a 6 digit serial number on the view side with the initials "J. V." in a circle adjacent to the number. The 300,000's related to views of Australia. From around 1900 (or earlier) the firm bought many images for their postcards from local and national photographers who sold publishing rights to Valentines.This postcard is significant for its association with the Port of Warrnambool and the Warrnambool Breakwater as it shows a point in time when shipping activities were an important part of Warrnambool's commerce and social development. It is also a record of the Warrnambool Lifeboat and Rocket house which was important in aiding ordinary citizens, harbour employees and the volunteer boat and rescue crew in saving the lives of sailors and passengers due to the high number of shipwrecks that occurred along the coastline. Joseph Jordan is a significant figure in Warrnambool history as he helped to establish early units of the Mounted Rifles (G Company) in local towns during the late 1880's and later, photographed local scenes, groups and citizens of early Warrnambool. It is also a culturally significant example of the type of postcards that were very popular in the early part of the 20th century.Photograph of breakwater from beachFront of card - Breakwater, Warrnambool / 300,025 J.V [in a circle] Back of card - POSTCARD / VALENTINE'S SERIES / - This space may be used for communication / The address only to be written here - Miss Alice Griffen / Howard St / Warrnambool - How are you enjoying your holiday we are grand. / from / Dodo, Dodo, Dodo with love - Leura? / Marjory Craig? / BL006 / R99A / REG NO 2169flagstaff hill, warrnambool, shipwrecked-coast, flagstaff-hill, flagstaff-hill-maritime-museum, maritime-museum, photograph, warrnambool breakwater, breakwater, shipwreck-coast, flagstaff-hill-maritime-village, warrnambool harbour, postcard, joseph jordan, valentine and sons, valentine publishing company, lady bay, life boat house, rocket house, steam ship, barque, jordan photography -
 Flagstaff Hill Maritime Museum and Village
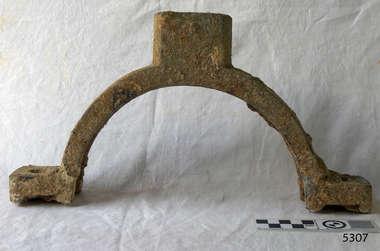
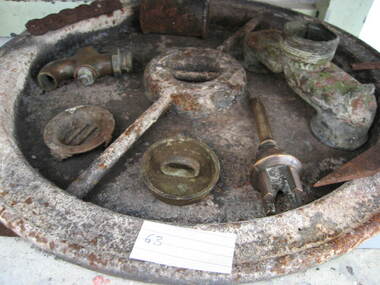
Bearing cap, (estimated); Before The Newfield completion in 1889
This bearing cap is thought to be from a donkey winch engine, (or steam donkey, or donkey winch), which is a small secondary steam engine with a cylindrical shaped boiler. In 19th century merchant sailing a steam donkey was often used in marine applications such as to help raise and lower larger sails, load and unload cargo or to power pumps. The bearing cap could have been used on the donkey engine to hold the rod of the winch gear wheel in place, or bolted to another bearing cap around the neck on the top of the boiler’s cylinder, connecting it to the flue. The Newfield was a three-masted iron and steel barque, built in Dundee, Scotland, in 1889 by Alexander Stephen and Sons. It was owned by the Newfield Ship Company in 1890 and later that year It was registered in Liverpool to owners Brownells and Co. The Newfield left Sharpness, Scotland, on 28th May 1892 with a crew of 25 under the command of Captain George Scott and on 1st June left Liverpool. She was bound for Brisbane, Australia, with a cargo of 1850 tons of fine rock salt, the main export product of Sharpness. At about 9pm on 28th August 1892, in heavy weather, Captain Scott sighted, between heavy squalls, the Cape Otway light on the mainland of Victoria but, due to a navigational error (the ship’s chronometers were wrong), he assumed it to be the Cape Wickham light on King Island, some 40 miles south. He altered his course to the north, expecting to enter Bass Strait. The ship was now heading straight for the south west Victorian coast. At about 1:30am the Newfield ran aground on a reef about 100 yards from shore and one mile east of Curdie’s Inlet, Peterborough. The ship struck heavily three times before grounding on an inner shoal with 6 feet of water in the holds. Rough sea made the job of launching lifeboats very difficult. The first two lifeboats launched by the crew were smashed against the side of the ship and some men were crushed or swept away. The third lifeboat brought eight men to shore. It capsized when the crew tried to return it to the ship for further rescue The rescue was a difficult operation. The Port Campbell Rocket Crew arrived and fired four rocket lines, none of which connected with the ship. Peter Carmody, a local man, volunteered to swim about one mile off shore to the ship with a line to guide the fourth and final lifeboat safely to shore. He was assisted by James McKenzie and Gerard Irvine. Seventeen men survived the shipwreck but the captain and eight of his crew perished. The Newfield remained upright on the reef with sails set for a considerable time as the wind slowly ripped the canvas to shreds and the sea battered the hull to pieces. The Marine Board inquiry found the wreck was caused by a "one man style of navigation" and that the Captain had not heeded the advice of his crew. According to Jack Loney ‘… when the drama was over . . the Newfield was deserted except for the Captain’s dog and two pigs.’ Peter Carmody was awarded the Bramley-Moore medal by the Liverpool Shipwreck and Humane Society for Saving Life at Ssea, which he received by mail on January 21st 1893. The medal and a letter of congratulations were donated to Flagstaff Hill Maritime Museum by Peter Carmody’s grand-daughter Norma Bracken and her son Stuart Bracken on 25th May 2006. The Bearing Cap joins other items in the Newfield collection.Flagstaff Hill’s collection of artefacts from the Newfield is significant for its association with the shipwreck Newfield, which is listed on the Victorian Heritage Registry. The collection is significant because of the relationship between the objects. The Newfield collection is archaeologically significant as the remains of an international cargo ship. The Newfield collection is historically significant for representing aspects of Victoria’s shipping history and its association with the shipwreck.Brass bearing cap from the wreck of the sailing ship “Newfield” is possibly from a donkey winch engine. The half-circle shaped cuff with a rectangular brass block attached to the outside of each end of the half-circle. Both blocks have a round hole in their centre and are approximately the same depth and width as the cuff. Midway around the half-circle cuff is another brass block that is about twice the depth of the cuff. It appears to have been a circular shape that has been modified to match the width of the collar, having had the sides of the circle cut off to leave straights edge parallel to the edges of the cuff. In the centre of this block is another hole, and there appears to be the head of a bolt inside this hole. The bearing cap is lightly encrusted.1893, flagstaff hill, flagstaff hill maritime museum, maritime museum, warrnambool, newfield, 1892, 28 august 1892, port campbell, shipwreck, nineteenth century, ship, curdie s river, victorian shipwrecks, barque, ship wreck, 29 august 1892, 19th century, bearing cap, donkey engine, donkey winch, steam donkey -
 Flagstaff Hill Maritime Museum and Village
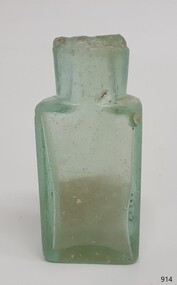
Container - Pill bottle, Circa 1878
This small pill bottle has been handmade by a glass blower. The battles and seamless concave sides and base show that the glass was blown into a shaped mould. The rough lip shows that the glass was snapped off at the mouth and roughly ground. This was an inexpensive way to produce a bottle. The bottle was recovered from the Loch Ard, wrecked in 1878. A brief history of the Loch Ard (1873-1878): - The sailing ship Loch Ard was one of the famous Loch Line ships that sailed from England to Australia. Barclay, Curdle and Co. built the three-masted iron vessel in Glasgow in 1873. It had sailed three trips to Australia and one trip to Calcutta before its fateful voyage. Loch Ard left England on March 2, 1878, under the command of recently married, 29-year-old Captain Gibbs. It was bound for Melbourne with a crew of 37, plus 17 passengers. The general cargo reflected the affluence of Melbourne at the time. Onboard were straw hats, umbrellas, perfumes, clay pipes, pianos, clocks, confectionery, linen and candles, and a heavier load of railway irons, cement, lead and copper. Other cargo included items intended for display in the Melbourne International Exhibition of 1880. The Loch Ard had been sailing for three months and was close to its destination on June 1, 1878. Captain Gibbs had expected to see land at about 3 am but the Loch Ard ran into a fog that greatly reduced visibility and there was no sign of land or the Cape Otway lighthouse. The fog lifted at 4 am and the sheer cliffs of Victoria's west coast were much closer to them than Captain Gibbs expected. He tried to manage the vessel but failed and the ship struck a reef at the base of Mutton Bird Island, near Port Campbell. The top deck loosened from the hull, and the masts and rigging crashed down, knocking passengers and crew overboard. The lifeboat was launched by Tom Pearce but crashed into the side of Loch Ard and capsized. He clung onto its overturned hull and sheltered under it. He drifted out to sea and the tide brought him back to what is now called Loch Ard Gorge. He swam to shore and found a cave for shelter. A passenger, Eva Carmichael, had raced onto the deck to find out what was happening and was confronted by towering cliffs above the ship. She was soon swept off the ship by a huge wave. Eva saw Tom Pearce on a small rocky beach and yelled to attract his attention. He swam out and dragged her to the shelter of the cave. He revived her with a bottle of brandy from a case that had washed up on the beach. Tom scaled a cliff in search of help and followed some horse hoof prints. He came from two men from Glenample Station, three and a half miles away. He told the men of the tragedy and then returned to the gorge while the two men rode back to the station to get help. They reached Loch Ard Gorge and took the two shipwreck survivors to Glenample Station to recover. Eva stayed at the station for six weeks before returning to Ireland by steamship. In Melbourne, Tom Pearce received a hero's welcome and was presented with a medal and some money. Of the 54 crew members and passengers on board, only two survived: the apprentice, Tom Pearce and the young woman passenger, Eva Carmichael, who lost her family in the tragedy. The glass pill bottle is associated with the shipwreck of the Loch Ard and of significance for Victoria as the wreck is registered on the Victorian Heritage Register ( S 417). Flagstaff Hill has a varied collection of artefacts from Loch Ard of which the pill bottle is one. Its collection is significant for being one of the largest accumulation of artefacts from this notable Victorian shipwreck of which the subject item is a small part. The collections objects give us a snapshot of how we can interpret the story of this tragic event. The collection is also archaeologically significant as it represents aspects of Victoria's shipping history that allows us to interpret Victoria's social and historical themes of the time. Through is associated with the worst and best-known shipwreck in Victoria's history.Small clear green-hue glass pill bottle, rectangular in shape and chipped lip. Sides and base are seamless and concave and varying thickness. Glass has bubbles and imperfections. A sticker is attached. Recovered from the wreck of the Loch Ard, flagstaff hill, flagstaff hill maritime museum and village, warrnambool, maritime museum, maritime village, great ocean road, shipwreck coast, loch ard, 1878 shipwreck, handblown bottle, pill bottle, small bottle, medicine bottle -
 Flagstaff Hill Maritime Museum and Village
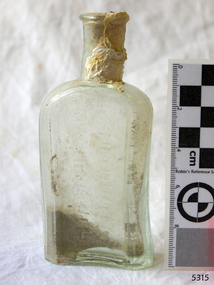
Domestic object - Bottle, Singer Sewing Machine Company, ca 1878
This Singer Sewing Machine oil bottle was made by hand, with the glass blown into a mould. Isaac M. Singer established his sewing machine company, I.M. Singer & Co. in America in 1851. A brief history of the Loch Ard (1873-1878): - The sailing ship Loch Ard was one of the famous Loch Line ships that sailed from England to Australia. Barclay, Curdle and Co. built the three-masted iron vessel in Glasgow in 1873. It had sailed three trips to Australia and one trip to Calcutta before its fateful voyage. Loch Ard left England on March 2, 1878, under the command of recently married, 29-year-old Captain Gibbs. It was bound for Melbourne with a crew of 37, plus 17 passengers. The general cargo reflected the affluence of Melbourne at the time. Onboard were straw hats, umbrellas, perfumes, clay pipes, pianos, clocks, confectionery, linen and candles, and a heavier load of railway irons, cement, lead and copper. Other cargo included items intended for display in the Melbourne International Exhibition of 1880. The Loch Ard had been sailing for three months and was close to its destination on June 1, 1878. Captain Gibbs had expected to see land at about 3 am but the Loch Ard ran into a fog that greatly reduced visibility and there was no sign of land or the Cape Otway lighthouse. The fog lifted at 4 am and the sheer cliffs of Victoria's west coast were much closer to them than Captain Gibbs expected. He tried to manage the vessel but failed and the ship struck a reef at the base of Mutton Bird Island, near Port Campbell. The top deck loosened from the hull, and the masts and rigging crashed down, knocking passengers and crew overboard. The lifeboat was launched by Tom Pearce but crashed into the side of Loch Ard and capsized. He clung onto its overturned hull and sheltered under it. He drifted out to sea and the tide brought him back to what is now called Loch Ard Gorge. He swam to shore and found a cave for shelter. A passenger, Eva Carmichael, had raced onto the deck to find out what was happening and was confronted by towering cliffs above the ship. She was soon swept off the ship by a huge wave. Eva saw Tom Pearce on a small rocky beach and yelled to attract his attention. He swam out and dragged her to the shelter of the cave. He revived her with a bottle of brandy from a case that had washed up on the beach. Tom scaled a cliff in search of help and followed some horse hoof prints. He came from two men from Glenample Station, three and a half miles away. He told the men of the tragedy and then returned to the gorge while the two men rode back to the station to get help. They reached Loch Ard Gorge and took the two shipwreck survivors to Glenample Station to recover. Eva stayed at the station for six weeks before returning to Ireland by steamship. In Melbourne, Tom Pearce received a hero's welcome and was presented with a medal and some money. Of the 54 crew members and passengers on board, only two survived: the apprentice, Tom Pearce and the young woman passenger, Eva Carmichael, who lost her family in the tragedy.The bottle is significant for representing an early innovation in domestic sewing, the treadle sewing machine. It is also significant for its connection with the Loch Ard shipwreck. The shipwreck of the Loch Ard is of significance for Victoria and is registered on the Victorian Heritage Register ( S 417). Flagstaff Hill has a varied collection of artefacts from Loch Ard and its collection is significant for being one of the largest accumulation of artefacts from this notable Victorian shipwreck. The collections object is to also give us a snapshot into history so we are able to interpret the story of this tragic event. The collection is also archaeologically significant as it represents aspects of Victoria's shipping history that allows us to interpret Victoria's social and historical themes of the time. The collection's historical significance is that it is associated unfortunately with the worst and best-known shipwreck in Victoria's history. Clear glass bottle, straight neck, broad shoulders tapering to slightly narrower indented base. Bottle once contained Singer Sewing Machine oil. Inscription embossed in the glass. Bottle was recovered from the wreck of the Loch Ard.Embossed in the glass "The Singer Manufacturing Company" on one side on the reverse "Extra Quality Machine Oil." flagstaff hill, flagstaff hill maritime museum and village, warrnambool, maritime museum, maritime village, great ocean road, shipwreck coast, singer sewing machine, sewing machine oil, singer sewing machine oil, oil bottle, isaac m. singer, loch ard artifacts, loch ard -
 Parks Victoria - Wilsons Promontory Lightstation
Tank lid
Lid for ship's tanks used for early domestic water storage (1860's) at the lightstation The water tank and lid are probably from the same unit that was used for transporting drinking water or perishable dry goods on ships. The unit comprised a large, riveted metal tank which was fitted with a heavy cast iron round lid to form a hermetically sealed container. It had a rubber sealing ring ‘which was screwed tight with the aid of lugs cast into the lid and wedges cast into the rim of the loading hole’. A raised iron rod welded across the outer face of many lids allowed for screwing the lid tight. Ship tanks were invented in1808 by notable engineer, Richard Trevithick and his associate John Dickinson. Their patent obtained the same year described the tank’s superior cubic shape that allowed it to fit squarely as a container in ships and thus use space efficiently, while its metal fabric preserved and secured its contents, whether liquid or solid, from damage. The containers revolutionised the movement of goods by ship and made wooden casks redundant. Research by Michael Pearson has determined that they were carried on passages to Australia from at least the 1830s, conveying ships’ victuals and water storage as well as general goods heading for the colonies, and by the 1870s they were in common use. Once in the colonies, the tanks were often recycled and adapted for many resourceful uses such as water tanks, packing cases, dog kennels, oil containers and food stores and this invariably led to the separation of the lid and tank. Raised lettering on the lids indicates that nearly all of the ship tanks transported to Australia came from London manufacturers, and it was usual also for the brand name to feature as a stencil on the associated square tank but in most cases this eventually wore off. It is not known if the Wilsons Promontory tank retains its stencil, and the heavy lid will need to be turned over to reveal its manufacturer’s name. How it came to the lightstation is also not known, but it was either brought to the site as a recycled tank or salvaged from a shipwreck. Pearson writes that Ship tanks show up at a wide range of sites, many of them isolated like lighthouses. They were, I think, usually taken there for the purposes they filled, usually water storage, as they were readily available, relatively light to transport, and probably very cheap to buy as second‐hand goods containers. In rural areas they may have been scavenged for their new uses from local stores, to whom goods were delivered in them. Recycled to serve as a water tank, the Wilsons Promontory tank is the last surviving example of several that were used at the site to hold water for domestic consumption. The tank has had its lid removed and a tap fitted to the one of the sides. It stands on concrete blocks next to a building to receive water running off the roof via a metal pipe. Wilsons Promontory is the only lightstation managed by Parks Victoria with a tank container, although Cape Otway and Point Hicks have lids. Parks Victoria has identified four other lids which include two at Point Hicks, one manufactured by Lancaster and Co. the other by Bellamy. Cape Otway also has two, one unidentified and the other by the Bow Tank Works, East London, which produced tanks between 1910 and 1930. Pearson notes that ‘surviving lids are far less numerous than the tanks themselves, presumably because the uses to which the tanks were put did not require the lid to be retained’. The tank and lid, which are possibly part of the same unit, have first level contributory significance for their historic values and rarity. Round ship's tanks lid, iron. -
 Flagstaff Hill Maritime Museum and Village
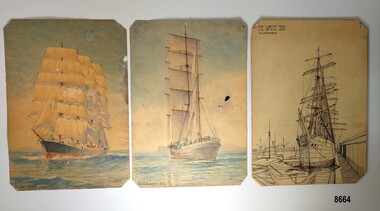
Painting - Paintings - set of three, Beni Carr Glyn Burnett, 1933
Beni Carr Glyn Burnett (also known as B. C. G. Burnett or Beni Burnett) was born in 1889 to missionary parents in Mongolia. When he was 15 years old he began training as an architect with a firm in Shanghai. He worked in Singapore, Japan and China before moving to Australia around 1933. In 1937 he was appointed as the Commonwealth principal architect in the Northern Territory. He went on to design a series of houses for senior public servants and military personnel which became very popular as they were specifically designed for the tropics - incorporating louvres, high ceilings and good ventilation. When Darwin was bombed in February 1942, he was evacuated to Alice Springs where he continued to work as an architect. He also became a Magistrate and Coroner in Alice Springs. In later life he was well known for sketching clientele in public bars. He died in 1955. Beni Burnett was living in Sydney in 1933 when he produced these three artworks. There were several photography firms operating in Sydney at this time who specialised in photographing ships and the shipping trade (e.g. Samuel J. Hood and William James Hall) and whose photographs were used by artists to produce ship portraits. Both of these photographers took photographs of the two ships in B. C. G. Burnett's watercolours. The "Magdalene Vinnen" was photographed by Samuel J Hood in a series of photos taken in March 1933. It was a 4 masted steel barque, built in 1921 in Kiel, Germany and for almost 80 years was the largest traditional sailing ship in operation. It was used extensively as a cargo ship. It sailed into Sydney Harbour on 27th Feb 1933, loaded with almost 16,000 bales of wool destined for Falmouth, England. In March 1933 (whilst in Sydney) the German Republic flag (on orders from Adolph Hitler) was lowered and replaced with the old monarchist flag which was then to be the official flag and beside it the Nazi flag was to be flown on all ceremonial occasions. It visited Australia again in 1935 with its cargo being wheat from Port Broughton, S. A. In 1936 it was renamed "Kommodore Johnsen" and in 1945 (after WW2) the ship was awarded to the Soviet Union as war compensation and renamed "STS Sedov". The "Winterhude" (originally called "Mabel Rickmers) was a three masted Finnish barque built in 1898 by Rickers - Werft Bremerhaven for use on the East India rice trade and later the South American nitrate trade. After WW1 it came under French control as war compensation. It was also sold several times and at one stage was called "Selma Hemsoth" but in 1925 it was bought by Gustaf Erikson who restored the name "Winterhude" and the vessel became a regular transport in the Australian wheat trade. In 1944 it was sold to the German navy before being taken over by the British at the end of WW2. It was photographed in Sydney by William James Hall in 1931 on its way to Port Lincoln, South Australia to load wheat for Europe. The third ship depicted by B. C. G. Burnett is a pen and wash sketch labelled "The White Ship" and exactly matches a photograph pasted into his personal scrapbook which is in the "Library and Archives N. T.". The name of the ship is unknown and B. C. G. Burnett may have taken some artistic licence with the colouring as in the original photograph, the ship had a dark hull.This set of three small artworks is significant as examples of shipping (particularly the use of sailing ships) that were still being used as late as the 1930's in Australia. They are also important because their creator (B. C. G. Burnett) went on to become a well-known public figure in the Northern Territory in the late 1930's due to his innovative approach to designing homes for the tropical climate.A set of three artworks by B. C. G. Burnett of sailing ships in Sydney Harbour. They are all on rectangular watercolour paper with small diagonal edges at each corner. Painting 1 is a watercolour painting of a sailing ship called "Magdalene Vinnen". It shows a 4 masted barque with a blue and red steel hull in full sail heading towards the viewer. The painter's name (B. C. G. Burnett) and date (1933) are written on the bottom left-hand corner of the painting. Painting 2 is a watercolour painting of a sailing ship called "Winterhude". It shows a 3-masted barque with a blue and red steel hull in full sail heading away from the viewer. A small figure can be seen at the wheel at the rear of the ship. The painter's name (B. C. G. Burnett) and date (1933) are written on the bottom left-hand corner of the painting. Sketch 3 is an ink sketch of an unknown sailing ship moored to a dock. There are several small boats tied up near the sailing ship and a large steel freighter can be seen in the background. There is a faint wash of colour on parts of the sketch - the bottom of the ship, the masts and booms and the water at the end of the pier. The title (The White Ship) and the artist's name (B. C. G. Burnett) are written in ink in the top left corner. 1 (front) - "B. C. G. BURNETT. 1933 2 (front) - "B. C. G. BURNETT. 1933" 3 (front) - "THE WHITE SHIP / B. C. G. BURNETT"flagstaff hill maritime museum and village, warrnambool, great ocean road, sailing ships, ships, barque, magdalene vinnen, winterhude, beni carr glyn burnett, b. c. g. burnett, beni burnett, painting, watercolour painting, sketch, ink sketch, sydney harbour, architect, darwin, burnett house, photography, samuel j. hood, william james hall, sedov, kommodore johnsen, mabel rickmers -
 Flagstaff Hill Maritime Museum and Village
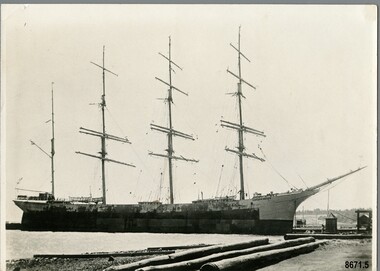
Photograph - Vessel "Strathgryfe", late 19th or early 20th century
This photograph was one of ten photographs donated to Flagstaff Hill Maritime Museum and Village by Fred Trewartha. Frederick John Fox Trewartha (Fred) was a well-known Warrnambool businessman. He was born in Beeac near Geelong in 1920 and came to Warrnambool with his family as a very young child. He was apprenticed to his father John, as a saddler and later opened his own shop on Raglan Parade. He then moved into working with tarpaulins and canvases for the trucking industry. Fred was keenly interested in photography (and was a member of the Warrnambool Cine Club), yachting and boat building. He kept his yacht moored at Port Fairy for many years and participated in sailing events locally and interstate. He also built boats with his sons. He had the opportunity to meet many older sailors and it's thought this photo (and others in the set) may have been given to him by one of these men. Fred Trewartha died in 2016 in Warrnambool. The "Strathgryfe" was a four masted steel barque built in 1890 by "Russell and Company", Port Glasgow and was owned by Duncan McGillivray (The Strathgryfe Ship Company Limited), Greenock. It arrived in Melbourne in December 1891 from New York. Between 1891 and 1910 it carried merchandise in and out of Australia to ports around the world - Melbourne to London (1892), Newcastle to San Francisco (1894), Capetown to Newcastle (1894), New York to Shanghai (1897), New York to Melbourne (1898), Frederickstadt to Melbourne (1899), Liverpool to Sydney (1900), San Francisco to Brisbane (1903), Newcastle to Pisagna, Chile (1905) and Rotterdam to Melbourne (1910). It carried breadstuffs from San Francisco, coal from Newcastle, wool from Sydney, saltpetre from Hamburg and wheat from Brisbane and Melbourne as well as a variety of general merchandise. In 1898, whilst on route between New York and Melbourne, it came across the Captain and crew of the missing barque "Glen Huntley" which had been reported as "lost" several months earlier. They had been marooned at Tristan D'Acunha (a remote group of volcanic islands in the South Atlantic ocean). Captain McIntyre, of the Strathgryfe, offered to bring Captain Shaw (of the Glen Huntly) on to Melbourne with them but the "old mariner" decided to stay on with his crew till arrangements could be made for rescuing the whole of them. In 1899, when in Melbourne, seven of its crew refused to go to sea in it due to its unsafe conditions. They said the vessel was unseaworthy and that the rigging was unsafe and the lifeboats, not watertight. The Captain (Donald McIntyre) denied the allegations and produced a marine surveyor's certificate as evidence of the condition of the vessel. The men were sentenced to three weeks imprisonment. In 1901 there was a fire on board the Strathgryfe just after it left Sydney for London which resulted in many bales of wool being destroyed. In 1902 it was beached at Shellback island (near Wilson's promontory) for several weeks and had to be considerably dismantled in order to lighten its load enough to allow tugs to pull it back into deep water. In 1910 it was sold to a German firm and renamed "Margretha". It continued to operate in Australian ports until 1914 when it left Sydney for the English Channel with 42,438 bags of wheat. However owing to W.W.1 breaking out, it made for the port of St Michael's where it remained for twenty-one months. Later it was seized by the Portuguese Government and renamed "Graciosa" and was leased back to the English Government. It was sunk by two German submarines in 1918.This photograph is significant as a record of the world wide mercantile trade Australia was engaged in at the end of the nineteenth century and beginning of the twentieth century.Black and white photograph of a four masted barque moored at a dock. The rigging and two lifeboats are clearly visible. Three large timber logs are in the foreground. On the back of the photograph, the donor's name and telephone number have been written in black ballpoint pen and the name of the ship has been handwritten (incorrectly) in pencil in cursive script.Back of Photo - donor's name and telephone number "Strarthgryfe" [Strathgryfe] / "late" / "Margurita" [Margretha]flagstaff hill maritime museum and village, warrnambool, great ocean road, shipwreck coast, strathgryfe, barque, steel barque, margretha, graciosa, frederick trewartha, mercantile trade, russell and company, merchandise, cargo ship, glen huntly, w. w. 1 -
 Flagstaff Hill Maritime Museum and Village
Domestic object - Spoon, circa 1878
This table spoon is from the wreck of the LOCH ARD, a Loch Line ship of 1,693 tons which sailed from Gravesend, London, on 2 March 1878 with 17 passengers and a crew of 36 under Captain George Gibbs. “The intention was to discharge cargo in Melbourne, before returning to London via the Horn with wool and wheat”. Instead, on 1 June 1878, after 90 days at sea, she struck the sandstone cliffs of Mutton Bird Island on the south west coast of Victoria, and sank with the loss of 52 lives and all her cargo. The manifest of the LOCH ARD listed an array of manufactured goods and bulk metals being exported to the Colony of Victoria, with a declared value of £53,700. (202 bills of lading show an actual invoice value of £68, 456, with insurance underwriting to £30,000 of all cargo). Included in the manifest is the item of “Tin hardware & cutlery £7,530”. This table spoon is one of 482 similar items of electro-plated cutlery from the LOCH ARD site, comprising spoons and forks of various sizes but all sharing the same general shape or design and metallic composition. 49 of these pieces display a legible makers’ mark — the initials “W” and “P” placed within a raised diamond outline, which is in turn contained within a sunken crown shape — identifying the manufacturer as William Page & Co of Birmingham. An electroplater’s makers’ marks, unlike sterling silver hallmarks, are not consistent identifiers of quality or date and place of manufacture. A similar line of five impressions was usually made to impress the consumer with an implication of industry standards, but what each one actually signified was not regulated and so they varied according to the whim of the individual foundry. In this case, the maker’s marks are often obscured by sedimentary accretion or removed by corrosion after a century of submersion in the ocean. However sufficient detail has survived to indicate that these samples of electro-plated cutlery probably originated from the same consignment in the LOCH ARD’s cargo. The generally common range of marks are drawn from 255 tea spoons, 125 dessert spoons, and 99 table forks. These marks are clearly visible in 66 instances, while the same sequence of general outlines, or depression shapes, is discernible in another 166 examples. Suggested trade names for William Page & Co’s particular blend of brass plating are ‘roman silver’ or ‘silverite’. This copper alloy polishes to a lustrous gold when new, discolouring to a murky grey with greenish hue when neglected. HISTORY OF THE LOCH ARD The LOCH ARD belonged to the famous Loch Line which sailed many ships from England to Australia. Built in Glasgow by Barclay, Curdle and Co. in 1873, the LOCH ARD was a three-masted square rigged iron sailing ship. The ship measured 262ft 7" (79.87m) in length, 38ft (11.58m) in width, 23ft (7m) in depth and had a gross tonnage of 1693 tons. The LOCH ARD's main mast measured a massive 150ft (45.7m) in height. LOCH ARD made three trips to Australia and one trip to Calcutta before its final voyage. LOCH ARD left England on March 2, 1878, under the command of Captain Gibbs, a newly married, 29 year old. She was bound for Melbourne with a crew of 37, plus 17 passengers and a load of cargo. The general cargo reflected the affluence of Melbourne at the time. On board were straw hats, umbrella, perfumes, clay pipes, pianos, clocks, confectionary, linen and candles, as well as a heavier load of railway irons, cement, lead and copper. There were items included that intended for display in the Melbourne International Exhibition in 1880. The voyage to Port Phillip was long but uneventful. At 3am on June 1, 1878, Captain Gibbs was expecting to see land and the passengers were becoming excited as they prepared to view their new homeland in the early morning. But LOCH ARD was running into a fog which greatly reduced visibility. Captain Gibbs was becoming anxious as there was no sign of land or the Cape Otway lighthouse. At 4am the fog lifted. A man aloft announced that he could see breakers. The sheer cliffs of Victoria's west coast came into view, and Captain Gibbs realised that the ship was much closer to them than expected. He ordered as much sail to be set as time would permit and then attempted to steer the vessel out to sea. On coming head on into the wind, the ship lost momentum, the sails fell limp and LOCH ARD's bow swung back. Gibbs then ordered the anchors to be released in an attempt to hold its position. The anchors sank some 50 fathoms - but did not hold. By this time LOCH ARD was among the breakers and the tall cliffs of Mutton Bird Island rose behind the ship. Just half a mile from the coast, the ship's bow was suddenly pulled around by the anchor. The captain tried to tack out to sea, but the ship struck a reef at the base of Mutton Bird Island, near Port Campbell. Waves broke over the ship and the top deck was loosened from the hull. The masts and rigging came crashing down knocking passengers and crew overboard. When a lifeboat was finally launched, it crashed into the side of LOCH ARD and capsized. Tom Pearce, who had launched the boat, managed to cling to its overturned hull and shelter beneath it. He drifted out to sea and then on the flood tide came into what is now known as LOCH ARD Gorge. He swam to shore, bruised and dazed, and found a cave in which to shelter. Some of the crew stayed below deck to shelter from the falling rigging but drowned when the ship slipped off the reef into deeper water. Eva Carmichael had raced onto deck to find out what was happening only to be confronted by towering cliffs looming above the stricken ship. In all the chaos, Captain Gibbs grabbed Eva and said, "If you are saved Eva, let my dear wife know that I died like a sailor". That was the last Eva Carmichael saw of the captain. She was swept off the ship by a huge wave. Eva saw Tom Pearce on a small rocky beach and yelled to attract his attention. He dived in and swam to the exhausted woman and dragged her to shore. He took her to the cave and broke open case of brandy which had washed up on the beach. He opened a bottle to revive the unconscious woman. A few hours later Tom scaled a cliff in search of help. He followed hoof prints and came by chance upon two men from nearby Glenample Station three and a half miles away. In a state of exhaustion, he told the men of the tragedy. Tom returned to the gorge while the two men rode back to the station to get help. By the time they reached LOCH ARD Gorge, it was cold and dark. The two shipwreck survivors were taken to Glenample Station to recover. Eva stayed at the station for six weeks before returning to Ireland, this time by steamship. In Melbourne, Tom Pearce received a hero's welcome. He was presented with the first gold medal of the Royal Humane Society of Victoria and a £1000 cheque from the Victorian Government. Concerts were performed to honour the young man's bravery and to raise money for those who lost family in the LOCH ARD disaster. Of the 54 crew members and passengers on board, only two survived: the apprentice, Tom Pearce and the young woman passenger, Eva Carmichael, who lost all of her family in the tragedy. Ten days after the LOCH ARD tragedy, salvage rights to the wreck were sold at auction for £2,120. Cargo valued at £3,000 was salvaged and placed on the beach, but most washed back into the sea when another storm developed. The wreck of LOCH ARD still lies at the base of Mutton Bird Island. Much of the cargo has now been salvaged and some was washed up into what is now known as LOCH ARD Gorge. Cargo and artefacts have also been illegally salvaged over many years before protective legislation was introduced. One of the most unlikely pieces of cargo to have survived the shipwreck was a Minton porcelain peacock - one of only seven in the world. The peacock was destined for the Melbourne International Exhibition in 1880. It had been well packed, which gave it adequate protection during the violent storm. Today, the Minton peacock can be seen at the Flagstaff Hill Maritime Museum in Warrnambool. From Australia's most dramatic shipwreck it has now become Australia's shipwreck artefact and is one of very few 'objects' on the Victorian State Heritage Register most valuable. HISTORY OF THE LOCH ARD The LOCH ARD belonged to the famous Loch Line which sailed many ships from England to Australia. Built in Glasgow by Barclay, Curdle and Co. in 1873, the LOCH ARD was a three-masted square rigged iron sailing ship. The ship measured 262ft 7" (79.87m) in length, 38ft (11.58m) in width, 23ft (7m) in depth and had a gross tonnage of 1693 tons. The LOCH ARD's main mast measured a massive 150ft (45.7m) in height. LOCH ARD made three trips to Australia and one trip to Calcutta before its final voyage. LOCH ARD left England on March 2, 1878, under the command of Captain Gibbs, a newly married, 29 year old. She was bound for Melbourne with a crew of 37, plus 17 passengers and a load of cargo. The general cargo reflected the affluence of Melbourne at the time. On board were straw hats, umbrella, perfumes, clay pipes, pianos, clocks, confectionary, linen and candles, as well as a heavier load of railway irons, cement, lead and copper. There were items included that intended for display in the Melbourne International Exhibition in 1880. The voyage to Port Phillip was long but uneventful. At 3am on June 1, 1878, Captain Gibbs was expecting to see land and the passengers were becoming excited as they prepared to view their new homeland in the early morning. But LOCH ARD was running into a fog which greatly reduced visibility. Captain Gibbs was becoming anxious as there was no sign of land or the Cape Otway lighthouse. At 4am the fog lifted. A man aloft announced that he could see breakers. The sheer cliffs of Victoria's west coast came into view, and Captain Gibbs realised that the ship was much closer to them than expected. He ordered as much sail to be set as time would permit and then attempted to steer the vessel out to sea. On coming head on into the wind, the ship lost momentum, the sails fell limp and LOCH ARD's bow swung back. Gibbs then ordered the anchors to be released in an attempt to hold its position. The anchors sank some 50 fathoms - but did not hold. By this time LOCH ARD was among the breakers and the tall cliffs of Mutton Bird Island rose behind the ship. Just half a mile from the coast, the ship's bow was suddenly pulled around by the anchor. The captain tried to tack out to sea, but the ship struck a reef at the base of Mutton Bird Island, near Port Campbell. Waves broke over the ship and the top deck was loosened from the hull. The masts and rigging came crashing down knocking passengers and crew overboard. When a lifeboat was finally launched, it crashed into the side of LOCH ARD and capsized. Tom Pearce, who had launched the boat, managed to cling to its overturned hull and shelter beneath it. He drifted out to sea and then on the flood tide came into what is now known as LOCH ARD Gorge. He swam to shore, bruised and dazed, and found a cave in which to shelter. Some of the crew stayed below deck to shelter from the falling rigging but drowned when the ship slipped off the reef into deeper water. Eva Carmichael had raced onto deck to find out what was happening only to be confronted by towering cliffs looming above the stricken ship. In all the chaos, Captain Gibbs grabbed Eva and said, "If you are saved Eva, let my dear wife know that I died like a sailor". That was the last Eva Carmichael saw of the captain. She was swept off the ship by a huge wave. Eva saw Tom Pearce on a small rocky beach and yelled to attract his attention. He dived in and swam to the exhausted woman and dragged her to shore. He took her to the cave and broke open case of brandy which had washed up on the beach. He opened a bottle to revive the unconscious woman. A few hours later Tom scaled a cliff in search of help. He followed hoof prints and came by chance upon two men from nearby Glenample Station three and a half miles away. In a state of exhaustion, he told the men of the tragedy. Tom returned to the gorge while the two men rode back to the station to get help. By the time they reached LOCH ARD Gorge, it was cold and dark. The two shipwreck survivors were taken to Glenample Station to recover. Eva stayed at the station for six weeks before returning to Ireland, this time by steamship. In Melbourne, Tom Pearce received a hero's welcome. He was presented with the first gold medal of the Royal Humane Society of Victoria and a £1000 cheque from the Victorian Government. Concerts were performed to honour the young man's bravery and to raise money for those who lost family in the LOCH ARD disaster. Of the 54 crew members and passengers on board, only two survived: the apprentice, Tom Pearce and the young woman passenger, Eva Carmichael, who lost all of her family in the tragedy. Ten days after the LOCH ARD tragedy, salvage rights to the wreck were sold at auction for £2,120. Cargo valued at £3,000 was salvaged and placed on the beach, but most washed back into the sea when another storm developed. The wreck of LOCH ARD still lies at the base of Mutton Bird Island. Much of the cargo has now been salvaged and some was washed up into what is now known as LOCH ARD Gorge. Cargo and artefacts have also been illegally salvaged over many years before protective legislation was introduced. One of the most unlikely pieces of cargo to have survived the shipwreck was a Minton porcelain peacock - one of only seven in the world. The peacock was destined for the Melbourne International Exhibition in 1880. It had been well packed, which gave it adequate protection during the violent storm. Today, the Minton peacock can be seen at the Flagstaff Hill Maritime Museum in Warrnambool. From Australia's most dramatic shipwreck it has now become Australia's shipwreck artefact and is one of very few 'objects' on the Victorian State Heritage Register most valuable. The LOCH ARD shipwreck is of State significance – Victorian Heritage Register S 417. Flagstaff Hill’s collection of artefacts from LOCH ARD is significant for being one of the largest collections of artefacts from this shipwreck in Victoria. It is significant for its association with the shipwreck, which is on the Victorian Heritage Register (VHR S417). The collection is significant because of the relationship between the objects, as together they have a high potential to interpret the story of the LOCH ARD. The LOCH ARD collection is archaeologically significant as the remains of a large international passenger and cargo ship. The LOCH ARD collection is historically significant for representing aspects of Victoria’s shipping history and its potential to interpret sub-theme 1.5 of Victoria’s Framework of Historical Themes (living with natural processes). The collection is also historically significant for its association with the LOCH ARD, which was one of the worst and best known shipwrecks in Victoria’s history. Unrestored table spoon from the wreck of the LOCH ARD. The spoon design has a flattened fiddle-back handle, with a thin stem or shank, flared collar, and a shallow rounded bowl. The spoons metallic composition is a thin layer of brass alloy which has partially corroded back to a nickel-silver base metal. Minimal original plate remains. Some verdigris (15%) and concretion (40%) on front and back of spoon. Spoon is bent and balance is covered in Silver Oxide.flagstaff hill maritime museum, shipwreck coast, great ocean road, loch line, loch ard, mutton bird island, loch ard gorge, electroplated cutlery, loch ard shipwreck, william page and co, birmingham brass plating, table spoons -
 Flagstaff Hill Maritime Museum and Village
Marble Tile, circa 1878
The artefact is a white marble tile raised from the wreck of the LOCH ARD (1878). The cargo manifest of the sunken vessel has the entry “Marble £400”. This is placed directly following the entry “Glass (604 cases)”. This conjunction suggests the marble tile was originally part of a consignment intended for use in a ‘high end’ residential or public building project in the gold and wool rich Colony of Victoria. Traditionally, white or cream marble was imported into Britain from the Mediterranean region of Europe, where beds of sedimentary limestone (calcium and magnesium carbonate) had been buried over a long geological period of time. Deep in the earth’s crust, it had been subjected to immense pressures and high temperatures, sufficient to completely re-crystallise the original deposits. Marble beds began as layers of sediment at the bottom of ancient tropical seas, forming from the skeletal remains of calcareous fossils, shell, and coral fragments. The metamorphic process of prolonged compression and heating recrystallised this skeletal material, destroying all signs of the original sedimentary fabric. The resulting ‘true’ marbles of, for example, White Carrara (Tuscany, Italy), Verdi (green) Antico (Thessaly, Greece), and Rouge (red) Languadoc (Carcassone, France), were highly prized in classical decoration (sculpture and friezes) and architecture (temples and arches). Marble was found in nineteenth century Australia, but in small, uneconomic deposits, not suitable for commercial quarrying. The comparative expense of imported marble restricted its use in colonial buildings to carved fireplaces and mantel pieces, or outdoor ornaments such as fountains, statuary and grave stones. If Carrara marble floor tiles were used, they were used sparingly, as an arresting feature in entrance halls for instance. However, most prominent private and public construction used timber flooring, waxed or ‘jappaned’, with carpet runners and rugs (for example the Austin’s Barwon Park Mansion, 1871), or laid tessellated and ceramic tiles of baked clay infused with colour (for example the Chirnside’s Werribee Park Mansion, 1878). HISTORY OF THE LOCH ARD The LOCH ARD belonged to the famous Loch Line which sailed many ships from England to Australia. Built in Glasgow by Barclay, Curdle and Co. in 1873, the LOCH ARD was a three-masted square rigged iron sailing ship. The ship measured 262ft 7" (79.87m) in length, 38ft (11.58m) in width, 23ft (7m) in depth and had a gross tonnage of 1693 tons. The LOCH ARD's main mast measured a massive 150ft (45.7m) in height. LOCH ARD made three trips to Australia and one trip to Calcutta before its final voyage. LOCH ARD left England on March 2, 1878, under the command of Captain Gibbs, a newly married, 29 year old. She was bound for Melbourne with a crew of 37, plus 17 passengers and a load of cargo. The general cargo reflected the affluence of Melbourne at the time. On board were straw hats, umbrella, perfumes, clay pipes, pianos, clocks, confectionary, linen and candles, as well as a heavier load of railway irons, cement, lead and copper. There were items included that intended for display in the Melbourne International Exhibition in 1880. The voyage to Port Phillip was long but uneventful. At 3am on June 1, 1878, Captain Gibbs was expecting to see land and the passengers were becoming excited as they prepared to view their new homeland in the early morning. But LOCH ARD was running into a fog which greatly reduced visibility. Captain Gibbs was becoming anxious as there was no sign of land or the Cape Otway lighthouse. At 4am the fog lifted. A man aloft announced that he could see breakers. The sheer cliffs of Victoria's west coast came into view, and Captain Gibbs realised that the ship was much closer to them than expected. He ordered as much sail to be set as time would permit and then attempted to steer the vessel out to sea. On coming head on into the wind, the ship lost momentum, the sails fell limp and LOCH ARD's bow swung back. Gibbs then ordered the anchors to be released in an attempt to hold its position. The anchors sank some 50 fathoms - but did not hold. By this time LOCH ARD was among the breakers and the tall cliffs of Mutton Bird Island rose behind the ship. Just half a mile from the coast, the ship's bow was suddenly pulled around by the anchor. The captain tried to tack out to sea, but the ship struck a reef at the base of Mutton Bird Island, near Port Campbell. Waves broke over the ship and the top deck was loosened from the hull. The masts and rigging came crashing down knocking passengers and crew overboard. When a lifeboat was finally launched, it crashed into the side of LOCH ARD and capsized. Tom Pearce, who had launched the boat, managed to cling to its overturned hull and shelter beneath it. He drifted out to sea and then on the flood tide came into what is now known as LOCH ARD Gorge. He swam to shore, bruised and dazed, and found a cave in which to shelter. Some of the crew stayed below deck to shelter from the falling rigging but drowned when the ship slipped off the reef into deeper water. Eva Carmichael had raced onto deck to find out what was happening only to be confronted by towering cliffs looming above the stricken ship. In all the chaos, Captain Gibbs grabbed Eva and said, "If you are saved Eva, let my dear wife know that I died like a sailor". That was the last Eva Carmichael saw of the captain. She was swept off the ship by a huge wave. Eva saw Tom Pearce on a small rocky beach and yelled to attract his attention. He dived in and swam to the exhausted woman and dragged her to shore. He took her to the cave and broke open case of brandy which had washed up on the beach. He opened a bottle to revive the unconscious woman. A few hours later Tom scaled a cliff in search of help. He followed hoof prints and came by chance upon two men from nearby Glenample Station three and a half miles away. In a state of exhaustion, he told the men of the tragedy. Tom returned to the gorge while the two men rode back to the station to get help. By the time they reached LOCH ARD Gorge, it was cold and dark. The two shipwreck survivors were taken to Glenample Station to recover. Eva stayed at the station for six weeks before returning to Ireland, this time by steamship. In Melbourne, Tom Pearce received a hero's welcome. He was presented with the first gold medal of the Royal Humane Society of Victoria and a £1000 cheque from the Victorian Government. Concerts were performed to honour the young man's bravery and to raise money for those who lost family in the LOCH ARD disaster. Of the 54 crew members and passengers on board, only two survived: the apprentice, Tom Pearce and the young woman passenger, Eva Carmichael, who lost all of her family in the tragedy. Ten days after the LOCH ARD tragedy, salvage rights to the wreck were sold at auction for £2,120. Cargo valued at £3,000 was salvaged and placed on the beach, but most washed back into the sea when another storm developed. The wreck of LOCH ARD still lies at the base of Mutton Bird Island. Much of the cargo has now been salvaged and some was washed up into what is now known as LOCH ARD Gorge. Cargo and artefacts have also been illegally salvaged over many years before protective legislation was introduced. One of the most unlikely pieces of cargo to have survived the shipwreck was a Minton porcelain peacock - one of only nine in the world. The peacock was destined for the Melbourne International Exhibition in 1880. It had been well packed, which gave it adequate protection during the violent storm. Today, the Minton peacock can be seen at the Flagstaff Hill Maritime Museum in Warrnambool. From Australia's most dramatic shipwreck it has now become Australia's most valuable shipwreck artefact and is one of very few 'objects' on the Victorian State Heritage Register. HISTORY OF THE LOCH ARD The LOCH ARD belonged to the famous Loch Line which sailed many ships from England to Australia. Built in Glasgow by Barclay, Curdle and Co. in 1873, the LOCH ARD was a three-masted square rigged iron sailing ship. The ship measured 262ft 7" (79.87m) in length, 38ft (11.58m) in width, 23ft (7m) in depth and had a gross tonnage of 1693 tons. The LOCH ARD's main mast measured a massive 150ft (45.7m) in height. LOCH ARD made three trips to Australia and one trip to Calcutta before its final voyage. LOCH ARD left England on March 2, 1878, under the command of Captain Gibbs, a newly married, 29 year old. She was bound for Melbourne with a crew of 37, plus 17 passengers and a load of cargo. The general cargo reflected the affluence of Melbourne at the time. On board were straw hats, umbrella, perfumes, clay pipes, pianos, clocks, confectionary, linen and candles, as well as a heavier load of railway irons, cement, lead and copper. There were items included that intended for display in the Melbourne International Exhibition in 1880. The voyage to Port Phillip was long but uneventful. At 3am on June 1, 1878, Captain Gibbs was expecting to see land and the passengers were becoming excited as they prepared to view their new homeland in the early morning. But LOCH ARD was running into a fog which greatly reduced visibility. Captain Gibbs was becoming anxious as there was no sign of land or the Cape Otway lighthouse. At 4am the fog lifted. A man aloft announced that he could see breakers. The sheer cliffs of Victoria's west coast came into view, and Captain Gibbs realised that the ship was much closer to them than expected. He ordered as much sail to be set as time would permit and then attempted to steer the vessel out to sea. On coming head on into the wind, the ship lost momentum, the sails fell limp and LOCH ARD's bow swung back. Gibbs then ordered the anchors to be released in an attempt to hold its position. The anchors sank some 50 fathoms - but did not hold. By this time LOCH ARD was among the breakers and the tall cliffs of Mutton Bird Island rose behind the ship. Just half a mile from the coast, the ship's bow was suddenly pulled around by the anchor. The captain tried to tack out to sea, but the ship struck a reef at the base of Mutton Bird Island, near Port Campbell. Waves broke over the ship and the top deck was loosened from the hull. The masts and rigging came crashing down knocking passengers and crew overboard. When a lifeboat was finally launched, it crashed into the side of LOCH ARD and capsized. Tom Pearce, who had launched the boat, managed to cling to its overturned hull and shelter beneath it. He drifted out to sea and then on the flood tide came into what is now known as LOCH ARD Gorge. He swam to shore, bruised and dazed, and found a cave in which to shelter. Some of the crew stayed below deck to shelter from the falling rigging but drowned when the ship slipped off the reef into deeper water. Eva Carmichael had raced onto deck to find out what was happening only to be confronted by towering cliffs looming above the stricken ship. In all the chaos, Captain Gibbs grabbed Eva and said, "If you are saved Eva, let my dear wife know that I died like a sailor". That was the last Eva Carmichael saw of the captain. She was swept off the ship by a huge wave. Eva saw Tom Pearce on a small rocky beach and yelled to attract his attention. He dived in and swam to the exhausted woman and dragged her to shore. He took her to the cave and broke open case of brandy which had washed up on the beach. He opened a bottle to revive the unconscious woman. A few hours later Tom scaled a cliff in search of help. He followed hoof prints and came by chance upon two men from nearby Glenample Station three and a half miles away. In a state of exhaustion, he told the men of the tragedy. Tom returned to the gorge while the two men rode back to the station to get help. By the time they reached LOCH ARD Gorge, it was cold and dark. The two shipwreck survivors were taken to Glenample Station to recover. Eva stayed at the station for six weeks before returning to Ireland, this time by steamship. In Melbourne, Tom Pearce received a hero's welcome. He was presented with the first gold medal of the Royal Humane Society of Victoria and a £1000 cheque from the Victorian Government. Concerts were performed to honour the young man's bravery and to raise money for those who lost family in the LOCH ARD disaster. Of the 54 crew members and passengers on board, only two survived: the apprentice, Tom Pearce and the young woman passenger, Eva Carmichael, who lost all of her family in the tragedy. Ten days after the LOCH ARD tragedy, salvage rights to the wreck were sold at auction for £2,120. Cargo valued at £3,000 was salvaged and placed on the beach, but most washed back into the sea when another storm developed. The wreck of LOCH ARD still lies at the base of Mutton Bird Island. Much of the cargo has now been salvaged and some was washed up into what is now known as LOCH ARD Gorge. Cargo and artefacts have also been illegally salvaged over many years before protective legislation was introduced. One of the most unlikely pieces of cargo to have survived the shipwreck was a Minton porcelain peacock - one of only nine in the world. The peacock was destined for the Melbourne International Exhibition in 1880. It had been well packed, which gave it adequate protection during the violent storm. Today, the Minton peacock can be seen at the Flagstaff Hill Maritime Museum in Warrnambool. From Australia's most dramatic shipwreck it has now become Australia's most valuable shipwreck artefact and is one of very few 'objects' on the Victorian State Heritage Register. The wreck of the LOCH ARD is of State significance — Victorian Heritage Register S417 Flagstaff Hill’s collection of artefacts from LOCH ARD is significant for being one of the largest collections of artefacts from this shipwreck in Victoria. It is significant for its association with the shipwreck, which is on the Victorian Heritage Register (VHR S417). The collection is significant because of the relationship between the objects, as together they have a high potential to interpret the story of the LOCH ARD. The LOCH ARD collection is archaeologically significant as the remains of a large international passenger and cargo ship. The LOCH ARD collection is historically significant for representing aspects of Victoria’s shipping history and its potential to interpret sub-theme 1.5 of Victoria’s Framework of Historical Themes (living with natural processes). The collection is also historically significant for its association with the LOCH ARD, which was one of the worst and best known shipwrecks in Victoria’s history. A square marble tile retrieved from the wreck of the LOCH ARD. Most of its surface is covered by a thin layer of limestone and marine growth encrustation that is stained rust-red. There is a piece of corroded iron encrusted at an oblique angle on the tile’s rear face. The tile is ‘rough-worked’, cut to shape and size, but not smoothed or polished. There is a companion tile in similar condition in the Flagstaff Hill collection. From visual observation of the original surface (at low magnification) the tile appears to be of white Carrara-type marble.flagstaff hill, warrnambool, shipwrecked coast, flagstaff hill maritime museum, maritime museum, shipwreck coast, flagstaff hill maritime village, great ocean road, loch line, loch ard, captain gibbs, eva carmichael, tom pearce, glenample station, mutton bird island, loch ard gorge, white marble, marble tile, carrara marble, colonial architecture, victorian building materials -
 Melbourne Tram Museum
Album - Ron Scholten Slide Collection, Ron Scholten
Photo - see pdf file for further information. Number Brief Description RSC1 PCC 1041 at the gates of Preston Workshops on a test run without it’s trolley retriever RSC2 PCC 1041 in Glenhuntly Road on Route 67 en route to Carnegie crossing the Railway Gates at Glenhuntly Station RSC3 W2 482 stored at Malvern Depot with Olympic Park on the Destination RSC4 Cable Car Set 64 in Swanston St outside Princess Bridge Station in Bound with open top Double Deck Bus, Trak Motors ? Departing from Flinders St Station RSC5 W3 669 in St George Rd at Sumner St en route to Preston Workshops for scrapping RSC6 Cable Car in Lygon St en route to Carlton RSC7 PCC 1041 turning from St Georges Rd into Miller St to enter Preston Workshops RSC8 Flinders St Station with cable cars RSC9 PCC 1041 in strife on it’s maiden day in service. Trams on route 88 delayed in Queens Parade Clifton Hill RSC10 Flinders St at William St with Cable Cars RSC11 L 104 on the fan of the new shed at Malvern Depot on a TMSV tour RSC12 Cable Set 1 after it’s restoration at Preston Workshops on the fan near the front gate RSC13 X1 466 at a suburban terminus of the Footscray System RSC14 X2 680 at Point Ormond Terminus RSC15 An ex Launceston Tram at the outside terminus of the Penny Royal Complex Tramway in Launceston RSC16 Q 148 at Preston Workshops awaiting disposal RSC17 Elizabeth St with Cable Cars RSC18 Elizabeth and Bourke St corner outside the GPO with cable cars RSC19 Collins St with Cable Cars RSC20 A photo taken from the observation deck of the ICI building showing a view of Parliament house with a w class tram in Nicholson St RSC21 Auburn Horse car with a posed photo of all the tramwaymen employed RSC22 Cheltenham Double Deck Horsecar with a full load of passengers RSC23 City of Northcote cable trailer 3 at a terminus RSC24 City of Northcote Cable cars passing in High St Northcote RSC25 St Kilda Rd at Princes Bridge with Cable Cars RSC26 Flinders St with Cable Cars RSC27 Cable Cars RSC28 Bourke St looking towards Elizabeth St from Queen St RSC29 Cable cars in Bourke St at Elizabeth St looking East RSC30 Cable cars in Elizabeth St at the terminus at Flinders St RSC31 Cable cars in Bourke St at Swanston St looking west RSC32 Cable cars in Swanston St at Flinders St looking North RSC33 Cable cars in Collins St near Russell St RSC34 Cable cars in Elizabeth St at Bourke St RSC35 Cable cars in Collins St at Elizabeth St RSC36 Cable Cars in Swanston St at Flinders St RSC37 Cable cars in Collins St RSC38 Cable Cars RSC39 Cable cars in St Kilda Rd near Princes Bridge RSC40 Cable cars in Collins St East of Swanston St RSC41 Cable cars in Spring St outside Parliament house RSC42 K 92 in M&MTB Chocolate and cream livery but with a P&MTT Destination box on Route 14 RSC43 Thornbury depot viewed from Miller St and St Georges rd. Two W2 class cars are laying over between the peaks RSC44 Z3 201 in Met Livery passes D1 3510 in new M Tram livery. A Staff member in uniform stands in the doorway. Dandenong Rd RSC45 D1 3530 advertising Heinekin Super Golf on Route 55 in Royal Park RSC46 D1 3504 in M Tram livery on the reserved track in Matthews Ave near Essendon Airport showing Route 81 Travancore . I suspect it is a private enthusiasts charter due to the Malvern W class run number in the rear windscreen RSC47 D1 3504 on Route 64 in Dandenong Rd in M Tram Livery RSC48 D1 3504 in M Tram Livery at Airport West Terminus RSC49 D1 3504 in M Tram Livery in Union Rd outside the Showgrounds RSC50 D1 3504 at West Maribyrnong Terminus in M Tram Livery RSC51 D1 3503 in M Tram Livery in Malvern Depot RSC52 SW6 960 and VR 53 in Harbour Esplanade for the NMEL&T Co Centenary RSC53 Hawthorn Tramways Trust 32 in Harbour Esplanade for the NMEL&T Co Centenary RSC54 VR 53 & B 2042 in Harbour Esplanade for the NMEL&T Co Centenary RSC55 VR 53 & C 3016 in Harbour Esplanade for the NMEL&T Co Centenary RSC56 NMEL&T Co 13 usually V214 in Harbour Esplanade for the NMEL&T Co Centenary RSC57 NMEL&T Co 13 usually V214 at Preston Workshops for the NMEL&T Co Centenary RSC58 Hawthorn Tramways Trust Lettering on HTT 32 in Harbour Esplanade for the NMEL&T Co Centenary RSC59 Hawthorn Tramways Trust 32 in Harbour Esplanade for the NMEL&T Co Centenary RSC60 Hawthorn Tramways Trust 32in Harbour Esplanade for the NMEL&T Co Centenary RSC61 Hawthorn Tramways Trust 32 in Harbour Esplanade for the NMEL&T Co Centenary RSC62 NMEL&T Co 13 usually V214 at Preston Workshops for the NMEL&T Co Centenary RSC63 W2 516 and another on route 59 wait to shunt at Essendon Airdrome Terminus as W2 571 on route 49 departs. This was the last day of operation. RSC64 Australia’s First Electric Tram at Box Hill with Tramwaymen including H J Hilton who is in the centre RSC65 W2 484 en route to St Kilda Junction and another wait for passengers after a race meeting at Caulfield Racecourse RSC66 X1 463 on the Footscray system en route to Russell St RSC67 Geelong 35 on Chilwell Route, Formerly HTT 13, M&MTB 119, then Bendigo 1 and Ballarat 37 RSC68 P&MTT 4 on Opening Day of the system in Glenferrie Rd RSC69 Bendigo 6 in McCrae St near the Depot end route to North Bendigo RSC70 P&MTT 4 in Glenferrie on opening day of the System RSC71 Scrubber 3 stripped and awaiting scrapping at Preston Workshops RSC72 Scrubber 4 at South Melbourne Depot RSC73 Q 191 & 139 at Preston Workshops awaiting scrapping RSC74 Rail Grinder 3 at Preston Workshops as purchased from Sydney RSC75 Y 469 waits to shunt at Wattle Park Terminus as Y1 613 departs on driver training duties RSC76 VR 53 on the outside roads at Essendon Depot RSC77 W5 796 with three doors and square windows running out of Brunswick Depot in Cameron St, with a supplementary destination board showing “City via Swanston St” RSC78 W2 258 on the wheel grinder road at Brunswick depot RSC79 X2 676 on a TMSV tour, W5 817 & 836 & VR 53 on the open roads at Essendon Depot RSC80 PCC 1041 on test, passes W71035 in High St Preston RSC81 D1 class production number 7 as delivered on test in Matthews Ave RSC82 W2 383 on route 5 turning from the reserved track in Dandenong Rd into St Kilda Rd at St Kilda Junction RSC83 Z3 204 as advertising tram for Vodaphone Grand Prix running into Malvern Depot new shed RSC84 Z1 4 on test in St Georges Rd RSC85 PCC 1041 on Route 96 in Burke St near Exhibition St RSC86 Z1 3 without numbers on test turning from Miller St in St Georges Rd RSC87 Track components stored in Coldblo Rd at Malvern Depot with Z class cars adjacent RSC88 D1 3501 in M Tram Livery on Route 55 in Peel St at Franklin St RSC89 C 3001 in Yarra Trams Livery Porto 018 & D13502 in M Tram Livery on Display in Harbourside Esplanade RSC90 D1 class tram production number 7, in as delivered condition on test in Matthews Ave RSC91 D1 3503 inside Malvern Depot RSC92 SW6 955 and W6 974 in St Kilda at City Rd at Dusk RSC93 Freight Car 19 at Preston Workshops in green Livery RSC94 Rail Grinder 3 in green Livery at South Melb Per Way Yard RSC95 A SW6 class car on route 50 shunting at Elizabeth St Terminus at night, taken from Flinders St Station RSC96 W2 588 & 435 in St Kilda Rd at Batman Ave RSC97 Y1 613 in service at Wattle Park Terminus RSC98 W2 588 in Wellington Parade en-route to the City with a Grand Final Load of passengers followed closely by 384 RSC99 W2 558 on a MCG Footy Special entering the Simpson St sidings RSC100 W3 657 & an L Class in the new shed at Malvern Depot RSC101 Y1 613 in St Kilda Rd on an enthusiasts tour in St Kilda Rd south of St Kilda jun RSC102 Y1 613 on an enthusiasts tour in Clarendon St with the two extra tracks on the Viaduct under construction RSC103 W6 976 on the fan of the new shed at Malvern Depot RSC104 W7 1024 as an advertising car for Bank of NSW at the route 1 terminus at South Melb Beach RSC105 PCC 980 on route 96 in Nicholson St near North Fitzroy Depot RSC106 SW6 890 with dash canopy lighting in Market St on the opening day of William St Services RSC107 W2 444 with big numbers heads a line of footy specials in Simpson St Sidings RSC108 Cable Cars in Elizabeth St RSC109 NMEL&T co 2 with a trailer outside the power station in Mount Alexander Rd RSC110 Alf Twentyman’s cable car set in his Northcote backyard RSC111 Cable Cars in Queens Parade Clifton Hill RSC112 Cable cars in Collins St outside the Townhall RSC113 PCC 1041 at Carnegie terminus RSC114 Cable cars in Elizabeth St RSC115 Cable cars in Collins St near Swanston St RSC116 HTT 19 turns from Riversdale Rd into Camberwell Rd at Camberwell Junction RSC117 W1 419 official builders photo of first car of the class RSC118 Cable car with a full load of passengers RSC119 W1 422 illuminated for the visit of T.R.H. The Duke and Duchess of York RSC120 PCC 1041 in strife on it’s maiden day in service. Trams on route 88 delayed in Queens Parade Clifton Hill RSC121 Bendigo birney in Finn St near North Bendigo terminus RSC122 SW6 in St Kilda Rd at Domain Rd at night RSC123 All 3 of Alf Twentyman’s cable cars in his Northcote backyard RSC124 Cable trailer 256 being unloaded into the shed at Bylands RSC125 Cable grip car 1 being removed from the Melbourne Museum RSC126 Alf Twentyman's cable cars in his Northcote Backyard RSC127 Alf Twentyman's cable cars in his Northcote Backyard RSC128 Alf Twentyman's cable cars in his Northcote Backyard RSC129 Alf Twentyman's cable cars in his Northcote Backyard RSC130 W class car in Swanston St at Collins St RSC131 Y1 469, L & W3 on the run out of Glenhuntly Depot on a tour RSC132 W7 1024 as an advertising tram for Bank of NSW at Clifton Hill RSC133 W2 496 on a footy special in Simpson St Sidings RSC134 W2 as originally converted to a test car at Preston Workshops RSC135 W3 667 in Brunswick Depot with Ellen Butland at the controls RSC136 W3 669 on it’s final run at Victoria Prd & Brunswick St RSC137 W2 571 in Wellington Prd at Clarendon St with a Footy Final load of Passengers RSC138 Y1 613 shunts at Spencer St Terminus as X217 waits on Australia Day Pageant RSC139 PCC 1041 on Rt 96 in Burke St outside the Southern Cross Hotel RSC140 890 with accident damage on the outside roads at Preston Workshops c1978 RSC141 535 on Rt 4 at the old St Kilda Jun c1967 RSC142 1041 on Rt 88 turns from Bourke St into Spring St 1973 RSC143 102 on a tour at Albert Park Beach Terminus Feb 1972 RSC144 833, 835 & 834 in the shed at Malvern Depot c1976 RSC145 281 in Wellington Parade on a football very crowded special c1974 RSC146 464 Ballarat Rd 1960 RSC147 181 Explosives Fty - at Footscray Station - July 1960 RSC148 181 Williamstown Road 1960 RSC149 Cable car set at Alf Twentyman’s c1970 RSC150 X 217 at Malvern Depot c1970 RSC151 X1 465 and T181 Footscray Football ground in Barkly St. c1960 RSC152 Scrubber 5 at South Melbourne depot c1960 RSC153 X1 465 Footscray to Russell St, c1960 RSC154 X1 467 Leeds St Footscray 1960 RSC155 PMTT 4 Glenferrie Road, 1910 RSC156 S 164 at Malvern Depot c1970 RSC157 T178 Footscray c1960 RSC158 Cleaner No. 7 at South Melbourne depot c1960 RSC159 Two Y classes at Princes Bridge / Batman Ave mid 1950s RSC160 Swanston St – Nu color vue slide – M142 Demonstrates the work of Ron Scholten in photography, collection and/or production of duplicate slidesAssembled album in a black presentation folder of 160 colour slides, 8 slide sleeves, collected or produced by Ron Scholten. Many are TMSV or Windsor Publications slides. All photographs have been scanned and placed on the Museum's G drive. A list of all photographs with details has been compiled. melbourne, tramways, trams, cable trams -
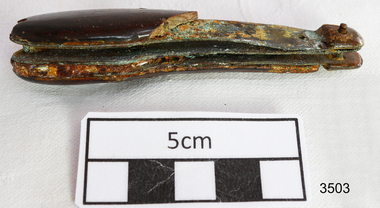 Flagstaff Hill Maritime Museum and Village
Pocket Knife, before 1878
Found on board the "Loch Ard" . 'Loch Ard" left Gravesend, England on 2nd March 1878, under the command of Captain Gibb, bound for Melbourne loaded with passengers and cargo. On June 1st 1878, almost at the end of her journey, she ran into a rocky reef at the base of Mutton Bird Island, near Port Campbell. Of the 54 crew members and passengers on board, only two survived: an apprentice, Tom Pearce and a young woman passenger, Eva Carmichael, who lost all of her family in the tragedy. The wreck of Loch Ard still lies at the base of Mutton Bird Island and much of the cargo has been salvaged. Some was washed up into what is now known as Loch Ard Gorge following the shipwreck. Amongst artefacts salvaged from the Loch Ard is the now famous Minton Peacock Statue which was destined for the Melbourne International Exhibition to be held in 1880 HISTORY OF THE LOCH ARD The LOCH ARD belonged to the famous Loch Line which sailed many ships from England to Australia. Built in Glasgow by Barclay, Curdle and Co. in 1873, the LOCH ARD was a three-masted square rigged iron sailing ship. The ship measured 262ft 7" (79.87m) in length, 38ft (11.58m) in width, 23ft (7m) in depth and had a gross tonnage of 1693 tons. The LOCH ARD's main mast measured a massive 150ft (45.7m) in height. LOCH ARD made three trips to Australia and one trip to Calcutta before its final voyage. LOCH ARD left England on March 2, 1878, under the command of Captain Gibbs, a newly married, 29 year old. She was bound for Melbourne with a crew of 37, plus 17 passengers and a load of cargo. The general cargo reflected the affluence of Melbourne at the time. On board were straw hats, umbrella, perfumes, clay pipes, pianos, clocks, confectionary, linen and candles, as well as a heavier load of railway irons, cement, lead and copper. There were items included that intended for display in the Melbourne International Exhibition in 1880. The voyage to Port Phillip was long but uneventful. At 3am on June 1, 1878, Captain Gibbs was expecting to see land and the passengers were becoming excited as they prepared to view their new homeland in the early morning. But LOCH ARD was running into a fog which greatly reduced visibility. Captain Gibbs was becoming anxious as there was no sign of land or the Cape Otway lighthouse. At 4am the fog lifted. A man aloft announced that he could see breakers. The sheer cliffs of Victoria's west coast came into view, and Captain Gibbs realised that the ship was much closer to them than expected. He ordered as much sail to be set as time would permit and then attempted to steer the vessel out to sea. On coming head on into the wind, the ship lost momentum, the sails fell limp and LOCH ARD's bow swung back. Gibbs then ordered the anchors to be released in an attempt to hold its position. The anchors sank some 50 fathoms - but did not hold. By this time LOCH ARD was among the breakers and the tall cliffs of Mutton Bird Island rose behind the ship. Just half a mile from the coast, the ship's bow was suddenly pulled around by the anchor. The captain tried to tack out to sea, but the ship struck a reef at the base of Mutton Bird Island, near Port Campbell. Waves broke over the ship and the top deck was loosened from the hull. The masts and rigging came crashing down knocking passengers and crew overboard. When a lifeboat was finally launched, it crashed into the side of LOCH ARD and capsized. Tom Pearce, who had launched the boat, managed to cling to its overturned hull and shelter beneath it. He drifted out to sea and then on the flood tide came into what is now known as LOCH ARD Gorge. He swam to shore, bruised and dazed, and found a cave in which to shelter. Some of the crew stayed below deck to shelter from the falling rigging but drowned when the ship slipped off the reef into deeper water. Eva Carmichael had raced onto deck to find out what was happening only to be confronted by towering cliffs looming above the stricken ship. In all the chaos, Captain Gibbs grabbed Eva and said, "If you are saved Eva, let my dear wife know that I died like a sailor". That was the last Eva Carmichael saw of the captain. She was swept off the ship by a huge wave. Eva saw Tom Pearce on a small rocky beach and yelled to attract his attention. He dived in and swam to the exhausted woman and dragged her to shore. He took her to the cave and broke open case of brandy which had washed up on the beach. He opened a bottle to revive the unconscious woman. A few hours later Tom scaled a cliff in search of help. He followed hoof prints and came by chance upon two men from nearby Glenample Station three and a half miles away. In a state of exhaustion, he told the men of the tragedy. Tom returned to the gorge while the two men rode back to the station to get help. By the time they reached LOCH ARD Gorge, it was cold and dark. The two shipwreck survivors were taken to Glenample Station to recover. Eva stayed at the station for six weeks before returning to Ireland, this time by steamship. In Melbourne, Tom Pearce received a hero's welcome. He was presented with the first gold medal of the Royal Humane Society of Victoria and a £1000 cheque from the Victorian Government. Concerts were performed to honour the young man's bravery and to raise money for those who lost family in the LOCH ARD disaster. Of the 54 crew members and passengers on board, only two survived: the apprentice, Tom Pearce and the young woman passenger, Eva Carmichael, who lost all of her family in the tragedy. Ten days after the LOCH ARD tragedy, salvage rights to the wreck were sold at auction for £2,120. Cargo valued at £3,000 was salvaged and placed on the beach, but most washed back into the sea when another storm developed. The wreck of LOCH ARD still lies at the base of Mutton Bird Island. Much of the cargo has now been salvaged and some was washed up into what is now known as LOCH ARD Gorge. Cargo and artefacts have also been illegally salvaged over many years before protective legislation was introduced. One of the most unlikely pieces of cargo to have survived the shipwreck was a Minton porcelain peacock - one of only nine in the world. The peacock was destined for the Melbourne International Exhibition in 1880. It had been well packed, which gave it adequate protection during the violent storm. Today, the Minton peacock can be seen at the Flagstaff Hill Maritime Museum in Warrnambool. From Australia's most dramatic shipwreck it has now become Australia's most valuable shipwreck artefact and is one of very few 'objects' on the Victorian State Heritage Register. The "Loch Ard" is registered on the National Shipwreck database and is protected as an Historic "Shipwreck. It is one of Australia's and Victoria's most tragic and most famous shipwrecks. The quantity of luxury and commercial items carried as cargo show the type and quality of goods passengers migrating to Australia at that time were bringing with them Flagstaff Hill’s collection of artefacts from LOCH ARD is significant for being one of the largest collections of artefacts from this shipwreck in Victoria. It is significant for its association with the shipwreck, which is on the Victorian Heritage Register (VHR S417). The collection is significant because of the relationship between the objects, as together they have a high potential to interpret the story of the LOCH ARD. The LOCH ARD collection is archaeologically significant as the remains of a large international passenger and cargo ship. The LOCH ARD collection is historically significant for representing aspects of Victoria’s shipping history and its potential to interpret sub-theme 1.5 of Victoria’s Framework of Historical Themes (living with natural processes). The collection is also historically significant for its association with the LOCH ARD, which was one of the worst and best known shipwrecks in Victoria’s history. Small pocket knife salvaged from the wreck of the Loch Ard. It has a dark brown cover on one side. Reverse side is only partly there. Both blades are missingflagstaff hill, warrnambool, shipwrecked coast, flagstaff hill maritime museum, maritime museum, shipwreck coast, flagstaff hill maritime village, great ocean road, loch line, loch ard, captain gibbs, eva carmichael, tom pearce, glenample station, mutton bird island, loch ard gorge, pocket knife, knife, tool -
 Federation University Historical Collection
Photograph - Photograph - Black and White, Ballarat Courier, Dick Richards and his sister, Mrs V.S. Greenhalgh with the Bust of Dick Richards, 06/1983
Dick Richards joined the Ballarat School of Mines in 1914, and soon afterwards was granted leave to join an expedition to Antartica. In 1915 he sailed from Australia with the Antartic Exploraton Expedition, led by Sir Ernest Shackleton. Most Antarctic enthusiasts know of Ernest Shackleton's attempt to cross the continent, only to be thwarted by the sinking of the ship 'Endurance'. Dick Richards was the physicist and sled manager for Shackleton's Ross Sea Party - with the task to meet Shackleton on the other side of the continent. When Shackleton planned his transcontinental crossing he decided to use supply depots as loads of supplies were too heavy to pull. The depots would enable Shackleton's party to carry just enough to reach the Pole, relying on the depots which were to be left by the Aurora's crew every 60 miles, stowed in 2 sledge journeys in 1915 and 1916. Dick Richards spent 3 freezing years in Antarctica between 1914 and 1917. Richards' worst experience was when his ship Aurora, tethered offshore, was blown away in a gale leaving Richards marooned for two years with nine other men on the ice floe. The expedition, consisting of two teams, were attempting to cross Antarctica from opposite sides, linking up somewhere near the middle. "That was with pretty poor equipment by today's standards, and we did not make it." (Dick Richards) The Ross Sea Party arrived in McMurdo Sound aboard the Aurora in January 1915. The men planned to make two sledging trips to leave supply depots every 60 nautical miles to Mount Hope about 400 miles away. The going was tough as the sledges were overloaded. Temperatures were as low as minus 68F. In June 1916 the party crossed on foot to Cape Evans, occupied Scott's Hut (from his Terra Nova Expedition, erected in January 1911) in May 1915, for two months. On 10 January 1917 Richards was hunting for seals when he saw a ship on the horizon. It was 'The Aurora'. Picking up the relieved survivors 'The Aurora' arrived in New Zealand on 9 February 1917 to a hero's welcome. Joyce, Wild, Hayward and Richards later won the Albert Medal for their heroic devotion to duty. Later an inlet on the Antartic continent was named after Richards. Dick Richards wrote the following years after the ordeal "To me no undertaking carried through to conclusion is for nothing. And so I don't think of our struggle as futile. It was something the human spirit accomplished." Prime Minister Bob Hawke wrote in 1984 'Your incredible journey of almost 2000 miles across the Antarctic Wastelands - involving some 9 months in the field with makeshift equipment - and you're adherence to duty in the face of enormous difficulty, suffering from scurvy, and the death of comrades, will; be an inspiration to your countrymen of the future as it is to us today." After returning to Australia Dick Richards resumed his work at SMB as Lecturer in Physics and Mathematics, and developed many pieces of experimental equipment. During World War Two he acted as a scientific adviser in the production of optical apparatus in Australia. In 1946 he was appointed Principal and twelve years later he retired after a total of 44 years service. Dick Richards has been honoured through the naming of a Ballarat School of Mines prize - The R.W. Richards Medal. This medal later became a University of Ballarat prize. It has been awarded annually since 1959 to the Bachelor of Applied Science graduate considered to have achieved the most outstanding academic performance of their course. (See http://guerin.ballarat.edu.au/aasp/is/library/collections/art_history/honour-roll/honourroll_Richards,Dick.shtml )A man and lady inspect a bust of Richard (Dick) Richards by sculptor Victor Greenhalgh. The scultpure is at the Ballarat School of Mines. The man is Dick Richards, and the woman is his sister and wife of sculptor Victor Greenhalgh. Both Dick Richards and Victor Greenhalgh were former students and teachers at the Ballarat School of Mines. The bust of Dick Richards was Victor Greenhalgh's last work and was cast in bronze after his death. The bust was presented to the Ballarat School of Mines by Mrs V.S. Greenhalgh (widow of the sculptor and sister of the subject). At the presentation Victor Greenhagh's son said "the two men had been friends as well as brothers-in-law, were of similar age, both enjoyed red wine, beer and cricket and both were educationalists, one an artist the other a mathematician."dick richards, r.w. richards, richards, richard w. richards, victor greenhalgh, bust, sculpture, ballarat school of mines, antarctica, ross shore -
 Flagstaff Hill Maritime Museum and Village
Weapon - Carronade
This deck cannon is believed to be a replica Carronade as it has no foundry mark, year of manufacture, proof marks or weight of carronade on it. However, its design matches the design of Carronades used in the early to mid 19th century. History: The carronade was designed as a short-range naval weapon with a low muzzle velocity for merchant ships, but it also found a niche role on warships. It was produced by the Carron iron works and was at first sold as a complete system with the gun, mounting, and shot altogether. Carronades initially became popular on British merchant ships during the American Revolutionary War. A lightweight gun that needed only a small gun crew and was devastating at short range was well suited to defending merchant ships against French and American privateers. Its invention is variously attributed to Lieutenant General Robert Melville in 1759, or to Charles Gascoigne, manager of the Carron Company from 1769 to 1779. In its early years, the weapon was sometimes called a "mellvinade" or a "gasconade". The carronade can be seen as the culmination of a development of naval guns reducing the barrel length and thereby the gunpowder charge. The Carron Company was already selling a "new light-constructed" gun, two-thirds of the weight of the standard naval gun and charged with one-sixth of the weight of the ball in powder before it introduced the carronade, which further halved the gunpowder charge. The theory of its design was to use less powder and had other advantages that were advertised in the company's sales pamphlet of the time, state. The smaller gunpowder charge reduced the barrel heating in action, also reduced the recoil. The mounting, attached to the side of the ship on a pivot, took the recoil on a slider, without altering the alignment of the gun. The pamphlet advocated the use of woolen cartridges, which eliminated the need for wadding and worming, although they were more expensive. Carronades also simplified gunnery for comparatively untrained merchant seamen in both aiming and reloading that was part of the rationale for adopting the gun. Other advantages promoted by the company were. The replacement of trunnions by a bolt underneath, to connect the gun to the mounting, reduced the width of the carriage that enhanced the wide angle of fire. A merchant ship would almost always be running away from an enemy, so a wide-angle of fire was much more important than on a warship. A carronade weighed a quarter as much as a standard cannon and used a quarter to a third of the gunpowder charge. This reduced charge allowed Carronades to have a shorter length and much lighter weight than long guns. Increasing the size of the bore and ball reduces the required length of the barrel. The force acting on the ball is proportional to the square of the diameter, while the mass of the ball rises by the cube, so acceleration is slower; thus, the barrel can be shorter and therefore lighter. Long guns were also much heavier than Carronades because they were over-specified to be capable of being double-shotted,(to load cannons with twice the shot, for increased damage at the expense of range). Whereas it was dangerous to do this in a carronade. A ship could carry more carronades, or carronades of a larger caliber, than long guns, and carronades could be mounted on the upper decks, where heavy long guns could cause the ship to be top-heavy and unstable. Carronades also required a smaller gun crew, which was very important for merchant ships, and they were faster to reload. Additional notes: Cannon cast in England, Wales and Scotland had their imperial weight chiselled or engraved in the format of 4-2-0 on the bottom of the cascabel, indicating the weight of the cannon as 4 hundredweight, 2 quarters and 0 pounds. Since a hundredweight equals 112 pounds and a quarter weight is 28 pounds the total weight is 504 pounds or about 228 kilograms. The small bore replica carronade and carriage is part of a collection of nineteenth Century Flagstaff Hill Guns and cannons, and is a representation of carronades used from the early 18th up to the 1850s on merchant and military ships particularly the British Royal Navy until 1850. This example is not significant in the historic sense but demonstrates the type of artillery used aboard vessels of the time for protection & offensive military actions. Cannon, cast iron, small smooth bore cannon on the stepped wooden carriage with wooden wheels. It appears to fire a 12-pound cannonball. The Cannon barrel can have its elevation adjusted via a sliding sloped block at the rear of the cannon. Gun carriage has loops for locating and holding the carriage in position with the use of ropes. It is believed this carronade is a replica of a mid-to-late 19th-century Carronade cannon.Cast into metal; [Royal emblem of Queen Victoria (VR "Victoria Regina")]warrnambool, flagstaff-hill, flagstaff-hill-maritime-museum, maritime-museum, shipwreck-coast, flagstaff-hill-maritime-village, cannon, naval cannon, cannon on carriage, 19th century cannon, fortifications, smooth bore cannon, 12 pounder, carronade, artillery, replica, deck cannon, cannon in carriage, ship cannon -
 Old Colonists' Association of Ballarat Inc.
Photograph - Photograph - Colour, Ballarat Old Colonists' Association Homes, Charles Anderson Grove, Ballarat
HISTORY OF THE BALLARAT OLD COLONISTS' ASSOCIATION HOMES AT CHARLES ANDERSON GROVE, LAKE GARDENS One of the original objectives of the Association was “to provide the shelter of a house for those Pioneers of the Goldfields whom the reverses of fortune have deprived of the means of procuring the comforts of life in their declining years.” While the first home at Charles Anderson Grove was built in 1925 the Association had previously provided relief for needy pioneers from the time it was formed in 1883. Relief included monthly monetary payments, loads of firewood, medical assistance and distribution of Christmas boxes of groceries to deserving pensioners and in some cases payment of burial costs. Records indicate that in September 1922 three of the pensioners being assisted by the Association were accepted as residents in the newly erected Hassell Homes in Gillies Street (now demolished-opposite the High School). The first site for an Asylum for Indigent Members of the Old Colonists' Association was temporarily reserved from sale in October 1891. The site was approximately 28 acres in area in Mt Clear nearly opposite Midvale Shopping Centre in Main Road. The site was heavily timbered and when cleared over 260 tons of wood was sold to the Woah Hawp Gold Mining Company. A set of gates were erected but no homes built, although a plan for this reserve was drawn which showed twenty buildings ranging from one to four unit per building. The reserve was revoked in November 1909. The second site temporarily reserved in November 1909 as an Asylum was in Alfredton and consisted of some 7 acres and was adjacent to land reserved for an Abattoirs for the Ballarat Council. The reserve was revoked in February 1912 as it was deemed more appropriate to be added to the Abattoir site. Council suggested four (4) other sites in exchange for this land and they were inspected by the President, Vice President and Secretary on 22 December 1912. The first site inspected was land on the west side of Creswick Road opposite the brick kilns (now occupied by the showgrounds and oval). The land was described as being good quality, well fenced, no trees, good drainage and ample acreage but some distance from trams. The second site was Perry Park which was described as being good land, well fenced, having frontage to Gillies Street, good drainage and about 26 acres (but subsequently reduced to 10 acres). It was closely planted with Pinus Insignias and Wattle and had easy access from the Botanic Gardens tram. The third site was the North West portion of Victoria Park (corner of Sturt and Gillies Street) and was described as good land, well fenced and drained and well located. The fourth site was the South West corner of Victoria Park and known as Pound Paddock (corner of Winter Street and Gillies Street). It was considered to be low lying and too close to the Abattoir, and was also a considerable distance from trams. While the third site was recommended as the most suitable for the erection of homes it was considered unwise from the point of view as citizens to reduce the acreage of the park and therefore it was recommended that the Perry Park site be asked for as the most acceptable to the Association for the building of homes. The site was eventually temporarily reserved for an Asylum for Indigent Members of the Association in April 1914 with the gates from Mt Clear having been removed to the site a year earlier and eventually erected in 1917 for £12.10.0. In the same year the first 290 pine trees were advertised for removal in July and sold for £16. A sign indicating that the site was reserved for the erection of cottages was erected in September 1917. Stripping of the wattle bark (for tanning) and the cutting of the wood occurred in November 1918 with the land then being leased until it was required for the construction of the first homes in 1924. While the site was the third to be reserved it was the only one which was used for its intended purpose. It was named as Charles Anderson Grove in honour of Charles Anderson who joined the Association in 1918 and was President of the Association from 1942 to 1944. A number of cottages in the Ballarat Old Colonists' Association Retirement Village of Gillies Street, Ballarat.charles anderson grove, old colonists' club, ballarat, old colonists' association, old colonists' homes, retirement village -
 Flagstaff Hill Maritime Museum and Village
Ceramic - Ceramic Piece, Minton Potteries, ca 1877
The ceramic piece is one of five porcelain fragments washed up from the Loch Ard wreck near Port Campbell, Victoria. These fragments resemble the foot and leg of a large bird, and legend has it that another bird had drifted ashore at the same time as the Loch Ard peacock. This figurine is on display at Flagstaff Hill Maritime Museum and regarded as the most valuable shipwreck relic. It is believed that all five fragments could belong to another peacock or a Minton porcelain stork that had been photographed in a Home Beautiful magazine in 1928. This stork appeared to be missing a leg and foot, and experts have hypothesised that the five fragments could belong to this stork, the whereabouts of which are currently unknown. A brief history of the Loch Ard (1873-1878): - The sailing ship Loch Ard was one of the famous Loch Line of ships that sailed the long voyage from England to Australia. Barclay, Curdle and Co. built the three-masted iron vessel in Glasgow in 1873. It had sailed three trips to Australia and one trip to Calcutta before its fateful voyage. Loch Ard left England on March 2, 1878, under the command of recently married, 29-year-old Captain Gibbs. It was bound for Melbourne with a crew of 37, plus 17 passengers. The general cargo reflected the affluence of Melbourne at the time. Onboard were straw hats, umbrellas, perfumes, clay pipes, pianos, clocks, confectionery, linen and candles, and a heavier load of railway irons, cement, lead and copper. Other cargo included items intended for display in the Melbourne International Exhibition of 1880. The Loch Ard had been sailing for three months and was close to its destination on June 1, 1878. Captain Gibbs had expected to see land at about 3 am, but the Loch Ard ran into a fog that greatly reduced visibility, and there was no sign of land or the Cape Otway lighthouse. The fog lifted at 4 am, and the sheer cliffs of Victoria's west coast were much closer to them than Captain Gibbs expected. He tried to manage the vessel but failed, and the ship struck a reef at the base of Mutton Bird Island, near Port Campbell. The top deck loosened from the hull, and the masts and rigging crashed down, knocking passengers and crew overboard. The lifeboat was launched by Tom Pearce but crashed into the side of Loch Ard and capsized. He clung onto its overturned hull and sheltered under it. He drifted out to sea, and the tide brought him back to what is now called Loch Ard Gorge. He swam to shore and found a cave for shelter. A passenger, Eva Carmichael, had raced onto the deck to find out what was happening and was confronted by towering cliffs above the ship. She was soon swept off the ship by a huge wave. Eva saw Tom Pearce on a small rocky beach and yelled to attract his attention. He swam out and dragged her to the shelter of the cave. He revived her with a bottle of brandy from a case that had washed up on the beach. Tom scaled a cliff in search of help and followed some horse hoof prints. He came from two men from Glenample Station, three and a half miles away. He told the men of the tragedy and then returned to the gorge while the two men rode back to the station to get help. They reached Loch Ard Gorge and took the two shipwreck survivors to Glenample Station to recover. Eva stayed at the station for six weeks before returning to Ireland by steamship. In Melbourne, Tom Pearce received a hero's welcome and was presented with a medal and some money. Of the 54 crew members and passengers on board, only two survived: the apprentice, Tom Pearce and the young woman passenger, Eva Carmichael, who lost her family in the tragedy. The shipwreck of the Loch Ard is of significance for Victoria and is registered on the Victorian Heritage Register ( S 417). Flagstaff Hill has a varied collection of artefacts from Loch Ard and its collection is significant for being one of the largest accumulation of artefacts from this notable Victorian shipwreck. The collections object is to also give us a snapshot into history so we can interpret the story of this tragic event. The collection is also archaeologically significant as it represents aspects of Victoria's shipping history that allows us to interpret Victoria's social and historical themes of the time. The collections historically significance is that it is associated unfortunately with the worst and best-known shipwreck in Victoria's history.Ceramic piece, broken, with remnants of burgundy, green and yellow glaze. The piece has been shaped. It could be a peacock leg section with green foliage with glaze. Noneflagstaff hill, flagstaff hill maritime museum and village, warrnambool, maritime museum, maritime village, great ocean road, shipwreck coast, ceramic, porcelain, piece, fragment, ceramic bird, loch ard, shipwreck, salvage, recover, 1877, 1878, minton, shard -
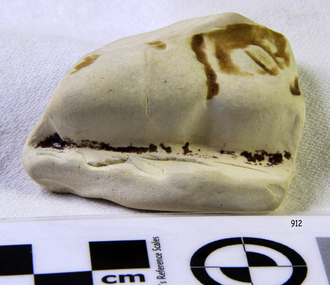 Flagstaff Hill Maritime Museum and Village
Ceramic - Ceramic Piece, Minton Potteries, ca 1877
The ceramic piece is one of five porcelain fragments washed up from the Loch Ard wreck near Port Campbell, Victoria. These fragments resemble the foot and leg of a large bird, and legend has it that another bird had drifted ashore at the same time as the Loch Ard peacock. This figurine is on display at Flagstaff Hill Maritime Museum and regarded as the most valuable shipwreck relic. It is believed that all five fragments could belong to another peacock or a Minton porcelain stork that had been photographed in a Home Beautiful magazine in 1928. This stork appeared to be missing a leg and foot, and experts have hypothesised that the five fragments could belong to this stork, the whereabouts of which are currently unknown. A brief history of the Loch Ard (1873-1878): - The sailing ship Loch Ard was one of the famous Loch Line of ships that sailed the long voyage from England to Australia. Barclay, Curdle and Co. built the three-masted iron vessel in Glasgow in 1873. It had sailed three trips to Australia and one trip to Calcutta before its fateful voyage. Loch Ard left England on March 2, 1878, under the command of recently married, 29-year-old Captain Gibbs. It was bound for Melbourne with a crew of 37, plus 17 passengers. The general cargo reflected the affluence of Melbourne at the time. Onboard were straw hats, umbrellas, perfumes, clay pipes, pianos, clocks, confectionery, linen and candles, and a heavier load of railway irons, cement, lead and copper. Other cargo included items intended for display in the Melbourne International Exhibition of 1880. The Loch Ard had been sailing for three months and was close to its destination on June 1, 1878. Captain Gibbs had expected to see land at about 3 am, but the Loch Ard ran into a fog that greatly reduced visibility, and there was no sign of land or the Cape Otway lighthouse. The fog lifted at 4 am, and the sheer cliffs of Victoria's west coast were much closer to them than Captain Gibbs expected. He tried to manage the vessel but failed, and the ship struck a reef at the base of Mutton Bird Island, near Port Campbell. The top deck loosened from the hull, and the masts and rigging crashed down, knocking passengers and crew overboard. The lifeboat was launched by Tom Pearce but crashed into the side of Loch Ard and capsized. He clung onto its overturned hull and sheltered under it. He drifted out to sea, and the tide brought him back to what is now called Loch Ard Gorge. He swam to shore and found a cave for shelter. A passenger, Eva Carmichael, had raced onto the deck to find out what was happening and was confronted by towering cliffs above the ship. She was soon swept off the ship by a huge wave. Eva saw Tom Pearce on a small rocky beach and yelled to attract his attention. He swam out and dragged her to the shelter of the cave. He revived her with a bottle of brandy from a case that had washed up on the beach. Tom scaled a cliff in search of help and followed some horse hoof prints. He came from two men from Glenample Station, three and a half miles away. He told the men of the tragedy and then returned to the gorge while the two men rode back to the station to get help. They reached Loch Ard Gorge and took the two shipwreck survivors to Glenample Station to recover. Eva stayed at the station for six weeks before returning to Ireland by steamship. In Melbourne, Tom Pearce received a hero's welcome and was presented with a medal and some money. Of the 54 crew members and passengers on board, only two survived: the apprentice, Tom Pearce and the young woman passenger, Eva Carmichael, who lost her family in the tragedy. The shipwreck of the Loch Ard is of significance for Victoria and is registered on the Victorian Heritage Register ( S 417). Flagstaff Hill has a varied collection of artefacts from Loch Ard and its collection is significant for being one of the largest accumulation of artefacts from this notable Victorian shipwreck. The collections object is to also give us a snapshot into history so we can interpret the story of this tragic event. The collection is also archaeologically significant as it represents aspects of Victoria's shipping history that allows us to interpret Victoria's social and historical themes of the time. The collections historically significance is that it is associated unfortunately with the worst and best-known shipwreck in Victoria's history.Ceramic piece, broken with remnants of glaze. It has been shaped. It may be from a peacock leg section.Noneflagstaff hill, flagstaff hill maritime museum and village, warrnambool, maritime museum, maritime village, great ocean road, shipwreck coast, ceramic, porcelain, piece, fragment, ceramic bird, loch ard, shipwreck, salvage, recover, 1877, 1878, minton, shard -
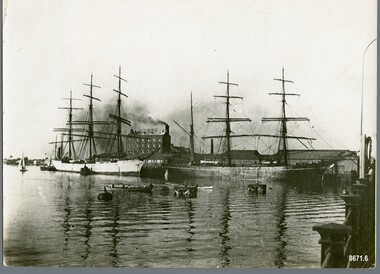 Flagstaff Hill Maritime Museum and Village
Photograph - Vessels, Sailing Ships, Circa 1910 - 1913
This photograph was one of ten photographs donated to Flagstaff Hill Maritime Museum and Village by Fred Trewartha. Frederick John Fox Trewartha (Fred) was a well-known Warrnambool businessman. He was born in Beeac near Geelong in 1920 and came to Warrnambool with his family as a very young child. He was apprenticed to his father John, as a saddler and later opened his own shop on Raglan Parade. He then moved into working with tarpaulins and canvases for the trucking industry. Fred was keenly interested in photography (and was a member of the Warrnambool Cine Club), yachting and boat building. He kept his yacht moored at Port Fairy for many years and participated in sailing events locally and interstate. He also built boats with his sons. He had the opportunity to meet many older sailors and it's thought this photo (and others in the set) may have been given to him by one of these men. Fred Trewartha died in 2016 in Warrnambool. There is some conflict re the identity of the ship in the foreground of this photograph. It has been identified as the "Dimsdale" by the original owner of this photograph and by the website "Photos of the Past" which have an identical copy of the photo, however the State Library of South Australia (who also have an identical copy of the photograph) have identified the date of the photograph as 1910 and the ship as the "Ainsdale". The "Dimsdale" and the "Lobo" were recorded several times in the local shipping news as being docked at the Port of Adelaide, at the same time, during the years 1912 and 1913, whereas the "Ainsdale" wasn't in Adelaide very often but was recorded as coming in and out of the Port of Adelaide in the years 1915 and 1916. On February 25th 1916, the two ships (the "Ainsdale" and "Lobo") were both in the Port of Adelaide at the same time, but the "Ainsdale" was loading at Outer Harbor and the "Lobo" was discharging timber at Corporation Wharf. The "Ainsdale" was owned by the same firm that had owned the "Dimsdale". The Dimsdale was a three masted steel ship built in 1890 by C. J. Bigger of Londonderry. It became notorious when it struck the Wonga Shoal lighthouse near Port Adelaide on the night of 17th November 1912, destroying the structure and killing two lighthouse keepers. The accident was investigated by the Marine Board, the Coroner, the Police Court, the Admiralty Court and by the Criminal Courts of South Australia where the Captain (John Jones) was charged with manslaughter and found "not guilty". The Dimsdale was sold to a Norwegian firm and its name was changed to "Kwango". It sank in 1915 near the Magdalen Islands in the Gulf of St. Lawrence. The "Lobo" was a well known "windjammer" trading from the Port of Adelaide to other parts of the world. For a number of years it was employed in the New Zealand and Tasmanian services, after which it made several voyages to North America. It was an iron barque of 945 tons, built at Sunderland in 1877 by Osbourne, Graham and Company. On October 18th 1916, the Lobo (owned by Walter and Morris, timber merchants) was on a voyage from Parapato (Mozambique) to New York with a cargo of mango bark and ebony, when it struck rocks and ran aground 30 miles east of the Angoche River in Portuguese East Africa. A detailed account of the incident, written by Mrs Murchison (the Captains wife who was on board with her two year old son) was published in the Adelaide newspaper "The Mail" on Saturday 9th December 1916. She, and several of the crew were put in a boat early in the morning and sent away from the wreck. Several hours later, they were joined by Captain Murchison and the remainder of the crew. They were in their small open boats for several hours before landing on a small uninhabited island where they remained for several days before being picked up by another vessel and taken back to Parapato. The captain was able to obtain a position on a steamer which took him and his wife and child back to England.This photograph is significant as a record of the world wide mercantile trade Australia was engaged in at the end of the nineteenth century and beginning of the twentieth century and as a record of the dangers faced by the crews of these ships.A black and white photograph showing two large sailing ships moored at a dock. There are industrial buildings in the background (one has smoke coming from its chimney) and several smaller craft (a rowing boat, two small boats that may be tugs and a little yacht) at the side of the ships. Pylons can be seen in the water and a metal fence is in the bottom right corner. On the back of the photo the words "Ship Dimsdale" and "Bk Lobo" are written diagonally across the top left corner in pencil. A beige paper label has been attached to the top right corner with the words "Dimsdale at Port Adelaide" and "Port Adelaide Historical Society may be interested" written in black ballpoint pen."Ship Dimsdale" / "Bk Lobo" ""Dimsdale" / at Port Adelaide" "- Port Adelaide Historical /Society may be / interested"warrnambool, dimsdale, lobo, barque lobo, port of adelaide, kwango, wonga shoal lighthouse, fred trewartha, ainsdale, frederick john fox trewartha, captain john jones, windjammer, iron barque, parapato -
 Melbourne Tram Museum
Album - Charles Craig - part 1 of 2, 1950s to 1970s
Photo - see pdf file for further information. Number Brief Description CC1 S178 at Elsternwick level crossing track works CC2 Building East Preston Depot 1955 CC3 Camberwell depot – post WW2 – lots of trams and a black cat CC4 W2 584 and SW6 958 northbound – Chapel St and Brighton Road CC5 W2 357 – southbound, Chapel St Brighton Road CC6 Pascoe Vale Road, Raceday working – note the signal CC7 The Preston Workshops - The Argus, post WW2, 223, 647 et al CC8 923 or is it 922 being built at Preston – The Argus photo - CC8A 832 being positioned onto trucks at Preston after an overhaul – Argus Photo – see also CC306 CC9 Footscray depot` CC10 W5 797 in St Kilda Road during track works – 1950s CC11 W2 457 at Kew Post Office CC12 Wellington Parade – W2 432, 492 and 337 – special event CC13 Swan St line up of trams – football? Or other special event – Sinclair’s bus on the right side. CC14 W2 630 being washed at a depot – The Argus photo CC15 Royal Park line at Flemington Road – W2 355 and W5 786 CC16 Nicholson St track construction from a tram cab CC17 T181 on tour at Gordon St CC18 T181 on Maribyrnong Bridge CC19 Ditto at River St just off bridge CC20 As for CC18 CC21 At Raleigh Rd CC22 T181 at Footscray depot CC23 Track construction, Nicholson, just north of Gertrude CC24 Commissioning overhead Bourke St tram 988 CC25 Queens Parade – 997 and 994 CC26 Swapping trolley wheel to skid – commissioning CC27 Track construction in Gertrude St CC28 985 in Queens Parade running special CC29 997 in Queens Parade CC30 1033 at North Fitzroy – AETA Special CC31 Bourke St at Elizabeth St – has passengers on board CC32 W6 985, 996 Queens Parade, Mk 3 bus 333 CC33 As above CC34 Showing construction at Nicholson & Gertrude – Bourke St CC35 W2 223 on Burnley temporary bridge – VR track expansion CC36 W5 823 – ditto CC37 Tram on old bridge prior to removal CC38 W2 433 on temporary bridge with new bridge beams and old track CC39 Looking down showing temporary single track – Swan St CC40 Tait train passing under tram bridge CC41 SW6 on single line – off loading CC42 W2 547 at City Road Junction CC43 City Road Jtn – 1969 – 596 and 771 CC44 City Road Jtn – 1969 – 596 and 771 (same as CC45 438 in Flinders St CC46 355 somewhere CC47 552 somewhere CC47A 364 at Preston Workshops? CC48 W2 334 on Traverser – Preston Workshops CC49 Wellington pade – large line up of trams, c1950 925, and 611 CC50 W2 493 Franklin st – advertising for Savings Certificates CC51 Possibly 551 with advertising for fund raising for Blind institute CC52 249 at Hawthorn – Riversdale Junction – with a Tally Ho and Village Fair Aux. board CC53 MMTB Postcard of 511 CC54 Wattle Park terminus with Single line warning sign CC55 Wattle Park Duplication CC56 36 at Domain Junction – 833 CC57 36 at Domain Junction CC58 36 at Domain Junction with 810 and 833 CC59 36 in Swanston by Flinders St Station CC60 36 in Spencer St at A’Beckett CC61 36 crossing Collins St CC62 36 crossing Collins St CC63 36 northbound in St Kilda Road with Shrine in background CC64 36 northbound in Swanston St at Flinders St CC65 Postcard – Ballarat 36 in Domain Road CC66 Postcard - Stampshow – Hawthorn Horse tram CC67 Postcard - Stampshow – Peace cable tram CC68 Postcard - 1041 and cable car set 1 at Preston CC69 Postcard - Colins & Elizabeth – greetings from old Melbourne CC70 Postcard - Cable car set at Preston CC71 Postcard - Twentyman’s cable cars CC72 Postcard - Nu-color-vue – horse tram 256 CC73 Cable car set – Market & Flinders CC74 Cable trams at Twentymans’ in their shed CC75 Cable tram track at Bourke & Spencer prior to removal CC76 Cable tram bogie at Preston Workshops – used as a dolly CC77 Cable trams at Twentymans’ CC78 Postcard - Valentines – Bourke looking west from Swanston CC79 Postcard - Rose 3938 – Bourke at Swanston – the Leviathan building CC80 Postcard - Valentines – Elizabeth St looking south from Collins – No. 19 CC81 Postcard - Rose P4765 – Bourke St Melbourne CC82 Postcard - Rose 4090 – cable tram passing Parliament house CC83 Postcard - Valentines – GPO Elizabeth St CC84 Interior of cable trailer with clothing on a set CC85 Elizabeth St looking north CC86 Cigarette card - Collins St No. 41- WD HO Wills CC87 Postcard - Rialto building with cable set CC88 Postcard - Valentines - Swanston at Flinders looking north CC89 CC90 Q 150 Hanna St – dated on rear CC91 176 turning – photo ex Alan Jungworth CC92 161 on Princes Bridge – minimum fare 4d sign and Inspector CC93 459 at Point Ormond CC94 158 at Gordon St – side on view CC95 X 217 in Swanston St CC96 X 217 in Swanston St with an East Brighton destination CC97 T177 CC98 T177 Peel St – no destination roll – being transferred? CC99 X1 462 in Glenhuntly Road to Point Ormond CC100 X1 462 in Glenhuntly Road to Elsternwick Rly Station CC101 X1 462 in Glenhuntly Road to Point Ormond CC102 Q 150 Hanna St CC103 190 at Camberwell Depot CC104 T182 at Footscray CC105 X1 466 and W2 at Footscray CC106 190 at Camberwell Depot CC107 X1 467 Barkly St Footscray CC108 X2 679 turning into William St from La Trobe St CC109 X2 677 Glenhuntly Road with Point Ormond Destination CC110 Postcard T180 CC111 Postcard format – X1 467 on a truck – see also CC178 CC112 Postcard format – X1 467 at Wantirna South CC113 Q200 and SW6 896 at Thornbury – has labels on rear CC114 T177, Ballarat Road – has labels on rear CC115 T178 at Point Ormond CC116 Postcard X1 465 and 466 CC117 Postcard – X2 676 CC118 Postcard – TMSV X2 217 CC119 810 on temporary bridging – 24-12-67 CC120 W2 575 – Queens Parade junction in, still temporary bridging, substation under construction CC121 Forming Queens Parade Junction base slab CC122 W2 596 prior to tramway works – all tracks still in position CC123 It’s a mass of reinforcing – bridging being formed CC124 Looking north with substation being built CC125 Looking east with some rather tight curves, Wellington St still in use CC126 SW6 958 ex Wellington St with all tracks and signal box and buildings. CC127 Victoria Pde at Gisborne looking east – at least 4 cars CC128 SW6 893? With dash canopy lights and SW6 862 and a man with a newspaper CC129 SW6 894 on the S curves, with tram in Wellington St CC130 Similar photo CC131 W2 564 turning into Wellington St – the concrete tracks are not that old CC132 W2 552 running out of Wellington St CC133 W5 732 from Fitzroy St into St Kilda Road with next iteration in position – very wonky CC134 W5 764 turning into Fitzroy St CC135 SW6 947 turning from Wellington St CC136 W2 586 running out of High St CC137 W2 500 turning into Wellington St CC138 W2 543 in Wellington St inbound CC139 L103 with St Kilda Junction destination, and a tower truck on right CC140 Workmen – new track in Queensway in use CC141 Ditto CC142 L103 in Queensway, and another car in bound CC143 Looking east along Wellington St which has been taken out of use. Also a MMTB Roller CC144 W5 824 and a W2 and all types of wobbly temporary track CC145 W2 354 to High St CC146 Sw6 947 on the S bends CC147 W2 500 looking north – tram on the S bends CC148 SW6 896 leaving the S bend CC149 W2 357 and a MMTB City bus with trees/gardens on the side CC150 W5 817 Elliot Ave – see also CC302 CC151 W2 552 – note the large trolley bridge CC152 W2 550 at depot or workshops CC153 1B truck CC154 SW2 432 CC155 W2 155 at Glenhuntly CC156 SW6 937 on AETA tour? CC157 X2 677 on Footscray service – Ballarat Rd? CC158 W2 641 – High St Kew? CC159 SW6 847 – Power St Hawthorn CC160 Simpson St – big line up CC161 W2 546 truck No. 1? CC162 W2s at Glenhuntly depot CC163 No. 15 truck under 899 CC164 206 and other junk at Preston Workshops CC165 W in Swanston St Melbourne – Rose series card CC166 Y1 613 Batman Ave?? or William St at Collins CC167 Tram plans CC168 X 217 Swanston St – see also 95 and 96 CC169 217 in Swanston St – same as 95 CC169A 192 in St Kilda Road at Princes bridge CC170 192 in St Kilda Road at Princes bridge CC171 Bendigo 3 arriving Malvern depot – being unloaded CC172 Ditto CC173 T180 at a depot CC174 X1 463 wheel set CC175 C30 – dog car side view – close up CC176 C30 dog car CC177 206 and 30 at Preston Workshops CC178 X1 467 on a truck – see CC111 also CC179 42 CC180 42 at a depot, no destination box CC181 W2 556 1A type truck CC182 Flinders St Station – Rose Series CC183 W7 1035 Spring – Nicholson St CC184 W7 1022 MMTB Post Card CC185 Adelaide 178 – has on rear – R. Lilburn 4/82 CC186 Adelaide 175 – has on rear – R. Lilburn 4/82 CC187 Y1 610 on AETA tour CC188 Y1 610 on AETA tour with large group – Point Ormond CC189 AETA display – has GH55-32 in pencil on rear CC190 AETA display – has GH55-29 in pencil on rear CC191 Y1 610 on AETA tour with large group – Point Ormond CC192 VR 53 at Footscray CC193 VR cars 40 and 34 at Elwood wash dock CC194 W7 1024 as the 1970 Christmas tram CC195 Geelong – loading a set of 22E trucks CC196 Geelong 10 and 23 running an AETA special CC197 Geelong – AETA special CC198 Geelong 7 at Junction CC199 Geelong 10, in the city CC200 Geelong 33 with Belmont destination CC201 Geelong 15 Eastern Park destination 29-3-1948 CC202 Geelong 23 at Railway Station – 29-3-1948 CC203 Geelong 23 at Railway Station – 29-3-1948 CC204 Geelong – loading a bogie tram CC205 Geelong – loading a bogie tram CC206 Geelong 40 – loaded on truck CC207 Geelong 40 – on jacks CC208 Geelong 40 on jacks – 19 behind CC209 Geelong 38 with two workers on either side CC210 – 214 Australian Historic Tramways stamp folder and set CC215 Bendigo 17 at depot – has dup JBS on rear CC216 Bendigo 20, 29 bogie and straight sill car at Charing Cross CC217 Bendigo one man bogie Pall Mall CC218 Bendigo – Bogie 23, other cars and welding truck at depot CC219 Bendigo 7 with Quarry Hill destination CC220 Bendigo 21 with Lake Weerona destination CC221 ESCo 18 Ballarat CC222 Ballarat bogie 22 on AETA special CC223 Ditto CC224 Ballarat 34 at Stones Corner – R Lilburn CC225 Ballarat 15 in Bridge St – R Lilburn CC226 Ballarat 40 at Gardens – R Lilburn CC227 Ballarat 37 running out of depot – R Lilburn CC228 Postcard – Valentines – Sturt St with loaded horse tram trailer CC229 AETA Geelong tram tour ticket – 29-3-1948 CC230 Postcard – Geelong – Valentine 2114 – T&G building CC231 Postcard – PMTT ! – High St Malvern CC232 Postcard – Empire – Glenferrie Road, Malvern at Wattletree Rd CC233 Postcard Y469, MMTB CC234 Postcard Z2 Spring St CC235 Postcard – Z1 MMTB CC236 Postcard – Stamp Show W1 431 CC237 Postcard – Stamp show B2005 CC238 Postcard – Stamp show W6 982 CC239 Postcard – Valentines 1264 – Johnstone Park with tram in distance CC240 Postcard – Rose 10711 – Swanston and Lonsdale – Hospital and W232 CC241 Postcard – Rose 4827 – Fitzroy St St Kilda W2 362 and 548 CC242 Postcard – Valentines – 939 – St Kilda War Memorial, W and a R? CC243 Postcard – Valentines – 572 – St Kilda War Memorial, W 413 and 140? CC244 Postcard – Valentines – 938 – Uper and Lower Esplanade – L 104 CC245 Postcard – St Kilda Rd at Princes Bridge Y1 and W CC246 Postcard – Biscay BG82 – W5 814 - CC247 Postcard – Biscay 796112 – Bourke St looking west CC248 Postcard – Biscay 796109 – Bourke St looking east CC249 Postcard – Biscay 2AUS58 – Z5 Bourke St CC250 Postcard – Biscay BG 249 – Swanston St CC251 Postcard – National View – St Kilda Rd – shrine and Prince Henrys W2 405 CC252 Postcard – Nu color vue – 11 ML 156 – St Kilda Rd CC253 Postcard – Nu color vue – 11 ML 153 – Swanston St CC254 Postcard – Nu Color vue – Collins St 442 CC255 Postcard – Pitt card – Adelaide – H 364 at Victoria St CC256 Postcard – SPER L/P 154 CC257 Postcard – BTMS – 550 CC258 Postcard – SPER – Brisbane 295 CC259 Adelaide 131 at Burnside – has R Lilburn on card, c1911 CC260 Adelaide 194 CC261 Adelaide 235, with two crew, The News photo CC262 Rockhampton, outside post office – has source of photo details CC263 Sydney – 2086 and 2062 arriving Circular Quay CC264 Sydney – P class – Pitt St? CC265 Sydney – 1610 at Circular Quay CC266 Brisbane 99 and 468 CC267 Sydney with bridge behind CC268 Steam tram Paramatta Park – 103 CC269 Sydney – Museum Station =- Elizabeth St CC270 Sydney – weed burner 137S at a loop Demonstrates the work of Charles Craig in photography and collection of prints.Assembled album in a black presentation folder of 270 photographs from the Charles Craig Collection - 86 sleeves - part 1 of 2. All photographs have been scanned and placed on the Museum's G drive. A list of all photographs with details where possible has been compiled. Victorian Provincial, Launceston, Hobart and Sydney tram photos have been transferred to other Museums, image files retained.melbourne, tramways, tramcars, trams, charles craig, st kilda junction, trackworks -
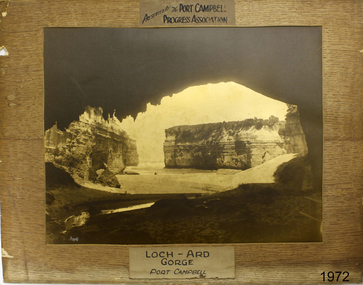 Flagstaff Hill Maritime Museum and Village
Photograph - Coastal Scene, Foyle Photographic Studio, Loch Ard Gorge Port Campbell, 1889-1919
The photograph shows the popular tourist attraction, Loch Ard Gorge, which is located along the Great Ocean Road in Victoria, near Port Campbell. The gorge is named after the famous sailing ship, the LOCH ARD, that was wrecked there in 1878. Only two of the 54 passengers and crew survived. FOYLE “Foyle” written on the photograph is the name of Foyle’s Photographic studio. At the time of the photograph, the studio was owned by both Charles and Lilian Foyle (sometimes known as Lillian or Lily), either of whom could have taken this photograph. They also worked together at a later date on the photographs, sketches and paintings of the famous and historical Pioneers’ Honour Board, which is currently on view in the Warrnambool Library. Foyles Photography was the studio of James Charles Foyle. He owned “Foyle’s Photo Card Studios” in Liebig St, Warrnambool, which operated between 1889 – 1919. A letter to the editor (by Mr Edward Vidler) in the Melbourne Argus, 3rd August 1907, mentions that in that year Warrnambool would celebrate the 60th anniversary of its proclamation as a town, and that talented local artist Miss Lily Foyle would paint 200 portraits in watercolour of the pioneers who settled in the district prior to 1860. The Pioneer Honour Board can still be seen on display in the Warrnambool Library. In the Warrnambool Standard, Dec. 1917, “Mr Foyle’s studio was awarded the contract to decorate rail cars on newly opened Trans-Continental railway, assisted by his sister, Miss Findlay.” HISTORY OF THE LOCH ARD The LOCH ARD belonged to the famous Loch Line which sailed many ships from England to Australia. Built-in Glasgow by Barclay, Curdle and Co. in 1873, the LOCH ARD was a three-masted square-rigged iron sailing ship. The ship measured 262ft 7" (79.87m) in length, 38ft (11.58m) in width, 23ft (7m) in depth and had a gross tonnage of 1693 tons. The LOCH ARD's main mast measured a massive 150ft (45.7m) in height. LOCH ARD made three trips to Australia and one trip to Calcutta before its final voyage. LOCH ARD left England on March 2, 1878, under the command of Captain Gibbs, a newly married, 29-year-old. She was bound for Melbourne with a crew of 37, plus 17 passengers and a load of cargo. The general cargo reflected the affluence of Melbourne at the time. Onboard were straw hats, umbrella, perfumes, clay pipes, pianos, clocks, confectionary, linen and candles, as well as a heavier load of railway irons, cement, lead and copper. There were items included that intended for display in the Melbourne International Exhibition in 1880. The voyage to Port Phillip was long but uneventful. At 3 am on June 1, 1878, Captain Gibbs was expecting to see land and the passengers were becoming excited as they prepared to view their new homeland in the early morning. But LOCH ARD was running into a fog which greatly reduced visibility. Captain Gibbs was becoming anxious as there was no sign of land or the Cape Otway lighthouse. At 4 am the fog lifted. A man aloft announced that he could see breakers. The sheer cliffs of Victoria's west coast came into view, and Captain Gibbs realised that the ship was much closer to them than expected. He ordered as much sail to be set as time would permit and then attempted to steer the vessel out to sea. On coming head-on into the wind, the ship lost momentum, the sails fell limp and LOCH ARD's bow swung back. Gibbs then ordered the anchors to be released in an attempt to hold its position. The anchors sank some 50 fathoms - but did not hold. By this time LOCH ARD was among the breakers and the tall cliffs of Mutton Bird Island rose behind the ship. Just half a mile from the coast, the ship's bow was suddenly pulled around by the anchor. The captain tried to tack out to sea, but the ship struck a reef at the base of Mutton Bird Island, near Port Campbell. Waves broke over the ship and the top deck was loosened from the hull. The masts and rigging came crashing down knocking passengers and crew overboard. When a lifeboat was finally launched, it crashed into the side of LOCH ARD and capsized. Tom Pearce, who had launched the boat, managed to cling to its overturned hull and shelter beneath it. He drifted out to sea and then on the flood tide came into what is now known as LOCH ARD Gorge. He swam to shore, bruised and dazed, and found a cave in which to shelter. Some of the crew stayed below deck to shelter from the falling rigging but drowned when the ship slipped off the reef into deeper water. Eva Carmichael had raced onto the deck to find out what was happening only to be confronted by towering cliffs looming above the stricken ship. In all the chaos, Captain Gibbs grabbed Eva and said, "If you are saved Eva, let my dear wife know that I died like a sailor". That was the last Eva Carmichael saw of the captain. She was swept off the ship by a huge wave. Eva saw Tom Pearce on a small rocky beach and yelled to attract his attention. He dived in and swam to the exhausted woman and dragged her to shore. He took her to the cave and broke and opened the case of brandy, which had washed up on the beach. He opened a bottle to revive the unconscious woman. A few hours later Tom scaled a cliff in search of help. He followed hoof prints and came by chance upon two men from nearby Glenample Station three and a half miles away. In a state of exhaustion, he told the men of the tragedy. Tom returned to the gorge while the two men rode back to the station to get help. By the time they reached LOCH ARD Gorge, it was cold and dark. The two shipwreck survivors were taken to Glenample Station to recover. Eva stayed at the station for six weeks before returning to Ireland, this time by steamship. In Melbourne, Tom Pearce received a hero's welcome. He was presented with the first gold medal of the Royal Humane Society of Victoria and a £1000 cheque from the Victorian Government. Concerts were performed to honour the young man's bravery and to raise money for those who lost family in the LOCH ARD disaster. Of the 54 crew members and passengers on board, only two survived: the apprentice, Tom Pearce and the young woman passenger, Eva Carmichael, who lost all of her family in the tragedy. Ten days after the LOCH ARD tragedy, salvage rights to the wreck were sold at auction for £2,120. Cargo valued at £3,000 was salvaged and placed on the beach, but most washed back into the sea when another storm developed. The wreck of LOCH ARD still lies at the base of Mutton Bird Island. Much of the cargo has now been salvaged, and some of it was washed up into what is now known as LOCH ARD Gorge. Cargo and artefacts have also been illegally salvaged over many years before protective legislation was introduced. One of the most unlikely pieces of cargo to have survived the shipwreck was a Minton porcelain peacock - one of only nine in the world. The peacock was destined for the Melbourne International Exhibition in 1880. It had been well packed, which gave it adequate protection during the violent storm. Today, the Minton peacock can be seen at the Flagstaff Hill Maritime Museum in Warrnambool. From Australia's most dramatic shipwreck it has now become Australia's most valuable shipwreck artefact and is one of very few 'objects' on the Victorian State Heritage Register.Flagstaff Hill’s collection of artefacts from LOCH ARD is significant for being one of the largest collections of artefacts from this shipwreck in Victoria. It is significant for its association with the shipwreck, which is on the Victorian Heritage Register (VHR S417). The collection is significant because of the relationship between the objects, as together they have a high potential to interpret the story of the LOCH ARD. The LOCH ARD collection is archaeologically significant as the remains of a large international passenger and cargo ship. The LOCH ARD collection is historically significant for representing aspects of Victoria’s shipping history and its potential to interpret sub-theme 1.5 of Victoria’s Framework of Historical Themes (living with natural processes). The collection is also historically significant for its association with the LOCH ARD, which was one of the worst and best-known shipwrecks in Victoria’s history. Foyle's photographs date from the late 19th century to the early 20th century, representing a time of growth in the Warrnambool district and a time when the still relatively new technology of photography was more available to the community.Photograph of Loch Ard Gorge. This sepia coloured rectangular photograph is mounted on a brown cardboard backing that has a wood grain pattern. The photograph has an inscription above it, below it, and in the bottom left corner. It was made for the purpose of a presentation by the Port Campbell Progress Association. Printed above the photograph "PRESENTED BY THE PORT CAMPBELL / PROGRESS ASSOCIATION". Printed below the photograph "LOCH ARD GORGE / PORT CAMPBELL". Hand written on bottom left corner "Foyle". flagstaff hill, warrnambool, shipwrecked coast, flagstaff hill maritime museum, maritime museum, shipwreck coast, flagstaff hill maritime village, great ocean road, loch line, loch ard, captain gibbs, eva carmichael, tom pearce, glenample station, mutton bird island, loch ard gorge, photograph, port campbell, port campbell progress association, foyle photograph, foyle photographic studio warrnambool, warrnambool photo studio -
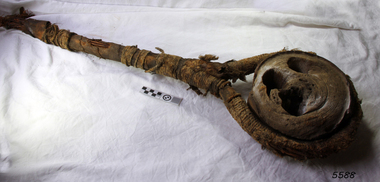 Flagstaff Hill Maritime Museum and Village
Deadeye, circa 1873
This example of a sailing ship’s ‘dead-eye’ is from the wreck of the LOCH ARD, which sank near Port Campbell in 1878. The vessel was an iron hulled clipper ship constructed for the Loch Line in 1873. It was part of a fleet of similar merchant ships owned by that company, which specialised in bringing passengers and goods from London via the Great Circle route to Melbourne, and returning to Britain via Cape Horn with the colony’s wool clip. Deadeyes were a common feature of sailing ship technology in the nineteenth century. They were a simple, cheap, and hard-wearing device that, in conjunction with another deadeye, provided an effective means of levering, or tightening, attached ropes and stays. Lower deadeyes were fixed to the sides of the ship by an encircling metal collar (inset in a flattish groove chiselled around the outer circumference of the disc), which was bolted to iron bars attached to the hull (called chain-plates). Upper deadeyes were looped by a strong hemp or wire rope (inset in a rounded groove carved around the outer circumference of the disc), which was joined to the bottom ends of the rigging which reached up to secure the masts into position (called shrouds or stays). Connecting a Lower deadeye to its corresponding Upper deadeye was a rope (called a lanyard) which looped up and down through the three “eyes” of each disc, to form a pulley system. The hitching of the two deadeyes with a looped lanyard provided the means of tightening, or loosening, the tension on the mast rigging ― essentially by pulling against the chain-plates bolted to the outside of the hull. It was a procedure that could be performed by sailors at sea and in emergencies. For example, after a gale the stays may have stretched and the masts worked loose, requiring retightening. Or, in the extreme circumstance of shipwreck, the lanyards might need to be released on the weather side, so that the masts fall away from the stricken vessel. HISTORY OF THE LOCH ARD The LOCH ARD belonged to the famous Loch Line which sailed many ships from England to Australia. Built in Glasgow by Barclay, Curdle and Co. in 1873, the LOCH ARD was a three-masted square rigged iron sailing ship. The ship measured 262ft 7" (79.87m) in length, 38ft (11.58m) in width, 23ft (7m) in depth and had a gross tonnage of 1693 tons. The LOCH ARD's main mast measured a massive 150ft (45.7m) in height. LOCH ARD made three trips to Australia and one trip to Calcutta before its final voyage. LOCH ARD left England on March 2, 1878, under the command of Captain Gibbs, a newly married, 29 year old. She was bound for Melbourne with a crew of 37, plus 17 passengers and a load of cargo. The general cargo reflected the affluence of Melbourne at the time. On board were straw hats, umbrella, perfumes, clay pipes, pianos, clocks, confectionary, linen and candles, as well as a heavier load of railway irons, cement, lead and copper. There were items included that intended for display in the Melbourne International Exhibition in 1880. The voyage to Port Phillip was long but uneventful. At 3am on June 1, 1878, Captain Gibbs was expecting to see land and the passengers were becoming excited as they prepared to view their new homeland in the early morning. But LOCH ARD was running into a fog which greatly reduced visibility. Captain Gibbs was becoming anxious as there was no sign of land or the Cape Otway lighthouse. At 4am the fog lifted. A man aloft announced that he could see breakers. The sheer cliffs of Victoria's west coast came into view, and Captain Gibbs realised that the ship was much closer to them than expected. He ordered as much sail to be set as time would permit and then attempted to steer the vessel out to sea. On coming head on into the wind, the ship lost momentum, the sails fell limp and LOCH ARD's bow swung back. Gibbs then ordered the anchors to be released in an attempt to hold its position. The anchors sank some 50 fathoms - but did not hold. By this time LOCH ARD was among the breakers and the tall cliffs of Mutton Bird Island rose behind the ship. Just half a mile from the coast, the ship's bow was suddenly pulled around by the anchor. The captain tried to tack out to sea, but the ship struck a reef at the base of Mutton Bird Island, near Port Campbell. Waves broke over the ship and the top deck was loosened from the hull. The masts and rigging came crashing down knocking passengers and crew overboard. When a lifeboat was finally launched, it crashed into the side of LOCH ARD and capsized. Tom Pearce, who had launched the boat, managed to cling to its overturned hull and shelter beneath it. He drifted out to sea and then on the flood tide came into what is now known as LOCH ARD Gorge. He swam to shore, bruised and dazed, and found a cave in which to shelter. Some of the crew stayed below deck to shelter from the falling rigging but drowned when the ship slipped off the reef into deeper water. Eva Carmichael had raced onto deck to find out what was happening only to be confronted by towering cliffs looming above the stricken ship. In all the chaos, Captain Gibbs grabbed Eva and said, "If you are saved Eva, let my dear wife know that I died like a sailor". That was the last Eva Carmichael saw of the captain. She was swept off the ship by a huge wave. Eva saw Tom Pearce on a small rocky beach and yelled to attract his attention. He dived in and swam to the exhausted woman and dragged her to shore. He took her to the cave and broke open case of brandy which had washed up on the beach. He opened a bottle to revive the unconscious woman. A few hours later Tom scaled a cliff in search of help. He followed hoof prints and came by chance upon two men from nearby Glenample Station three and a half miles away. In a state of exhaustion, he told the men of the tragedy. Tom returned to the gorge while the two men rode back to the station to get help. By the time they reached LOCH ARD Gorge, it was cold and dark. The two shipwreck survivors were taken to Glenample Station to recover. Eva stayed at the station for six weeks before returning to Ireland, this time by steamship. In Melbourne, Tom Pearce received a hero's welcome. He was presented with the first gold medal of the Royal Humane Society of Victoria and a £1000 cheque from the Victorian Government. Concerts were performed to honour the young man's bravery and to raise money for those who lost family in the LOCH ARD disaster. Of the 54 crew members and passengers on board, only two survived: the apprentice, Tom Pearce and the young woman passenger, Eva Carmichael, who lost all of her family in the tragedy. Ten days after the LOCH ARD tragedy, salvage rights to the wreck were sold at auction for £2,120. Cargo valued at £3,000 was salvaged and placed on the beach, but most washed back into the sea when another storm developed. The wreck of LOCH ARD still lies at the base of Mutton Bird Island. Much of the cargo has now been salvaged and some was washed up into what is now known as LOCH ARD Gorge. Cargo and artefacts have also been illegally salvaged over many years before protective legislation was introduced. One of the most unlikely pieces of cargo to have survived the shipwreck was a Minton porcelain peacock - one of only nine in the world. The peacock was destined for the Melbourne International Exhibition in 1880. It had been well packed, which gave it adequate protection during the violent storm. Today, the Minton peacock can be seen at the Flagstaff Hill Maritime Museum in Warrnambool. From Australia's most dramatic shipwreck it has now become Australia's most valuable shipwreck artefact and is one of very few 'objects' on the Victorian State Heritage Register. The shipwreck of the LOCH ARD is of State significance. Victorian Heritage Register S417. Flagstaff Hill’s collection of artefacts from LOCH ARD is significant for being one of the largest collections of artefacts from this shipwreck in Victoria. It is significant for its association with the shipwreck, which is on the Victorian Heritage Register (VHR S417). The collection is significant because of the relationship between the objects, as together they have a high potential to interpret the story of the LOCH ARD. The LOCH ARD collection is archaeologically significant as the remains of a large international passenger and cargo ship. The LOCH ARD collection is historically significant for representing aspects of Victoria’s shipping history and its potential to interpret sub-theme 1.5 of Victoria’s Framework of Historical Themes (living with natural processes). The collection is also historically significant for its association with the LOCH ARD, which was one of the worst and best known shipwrecks in Victoria’s history. A reasonably well-preserved ship’s deadeye with rust-stained wire loop-rope still attached. It retains portions of its original hemp cord and hessian wrapping. The flat sides of this thick wooden disc have three holes drilled through in a triangular configuration. The artefact is from the shipwreck of the LOCH ARD (1878). The survival of the loop-rope (wire cable) indicates it was an Upper Deadeye, connected to the shrouds (mast rigging).flagstaff hill, warrnambool, shipwrecked coast, flagstaff hill maritime museum, maritime museum, shipwreck coast, flagstaff hill maritime village, great ocean road, loch line, loch ard, captain gibbs, eva carmichael, tom pearce, glenample station, mutton bird island, loch ard gorge, deadeye, rigging -
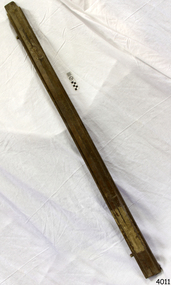 Flagstaff Hill Maritime Museum and Village
Tool - Wood Sample, Before 1878
On a piece of paper subsequently glued near one end of its curved upper face, this length of planed and polished hardwood timber bears the inscription: “A [p]iece of w[r]ec[k] of the Loch Ard wrecked near Sherbroke River”. The timber is carefully worked with rich dark colouring and a uniformly moulded design, suggesting that it was part of a fitting or furnishing that was publicly visible and prominent. If the artefact is what it is declared to be, then it is possible that it formed part of the ship’s railings or companionway stairs. The LOCH ARD was a 1,693 ton, 3 masted barque, built on the Clyde in 1873. In an age of increasing competition for the emigrant passenger trade from steam-driven vessels, special attention was paid to her wooden furnishings and fittings. The Loch Line owners prided themselves on their attractive, distinctively painted, sailing ships. Below decks, where cargo and third class passengers were stowed, was made of iron. But everything above deck, and on show to the saloon and second class passengers, was carved and varnished timber. Captain Daish’s 1878 report for the ship’s underwriters notes “a quantity of general Cargo washed up in a confused mass” in the cove and “a number of Cases, Casks and Bales; also deals and boards floating about in some of the gorges” further west of the shipwreck. Contemporary newspaper accounts also reported a large quantity of cargo and timber washed ashore in the days following the LOCH ARD shipwreck, adding “but those were speedily removed by persons who came down from Port Campbell, Scott’s Creek and other places with carts and pack horses”. The appearance and good condition of this wood artefact, and the aged patina and dated hand-writing style of its pasted on inscription, support the suggestion that it was ‘souvenired’ from the floating debris of the LOCH ARD at or near the 1878 date of its foundering off Mutton Bird Island. HISTORY OF THE LOCH ARD The LOCH ARD belonged to the famous Loch Line which sailed many ships from England to Australia. Built in Glasgow by Barclay, Curdle and Co. in 1873, the LOCH ARD was a three-masted square rigged iron sailing ship. The ship measured 262ft 7" (79.87m) in length, 38ft (11.58m) in width, 23ft (7m) in depth and had a gross tonnage of 1693 tons. The LOCH ARD's main mast measured a massive 150ft (45.7m) in height. LOCH ARD made three trips to Australia and one trip to Calcutta before its final voyage. LOCH ARD left England on March 2, 1878, under the command of Captain Gibbs, a newly married, 29 year old. She was bound for Melbourne with a crew of 37, plus 17 passengers and a load of cargo. The general cargo reflected the affluence of Melbourne at the time. On board were straw hats, umbrella, perfumes, clay pipes, pianos, clocks, confectionary, linen and candles, as well as a heavier load of railway irons, cement, lead and copper. There were items included that intended for display in the Melbourne International Exhibition in 1880. The voyage to Port Phillip was long but uneventful. At 3am on June 1, 1878, Captain Gibbs was expecting to see land and the passengers were becoming excited as they prepared to view their new homeland in the early morning. But LOCH ARD was running into a fog which greatly reduced visibility. Captain Gibbs was becoming anxious as there was no sign of land or the Cape Otway lighthouse. At 4am the fog lifted. A man aloft announced that he could see breakers. The sheer cliffs of Victoria's west coast came into view, and Captain Gibbs realised that the ship was much closer to them than expected. He ordered as much sail to be set as time would permit and then attempted to steer the vessel out to sea. On coming head on into the wind, the ship lost momentum, the sails fell limp and LOCH ARD's bow swung back. Gibbs then ordered the anchors to be released in an attempt to hold its position. The anchors sank some 50 fathoms - but did not hold. By this time LOCH ARD was among the breakers and the tall cliffs of Mutton Bird Island rose behind the ship. Just half a mile from the coast, the ship's bow was suddenly pulled around by the anchor. The captain tried to tack out to sea, but the ship struck a reef at the base of Mutton Bird Island, near Port Campbell. Waves broke over the ship and the top deck was loosened from the hull. The masts and rigging came crashing down knocking passengers and crew overboard. When a lifeboat was finally launched, it crashed into the side of LOCH ARD and capsized. Tom Pearce, who had launched the boat, managed to cling to its overturned hull and shelter beneath it. He drifted out to sea and then on the flood tide came into what is now known as LOCH ARD Gorge. He swam to shore, bruised and dazed, and found a cave in which to shelter. Some of the crew stayed below deck to shelter from the falling rigging but drowned when the ship slipped off the reef into deeper water. Eva Carmichael had raced onto deck to find out what was happening only to be confronted by towering cliffs looming above the stricken ship. In all the chaos, Captain Gibbs grabbed Eva and said, "If you are saved Eva, let my dear wife know that I died like a sailor". That was the last Eva Carmichael saw of the captain. She was swept off the ship by a huge wave. Eva saw Tom Pearce on a small rocky beach and yelled to attract his attention. He dived in and swam to the exhausted woman and dragged her to shore. He took her to the cave and broke open case of brandy which had washed up on the beach. He opened a bottle to revive the unconscious woman. A few hours later Tom scaled a cliff in search of help. He followed hoof prints and came by chance upon two men from nearby Glenample Station three and a half miles away. In a state of exhaustion, he told the men of the tragedy. Tom returned to the gorge while the two men rode back to the station to get help. By the time they reached LOCH ARD Gorge, it was cold and dark. The two shipwreck survivors were taken to Glenample Station to recover. Eva stayed at the station for six weeks before returning to Ireland, this time by steamship. In Melbourne, Tom Pearce received a hero's welcome. He was presented with the first gold medal of the Royal Humane Society of Victoria and a £1000 cheque from the Victorian Government. Concerts were performed to honour the young man's bravery and to raise money for those who lost family in the LOCH ARD disaster. Of the 54 crew members and passengers on board, only two survived: the apprentice, Tom Pearce and the young woman passenger, Eva Carmichael, who lost all of her family in the tragedy. Ten days after the LOCH ARD tragedy, salvage rights to the wreck were sold at auction for £2,120. Cargo valued at £3,000 was salvaged and placed on the beach, but most washed back into the sea when another storm developed. The wreck of LOCH ARD still lies at the base of Mutton Bird Island. Much of the cargo has now been salvaged and some was washed up into what is now known as LOCH ARD Gorge. Cargo and artefacts have also been illegally salvaged over many years before protective legislation was introduced. One of the most unlikely pieces of cargo to have survived the shipwreck was a Minton porcelain peacock - one of only nine in the world. The peacock was destined for the Melbourne International Exhibition in 1880. It had been well packed, which gave it adequate protection during the violent storm. Today, the Minton peacock can be seen at the Flagstaff Hill Maritime Museum in Warrnambool. From Australia's most dramatic shipwreck it has now become Australia's most valuable shipwreck artefact and is one of very few 'objects' on the Victorian State Heritage Register. The Loch Ard wreck is of state significance – Victorian Heritage Register S417. However there is a lack of documented provenance that limits the interpretive value of this piece of timber (for example, its potential to interpret nineteenth century souveniring and scavenging from shipwrecks along the south west coast of Victoria). Flagstaff Hill’s collection of artefacts from LOCH ARD is significant for being one of the largest collections of artefacts from this shipwreck in Victoria. It is significant for its association with the shipwreck, which is on the Victorian Heritage Register (VHR S417). The collection is significant because of the relationship between the objects, as together they have a high potential to interpret the story of the LOCH ARD. The LOCH ARD collection is archaeologically significant as the remains of a large international passenger and cargo ship. The LOCH ARD collection is historically significant for representing aspects of Victoria’s shipping history and its potential to interpret sub-theme 1.5 of Victoria’s Framework of Historical Themes (living with natural processes). The collection is also historically significant for its association with the LOCH ARD, which was one of the worst and best known shipwrecks in Victoria’s history. A length of hardwood timber, planed and varnished to smooth finish on three sides, with two unfinished tongues protruding from each end (one broken off), possibly from the wreck of the LOCH ARD. The front or upper face is moulded and routed to a regular, linear (skirting board type) design along its entire length, the two sides flat planed. One side contains two inserted dowel rods that have been broken off. The bottom face has not been finished to the same standard. The sample is good quality wood that has retained its density and weight and shows no evidence of having been submerged in seawater for any length of time. Glued on to the upper face of the length of timber near the right hand end is a deteriorated square of paper bearing an inscription. The paper, peeling back and with torn edges, is stuck over an original wood stain but under a subsequent layer of varnish. The faded ink words are indecipherable where paper is missing, but written carefully in an old fashioned cursive script.The inscription on the paper reads: “A [p]iece of w[r]ec[k] of the Loch Ard wrecked near Sherbroke River”. flagstaff hill, warrnambool, shipwrecked coast, flagstaff hill maritime museum, maritime museum, shipwreck coast, flagstaff hill maritime village, great ocean road, loch line, loch ard, captain gibbs, eva carmichael, tom pearce, glenample station, mutton bird island, loch ard gorge, nineteenth-century souveniring, shipwreck scavenging, loch line sailing ships, wood sample -
 Flagstaff Hill Maritime Museum and Village
Letter
This original letter was handwritten and dated 21 January 1884. The author is Eveline V. Carmichael, of 29 Montpellier Villa, Cheltenham. Eva Carmichael was the only woman survivor of the iron clipper LOCH ARD, which was wrecked on 1 June 1878, at the subsequently named Loch Ard Gorge near Port Campbell. The letter was written to Mr J Archibald, first curator of the Warrnambool Mechanics Institute Museum, and was in response to a letter he wrote to Miss Carmichael on 1 December 1883. A complete transcript of Eva’s letter is attached as a Hard Copy Supplementary File. The letter first addressed the subject of her reply. She writes, “Thank you very much for thinking of me with regard to the volume of Longfellows Poems that have been found by Mr HW Davis [at Loch Ard Gorge], the book is not mine, nor did it belong to any members of my family. We had a ‘Longfellows’, but our book had a green cover.” The rescued book is on display at Flagstaff Hill (541) and has a blue cover. Another interesting aspect to her letter is its reference to the only other survivor from the LOCH ARD. As a postscript she writes, “You will be glad to hear that Tom Pearce is now on board the HMS Solvent. I heard from him last month he wrote from the West-Indies and seemed well and in good spirits. I have not seen him since we parted in Melbourne. I believe he is to be married next year, or perhaps this, but I do not know the young lady.” Tom Pearce was the young, male, able seaman who had risked his life to save her. In the months after the shipwreck, an excited public press speculated of a romantic connection between the two survivors, but this was clearly not the case. HISTORY OF THE LOCH ARD The LOCH ARD belonged to the famous Loch Line which sailed many ships from England to Australia. Built in Glasgow by Barclay, Curdle and Co. in 1873, the LOCH ARD was a three-masted square rigged iron sailing ship. The ship measured 262ft 7" (79.87m) in length, 38ft (11.58m) in width, 23ft (7m) in depth and had a gross tonnage of 1693 tons. The LOCH ARD's main mast measured a massive 150ft (45.7m) in height. LOCH ARD made three trips to Australia and one trip to Calcutta before its final voyage. LOCH ARD left England on March 2, 1878, under the command of Captain Gibbs, a newly married, 29 year old. She was bound for Melbourne with a crew of 37, plus 17 passengers and a load of cargo. The general cargo reflected the affluence of Melbourne at the time. On board were straw hats, umbrella, perfumes, clay pipes, pianos, clocks, confectionary, linen and candles, as well as a heavier load of railway irons, cement, lead and copper. There were items included that intended for display in the Melbourne International Exhibition in 1880. The voyage to Port Phillip was long but uneventful. At 3am on June 1, 1878, Captain Gibbs was expecting to see land and the passengers were becoming excited as they prepared to view their new homeland in the early morning. But LOCH ARD was running into a fog which greatly reduced visibility. Captain Gibbs was becoming anxious as there was no sign of land or the Cape Otway lighthouse. At 4am the fog lifted. A man aloft announced that he could see breakers. The sheer cliffs of Victoria's west coast came into view, and Captain Gibbs realised that the ship was much closer to them than expected. He ordered as much sail to be set as time would permit and then attempted to steer the vessel out to sea. On coming head on into the wind, the ship lost momentum, the sails fell limp and LOCH ARD's bow swung back. Gibbs then ordered the anchors to be released in an attempt to hold its position. The anchors sank some 50 fathoms - but did not hold. By this time LOCH ARD was among the breakers and the tall cliffs of Mutton Bird Island rose behind the ship. Just half a mile from the coast, the ship's bow was suddenly pulled around by the anchor. The captain tried to tack out to sea, but the ship struck a reef at the base of Mutton Bird Island, near Port Campbell. Waves broke over the ship and the top deck was loosened from the hull. The masts and rigging came crashing down knocking passengers and crew overboard. When a lifeboat was finally launched, it crashed into the side of LOCH ARD and capsized. Tom Pearce, who had launched the boat, managed to cling to its overturned hull and shelter beneath it. He drifted out to sea and then on the flood tide came into what is now known as LOCH ARD Gorge. He swam to shore, bruised and dazed, and found a cave in which to shelter. Some of the crew stayed below deck to shelter from the falling rigging but drowned when the ship slipped off the reef into deeper water. Eva Carmichael had raced onto deck to find out what was happening only to be confronted by towering cliffs looming above the stricken ship. In all the chaos, Captain Gibbs grabbed Eva and said, "If you are saved Eva, let my dear wife know that I died like a sailor". That was the last Eva Carmichael saw of the captain. She was swept off the ship by a huge wave. Eva saw Tom Pearce on a small rocky beach and yelled to attract his attention. He dived in and swam to the exhausted woman and dragged her to shore. He took her to the cave and broke open case of brandy which had washed up on the beach. He opened a bottle to revive the unconscious woman. A few hours later Tom scaled a cliff in search of help. He followed hoof prints and came by chance upon two men from nearby Glenample Station three and a half miles away. In a state of exhaustion, he told the men of the tragedy. Tom returned to the gorge while the two men rode back to the station to get help. By the time they reached LOCH ARD Gorge, it was cold and dark. The two shipwreck survivors were taken to Glenample Station to recover. Eva stayed at the station for six weeks before returning to Ireland, this time by steamship. In Melbourne, Tom Pearce received a hero's welcome. He was presented with the first gold medal of the Royal Humane Society of Victoria and a £1000 cheque from the Victorian Government. Concerts were performed to honour the young man's bravery and to raise money for those who lost family in the LOCH ARD disaster. Of the 54 crew members and passengers on board, only two survived: the apprentice, Tom Pearce and the young woman passenger, Eva Carmichael, who lost all of her family in the tragedy. Ten days after the LOCH ARD tragedy, salvage rights to the wreck were sold at auction for £2,120. Cargo valued at £3,000 was salvaged and placed on the beach, but most washed back into the sea when another storm developed. The wreck of LOCH ARD still lies at the base of Mutton Bird Island. Much of the cargo has now been salvaged and some was washed up into what is now known as LOCH ARD Gorge. Cargo and artefacts have also been illegally salvaged over many years before protective legislation was introduced. One of the most unlikely pieces of cargo to have survived the shipwreck was a Minton porcelain peacock - one of only nine in the world. The peacock was destined for the Melbourne International Exhibition in 1880. It had been well packed, which gave it adequate protection during the violent storm. Today, the Minton peacock can be seen at the Flagstaff Hill Maritime Museum in Warrnambool. From Australia's most dramatic shipwreck it has now become Australia's most valuable shipwreck artefact and is one of very few 'objects' on the Victorian State Heritage Register. The LOCH ARD shipwreck is of State significance – Victorian Heritage Number S417 Flagstaff Hill’s collection of artefacts from LOCH ARD is significant for being one of the largest collections of artefacts from this shipwreck in Victoria. It is significant for its association with the shipwreck, which is on the Victorian Heritage Register (VHR S417). The collection is significant because of the relationship between the objects, as together they have a high potential to interpret the story of the LOCH ARD. The LOCH ARD collection is archaeologically significant as the remains of a large international passenger and cargo ship. The LOCH ARD collection is historically significant for representing aspects of Victoria’s shipping history and its potential to interpret sub-theme 1.5 of Victoria’s Framework of Historical Themes (living with natural processes). The collection is also historically significant for its association with the LOCH ARD, which was one of the worst and best known shipwrecks in Victoria’s history. A photocopy of a letter, handwritten in ink on both sides of 4 small sheets of thick, light blue paper. The letter is in neat cursive script. The writing originally covered 7 sides of the note paper and has been reproduced as 7 separate pages. It is dated 21 January 1884, five and a half years after the LOCH ARD shipwreck. The letter is from Eva Carmichael, one of only 2 survivors from that disaster, and is addressed to J. Archibald, first curator of the Warrnambool Mechanics Institute Museum. The copies include the reproduction of a typed index card which accompanies the original letter. The card states: “Photographic copy of the letter written by Eva Carmichael to Mr J Archibald, first Curator of the Warrnambool Museum. The original letter is kept with other documents, but the writing being on both sides of the note-paper it was not possible to read in its entireity when on display”.flagstaff hill, warrnambool, shipwrecked coast, flagstaff hill maritime museum, maritime museum, shipwreck coast, flagstaff hill maritime village, great ocean road, loch line, loch ard, captain gibbs, eva carmichael, tom pearce, glenample station, mutton bird island, loch ard gorge, loch ard, survivor’s letter, eva carmichael, longfellow’s poems, warrnambool mechanics institute museum, joseph archibald, henry davis -
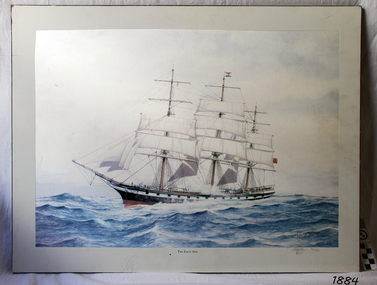 Flagstaff Hill Maritime Museum and Village
Print, The Loch Ard, 1993
ABOUT THE ARTIST – Philip James Gray “Philip is one of Australia’s leading maritime artists and his meticulous research and social commentary paintings of ships, such as, the Loch Ard and Schomberg form an important part of Warrnambool’s Flagstaff Hill Maritime Museum.” [ref. Dr Marion Manifold, Artist and Art Historian, 2014] Philip James Gray was born in London but has lived most of his life in Australia. He graduated from a London school of art as an illustrator, specialising in technical and scientific illustration as well as other commercial and applied art. He was also a student for a time of Fyffe Christie - British figurative artist, mural painter and humanitarian – who had a great influence on his career. Philip has always worked as a professional artist and illustrator. Many publications on maritime history have featured his work. His paintings have been released and sold all over the world as limited edition prints. The State Library of Victoria’s ‘Latrobe Collection’ holds two of his paintings. His street painting of ‘The Ashes Contest’ decorates the brick wall of Old Bakery Laneway in Sunbury and a Sunbury café owner commissioned him to paint the ‘Sunbury Pop Festival’ as a remembrance of local history. [ref. Sunbury Leader, Nov 15 2013] Philip has been an active member of the Sunbury Art Society in Victoria for several years, serving on the committee for some of that time and being involved in exhibitions. He enjoys helping new artists and sharing his skills and experience. [other references: Sunbury Art Society Inc. Oct-Nov 2012] HISTORY OF THE LOCH ARD The LOCH ARD belonged to the famous Loch Line which sailed many ships from England to Australia. Built in Glasgow by Barclay, Curdle and Co. in 1873, the LOCH ARD was a three-masted square rigged iron sailing ship. The ship measured 262ft 7" (79.87m) in length, 38ft (11.58m) in width, 23ft (7m) in depth and had a gross tonnage of 1693 tons. The LOCH ARD's main mast measured a massive 150ft (45.7m) in height. LOCH ARD made three trips to Australia and one trip to Calcutta before its final voyage. LOCH ARD left England on March 2, 1878, under the command of Captain Gibbs, a newly married, 29 year old. She was bound for Melbourne with a crew of 37, plus 17 passengers and a load of cargo. The general cargo reflected the affluence of Melbourne at the time. On board were straw hats, umbrella, perfumes, clay pipes, pianos, clocks, confectionary, linen and candles, as well as a heavier load of railway irons, cement, lead and copper. There were items included that intended for display in the Melbourne International Exhibition in 1880. The voyage to Port Phillip was long but uneventful. At 3am on June 1, 1878, Captain Gibbs was expecting to see land and the passengers were becoming excited as they prepared to view their new homeland in the early morning. But LOCH ARD was running into a fog which greatly reduced visibility. Captain Gibbs was becoming anxious as there was no sign of land or the Cape Otway lighthouse. At 4am the fog lifted. A man aloft announced that he could see breakers. The sheer cliffs of Victoria's west coast came into view, and Captain Gibbs realised that the ship was much closer to them than expected. He ordered as much sail to be set as time would permit and then attempted to steer the vessel out to sea. On coming head on into the wind, the ship lost momentum, the sails fell limp and LOCH ARD's bow swung back. Gibbs then ordered the anchors to be released in an attempt to hold its position. The anchors sank some 50 fathoms - but did not hold. By this time LOCH ARD was among the breakers and the tall cliffs of Mutton Bird Island rose behind the ship. Just half a mile from the coast, the ship's bow was suddenly pulled around by the anchor. The captain tried to tack out to sea, but the ship struck a reef at the base of Mutton Bird Island, near Port Campbell. Waves broke over the ship and the top deck was loosened from the hull. The masts and rigging came crashing down knocking passengers and crew overboard. When a lifeboat was finally launched, it crashed into the side of LOCH ARD and capsized. Tom Pearce, who had launched the boat, managed to cling to its overturned hull and shelter beneath it. He drifted out to sea and then on the flood tide came into what is now known as LOCH ARD Gorge. He swam to shore, bruised and dazed, and found a cave in which to shelter. Some of the crew stayed below deck to shelter from the falling rigging but drowned when the ship slipped off the reef into deeper water. Eva Carmichael had raced onto deck to find out what was happening only to be confronted by towering cliffs looming above the stricken ship. In all the chaos, Captain Gibbs grabbed Eva and said, "If you are saved Eva, let my dear wife know that I died like a sailor". That was the last Eva Carmichael saw of the captain. She was swept off the ship by a huge wave. Eva saw Tom Pearce on a small rocky beach and yelled to attract his attention. He dived in and swam to the exhausted woman and dragged her to shore. He took her to the cave and broke open case of brandy which had washed up on the beach. He opened a bottle to revive the unconscious woman. A few hours later Tom scaled a cliff in search of help. He followed hoof prints and came by chance upon two men from nearby Glenample Station three and a half miles away. In a state of exhaustion, he told the men of the tragedy. Tom returned to the gorge while the two men rode back to the station to get help. By the time they reached LOCH ARD Gorge, it was cold and dark. The two shipwreck survivors were taken to Glenample Station to recover. Eva stayed at the station for six weeks before returning to Ireland, this time by steamship. In Melbourne, Tom Pearce received a hero's welcome. He was presented with the first gold medal of the Royal Humane Society of Victoria and a £1000 cheque from the Victorian Government. Concerts were performed to honour the young man's bravery and to raise money for those who lost family in the LOCH ARD disaster. Of the 54 crew members and passengers on board, only two survived: the apprentice, Tom Pearce and the young woman passenger, Eva Carmichael, who lost all of her family in the tragedy. Ten days after the LOCH ARD tragedy, salvage rights to the wreck were sold at auction for £2,120. Cargo valued at £3,000 was salvaged and placed on the beach, but most washed back into the sea when another storm developed. The wreck of LOCH ARD still lies at the base of Mutton Bird Island. Much of the cargo has now been salvaged and some was washed up into what is now known as LOCH ARD Gorge. Cargo and artefacts have also been illegally salvaged over many years before protective legislation was introduced. One of the most unlikely pieces of cargo to have survived the shipwreck was a Minton porcelain peacock - one of only nine in the world. The peacock was destined for the Melbourne International Exhibition in 1880. It had been well packed, which gave it adequate protection during the violent storm. Today, the Minton peacock can be seen at the Flagstaff Hill Maritime Museum in Warrnambool. From Australia's most dramatic shipwreck it has now become Australia's most valuable shipwreck artefact and is one of very few 'objects' on the Victorian State Heritage Register. Flagstaff Hill’s collection of artefacts from LOCH ARD is significant for being one of the largest collections of artefacts from this shipwreck in Victoria. It is significant for its association with the shipwreck, which is on the Victorian Heritage Register (VHR S417). The collection is significant because of the relationship between the objects, as together they have a high potential to interpret the story of the LOCH ARD. The LOCH ARD collection is archaeologically significant as the remains of a large international passenger and cargo ship. The LOCH ARD collection is historically significant for representing aspects of Victoria’s shipping history and its potential to interpret sub-theme 1.5 of Victoria’s Framework of Historical Themes (living with natural processes). The collection is also historically significant for its association with the LOCH ARD, which was one of the worst and best known shipwrecks in Victoria’s history. Print of the sailing ship Loch Ard by artist Philip J. Gray, 1993. Depicts the Loch Ard in full sail at sea, figures on deck. Limited Edition number 54/925. Print is adhered to a piece of chipboard and is stamped by the framer, Ian's Picture Framing of Warrnambool.Signature of "Philip J. Gray" , "54/925" Stamped on back "IAN'S PICTURE FRAMING, 48 KEPLER STREET, WARRNAMBOOL 3280, PH: (055) 628 022, FAX: (055) 628 145"flagstaff hill, warrnambool, shipwrecked coast, flagstaff hill maritime museum, maritime museum, shipwreck coast, flagstaff hill maritime village, great ocean road, loch line, loch ard, captain gibbs, eva carmichael, tom pearce, glenample station, mutton bird island, loch ard gorge, print, philip j. gray -
 Flagstaff Hill Maritime Museum and Village
Plate, before 1878
This earthenware dinner plate fragment is very similar to others recovered from the wreck of the LOCH ARD. It is uncertain whether the plates were personal belongings or part of the cargo. The Asiatic Pheasant pattern is a transfer design and was the most popular design of the 19th century Victorian era. It is still being produced today. The design was produced as high quality, decorative dinnerware by the potters in the Staffordshire, England, area from the late 1830’s, but no-one is sure exactly who the original designer was. The industrial age made production of this design more affordable to the ordinary person who purchased and proudly displayed settings in their homes. The high demand for production resulted in loss of quality in both potting and design, particularly between 1860-1914 when the design reached its height of popularity, and the results were often a poor match for the earlier pieces’ quality and detail. Some engravers would make copies of the Asiatic Pheasant design (and other designs) onto copper plates and sell them to more than one pottery producer (the Copyright Act of 1842 was intended to control this very thing). Consequently the list of Makers’ Marks associated with the Asiatic Pheasant is well over 100. A single pottery factory could have several owners, all with their own Marks. These factors all make the dating of pieces difficult. Also, after 1891, pieces produced for the export were required to be stamped with “ENGLAND”, but pieces produced for the domestic market in England did not need this stamp, so early pieces and pieces produced for the domestic marked would all be without the “ENGLAND” stamp, confusing the matter. Over time the body shape of the pieces changed, the feathered, curved and fluted edges giving way to the simpler, cheaper oblong shapes. The LOCH ARD belonged to the famous Loch Line which sailed many ships from England to Australia. Built in Glasgow by Barclay, Curdle and Co. in 1873, the LOCH ARD was a three-masted square rigged iron sailing ship. The ship measured 262ft 7" (79.87m) in length, 38ft (11.58m) in width, 23ft (7m) in depth and had a gross tonnage of 1693 tons. The LOCH ARD's main mast measured a massive 150ft (45.7m) in height. LOCH ARD made three trips to Australia and one trip to Calcutta before its final voyage. LOCH ARD left England on March 2, 1878, under the command of Captain Gibbs, a newly married, 29 year old. She was bound for Melbourne with a crew of 37, plus 17 passengers and a load of cargo. The general cargo reflected the affluence of Melbourne at the time. On board were straw hats, umbrella, perfumes, clay pipes, pianos, clocks, confectionary, linen and candles, as well as a heavier load of railway irons, cement, lead and copper. There were items included that intended for display in the Melbourne International Exhibition in 1880. The voyage to Port Phillip was long but uneventful. At 3am on June 1, 1878, Captain Gibbs was expecting to see land and the passengers were becoming excited as they prepared to view their new homeland in the early morning. But LOCH ARD was running into a fog which greatly reduced visibility. Captain Gibbs was becoming anxious as there was no sign of land or the Cape Otway lighthouse. At 4am the fog lifted. A man aloft announced that he could see breakers. The sheer cliffs of Victoria's west coast came into view, and Captain Gibbs realised that the ship was much closer to them than expected. He ordered as much sail to be set as time would permit and then attempted to steer the vessel out to sea. On coming head on into the wind, the ship lost momentum, the sails fell limp and LOCH ARD's bow swung back. Gibbs then ordered the anchors to be released in an attempt to hold its position. The anchors sank some 50 fathoms - but did not hold. By this time LOCH ARD was among the breakers and the tall cliffs of Mutton Bird Island rose behind the ship. Just half a mile from the coast, the ship's bow was suddenly pulled around by the anchor. The captain tried to tack out to sea, but the ship struck a reef at the base of Mutton Bird Island, near Port Campbell. Waves broke over the ship and the top deck was loosened from the hull. The masts and rigging came crashing down knocking passengers and crew overboard. When a lifeboat was finally launched, it crashed into the side of LOCH ARD and capsized. Tom Pearce, who had launched the boat, managed to cling to its overturned hull and shelter beneath it. He drifted out to sea and then on the flood tide came into what is now known as LOCH ARD Gorge. He swam to shore, bruised and dazed, and found a cave in which to shelter. Some of the crew stayed below deck to shelter from the falling rigging but drowned when the ship slipped off the reef into deeper water. Eva Carmichael had raced onto deck to find out what was happening only to be confronted by towering cliffs looming above the stricken ship. In all the chaos, Captain Gibbs grabbed Eva and said, "If you are saved Eva, let my dear wife know that I died like a sailor". That was the last Eva Carmichael saw of the captain. She was swept off the ship by a huge wave. Eva saw Tom Pearce on a small rocky beach and yelled to attract his attention. He dived in and swam to the exhausted woman and dragged her to shore. He took her to the cave and broke open case of brandy which had washed up on the beach. He opened a bottle to revive the unconscious woman. A few hours later Tom scaled a cliff in search of help. He followed hoof prints and came by chance upon two men from nearby Glenample Station three and a half miles away. In a state of exhaustion, he told the men of the tragedy. Tom returned to the gorge while the two men rode back to the station to get help. By the time they reached LOCH ARD Gorge, it was cold and dark. The two shipwreck survivors were taken to Glenample Station to recover. Eva stayed at the station for six weeks before returning to Ireland, this time by steamship. In Melbourne, Tom Pearce received a hero's welcome. He was presented with the first gold medal of the Royal Humane Society of Victoria and a £1000 cheque from the Victorian Government. Concerts were performed to honour the young man's bravery and to raise money for those who lost family in the LOCH ARD disaster. Of the 54 crew members and passengers on board, only two survived: the apprentice, Tom Pearce and the young woman passenger, Eva Carmichael, who lost all of her family in the tragedy. Ten days after the LOCH ARD tragedy, salvage rights to the wreck were sold at auction for £2,120. Cargo valued at £3,000 was salvaged and placed on the beach, but most washed back into the sea when another storm developed. The wreck of LOCH ARD still lies at the base of Mutton Bird Island. Much of the cargo has now been salvaged and some was washed up into what is now known as LOCH ARD Gorge. Cargo and artefacts have also been illegally salvaged over many years before protective legislation was introduced. One of the most unlikely pieces of cargo to have survived the shipwreck was a Minton porcelain peacock - one of only nine in the world. The peacock was destined for the Melbourne International Exhibition in 1880. It had been well packed, which gave it adequate protection during the violent storm. Today, the Minton peacock can be seen at the Flagstaff Hill Maritime Museum in Warrnambool. From Australia's most dramatic shipwreck it has now become Australia's most valuable shipwreck artefact and is one of very few 'objects' on the Victorian State Heritage Register. [References: Flagstaff Hill Maritime Village information sheets and documents, http://www.asiaticpheasants.co.uk/index.html ]Flagstaff Hill’s collection of artefacts from LOCH ARD is significant for being one of the largest collections of artefacts from this shipwreck in Victoria. It is significant for its association with the shipwreck, which is on the Victorian Heritage Register (VHR S417). The collection is significant because of the relationship between the objects, as together they have a high potential to interpret the story of the LOCH ARD. The LOCH ARD collection is archaeologically significant as the remains of a large international passenger and cargo ship. The LOCH ARD collection is historically significant for representing aspects of Victoria’s shipping history and its potential to interpret sub-theme 1.5 of Victoria’s Framework of Historical Themes (living with natural processes). The collection is also historically significant for its association with the LOCH ARD, which was one of the worst and best known shipwrecks in Victoria’s history. Fragment of earthenware dinner plate recovered from the wreck of the Loch Ard. White glazed porcelain with blue Asiatic Pheasant design; this piece shows a pheasant. Sticker underneath has blue pen handwriting "L/58". Asiatic Pheasant Cartouche has Maker’s name (hard to decipher). Stamped underneath "0 1 2 8 1 (or 9)" Sticker underneath has blue pen handwriting "L/58". Asiatic Pheasant Cartouche has Maker’s name (hard to decipher). Stamped underneath "0 1 2 8 1 (or 9)" flagstaff hill, warrnambool, shipwrecked coast, flagstaff hill maritime museum, maritime museum, shipwreck coast, flagstaff hill maritime village, great ocean road, loch line, loch ard, captain gibbs, eva carmichael, tom pearce, glenample station, mutton bird island, loch ard gorge, dinner plate, asiatic pheasant, loch ard, plate -
 Flagstaff Hill Maritime Museum and Village
Equipment - Hand Barrow, 1860s
This hand barrow, sometimes called a Welsh hand barrow, was used to transport a load of marine rescue equipment from the beach cart to the rescue site, particularly over hilly, uneven or rough terrain. Hand barrows were in common use in the 19th century. Saving lives in Warrnambool – The coastline of South West Victoria is the site of over 600 shipwrecks and many lost lives; even in Warrnambool’s Lady Bay there were around 16 known shipwrecks between 1850 and 1905, with eight lives lost. Victoria’s Government responded to the need for lifesaving equipment and, in 1858, the provision of rocket and mortar apparatus was approved for the lifeboat stations. In 1859 the first Government-built lifeboat arrived at Warrnambool Harbour and a shed was soon built for it on the Tramway Jetty, followed by a rocket house in 1864 to safely store the rocket rescue equipment. In 1878 the buildings were moved to the Breakwater (constructed from 1874-1890), and in 1910 the new Lifeboat Warrnambool arrived with its ‘self-righting’ design. For almost a hundred years the lifesaving and rescue crews, mostly local volunteers, trained regularly to rehearse and maintain their rescue skills. They were summoned when needed by alarms, gunshots, ringing bells and foghorns. In July 1873 a brass bell was erected at Flagstaff Hill specifically to call the rescue crew upon news of a shipwreck. Some crew members became local heroes but all served an important role. Rocket apparatus was used as recently as the 1950s. Rocket Rescue Method - Rocket rescue became the preferred lifesaving method of the rescue crews, being much safer that using a lifeboat in rough seas and poor conditions. The Government of Victoria adopted lifesaving methods based on Her Majesty’s Coast Guard in Great Britain. It authorised the first line-throwing rescue system in 1858. Captain Manby’s mortar powered a projectile connected to rope, invented in 1808. The equipment was updated to John Dennett’s 8-foot shaft and rocket method that had a longer range of about 250 yards. From the 1860s the breeches buoy and traveller block rocket rescue apparatus was in use. It was suspended on a hawser line and manually pulled to and from the distressed vessel carrying passengers and items. In the early 1870s Colonel Boxer’s rocket rescue method became the standard in Victoria. His two-stage rockets, charged by a gunpowder composition, could fire the line up to 500-600 yards, although 1000 yards range was possible. Boxer’s rocket carried the light line, which was faked, or coiled, in a particular way between pegs in a faking box to prevent twists and tangles when fired. The angle of firing the rocket to the vessel in distress was measured by a quadrant-type instrument on the side of the rocket machine. Decades later, in about 1920, Schermuly invented the line-throwing pistol that used a small cartridge to fire the rocket. . The British Board of Trade regularly published instructions for both the beach rescue crew and ship’s crew. It involved setting up the rocket launcher on shore at a particular angle, determined by the Head of the crew and measured by the quadrant, inserting a rocket that had a light-weight line threaded through its shaft, and then firing it across the stranded vessel, the line issuing freely from the faking board. A continuous whip line was then sent out to the ship’s crew, who hauled it in then followed the instructions – in four languages - on the attached tally board. The survivors would haul on the line to bring out the heavier, continuous whip line with a tail block connected to it. They then secured the block to the mast or other strong part the ship. The rescue crew on shore then hauled out a stronger hawser line, which the survivors fixed above the whip’s tail block. The hawser was then tightened by the crew pulling on it, or by using the hooked block on the shore end of the whip and attaching it to a sand anchor. The breeches buoy was attached to the traveller block on the hawser, and the shore crew then used the whip line to haul the breeches buoy to and from the vessel, rescuing the stranded crew one at a time. The rescue crew wore scarlet, numbered armbands and worked on a numerical rotation system, swapping members out to rest them. This hand barrow is significant for its connection with local history, maritime history and marine technology. Lifesaving has been an important part of the services performed from Warrnambool's very early days, supported by State and Local Government, and based on the methods and experience of Great Britain. Hundreds of shipwrecks along the coast are evidence of the rough weather and rugged coastline. Ordinary citizens, the Harbour employees, and the volunteer boat and rescue crew, saved lives in adverse circumstances. Some were recognised as heroes, others went unrecognised. In Lady Bay, Warrnambool, there were around 16 known shipwrecks between 1850 and 1905. Many lives were saved but tragically, eight lives were lost.Hand barrow; a transporting device carried between two people walking one in front of the other. A wooden ladder-like frame with two handles at each end, blue painted body with unpainted handles. Seven equal-length slats are joined at equal distance between two parallel poles, and two longer slats are attached diagonally between the first and last slats as a brace. flagstaff hill maritime museum and village, flagstaff hill, maritime museum, maritime village, warrnambool, great ocean road, lady bay, warrnambool harbour, port of warrnambool, tramway jetty, breakwater, shipwreck, life-saving, lifesaving, rescue crew, rescue, rocket rescue, rocket crew, lifeboat men, beach rescue, line rescue, rescue equipment, rocket firing equipment, rocket rescue equipment, maritime accidents, shipwreck victim, rocket equipment, marine technology, rescue boat, lifeboat, volunteer lifesavers, volunteer crew, life saving rescue crew, lifesaving rescue crew, rocket apparatus, rocket rescue method, shore to ship, rocket apparatus rescue, stranded vessel, line throwing mortar, mortar, rocket rescue apparatus, line thrower, line throwing, lifeboat warrnambool, hand barrow, manual transport, welsh hand barrow -
 Eltham District Historical Society Inc
Photograph - Digital Photograph, Marguerite Marshall, Eltham Lower Park, 20 April 2008
Originally a race course, the park has brought the community together with a variety of activities. Published: Nillumbik Now and Then / Marguerite Marshall 2008; photographs Alan King with Marguerite Marshall.; p45 Once used for horse racing, which attracted visitors from Melbourne, the Eltham Lower Park has brought the community together with a wide range of activities. Horse riding is now enjoyed as a recreation in the park as are other sports. The park also includes the Diamond Valley Railway miniature trains and a sanctuary for the rare and vulnerable Eltham Copper Butterfly. Eltham Lower Park, with other parks, forms an almost continuous green band from Eltham’s centre, along the Diamond Creek to the Yarra River.1 Before European settlement the Wurundjeri people met on this land, particularly at the junction of the Diamond Creek with the Yarra River, which they called Birr-arung. This is commemorated by the sculpture, Not just a Pretty Place by Aleks Danko, winner of the 2000 Nillumbik Art in Public Places Award. The first European to settle here was probably Henry Foley, who in 1841 used it as part of his pastoral run. Foley sold his leasehold to Joseph Wilson in 1845, who soon after sold it to Frederick Falkiner. During the 1840s the future park was part of a government square mile (2.6 sqkm) reserve, north of the Yarra, within the Parish of Nillumbik, later named Eltham. Soon the land was used for horse racing after nearby residents cleared ten acres (4ha) in the early 1850s. A three-quarter of a mile (1.2km) race secured the winner the £10 Publican’s Prize. In response to popular demand, the newly formed Eltham District Road Board petitioned the Surveyor General of the Colony of Victoria, in 1856, for 36 acres (14.6ha) of crown land for a racecourse and recreation. By 1858 the Eltham races had become an institution. ‘Many skirmishes occurred and the way home was paved with temptation, with sly-grog for sale.3 In the early 1870s, two jockeys were sons of the police officer in charge of the Eltham Police Station, Miles S Lyons. Another ten acres (4ha) was added to the area in 1866 and 12 acres (4.8ha) – Hohnes Hill – in 1870. In 1866, two acres (0.8ha) on the creek banks became an animal pound with William Walsh the pound keeper in 1870, but this was later incorporated into the park. By 1877 the area was called a public park but horse racing and training continued into the 1920s. In the mid-1900s trotters were trained on a circuit road. In 1953 the Eltham Pony Club was established and used a cross-country course on Hohnes Hill. From the mid 1950s the club held the Eltham Easter Fair at the park, later to include a procession along Main Road from the town centre to the park. The park also attracted picnic parties and campers from the inner suburbs as did Wingrove Park, and businesses catering for visitors, sprang up on the opposite side of Main Road. Bus-loads of school children visited the park for Gould League bird days in the 1960s. In 1979 the Eltham Shire Council bought Lenister Farm, linking the park with the Yarra River. The Lenister Farm wetland includes a bird hide, viewing platform and interpretive signs.5 Pioneer Henry Stooke, later Road Board chairman, bought the 11 acres (4.5ha) - later to become Lenister Farm - from the Crown in 1862. Stooke never lived on this site and the two houses at Lenister Farm were built in the 20th century. Since its formation in 1871, the Council has controlled this crown land, which it named Eltham Park. But in the 1920s Eltham Council bought land near the town centre for a park, which it named Eltham Central Park. To avoid confusion the Council renamed Eltham Park, Eltham Lower Park. Since 2004 the Yarra footbridge has linked the park with the Yarra Valley Metropolitan Park and the Main Yarra Trail.This collection of almost 130 photos about places and people within the Shire of Nillumbik, an urban and rural municipality in Melbourne's north, contributes to an understanding of the history of the Shire. Published in 2008 immediately prior to the Black Saturday bushfires of February 7, 2009, it documents sites that were impacted, and in some cases destroyed by the fires. It includes photographs taken especially for the publication, creating a unique time capsule representing the Shire in the early 21st century. It remains the most recent comprehenesive publication devoted to the Shire's history connecting local residents to the past. nillumbik now and then (marshall-king) collection, eltham lower park, eltham park -
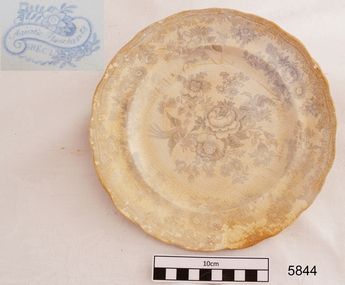 Flagstaff Hill Maritime Museum and Village
Ceramic - Plate, Minton Potteries, before 1878
This earthenware dinner plate was donated by Lorna Jensen. It had belonged to her father Wally O’Brien, who was a cyclist and had ridden in the long Melbourne to Warrnambool Cycle Classic twice. Wally was given this plate by a diving friend who had recovered it from the wreck of the LOCH ARD, on the southwest coast of Victoria. The plate had been sitting in Lorna’s mum’s china cabinet until recently when she and her husband drove to Warrnambool to donate it to Flagstaff Hill Maritime Village. When they stopped at a friend’s home along the way the friend removed it from its plastic bag and tea towel and carefully wrapped it in protective packaging for the rest of its journey. The plate is very similar to other plates recovered from the wreck of the LOCH ARD. It is uncertain whether the plates were personal belongings or part of the cargo. The Asiatic Pheasant pattern is a transfer design and was the most popular design of the 19th-century Victorian era. It is still being produced today. The design was produced as high-quality, decorative dinnerware by the potters in the Staffordshire, England, area from the late 1830s, but no one is sure exactly who the original designer was. The industrial age made the production of this design more affordable to the ordinary person who purchased and proudly displayed settings in their homes. The high demand for production resulted in the loss of quality in both potting and design, particularly between 1860-1914 when the design reached its height of popularity, and the results were often a poor match for the earlier pieces’ quality and detail. Some engravers would make copies of the Asiatic Pheasant design (and other designs) onto copper plates and sell them to more than one pottery producer (the Copyright Act of 1842 was intended to control this very thing). Consequently, the list of Makers’ Marks associated with the Asiatic Pheasant is well over 100. A single pottery factory could have several owners, all with their own Marks. These factors all make the dating of pieces difficult. Also, after 1891, pieces produced for export were required to be stamped with “ENGLAND”, but pieces produced for the domestic market in England did not need this stamp, so early pieces and pieces produced for the domestic market would all be without the “ENGLAND” stamp, confusing the matter. Over time the body shape of the pieces changed, the feathered, curved and fluted edges giving way to simpler, cheaper oblong shapes. The LOCH ARD belonged to the famous Loch Line which sailed many ships from England to Australia. Built in Glasgow by Barclay, Curdle and Co. in 1873, the LOCH ARD was a three-masted square-rigged iron sailing ship. The ship measured 262ft 7" (79.87m) in length, 38ft (11.58m) in width, 23ft (7m) in depth and had a gross tonnage of 1693 tons. The LOCH ARD's main mast measured a massive 150ft (45.7m) in height. LOCH ARD made three trips to Australia and one trip to Calcutta before its final voyage. LOCH ARD left England on March 2, 1878, under the command of Captain Gibbs, a newly married, 29-year-old. She was bound for Melbourne with a crew of 37, plus 17 passengers and a load of cargo. The general cargo reflected the affluence of Melbourne at the time. On board were straw hats, umbrellas, perfumes, clay pipes, pianos, clocks, confectionary, linen and candles, as well as a heavier load of railway irons, cement, lead and copper. There were items included that were intended for display in the Melbourne International Exhibition in 1880. The voyage to Port Phillip was long but uneventful. At 3 am on June 1, 1878, Captain Gibbs was expecting to see land and the passengers were becoming excited as they prepared to view their new homeland in the early morning. But LOCH ARD was running into a fog which greatly reduced visibility. Captain Gibbs was becoming anxious as there was no sign of land or the Cape Otway lighthouse. At 4 am the fog lifted. A man aloft announced that he could see breakers. The sheer cliffs of Victoria's west coast came into view, and Captain Gibbs realised that the ship was much closer to them than expected. He ordered as much sail to be set as time would permit and then attempted to steer the vessel out to sea. On coming head-on into the wind, the ship lost momentum, the sails fell limp and LOCH ARD's bow swung back. Gibbs then ordered the anchors to be released in an attempt to hold their position. The anchors sank some 50 fathoms - but did not hold. By this time LOCH ARD was among the breakers and the tall cliffs of Mutton Bird Island rose behind the ship. Just half a mile from the coast, the ship's bow was suddenly pulled around by the anchor. The captain tried to tack out to sea, but the ship struck a reef at the base of Mutton Bird Island, near Port Campbell. Waves broke over the ship and the top deck was loosened from the hull. The masts and rigging came crashing down knocking passengers and crew overboard. When a lifeboat was finally launched, it crashed into the side of LOCH ARD and capsized. Tom Pearce, who had launched the boat, managed to cling to its overturned hull and shelter beneath it. He drifted out to sea and then on the flood tide came into what is now known as LOCH ARD Gorge. He swam to shore, bruised and dazed, and found a cave in which to shelter. Some of the crew stayed below deck to shelter from the falling rigging but drowned when the ship slipped off the reef into deeper water. Eva Carmichael had raced onto deck to find out what was happening only to be confronted by towering cliffs looming above the stricken ship. In all the chaos, Captain Gibbs grabbed Eva and said, "If you are saved Eva, let my dear wife know that I died like a sailor". That was the last Eva Carmichael saw of the captain. She was swept off the ship by a huge wave. Eva saw Tom Pearce on a small rocky beach and yelled to attract his attention. He dived in and swam to the exhausted woman and dragged her to shore. He took her to the cave and broke open a case of brandy which had washed up on the beach. He opened a bottle to revive the unconscious woman. A few hours later Tom scaled a cliff in search of help. He followed hoof prints and came by chance upon two men from nearby Glenample Station three and a half miles away. In a state of exhaustion, he told the men of the tragedy. Tom returned to the gorge while the two men rode back to the station to get help. By the time they reached LOCH ARD Gorge, it was cold and dark. The two shipwreck survivors were taken to Glenample Station to recover. Eva stayed at the station for six weeks before returning to Ireland, this time by steamship. In Melbourne, Tom Pearce received a hero's welcome. He was presented with the first gold medal of the Royal Humane Society of Victoria and a £1000 cheque from the Victorian Government. Concerts were performed to honour the young man's bravery and to raise money for those who lost family in the LOCH ARD disaster. Of the 54 crew members and passengers on board, only two survived: the apprentice, Tom Pearce and the young woman passenger, Eva Carmichael, who lost all of her family in the tragedy. Ten days after the LOCH ARD tragedy, salvage rights to the wreck were sold at auction for £2,120. Cargo valued at £3,000 was salvaged and placed on the beach, but most washed back into the sea when another storm developed. The wreck of LOCH ARD still lies at the base of Mutton Bird Island. Much of the cargo has now been salvaged and some were washed up into what is now known as LOCH ARD Gorge. Cargo and artefacts have also been illegally salvaged over many years before protective legislation was introduced. One of the most unlikely pieces of cargo to have survived the shipwreck was a Minton porcelain peacock - one of only nine in the world. The peacock was destined for the Melbourne International Exhibition in 1880. It had been well packed, which gave it adequate protection during the violent storm. Today, the Minton peacock can be seen at the Flagstaff Hill Maritime Museum in Warrnambool. From Australia's most dramatic shipwreck, it has now become Australia's most valuable shipwreck artefact and is one of very few 'objects' on the Victorian State Heritage Register.Flagstaff Hill’s collection of artefacts from LOCH ARD is significant for being one of the largest collections of artefacts from this shipwreck in Victoria. It is significant for its association with the shipwreck, which is on the Victorian Heritage Register (VHR S417). The collection is significant because of the relationship between the objects, as together they have a high potential to interpret the story of the LOCH ARD. The LOCH ARD collection is archaeologically significant as the remains of a large international passenger and cargo ship. The LOCH ARD collection is historically significant for representing aspects of Victoria’s shipping history and its potential to interpret sub-theme 1.5 of Victoria’s Framework of Historical Themes (living with natural processes). The collection is also historically significant for its association with the LOCH ARD, which was one of the worst and best known shipwrecks in Victoria’s history.Plate, earthenware dinner plate recovered from the wreck of the Loch Ard. Blue transfer design (Asiatic Pheasant) with a clear over-glaze. The outer rim is scalloped. Printed within cartouche on underside of plate "_ H E C L " Printed within cartouche on plate "_ H E C L "flagstaff hill, warrnambool, flagstaff hill maritime museum and village, shipwreck coast, great ocean road, tom pearce, eva carmichael, loch ard, asiatic pheasant design, dinnerware, ceramic plate, wally o’brien, dinner plate