Showing 1650 items
matching kitchens
-
 Victorian Railway History Library
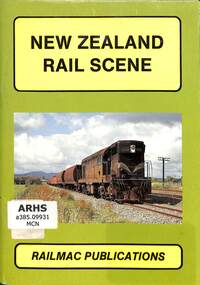
Book, Steve McNicol, New Zealand Rail Scene, 1988
Photographs of New Zealand trains in the North Island. 1988.ill, maps, p.52.non-fictionPhotographs of New Zealand trains in the North Island. 1988.railway operations and rollingstock - new zealand, railway history - new zealand -
 The Mrs Aeneas Gunn Memorial Library
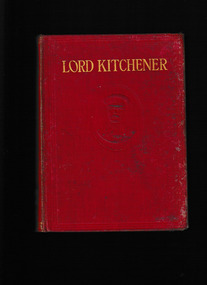
Book, George G Harrap and Co, The story of Lord Kitchener, 1916
The life and times of Lord KitchenerIll, p.288.non-fictionThe life and times of Lord Kitchenergenerals - great britain - biography, great britain - history - military -
 The Mrs Aeneas Gunn Memorial Library
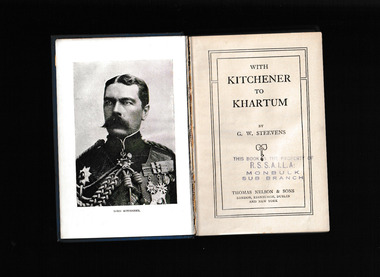
Book, Thomas Nelson and Sons, With Kitchener to Khartum, ????
A biography of Lord KitchenerIll, maps, p.384.non-fictionA biography of Lord Kitchenersudan - history, generals - great britain - biography -
 The Mrs Aeneas Gunn Memorial Library
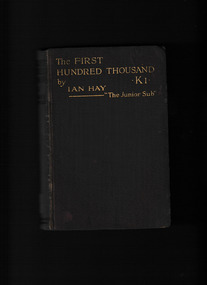
Book, Ian Hay, First hundred thousand, 1916
A fictional record of some of the personal adventures of a typical regiment of Kitchener's army.p.342.fictionA fictional record of some of the personal adventures of a typical regiment of Kitchener's army.world war 1914-1918 - fiction, world war 1914-1918 - personal recollections -
 The Mrs Aeneas Gunn Memorial Library
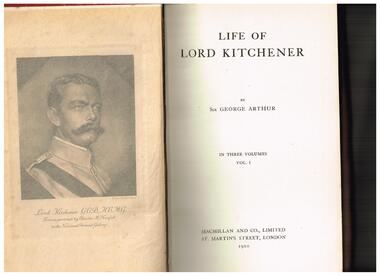
Book, Macmillan, Life of Lord Kitchener, 1920
Biography of Lord KitchenerIll, maps, 3.v, non-fictionBiography of Lord Kitchenergenerals - great - britain - biography, world war - 1914-1918 - history -
 Department of Health and Human Services
Interior - Photo of interior of kitchen, hot water urns, air conditioning unit, at Alexandra District Hospital. Photo take in March 1978 - Regional & District Hospital Collection - Department of Health & Human Services (DHHS)
Photo is part of the Department of Health, Building & Services Division, Facilities Development - Hospitals - Photographic Inventory -
 Department of Health and Human Services
Interior - Photo of interior of kitchen at Alexandra District Hospital. Photo take in March 1978
Photo is part of the Department of Health, Building & Services Division, Facilities Development - Hospitals - Photographic Inventory -
 Wodonga & District Historical Society Inc
Domestic object - Haeusler Collection Lactogen baby formula measuring spoon c.1920s
The Wodonga Historical Society Haeusler Collection provides invaluable insight into life in late nineteenth and early twentieth century north east Victoria. The collection comprises manuscripts, personal artefacts used by the Haeusler family on their farm in Wodonga, and a set of glass negatives which offer a unique visual snapshot of the domestic and social lives of the Haeusler family and local Wodonga community. The Haeusler family migrated from Prussia (Germany) to South Australia in the 1840s and 1850s, before purchasing 100 acres of Crown Land made available under the Victorian Lands Act 1862 (also known as ‘Duffy’s Land Act’) in 1866 in what is now Wodonga West. The Haeusler family were one of several German families to migrate from South Australia to Wodonga in the 1860s. This item is a Nestlé Lactogen baby formula measuring scoop used in the preparation of formula for bottle feeding. It was used by Ilma Margaret Ernestine Haeusler (née Tasker, b.1900 in Tallangatta) to feed her son Alfred who was born in 1922. Ilma died in childbirth in 1928. This measuring spoon is one of several objects in the Haeusler Collection concerning early childhood that provide insight into family and home life in early twentieth century Wodonga. The first fully artificial infant milk formula, Farine Lactee, was developed in the 1860s. Companies continued to attempt to develop synthetic formulas which nutritionally replicated human breast milk in the decades that followed. Nestlé began producing Lactogen in 1921. It was marketed to women as a nutritionally superior substitute for breast milk, and as a nutritional supplement for breast feeding mothers. From the 1920s, when the Haeusler Collection measure was produced and used, Nestlé employed nurses in major Australian cities to promote Lactogen and its supposed health benefits to new mothers. They also used print advertisements to offer free product samples and instruction booklets advising on pregnancy and infant care for the same purpose. Nestlé was formed in 1905 by the merger of the Anglo-Swiss Milk Company, established in 1866 by brothers George and Charles Page, and Farine Lactée Henri Nestlé, founded in 1866 by Henri Nestlé. The company grew significantly during the First World War and again following the Second World War, expanding its offerings beyond its early condensed milk and infant formula products. In the twenty-first century, Nestlé has faced criticism and boycotts over its decision to market baby formula as an alternative to breastfeeding in developing countries. The adoption of bottle feeding in countries without access to clean water and sanitation infrastructure has contributed to high infant mortality rates. This item has well documented provenance and a known owner. It forms part of a significant and representative historical collection which reflects the local history of Wodonga. It contributes to our understanding of domestic and family life in early twentieth century Wodonga, as well as providing interpretative capacity for themes including local history, social history, and women’s history.Silver toned alloy measuring spoon for Lactogen infant formula, produced by food and drink manufacturing company Nestlé. Embossed with the Lactogen brand name, and teaspoon and tablespoon measurements. "LACTOGEN MEASURE" on central handle/"TABLESPOON" on large inner scoop/"TEASPOON" on small inner scoopchildren, babies, household, domestic, motherhood, family, kitchen -
 Wodonga & District Historical Society Inc
Functional object - Haeusler Collection Honey Dipper c. early 1900s
The Wodonga Historical Society Haeusler Collection provides invaluable insight into life in late nineteenth and early twentieth century north east Victoria. The collection comprises manuscripts, personal artefacts used by the Haeusler family on their farm in Wodonga, and a set of glass negatives which offer a unique visual snapshot of the domestic and social lives of the Haeusler family and local Wodonga community. The Haeusler family migrated from Prussia (Germany) to South Australia in the 1840s and 1850s, before purchasing 100 acres of Crown Land made available under the Victorian Lands Act 1862 (also known as ‘Duffy’s Land Act’) in 1866 in what is now Wodonga West. The Haeusler family were one of several German families to migrate from South Australia to Wodonga in the 1860s. This honey dipper is one of the many objects in the Haeusler Collection that represent home life in early twentieth century Wodonga.This item has well documented provenance and a known owner. It forms part of a significant and representative historical collection which reflects the local history of Wodonga. It contributes to our understanding of domestic and family life in early twentieth century Wodonga, as well as providing interpretative capacity for themes including local history, social history, and women’s history. Wooden honey dipper c. early 1900shoney, bees, food, kitchen, wodonga, haeusler collection, domestic, family, household, tableware -
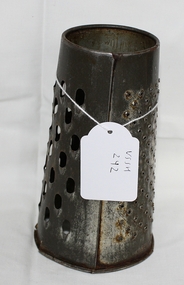 Southern Sherbrooke Historical Society Inc.
Grater, 1940's
Metallic cylinder that is wide at the bottom and narrow at the top. Has various sized holes cut/drilled into it to allow food to be grated. Hollow in the centre to contain grated food.Willow', 'registered design' and 'made in Australia' all featured on cylinder.cooking, kitchen -
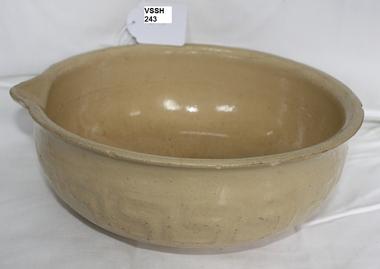 Southern Sherbrooke Historical Society Inc.
Mixing Bowl
Belonged to Cheryl Kellett and donated to Susan Heywood-Downard for the Southern Sherbrooke Historical Society. Unknown history prior to that time.Ceramic Bowl originally belonging to Cheryl Kellett. Size 12 with a small "lip" at one edge for easy pouring of contents."12" at the bottom.baking, kitchen -
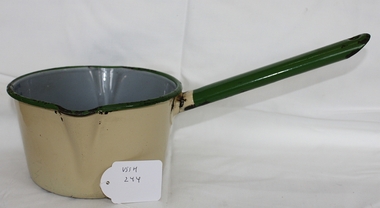 Southern Sherbrooke Historical Society Inc.
Milk Saucepan
Unknown. Bought from an opportunity shop in Victoria.2 pint/litre coloured enamel milk saucepan with handle. Volume marked on inside of saucepan. Grey inside, cream outside with green handle.Volume markings on the inside.kitchen, cooking -
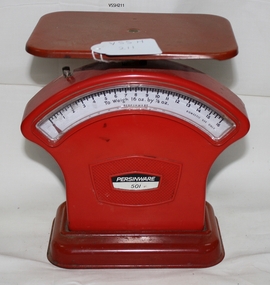 Southern Sherbrooke Historical Society Inc.
Persinware 501 kitchen scales
Red metal scales. Square shaped dish. Dial weighs up to 16oz. Has knurled knob for adjustments.On dial says "To weigh 16oz by 1/8oz" and "domestic use only" -
 Royal District Nursing Service (now known as Bolton Clarke)
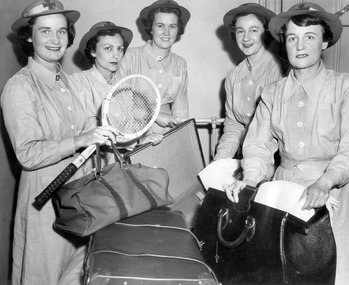
Photograph - Photograph, black and white, 11.1953
The MDNS Sisters are packing their belongs ready to move from their current Nurses Home at 39 Victoria Parade, Collingwood to their new Nurses Home and Headquarters situated at 452 St Kilda Road, Melbourne, then known as 'Airlie'. From its founding in 1885 until 1891 the Trained nurses (Nurses) of the Melbourne District Nursing Society (MDNS) worked from their own homes which were located in the vicinity of their areas (districts). The Committee meetings were held at the Religious Tract Society rooms at Queen’s walk, off Swanston Street and then at the Library Room at the Melbourne Town Hall. The Annual General Meeting was held at the Town Hall. In November 1891 MDNS was able to rent a two story terraced house at 66 Cardigan Street, Carlton, at £65 a year, which contained accommodation for three Nurses and one pupil nurse as well as being used as their Headquarters. They left from their Nurses Home each morning and returned at the end of their shift to write up their book work before retiring for the day. Three years later they moved into a larger terraced house at 49 Drummond Street Carlton which was rented at ‘a very moderate rental’. There was a Board room, apartments for the Nurses and pupil nurse, a large dispensary which patients could attend each evening to have prescriptions signed and bottles refilled with ‘homely remedies’ and elixirs, which were administered for e.g. to Consumptive cases. Doctor’s prescriptions were filled at the Pharmacy. Cupboards containing donated blankets and bedclothes for needy patients were kept in this room, and it was here where the Nurses kept their nursing bags which were refilled at the end of each shift ready for any emergency and for the next day. A list of Doctors the Nurses could call was kept by the telephone. The home also had a kitchen where nourishing soup was made and distributed twice a week to the needy. Milk was also distributed when needed. In 1902 they moved into rented premises at 188 Leicester Street, Carlton and two years later, in 1904, to premises at 5 Royal Terrace, Nicholson Street, Fitzroy where they remained for ten years. In June 1914 at last the Society had sufficient funds to purchase their own terraced premises, ‘Floraston’ 39 Victoria Parade, Collingwood which was their Headquarters and Nurses Home. In 1926 the After-Care Home for recovering patients, (later called After-Care Hospital) was built by the Society next door, running from 41-47 Victoria Parade (became No. 45). There were now two divisions with the After Care having their owned Trained nurses (Sisters) and the District Division of Trained nurses (Sisters) who continued to live at No. 39. In November 1953 the Sisters working in the District Nursing Division moved into their new Headquarters and Nurses Home at 452 St. Kilda Road, Melbourne. In 1957 this Division changed its name to the Melbourne District Nursing Service when it separated from the After-Care Hospital. It was given Royal patronage in 1966 and became Royal District Nursing Service (RDNS). As it expanded, and now with Centres opening throughout the suburbs, the Nurses Home at 452 closed and those rooms used for administrative purposes. It now had outlying districts to service, and with a full fleet of District cars, the Sisters lived in their own homes and visited their closest District Centre each morning to collect their work for the day and returned there at the end of their community duties to do their administrative work. On April the 1st 1996 RDNS Head Office relocated to 31 Alma Road, St. Kilda. Standing in a semi circle of this photograph are 5 Melbourne District Nursing Society (MDNS) Sisters in their long sleeve grey uniform dresses which have a belt, peaked collars and white buttons down the centre. They are wearing their grey brimmed hats with a central Maltese cross on the light colour headband over their short dark curled hair. From Left to Right are Sisters Marianne Metcalf who is smiling and is holding a tennis racket and soft sided oblong travel bag which has two leather straps and handle in her right hand; it is resting on a closed case, which has two leather straps across the lid; this sits in front of her. Next is Gerda Oppenheim who is looking serious and has her right hand on the top of the lid of an open case in front of her, then Beryl Rowley, who is smiling and has her hands on a narrow white metal horizontal pole which has a vertical pole attached. Next is Marcia Parrat who is smiling and is holding a piece of white linen on the open case, and next, on the far right, is Florence Hoey who is holding a piece of white linen on top of an open hard leather travelling bag which is sitting in front of her next to the closed case. melbourne district nursing society, mdns, mdns headquarters, sister marianne metcalf, sister gerda oppenheim, sister beryl rowley, sister marcia parrat, sister florence hoey, royal district nursing service, rdns -
 Mont De Lancey
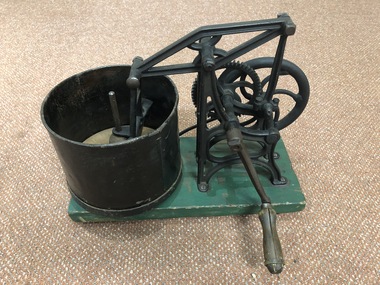
Food chopper, c1886
Mechanical food choppers or hashers (commonly called in the U.S.A.) were used around the 1880's to chop up food.Starrett cast iron mechanical food chopper with tin barrel, on green wooden base. With booklet. kitchenware, slicers, kitchen equipment -
 Whitehorse Historical Society Inc.
Newspaper, Along the highway, 1992
A guide to business along the Maroondah Highway from Middleborough Road to Heatherdale Road.A guide to business along the Maroondah Highway from Middleborough Road to Heatherdale Road.A guide to business along the Maroondah Highway from Middleborough Road to Heatherdale Road.maroondah highway blackburn, pharmacies, maroondah highway mitcham, athan, savvas, maroondah highway nunawading, gelb, joe, mitcham shopping centre, regal kitchens, blackburn, nunawading fire station, armstrong, norman -
 Old Castlemaine Schoolboys Association Inc.
Photograph, Ladies in Kitchen
-
 Old Castlemaine Schoolboys Association Inc.
Photograph, Ladies in Kitchen
-
 Flagstaff Hill Maritime Museum and Village
Domestic object - Bowl, J & G Meakin, Late 19th or early 20th Century
The Process of Making Pottery Decorating, Firing, Glazing, Making, Technical There is a rhythm and flow to clay. It can’t be done all at once! Even the making process! It can take weeks to get everything done, especially if you can only work on your pottery once a week! Even though we have three hour classes, it’s often just not enough time! Here is an overview of some of the processes so you have a bit more grasp on some of the technical stuff! Step One – Design There are SO many ideas out there for making stuff in clay! From delicate porcelain jewellery, through to heavy sculptural work and everything in between. Deciding your direction is sometimes not that easy – when you first start, try everything, you will naturally gravitate to the style that you enjoy! The options and variations are endless and can get a wee bit overwhelming too! Check in with me before you start to ensure your ideas will work, what order you might do things, how you could achieve the look you are seeking and any other technical data required! Step Two – Making Clay is thixotropic. This means that as you work with it, the clay first gets sloppier and wetter, before is begins to dry in the atmosphere. For most things, you simply can’t do all parts of the project at once. An example of work order might look like: Get last weeks work out from the shelves Prepare clay for today’s work – roll your clay, prepare balls for throwing, make the first stage of a pinch pot) Clean up last week’s work and put it on the shelf for bisque firing Check that you have any glazing to do – and do enough of it that you will have time to finish your main project Do the next step of your next project – there might be a further step that can’t be complete immediately, in that case, wrap your work well and put onto the shelves. Letting your work rest for a while can really help keep your work clean and professional looking. Many things require bagging under plastic to keep it ready for work the next week – put your name on the outside of the bag so you can find your work easily. We have stickers and markers. Consider how you want to decorate your work – coloured slip can be applied at a fairly wet stage (remembering that it will make your work even wetter!). Trying to apply slip to dry clay won’t work! If you want to do sgraffito – you will need to keep the work leather hard (a state of dryness where you can still work the clay with a little effort and a little water and care). Step Three – Drying Most of the time your work can go into the rack uncovered to let it dry out for the following week. If you want to continue forming or shaping you will need to double bag your work – put your work on a suitable sized bat and put the bat in a bag so the base of the bag is under the bat, then put another bag over the top of the work and tuck the top of the bag under the bat. If you want to trim (or turn) your thrown work the following week, it should also be double bagged. If your work is large, delicate, or of uneven thicknesses, you should lightly cover your work for drying. When considering the drying process, bare in mind the weather, humidity and wind! The hotter and dryer, the faster things dry and work can dry unevenly in the shelves – this can lead to cracking – another time to lightly cover your work for drying. Step Four – Trimming and Cleaning Up Your work is dry! It is called greenware now and it is at it’s most fragile! Handle everything with two hands. I often refer to soft hands – keep everything gentle and with your fingers spread as much as possible. Try to not pick up things like plates too much, and always with both hands! Before your work can be bisque fired it should be “cleaned up”. You work won’t go into the kiln if it has sharp edges – when glazed, sharp edges turn into razor blades! Use a piece of fly wire to rub the work all over – this will scratch a little so be light handed. Use a knife or metal kidney to scrape any areas that require a bit more dynamic treatment than the fly wire offers! Finally, a very light wipe over with a slightly damp sponge can help soften and soothe all of your edges and dags! Trimming thrown work: If you are planning to trim (or turn) your thrown work (and you should be), make sure you bag it well – your work should be leather hard to almost dry for easiest trimming. Use this step to finish the work completely – use a metal kidney to polish the surface, or a slightly damp sponge to give a freshly thrown look. Wipe the sponge around the rim after trimming, and check the inside of the pot for dags! Trimming slip cast work: Usually I will trim the rims of your work on the wheel the following day to make that stage easier, however you will still need to check your work for lumps and bumps. Last but not least – check that your name is still clearly on the bottom of your work. Step Five – Bisque Firing When the work is completely dry it can go into the bisque kiln. The bisque kiln is fired to 1000°C. This process burns off the water in the clay as well as some of the chemically bound water. The structure of the clay is not altered that much at this temperature. Inside the bisque kiln, the work is stacked a little, small bowl inside a larger bowl and onto a heavy plate. Smaller items like decorations or drink coasters might get stacked several high. Consideration is paid to the weight of the stack and shape of the work. A bisque kiln can fire about one and a half times the amount of work that the glaze kiln can fire. The firing takes about 10 hours to complete the cycle and about two days to cool down. Once it has been emptied the work is placed in the glaze room ready for you to decorate! Step Six – Glazing Decorating your work with colour can be a lot of fun – and time consuming! There are three main options for surface treatment at this stage: Oxide Washes Underglazes Glazes Washes and underglazes do not “glaze” the work – It will still need a layer of glaze to fully seal the clay (washes don’t need glaze on surfaces not designed for food or liquid as they can gloss up a little on their own). Underglazes are stable colourants that turn out pretty much how they look in the jar. They can be mixed with each other to form other colours and can be used like water colours to paint onto your work. Mostly they should have a clear glaze on top to seal them. Oxides are a different species – the pink oxide (cobalt) wash turns out bright blue for instance. They don’t always need a glaze on top, and some glazes can change the colour of the wash! The glazes need no other “glaze” on top! Be careful of unknown glaze interactions – you can put any combination of glaze in a bowl or on a plate, but only a single glaze on the outside of any vertical surface! Glazes are a chemical reaction under heat. We don’t know the exact chemicals in the Mayco glazes we use. I can guess by the way they interact with each other, however, on the whole, you need to test every idea you have, and not run the test on a vertical surface! Simply put, glaze is a layer of glass like substance that bonds with the clay underneath. Clay is made of silica, alumina and water. Glaze is made of mostly silica. Silica has a melting point of 1700°C and we fire to 1240°C. The silica requires a “flux” to help it melt at the lower temperature. Fluxes can be all sorts of chemicals – a common one is calcium – calcium has a melting point of 2500°C, however, together they both melt at a much lower temperature! Colourants are metal oxides like cobalt (blue), chrome (green through black), copper (green, blue, even red!), manganese (black, purple and pink) iron (red brown), etc. Different chemicals in the glaze can have dramatic effects. for example, barium carbonate (which we don’t use) turns manganese bright pink! Other elements can turn manganese dioxide brown, blue, purple and reddish brown. Manganese dioxide is a flux in and of itself as well. So, glazes that get their black and purple colours, often interact with other glazes and RUN! Our mirror black is a good example – it mixes really well with many glazes because it fluxes them – causes them to melt faster. It will also bring out many beautiful colours in the glazes because it’s black colouring most definitely comes from manganese dioxide! Glaze chemistry is a whole subject on it’s own! We use commercial Mayco glazes on purpose – for their huge range of colour possibilities, stability, cool interactions, artistic freedom with the ability to easily brush the glazes on and ease of use. We currently have almost 50 glazes on hand! A major project is to test the interactions of all glazes with each other. That is 2,500 test tiles!!!! I’m going to make the wall behind the wheels the feature wall of pretty colours! Step Seven – Glaze (Gloss or sometimes called “Glost”) Firing Most of the time this is the final stage of making your creation (but not always!) The glaze kiln goes to 1240°C. This is called cone 6, or midrange. It is the low end of stoneware temperatures. Stoneware clays and glazes are typically fired at cone 8 – 10, that is 1260 – 1290°C. The energy requirement to go from 1240°C to 1280°C is almost a 30% more! Our clay is formulated to vitrify (mature, turn “glass-like”) at 1240°, as are our glazes. A glaze kiln take around 12 hours to reach temperature and two to three days to cool down. Sometimes a third firing process is required – this is for decoration that is added to work after the glaze firing. For example – adding precious metals and lustres. this firing temperature is usually around 600 – 800°C depending upon the techniques being used. There are many students interested in gold and silver trims – we will be doing this third type of firing soon! After firing your work will be in the student finished work shelves. Remember to pay for it before you head out the door! There is a small extra charge for using porcelain clay (it’s more than twice the price of regular clay), and for any third firing process! Once your work has been fired it can not turn back into clay for millennia – so don’t fire it if you don’t like it! Put it in the bucket for recycling. https://firebirdstudios.com.au/the-process-of-making-pottery/This bowl was made by renowned pottery company J & G Meakin of England. The firm was established in the mid-1800's. The bowl is an example of kitchenware used in the 19th century and still in use today.Bowl; white ceramic, round and tapering inwards towards base. Made by J and G Meakin England.On base, 'Ironstone China Reg SOL 391413' with symbolflagstaff hill, flagstaff hill maritime museum and village, warrnambool, maritime museum, maritime village, great ocean road, shipwreck coast, mixing bowl, food preparation, j & g meakin, pottery, stoke-on-trent, kitchen equipment, ceramic -
 Whitehorse Historical Society Inc.
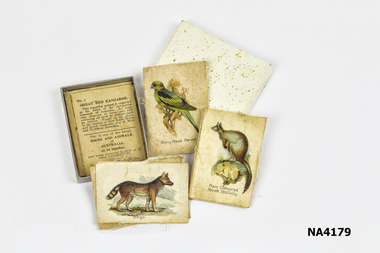
Memorabilia - Box - Cigarette silks, 1911 - 1917
These type of cigarette silks were included in WD & HO Wills cigarette packets to induce women in particular to take up smoking.|The Word 'Cartophilic?|It is believed that this unusual word was coined in the 1920s by Col. Bagnall, an Englishman, who was the father of the hobby of cigarette card and trade card collecting. It is thought to be a combination of a Latin word, 'carto' meaning 'card and the Greek word 'philic', meaning 'love'.- lover of cards. The term originally related to the collection of the two types mentioned, however, our Society has included postcards in the range of items collected by our members.|The Cigarette Card|The cigarette card began its evolution in the United States of America, in the early 1880s as a plain piece of cardboard used by tobacconists to protect the cigarettes which were sold in that era, not in packets, but loosely. A purchaser would buy his cigarettes then wrap them in paper around the small piece of cardboard, which acted as a stiffener. In fact, for many decades, cigarette cards were known as 'stiffeners' in the USA.|The card depicting 'The Marquis of Lome' is reputed to be the first known cigarette card issued. This is thought to have been in 1879. It did not take long for an enterprising entrepreneur to recognise the advertising potential of the cigarette card, and, very soon, the cards began displaying popular images, often in sets. This had the effect of youngsters, wishing to complete their sets, harassing their fathers to buy a specific brand of cigarettes. The kids who collected cards in the days when they were being issued in the cigarette packets, would hang around outside the local tobacconist's shop, pestering the men who had just bought a packet of cigarette, with the cry: 'can I have the cig can mister?'|It is a proven fact that, here in Australia during the 1930s, at least one set had one card deliberately withheld and issued very sparingly. This card is No. 86 (Mrs Jack Crawford) in the Carreras 'Turf Personality Series'. Thus, in a set of reasonably easy cards to get, this one card is a constant source of frustration for the collector, and as such, commands a premium when it comes to price. It is not hard to imagine the young collector nagging his to Dad to keep buying 'Turf' cigarettes to enable him to finish the set.|From small beginnings the cigarette card soon gave rise to a booming industry in itself. Artists and writers were|employed to produce the cards, which were miniature works of art and served as little encyclopaedia's for the children of the day. By the 1930s cards were being issued in the countless millions. It has been stated, in one book on the history of cards; that 450 million sets of a series produced and issued by the prolific issuer of cards in the United Kingdom, WD & HO Wills. As each set contained 50 cards you would need a calculator with a very long result window to see the answer to how many cards of that series were in circulation.|Australia's involvement would appear to have its beginnings with the English and American firms who shipped their tobacco products here and the cards of American Tobacco Company (ATC) are found in great numbers in early Australian collections; many featuring Australian subjects, e.g. 'Australian Parliament a 1901 issue. Earlier U.S. sets depicting Australians included Goodwin & Co's, so called. 'Australian Series' with cricketers and Australian Rules footballers who were on the sporting scene during the 1880s. The caption of one of theses cards reads:|'W.Hannysee. Captain Port Melbourne Football Club' which enables us to pinpoint the year of issue to either 1889 or 1890.|On the Australian scene the first local manufacturer who issued cards seems to have been The National Cigarette Company of Australia Proprietary Limited, whose 'Tally Ho' packets contained cards from a series of thirteen featuring the touring 'English Cricket Team 1897-8' Of the few Australian manufacturers who issued cards, only two companies issued more the two sets.|Undoubtedly the cards issued by the Melbourne firm Sniders & Abrahams (later Sniders & Abrahams Pty Ltd) are the 'jewels in the crown' of Australian card issues. They issued some thirty-three series, with numerous sub-series and allied issues such as metal badges, metal football shields, celluloid flags etc., which ensured that the hobbyist had a vast range from which to collect. Sporting themes – football, cricket, horse racing – dominate, indicating the Australians' love of sport and the outdoors was as strong in those earlier times as it is today. Military, animals and birds themes were also to the fore, with a touch of culture being provided by 'Shakespeare', 'Dickens', actresses and even classical 'Statuary'. Humour was not forgotten with 'Cartoons and Caricatures', 'Naval and Cricket (double meaning) Terms' and the 'Jokes' series. Art and history were covered by the artist, S.T. Gill's 'Views of Victoria in 1857' while the stereoscopic 'Views of the World' expanded the collectors' knowledge of the world as a whole.|The Sniders & Abrahams series began in 1904 and by 1919 the company was in decline and was eventually taken over by G.G. Goode & Co. Ltd. This company produced one set only, the highly collectable 'Prominent Cricketer Series' issued in 1924. During the early to mid-1920s, J.J. Schuh Tobacco Pty Ltd issued eight series, again containing the popular subjects of sport and war. At least two provincial tobacconists, Lentens of Bendigo and Baillies of Warrnambool, issued private football series. The last series of cards issued by a truly Australian firm was Dudgeon & Arnell's '1934 Australian Cricket Team'.|The Australian market was not neglected by the English companies with WD & HO Wills, Godfrey Phillips and Ogdens all making their contributions. By far the most active issuer was the long-established company Wills, whose 'Cricketers' of 1901 heralded the flood of Australian series, which continued into the mid-thirties.|The onset of the 1939-45 World War sounded the death knell of the cigarette card and very few post-war issues were made, certainly not here in Australia.|The Trade Card|The Trade Card is a non-tobacco item used by manufacturers to promote and advertise their products, in the same way that cigarette cards were. It is uncertain exactly when they were first produced, but in the USA, non-collectable cards were issued by firms in the early 1800s. These were more akin to a latter day 'business card'. It was not until the 1850s, when coloured and pictorial cards were issued to advertise and promote products that the Trade Card|became a collectable item. Many beautiful lithographic cards were produced in this early era and they are very mu sought after by collectors. By the 1870s the issues of Trade Cards became more prolific and it is from this era that more cards are seen.|Again, it is difficult to pinpoint the exact date of the first Australian Trade Card and it may be that the highly collectable and extremely rare 'American Candy Co's' - 'Pure Caramels' Australian Rules football card, issued i 1891, is the earliest series. This confectionery firm was located in Fitzroy, a Melbourne suburb. To date only two subjects have been seen.|Another early set was 'Flags', issued by F.H.Fauldings & Co. It featured testimonials of seven English cricketers who toured Australia with the 1894/5 Test team. Fauldings was an Adelaide based firm which manufactured medicinal toiletries, soaps and oils, using the distinctly Australian eucalyptus oil. During the 20th century a multitude of Australian businesses issued trade cards, with confectionery manufacturers such as Hoadleys, Allens, Sweetacres and Australian Licorice producing the majority of them. Again sporting themes dominated with the ever popular Aussie Rules football cards being the most numerous. Cricket issues ran a close second.|Apart from sporting cards, almost every subject imaginable was covered by the Trade Card, making it the most diverse and interesting branch of cartophilly. In contrast to the Cigarette Card, which had its demise prior to the Second World War, the Trade Card is still alive and well.|We all are aware of the long running 'Birds of Australasia' series put out by Tuck-fields Tea and 1 doubt if there is a kitchen drawer in Australia that has not got one or two of these informative and attractive cards floating about in it. These cards were first produced in the early 1960s and are still being inserted in that company's packets of tea. Such is also the case with Sanitarium Health Foods, manufacturers of the well known Weetbix, who began issuing cards, with a wide range of subjects, in the early 1940s and continue to do so.|The 1940s and 1950s saw the two breakfast food giants, Kornies and Weeties dominating the card scene. Kornies footballers were in production fora decade from 1948 to 1959. Four years later in 1963, we saw the start of four decades of Scanlens bubble-gum card issues, both football and cricket. In the mid 1990s, with the end of the Scanlens/Stimorol cards, the Trading Card came on the scene. These cards do not fit under the umbrella of the Trade Card, having been produced and marketed purely as a 'collectable' with no connection whatsoever to any product, which of course is necessary for an item to be classified as a Trade Card.|The earliest British postcard was issued in 1870 and was designed to send short messages; the stamp was printed on the card, therefore it did not require an envelope. It was considered by many to be lowering the postal standards because the texts were no longer private. However the cards were a great success as on the first day of issue in 1870, half a million passed through the London postal centre.|The first illustrated postcards are said to be those introduced by a French stationer in 1870. He realized that French troops fighting in the Franco-Prussian War needed to be able to send short messages to their families and designed a 'postcard' to suit the purpose. As many of the soldiers were illiterate they decorated their cards with sketches of their many activities at the front rather than writing; thus creating a picture postcard. Private enterprise soon saw the great financial possibilities of this new easy and attractive way of communication by post; also sending a postcard cost less than postage for letters. It was correctly assumed that postcards were likely to overtake letter writing in many instances.|Between 1875 and 1882 every state in Australia introduced official postcards, N.S.W. first and Tasmania last. Each state produced a simple type of postcard with a pre printed stamp allied to that state. The stamp side stated 'The Address Only To Be Written On This Side'; the reverse side sometimes carried a simple illustration or decoration with space fora short message, each state extolling their own state's virtues. In 1901, with the advent of Federation, the new Government became responsible for all postal services in Australia and produced postcards for sale in every state. With several mail deliveries each day in most towns, postcards were used for many purposes. One 1906 postcard, with an illustration of fruit, was sent from Mrs X in the morning to her greengrocer ordering her fruit and vegetables to be delivered that afternoon. Another lady asks her charlady to 'come this afternoon'.|Australian private enterprise also began selling pictorial postcards, most companies using the very experienced German printing works who were the worlds best in the field of lithography and fine detailed colour-printing. Many of these beautiful German cards still exist today, 100 years later. Australia did have a few fine printers but they were in the minority. Black and white postcards printed in Australia in the early 1900s were often of good quality e.g. postcards printed by 'The Bulletin', illustrating the works of 'The Bulletins' top artists.|Between c1903-09 The Melbourne company Osboldstone and Atkins etc. printed coloured reproductions of 46 J.A. Turner bush/rural life paintings, which were generally of good quality and became hugely popular and still sought after today. Like thousands of homes in Europe, Britain and U.S.A., many Australia homes had albums of cherished postcards, which were given pride of place for visitors to see and enjoy.|Postcard collecting remained popular but was changing with the times. About 1912 the Australian photographer George Rose of Melbourne began to produce topographical B/W real photographic postcards covering most of Australia and other photographers began to do likewise. These cards soon found their way into collections as well.|WWI and the horrors of war suddenly changed the world; postcards were still in great demand but the subject matter was far more serious. Thousands of postcards from the trenches in European war zones arrived in Australia to be included in family albums. Propaganda and recruitment messages were produced to encourage enlistment. Australian postcard producers began to create cards decorated with gum leaves, boomerangs, wattle etc., which were designed for sending to Australian troops serving overseas. Very few 'pretty' cards were available, as access to the Gentian printing works was no longer possible and exporting of postcards from Britain was very limited. By the end of WWI people had other more serious problems to contend with and the avid postcard collecting hobby declined, fold greetings took over and topographical photographic postcards became a small but steady income for the producers and newsagents etc. in every town.|Fortunately many of these old postcards still exist and are avidly collected by a new generation or postcard collectors. The Australian Cartophilic Society Inc. is one of four postcard/cigarette card organizations in Australia. They are, N.S.W. Post Card Collectors Society; Queensland Card Collectors' Society Inc. and West Australian Card Collectors|Society, and across the Tasman there is a New Zealand Postcard Society.|References:|Picture Postcards of the Golden Age A Collector's Guide by Toni & Valmai Holt. Picture Postcards in Australia 1898 - 1920 by David CookBox of Cigarette Silks ( 10 ) depicting animal motifs, which were placed in cigarette packets as an incentive for women in particular to smoke.|WD & HO Wills|Produced 1911 - 1917personal effects, smoking accessories, recreations, collections -
 Flagstaff Hill Maritime Museum and Village
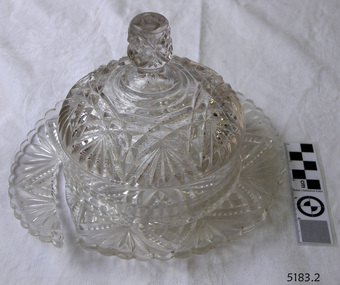
Domestic object - Butter Dish
The art of making glass can be traced back to 2600 BC in Mesopotamia. Egyptians practised making glass around 2500 BC. Artificial glass first appeared in the Egyptian or the Mesopotamian civilization, whereas they used tools made out of volcanic glass obsidian in the Stone Age. Ancient China, however, discovered how to make glass a little later. Glass beads are known to be one of the earliest products made out of glass. Their creation is thought to be primarily accidental. In the later Bronze Age, glassmaking came to a halt. Glass was a luxury material back then. Archaeological excavations suggest the use of glass in England during the middle ages. In the 10th century, stained glass found a place in cathedrals and windows of palaces. After the Renaissance, architectural methods changed substantially, leading to a decrease in stained glass as a building material. Domestic use of glass increased following the industrial revolution. Vessels, glass windows, and glass beads gained popularity in Europe during this period. During the 19th century, many people preferred glass windows and doors as a decorative option. In the late 19th century, some designers brought back stained glass in decorative windows. It was during this period that Mr Tiffany discovered several methods to make domed glass handicrafts. People discovered the true versatility of using glass as a building material only in the 20th century. With glassmaking technology receiving an industrial boom, you could produce several different types of glass. Toughened glass, laminated glass, bulletproof glass, and smart glass all boosted the use of glass in buildings. Today, several skyscrapers, small and big homes, and offices use glass in almost all aspects of construction and design. https://www.aisglass.com/glass-made-step-step-process/The invention and development of glass, both as domestic items and in building, has been nothing short of revolutionary. Prior to the use of glass for windows, the interior of buildings were extremely dark, even during sunny days. The use of glass domestic objects, that could be easily washed, led to improved hygiene.Moulded patterned glass butter dish. Base has been broken.None.flagstaff hill, warrnambool, shipwrecked-coast, flagstaff-hill, flagstaff-hill-maritime-museum, maritime-museum, shipwreck-coast, flagstaff-hill-maritime-village, glass, kitchen item, butter -
 Flagstaff Hill Maritime Museum and Village
Domestic object - Bowl, Late 19th or early 20th Century
The Process of Making Pottery Decorating, Firing, Glazing, Making, Technical There is a rhythm and flow to clay. It can’t be done all at once! Even the making process! It can take weeks to get everything done, especially if you can only work on your pottery once a week! Even though we have three hour classes, it’s often just not enough time! Here is an overview of some of the processes so you have a bit more grasp on some of the technical stuff! Step One – Design There are SO many ideas out there for making stuff in clay! From delicate porcelain jewellery, through to heavy sculptural work and everything in between. Deciding your direction is sometimes not that easy – when you first start, try everything, you will naturally gravitate to the style that you enjoy! The options and variations are endless and can get a wee bit overwhelming too! Check in with me before you start to ensure your ideas will work, what order you might do things, how you could achieve the look you are seeking and any other technical data required! Step Two – Making Clay is thixotropic. This means that as you work with it, the clay first gets sloppier and wetter, before is begins to dry in the atmosphere. For most things, you simply can’t do all parts of the project at once. An example of work order might look like: Get last weeks work out from the shelves Prepare clay for today’s work – roll your clay, prepare balls for throwing, make the first stage of a pinch pot) Clean up last week’s work and put it on the shelf for bisque firing Check that you have any glazing to do – and do enough of it that you will have time to finish your main project Do the next step of your next project – there might be a further step that can’t be complete immediately, in that case, wrap your work well and put onto the shelves. Letting your work rest for a while can really help keep your work clean and professional looking. Many things require bagging under plastic to keep it ready for work the next week – put your name on the outside of the bag so you can find your work easily. We have stickers and markers. Consider how you want to decorate your work – coloured slip can be applied at a fairly wet stage (remembering that it will make your work even wetter!). Trying to apply slip to dry clay won’t work! If you want to do sgraffito – you will need to keep the work leather hard (a state of dryness where you can still work the clay with a little effort and a little water and care). Step Three – Drying Most of the time your work can go into the rack uncovered to let it dry out for the following week. If you want to continue forming or shaping you will need to double bag your work – put your work on a suitable sized bat and put the bat in a bag so the base of the bag is under the bat, then put another bag over the top of the work and tuck the top of the bag under the bat. If you want to trim (or turn) your thrown work the following week, it should also be double bagged. If your work is large, delicate, or of uneven thicknesses, you should lightly cover your work for drying. When considering the drying process, bare in mind the weather, humidity and wind! The hotter and dryer, the faster things dry and work can dry unevenly in the shelves – this can lead to cracking – another time to lightly cover your work for drying. Step Four – Trimming and Cleaning Up Your work is dry! It is called greenware now and it is at it’s most fragile! Handle everything with two hands. I often refer to soft hands – keep everything gentle and with your fingers spread as much as possible. Try to not pick up things like plates too much, and always with both hands! Before your work can be bisque fired it should be “cleaned up”. You work won’t go into the kiln if it has sharp edges – when glazed, sharp edges turn into razor blades! Use a piece of fly wire to rub the work all over – this will scratch a little so be light handed. Use a knife or metal kidney to scrape any areas that require a bit more dynamic treatment than the fly wire offers! Finally, a very light wipe over with a slightly damp sponge can help soften and soothe all of your edges and dags! Trimming thrown work: If you are planning to trim (or turn) your thrown work (and you should be), make sure you bag it well – your work should be leather hard to almost dry for easiest trimming. Use this step to finish the work completely – use a metal kidney to polish the surface, or a slightly damp sponge to give a freshly thrown look. Wipe the sponge around the rim after trimming, and check the inside of the pot for dags! Trimming slip cast work: Usually I will trim the rims of your work on the wheel the following day to make that stage easier, however you will still need to check your work for lumps and bumps. Last but not least – check that your name is still clearly on the bottom of your work. Step Five – Bisque Firing When the work is completely dry it can go into the bisque kiln. The bisque kiln is fired to 1000°C. This process burns off the water in the clay as well as some of the chemically bound water. The structure of the clay is not altered that much at this temperature. Inside the bisque kiln, the work is stacked a little, small bowl inside a larger bowl and onto a heavy plate. Smaller items like decorations or drink coasters might get stacked several high. Consideration is paid to the weight of the stack and shape of the work. A bisque kiln can fire about one and a half times the amount of work that the glaze kiln can fire. The firing takes about 10 hours to complete the cycle and about two days to cool down. Once it has been emptied the work is placed in the glaze room ready for you to decorate! Step Six – Glazing Decorating your work with colour can be a lot of fun – and time consuming! There are three main options for surface treatment at this stage: Oxide Washes Underglazes Glazes Washes and underglazes do not “glaze” the work – It will still need a layer of glaze to fully seal the clay (washes don’t need glaze on surfaces not designed for food or liquid as they can gloss up a little on their own). Underglazes are stable colourants that turn out pretty much how they look in the jar. They can be mixed with each other to form other colours and can be used like water colours to paint onto your work. Mostly they should have a clear glaze on top to seal them. Oxides are a different species – the pink oxide (cobalt) wash turns out bright blue for instance. They don’t always need a glaze on top, and some glazes can change the colour of the wash! The glazes need no other “glaze” on top! Be careful of unknown glaze interactions – you can put any combination of glaze in a bowl or on a plate, but only a single glaze on the outside of any vertical surface! Glazes are a chemical reaction under heat. We don’t know the exact chemicals in the Mayco glazes we use. I can guess by the way they interact with each other, however, on the whole, you need to test every idea you have, and not run the test on a vertical surface! Simply put, glaze is a layer of glass like substance that bonds with the clay underneath. Clay is made of silica, alumina and water. Glaze is made of mostly silica. Silica has a melting point of 1700°C and we fire to 1240°C. The silica requires a “flux” to help it melt at the lower temperature. Fluxes can be all sorts of chemicals – a common one is calcium – calcium has a melting point of 2500°C, however, together they both melt at a much lower temperature! Colourants are metal oxides like cobalt (blue), chrome (green through black), copper (green, blue, even red!), manganese (black, purple and pink) iron (red brown), etc. Different chemicals in the glaze can have dramatic effects. for example, barium carbonate (which we don’t use) turns manganese bright pink! Other elements can turn manganese dioxide brown, blue, purple and reddish brown. Manganese dioxide is a flux in and of itself as well. So, glazes that get their black and purple colours, often interact with other glazes and RUN! Our mirror black is a good example – it mixes really well with many glazes because it fluxes them – causes them to melt faster. It will also bring out many beautiful colours in the glazes because it’s black colouring most definitely comes from manganese dioxide! Glaze chemistry is a whole subject on it’s own! We use commercial Mayco glazes on purpose – for their huge range of colour possibilities, stability, cool interactions, artistic freedom with the ability to easily brush the glazes on and ease of use. We currently have almost 50 glazes on hand! A major project is to test the interactions of all glazes with each other. That is 2,500 test tiles!!!! I’m going to make the wall behind the wheels the feature wall of pretty colours! Step Seven – Glaze (Gloss or sometimes called “Glost”) Firing Most of the time this is the final stage of making your creation (but not always!) The glaze kiln goes to 1240°C. This is called cone 6, or midrange. It is the low end of stoneware temperatures. Stoneware clays and glazes are typically fired at cone 8 – 10, that is 1260 – 1290°C. The energy requirement to go from 1240°C to 1280°C is almost a 30% more! Our clay is formulated to vitrify (mature, turn “glass-like”) at 1240°, as are our glazes. A glaze kiln take around 12 hours to reach temperature and two to three days to cool down. Sometimes a third firing process is required – this is for decoration that is added to work after the glaze firing. For example – adding precious metals and lustres. this firing temperature is usually around 600 – 800°C depending upon the techniques being used. There are many students interested in gold and silver trims – we will be doing this third type of firing soon! After firing your work will be in the student finished work shelves. Remember to pay for it before you head out the door! There is a small extra charge for using porcelain clay (it’s more than twice the price of regular clay), and for any third firing process! Once your work has been fired it can not turn back into clay for millennia – so don’t fire it if you don’t like it! Put it in the bucket for recycling. https://firebirdstudios.com.au/the-process-of-making-pottery/ The bowl is an example of kitchenware used in the 19th century and still in use today.Bowl white ceramic. Crack on side. Badly stained.Backstamp very faint and unable to be read.flagstaff hill, warrnambool, shipwrecked-coast, flagstaff-hill, flagstaff-hill-maritime-museum, maritime-museum, shipwreck-coast, flagstaff-hill-maritime-village, mixing bowl, food preparation, kitchen equipment, ceramic -
 Numurkah & District Historical Society
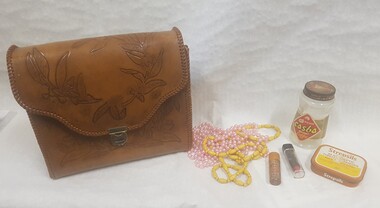
Memorabilia - Leather Bag, Necklace, Coffee Jar, Cough drops container, Jigsaw, Necklaces, Lipstick
see photossee photosaccessories, make-up, jigsaw, kitchen jars, strepsil -
 Flagstaff Hill Maritime Museum and Village
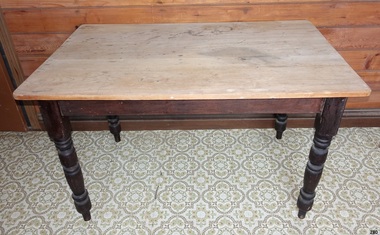
Furniture - Table
Some very early tables were made and used by the Ancient Egyptians around 2500 BC, using wood and alabaster. They were often little more than stone platforms used to keep objects off the floor, though a few examples of wooden tables have been found in tombs. Food and drinks were usually put on large plates deposed on a pedestal for eating. The Egyptians made use of various small tables and elevated playing boards. The Chinese also created very early tables in order to pursue the arts of writing and painting, as did people in Mesopotamia, where various metals were used. The Greeks and Romans made more frequent use of tables, notably for eating, although Greek tables were pushed under a bed after use. The Greeks invented a piece of furniture very similar to the guéridon. Tables were made of marble or wood and metal (typically bronze or silver alloys), sometimes with richly ornate legs. Later, the larger rectangular tables were made of separate platforms and pillars. The Romans also introduced a large, semicircular table to Italy, the mensa lunata. Plutarch mentions use of "tables" by Persians. Furniture during the Middle Ages is not as well known as that of earlier or later periods, and most sources show the types used by the nobility. In the Eastern Roman Empire, tables were made of metal or wood, usually with four feet and frequently linked by x-shaped stretchers. Tables for eating were large and often round or semicircular. A combination of a small round table and a lectern seemed very popular as a writing table. In western Europe, the invasions and internecine wars caused most of the knowledge inherited from the classical era to be lost. As a result of the necessary movability, most tables were simple trestle tables, although small round tables made from joinery reappeared during the 15th century and onward. In the Gothic era, the chest became widespread and was often used as a table. Refectory tables first appeared at least as early as the 17th century, as an advancement of the trestle table; these tables were typically quite long and wide and capable of supporting a sizeable banquet in the great hall or other reception room of a castle. https://en.wikipedia.org/wiki/Table_(furniture)The table is one of the most important items of furniture used in the home, including the kitchen.Table wooden with 4 wooden turned legs and unvarnished raw wood topNone flagstaff hill, warrnambool, shipwrecked-coast, flagstaff-hill, flagstaff-hill-maritime-museum, maritime-museum, shipwreck-coast, flagstaff-hill-maritime-village, table, kitchen furniture -
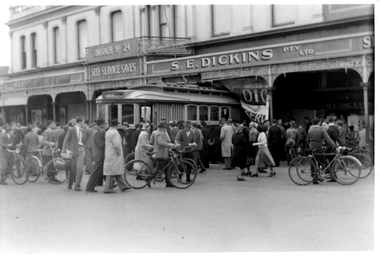 Ballarat Tramway Museum
Photograph - Digital image, The Courier Ballarat, 1/10/1949 12:00:00 AM
Yields information about Ballarat 17 in an accident with a bus used a doughnut kitchen and S.E. Dickins Store, Bridge St Ballarat.Set of four images of photographs (two each same, different exposure) of Black and white photographs of SEC Tram 17 and a former bus used a food vendors stand, that have finished up in the front of S.E. Dickins Pty Ltd. (Grocers) store c1949. The tram derailed at the intersection of Sturt and Grenville St. collided with the bus and pushed it into the front of the store. Many people standing around the incident, including two trammies in front of the tram. See Reg Item 5587 for newspaper reports and 1020 for other photographs.trams, tramways, grenville st, accidents, s.e. dickins, tram 17 -
 Flagstaff Hill Maritime Museum and Village
Domestic object - Bowl
The Process of Making Pottery Decorating, Firing, Glazing, Making, Technical There is a rhythm and flow to clay. It can’t be done all at once! Even the making process! It can take weeks to get everything done, especially if you can only work on your pottery once a week! Even though we have three hour classes, it’s often just not enough time! Here is an overview of some of the processes so you have a bit more grasp on some of the technical stuff! Step One – Design There are SO many ideas out there for making stuff in clay! From delicate porcelain jewellery, through to heavy sculptural work and everything in between. Deciding your direction is sometimes not that easy – when you first start, try everything, you will naturally gravitate to the style that you enjoy! The options and variations are endless and can get a wee bit overwhelming too! Check in with me before you start to ensure your ideas will work, what order you might do things, how you could achieve the look you are seeking and any other technical data required! Step Two – Making Clay is thixotropic. This means that as you work with it, the clay first gets sloppier and wetter, before is begins to dry in the atmosphere. For most things, you simply can’t do all parts of the project at once. An example of work order might look like: Get last weeks work out from the shelves Prepare clay for today’s work – roll your clay, prepare balls for throwing, make the first stage of a pinch pot) Clean up last week’s work and put it on the shelf for bisque firing Check that you have any glazing to do – and do enough of it that you will have time to finish your main project Do the next step of your next project – there might be a further step that can’t be complete immediately, in that case, wrap your work well and put onto the shelves. Letting your work rest for a while can really help keep your work clean and professional looking. Many things require bagging under plastic to keep it ready for work the next week – put your name on the outside of the bag so you can find your work easily. We have stickers and markers. Consider how you want to decorate your work – coloured slip can be applied at a fairly wet stage (remembering that it will make your work even wetter!). Trying to apply slip to dry clay won’t work! If you want to do sgraffito – you will need to keep the work leather hard (a state of dryness where you can still work the clay with a little effort and a little water and care). Step Three – Drying Most of the time your work can go into the rack uncovered to let it dry out for the following week. If you want to continue forming or shaping you will need to double bag your work – put your work on a suitable sized bat and put the bat in a bag so the base of the bag is under the bat, then put another bag over the top of the work and tuck the top of the bag under the bat. If you want to trim (or turn) your thrown work the following week, it should also be double bagged. If your work is large, delicate, or of uneven thicknesses, you should lightly cover your work for drying. When considering the drying process, bare in mind the weather, humidity and wind! The hotter and dryer, the faster things dry and work can dry unevenly in the shelves – this can lead to cracking – another time to lightly cover your work for drying. Step Four – Trimming and Cleaning Up Your work is dry! It is called greenware now and it is at it’s most fragile! Handle everything with two hands. I often refer to soft hands – keep everything gentle and with your fingers spread as much as possible. Try to not pick up things like plates too much, and always with both hands! Before your work can be bisque fired it should be “cleaned up”. You work won’t go into the kiln if it has sharp edges – when glazed, sharp edges turn into razor blades! Use a piece of fly wire to rub the work all over – this will scratch a little so be light handed. Use a knife or metal kidney to scrape any areas that require a bit more dynamic treatment than the fly wire offers! Finally, a very light wipe over with a slightly damp sponge can help soften and soothe all of your edges and dags! Trimming thrown work: If you are planning to trim (or turn) your thrown work (and you should be), make sure you bag it well – your work should be leather hard to almost dry for easiest trimming. Use this step to finish the work completely – use a metal kidney to polish the surface, or a slightly damp sponge to give a freshly thrown look. Wipe the sponge around the rim after trimming, and check the inside of the pot for dags! Trimming slip cast work: Usually I will trim the rims of your work on the wheel the following day to make that stage easier, however you will still need to check your work for lumps and bumps. Last but not least – check that your name is still clearly on the bottom of your work. Step Five – Bisque Firing When the work is completely dry it can go into the bisque kiln. The bisque kiln is fired to 1000°C. This process burns off the water in the clay as well as some of the chemically bound water. The structure of the clay is not altered that much at this temperature. Inside the bisque kiln, the work is stacked a little, small bowl inside a larger bowl and onto a heavy plate. Smaller items like decorations or drink coasters might get stacked several high. Consideration is paid to the weight of the stack and shape of the work. A bisque kiln can fire about one and a half times the amount of work that the glaze kiln can fire. The firing takes about 10 hours to complete the cycle and about two days to cool down. Once it has been emptied the work is placed in the glaze room ready for you to decorate! Step Six – Glazing Decorating your work with colour can be a lot of fun – and time consuming! There are three main options for surface treatment at this stage: Oxide Washes Underglazes Glazes Washes and underglazes do not “glaze” the work – It will still need a layer of glaze to fully seal the clay (washes don’t need glaze on surfaces not designed for food or liquid as they can gloss up a little on their own). Underglazes are stable colourants that turn out pretty much how they look in the jar. They can be mixed with each other to form other colours and can be used like water colours to paint onto your work. Mostly they should have a clear glaze on top to seal them. Oxides are a different species – the pink oxide (cobalt) wash turns out bright blue for instance. They don’t always need a glaze on top, and some glazes can change the colour of the wash! The glazes need no other “glaze” on top! Be careful of unknown glaze interactions – you can put any combination of glaze in a bowl or on a plate, but only a single glaze on the outside of any vertical surface! Glazes are a chemical reaction under heat. We don’t know the exact chemicals in the Mayco glazes we use. I can guess by the way they interact with each other, however, on the whole, you need to test every idea you have, and not run the test on a vertical surface! Simply put, glaze is a layer of glass like substance that bonds with the clay underneath. Clay is made of silica, alumina and water. Glaze is made of mostly silica. Silica has a melting point of 1700°C and we fire to 1240°C. The silica requires a “flux” to help it melt at the lower temperature. Fluxes can be all sorts of chemicals – a common one is calcium – calcium has a melting point of 2500°C, however, together they both melt at a much lower temperature! Colourants are metal oxides like cobalt (blue), chrome (green through black), copper (green, blue, even red!), manganese (black, purple and pink) iron (red brown), etc. Different chemicals in the glaze can have dramatic effects. for example, barium carbonate (which we don’t use) turns manganese bright pink! Other elements can turn manganese dioxide brown, blue, purple and reddish brown. Manganese dioxide is a flux in and of itself as well. So, glazes that get their black and purple colours, often interact with other glazes and RUN! Our mirror black is a good example – it mixes really well with many glazes because it fluxes them – causes them to melt faster. It will also bring out many beautiful colours in the glazes because it’s black colouring most definitely comes from manganese dioxide! Glaze chemistry is a whole subject on it’s own! We use commercial Mayco glazes on purpose – for their huge range of colour possibilities, stability, cool interactions, artistic freedom with the ability to easily brush the glazes on and ease of use. We currently have almost 50 glazes on hand! A major project is to test the interactions of all glazes with each other. That is 2,500 test tiles!!!! I’m going to make the wall behind the wheels the feature wall of pretty colours! Step Seven – Glaze (Gloss or sometimes called “Glost”) Firing Most of the time this is the final stage of making your creation (but not always!) The glaze kiln goes to 1240°C. This is called cone 6, or midrange. It is the low end of stoneware temperatures. Stoneware clays and glazes are typically fired at cone 8 – 10, that is 1260 – 1290°C. The energy requirement to go from 1240°C to 1280°C is almost a 30% more! Our clay is formulated to vitrify (mature, turn “glass-like”) at 1240°, as are our glazes. A glaze kiln take around 12 hours to reach temperature and two to three days to cool down. Sometimes a third firing process is required – this is for decoration that is added to work after the glaze firing. For example – adding precious metals and lustres. this firing temperature is usually around 600 – 800°C depending upon the techniques being used. There are many students interested in gold and silver trims – we will be doing this third type of firing soon! After firing your work will be in the student finished work shelves. Remember to pay for it before you head out the door! There is a small extra charge for using porcelain clay (it’s more than twice the price of regular clay), and for any third firing process! Once your work has been fired it can not turn back into clay for millennia – so don’t fire it if you don’t like it! Put it in the bucket for recycling. https://firebirdstudios.com.au/the-process-of-making-pottery/ This bowl is an example of kitchenware used in the 19th century and still in use today.Bowl white ceramic plain that has two sets of edging around lip. Inside bowl has plaster designed to look like cooking mixture.flagstaff hill, warrnambool, shipwrecked-coast, flagstaff-hill, flagstaff-hill-maritime-museum, maritime-museum, shipwreck-coast, flagstaff-hill-maritime-village, kitchen equipment, ceramic -
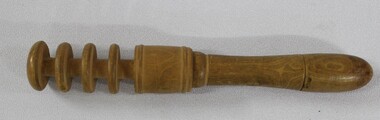
 Rutherglen Historical Society
Butter pat, 1950 (Approximate)
Piece of home churned butter was placed between the paddles and rolled into a ball for serving.Set of wooden butter pats, bat shaped, smooth on back - grooved on frontkitchen, food production, butter -
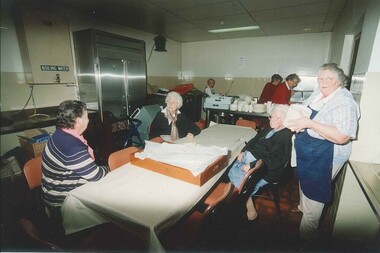
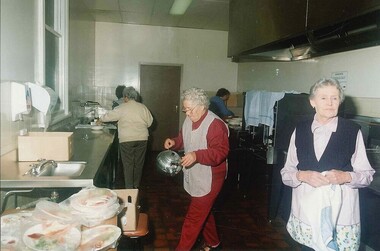
 International House, The University of Melbourne
Photograph (Item), Woman working in the servery at International House, c. 1958
staff, kitchen -
 Royal District Nursing Service (now known as Bolton Clarke)
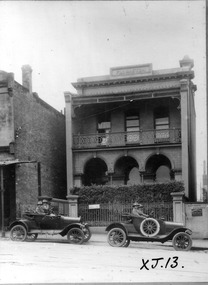
Photograph - Photograph, sepia, c.1920
A public appeal was made to raise funds for Melbourne District Nursing Society (MDNS) so motor cars could be purchased to assist their Trained nurses, known as 'Nurse' in those days, with their visits during the Spanish Influenza epidemic of 1919. With donations from businesses and individuals four cars were available within a month, and this photograph shows two of them In 1919 parked outside 'Floraston', 39 Victoria Parade, Collingwood, which was the first MDNS Headquarters and Nursing Home purchased by the Society. The MDNS uniform was a grey cotton frock with white collar, a grey coat with lapels, and a grey brimmed hat with a red Maltese cross in the centre of the hatband. From its founding in 1885 until 1891 the Trained nurses, known as 'Nurse' in those days, of the Melbourne District Nursing Society (MDNS) worked from their own homes which were located in the vicinity of their areas (districts). In November 1891 MDNS was able to rent a two story terraced house at 66 Cardigan Street, Carlton, at £65 a year, which contained accommodation for three Nurses and one pupil nurse as well as being used as their Headquarters. They left from their Nurses Home each morning and returned at the end of their shift to write up their book work before retiring for the day. Three years later they moved into a larger terraced house at 49 Drummond Street Carlton which was rented at ‘a very moderate rental’. There was a Board room, apartments for the Nurses and pupil nurse, a large dispensary which patients could attend each evening to have prescriptions signed and bottles refilled with ‘homely remedies’ and elixirs, which were administered to for e.g. Consumptive cases. Doctor’s prescriptions were filled at the Pharmacy. Cupboards containing donated blankets and bedclothes for needy patients were kept in this room, and it was here where the Nurses kept their nursing bags which were refilled at the end of each shift ready for any emergency and for the next day. A list of Doctors the Nurses could call was kept by the telephone. The home also had a kitchen where nourishing soup was made and distributed twice a week to the needy. Milk was also distributed when needed. In 1902 they moved into rented premises at 188 Leicester Street, Carlton and two years later, in 1904, to premises at 5 Royal Terrace, Nicholson Street, Fitzroy. They remained there for ten years. In June 1914 at last the Society had sufficient funding to purchase their own terraced premises, ‘Floraston’ 39 Victoria Parade, Collingwood which was their Headquarters and Nurses Home. In 1926 the After-Care Home for recovering patients, (later called After-Care Hospital) was built by the Society next door, running from 41-47 Victoria Parade (became No. 45); the District nurses continued to live at No. 39. District Nursing has had various modes of transport over the last 130 plus years. At first, from 1885 as Melbourne District Nursing Society (MDNS), the Nurses walked the streets and lane ways amid the slums of central Melbourne. As the Society expanded public transport was used, and bicycles were bought by the Society in 1903 and used in inner areas until 1945. During the Spanish flu epidemic, in 1919, MDNS appealed for assistance to procure Motor vehicles so the Nurses could visit an influx of cases. Through trusts, grants and donations four 'Ford 'T Model' cars were procured which enabled the Nurses to triple their visits. Through constant use the cars were in such a poor state they were sold in 1927. A Motor Auxiliary was formed in 1929 to take Trained nurses, now called 'Sisters' to patients, and some Sisters used their own cars; even a motorcycle was used by one Sister in 1933. All these forms of transport were intermingled until MDNS and, having received Royal patronage, the now named Royal District Nursing Service (RDNS) had its own full fleet of vehicles.Sepia photograph on grey mounting board depicting four Melbourne District Nursing Society (MDNS) Trained nurses (Nurses) sitting in two motor vehicles in front of Melbourne District Nursing Society Headquarters and Nurses Home. In the foreground are the two Ford Model T vehicles with their soft hoods open. Each car has four spoked wheels. A frame where a spare wheel is attached can be seen attached to the rear car's running board. A spare wheel, with white tyre, can be seen standing up resting against the middle of the front car; the lower section of the tyre is sitting on the running board. The steering wheel can be seen on the right hand side of both cars with a Nurse sitting behind it with her hands resting on the wheel. The upper part seen of the two MDNS Nurses in each car shows they are wearing grey uniform coats over their frocks, the white collars of which can be seen. They are all looking at the camera, and are wearing grey hats with a central Maltese cross on the white hatband. Behind the cars the footpath and the metal spiked fence, with a square concrete columns at either end can be seen. '39' is near the top of the left hand column and a white oblong name plate is attached to the fence. On the far right of the photograph a wooden gate runs from the column. A dark name plate is attached with the words 'Patient Entrance' / - 'Melbourne District Nursing Society -/ For Nursing the Sick Poor'. Behind this are a row of shrubs forming a hedge and behind this the two storey terrace building with its three arched arcade veranda on the ground floor and three long widows on the top floor with a veranda with a metal scrolled safety rail. The building has a flat roof with a central raised section with 'Floraston', written in capital letters on it. XJ. 13. is written in black ink on the bottom right corner of the photographPhotographer's stamp on mounting boardmelbourne district nursing society, mdns, transport, nurses home, rdns, royal district nursing service -
 Royal District Nursing Service (now known as Bolton Clarke)
Photograph - Photograph, Portrait black and white, c.1900
This is a photograph taken from the painting by McCubbin of Lady Janet Clarke, a prominent Melbourne philanthropist who worked for social welfare issues and was a driving force in the early days of the Melbourne District Nursing Society. At the end of 1885 for her work with MDNS she was given a Testimonial Dinner where she was presented with a letter signed by 429 people expressing their thanks for her visits, kindness, sympathy and charity shown toward the sick poor. In 1887, at her home, she held the first function to raise money for the Society. Lady Janet Clarke was a generous and hospitable prominent socialite of Melbourne; a kind and sympathetic philanthropist who worked tirelessly for social welfare issues. The Melbourne District Nursing Society (MDNS) was founded on the 17th of February 1885 and on the 9th of April a Special General Meeting was held to elect the committee for the following twelve months. Lady Clarke was elected a Vice-president; a position she held until being appointed President, when Mrs. Simon resigned on the 7th of June 1887, a role Lady Clarke held until she became ill in 1908; except during her trips overseas, when the role was held by another until her return. Her management and organizational skills enabled MDNS to flourish in its earliest days. She was actively involved taking her turn on the Superintendent sub-committee where she accompanied a Trained nurse when she visited patients; checking that high quality nursing care was maintained, as well as observing the patient's social condition; even giving a personal donation to a special case in need. The patients of the Society were so grateful for her sympathy, kindness and love that when she and her husband, Sir William Clarke, were going overseas at the end of 1885, a Testimonial was given for her at Scots Church District-hall where 200 attended to show their appreciation of her work carried out with MDNS. She was presented with a Bible from them, and their letter signed by 429 working persons expressing their thanks. In a time of great financial need of the Society, Lady Clarke offered the ballroom at her home, 'Cliveden', for a monster Cake, Flower, and Dairy produce Fair which raised a substantial amount saving the Society from closure. She promoted the Society and led it in further fund-raising events, such as the annual Ball, and Fairs where she often manned cake stalls. Near Christmas each year she made a special appeal to the public for 'comfort and good cheer' which could be given to poor families visited by the Society. During the depression of 1890 she had thick soup prepared in the Cliveden kitchens and this was distributed, with bread, from her home, and from a school room, to hundreds of the poor. In 1892 Lady Clarke agreed to represent the Society during her visit to England. During her years of leadership MDNS expanded; Nurses uniforms were introduced; lectures - for example, on hygiene and on the prevention of sickness and the treatment of children, were given by doctors for the patients; further Trained nursing staff were employed; Midwifery was introduced to the poor, the Society extended beyond the city centre and bicycles were introduced for transport; a system for regular annual subscriptions was introduced and sufficient funds were raised for the Society to rent its own premises, with Lady Clarke paying for a subscription to Mullen's bookstore each year for the use of the Nurses in the Nurses Home. As well as her work for MDNS she held roles in many other organizations . She donated a substantial amount of money to build a Hostel for Women University Students attending Trinity College, later named the Janet Clarke Hall. Lady Janet Marion Clarke died at Cliveden, aged 57 years, on the 28th of April 1909; a lady held in high esteem and affection by all she knew.This is a black and white photograph of a painting of Lady Janet Clarke. She is looking forward and has a serious visage; she is wearing her long dark hair drawn up and back and in her left ear a small dropped ear ring can be seen. She is wearing a light coloured, long sleeved, floral frock with a material short cape section seen over the top of her left sleeve. Her left arm is crooked with her hand resting just under a flower brooch fastened in the centre of her frock. She has a choker around her neck with a brooch in the centre..Janet Lady Clarke, president 1889-1908.From the painting by McCubbin.melbourne district nursing society, mdns, rdns, royal district nursing service, lady janet clarke