Showing 4778 items matching " tables"
-
 Greensborough Historical Society
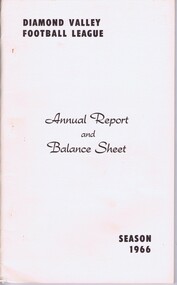
Book - Annual Report, Diamond Valley Football League, Diamond Valley Football League. Annual Report and Balance Sheet. Season 1966, 15/03/1965
A complete record of the DVFL season 1966, includes financial report, description of events, membership, teams, scores from the seasons games and winners of best and fairest awards for all divisions and age groups. In 1966 the Division 1 Premiers were Greensborough Football Club.This annual report covers many teams from within the Diamond Valley area. Includes junior and senior teams.Foolscap size book. 45 pages, printed on single sides of page . Larger buff cover with black text and. Includes typed tables. australian rules football, greensborough football club, diamond valley football league, dvfl, northern football league, nfl, northern football netball league, nfnl, reservoir lakeside football club -
 Greensborough Historical Society
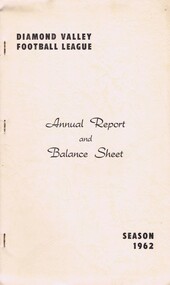
Book - Annual Report, Diamond Valley Football League, Diamond Valley Football League. Annual Report and Balance Sheet. Season 1962, 03/03/1953
A complete record of the DVFL season 1962, includes financial report, description of events, membership, teams, scores from the seasons games and winners of best and fairest awards for all divisions and age groups. In 1962 the Division 1 Premiers were Greensborough Football Club.This annual report covers many teams from within the Diamond Valley area. Includes junior and senior teams.Foolscap size book. 47 pages, printed on single sides of page . Larger buff cover with black text. Includes typed tables.australian rules football, greensborough football club, diamond valley football league, dvfl, northern football league, nfl, northern football netball league, nfnl -
 Greensborough Historical Society
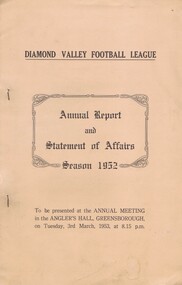
Book - Annual Report, Diamond Valley Football League, Diamond Valley Football League. Annual Report and Statement of Affairs. Season 1952, 03/03/1953
A complete record of the DVFL season 1952, includes financial report, description of events, membership, teams, scores from the seasons games and winners of best and fairest awards for all divisions and age groups. In 1952 the Division 1 Premiers were Greensborough Football Club.This annual report covers many teams from within the Diamond Valley area. Includes junior and senior teams.Foolscap size book. 12 pages, printed on both sides of page . Larger buff cover with black text. Includes typed tables.australian rules football, greensborough football club, diamond valley football league, dvfl, northern football league, nfl, northern football netball league, nfnl -
 University of Melbourne, Burnley Campus Archives
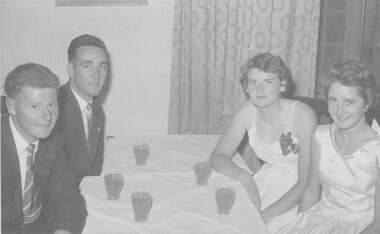
Photograph - Black and white print, City Studios (David Fell), Social Outing 1955, 1955
Donated by Maureen A. Nelson (née Skuse) (1956), Springhurst. Black and white photograph. 2 couples dressed up seated at a table. Other names, G.D. Feathers 1956, F.D Stephenson 1955.Handwritten on reverse, "Geoff Feathers, Fred Stevenson RHS Maureen Skuse (later Nelson) Social Outing 1955." Printed, "City Studios (David Fell) Central 5732 Melbourne When Re-ordering Quote No Y727 38 (1).geoff d. feathers, fred d. stevenson, maureen a. nelson (née skuse), social outing, 1955 -
 Lakes Entrance Historical Society
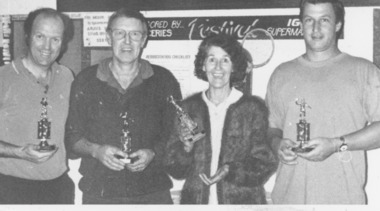
Photograph - Table tennis, Lakes Post Newspaper, 1/06/1994 12:00:00 AM
Finals were played at squash courtsBlack and white photograph of winners of Table Tennis finals Chris Furmeister, Geoff and Loris Anderson, Eddie Nyhst Lakes Entrance Victoriasports, table tennis -
 Lakes Entrance Historical Society
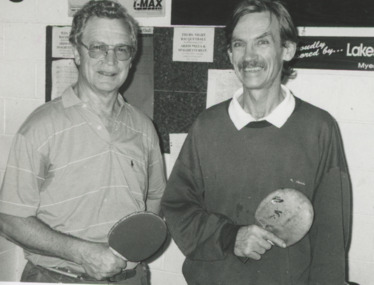
Photograph - Table tennis
Black and white photograph of Table Tennis team Elvis Aint Dead, John Froelich and Rick Harney, runners up at the end of seriessports, table tennis -
 Ithacan Historical Society
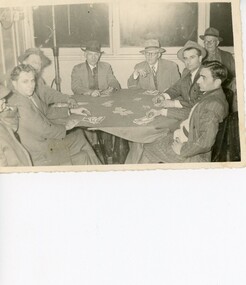
Photograph, The card players, c1950s
Many of the male members of the Ithacan Philanthropic Society who worked or lived close to the CBD would regularly gather at the clubrooms during lunch time or after their working day. Others would come in on the weekends to catch up with friends and play cards. The men in this image were probably meeting at the former clubrooms located in Michael's Building on the SW corner of Lonsdale and Elizabeth Streets. The Ithacan Philanthropic Society occupied the top floor of that building until Ithaca Hose was built in the 1968. The clubrooms are no longer an after work or weekend meeting place for the men. However, open days during the week provide an opportunity for all members to drop in for a coffee and chat. Many retired members enjoy the opportunity to catch up with old friendsA black and white photograph of eight men seated around a table playing cards. The photograph has a narrow, white frame with a crinkled edge. -
 Ithacan Historical Society
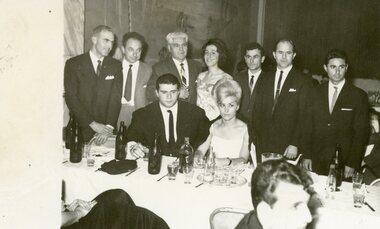
Photograph, Ithacan dinner dance at The Acropol, 1967
IPS committee members and special guest Spiros Arion (seated with his partner) at an Ithacan dinner dance held a The Acropol. Spiros was a well known wrestler in Australia. The Acropol was a reception business located on the top of floor of Ithaca House (level 2). The IPS club rooms were located on the first floor. Dinner dances were held at the Acropol. From L-R: Jim Kandiliotis, Stathi Raftopoulos, Alkinos Paizis (IPS president), Anastasia (Sia) Fatouros-Beasley (president of the social committee), Evangelos Metaxas?, Kiki Razos, Dennis Lourantos. Spiros arrived in Australia in July 1964 and was know in the wrestling scene under the name of 'The Golden Greek'. He joined f World Championship Wrestling where he wrestled until its end in 1978. He was a favorite among Greek wrestling fans.A black and white photograph with a crinkled edge of seven men and two ladies at a social gathering. A couple are seated at a table and the others are standing behind. -
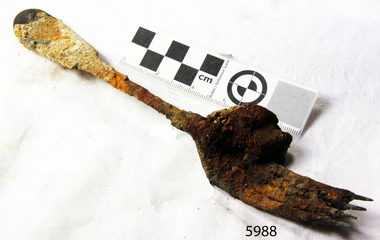
 Flagstaff Hill Maritime Museum and Village
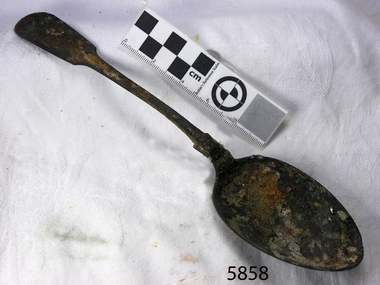
Domestic object - Spoon, circa 1878
This table spoon is from the wreck of the LOCH ARD, a Loch Line ship of 1,693 tons which sailed from Gravesend, London, on 2 March 1878 with 17 passengers and a crew of 36 under Captain George Gibbs. “The intention was to discharge cargo in Melbourne, before returning to London via the Horn with wool and wheat”. Instead, on 1 June 1878, after 90 days at sea, she struck the sandstone cliffs of Mutton Bird Island on the south west coast of Victoria, and sank with the loss of 52 lives and all her cargo. The manifest of the LOCH ARD listed an array of manufactured goods and bulk metals being exported to the Colony of Victoria, with a declared value of £53,700. (202 bills of lading show an actual invoice value of £68, 456, with insurance underwriting to £30,000 of all cargo). Included in the manifest is the item of “Tin hardware & cutlery £7,530”. This table spoon is one of 482 similar items of electro-plated cutlery from the LOCH ARD site, comprising spoons and forks of various sizes but all sharing the same general shape or design and metallic composition. 49 of these pieces display a legible makers’ mark — the initials “W” and “P” placed within a raised diamond outline, which is in turn contained within a sunken crown shape — identifying the manufacturer as William Page & Co of Birmingham. An electroplater’s makers’ marks, unlike sterling silver hallmarks, are not consistent identifiers of quality or date and place of manufacture. A similar line of five impressions was usually made to impress the consumer with an implication of industry standards, but what each one actually signified was not regulated and so they varied according to the whim of the individual foundry. In this case, the maker’s marks are often obscured by sedimentary accretion or removed by corrosion after a century of submersion in the ocean. However sufficient detail has survived to indicate that these samples of electro-plated cutlery probably originated from the same consignment in the LOCH ARD’s cargo. The generally common range of marks are drawn from 255 tea spoons, 125 dessert spoons, and 99 table forks. These marks are clearly visible in 66 instances, while the same sequence of general outlines, or depression shapes, is discernible in another 166 examples. Suggested trade names for William Page & Co’s particular blend of brass plating are ‘roman silver’ or ‘silverite’. This copper alloy polishes to a lustrous gold when new, discolouring to a murky grey with greenish hue when neglected. The LOCH ARD shipwreck is of State significance – Victorian Heritage Register S 417. Flagstaff Hill’s collection of artefacts from LOCH ARD is significant for being one of the largest collections of artefacts from this shipwreck in Victoria. It is significant for its association with the shipwreck, which is on the Victorian Heritage Register (VHR S417). The collection is significant because of the relationship between the objects, as together they have a high potential to interpret the story of the LOCH ARD. The LOCH ARD collection is archaeologically significant as the remains of a large international passenger and cargo ship. The LOCH ARD collection is historically significant for representing aspects of Victoria’s shipping history and its potential to interpret sub-theme 1.5 of Victoria’s Framework of Historical Themes (living with natural processes). The collection is also historically significant for its association with the LOCH ARD, which was one of the worst and best known shipwrecks in Victoria’s history Unrestored table spoon from the wreck of the LOCH ARD. The spoon design has a flattened fiddle-back handle, with a thin stem or shank, flared collar, and a shallow rounded bowl. The spoons metallic composition is a thin layer of brass alloy which has partially corroded back to a nickel-silver base metal. Approximately 40% of original plate remains. Some verdigris and concretion on front of spoon. Balance covered in Silver Oxide. Outlines of five makers marks are visible - Crown, Ellipse, Rounded Square, Circle, Diamond - but details are illegible.flagstaff hill maritime museum, shipwreck coast, great ocean road, loch line, loch ard, mutton bird island, loch ard gorge, electroplated cutlery, loch ard shipwreck, william page and co, birmingham brass plating, table spoon, spoon -
 Bendigo Military Museum
Manual - The Plane Table - Its Use in Surveying, McGraw Publishing Company, New York, USA, 1908
The plane table instrument was a simple but very effective early method of producing maps. Some very early editions were produced by the Australian Survey Corps after its formation in 1915 using this method. This manual details how to use the "Plane Table" for Surveying purposes.Hard Cloth covered Covers front and back, paper pages. title page has rubber stamp impressions (see below). Contents page, symbols page, pages 1-47 and index page.Adhesive label on front "46.10 and 12411", "1504" in purple also on front cover, Numbers inside front cover - "Acc. No. 000076" and crossed out. "scm - B0 - 86-72" written underneath. stamps- Australian Intelligence Corps, Headquarters library No 150 (difficult to read) on first page and stamped "CANCELLED" , Stamp School of Military Survey Library Call No 526 - 9825 LOV. Another stamp on title page - Department of Defence Library 46.10 and 12411. Second stamp 2/D. M.O.S. 2012 with CANCELLED. royal australian survey corps, rasvy, army survey regiment, army svy regt, asr, fortuna -
 Melbourne Legacy
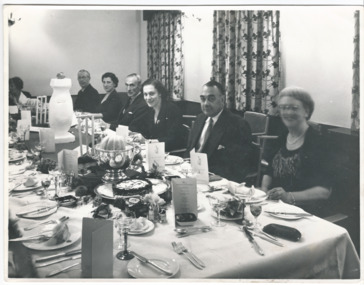
Photograph, Legatee function
The photo shows a group of people at a dinner table, the menus on the table indicate an official event. Sir Stan Savige is on the far left. The venue, date and names are unknown - there appears to be a cricketer on the menu and may read ' A Toast to England'. The event may be in England due to the photographer's mark.Legatees supported each other by coming together for various events throughout the year. Black and white photo of a people at a function.Stamped with the studio mark for "A & E Bradbury, Photographers, 20 Lonsdale St, Stoke-on-Trent, Staffs." in purple ink.legatee event, comradeship -
 Ballarat Tramway Museum
Document - Roster, State Electricity Commission of Victoria (SECV), "Tramways - Motormen/Conductors Rotation Roster - Bendigo", 1970
Significant in being a roster rotation sheet for Bendigo that used a different method of advising crews of the system of tables and weeks. Shows how the system was used. Given date, may have been the last one issued.Printed form titled "Tramways - Motormen/Conductors Rotation Roster - Bendigo" for Bendigo Tramways. Duplicated foolscap size paper, giving roster for motormen and conductors AM and PM rosters. Duplicated form in black ink with a red line drawing to split the AM and PM rosters and two tables on Monday underline. Gives details of the run, tables for each day of the week and shows Spare Tables. Headed "Northern Electricity Supply Branch" Five copies held. Copy 1 has pencil date "29 June 1970" in top right hand corner. trams, tramways, tram crews, shifts, rosters -
 Mission to Seafarers Victoria
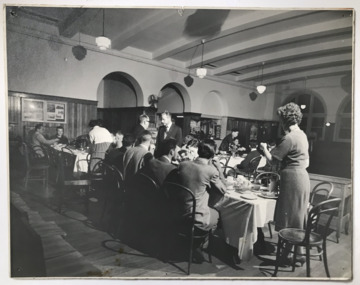
Photograph - Mounted photograph, Black and white, c. 1960
... tables ...Large mounted photograph depicting a meal at the Flinders Street Mission. At the back traces of newspaper glued.hlg, meals, dinners, seamen, jukebox, tables, bentwood chairs, sailors, reverend c.j. eldridge-doyle -
 Kiewa Valley Historical Society
Book - Ready Reckoner, The Express Ready Reckoner, circa 1920s
This item was produced for commercial shops and other traders in a period, 1800 to the 1950s. They were used because they were extremely cost effective, speedy, easy to learn and simple to use. It was also at a time before pocket calculators and electric cash tills were produced. The reckoners were a fast and accurate accounting book for a ever increasing bulk purchasing industry. These reckoners were at the start of a business principle "time is money" The reckoner was also looked upon as a way of reducing staff errors in the calculation field. This reckoner was highly valued to a rural industry in the Kiewa Valley because of the bulk produce being bought and sold here. Produce such as milk, tobacco, cattle, timber and fruits relied on weights and quantities calculation for cost pricing. Electrical machines were not of use in "the field or paddock" where important price negotiations took place. For a successful business to keep going accuracy was upper most to producers. It was still a time where honest transactions built reputations and tardiness ruined them. It was a time when a producer's word was his bond and a gentleman's handshake was as good as a contract. This attitude lasted a lot longer in rural regions than in the city. A producer's reputation was based on face to face negotiations and honesty.This hard cover book (blue in colour) contains 210 pages of black numbers and headings on light yellow pages (aged). The numbers refer to calculations of per unit price of goods and percentages.Top of front cover "Inglis Reckoners" underneath "The 'Express' Ready Reckoner", underneath "with All the Pence up to 1(pound symbol), Interest, Wages, Discount, Tables Etc." The spine: The Express Ready Reckoner with all the pence up to 1 (pound symbol) Interest Wages Discount Tables &c." underneath " The Express Series Vol 1" at the bottom of spine "Gall & Inglis"inlis, ready reckoner, imperial calculations -
 Warrnambool and District Historical Society Inc.
Glass, Medicine H London Chemist, Early 20th century
This is a small medicine measuring glass supplied by the Warrnambool pharmacy of Harry London. Born in England, Harry London, a chemist and dentist, came to Warrnambool in 1891, occupying the Nettleton building at 95 Liebig Street. In 1896 he built new premises at the corner of Liebig and Koroit Streets and in 1905 his was the first shop in Warrnambool to have electric lighting. He was succeeded in the early 1920s by the chemists, Dougall and Easton. This glass is of considerable significance because it came from the pharmacy of Harry London, an important chemist in Warrnambool at the end of the 19th century and the beginning of the 20th century. It also shows the custom of the time of chemists supplying to customers small glasses for measuring out medicine. This is a small thick glass tumbler used for measuring medicine. It is etched with the measurements of teaspoon, dessertspoon and tablespoon and the name of the supplier, H. London, a Warrnambool chemist and dentist. It has the initials of the maker on the base. Etched on side in oval shape: ‘H. London, Chemist and Dentist, Warrnambool’ Etched on side: ……. Tea ……. Dessert ……. Table Etched on base: ‘W.T. Co., A J. U.S.A.’ harry london, warrnambool, dougall and easton, chemists -
 Port Fairy Historical Society Museum and Archives
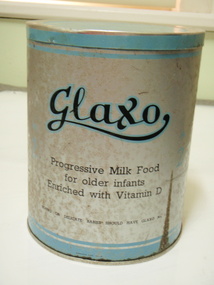
Container - Tin, Glaxo Laboratories, 1930's
Glaxo's Port Fairy Factory was built in 1929 as a milk factory it had a tin shop where the tins were manufactured and the milk was dried and sold as some of the first formula milk for babieslarge tin with printed information "Glaxo" progressive milk food for older infants enriched with Vitamin D Blue bands and silverGlaxo Progressive milk food for older infants enriched with Vitamin D Young or delicate babies should have Glaxo No 1. Table of quantities and directions for useglaxo, factory, princes highway, manufacturer, milk, baby food -
 National Wool Museum
Ready Reckoner, Wages Ready Reckoners
Folder of tables produced by Grazcos Co-operative Limited for calculating shearers' wages.8 22 June 1964 26 July 1965shearing, grazcos co-operative limited -
Malmsbury Historical Society
Photograph (Item), M.H.S. Meeting, Malmsbury ca1990
People - "Watson, Edgar Against Table" Buildings - Mechanics Institute Associated with - M.H.S -
 Whitehorse Historical Society Inc.
Textile - Table Centre, not known
Table centre was donated by Bette Jones from her collection of fine manchester.Tenneriffe Lace, square white cotton to form daisy like patterns measuring 5cm in diameter. Joined to centre of white linen and drawn thread square of smaller circles.domestic items, table setting -
 Heidelberg Golf Club
Photograph, Heidelberg Golf Club: Table decorations - Christmas in new clubhouse, 1998-1999, 1998-1999
Heidelberg Golf Club: Table decorations - Christmas in new clubhouse, 1998-19993 Colour photographs and captionbryn teg room, christmas decorations -
Tatura Irrigation & Wartime Camps Museum
Book, From Great Depths. The wreck of HMAS Sydney and HSK Kormoran
A coffee table book with information and photographs of the wrecks of HMAS Sydney and HSK Kormoran.Black hard cover landscape book. Spine has name in blue on it. Dustcover is black with title and author in white and a section of the wreck of HMAS Sydney. Spine has title in white and back has a paragraph about the book in white ink.hmas sydney, hsk kormoran -
 Mont De Lancey
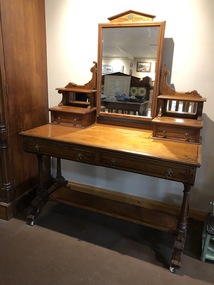
Dressing Table and Side Table, Circa 1930's
See picture of family history.Wooden dressing table with mirror, on castors, with two large drawers, and two smaller drawers at side of mirror. An inlaid decorative design, and brass handles on drawers. Wooden side table with one door with a brass handle, and an inlaid decorative design. The chamber pot would be stored on a shelf in this cupboard. These two pieces are part of a 4 piece bedroom suite.side tables, night cupboards, bedroom suites -
 Melbourne Tram Museum
Administrative record - Roster, Yarra Trams, "Crew Roster Malvern Tram Depot Week ending 30-9-2006", 30/09/2006 12:00:00 AM
Crew Roster - 4 A4 pages, stapled top left hand corner titled "Crew Roster Malvern Tram Depot Week ending 30-9-2006". Lists Table, days off, name personnel number, substitute, replacement table, day off cancelled (DOP). Lists some 212 rostered and 15 other drivers.trams, tramways, drivers, crews, malvern depot, rosters -
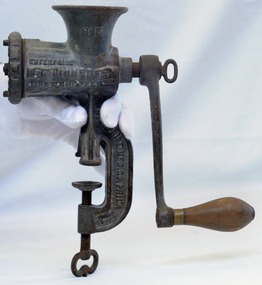 Orbost & District Historical Society
meat grinder, Late 19th century
This is one of many models of the Enterprise Tinned Meat Chopper No5This domestic kitchen appliance is typical of the period when food processing was done at home. It would have been before the time of mass food processing factoriesSmall black metal meat grinder with screw down grip for use on bench tops and tables. Still in working order. Carved wooden handle.Enterprise MFG.Co. PH'A, U.S.A. on clamp. Pat.Jan.30.83.June.5.88 on other side. Enterprise-Tinned-Meat-Chopper on barrel.grinder domestic food-preparation enterprise-mfc -
 Bendigo Military Museum
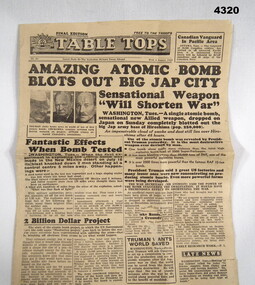
Newspaper - NEWSPAPER, TABLE TOPS, Australian Military Forces, 8.8.1945
Item in the collection re M.J. Craig NX170489, refer Cat No 4316.4 for service details.Newspaper yellowed, "Table Tops", Final Edition No 66, all black print 4 pages. The major item is the dropping of the Atomic Bomb on Hiroshima.newspapers, table tops, hiroshima -
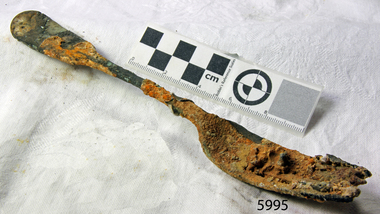
 Flagstaff Hill Maritime Museum and Village
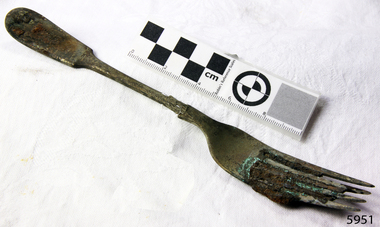
Fork
HISTORY OF THE LOCH ARD The LOCH ARD belonged to the famous Loch Line which sailed many ships from England to Australia. Built in Glasgow by Barclay, Curdle and Co. in 1873, the LOCH ARD was a three-masted square rigged iron sailing ship. The ship measured 262ft 7" (79.87m) in length, 38ft (11.58m) in width, 23ft (7m) in depth and had a gross tonnage of 1693 tons. The LOCH ARD's main mast measured a massive 150ft (45.7m) in height. LOCH ARD made three trips to Australia and one trip to Calcutta before its final voyage. LOCH ARD left England on March 2, 1878, under the command of Captain Gibbs, a newly married, 29 year old. She was bound for Melbourne with a crew of 37, plus 17 passengers and a load of cargo. The general cargo reflected the affluence of Melbourne at the time. On board were straw hats, umbrella, perfumes, clay pipes, pianos, clocks, confectionary, linen and candles, as well as a heavier load of railway irons, cement, lead and copper. There were items included that intended for display in the Melbourne International Exhibition in 1880. The voyage to Port Phillip was long but uneventful. At 3am on June 1, 1878, Captain Gibbs was expecting to see land and the passengers were becoming excited as they prepared to view their new homeland in the early morning. But LOCH ARD was running into a fog which greatly reduced visibility. Captain Gibbs was becoming anxious as there was no sign of land or the Cape Otway lighthouse. At 4am the fog lifted. A man aloft announced that he could see breakers. The sheer cliffs of Victoria's west coast came into view, and Captain Gibbs realised that the ship was much closer to them than expected. He ordered as much sail to be set as time would permit and then attempted to steer the vessel out to sea. On coming head on into the wind, the ship lost momentum, the sails fell limp and LOCH ARD's bow swung back. Gibbs then ordered the anchors to be released in an attempt to hold its position. The anchors sank some 50 fathoms - but did not hold. By this time LOCH ARD was among the breakers and the tall cliffs of Mutton Bird Island rose behind the ship. Just half a mile from the coast, the ship's bow was suddenly pulled around by the anchor. The captain tried to tack out to sea, but the ship struck a reef at the base of Mutton Bird Island, near Port Campbell. Waves broke over the ship and the top deck was loosened from the hull. The masts and rigging came crashing down knocking passengers and crew overboard. When a lifeboat was finally launched, it crashed into the side of LOCH ARD and capsized. Tom Pearce, who had launched the boat, managed to cling to its overturned hull and shelter beneath it. He drifted out to sea and then on the flood tide came into what is now known as LOCH ARD Gorge. He swam to shore, bruised and dazed, and found a cave in which to shelter. Some of the crew stayed below deck to shelter from the falling rigging but drowned when the ship slipped off the reef into deeper water. Eva Carmichael had raced onto deck to find out what was happening only to be confronted by towering cliffs looming above the stricken ship. In all the chaos, Captain Gibbs grabbed Eva and said, "If you are saved Eva, let my dear wife know that I died like a sailor". That was the last Eva Carmichael saw of the captain. She was swept off the ship by a huge wave. Eva saw Tom Pearce on a small rocky beach and yelled to attract his attention. He dived in and swam to the exhausted woman and dragged her to shore. He took her to the cave and broke open case of brandy which had washed up on the beach. He opened a bottle to revive the unconscious woman. A few hours later Tom scaled a cliff in search of help. He followed hoof prints and came by chance upon two men from nearby Glenample Station three and a half miles away. In a state of exhaustion, he told the men of the tragedy. Tom returned to the gorge while the two men rode back to the station to get help. By the time they reached LOCH ARD Gorge, it was cold and dark. The two shipwreck survivors were taken to Glenample Station to recover. Eva stayed at the station for six weeks before returning to Ireland, this time by steamship. In Melbourne, Tom Pearce received a hero's welcome. He was presented with the first gold medal of the Royal Humane Society of Victoria and a £1000 cheque from the Victorian Government. Concerts were performed to honour the young man's bravery and to raise money for those who lost family in the LOCH ARD disaster. Of the 54 crew members and passengers on board, only two survived: the apprentice, Tom Pearce and the young woman passenger, Eva Carmichael, who lost all of her family in the tragedy. Ten days after the LOCH ARD tragedy, salvage rights to the wreck were sold at auction for £2,120. Cargo valued at £3,000 was salvaged and placed on the beach, but most washed back into the sea when another storm developed. The wreck of LOCH ARD still lies at the base of Mutton Bird Island. Much of the cargo has now been salvaged and some was washed up into what is now known as LOCH ARD Gorge. Cargo and artefacts have also been illegally salvaged over many years before protective legislation was introduced. One of the most unlikely pieces of cargo to have survived the shipwreck was a Minton porcelain peacock - one of only seven in the world. The peacock was destined for the Melbourne International Exhibition in 1880. It had been well packed, which gave it adequate protection during the violent storm. Today, the Minton peacock can be seen at the Flagstaff Hill Maritime Museum in Warrnambool. From Australia's most dramatic shipwreck it has now become Australia's shipwreck artefact and is one of very few 'objects' on the Victorian State Heritage Register most valuable. The LOCH ARD shipwreck is of State significance – Victorian Heritage Register S 417 Flagstaff Hill’s collection of artefacts from LOCH ARD is significant for being one of the largest collections of artefacts from this shipwreck in Victoria. It is significant for its association with the shipwreck, which is on the Victorian Heritage Register (VHR S417). The collection is significant because of the relationship between the objects, as together they have a high potential to interpret the story of the LOCH ARD. The LOCH ARD collection is archaeologically significant as the remains of a large international passenger and cargo ship. The LOCH ARD collection is historically significant for representing aspects of Victoria’s shipping history and its potential to interpret sub-theme 1.5 of Victoria’s Framework of Historical Themes (living with natural processes). The collection is also historically significant for its association with the LOCH ARD, which was one of the worst and best known shipwrecks in Victoria’s history. Silver plated copper alloy table fork from the wreck of the Loch Ard. Some verdigris and encrustation. Large lump of encrustation on fork tine. flagstaff hill, warrnambool, shipwrecked coast, flagstaff hill maritime museum, maritime museum, shipwreck coast, flagstaff hill maritime village, great ocean road, loch line, loch ard, captain gibbs, eva carmichael, tom pearce, glenample station, mutton bird island, loch ard gorge, fork -
 Flagstaff Hill Maritime Museum and Village
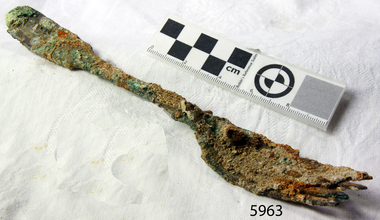
Fork
HISTORY OF THE LOCH ARD The LOCH ARD belonged to the famous Loch Line which sailed many ships from England to Australia. Built in Glasgow by Barclay, Curdle and Co. in 1873, the LOCH ARD was a three-masted square rigged iron sailing ship. The ship measured 262ft 7" (79.87m) in length, 38ft (11.58m) in width, 23ft (7m) in depth and had a gross tonnage of 1693 tons. The LOCH ARD's main mast measured a massive 150ft (45.7m) in height. LOCH ARD made three trips to Australia and one trip to Calcutta before its final voyage. LOCH ARD left England on March 2, 1878, under the command of Captain Gibbs, a newly married, 29 year old. She was bound for Melbourne with a crew of 37, plus 17 passengers and a load of cargo. The general cargo reflected the affluence of Melbourne at the time. On board were straw hats, umbrella, perfumes, clay pipes, pianos, clocks, confectionary, linen and candles, as well as a heavier load of railway irons, cement, lead and copper. There were items included that intended for display in the Melbourne International Exhibition in 1880. The voyage to Port Phillip was long but uneventful. At 3am on June 1, 1878, Captain Gibbs was expecting to see land and the passengers were becoming excited as they prepared to view their new homeland in the early morning. But LOCH ARD was running into a fog which greatly reduced visibility. Captain Gibbs was becoming anxious as there was no sign of land or the Cape Otway lighthouse. At 4am the fog lifted. A man aloft announced that he could see breakers. The sheer cliffs of Victoria's west coast came into view, and Captain Gibbs realised that the ship was much closer to them than expected. He ordered as much sail to be set as time would permit and then attempted to steer the vessel out to sea. On coming head on into the wind, the ship lost momentum, the sails fell limp and LOCH ARD's bow swung back. Gibbs then ordered the anchors to be released in an attempt to hold its position. The anchors sank some 50 fathoms - but did not hold. By this time LOCH ARD was among the breakers and the tall cliffs of Mutton Bird Island rose behind the ship. Just half a mile from the coast, the ship's bow was suddenly pulled around by the anchor. The captain tried to tack out to sea, but the ship struck a reef at the base of Mutton Bird Island, near Port Campbell. Waves broke over the ship and the top deck was loosened from the hull. The masts and rigging came crashing down knocking passengers and crew overboard. When a lifeboat was finally launched, it crashed into the side of LOCH ARD and capsized. Tom Pearce, who had launched the boat, managed to cling to its overturned hull and shelter beneath it. He drifted out to sea and then on the flood tide came into what is now known as LOCH ARD Gorge. He swam to shore, bruised and dazed, and found a cave in which to shelter. Some of the crew stayed below deck to shelter from the falling rigging but drowned when the ship slipped off the reef into deeper water. Eva Carmichael had raced onto deck to find out what was happening only to be confronted by towering cliffs looming above the stricken ship. In all the chaos, Captain Gibbs grabbed Eva and said, "If you are saved Eva, let my dear wife know that I died like a sailor". That was the last Eva Carmichael saw of the captain. She was swept off the ship by a huge wave. Eva saw Tom Pearce on a small rocky beach and yelled to attract his attention. He dived in and swam to the exhausted woman and dragged her to shore. He took her to the cave and broke open case of brandy which had washed up on the beach. He opened a bottle to revive the unconscious woman. A few hours later Tom scaled a cliff in search of help. He followed hoof prints and came by chance upon two men from nearby Glenample Station three and a half miles away. In a state of exhaustion, he told the men of the tragedy. Tom returned to the gorge while the two men rode back to the station to get help. By the time they reached LOCH ARD Gorge, it was cold and dark. The two shipwreck survivors were taken to Glenample Station to recover. Eva stayed at the station for six weeks before returning to Ireland, this time by steamship. In Melbourne, Tom Pearce received a hero's welcome. He was presented with the first gold medal of the Royal Humane Society of Victoria and a £1000 cheque from the Victorian Government. Concerts were performed to honour the young man's bravery and to raise money for those who lost family in the LOCH ARD disaster. Of the 54 crew members and passengers on board, only two survived: the apprentice, Tom Pearce and the young woman passenger, Eva Carmichael, who lost all of her family in the tragedy. Ten days after the LOCH ARD tragedy, salvage rights to the wreck were sold at auction for £2,120. Cargo valued at £3,000 was salvaged and placed on the beach, but most washed back into the sea when another storm developed. The wreck of LOCH ARD still lies at the base of Mutton Bird Island. Much of the cargo has now been salvaged and some was washed up into what is now known as LOCH ARD Gorge. Cargo and artefacts have also been illegally salvaged over many years before protective legislation was introduced. One of the most unlikely pieces of cargo to have survived the shipwreck was a Minton porcelain peacock - one of only seven in the world. The peacock was destined for the Melbourne International Exhibition in 1880. It had been well packed, which gave it adequate protection during the violent storm. Today, the Minton peacock can be seen at the Flagstaff Hill Maritime Museum in Warrnambool. From Australia's most dramatic shipwreck it has now become Australia's shipwreck artefact and is one of very few 'objects' on the Victorian State Heritage Register most valuable. The LOCH ARD shipwreck is of State significance – Victorian Heritage Register S 417 Flagstaff Hill’s collection of artefacts from LOCH ARD is significant for being one of the largest collections of artefacts from this shipwreck in Victoria. It is significant for its association with the shipwreck, which is on the Victorian Heritage Register (VHR S417). The collection is significant because of the relationship between the objects, as together they have a high potential to interpret the story of the LOCH ARD. The LOCH ARD collection is archaeologically significant as the remains of a large international passenger and cargo ship. The LOCH ARD collection is historically significant for representing aspects of Victoria’s shipping history and its potential to interpret sub-theme 1.5 of Victoria’s Framework of Historical Themes (living with natural processes). The collection is also historically significant for its association with the LOCH ARD, which was one of the worst and best known shipwrecks in Victoria’s history. Silver plated copper alloy table fork from the wreck of the Loch Ard. Some little verdigris. Large amount of encrustation covers the fork. flagstaff hill, warrnambool, shipwrecked coast, flagstaff hill maritime museum, maritime museum, shipwreck coast, flagstaff hill maritime village, great ocean road, loch line, loch ard, captain gibbs, eva carmichael, tom pearce, glenample station, mutton bird island, loch ard gorge, fork -
 Flagstaff Hill Maritime Museum and Village
Fork
HISTORY OF THE LOCH ARD The LOCH ARD belonged to the famous Loch Line which sailed many ships from England to Australia. Built in Glasgow by Barclay, Curdle and Co. in 1873, the LOCH ARD was a three-masted square rigged iron sailing ship. The ship measured 262ft 7" (79.87m) in length, 38ft (11.58m) in width, 23ft (7m) in depth and had a gross tonnage of 1693 tons. The LOCH ARD's main mast measured a massive 150ft (45.7m) in height. LOCH ARD made three trips to Australia and one trip to Calcutta before its final voyage. LOCH ARD left England on March 2, 1878, under the command of Captain Gibbs, a newly married, 29 year old. She was bound for Melbourne with a crew of 37, plus 17 passengers and a load of cargo. The general cargo reflected the affluence of Melbourne at the time. On board were straw hats, umbrella, perfumes, clay pipes, pianos, clocks, confectionary, linen and candles, as well as a heavier load of railway irons, cement, lead and copper. There were items included that intended for display in the Melbourne International Exhibition in 1880. The voyage to Port Phillip was long but uneventful. At 3am on June 1, 1878, Captain Gibbs was expecting to see land and the passengers were becoming excited as they prepared to view their new homeland in the early morning. But LOCH ARD was running into a fog which greatly reduced visibility. Captain Gibbs was becoming anxious as there was no sign of land or the Cape Otway lighthouse. At 4am the fog lifted. A man aloft announced that he could see breakers. The sheer cliffs of Victoria's west coast came into view, and Captain Gibbs realised that the ship was much closer to them than expected. He ordered as much sail to be set as time would permit and then attempted to steer the vessel out to sea. On coming head on into the wind, the ship lost momentum, the sails fell limp and LOCH ARD's bow swung back. Gibbs then ordered the anchors to be released in an attempt to hold its position. The anchors sank some 50 fathoms - but did not hold. By this time LOCH ARD was among the breakers and the tall cliffs of Mutton Bird Island rose behind the ship. Just half a mile from the coast, the ship's bow was suddenly pulled around by the anchor. The captain tried to tack out to sea, but the ship struck a reef at the base of Mutton Bird Island, near Port Campbell. Waves broke over the ship and the top deck was loosened from the hull. The masts and rigging came crashing down knocking passengers and crew overboard. When a lifeboat was finally launched, it crashed into the side of LOCH ARD and capsized. Tom Pearce, who had launched the boat, managed to cling to its overturned hull and shelter beneath it. He drifted out to sea and then on the flood tide came into what is now known as LOCH ARD Gorge. He swam to shore, bruised and dazed, and found a cave in which to shelter. Some of the crew stayed below deck to shelter from the falling rigging but drowned when the ship slipped off the reef into deeper water. Eva Carmichael had raced onto deck to find out what was happening only to be confronted by towering cliffs looming above the stricken ship. In all the chaos, Captain Gibbs grabbed Eva and said, "If you are saved Eva, let my dear wife know that I died like a sailor". That was the last Eva Carmichael saw of the captain. She was swept off the ship by a huge wave. Eva saw Tom Pearce on a small rocky beach and yelled to attract his attention. He dived in and swam to the exhausted woman and dragged her to shore. He took her to the cave and broke open case of brandy which had washed up on the beach. He opened a bottle to revive the unconscious woman. A few hours later Tom scaled a cliff in search of help. He followed hoof prints and came by chance upon two men from nearby Glenample Station three and a half miles away. In a state of exhaustion, he told the men of the tragedy. Tom returned to the gorge while the two men rode back to the station to get help. By the time they reached LOCH ARD Gorge, it was cold and dark. The two shipwreck survivors were taken to Glenample Station to recover. Eva stayed at the station for six weeks before returning to Ireland, this time by steamship. In Melbourne, Tom Pearce received a hero's welcome. He was presented with the first gold medal of the Royal Humane Society of Victoria and a £1000 cheque from the Victorian Government. Concerts were performed to honour the young man's bravery and to raise money for those who lost family in the LOCH ARD disaster. Of the 54 crew members and passengers on board, only two survived: the apprentice, Tom Pearce and the young woman passenger, Eva Carmichael, who lost all of her family in the tragedy. Ten days after the LOCH ARD tragedy, salvage rights to the wreck were sold at auction for £2,120. Cargo valued at £3,000 was salvaged and placed on the beach, but most washed back into the sea when another storm developed. The wreck of LOCH ARD still lies at the base of Mutton Bird Island. Much of the cargo has now been salvaged and some was washed up into what is now known as LOCH ARD Gorge. Cargo and artefacts have also been illegally salvaged over many years before protective legislation was introduced. One of the most unlikely pieces of cargo to have survived the shipwreck was a Minton porcelain peacock - one of only seven in the world. The peacock was destined for the Melbourne International Exhibition in 1880. It had been well packed, which gave it adequate protection during the violent storm. Today, the Minton peacock can be seen at the Flagstaff Hill Maritime Museum in Warrnambool. From Australia's most dramatic shipwreck it has now become Australia's shipwreck artefact and is one of very few 'objects' on the Victorian State Heritage Register most valuable. The LOCH ARD shipwreck is of State significance – Victorian Heritage Register S 417 Flagstaff Hill’s collection of artefacts from LOCH ARD is significant for being one of the largest collections of artefacts from this shipwreck in Victoria. It is significant for its association with the shipwreck, which is on the Victorian Heritage Register (VHR S417). The collection is significant because of the relationship between the objects, as together they have a high potential to interpret the story of the LOCH ARD. The LOCH ARD collection is archaeologically significant as the remains of a large international passenger and cargo ship. The LOCH ARD collection is historically significant for representing aspects of Victoria’s shipping history and its potential to interpret sub-theme 1.5 of Victoria’s Framework of Historical Themes (living with natural processes). The collection is also historically significant for its association with the LOCH ARD, which was one of the worst and best known shipwrecks in Victoria’s history. Silver plated copper alloy table fork from the wreck of the Loch Ard. Some a little verdigris and silver oxide. Encrustation and concretion on fork.flagstaff hill, warrnambool, shipwrecked coast, flagstaff hill maritime museum, maritime museum, shipwreck coast, flagstaff hill maritime village, great ocean road, loch line, loch ard, captain gibbs, eva carmichael, tom pearce, glenample station, mutton bird island, loch ard gorge, electroplated cutlery, fork -
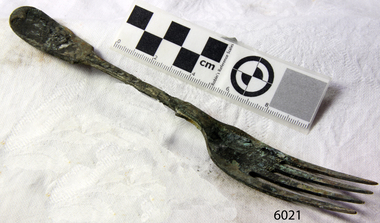
 Flagstaff Hill Maritime Museum and Village
Fork
HISTORY OF THE LOCH ARD The LOCH ARD belonged to the famous Loch Line which sailed many ships from England to Australia. Built in Glasgow by Barclay, Curdle and Co. in 1873, the LOCH ARD was a three-masted square rigged iron sailing ship. The ship measured 262ft 7" (79.87m) in length, 38ft (11.58m) in width, 23ft (7m) in depth and had a gross tonnage of 1693 tons. The LOCH ARD's main mast measured a massive 150ft (45.7m) in height. LOCH ARD made three trips to Australia and one trip to Calcutta before its final voyage. LOCH ARD left England on March 2, 1878, under the command of Captain Gibbs, a newly married, 29 year old. She was bound for Melbourne with a crew of 37, plus 17 passengers and a load of cargo. The general cargo reflected the affluence of Melbourne at the time. On board were straw hats, umbrella, perfumes, clay pipes, pianos, clocks, confectionary, linen and candles, as well as a heavier load of railway irons, cement, lead and copper. There were items included that intended for display in the Melbourne International Exhibition in 1880. The voyage to Port Phillip was long but uneventful. At 3am on June 1, 1878, Captain Gibbs was expecting to see land and the passengers were becoming excited as they prepared to view their new homeland in the early morning. But LOCH ARD was running into a fog which greatly reduced visibility. Captain Gibbs was becoming anxious as there was no sign of land or the Cape Otway lighthouse. At 4am the fog lifted. A man aloft announced that he could see breakers. The sheer cliffs of Victoria's west coast came into view, and Captain Gibbs realised that the ship was much closer to them than expected. He ordered as much sail to be set as time would permit and then attempted to steer the vessel out to sea. On coming head on into the wind, the ship lost momentum, the sails fell limp and LOCH ARD's bow swung back. Gibbs then ordered the anchors to be released in an attempt to hold its position. The anchors sank some 50 fathoms - but did not hold. By this time LOCH ARD was among the breakers and the tall cliffs of Mutton Bird Island rose behind the ship. Just half a mile from the coast, the ship's bow was suddenly pulled around by the anchor. The captain tried to tack out to sea, but the ship struck a reef at the base of Mutton Bird Island, near Port Campbell. Waves broke over the ship and the top deck was loosened from the hull. The masts and rigging came crashing down knocking passengers and crew overboard. When a lifeboat was finally launched, it crashed into the side of LOCH ARD and capsized. Tom Pearce, who had launched the boat, managed to cling to its overturned hull and shelter beneath it. He drifted out to sea and then on the flood tide came into what is now known as LOCH ARD Gorge. He swam to shore, bruised and dazed, and found a cave in which to shelter. Some of the crew stayed below deck to shelter from the falling rigging but drowned when the ship slipped off the reef into deeper water. Eva Carmichael had raced onto deck to find out what was happening only to be confronted by towering cliffs looming above the stricken ship. In all the chaos, Captain Gibbs grabbed Eva and said, "If you are saved Eva, let my dear wife know that I died like a sailor". That was the last Eva Carmichael saw of the captain. She was swept off the ship by a huge wave. Eva saw Tom Pearce on a small rocky beach and yelled to attract his attention. He dived in and swam to the exhausted woman and dragged her to shore. He took her to the cave and broke open case of brandy which had washed up on the beach. He opened a bottle to revive the unconscious woman. A few hours later Tom scaled a cliff in search of help. He followed hoof prints and came by chance upon two men from nearby Glenample Station three and a half miles away. In a state of exhaustion, he told the men of the tragedy. Tom returned to the gorge while the two men rode back to the station to get help. By the time they reached LOCH ARD Gorge, it was cold and dark. The two shipwreck survivors were taken to Glenample Station to recover. Eva stayed at the station for six weeks before returning to Ireland, this time by steamship. In Melbourne, Tom Pearce received a hero's welcome. He was presented with the first gold medal of the Royal Humane Society of Victoria and a £1000 cheque from the Victorian Government. Concerts were performed to honour the young man's bravery and to raise money for those who lost family in the LOCH ARD disaster. Of the 54 crew members and passengers on board, only two survived: the apprentice, Tom Pearce and the young woman passenger, Eva Carmichael, who lost all of her family in the tragedy. Ten days after the LOCH ARD tragedy, salvage rights to the wreck were sold at auction for £2,120. Cargo valued at £3,000 was salvaged and placed on the beach, but most washed back into the sea when another storm developed. The wreck of LOCH ARD still lies at the base of Mutton Bird Island. Much of the cargo has now been salvaged and some was washed up into what is now known as LOCH ARD Gorge. Cargo and artefacts have also been illegally salvaged over many years before protective legislation was introduced. One of the most unlikely pieces of cargo to have survived the shipwreck was a Minton porcelain peacock - one of only seven in the world. The peacock was destined for the Melbourne International Exhibition in 1880. It had been well packed, which gave it adequate protection during the violent storm. Today, the Minton peacock can be seen at the Flagstaff Hill Maritime Museum in Warrnambool. From Australia's most dramatic shipwreck it has now become Australia's shipwreck artefact and is one of very few 'objects' on the Victorian State Heritage Register most valuable. The LOCH ARD shipwreck is of State significance – Victorian Heritage Register S 417 Flagstaff Hill’s collection of artefacts from LOCH ARD is significant for being one of the largest collections of artefacts from this shipwreck in Victoria. It is significant for its association with the shipwreck, which is on the Victorian Heritage Register (VHR S417). The collection is significant because of the relationship between the objects, as together they have a high potential to interpret the story of the LOCH ARD. The LOCH ARD collection is archaeologically significant as the remains of a large international passenger and cargo ship. The LOCH ARD collection is historically significant for representing aspects of Victoria’s shipping history and its potential to interpret sub-theme 1.5 of Victoria’s Framework of Historical Themes (living with natural processes). The collection is also historically significant for its association with the LOCH ARD, which was one of the worst and best known shipwrecks in Victoria’s history. Silver plated copper alloy table fork from the wreck of the Loch Ard. Some verdigris and a silver oxide. Fork has a heavy encrustation.flagstaff hill, warrnambool, shipwrecked coast, flagstaff hill maritime museum, maritime museum, shipwreck coast, flagstaff hill maritime village, great ocean road, loch line, loch ard, captain gibbs, eva carmichael, tom pearce, glenample station, mutton bird island, loch ard gorge, electroplated cutlery, fork -
 Flagstaff Hill Maritime Museum and Village
Fork
HISTORY OF THE LOCH ARD The LOCH ARD belonged to the famous Loch Line which sailed many ships from England to Australia. Built in Glasgow by Barclay, Curdle and Co. in 1873, the LOCH ARD was a three-masted square rigged iron sailing ship. The ship measured 262ft 7" (79.87m) in length, 38ft (11.58m) in width, 23ft (7m) in depth and had a gross tonnage of 1693 tons. The LOCH ARD's main mast measured a massive 150ft (45.7m) in height. LOCH ARD made three trips to Australia and one trip to Calcutta before its final voyage. LOCH ARD left England on March 2, 1878, under the command of Captain Gibbs, a newly married, 29 year old. She was bound for Melbourne with a crew of 37, plus 17 passengers and a load of cargo. The general cargo reflected the affluence of Melbourne at the time. On board were straw hats, umbrella, perfumes, clay pipes, pianos, clocks, confectionary, linen and candles, as well as a heavier load of railway irons, cement, lead and copper. There were items included that intended for display in the Melbourne International Exhibition in 1880. The voyage to Port Phillip was long but uneventful. At 3am on June 1, 1878, Captain Gibbs was expecting to see land and the passengers were becoming excited as they prepared to view their new homeland in the early morning. But LOCH ARD was running into a fog which greatly reduced visibility. Captain Gibbs was becoming anxious as there was no sign of land or the Cape Otway lighthouse. At 4am the fog lifted. A man aloft announced that he could see breakers. The sheer cliffs of Victoria's west coast came into view, and Captain Gibbs realised that the ship was much closer to them than expected. He ordered as much sail to be set as time would permit and then attempted to steer the vessel out to sea. On coming head on into the wind, the ship lost momentum, the sails fell limp and LOCH ARD's bow swung back. Gibbs then ordered the anchors to be released in an attempt to hold its position. The anchors sank some 50 fathoms - but did not hold. By this time LOCH ARD was among the breakers and the tall cliffs of Mutton Bird Island rose behind the ship. Just half a mile from the coast, the ship's bow was suddenly pulled around by the anchor. The captain tried to tack out to sea, but the ship struck a reef at the base of Mutton Bird Island, near Port Campbell. Waves broke over the ship and the top deck was loosened from the hull. The masts and rigging came crashing down knocking passengers and crew overboard. When a lifeboat was finally launched, it crashed into the side of LOCH ARD and capsized. Tom Pearce, who had launched the boat, managed to cling to its overturned hull and shelter beneath it. He drifted out to sea and then on the flood tide came into what is now known as LOCH ARD Gorge. He swam to shore, bruised and dazed, and found a cave in which to shelter. Some of the crew stayed below deck to shelter from the falling rigging but drowned when the ship slipped off the reef into deeper water. Eva Carmichael had raced onto deck to find out what was happening only to be confronted by towering cliffs looming above the stricken ship. In all the chaos, Captain Gibbs grabbed Eva and said, "If you are saved Eva, let my dear wife know that I died like a sailor". That was the last Eva Carmichael saw of the captain. She was swept off the ship by a huge wave. Eva saw Tom Pearce on a small rocky beach and yelled to attract his attention. He dived in and swam to the exhausted woman and dragged her to shore. He took her to the cave and broke open case of brandy which had washed up on the beach. He opened a bottle to revive the unconscious woman. A few hours later Tom scaled a cliff in search of help. He followed hoof prints and came by chance upon two men from nearby Glenample Station three and a half miles away. In a state of exhaustion, he told the men of the tragedy. Tom returned to the gorge while the two men rode back to the station to get help. By the time they reached LOCH ARD Gorge, it was cold and dark. The two shipwreck survivors were taken to Glenample Station to recover. Eva stayed at the station for six weeks before returning to Ireland, this time by steamship. In Melbourne, Tom Pearce received a hero's welcome. He was presented with the first gold medal of the Royal Humane Society of Victoria and a £1000 cheque from the Victorian Government. Concerts were performed to honour the young man's bravery and to raise money for those who lost family in the LOCH ARD disaster. Of the 54 crew members and passengers on board, only two survived: the apprentice, Tom Pearce and the young woman passenger, Eva Carmichael, who lost all of her family in the tragedy. Ten days after the LOCH ARD tragedy, salvage rights to the wreck were sold at auction for £2,120. Cargo valued at £3,000 was salvaged and placed on the beach, but most washed back into the sea when another storm developed. The wreck of LOCH ARD still lies at the base of Mutton Bird Island. Much of the cargo has now been salvaged and some was washed up into what is now known as LOCH ARD Gorge. Cargo and artefacts have also been illegally salvaged over many years before protective legislation was introduced. One of the most unlikely pieces of cargo to have survived the shipwreck was a Minton porcelain peacock - one of only seven in the world. The peacock was destined for the Melbourne International Exhibition in 1880. It had been well packed, which gave it adequate protection during the violent storm. Today, the Minton peacock can be seen at the Flagstaff Hill Maritime Museum in Warrnambool. From Australia's most dramatic shipwreck it has now become Australia's shipwreck artefact and is one of very few 'objects' on the Victorian State Heritage Register most valuable. The LOCH ARD shipwreck is of State significance – Victorian Heritage Register S 417 Flagstaff Hill’s collection of artefacts from LOCH ARD is significant for being one of the largest collections of artefacts from this shipwreck in Victoria. It is significant for its association with the shipwreck, which is on the Victorian Heritage Register (VHR S417). The collection is significant because of the relationship between the objects, as together they have a high potential to interpret the story of the LOCH ARD. The LOCH ARD collection is archaeologically significant as the remains of a large international passenger and cargo ship. The LOCH ARD collection is historically significant for representing aspects of Victoria’s shipping history and its potential to interpret sub-theme 1.5 of Victoria’s Framework of Historical Themes (living with natural processes). The collection is also historically significant for its association with the LOCH ARD, which was one of the worst and best known shipwrecks in Victoria’s history. Silver plated copper alloy table forks - entrée from the wreck of the Loch Ard. Some verdigris and silver oxide. Light encrustation on fork.flagstaff hill, warrnambool, shipwrecked coast, flagstaff hill maritime museum, maritime museum, shipwreck coast, flagstaff hill maritime village, great ocean road, loch line, loch ard, captain gibbs, eva carmichael, tom pearce, glenample station, mutton bird island, loch ard gorge, electroplated cutlery, fork