Showing 2068 items matching "bendigo show"
-
 Ballarat Tramway Museum
Photograph - Black & White Photograph/s, Herald Sun, 16/04/1972 12:00:00 AM
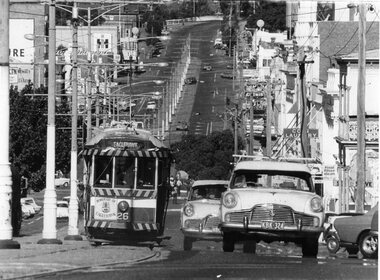
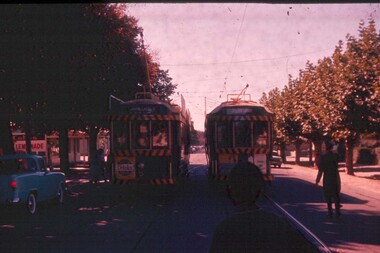
Yields information the operation of Bendigo trams in View St Bendigo, on the Eaglehawk route, and the delivery of the tram to Eaglehawk following closure.Black and White photograph of Bendigo No. 26 climbing View St, Bendigo with the destination of Eaglehawk and a "Borough of Eaglehawk sign" on the front dash panel. Photo taken with a large telephoto lens to show up the hill. Has Mitchell St in the background and a number of cars in the foreground. Photo taken on the last day of operation - used in Keith Dunstan's "A Place in the Sun" 17/4/1972. Herald Sun newspaper photograph. Printed on Agfa paper. For a copy of the newspaper article see Reg. Item 2229. See A Place in the Sun 17/4/1972.On rear in ink "ED15/215" and "17/4/72" in ink and a "Herald Sun Newspaper copyright" stamp - very faint green ink.tramways, trams, bendigo, eaglehawk, closure, view st, tram 26 -
 Ballarat Tramway Museum
Photograph - Black & White Photograph/s, early 1960's
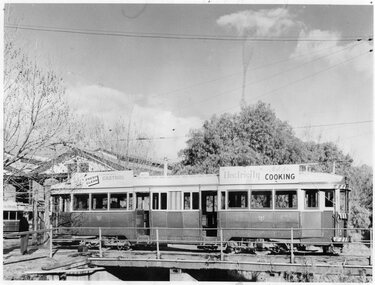
Black and white photograph of Bendigo No. 18 running out from the Bendigo depot, across the creek bridge, with the depot in the background. Tram has an Castrol oil and a "Electricity best for Cooking" roof advertisements. Tram shows the conversion/ configuration for "one-man" operation. Photo taken early 1960's, no large white strip on the driver's dash panels.tramways, trams, bendigo, depot, one man trams, tram 18 -
 Ballarat Tramway Museum
Photograph - Block Mounted Photograph, c1903
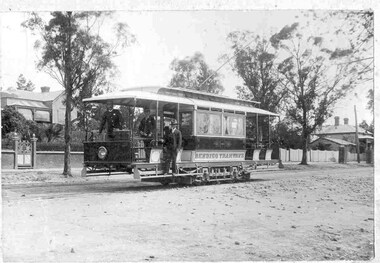
Black and white block mounted photograph of a Bendigo ESCo two window saloon tram soon after the opening the system in 1903. Shows the driver and conductor and another person on the front saloon portion of the tram. No number can been seen. Block mounting, off white cardboard, has thick outer border of stippled cardboard with rounded corners and a white paper mounting for the photograph. trams, tramways, esco, tram crews, bendigo -
 Ballarat Tramway Museum
Slide - 35mm slide/s, Harry Jackson, Dec. 1971
White cardboard mount, 35mm slide, from the Association of Railway Enthusiast's film strip titled "Provincial Tramway Film Strip" of a Bendigo No. 3 standing at the Eaglehawk terminus with the Town Hall in the background. Tram reflected in shop windows and shows some of the verandas of High St. Eaglehawk. The film strip notes (Reg. Item 2560), provided the following caption details: "Bogie car No. 3 stands at "EAGLEHAWK" in the hot midday sun. = Dec. '71 (Harry Jackson) See image btm2597p.tif for high level scan of image. Stamped on base of slide "11807" and written in ink on top edge "No. 3 Eaglehawk"tramways, trams, are, film strip, high st, eaglehawk, tram 3 -
 Ballarat Tramway Museum
Slide - 35mm slide/s, Travis Jeffrey, c1962
Agfa plastic mount (blue base, white cover) with a photo of Bendigo No. 5 and No. 24 crossing at Myrtle St. loop. No. 5 has destination of Charing Cross and a Cohns Drinks Advertisement on front panel. No. 24 has destination of Golden Square. On the front dash panel is advertisement for Huttons Hams and a Streets Ice-cream advertisement. Note the empty roof advertisement panel on No. 24 - refer to Reg. Item 2632, which shows the tram at Golden Square."BES 21" in penciltramways, trams, bendigo, golden square, myrtle st, tram 5, tram 24 -
 Ballarat Tramway Museum
Slide - 35mm slide/s, Travis Jeffrey, late 1960's or early 1970's
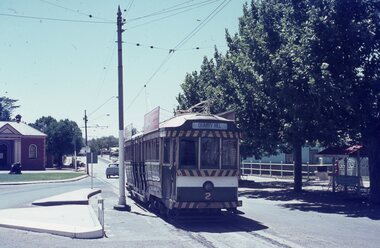
Agfa plastic mount (blue base, white cover) with a photo of Bendigo No. 2 at Eaglehawk terminus, looking along the terminal track. Photo has the traffic island arrangements, and shows the waiting shelter on the right hand side of the photo. Photo taken late 1960's early 1970's. No. 2 has the destination of Quarry Hill and two SEC roof advertisements on the tram."BES 39" in penciltramways, trams, bendigo, eaglehawk, tram 2 -
 Ballarat Tramway Museum
Slide - 35mm slide/s - set of 3, Travis Jeffrey, late 1960's or early 1970's
Series of three Agfa plastic mount (blue base, white cover) with a photo of Bendigo Nos. 2 running into the depot. Photo taken late 1960's early 1970's from the window of another tram. Reg Item 2652.2 and .3 show depot building and .2, has the scrubber in the background as well."BES 43", "45", "46" in pencil.tramways, trams, bendigo, crews, depot junction, tram 2, scrubber -
 Ballarat Tramway Museum
Slide - 35mm slide/s, Travis Jeffrey, late 1960's or early 1970's
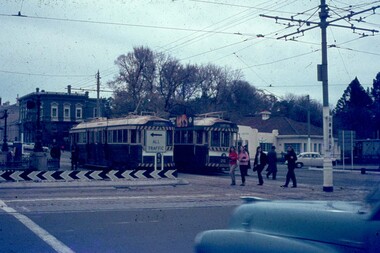
Agfa plastic mount (blue base, white cover) with a photo of Bendigo Nos. 3 and 26 at Charing Cross. The trams are bound for Eaglehawk, Quarry Hill respectively. Photo shows the traffic arrangements at Charing Cross prior to closure. Photo taken late 1960's early 1970's from the window of another tram. No. 3 has two roof advertisement racks which are empty, while No. 26 has a SEC briquettes roof advertisement."BES 48" in pencil.tramways, trams, bendigo, charing cross, tram 3, tram 26 -
 Ballarat Tramway Museum
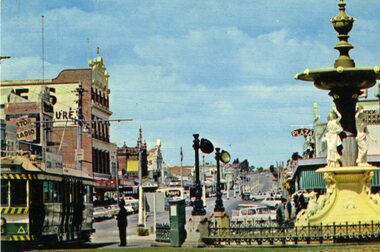
Postcard, Nu-color-vue or Nucolorvue Productions, Bendigo No. 3 at Charing Cross, late 1960's
Nu-colour-Vue series postcard No. BE 24 of Bendigo No. 3 at Charing Cross with Mitchell St in the background. Shows part of the tram, fountain and the buildings on either side of Mitchell St. Photo taken mid to late 1960's. Has advertisements on buildings for Astor Radio, Fountain Plaza and a Peters Ice cream van in the photograph. On rear of postcard are the details of the photo, manufacturer, copy right statement and location to place the stamp.trams, tramways, bendigo, charing cross, mitchell st -
 Ballarat Tramway Museum
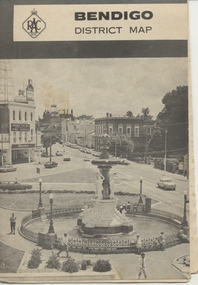
Map, Royal Automobile Club of Victoria, "Bendigo District Map - RACV", c1971
Printed street map titled "Bendigo District Map", published by the RACV, showing the central part of Bendigo, Bendigo Outlets, streets, principal attractions, Bendigo and district maps and information, and a list of sporting and entertainment facilities. Has the tram lines shown dotted, only shows the full extent of the Golden Square line. The main map has the number "0171" in the bottom left hand corner, indicating the publication date.in ink on the Bendigo Outlet map, "3/4" along bottom edge.trams, tramways, map, bendigo, racv, railways -
 Ballarat Tramway Museum
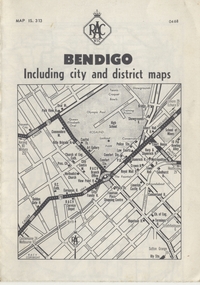
Map, Royal Automobile Club of Victoria, "Bendigo Including city and district maps - RACV", c1968
Printed street map titled "Bendigo Including city and district maps", published by the RACV, showing the central part of Bendigo on the front cover, Bendigo Outlets and notes on the city itself. Has the tram lines shown dotted, only shows the full extent of the Golden Square line. Inside has a district road map. The front cover has the number "0468" in the bottom left hand corner, indicating the publication date.in ink on the Bendigo Outlet map, has various notes showing the location of crossing loops on and off the map and the location of the tram depot itself.trams, tramways, map, bendigo, racv, railways -
 Ballarat Tramway Museum
Document - Letter/s, State Electricity Commission of Victoria (SECV), "Crossing Under Tramway Tracks", 1937
... Item 4946, but marked up to show changes to the Bendigo docs... Item 4946, but marked up to show changes to the Bendigo docs ...Yields information about the correspondence that was sent to Ballarat from Bendigo about underground services under tram tracks, the changes and the list of the people it was sent to.Set of five documents: Documents 2 and 5 same as Reg Item 4946, but marked up to show changes to the Bendigo docs for the Ballarat situation - in pencil. Cover sheet pinned to the four sheets is a handwritten ink foolscap ruled sheet showing all the addressees that the letter was to be sent to. Other sheets are: Letter on SECV letterhead, "Bendigo Electricity Supply and Tramways", not dated, gives phone number, address, duplicated in black ink, titled "Crossing Under Tramway Tracks", consisting of one foolscap sheet. quarto sheet, as a blank form - application form to install the service. cut sheet - blank form - Permit for Crossings under Tramway Tracks cut sheet - blank form - "Pipe crossings under tramway tracks" See Reg Item 4945 for Ballarat, possibly used as a model for the Ballarat document, given Reg Item 4943 correspondence and see Reg Item 4947 for cover letter for these documents and Reg Item 4946 for the original Bendigo docs.in ink "1" and "2" "3" and "4" on sheets in ink and on sheet 4 - change noted re "Technical Assistant" changed to "Tramway Inspector"trams, tramways, letters, sec, tram track, bendigo -
 Ballarat Tramway Museum
Photograph - Black & White Photograph/s, Chris Wurr, early 1970's
Yields information about the appearance of Bendigo Birney trams early 1970's en route to North Bendigo and its tree lined streets.Black and White Photograph of SEC Bendigo 30, Birney at North Bendigo terminus with the driver turning the trolley pole. Tram has the destination of Golden Square. Photo shows the fitting in the overhead to help locate the trolley pole on the inbound wire. Photo Chris Wurr, early 1970's. "Photo by Chris Wurr" stamped on the rear.trams, tramways, bendigo, north bendigo, overhead, birney, tram 30 -
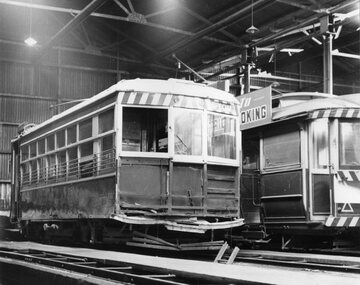 Ballarat Tramway Museum
Photograph - Black & White Photograph/s, Chris Wurr, early 1970's
Yields information about the appearance of Bendigo Birney trams early 1970's and the Charing Cross area.Black and White Photograph of Bendigo No. 11, Birney, stored in the Bendigo tram depot, early 1970's following an accident. See Bendigo Tramways excerpt re this tram, ex their web site 9/6/2009. Has another, possibly stored tram along side. Photo shows the damaged end panel removed, distorted bumper bar and broken life guard tray. Photo Chris Wurr, early 1970's. "In 1968, the SECV assessed damage to the tram after an accident with an automobile. Upon inspection, it was found that the side bearers of the tram body had spread, and the centre bearers had been severely distorted because of the impact. Repairs of this nature required costly engineering work and with the closure of the tramway being imminent, it was decided to place Car 11 in storage on 6 road until the cessation of SECV services in 1972. Work commenced on the restoration of this tram in 1975 and it returned to service in 1986, being painted in the SECV livery of the 1950s." See Bendigo Tramway web site, accessed 9/6/2009 for notes re accident damage."Photo by Chris Wurr" stamped on the rear. On rear in pencil "B'go 11"trams, tramways, bendigo, depot, tram 11 -
 Ballarat Tramway Museum
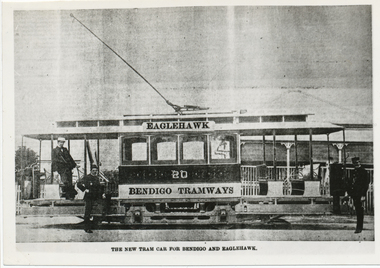
Photograph - Black & White Photograph/s, 8/04/1903 12:00:00 AM
Black and White reproduction (copy by scanning and reprinting) of a sepia toned image of an ESCo Bendigo Electric tramcar at the time of opening trails with many people on board, crews, a dog, in the Ball Mall area. Shows details of the car decoration, painting, crew uniforms, seating arrangements, truck arrangements. Information provided with photographs says "Trial run on route to Golden Square 8.4.1903", copied from Leonard C. Bennetts collection by William Scott. Shows edges and edge damage of original photograph. Two copies held.Copy 1 - has "20)" in the top left hand and right hand corners of the front of the photograph. On the rear "140)" in ink in the top left hand corner. In pencil and ink "Bendigo Tramways (Company electric) / Trial run on route to Golden Square 8.4.1903", "copies from Leonard C. Bennetts Collection" and a "William F Scott" address label in the bottom right hand corner. copy 2- has "12" in a circle on the top left hand front. Back has been covered by a sheet of paper, but has similar notes to copy 1 and cropping instructions.trams, tramways, bendigo, pall mall, golden square, trials, esco -
 Ballarat Tramway Museum
Photograph - Black & White Photograph/s, The Bendigonian, Dec. 1896
Black and White copy print contained within the Wal Jack Bendigo and Geelong Album, see Reg Item 5003 for more details. Photograph of looking west along High St Eaglehawk, Dec 1896, shows steam tram track, buildings and vehicles. A steam tram and trailer is parked at the terminus. Copied by Keith Kings from The Bendigonian 24/12/1896. See Reg Item 5735 for a similar photograph.On rear in ink " S-A962, Bendigo, Steam Motor and 4 wheel (?) trailer at Eaglehawk terminus. Copied ex "The Bendigonian 24/12/1896."trams, tramways, bendigo, steam trams, eaglehawk -
 Ballarat Tramway Museum
Photograph - Black & White Photograph/s, c1895
Black and White copy print contained within the Wal Jack Bendigo and Geelong Album, see Reg Item 5003 for more details. Copy photograph of a photograph from a book (Plate 1) showing a view along High St Eaglehawk, looking west, c1895. Shows buildings on both sides of the street. Has name J. Nimmon? or Ninnis (see btm 4372) in the bottom right hand corner. See also Reg item 5729 for a similar photograph. .1 - On rear in ink "Steam track tracks, Eaglehawk. (So much for the AETA boys who believe steam service did not cross the railway on the level!). In bottom right hand corner is "P. W. Duckett" trams, tramways, bendigo, high st, eaglehawk, steam trams -
 Ballarat Tramway Museum
Document - Adhesive label - SEC logo, Bendigo Tramways, c2010
Adhesive label or adhesive sign with the SEC 1921 logo printed on to a Avery Graphics label paper cover with a paper sheet with an adhesive finish. Photo i2, shows the paper being peeled off. One copy held without the paper sheet and one copy with. Made by the Bendigo Tramways c2010 and two copies given to Warren Doubleday at the time. High resolution image - tiff file held.tramways, trams, sec, logos, bendigo, tramcars -
 Ballarat Tramway Museum
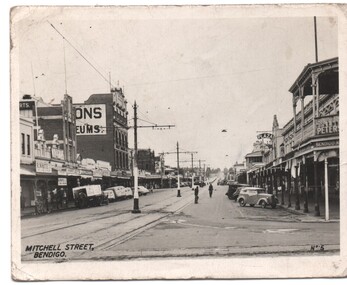
Photograph - Black & White Photograph/s
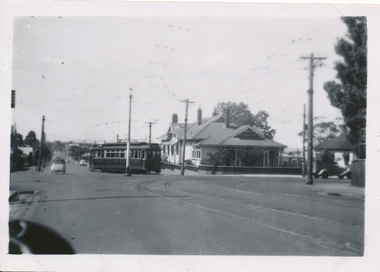
Black and white photograph, reproduced for sale, of Mitchell St Bendigo looking east towards the Railway Station. Has the title "Mitchell Street Bendigo" in the bottom left hand corner and " No. 5" in the bottom right hand corner. Shows the tramway overhead, track, centre poles. Photo early 1950's. trams, tramways, bendigo, mitchell st -
 Ballarat Tramway Museum
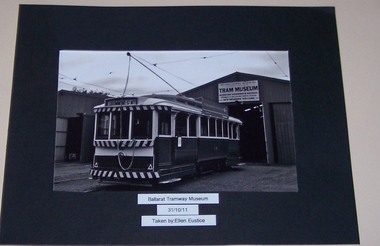
Photograph - Black and White photograph - mounted, Ellen Eustice, 30/10/2011 12:00:00 AM
Demonstrates the work of the Ballarat Tramway Museum and has a strong association with the photographer and photo competition.Mounted digital print of SEC Ballarat Tram No. 14 outside the BTM Depot, 31/10/2011 - photographed by Ellen Eustice. Made for the Ballarat Agricultural and Pastoral Society 2011 show, printed on Fujifilm paper. Exhibit 5. Tram has the destination of Drummond St North, and the Bendigo Bank roof advertisement. Details of photograph on the front and rear of the photograph.trams, tramways, btm, depot, showgrounds, tram 14 -
 Ballarat Tramway Museum
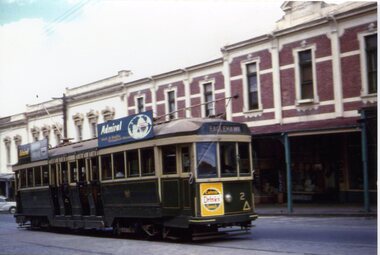
Photograph - Black & White Photograph/s - set of 3, Ron Hann, 26/12/1959 12:00:00 AM
Yields information about the principal intersection following the opening of electric trams, with an electric tram in photo and prior to a parade.Colour prints on laser print paper - of Bendigo 2 climbing the hill in View St Bendigo, 26/12/1959 enroute to Eaglehawk. Show streetscape, centre poles and buildings. The tram has a Cohn's drink ad on the front panel and two roof advertisements for Admiral Televisions and the destination of Eaglehawk. Printed on Fujifilm, Fujicolor Crystal Archive for Frontier"Has labels "References T3116, T3117 and T3118 Photo by Ron Hann" and another label "Bendigo 26.12.59" on rear.trams, tramways, view st, bendigo, tram 2 -
 Ballarat Tramway Museum
Photograph - Bendigo tram 22 decorated for Queens visit, Wal Jack, 7/03/1954
Photograph of No. 22 decorated for the Queen's visit (Royal visit) at the depot 7-3-1954. Photos by Wal Jack. Shows the decorations applied to the tram. The first has a depot worker standing in the drivers doorway. Single copy from the Ken Magor collection also held. Printed on Ilford paper. See Reg Item 7878 for a photo of the same tram on the depot access track. See image i2 for rear of photograph. See image i3 for hi res scan of negative Yields information about Bendigo tram 22 decorated for the 1954 visit of Queen Elizabeth IIBlack and White prints contained within the Wal Jack Bendigo and Geelong Album, see Reg Item 5003 for more details.On the rear in blue ink "SEC Bendigo No 22 decorated for Queen's visit, outside depot 7-3-54" with Wal Jack copyright stamp in the top right hand corner and the number "T74PC" written in.trams, tramways, bendigo, royal visit, decorated trams, depot, tram 22 -
 Ballarat Tramway Museum
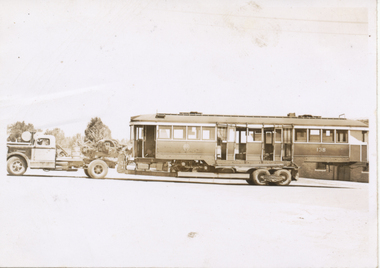
Photograph - Black & White Photograph/s, 1945
Black and White print contained within the Wal Jack Bendigo and Geelong Album, see Reg Item 5003 for more details. Photograph of MMTB 138 arriving at the Bendigo depot on a Yellow Transport truck, Sept 1945 - shows the transport arrangement from a side view. Tram became No. 24. No other details available. See Keith Kings "Bendigo Tramways" for the tram number. "29" on reartrams, tramways, bendigo, delivery of tramcars, mmtb, tram 138, tram 24 -
 Ballarat Tramway Museum
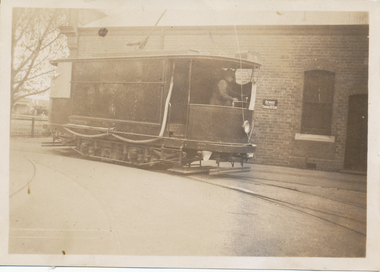
Photograph - Black & White Photograph/s, Oct. 1939
Black and White print contained within the Wal Jack Bendigo and Geelong Album, see Reg Item 5003 for more details. Photo of Bendigo sprinkler or scrubber tram just inside the depot gates, October 1939. Shows the curtains around one side of the tram, hose lines and lights underneath the ends of the tram. Printed on Velox paper. i1 - scan of print in the album i2 - rear of image i3 - scan of negative at 3200dpi added 6/6/2020.On the rear in blue ink "Bendigo Brush Water Tram built by Brush Engineering Co. England"trams, tramways, bendigo, sprinkler tram, scrubber tram, depot, sprinkler, scrubber -
 Ballarat Tramway Museum
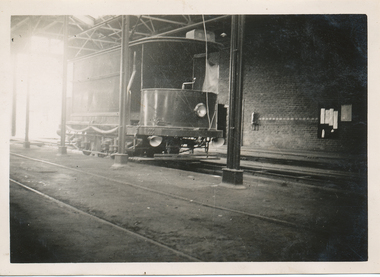
Photograph - Black & White Photograph/s, Oct. 1939
Black and White print contained within the Wal Jack Bendigo and Geelong Album, see Reg Item 5003 for more details. Photo of Bendigo sprinkler or scrubber tram just inside the depot October 1939. Shows the curtains around one side of the tram, hose lines and lights underneath the ends of the tram. Printed on Velox paper with a Kodak Print stamp. i1 - scan of print in the album i2 - rear of image i3 - scan of negative at 3200dpi added 6/6/2020.On the rear in pencil the number "35"trams, tramways, bendigo, sprinkler tram, scrubber tram, sprinkler, scrubber -
 Ballarat Tramway Museum
Photograph - Black & White Photograph/s, c1905
Black and White copy print contained within the Wal Jack Bendigo and Geelong Album, see Reg Item 5003 for more details. Photo of ESCo tram No. 6 with advertisements for Dewars whiskey, OT additive to drinks and Silverline Soap - possible photographed to show advertising space that could be sold by ESCo.trams, tramways, bendigo, esco, advertisements, tram 6 -
 Ballarat Tramway Museum
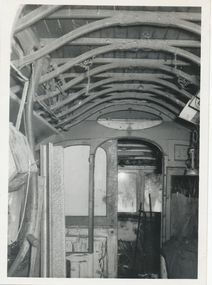
Photograph - Black & White Photograph/s, Keith Kings, 15/09/1962 12:00:00 AM
Black and White print contained within the Wal Jack Bendigo and Geelong Album, see Reg Item 5003 for more details. Photo of the interior Bendigo ESCo 9 after the body had been sold, in Thistle St, Bendigo, 15-9-1962, photo by Keith Kings. Shows the structure of the tram, very similar to the Duncan and Fraser horse tram structure. Has the D&F bell cord straps.on rear in ink "Bendigo Interior of original electric tram No. 9, rear of house in Thistle St. Flash 1/25. f22, 9 ft 15/9/62" and in the top right hand corner, the Keith Kings copyright stamp with the number "N(v)(13)" written in.trams, tramways, bendigo, esco, duncan fraser, tramcar bodies, tram 9 -
 Ballarat Tramway Museum
Photograph - Black & White Photograph/s, The Bendigonian, Oct. 2000
Black and White copy print contained within the Wal Jack Bendigo and Geelong Album, see Reg Item 5003 for more details. Photo of City of Brisbane Tram No. 20, altered to show the destination of Eaglehawk and Bendigo Tramways. Copied by Keith Kings from The Bendigonian 24/6/1902. On rear in ink " SA791 Bendigo "The New Tram"-!!! Actually Brisbane No. 20, suitably "touched." Copied ex "The Bendigonian", 24/6/02; previously printed on 2/10/1900.trams, tramways, bendigo, brisbane, new trams, esco, tram 20 -
 Ballarat Tramway Museum
Photograph - Black & White Photograph/s, 8/01/1956 12:00:00 AM
Black and White print contained within the Wal Jack Bendigo and Geelong Album, see Reg Item 5003 for more details. Photo of No. 18 turning out of Pakington St into Aberdeen St, last day of operations 8-1-1956. Photographer unknown - same as 5854. Shows the arrangement of the overhead and curves at this intersection. Has written in ink on the rear "No. 18 city bound from West to East, turning from Packington St into Aberdeen St 8/1/56. Next day was buses."trams, tramways, geelong, east, west, pakington st, tram 18 -
 Ballarat Tramway Museum
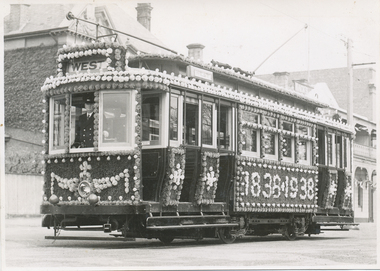
Photograph - Black & White Photograph/s, E. Bonney, Geelong No. 23 decorated for the Centenary, Oct. 1938
Black and White print contained within the Wal Jack Bendigo and Geelong Album, see Reg Item 5003 for more details. Photo of No. Geelong No. 23 was decorated for the Centenary of Geelong in 1938, photographed in Corio Terrace, decorated with festooned lighting and other "baubles" and items. On the sides, the letters "1838.1938". Tram has the destination of West, with a driver in the front cabin. Shows the lighting on the tram in detail and able to see the waxed flowers and other greenery. Photo by E. Bonney of 11 Shannon Ave Newtown Geelong, representing the "Sun News Pictorial" and "Melbourne Herald". Would indicate a "launch" of the tramcar. See also Reg item 5863 for another photograph of the same decorated tramcar.and 8886 for a mounted versioin.Has the rear a stamp advising photo taken by E. Bonney of Geelong.trams, tramways, geelong, depot, decorated trams, tram 23