Showing 2385 items
matching golden bendigo
-
 Ballarat Tramway Museum
Photograph - Black & White Photograph/s, Chris Wurr, early 1970's
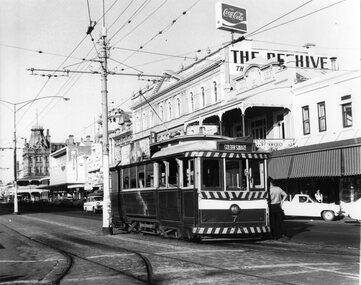
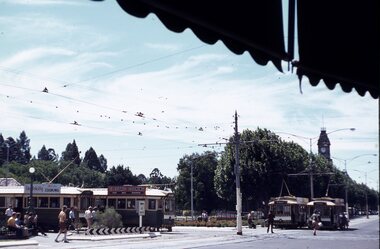
Yields information about the appearance of Bendigo Birney trams early 1970's and the McCrae St area.Black and White Photograph of Bendigo No. 7, in Pall Mall, at Charing Cross, with the destination of Golden Square. An inspector is leaning against the front door of the tram. Has in the background, The Beehive building, Coca Cola advertisement, Myers store and Stoneman's Shamrock Hotel. Photo Chris Wurr, early 1970's. "Photo by Chris Wurr" stamped on the rear.trams, tramways, bendigo, charing cross, pall mall, tram 7 -
 Ballarat Tramway Museum
Photograph - Black & White Photograph/s, Chris Wurr, early 1970's
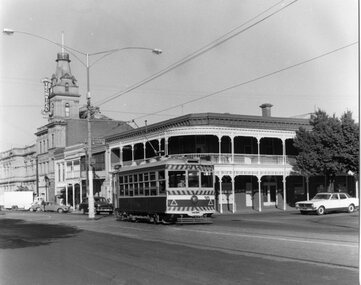
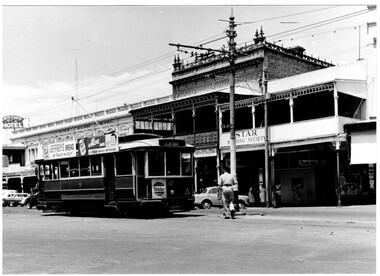
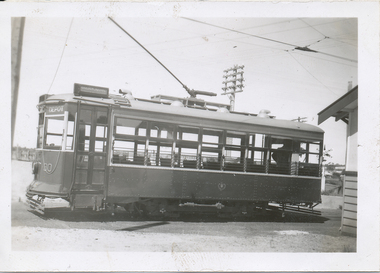
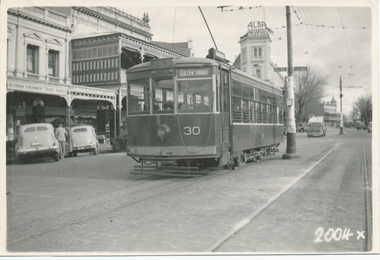
Yields information about the appearance of Bendigo Birney tram No. 11, stored at the depot, following an accident. Was not returned to service until after the SEC closed the tram system.Black and White Photograph of Bendigo No. 30, Birney, inbound to Charing Cross, McRae St, Bendigo, at Baxter St intersection? with the Bendigo Technical College in the background. Note the direction sign for "Heathcote". Tram has the destination of Golden Square. Photo Chris Wurr, early 1970's. "Photo by Chris Wurr" stamped on the rear.trams, tramways, bendigo, mccrae st, tram 30 -
 Ballarat Tramway Museum
Photograph - Colour Print, Glen Mills, 22/12/1971 12:00:00 AM
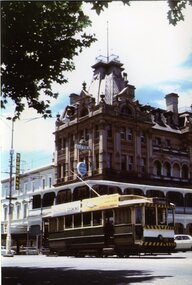
Colour photograph of 19, inbound in Pall Mall with Stoneman's Shamrock Hotel in the background. Tram has two SEC roof advertisements and destination of Golden Square. Photo by Glen Mills, ex a slide, printed on Fujifilm, Pictropaper. Dated 22.12.1971On rear in pencil "Glen G Mills / Bendigo 22.12.71 / A 4218 (slide)"trams, tramways, bendigo, pall mall, tram 19 -
 Ballarat Tramway Museum
Photograph - Black & White Photograph/s, 8/04/1903 12:00:00 AM
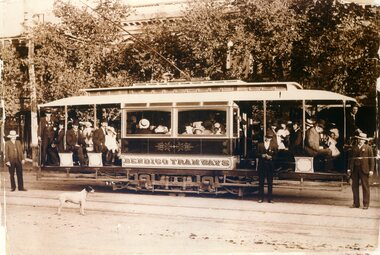
... Parade Ballarat Ballarat goldfields trams tramways Bendigo Pall ...Black and White reproduction (copy by scanning and reprinting) of a sepia toned image of an ESCo Bendigo Electric tramcar at the time of opening trails with many people on board, crews, a dog, in the Ball Mall area. Shows details of the car decoration, painting, crew uniforms, seating arrangements, truck arrangements. Information provided with photographs says "Trial run on route to Golden Square 8.4.1903", copied from Leonard C. Bennetts collection by William Scott. Shows edges and edge damage of original photograph. Two copies held.Copy 1 - has "20)" in the top left hand and right hand corners of the front of the photograph. On the rear "140)" in ink in the top left hand corner. In pencil and ink "Bendigo Tramways (Company electric) / Trial run on route to Golden Square 8.4.1903", "copies from Leonard C. Bennetts Collection" and a "William F Scott" address label in the bottom right hand corner. copy 2- has "12" in a circle on the top left hand front. Back has been covered by a sheet of paper, but has similar notes to copy 1 and cropping instructions.trams, tramways, bendigo, pall mall, golden square, trials, esco -
 Ballarat Tramway Museum
Photograph - Black & White Photograph/s - set of 2, Wal Jack, 28/02/1962 12:00:00 AM
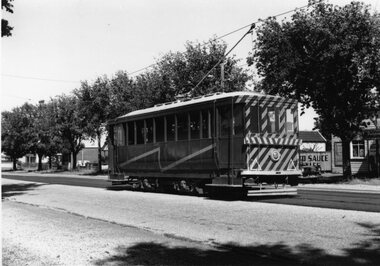
... Bendigo trams, the Golden Square route in the early 1960's prior ...Yields information about Bendigo trams, the Golden Square route in the early 1960's prior to fitting dash canopy lighting.Black and white print of the Ballarat Scrubber tram, at the Bell Street loop, 28/2/1962, Photo by Wal Jack. Two copies. Photo print courtesy of Port Dock Railway Museum, now the National Railway Museum. See worksheet 4311 for letter and details of prints sent to Bill Scott, 19/10/2001. Any photo credit to mention NRM Collection. .1 - same photograph with Doug Colquhoun stamp on rear - see image i2..1 - On rear of copy 1"SEC Ballarat / Scrubber car /Bell St loop / 28/2/62 2125 / Wal Jack " In the top right hand corner "74)" .2 - On rear has Douglas Colquhoun stamp with photograph details - see image i2 trams, tramways, scrubber tram, bell st, tram scrubber -
 Ballarat Tramway Museum
Photograph - Black & White Photograph/s, Doug Colquhoun, 16/05/1971 12:00:00 AM
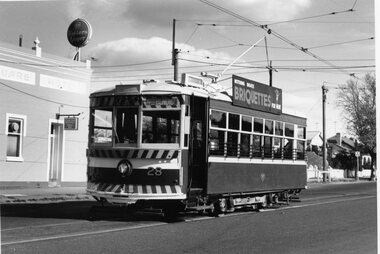
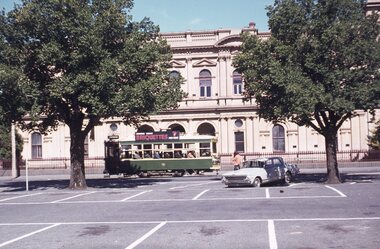
... Black and white print of Bendigo 28 at the Golden Square...On rear of copy 1 "SEC Bendigo / 28 /Golden Square / 16/5... Bendigo / 28 /Golden Square / 16/5/71 4187 / D.A. Colquhoun ...Yields information about Bendigo's trams in the early 1970's and the Eaglehawk terminus.Black and white print of Bendigo 28 at the Golden Square terminus. Two copies. Photo by Doug Colquhoun, 16/5/1971. Trams has the destination of Nth Bendigo and roof advertisements for Briquettes. Also has the Golden Square hotel in the background. Photo print courtesy of Port Dock Railway Museum, now the National Railway Museum. See worksheet 4311 for letter and details of prints sent to Bill Scott, 19/10/2001. Any photo credit to mention NRM Collection.On rear of copy 1 "SEC Bendigo / 28 /Golden Square / 16/5/71 4187 / D.A. Colquhoun" . Copy 2 "DAC" in ink, bottom right hand corner.trams, tramways, golden square, tram 28 -
 Ballarat Tramway Museum
Photograph - Black & White Photograph/s, Wal Jack, 7/10/1939 12:00:00 AM
Black and White print contained within the Wal Jack Bendigo and Geelong Album, see Reg Item 5003 for more details. Photo of No. 19 at the Lake Weeroona Terminus, 7-10-1939, with the driver turning the trolley pole. The tram has the destination of Golden Square. i1 - scan of print in the album i2 - rear of image i3 - scan of negative at 3200dpi added 6/6/2020. On rear in ink "SEC Bendigo, No. 19 (ex MMTB 185) at Lake Weeroona terminus 7-10-39" with the Wal Jack copyright stamp in the top right hand corner and the number "T189" written in.trams, tramways, bendigo, lake weeroona, tram 19 -
 Ballarat Tramway Museum
Photograph - Black & White Photograph/s, 1935
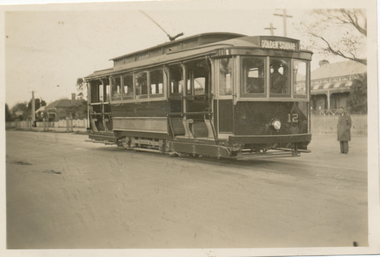
Black and White print contained within the Wal Jack Bendigo and Geelong Album, see Reg Item 5003 for more details. Photo of No. 12 at Lake Weeroona, 1935, with the destination of Golden Square. No other details known. Date from Wal's caption in the album. trams, tramways, lake weeroona, bendigo, tram 12 -
 Ballarat Tramway Museum
Postcard, Valentine & Sons Publishing Co, Valentines Series Postcard, No. 3308 of "View Point", Bendigo, Charing Cross
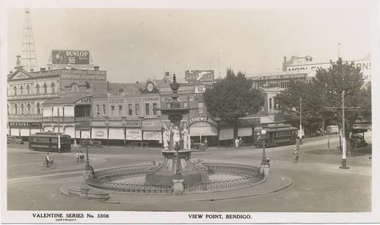
Valentines Series Postcard, No. 3308 of "View Point", Bendigo, Charing Cross with the fountain prominent in the photograph. No. 16 (left hand side) is bound for Golden Square and No. 13, to Quarry Hill. Late 1930's? In the background, The Beehive stores, A.E. Sayer Chemist, J. Edwards Jeweller and watchmaker with a large clock on the top of the shop, Matthews Bros - suits and men's clothes and Wrights Stores - tobacco and spirits. Also advertisements for Dunlop and Goodyear tyres. On rear of card is Valentines real photo series logo and that published in Melbourne and Sydney. On rear of copy 2 is "Nos 16 and 13" Yields information about Bendigo Tram operations and Charing Cross.Black and White postcard contained within the Wal Jack Bendigo and Geelong Album, see Reg Item 5003 for more details.trams, tramways, bendigo, charing cross, tram 16, tram 13 -
 Ballarat Tramway Museum
Postcard, Rose Stereograph Co, "Looking north from Charing Cross Bendigo Vic", c1950
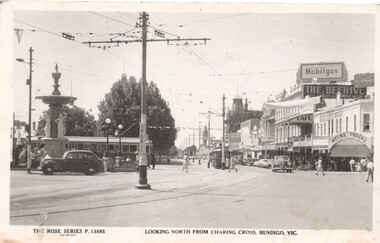
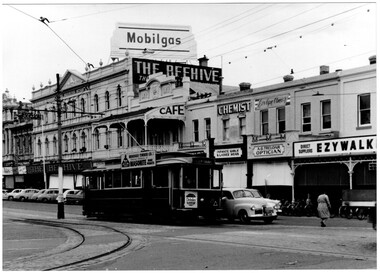
Black and white postcard of Charing Cross Bendigo, early 1950's or late 1940's. Rose Series postcard P13585, of a bogie tram heading to Eaglehawk behind the fountain and a single trucker heading for Golden Square hidden behind a pole. A number of motor cars in the scene along with people in summer clothing. In the background is the Beehive building, Mobilgas advertisement on top of the Beehive building and "Melba Frocks" shop on the corner, later Ezywalkin shoes. The postcard has the title underneath of "Looking north from Charing Cross Bendigo Vic". Divided back type with Rose Postcard Rose logo and that it was published by the Rose Stereograph Co. Armadale Victoria. Has not been used.trams, tramways, bendigo, charing cross, rose postcards -
 Ballarat Tramway Museum
Slide - 35mm slide/s, Jim Rush, early 1970's
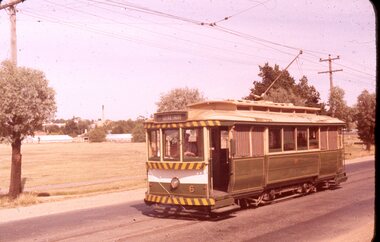
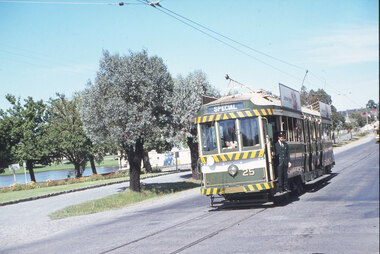
Colour 35mm slide in white cardboard mount of Bendigo 6, with the destination of Golden Square inbound in Nolan St with the White Hills Bendigo works in the background. Photo from the collection of Lilian Butler.in ink on rear "No. 6 Bendigo fleet was No. 25 Ballarat" and "Jim Rush took this slide in Nolan Street, Bendigo North"tramways, trams, bendigo, north bendigo, nolan st, tram 6 -
 Ballarat Tramway Museum
Photograph - Digital image, State Electricity Commission of Victoria (SECV), "Official Timetable Bendigo June 1940"
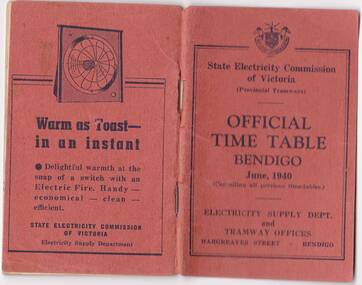
Yields information about the Bendigo Tram services.Digital image or copy of the SEC "Official Timetable Bendigo June 1940", 22 image files - 44 pages, giving details of the fares, transfers, luggage or parcels, lost property, times of each tram on the Quarry Hill, Eaglehawk, Lake Weeroona and Golden Square for both directions and Monday to Thursday, Friday, Saturday and Sunday. Has a number of advertisements for SEC home equipment, cookers, toasters, refrigerator, electric radiators and hot water. In the middle page is a map of the Tramway Routes, which has been hand drawn to shown North Bendigo and the depot location. Inside the rear cover, on a sheet headed "Memorandum" is a photograph, taped in of a conductor loading a pram onto a Birney tram. Under the photograph is in ink "Len Smith (Geelong)" See item3127 for an original copy and pdf scan. trams, tramways, bendigo, timetables -
 Ballarat Tramway Museum
Photograph - Black & White Photograph/s, mid to late 1950's
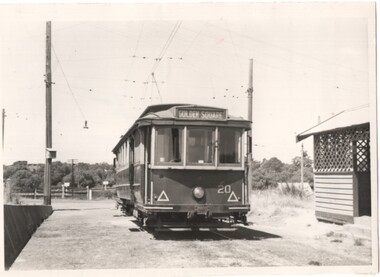
Black and white photograph of Bendigo 20 at the North Bendigo terminus. Tram showing the destination of Golden Square. Has the tram shelter at the terminus in the photograph. Photographer unknown - see history of object. See Keith Kings, The Bendigo Tramways, re the fitting of reflective tape in 1956, page 59.In the rear in ink "Bendigo"trams, tramways, north bendigo, tram 20 -
 Ballarat Tramway Museum
Photograph - Black & White Photograph/s, Bendigo tram 21 in Pell Mall, late 1950's
Black and White photograph, of Bendigo 21 with the destination of Golden Square, in the Pall Mall, approaching Charing Cross, during the mid to late 1950's. Tram has a roof advert for Bendigo Timber Co. Masonite and a Cohn's Drink ad on the front of the tram. In the background are roof advert for Mobilgas on the Beehive Building, Ezywalkin building, A. G. Treloar Optician and Evlyn Amer? shop for Infants Girls and Ladies Wear. There is a large number of Holden motor cars in the photos along with bicycles parked by the Ezywalkin shop. Printed on Fujichrome paper. Two copies held."TMSV Sales" stamp on rear. On rear of in ink "MMTB 188, Bendigo 21"trams, tramways, bendigo, charing cross, pall mall, tram 21 -
 Ballarat Tramway Museum
Photograph - Black & White, Bendigo 12 leaving Charing Cross, late 1950's
Black and White photograph, of Bendigo12 with destination of Golden Square, leaving Charing Cross in High St, during the mid to late 1950's. Tram has roof adverts for Jeffreys Bread, Alva Jams and a Cohn's Drink ad on the front drivers panel. In the background are the City Club Hotel and Start Building Society buildings. Printed on Fujichrome paper. Two copies held."TMSV Sales" stamp on rear. On rear of in ink 'HTT1 = MM107 = BED 19, Renumbered 12"trams, tramways, bendigo, charing cross, high st, tram 12 -
 Ballarat Tramway Museum
Slide - 35mm slide/s - set of 20, Eldon Hogan, 22/05/1971 12:00:00 AM
Set of 20 35mm Agfa colour blue and white plastic mount slide - featuring photos taken during an Association of Railway Enthusiasts Tour by Eldon Hogan. Folder had the date "22/5/1971" on it. Scanned on the Canon scanner at the depot 15/12/2005 at the time of the installation of the scanner. .1 - No. 25 in Nolan St with Lake Weeroona in the background. .2 - Three Birneys at the Depot junction, 30 and 29 with Conoles Hotel, McCrae St in the background. .3 - No. 5 in front of the Shamrock Hotel, Pall Mall .4 - No. 29 in front of the Shamrock Hotel with Stonemasons sign in the background. .5 - No. 18 ditto .6 - No. 30 and another Birney at the Quarry Hill terminus .7 - No. 24 southbound High St at the Violet St intersection with a "Mine Open" sign in the foreground and the Cathedral in the background. .8 - No. 19 at the Golden Square terminus, with the Golden Square Hotel in the background. .9 - No. 29 - side on view, North Bendigo line? Thunder St? .10 - No. 30 crossing the railway overbridge, inbound from Eaglehawk with a number of photographers in the foreground. .11 - No. 29? ditto .12 - No. 5 outbound - side on view, Thunder St, North Bendigo line? .13 - No. 29 and 30 at the intersection of High St and Brazier St with Church or School hall in the background. .14 - ditto .15 - ditto .16 - No. 25 and the two Birneys at the Eaglehawk terminus. .17 - No. 29 and two other trams at ditto .18 - No. 30 and 19 adjacent to the Lake View Hotel, McCrae St .19 - No. 5 and 25 crossing on the Eaglehawk Line, Ironbark? .20 - No. 29 at Quarry Hilltramways, trams, bendigo, lake weeroona, pall mall, golden square, eaglehawk, quarry hill, tram 25, tram 30, tram 29, tram 5, tram 18, tram 19, tram 24, tram 25 -
 Ballarat Tramway Museum
Slide - 35mm slide/s - set of 11, Eldon Hogan, mid 1960's to early 1970's
... Parade Ballarat Ballarat goldfields Tramways trams Bendigo Lake ...Set of 11 Agfa Plastic mounted slides - from the Eldon Hogan collection - possibly on an ARE Bendigo tours - mid 1960's (black destination rolls) and late 1960's or early 1970's. Scanned on the Canon scanner at the depot 15/12/1971 at the time of the installation of the scanner. .1 - No 18 with Lake Weeroona in the background - possibly at the same time as the tour with No. 18, though showing destination of Charing Cross. .2 - ditto .3 - No. 25 and two following trams on a special tour, note the white disc - Quarry Hill line? .4 - No. 29 on the Eaglehawk line at the Mt. Korong Road and the Calder Highway, with the Ampol Service station in the background. .5 - No. 29 passing Lake Weeroona with Destination of Nth Bendigo - has a Briquettes Roof Advertisement., .6 - No. 26 ditto - with two SEC Roof Advertisements. .7 - No. 24 leaving Charing Cross for Golden Square with The Beehive building, Ezywalkin, Coca Cola and the Fountain Shopping Centre in the background. .8 - No. 29 and a bogie tram at the Golden Square terminus with Golden Square Hotel and Victoria Bitter fence in the background. No. 29 has a SEC Briquettes roof advertisement. .9 - No. 29, with the Cathedral in background. Tram has a SEC Briquettes roof advertisement and destination of Golden Square. .10 - side view of a bogie tram on the Eaglehawk line? Tram has a Electric cooking roof advertisement. Photo has been over exposed. .11 - Single trucker, Violet St with the Central Deborah mine head in the background. Tram has two SEC Electric Cooking roof advertisements. tramways, trams, bendigo, lake weeroona, eaglehawk, golden square, charing cross, central deborah, tram 18, tram 25, tram 29, tram 24 -
 Ballarat Tramway Museum
Slide - 35mm slide/s - set of 10, Eldon Hogan, mid 1960's to early 1970's
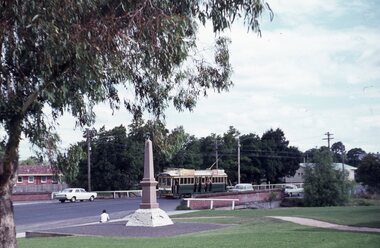
Set of 10 Agfa Plastic mounted slides - from the Eldon Hogan collection - possibly on an ARE Bendigo tours - mid 1960's (black destination rolls) and late 1960's or early 1970's. Scanned on the Canon scanner at the depot 15/12/1971 at the time of the installation of the scanner. .1 - No. 24 in bound along High St Bendigo with the discovery of gold monument in the foreground, Golden Sq route. .2 - ditto .3 - No. 26 outbound at the above location. .4 - No. 24 at the corner of Short St and High St, with the Technical college building? in the background. .5 - No. 26 at ditto, outbound for Golden Square. .6 - No. 24, High St Bendigo, with the Cathedral in the background. Tram has two Johnnie Walker Whiskey roof advertisements. .7 - Three trams, Pall Mall, Charing Cross, with the Beehive building in the background. Trams have SEC roof advertisement. .8 - ditto with Coca Cola ad on the Beehive building, turning around. .9 - No. 29 and a bogie tram at the Golden Square terminus with Billy Rodda's Golden Square Hotel in the background. Just past the tram is a large truck carrying boxes. .10 - Nos, 18, a bogie tram, 21 and 29 at the Quarry Hill terminus. tramways, trams, bendigo, tram 18, tram 24, tram 26, tram 21, tram 29 -
 Ballarat Tramway Museum
Slide - 35mm slide/s - set of 11, Eldon Hogan, mid 1960's to early 1970's
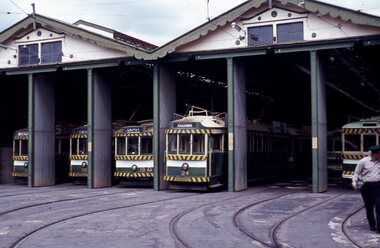
Set of 11 Agfa Plastic mounted slides - from the Eldon Hogan collection - possibly on an ARE Bendigo tours - mid 1960's (black destination rolls) and late 1960's or early 1970's. Scanned on the Canon scanner at the depot 15/12/1971 at the time of the installation of the scanner. .1 - front of depot -26, 19, 24, 29 and 28 amongst those present. .2 - ditto .3 - 24 departing depot .4 - 26 at Eaglehawk .5 - No. 5 turning from Pall Mall into Mitchell St with town hall in background. .6 - No. 5 using crossover in Mitchell St - with Maples, CBA Bank, Astor, Homecrafts, Roger David shops or signs in the background. .7 - ditto .8 - bogie car at Charing Cross with the Fountain Plaza shopping centre in the background. .9 - Charing Cross, with the fountain in the foreground, The Beehive and three trams in the view. .10 - No. 24 outbound, Golden Square line crossing the bridge over the creek, adjacent to the discovery of Gold Monument. .11 - ditto. tramways, trams, bendigo, eaglehawk, depot, charing cross, golden square, tram 26, tram 19, tram 24, tram 29, tram 28, tram 26, tram 5 -
 Ballarat Tramway Museum
Slide - 35mm slide/s - set of 11, Eldon Hogan, mid 1960's to early 1970's
... Parade Ballarat Ballarat goldfields Tramways trams Bendigo Lake ...Set of 11 Agfa Plastic mounted slides - from the Eldon Hogan collection - featuring an ARE tour with Nos. 21, 29 and 25 to Bendigo, mid 1960's. Scanned on the Canon scanner at the depot 15/12/1971 at the time of the installation of the scanner. .1 - No. 29 passing the Institute of Technology building, McCrae St. .2 - ditto .3 - Nos. 21 and 29 Lake Weeroona .4 - Nos. 29, 21 and 25 at the Golden Square Terminus with the Golden Square Hotel, Victoria Bitter fence in the background. .5 - ditto with a service car? .6 - ditto .7 - No. 21 with the Central Deborah mine poppet head in the background, Violet St. .8 - ditto with 21 and 29 .9 - ditto with 29 .10 - ditto with 21 and 29 .11 - 21, 29 and 25? at depot junction. Trams have SEC roof advertisements. tramways, trams, bendigo, lake weeroona, golden square, central deborah, tram 21, tram 29, tram 25 -
 Ballarat Tramway Museum
Slide - 35mm slide/s - set of 11, Eldon Hogan, mid 1960's to early 1970's
... Parade Ballarat Ballarat goldfields Tramways trams Bendigo ...Set of 11 Agfa Plastic mounted slides - from the Eldon Hogan collection - featuring an ARE tour with Nos. 21, 29 and 25 to Bendigo, mid 1960's. Scanned on the Canon scanner at the depot 15/12/1971 at the time of the installation of the scanner. .1 - four trams at Charing Cross - includes 19 and 25. .2 - 21 and 25 at the depot junction. .3 - 21 and 29 Quarry Hill route? .4 - 29 ditto .5 - 24 at Golden Square terminus - photo taken from the city side - note all the little shops and buildings on the left hand side of the photograph. .6 - 29, 21 and 25 at Eaglehawk .7 - 29 - side on view - Eaglehawk line? .8 - ditto with 21 .9 - 29 - North Bendigo line? - side on view .10 - 29 and 21 - vacant paddocks - Eaglehawk line .11 - 29 crossing the railway overbridge, Eaglehawk line, in bound. Trams have SEC roof advertisements. tramways, trams, bendigo, eaglehawk, charing cross, golden square, tram 21, tram 29, tram 25, tram 19 -
 Ballarat Tramway Museum
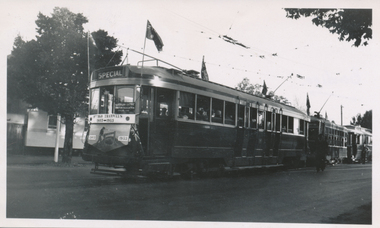
Photograph - Black & White Photograph/s - set of 2, Keith Kings, 11/04/1953 12:00:00 AM
Black and White prints contained within the Wal Jack Bendigo and Geelong Album, see Reg Item 5003 for more details. Set of two photographs of the AETA Special trams Golden Jubilee Anniversary Saturday 11-4-1953, by Keith Kings. .1 - Bogie 23 and Birney 29 and service car 20 at Golden Square. .2 - Birney 29, Bogie 23 at Quarry Hill. On the rear in blue ink .1 - "Bendigo, AETA specials Bogie 23 & Birney 29 (also service car 20), at Golden Square, Saturday 11/4/53. /Golden Jubilee Celebrations. (Two flags broken off drop centre roof by centre pole notices!!!!)" .2 - "Bendigo, AETA specials Bogie 23 & Birney 29, at Quarry Hill, Saturday 11/4/53. /Golden Jubilee Celebrations." Both have the K. S. Kings copyright stamp in the top right hand corner, and the numbers H(f)(iii) and H(e)(ii) written in respectively.trams, tramways, bendigo, decorated trams, gold tram, quarry hill, golden square, aeta -
 Ballarat Tramway Museum
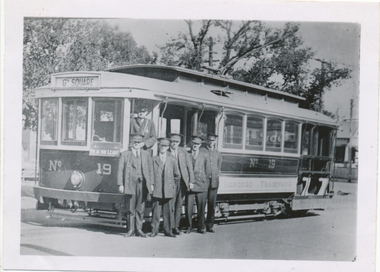
Photograph - Black & White Photograph/s, 1930
Black and White print contained within the Wal Jack Bendigo and Geelong Album, see Reg Item 5003 for more details. Photo of Bendigo tram No. 19, 1st of the ex MMTB cars to Bendigo, prior to any conversion work. Tram has "Bendigo Tramways" painted on the side of the tram, a sign at the front of the tram saying "Pay as you Leave", the destination of Golden Square. Has one conductor and five drivers? (motormen) standing alongside the front of the tram. Wal Jack has written in on the album "No. 19, 1st of ex MMTB cars at depot 1930" Peter Duckett photo or collection. On the rear in blue ink "PWD"trams, tramways, bendigo, new trams, signs, crews, tram 19 -
 Ballarat Tramway Museum
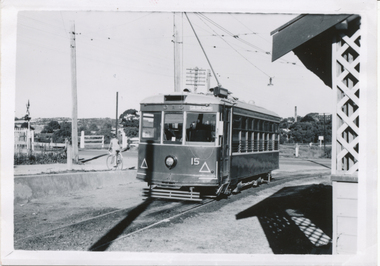
Photograph - Black & White Photograph/s, Wal Jack, 12/04/1950 12:00:00 AM
Black and White print contained within the Wal Jack Bendigo and Geelong Album, see Reg Item 5003 for more details. Photo of Bendigo Birney No.15 at North Bendigo, Photo Wal Jack, with the destination of Golden Square - 12-4-1959. Has the level crossing and rail line in the background and part of the tram stop shelter. i1 - scan of print in the album i2 - rear of image i3 - scan of negative at 3200dpi added 6/6/2020. On the rear in black ink "SEC Bendigo, No. 15 at Nth Bendigo 12-4-1959. Has the Wal Jack copyright stamp in the top right corner with the number "T219" written in.trams, tramways, bendigo, north bendigo, level crossings, birney, tram 15 -
 Ballarat Tramway Museum
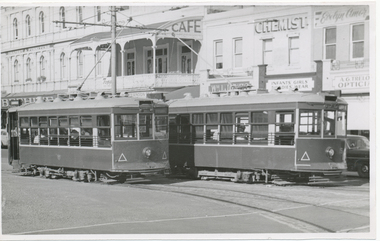
Photograph - Black & White Photograph/s, Wal Jack, 12/04/1959 12:00:00 AM
Black and White print contained within the Wal Jack Bendigo and Geelong Album, see Reg Item 5003 for more details. Photo of Bendigo Birney No. 29 and 15 in Pall Mall, near Charing Cross, 12-4-1959, Photo by Wal Jack. Has in the background, The Beehive buildings, Jopp? Cafe, Wm Jones building, Chemist, and A.G. Trello? Opticians. i1 - scan of print in the album i2 - rear of image i3 - scan of negative at 3200dpi added 6/6/2020. On the rear in black ink "SEC Bendigo #29 (left) for North Bendigo, and 15 (right) for Golden Square, photographed from #28, at Pall Mall 3.40pm, Sun 12th April 1959", in bottom left hand corner "Wal Jack Photo"trams, tramways, bendigo, pall mall, charing cross, birney, tram 15, tram 29 -
 Ballarat Tramway Museum
Photograph - Black & White Photograph/s, Leon Marshall Wood, 29/12/1947 12:00:00 AM
Black and White print contained within the Wal Jack Bendigo and Geelong Album, see Reg Item 5003 for more details. Photo of Bendigo Birney No.30 at North Bendigo, Photo Leon Marshall Wood, with the destination of Golden Square - 29-12-1947. Has the level crossing and rail line in the background and part of the tram stop shelter. On the rear in black ink "SEC of Victoria Bendigo, ex Geelong "Birney" car No. 30 Nth Bendigo terminus. In the bottom left hand corner "29.12.1947" The Leon Marshall Wood stamp in green ink and the number "SEC 15" written in.trams, tramways, bendigo, north bendigo, level crossings, birney, tram 30 -
 Ballarat Tramway Museum
Photograph - Black & White Photograph/s, Wal Jack, 3/01/1954 12:00:00 AM
... On the rear in black ink "SEC Bendigo Birney 28 to Golden... Birney 28 to Golden Square, High St Bendigo, 3-1-54", in the top ...Black and White print contained within the Wal Jack Bendigo and Geelong Album, see Reg Item 5003 for more details. Photo of Bendigo Birney No.28 in High St Bendigo, 3-1-1954, Photo Wal Jack. Has in the background the City Club Hotel, Desmond's Radio Parts and a Ice cream shop and Marshalls Fruit Shop Printed on Ilford Paper. See image i2 for rear of photograph. See image i3 for hi res scan of negative On the rear in black ink "SEC Bendigo Birney 28 to Golden Square, High St Bendigo, 3-1-54", in the top left hand corner, the Wal Jack copyright stamp but with no number written in.trams, tramways, bendigo, high st, birney, tram 28 -
 Ballarat Tramway Museum
Photograph - Black & White Photograph/s, Jun. 1949
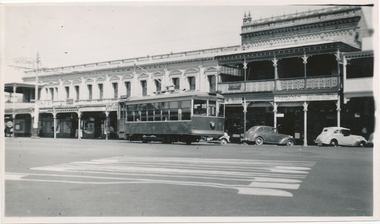
Black and White print contained within the Wal Jack Bendigo and Geelong Album, see Reg Item 5003 for more details. Photo of Bendigo Birney No. 30 in High St Bendigo at the end of the double track line en route to Golden Square. Wal's album notes date the photo as June 1949. In the background is the Victorian Government Tourist Bureau and an advertising sign for "Alba Motor Spirit" Has the number "2004X" written in white ink on the negative. Printed on Ilford paper. On rear in pencil "468"trams, tramways, bendigo, birney, high st, tram 30 -
 Ballarat Tramway Museum
Photograph - Black & White Photograph/s, State Electricity Commission of Victoria (SECV), late 1940's
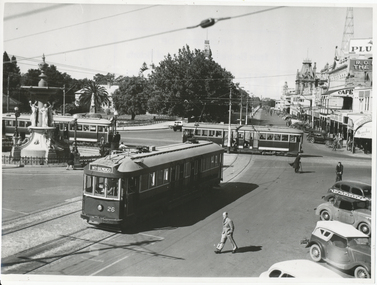
Black and White print contained within the Wal Jack Bendigo and Geelong Album, see Reg Item 5003 for more details. Photo of the Charing Cross with three bogie trams at the intersection, SEC publicity photo c1950. Two of the bogies crossing on the Eaglehawk - Quarry Hill line have white or cream strips on the lower edge of the body. No 26 has the destination of North Bendigo, though it is on Golden Square line with the driver standing just inside the doorway. In the background is the fountain, the Gardens and Pall Mall. SEC Publicity Photo, see Inscriptions for notes re photo. On the rear is the SEC Publicity Photo stamp, with negative number 21.1 written in, "Yallourn" in pencil and a typed piece of paper taped to the rear of the photo noting the Provincial tramways owned by the SEC, but that it is loss making.trams, tramways, bendigo, charing cross, secv, pall mall, tram 26 -
 Bendigo Historical Society Inc.
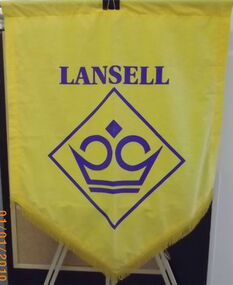
Banner - GOLDEN SQUARE P.S. LAUREL ST. 1189 COLLECTION: HOUSE BANNER
... Bendigo Historical Society Inc. Bendigo Historical Society ...Golden Square Primary school house banner. Yellow cloth with blue lettering the word Lansell and motif.education, primary, golden square laurel st p.s.