Showing 315 items
matching eaglehawk museum
-
 Ballarat Tramway Museum
Photograph - Colour Photograph/s, 1960's
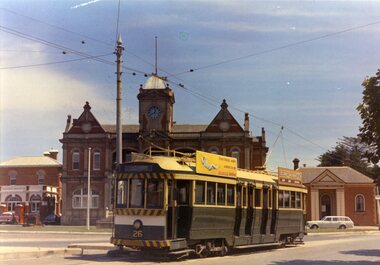
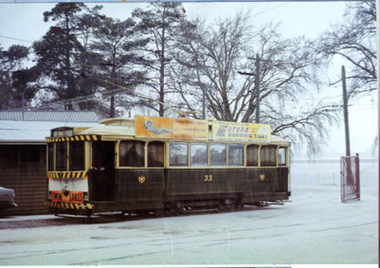
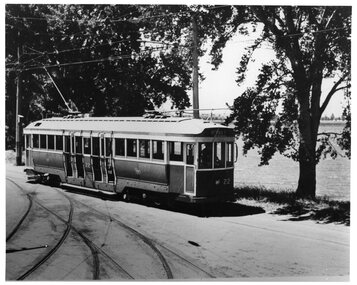
Colour postcard size print of an SEC Bendigo tram 26 at the Eaglehawk terminus. Printed on AGFA paper. Tram has SEC roof ads, both re Electric cooking. Has Eaglehawk Post Office, Town Hall and Mechanics Institute in the background. Tram fitted with dash canopy lighting and large white strip under driver's windows. Photo undated, taken late 1960's or early 1970's. Tram has destination of "Eaglehawk".eaglehawk, bendigo, post office, town hall, tram 26 -
 Ballarat Tramway Museum
Photograph - Colour Photograph/s, 21/11/1962 12:00:00 AM
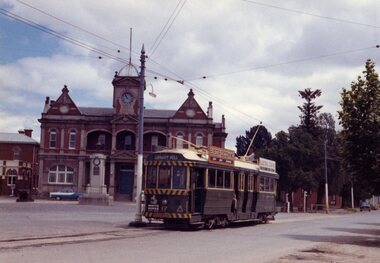
Colour print of Bendigo SECV Bendigo tram 17 at Eaglehawk Terminus. On Kodacolor paper with a Kodak red ink stamp on rear. Tram has dash canopy lights, but no large white strip under the drivers windows. Photo not dated but appears to be at about the same time as 977, 21.11.1962. Has Eaglehawk Town Hall and Post office in background and war memorial. Tram showing destination of "Quarry Hill". Photo shows how tram line extended past the town hall with the white posts visible. Tram has White Horse Whiskey ad on front dash panel and two SEC "Electric Cooking" ads.On rear top left hand corner "17".eaglehawk, bendigo, town hall, post office, tram 17 -
 Ballarat Tramway Museum
Photograph - Colour Photograph/s, 21/11/1962 12:00:00 AM
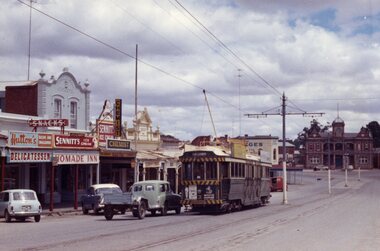
Colour print of Bendigo SECV Bendigo tram 3 travelling High St Eaglehawk towards the Eaglehawk Terminus. Photo taken after the tram has passed the photographer. On Kodacolor paper with a Kodak red ink stamp on rear. Tram has dash canopy lights, but no large white strip under the drivers windows. Photo not dated but appears to be at about the same time as 977, 21.11.1962. Has Eaglehawk Town Hall and Post office in background and shops along the south side of High St. Tram showing destination of "Eaglehawk". Tram has White Horse Whiskey ad and another on front dash panel and two roof ads. In photo are advertisements for "Hutton's Bacon" and "Sennett's Ice Cream" on shop roof advertisements.On rear top left hand corner "3"eaglehawk, bendigo, town hall., high st, tram 3 -
 Ballarat Tramway Museum
Photograph - Black & White Photograph/s set of 19, Mar. 1972
Set of 19 black and white prints, all 89mm square of Bendigo trams, date machine printed on print is "Mar 1972". 981.1 - Tram 21 at North Bendigo terminus, with level crossing in background. Has destination "Golden Square" and two SEC roof ads. 981.2 - tram 2? at Eaglehawk, with destination "Depot", two SEC roof ads and "Leo A. Hughes Photographer" on side of building in background. 981.3 - tram 2? at Eaglehawk, side on view. 981.4 - tram 26 at Quarry Hill terminus looking back into city. 981.5 - tram 7 en route to North Bendigo at the site of the Bridge St. loop. Has a Peters Ice Cream truck and Sandhurst Fruit Juices truck on right side of photograph. 981.6 - tram 2 at Quarry Hill terminus. 981.7 - tram 2? at one of the loops on the Eaglehawk line, inbound? 981.8 - bogie tram at Charing Cross with fountain in background. Side on view looking south. 981.9 -trams 7 and 21 on Golden Square/North Bendigo line with bogie tram in background, at Charing Cross. Same as item 972. 981.10 - bogie tram at Charing Cross - has buildings in south west corner in background, including Colonial Mutual Life and an advertisement for the Herald newspaper. 981.11 - trams 25, 7 and two other trams at Charing Cross. 981.12 - trams 2 and 26 and three others at Charing Cross. 981.13 - tram 25 at Golden Square terminus, with Rodda's Golden Square Hotel in the background. Tram showing destination of "Nth Bendigo" 981.14 - tram 24, showing "Special" on depot access track. Has two Johnnie Walker roof ads on side. 981.15 - as above, but tram on bridge outside depot. 981.16 - trams 25 and 28 at depot 981.17 - tram 24 showing "Special" on depot access track with a single truck car in background. 981.18 - trams 2 and 26 at Charing Cross. Has advertisements for "Armstrong Tyre Service" and "Cohn's drinks" on buildings in background. 981.19 - Bendigo 2 at location?, about to enter a loop or double track section. Has hotel in background. On rear of each photo in the top left hand corner is a print number 1 to 19 in ink and location notes, generally "Bendigo"trams, tramways, charing cross, bendigo, golden square, quarry hill, tram 2, tram 21, tram 7, tram 24, tram 26 -
 Ballarat Tramway Museum
Photograph - Black & White Photograph/s, early 1960's
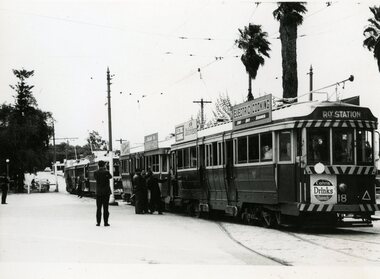
Black and White print of Bendigo SECV Bendigo tram 18 and four other trams (two bogies and two Birneys) at Eaglehawk tram terminus on a tour. Tram has dash canopy lights, but no large white strip under the drivers windows. Photo not dated but appears to be during early 1960's. Tram 18 has destination of "Railway Station", also has a white disk indicating a tram in a convoy. Also has a good photo of the "Cohn's Drinks Quench" advertisement on the front dash panel, as well as two SEC roof ads.trams, tramways, eaglehawk, bendigo, tram tours, high st, specials, tram 18 -
 Ballarat Tramway Museum
Photograph - Black & White Photograph/s, early 1960's
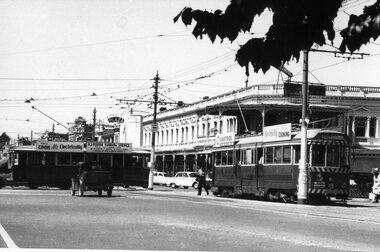
Black and White print of Bendigo SECV Bendigo tram 18 at Charing Cross terminus for the Eaglehawk route with a single truck car crossing behind heading for Golden Square. Trams have dash canopy lights, but no large white strip under the drivers windows. Photo not dated but appears to be at during early 1960's. Tram 18 has White Horse Whiskey ad on front dash panel, SEC Roof ad "Electricity best for Cooking" and a "CASTROL" ad, and showing destination of "Eaglehawk". Single truck car has SEC roof ad "You'll Cook better electrically" and a roof ad for "B.J. Osborn Plumbing Service" ad. Has City Club Hotel and Plaza Theatre buildings in background. Single truck could be No. 20, based on roof ads, see 986.trams, tramways, charing cross, bendigo, tram 18, tram 20 -
 Ballarat Tramway Museum
Photograph - Black & White Photograph/s, early 1960's
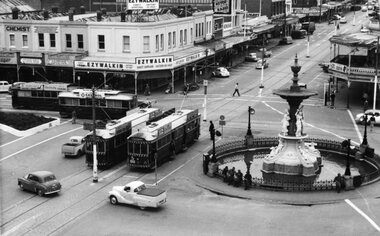
Black and White print of an aerial view of Bendigo SECV Bendigo tram 18 at Charing Cross terminus for the Eaglehawk route with another bogie tram and two single truck trams in the background. Trams have dash canopy lights, but no large white strip under the drivers windows. Photo not dated but appears to be at during early 1960's. Tram 18 has White Horse Whiskey ad on front dash panel, SEC Roof ads. Numbers of other trams cannot be determined. All trams have roof ads, including SEC ads and a CASTROL ad. Good view of the fountain and buildings on the north east corner. Has Ezywalkin store, City Club Hotel and other buildings. Shows traffic arrangements for cars to do a right turn from Pall Mall into Mitchell St. On a building in Mitchell St. is an advertisement for "ASTOR Radio"trams, tramways, charing cross, bendigo, mitchell st, aerial views, tram 18 -
 Ballarat Tramway Museum
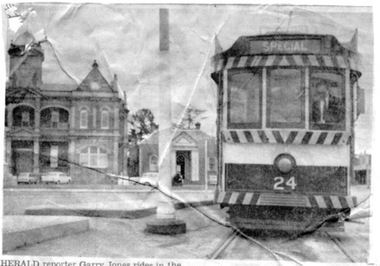
Newspaper, Herald Sun, "It's fun riding on those trams", c1968
Newspaper cutting, undated, from Melbourne Herald on a trip on the Bendigo Tramways - following the announced closure - c1968. Has photo of 24 at Eaglehawk and Tram Driver Jack Hogan, No. 22, age 56. Item written by Garry Jones. Photos by Peter Ward. Reporter hired a tram for a trip to Eaglehawk. Mentions Bendigo Mayor Warren Cambridge, Inspector Gordon James and Chairman of the TMSV, Bob Prentice. Item has been glued onto a sheet of foolscap paper - white.trams, tramways, bendigo, tram hire, closure, jack hogan -
 Ballarat Tramway Museum
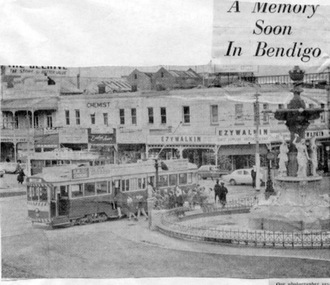
Newspaper, Bendigo Advertiser, " A memory Soon in Bendigo", 19/07/1968 12:00:00 AM
Newspaper cutting, undated, from Bendigo Advertiser (?) with a photo of a bogie car on the Eaglehawk route at Charing Cross, with the Alexandra Fountain in the foreground. Caption refers to the State Cabinet decision the previous day to close the Bendigo system, which would date the item as 19/7/1968. Item has been glued onto a sheet of foolscap paper - white.trams, tramways, bendigo, closure, charing cross -
 Ballarat Tramway Museum
Document - Calendar, Topmill Pty Ltd, "Australian Trams 1999 Calendar", 1998
24 Page full colour calendar featuring Australian Trams, published by Top mill Pty Ltd. Cover (1299i5) features Sydney trams outside Central station in Eddy Ave. Other cities represented - Brisbane, Sydney, Adelaide, Perth, Fremantle, Bendigo, Ballarat, Sydney light rail, Hobart and Melbourne. Photos by Hugh Ballment, Dale Budd, Robert Merchant, Arthur Perry and the Sydney Tramway Museum. Priced at $9.95, and has "Parkholme Newsagency and Toys" sticker over bar code section, giving the same price. Distributed by Gordon and Gotch. Ballarat trams - 1299i1 - 33 at depot during hail storm on 20/8/1971 and 1299i2 - BTM trams 14 and 26 at Carlton St. during BTM operations 1970's or early 1980's. Used for month of June. Bendigo trams - 1299i3 - No. 4 at Eaglehawk terminus - 1/2/1971 and 1299i4 - trams 28, 2, 23 and two single truckers at Charing Cross 1970. Used for month of May.tramways, trams, australian trams, ballarat, bendigo, museums -
 Ballarat Tramway Museum
Ephemera - Timetable/s, State Electricity Commission of Victoria (SECV), Timetable as from 29 June 1970 - Bendigo, 1970
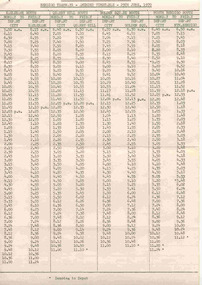
Two page Gestetner copy of an amended timetable for tram services in Bendigo for the SECV issued 29 June 1970. Gives times for the departure from the City and the terminus for the Eaglehawk, Quarry Hill, Golden Square and North Bendigo routes. Page 1 for Monday to Friday, page 2 for Saturday and on the bottom of page 2, details of Sunday services commencing from 2pm, until about 10.30pm. May have been the last timetable issued for Bendigo. On Gestetner foolscap sized paper, stapled in the top left corner. Headed the "Northern Electricity Supply Branch / Bendigo Tramways - Amended Timetable - 29th June, 1970" 1637.1 - 2nd copy added 22/08/04 - has two staples in top left hand corner. See pdf documents for good quality scans and history of record for details of source.bendigo, secv, timetables, tram services -
 Ballarat Tramway Museum
Photograph - Black & White Photograph/s, Electric Supply Co. of Vic (ESCo), 1913
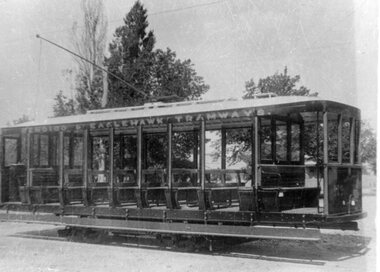
Black and white photograph of a Bendigo Single Truck cross bench tramcar (either 17 or 18) when built new in 1913. Tram has words "Bendigo and Eaglehawk Tramways" on top rail above windows. Photograph appears to be a photo of another print, with black ink "15" in the bottom left hand corner on the newer print on copy 1 of the item only. See page 30 of Destination Eaglehawktrams, tramways, bendigo, cross bench tram -
 Ballarat Tramway Museum
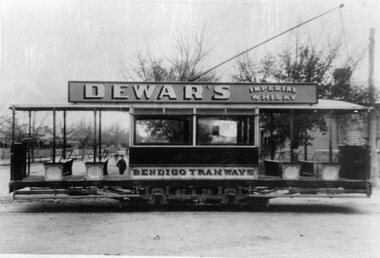
Photograph - Black & White Photograph/s, pre 1920
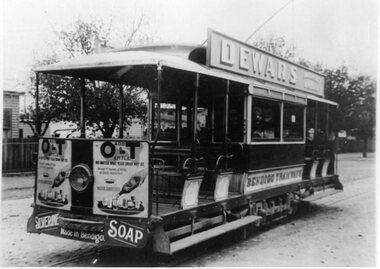
Black and white photograph of a Bendigo Single Truck straight sill tramcar (were numbers 1 to 12) prior to fitting windscreens (Destination Eaglehawk page 30 - says this occurred in 1920). Tram has "Dewar's imperial whisky" roof advertisement, "Bendigo Tramways" on the letterboard, on the front dash, advertisements for "O-T+ drink additive on either side of the headlight and "Silverline Soap" on the panel either side of the bumper bar. See Reg Item 1712 for side on view of this tram. Photograph appears to be a photo of another print, with black ink "18" in the bottom left hand corner on the newer print on copy 1 of the item only. Two copies held. See page 30 of Destination Eaglehawk trams, tramways, bendigo, esco -
 Ballarat Tramway Museum
Photograph - Black & White Photograph/s, pre 1920
Black and white photograph of a Bendigo Single Truck straight sill tramcar (were numbers 1 to 12) prior to fitting windscreens (Destination Eaglehawk page 30 - says this occurred in 1920). Side on view of the same tram in Reg. Item No. 1711 Tram has "Dewar's imperial whisky" roof advertisement, and "Bendigo Tramways" on the letterboard. Photograph appears to be a photo of another print. Two copies held on file. See page 30 of Destination Eaglehawktrams, tramways, bendigo, esco -
 Ballarat Tramway Museum
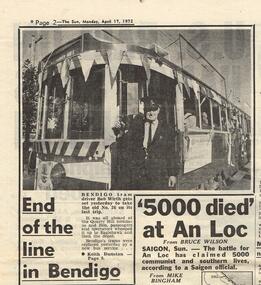
Photograph - Newspaper Clipping and Black & White Photograph/s, 16/04/1972 12:00:00 AM
Newspaper clipping from The Melbourne Sun, dated Monday 17/4/1972, titled "End of the line in Bendigo" showing a photograph of Bendigo tram driver Bob Wirth standing by Bendigo No. 26 prior to its last trip to Eaglehawk and then the depot. One of a large group of newspaper cuttings from John Bainbridge, 7/4/02. .1 - black and white print of the photograph in fair order. Added 11-8-2016tramways, trams, bendigo, tramway closure, last tram -
 Ballarat Tramway Museum
Slide - 35mm slide/s, Peter Moses, Jan. 1969
Photo of SEC Bendigo No. 2 at Eaglehawk terminus. Tram has a crew member (driver) standing by the rear door and has SEC roof advertisements "Electric Cooking is Matchless" and "Everything's under control in my all-electric kitchen". Kodak cardboard mount slide, taken by Peter Moses, Jan. 1969.On the rear of the slide "Jan 1969 Eaglehawk terminus", "P.Moses" and on the other side of the slide, in red ink “2”.tramways, trams, bendigo, eaglehawk, tram 2 -
 Ballarat Tramway Museum
Slide - 35mm slide/s - set of 2, Peter Moses, Jan. 1969
Set of two photos of SEC Bendigo No. 17 in Mitchell St. Bendigo. .1 - No. 17 using the crossover. Has destination of "Eaglehawk". In the background are the Plaza theatre, Maples store and Coles store. Advised that the Sunday run outs in the late morning, early afternoon used this crossover to form the first Eaglehawk tram service. .2 - No. 17, with destination of "Quarry Hill", near the Railway station. Has a Wilkinson Sword and SEC "Electric Cooking serves you best", roof advertisements. Kodak cardboard mount slide, taken by Peter Moses, Jan. 1969.On the rear of the slide: .1 - in red ink "Bendigo Mitchell St." , "6" and "P. Moses" in black ink. .2 - "3" in red ink and "P. Moses" in black ink.tramways, trams, bendigo, mitchell st, quarry hill, tram 17 -
 Ballarat Tramway Museum
Slide - 35mm slide/s, Peter Moses, Jan. 1969
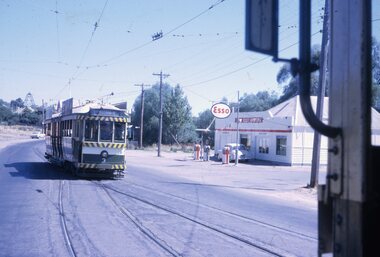
Photo of the SEC Bendigo No. 3 entering Long Gully Loop, bound for Eaglehawk, while another bogie tram waits in the loop. In the background is an Esso service station, known as Long Gully Motors, and a poppet head on a hillside in the background. Kodak cardboard mount slide, taken by Peter Moses, Jan. 1969.On the rear of the slide "P. Moses" in black ink and other side of the slide in red ink “4”.tramways, trams, bendigo, eaglehawk, long gully, esso, tram 3 -
 Ballarat Tramway Museum
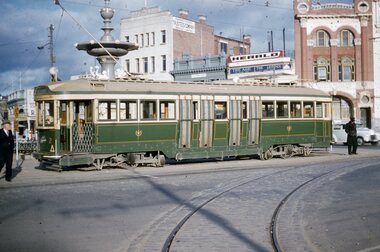
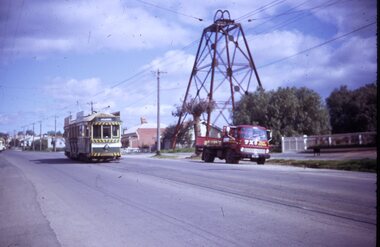
Slide - 35mm slide/s, Wal Jack, 3/09/1958 12:00:00 AM
Bendigo, bogie tram No. 2 standing alongside the fountain before proceeding to Eaglehawk. Tram fitted with small reflective triangles on front panels, all blinds drawn and gate closed. Has fountain in background and shops on the west side of Charing cross.'7 55 am Wed 3 Sept. 1958, Tram No. 2 at Fountain, Bendigo'tramways, trams, bendigo, tram 2 -
 Ballarat Tramway Museum
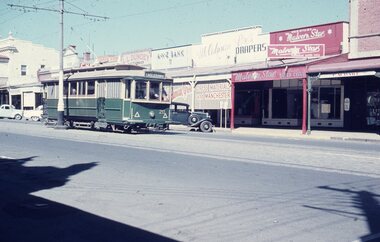
Slide - 35mm slide/s, Wal Jack, 12/04/1959 12:00:00 AM
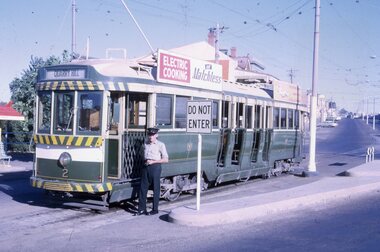
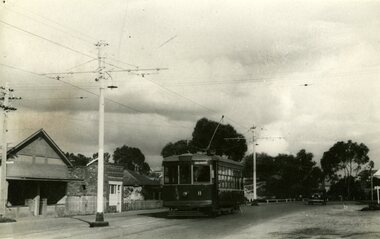
Bendigo, SEC No. 20 with Eaglehawk destination, travelling west along Mitchell St, 12-4-1959. Tram has small white reflective triangles placed on front panels, , blinds drawn, centre of the road poles visible, and some parked cars. Has various shops in view, eg ANZ bank, Malvern Star bicycles, Holdmans? Bros. drapers'Bendigo, No. 20, Mitchell St, 12-4-59, W.Jack Photo'tramways, trams, bendigo, tram 20 -
 Ballarat Tramway Museum
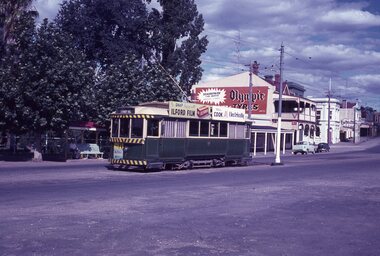
Slide - 35mm slide/s, Wal Jack, 6/01/1963 12:00:00 AM
Bendigo No. 7 at Eaglehawk tram terminus, 6-1-1963. Tram has been fitted with lights and warning stripes. On front panel is Hutton's hams, and roof ads for Ilford film and 'Cook with electricity'. In background is park, shops on the north side of the terminus, including a large 'Olympic' tyres advertisement. Tram has destination of 'Quarry Hill''Ex Ballarat 19, SEC Bendigo No. 7, at Eaglehawk terminus, 6-1-63'tramways, trams, bendigo, eaglehawk, tram 7 -
 Ballarat Tramway Museum
Photograph - Black & White Photograph/s - set of 2, State Electricity Commission of Victoria (SECV), c1950
Yields information about one of the first two maximum traction bogie trams in Ballarat in October 1945 after it had been repainted for use in Ballarat by the SEC and the Lake / depot area at the time.Black and white photograph of SEC (bogie No. 22), in Wendouree Parade passing depot junction, has destination of Victoria St. Tram later renumbered to 37 in 1951. (See Destination Eaglehawk, p7) Original of photograph, SEC held by Alan Bradley has been cropped. Had a canoe on the right hand side, which is referred to in the interpretation panel at the Gardens Loop 474.1 - shows the canoe. Additional copy of .1 added 21/3/20201,trams, tramways, ballarat, secv, bogie trams, depot junction. , tram 22, 37 -
 Ballarat Tramway Museum
Photograph - Black & White Photograph/s, Des Jowett, 1959
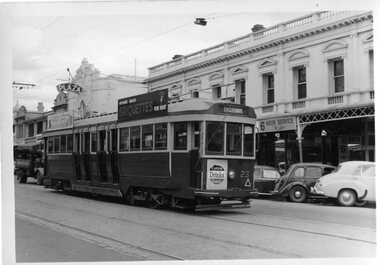
Black and white photograph of SEC Bendigo 23 in Mitchell St. Bendigo. Has destination of "Eaglehawk" On driver's cab, small ad for Cohn's drink and two roof ads, one for SEC briquettes and the other for a furniture store. Tram has not been fitted with dash canopy lights. Photo dated 1959. On Ilford paper.On rear in blue biro "Bendigo 1959" and D.F.Jowett stamp (see 626) in purple ink.trams, tramways, bendigo, mitchell st. , tram 23 -
 Ballarat Tramway Museum
Photograph - Black & White Photograph/s, John Alfred, late 1950's or early 1960's
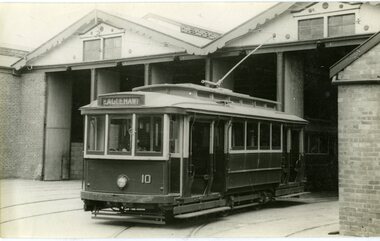
Black and white photograph of Bendigo No. 10 standing in front of the Bendigo depot building, late 1950's. Tram has the destination of Eaglehawk. Tram has been possibly run out of the depot for the photograph, as possibly seldom used. Tram scrapped by 1960. Taken by John Alfred. Photo printed on half weight paper. Page 96 of "Talking Trams" (Bendigo Trust 4/73), notes that Nos. 2, 10 and 13 were scrapped between 1951 and 1960.On rear written in black ink "Bendigo / No. 10" and on bottom edge, stamp "Photo by John Alfred / No." in red ink.tramways, trams, bendigo, depot, tram 10 -
 Ballarat Tramway Museum
Photograph - Black & White Photograph/s, John Alfred, late 1950's or early 1960's
Black and white photograph of Bendigo No. 11 at the eastern end of High St. Eaglehawk, late 1950's or early 1960's. Tram has the destination of Eaglehawk. Taken by John Alfred. Photo printed on half weight paper.On rear written in black ink "Eaglehawk / No. 11" and on bottom edge, stamp "Photo by John Alfred / No." in red ink.tramways, trams, eaglehawk, high st, tram 11 -
 Ballarat Tramway Museum
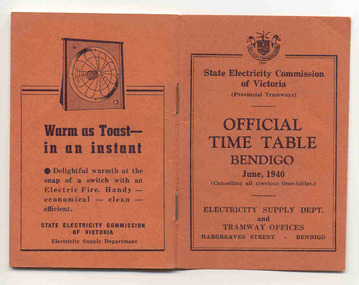
Ephemera - Timetable/s, State Electricity Commission of Victoria (SECV), "Official Time Table Bendigo June 1940", Jun. 1940
Centre pages show a map of the system and the sections. The extension to North Bendigo is yet to be constructed. Gives times for trams leaving the city or the terminals for the routes and for the Eaglehawk route, leaving Long Gully Bridge. Has four SECV Advertisements within the book for hot water, ovens - cookers, toasters and electric fan heaters. Three copies held. See item 5356 for a digital image of the same document with a photograph of Len Smith of Geelong loading a pram into a Birney tram.Provides details of 1940 tram services in Bendigo.Forty-page booklet, with orange lightweight covers, saddle-stapled, SECV Provincial Tramways with the title "Official Time Table Bendigo June 1940". Has address if Hargreaves St Bendigo on bottom of the cover. Two copies held.bendigo, timetables, secv -
 Ballarat Tramway Museum
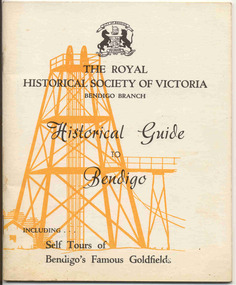
Book, Royal Historical Society of Vic - Bendigo Branch, "Historical Guide to Bendigo", 1968
Yields information about the appearance of SEC single truck trams during 1938. Has a strong association with Wal Jack.Book - 200gsm card cover - two colours, 36 pages off white paper printed with text and 8 pages of black and white photos printed onto gloss paper, centre stapled titled "Historical Guide to Bendigo". Published by the Royal Historical Society of Victoria Bendigo Branch, 1968. Contents: Derivation of the name of Bendigo, historical facts. mining guide, post offices, early Bendigo Hotels, Bendigo Tramways, Eaglehawk, the Lonely Grave. Has photos on the Battery Tram, Steam Tram and ESCo No. 2, Pall Mall, various mines, Golden Square and the Lonely Grave. Bendigo Tram item written by H. Biggs.On page 3 in black ink "Ballarat Tramway Preservation Society, Catalogue No. 119"trams, tramways, bendigo, eaglehawk, mining, post office -
 Ballarat Tramway Museum
Slide - 35mm slide/s - set of 8, Carolyn Dean, 24/09/1970 12:00:00 AM
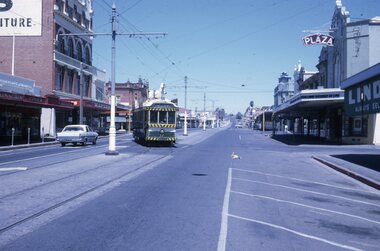
Set of photographs of operations, near the central area, in particular Charing Cross.Set of 13 Kodak slides, white cardboard of Bendigo trams. Taken 24.9.1970 by Carolyn Dean. .1 - "1" - No. 5 enroute to Eaglehawk passing former poppet head. .2 - "2" - Possibly No. 4 enroute to Eaglehawk - side on view (same ads shown on .4) .3 - "3" - View looking down onto Charing Cross from North East corner with single truck and Bogie car arriving. Has Ezywalkin, Maples and the Beehive buildings in the background. .4 - "7" - No 4, with destination of Eaglehawk, Mitchell St, near end of double track, with Shell Service station alongside. .5 - "8" - Alexandria Fountain, Charing Cross, with bogie tram behind. Has the Ezywalkin and The Beehive buildings in the view as well. .6 - "9" - No. 6 arriving at Charing Cross. Has the Ezywalkin and The Beehive buildings in the view as well. .7 - "10" - Bogie tram and single trucker at Charing Cross. Has the Ezywalkin and The Beehive buildings in the view as well. .8 - "11" - No. 7 departing ditto. Has the Ezywalkin and The Beehive buildings in the view as well. .Each slide has in corner a number in pencil and the first one the date of "24-9-70".tramways, trams, bendigo, charing cross, mitchell st, eaglehawk, tram 5, tram 4, tram 6, tram 7 -
 Ballarat Tramway Museum
Photograph - Black & White Photograph/s - set of 7, 16/04/1972 12:00:00 AM
Yields information about the final day of the Bendigo tramways and some of the tramcars used.Set of seven black and white photographs of the day Bendigo Tramways closed 16-4-1972. Taken on Agfa paper. Has printing date of 18.8.72 stamped on rear. All have been used for display purposes. .1 - 25 leaving the depot .2 - 2 at Charing Cross, bound for Eaglehawk - has Ezywalkin Store in background. .3 - 18 crossing another tram at a loop on the Eaglehawk line. .4 - 28 at Charing Cross showing Special .5 - 26 inside depot, with Borough of Eaglehawk sign on the front bumper and bunting around the tram. .6 - 29 leaving the depot .7 - 26 in the final parade, with "Destination Eaglehawk" on a roof mounted advertisement board, with the Beehive building in the background and Coca Cola advertisement on top of the building. Photographer not known.3549.8 - has "photo No. 8" on rear and been marked out for publication. tramways, trams, bendigo, closure, eaglehawk, tram 25, tram 2, tram 18, tram 28, tram 26, tram 29 -
 Ballarat Tramway Museum
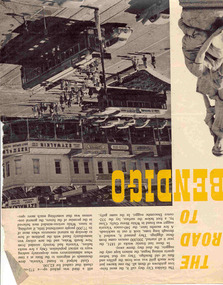
Newspaper, The Walkabout Magazine, "The Road to Bendigo", Oct. 1974
Yields information about the final day of the Bendigo tramways and some of the tramcars used.Three double sided sheets from "The Walkabout" magazine, October 1964, titled "The Road to Bendigo". Five printed pages featuring photographs of Bendigo, its buildings, its history stories, gold mining days and other information, including three illustrations containing trams. .1 - Charing Cross with bogies and single trucker - taken early 1960's. Photo by A. Doney. Features the intersection, with Ezywalkin store. Note the "Jeffrey's bread" roof advertisement on the single trucker. .2 - Bogie tram on the Eaglehawk route prior to any nearby housing development - reclaimed mining land - has Castrol roof advertisement - photo by Claver P Carroll. .3 - No. 6 outside The Beehive stores - 3BO - photo by Claver P Carroll. bendigo, eaglehawk, charing cross