Showing 318 items
matching garden st bridge
-
 Ballarat Tramway Museum
Photograph - Black & White Photograph/s, The Courier Ballarat, 21/11/1962 12:00:00 AM
Demonstrates nature and size of gang undertaking road repairs during 1962 in Bridge St. Lesser significance because quality of photograph - taken from a published photograph.Black and White copy photograph of a newspaper photograph taken by The Courier 21/11/1960, published on 22/11/1962 of track repairs in Bridge St during Ballarat Cup half-holiday.(copied from newsprint). Shows the nature of the work, but difficult to identify people. Collected by Alan Bradley from the Ballarat Courier early 1980's. See Excel file "Record of Ballarat Courier Photos SEC era" (Archive Documents) for source of details.On rear stamped "Copyright, The Ballarat Courier Proprietary Limited."tramways, trams, bridge st, road works -
 Ballarat Tramway Museum
Photograph - Black & White Photograph/s, The Courier Ballarat, 1/07/1964 12:00:00 AM
Yields information about the seemingly frequent derailment of bogie trams at this intersection and the people who travelled on the tram and alternative means of transport - walking. Also details information about the streetscape, clothing, and buildings.Black and White copy photograph of a newspaper photograph taken by The Courier - No. 40 derailed, Bridge & Main Sts corner, 1964. Photo taken 1/07/1964, published 2/07/1964 No. 40 bound for Mt Pleasant. Location Stones Corner. Has buildings in Bridge St in the background and part of Stones sign. Photo shows many people, passengers, from the single truck tram behind No. 40, walking up Bakery Hill towards Victoria St West. Ladies, Gents, shoppers, passengers, school children etc. Collected by Alan Bradley from the Ballarat Courier early 1980's. See Excel file "Record of Ballarat Courier Photos SEC era" (Archive Documents) for source of details.On rear stamped "Copyright, The Ballarat Courier Proprietary Limited."tramways, trams, stones corner, bridge st, derailments, accidents, passengers, tram 40 -
 Ballarat Tramway Museum
Photograph - Black & White Photograph/s, The Courier Ballarat, 4/09/1964 12:00:00 AM
Yields information about the seemingly frequent derailment of bogie trams at this intersection. Also details information about the streetscape, clothing, and buildings.Black and White copy photograph of a newspaper photograph taken by The Courier - No. 37 derailed, Bridge & Main Sts corner, 1964. Photo taken 4/09/1964, published 5/09/1964 No. 37 bound for Mt Pleasant. Location Stones Corner. Has Bridge St buildings in the background, including Stones signs, Verna Cake Shop, State Savings Bank and Caltex "Clean Rest Rooms" sign. Photo taken with two ladies and two children watching the event. Collected by Alan Bradley from the Ballarat Courier early 1980's. See Excel file "Record of Ballarat Courier Photos SEC era" (Archive Documents) for source of details.On rear stamped "Copyright, The Ballarat Courier Proprietary Limited."tramways, trams, stones corner, bridge st, derailments, accidents, passengers, tram 37 -
 Ballarat Tramway Museum
Photograph - Black & White Photograph/s, The Courier Ballarat, 25/04/1966 12:00:00 AM
Yields information about the seemingly frequent derailment of bogie trams at this intersection although this one was an in bound tram. Also details information about the streetscape, and buildings.Black and White copy photograph of a newspaper photograph taken by The Courier - No. 39 derailed, Bridge & Main Sts corner, in bound from Mt. Pleasant. No. 11 awaiting passengers. Photo taken 25/4/1966, published 26/4/1966 Location Stones Corner. Has Bridge St buildings in the background, including Stones signs, Gear Chemist, advertisements for Astor, Turf, Pye, and Suppland. Collected by Alan Bradley from the Ballarat Courier early 1980's. See Excel file "Record of Ballarat Courier Photos SEC era" (Archive Documents) for source of details.On rear stamped "Copyright, The Ballarat Courier Proprietary Limited."tramways, trams, stones corner, bridge st, derailments, accidents, passengers, tram 39 -
 Ballarat Tramway Museum
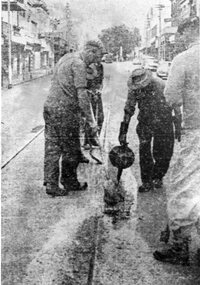
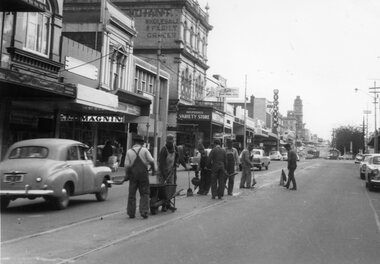
Photograph - Black & White Photograph/s, The Courier Ballarat, 20/09/1966 12:00:00 AM
Demonstrates nature and size of gang undertaking road repairs during 1966 in Bridge St and the buildings on the south side of the street.Black and White copy photograph of a newspaper photograph taken by The Courier, taken 20/9/1966, published 21/9/1966 of track repairs in Bridge St. Shows the nature of the work, and the level of the traffic in the streets at the time. Eight men working in the view. In the background are the buildings on the south side of Bridge St, including Magnin, a Disposal Variety store, Faull's Foot rest, and Dickins. In the far distance are two trams parked in the loop. Collected by Alan Bradley from the Ballarat Courier early 1980's. See Excel file "Record of Ballarat Courier Photos SEC era" (Archive Documents) for source of details.On rear stamped "Copyright, The Ballarat Courier Proprietary Limited." and "85%" in ink.tramways, trams, bridge st, road works -
 Ballarat Tramway Museum
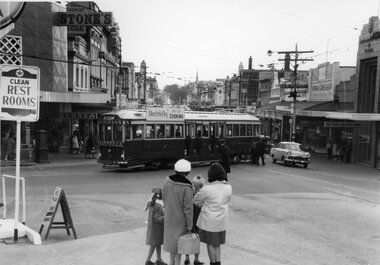
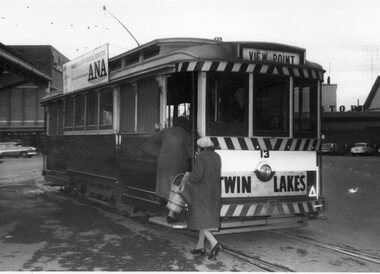
Photograph - Black & White Photograph/s, The Courier Ballarat, 19/07/1968 12:00:00 AM
Yields information about the tram stop at the east end of Sturt St, advertisements on the tram and the way the stop was used.Black and White copy photograph of a newspaper photograph taken by The Courier, published 19/7/1968 of No. 13 picking up passengers, Sturt & Grenville Sts corner, after Govt announced intention to close Ballarat & Bendigo systems. Tram has the destination of View Point, a "Twin Lakes" sign and a roof advertisement for ANA medical services. Two lady passengers, one with a shopping basket boarding the tram. In the background are Morsheads and Dickins stores. See Reg Item 2921 for the Newspaper cutting the photograph used in. Collected by Alan Bradley from the Ballarat Courier early 1980's. See Excel file "Record of Ballarat Courier Photos SEC era" (Archive Documents) for source of details.On rear stamped "Copyright, The Ballarat Courier Proprietary Limited."tramways, trams, bridge st, grenville st, sturt st, twin lakes, tram 13 -
 Ballarat Tramway Museum
Photograph - Black & White Photograph/s - set of 2, The Courier Ballarat, 6/03/1969 12:00:00 AM
Yields information about the nature of operating a tramway system in Ballarat, collisions with motor cars. Shows the accident and the clean up process.Black and White copy photograph of a newspaper photograph taken by The Courier, photo taken 6/03/1969, published 6/04/1969? - No. 18 derailed after collision with a Holden motor car at the intersection of Grenville and Bridge Sts, looking east, close-up of damaged car. 3751.2 - not published. Shows Policeman, tow truck, tow truck operator and tram and onlookers. Tram had the destination of Mt Pleasant. Dickins and Neptune signs in the photo. Collected by Alan Bradley from the Ballarat Courier early 1980's. See Excel file "Record of Ballarat Courier Photos SEC era" (Archive Documents) for source of details.On rear stamped "Copyright, The Ballarat Courier Proprietary Limited."tramways, trams, bridge st, accidents, derailments, tow trucks, tram 18 -
 Ballarat Tramway Museum
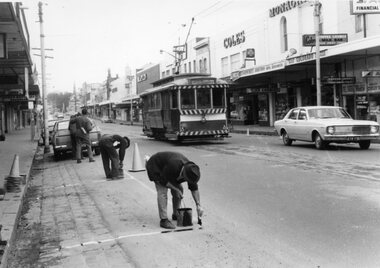
Photograph - Black & White Photograph/s, The Courier Ballarat, 19/08/1971 12:00:00 AM
Yields information about the work preparations for the introduction of buses following the cessation of the tram service - provision of bus stops and the loss of car parks.Black and White copy photograph of a newspaper photograph taken by The Courier - published 19/8/1971 of No. 13 in Bridge St while workmen prepare bus stop on the south side, near Peel St. Has Coles, Maples, Amcal Chemist, Colorado Coffee Lounge, AVCO financial services in the view. See Reg item 1069 for newspaper article that the photo was used in. Collected by Alan Bradley from the Ballarat Courier early 1980's. See Excel file "Record of Ballarat Courier Photos SEC era" (Archive Documents) for source of details.On rear stamped "Copyright, The Ballarat Courier Proprietary Limited."tramways, trams, bridge st, bus stops, closure, tram 13 -
 Ballarat Tramway Museum
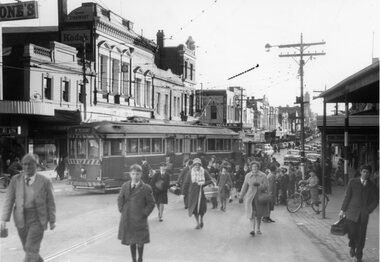
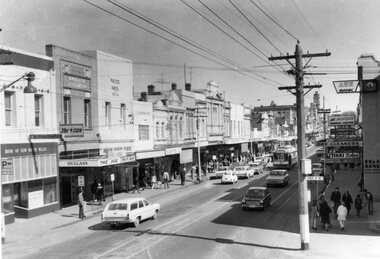
Photograph - Black & White Photograph/s - set of 2, The Courier Ballarat, Sep. 1971
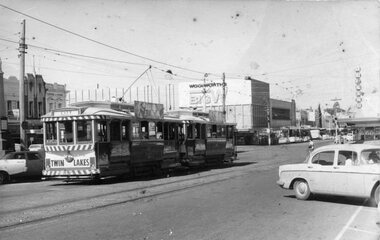
Yields information about the nature of the street scene in Bridge St prior to closure of the system, showing the traffic, people getting off a tram and the buildings. One photo used in the Courier Supplement to mark the closure of the system.Black and White copy photographs of a newspaper photograph taken by The Courier - published 20/9/1971 in the Courier supplement of No. 32 inbound in Bridge St. Possibly taken early September 1971, prior to closure of Mt Pleasant. Both photographs very similar, tram has moved off from stop in the 2nd one. Shows Bank of New South Wales, Gallants News Agency, Walter Davis Pty Ltd, E. Glitch, ANZ Bank (ES&A) buildings. Also has signs for AVCO financial services, Tikki Salon and a Dry Cleaner. Taken from the east side of Peel St. Photo used in the Courier Supplement following the closure of the tramways. Collected by Alan Bradley from the Ballarat Courier early 1980's. See Excel file "Record of Ballarat Courier Photos SEC era" (Archive Documents) for source of details.On rear of 4772.2 stamped "Copyright, The Ballarat Courier Proprietary Limited."tramways, trams, bridge st, peel st, tram 32 -
 Ballarat Tramway Museum
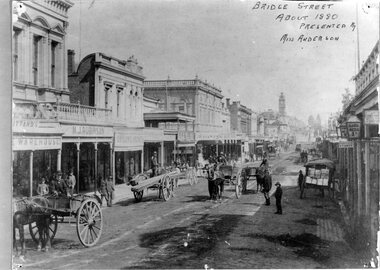
Photograph - Black & White Photograph/s, 1880's
Yields information about the streetscape of Bridge St about 1880, prior to trams, with horse drawn carts and gravel streets and businesses.Black and White copy photograph of a Gold Museum photograph - Bridge St, about 1880. Looks from intersection with Main St to the west. Shows many horse drawn carts, people, gravel paved streets with bluestone gutters. Buildings in the image - Pittards Warehouse, M.J. Robinson and Shilling Arcade. On the right hand side are three lamps, one with a sign "Good Beds 1s". Original photograph (not in book) has a handwritten note "Bridge St about 1880 presented by Miss Anderson." Has pins hole showing in the original print. Collected by Alan Bradley from the Gold Museum early 1980's. Used in The Golden City and its Tramways - page 8.tramways, trams, bridge st, horse drawn vehicle, main st -
 Ballarat Tramway Museum
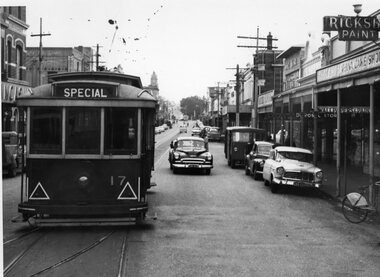
Photograph - Black & White Photograph/s, State Electricity Commission of Victoria (SECV), late 1950's or early 1960
Yields information Bridge Street and the buildings at the junction with Main and Victoria St / Stones corner. Tram parked for some particular reason - see 3807.1 to .3 for a similar set of photographs. Shows shops and cars.Black and White photograph, No. 17 at Stone Corner, intersection of Bridge and Main Streets Ballarat. Parked just past the junction points - reason unknown, see also Reg Item 3803, 3807.1 to 3807.3 - for other photographs of the tram at the same location. Photo late 1950's or early 1960. Also has a number of interesting motor vehicles in the background. In the background a Ricksha Paints (pronounced Rickshaw), Allen's Vernal Cake Shop, Junction Shoes. Roddas, ANZ and the English Scottish Bank of Australia buildings in the view. tramways, trams, bridge st, stones corner, tram 17 -
 Ballarat Tramway Museum
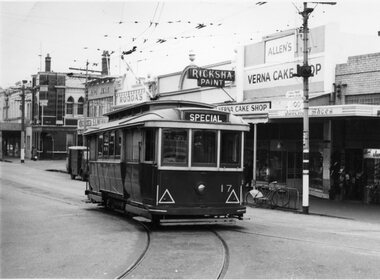
Photograph - Black & White Photograph/s, State Electricity Commission of Victoria (SECV), late 1950's or early 1960
Yields information Bridge Street and the buildings at the junction with Main and Victoria St / Stones corner. Tram parked for some particular reason - see 3807.1 to .3 for a similar set of photographs. Shows shops and cars.Black and White photograph, No. 17 at Stone Corner, intersection of Bridge and Main Streets Ballarat. Parked just past the junction points - reason unknown, see also Reg Item 3802, 3807.1 to 3807.3 - for other photographs of the tram at the same location. Photo late 1950's or early 1960. In the background a Ricksha Paints (pronounced Rickshaw), Allen's Verna Cake Shop, Junction Shoes. Roddas, ANZ and the English Scottish Bank of Australia buildings in the view. Also the signal for incoming trams from Main St, on the post with the tram stop. tramways, trams, bridge st, signals, stones corner, tram 17 -
 Ballarat Tramway Museum
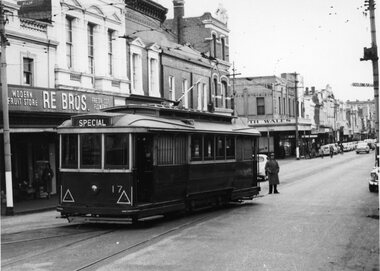
Photograph - Black & White Photograph/s, State Electricity Commission of Victoria (SECV), late 1950's or early 1960
Yields information Bridge Street and the buildings at the junction with Main and Victoria St / Stones corner. Tram parked for some particular reason - see 3802 and 3803 for a similar set of photographs. Shows shops and cars.Set of three Black and White photographs, of No. 17 at Stone Corner, intersection of Bridge and Main Streets Ballarat. The tram is parked in a number of slightly different positions with the same gent in an overcoat behind the tram - reason unknown. See also Reg Item 3802 and 3803 for a two similar photographs but without the gent. Possibility of an accident investigation. In the background are RE BROS fruit shop, Bank of New South Wales and Lancashires. tramways, trams, bridge st, stones corner, tram 17 -
 Ballarat Tramway Museum
Slide - 35mm slide/s, Eldon Hogan, Sep. 1971
35mm Agfa colour blue and white plastic mount slide - photo of Ballarat No. 37 crossing Grenville St, from Bridge St, with the Destination of "City". Has the Dickins Food Store in the background. Photo taken Sept. 1971?. Photos Eldon Hogan. tramways, trams, bridge st, grenville st, tram 37 -
 Ballarat Tramway Museum
Book, Nu-color-vue or Nucolorvue Productions, "Victoria The Land of Enchantment", c1950
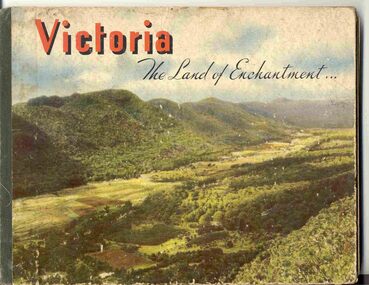
Book with hardcovers, 48 pages titled "Victoria The Land of Enchantment". Sewn in three sections, with a green strip of cloth and self end papers and printed outer paper, sides glued onto board covers. Consists of 43 colour photographs (full and half page) with captions, detailed text, and two black and white photos printed in blue on end covers. Photos of Mt Buffalo, Gippsland lakes, Mornington Beach, Yarra River, Flinders St. station from the Yarra, Collins and Spring St (with two W2's - see image No. 2), Parliament House, Kiewa Hydro scheme, Eildon Weir, Swan Hill Murray River Bridge, Bendigo Post Office, Melbourne Botanical Gardens, Ballarat - Grenville and Sturt St (No. 22 - see image No. 3), Lorne, Yallourn Power Station, Hume Weir, Maroondah Weir, Great Ocean Road, Warrnambool, Portland Beach, A timber train (see image No. 4), Mildura, flax mills, Eastern Geelong and the Prime Ministers Ave, Ballarat. Produced by Nucolorvue Productions, c1950. See also Reg Item 2925 for the same photo of No. 22 and Reg Item 5354 for a postcard. Purchased via eBay site - see attached sheets and packing slip. Purchased 10/2/2005 for A$12.50 including postage, from Virginia Georgopoulos of West Brunswick. eBay sheets and envelope with worksheet file. Has Swains 123 Pitt St, Sydney sticker on bottom left hand corner page 2trams, tramways, ballarat, sturt st, grenville st, bogie trams, geelong, bendigo, melbourne -
 Ballarat Tramway Museum
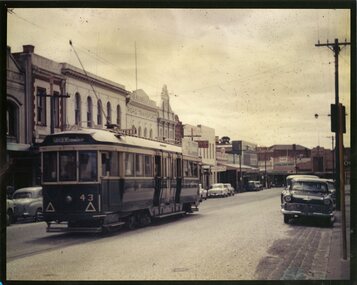
Photograph - Colour Photograph/s, Jim Seletto, c1958?
Colour photograph of SEC 43 in bound along Main St. ex Mt. Pleasant. Photograph prior to 1960. Photo looking towards the intersection of Main and Bridge St. Tram has the destination of Gardens via Drummond St. Nth.ballarat, mt pleasant, main st, tram 43 -
 Ballarat Tramway Museum
Photograph - Black & White Photograph/s, John Phillips, 26/01/1981 12:00:00 AM
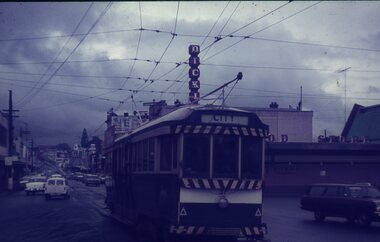
Yields information about one of the two visits to Melbourne for the Australia Day Parade of one of the Museum's trams.Black and White photograph of BTM No.27 operating in Flinders St. near intersection with William St. Melbourne during Australia Day 1981 - 26/1/1981 - see March 1981 issue of Fares Please!. Carolyn Dean driver. Photo John Phillips. Tram has destination of "CITY" and an auxiliary board "Spencer St Rly Station" and Twin Lakes sign. In the background is the Flinders St. railway bridge. Two copies held. See Reg Item 7402 for another photo of the tram in Flinders St. tramways, trams, btps, flinders st, australia day, tram 27 -
 Ballarat Tramway Museum
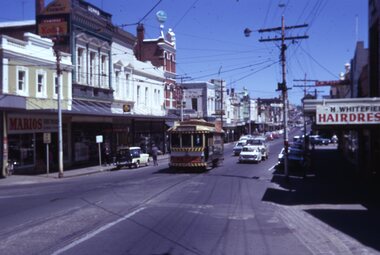
Slide - 35mm slide/s, Carolyn Dean, 3/11/1970 12:00:00 AM
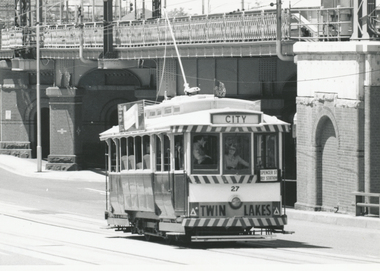
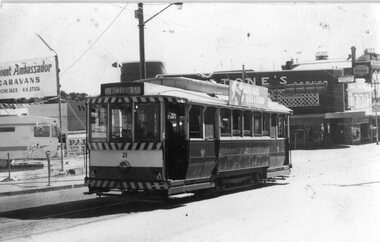
Shows trams in Bridge St at the junction.Kodak slides, white cardboard Taken 3.11.1970 by Carolyn Dean. No. 27 in Bridge St, approaches the junction. No. 27 has a Twin Lakes sign. Not well focused poor depth of field. Has signs for Mario's and H. Whitefield Hairdressers signs in photo. ."3-11-70" in ink on slide.tramways, trams, ballarat, bridge st, tram 27 -
 Ballarat Tramway Museum
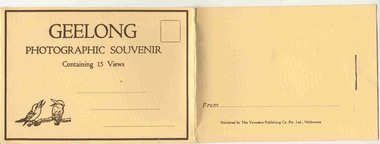
Postcard - Folder set, Valentine & Sons Publishing Co, "Geelong Photographic Souvenir", early 1920's
Shows views of the Geelong CBD and beach area in the 1930's including one tram photo and two other photos of trams in the street and the centre poles which were later removed. Demonstrates production of souvenirs of the era - folded postcards. The photos could also be used for individual postcards.Set of 15 black and white views of Geelong printed on a folded strip, glued within a manila colour cardboard folder, titled "Geelong Photographic Souvenir". Booklet printed with an address area with title and kookaburras and on the rear, an area where the sender could write their name. Produced by The Valentine Publishing Co. Pty Ltd Melbourne. The rear has a slit on the rear cover that allowed the folder to be secured. Pictures are: 1. Panorama of Eastern Beach Geelong 2. Eastern Beach Gardens 3. Eastern Beach 4. Ryrie St with centre poles and a tram in the distance. 5. Botanic Gardens 6. Johnstone Park 7. Gordon Technical College 8. Moorabool St. - with poles in street, single line track and tram in far distance. 9. Eastern Beach and Wharves 10 T and G Building 11 The Fountain, Eastern Beach 12 Town Hall and Post Office 13 Baron bridge - just prior to opening - roadway construction appears to be underway. 14 Malop St with tram (10?) in foreground 15 View of Johnstone Park. Made during 1930's given motor cars in the photo. trams, tramways, geelong, postcards, malop st, town hall, post office, gardens -
 Ballarat Tramway Museum
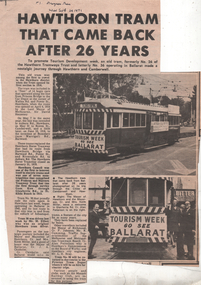
Newspaper, Progress Press, "Hawthorn Tram that came back after 26 years", Sep. 1971
Provides the story about the visit of No. 36 to the cities of Hawthorn and Camberwell 22/9/1971. Has photo of tram with "Tourism Week Go See Ballarat" banners and photo of the tram in St Kilda Road (at Princes Bridge), Melbourne. Quotes Cr Chisholm of Ballarat. Notes the Hawthorn Tramway Trust and that the tram would be based at Preston Depot for tours. See also Reg. Item 3173.Presents the story of tram No. 36 after it left Melbourne, operated one trip only in Melbourne and then was given to the TMSV later on. Gives relevance of the tram to Melbourne.Newspaper clipping, from the Progress Press 29/9/1971 -titled "Hawthorn Tram that came back after 26 years".2nd copy has the date and newspaper on the top of the sheet.hawthorn, melbourne, ballarat tourism -
 Ballarat Tramway Museum
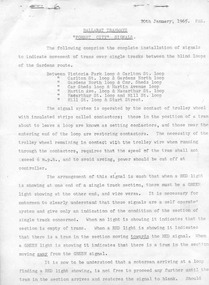
Document - Instruction, State Electricity Commission of Victoria (SECV), "Forest City Signals", 20/01/1965 12:00:00 AM
Significant in being a detailed set of instructions for the Forest City signalling system that was operated by the tram's trolley pole. Details of the locations and crossing loops where used, primarily around the loop and through Bridge St. and how it operated. Prepared and printed by the SEC during 1965.Five page, foolscap duplicated document, stapled in two locations along the top edge, titled Forest City Signals, and dated 20-1-1965, giving details about the Forest City signalling system installed in Ballarat. Explains how the system operates, gives instructions, details of the system, location of the loops, trams following each other, power failure. Also gives details of how the Bridge St system operated and the switch at Grenville St. Gives instructions for running out of the depot. Note: The locations of the signals are not as detailed as in the Driver Training Manual - See Reg Item 3486 See also Reg Item 5373 for another similar copy and fully scanned copy.trams, tramways, signals, crossing loop, forest city signals, grenville st, wendouree parade -
 Ballarat Tramway Museum
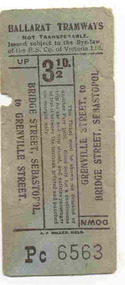
Ephemera - Ticket/s, J. J. Miller, ESCo 3 1/2d ticket, early to mid 1920's
Demonstrates aspects of the Ballarat Tramways ticketing system and how tickets were printed for specific uses, this for use between Bridge St Sebastopol and Grenville St. Issued 1920's or 1930's.Three pence halfpenny, 3 1/24d ticket on a light green colour, light weight card stock used by ESCo c1920, Number Pc 6563, has been printed for specific use between Grenville St and Bridge St Sebastopol. Printed by J. J. Miller Melb. Printing in black ink. Has been nipped or cancelled for the trip from Sebastopol.trams, tramways, tickets, sebastopol, esco -
 Ballarat Tramway Museum
Photograph - Black & White Photograph/s, early 1950's?
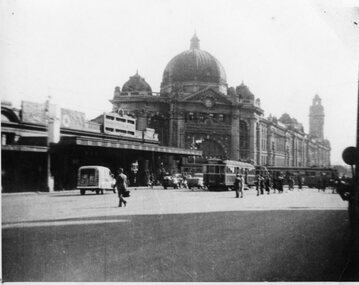
Yields information through a photograph of Flinders St in of the nature of traffic in the 1950's. Shows both railway station buildings and traffic. Black and white photograph of a scene in Flinders St Melbourne, during the 1950's, showing Flinders St and Princes Bridge Railway Station. Shows W2's in Flinders St and Swanston St, a few motor vehicles, but many people. Photographer unknown.tramways, trams, flinders st station, mmtb, princes bridge station -
 Ballarat Tramway Museum
Film - Movie Film & Box, Kodak, 1960
Yields information in movie film format of Ballarat trams in 1960, how the system operated and was used by people., Yields information in movie film format of Ballarat trams in 1960, how the system operated and was used by people.Movie film - 8mm, approx. 30mins, with leader strip on a plastic reel, within a black and white plastic box, titled "Ballarat No. 1. 1960". Has been transferred to DVD - see Reg item 4100 as Segment No. 2. Made by Ben Parle. Also transferred to DVD by Rod Cook Oct. 2015, via Roger Greenwood for use in his DVD, "The City of Ballarat Trams, Gardens & Gold" of 2016. See Reg Item 6883. Synopsis: based on time. 0:00 View of typed introduction, noting that this is a pictorial record of Ballarat. 0:10 Title “The Tramways of Ballarat 1960, Part 1” 0:16 13, showing “View Point” at Stones Corner, Bridge St, east end, with trolley pole being turned, while another single trucker heads out towards Mt Pleasant. 0:25 13 leaving Stones Corner, short approach and then longer trailing shot of the tram going towards the City in Bridge St. 0:44 View out of front of tram in Bridge St heading towards the City, with cars in the photo, then passing through city Loop, no trams in the loop and running up to Lydiard St Nth and crossing the road. 1:22 Running up Sturt St from Armstrong St, passes over Dawson St X-over and up to the next intersection, Lyons St. 1:54 Title “The View Point Line” 1:59 19 inbound, in Ripon St, from crossing Mair St, towards camera and then passing away and turning into Sturt St. 2:49 View of a “Warning Oncoming Trams” sign 2:52 19 in Ripon St, going to View Point, crossing Webster St towards camera, then going away through the disconnected Victoria Ave loop, pass the “Warning Oncoming Trams” sign. Note very windy scene with people running across roads. 3:17 19 in Wendouree Parade, in bound, though showing destination View Point, going away from the camera, past the View Point Hotel. 3:39 19 coming towards camera near Excerpt or Devon St and then going away towards the terminus. 4:04 19 at the terminus, stationary, with a single trucker 3?, passing from Macarthur St into Wendouree Parade, behind 19. 4:20 33 coming towards camera in Wendouree Parade from St Aidans Drive, stopping to pick up passenger at Forest St and then going away towards the City, photographed from near the depot, on a wet and windy day. 4:54 35 in Wendouree Parade, coming towards the Camera from St Aidans Drive and then going away with the Gardens Loop area in the background. Tram stops at stop to let a passenger off. 5:28 21 leaving Gardens Loop for the City via the Depot, green light in signal can be seen. 5:43 28?, closely followed by 26 turn from Drummond St South into Sturt St. 6:18 Scene opens with shot of “Sebastopol” destination on a bogie tram. 6:21 Title “The Sebastopol Line” 6:24 21 turning from Sturt St into Drummond St Sth with destination of Bell St and then going away from the camera. 6:55 38 in Drummond St Sth, coming towards the camera and then passing the camera with Sturt St just in the view. 7:10 21, showing Gregory St, in Drummond St Sth, approaching and then going away, entering the Urquhart St Loop, 7:39 34 in Drummond St Sth (location check required (Latrobe?)), approaches camera, picks up passengers and the goes away. 8:09 39 at ? Street, turns from Drummond St Sth into Skipton St, after picking up and setting down passengers, bound for Sebastopol 8:55 35 inbound in Skipton St passes through the Bell Street Loop, and then goes away from the camera. 9:33 42 outbound in Skipton St, approaches the camera, passes and then crosses over the half the road into Albert St. 10:00 39 inbound in Albert St – location? 10:31 34 outbound for Sebastopol, approaches camera and just starts to pass by. 10:36 34 in Grey St crossing loop, crosses 42 inbound. 10:59 39 outbound in Albert St, with shopping centre in bound, approaches camera, passes and then crosses over Albert St. Mid morning scene. 11:39 39 inbound, Albert St south, approaches camera and then passes and the crosses over Albert St. 12:16 41 outbound in Albert St passes the camera, and pulls into the terminus with the conductor getting out on the back bumper to pull the pole down as the tram stops and a passenger walks into the Royal Hotel. 12:39 Title “The Lydiard Street North Line” 12:44 Filmed from the Hotel balcony, 21 inbound in Lydiard St Nth passes over Mair St, stops while 33 passes in the other direction. 13:18 With the red light showing on the Seymour St loop signal, 33 inbound for Sebastopol stops and picks up many passengers, passes the camera and runs past the VRI building in the background and through the loop. Possibly filmed on a Sunday given the ladies dresses and quieter streets. 14:01 30 outbound, passes the camera and stops at Macarthur St. Filmed alongside the brick wall of the cutting. 14:28 30 inbound arrives, passes through the Gregory St loop and then proceeds past the camera, making a stop to pick up passengers. 15:14 28 in Lydiard St Nth – location?, approaches and goes away from the camera, north of Gregory St. 15:34 28 ditto location? 15:53 21 arrives at the terminus with passengers getting on and off. 16:11 View of the a vertical positioned “End of Section” sign on a pole at the terminus and then lifting the camera to see the timetable board and the stop sign. 16:33 31 in Bridge St passing Morseheads and then turning into Sturt St, stops at the Grenville St stop, while another single trucker comes down to the stop from the City. 16:58 31 outbound in Bridge St, with destination of Victoria St. 17:14 Title “The Victoria Street Line” 17:18 31 outbound to Victoria St from Stones Corner. Starts with an overhead shot, shows clock at the Caltex service station,. 17:37 31 inbound approaching Bakery Hill and then descending to the junction after it passes camera. 18:09 25 climbing outbound in Victoria St, passing the camera, to then pass through the King St loop. 18:47 25 inbound in Victoria St, passing the camera, then pass through the King St loop, with St Alypius Church in the background. 19:36 14 approaching the rail bridge in Victoria St and stopping at the 2nd last stop to left of passengers. 20:01 14 leaving the terminus and approaching the camera and the a short sequence going away, to the next stop to pick up quite a few passengers. 20:14 “Trams Stop Here” sign, metal wrap around on a steel pole. 20:16 Title “The Mount Pleasant Line” 20:21 11 inbound in Main St, with a passenger leaping off the tramcar and another getting off just before the junction. 20:45 11 passes the junction and then proceeds away from the camera in Bridge St. 21:04 30 outbound in Main St, then turns into Barkly St, a bus (Eclipse Motors) passes in Main St just before the sequence ends. 21:31 30 inbound near Steinfield St. (exact location?) 21:49 25 approaches the camera, then proceeds away and passes through the Grant St. loop. 22:29 25 inbound, windy day, between Grant and Cobden, (exact location?), with a horse drawn bread van in the view and the breadman walking behind the tram as it passes. 23:02 11 outbound in Barkly St, (exact location?) 23:37 11 inbound in Barkly St (exact location?) 23:44 Mt Pleasant terminus signage 23:50 30 approaches the terminus and then stops with the conductor alighting turning the pole, passengers getting on and off and the driver appearing at the other end. 24:32 Title “The Gardens Via Sturt St. West Line” 24:35 21 outbound in Sturt St near Raglan St, approaches and passes the Camera. 25:09 12, showing City Oval, approaches and passes the camera, outbound near Windermere St. 25:33 13 showing View Point, goes away from the camera – location? 25:44 12 comes from St. West, inbound passes the camera and then stop as the next stop next Talbot St? 26:21 Short sequence of a “Warning Oncoming Trams” sign 26:28 42 inbound in Sturt St West, just before Ripon St, view coming towards camera and then going away to cross Ripon St. 27:10 34 passes through the Parker St loop 27:25 35 or 39 inbound past the college in Sturt St West 28:04 41 outbound at the Russell St curve, passes away from the camera. 28:11 35? inbound passes away from the camera through the Victoria Park or Morrison St loop, swinging out into the roadway. 28:29 View of timetable sign at Hamilton Ave. 28:37 35 turning from Sturt St West into Hamilton Ave, can see the conductor changing over the barrier rails. 29:11 42 inbound, crosses another bogie tram (35?) at Carlton St loop then passes the camera and goes past the Olympic rings monument. 29:42 12 approaches the Carlton St gates. 30:07 12 outbound, crosses a bogie tram in the loop with both trams then leaving the loop. 30:20 Title “End of Part One” Written labels giving title information on outside of box.trams, tramways, ballarat, sebastopol, lydiard st north, victoria st, mt pleasant, sturt st west -
 Ballarat Tramway Museum
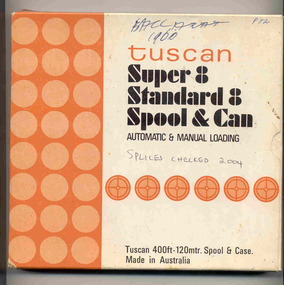
Film - Movie Film & Box, Kodak, 1960
Yields information in movie film format of Ballarat trams in 1960, how the system operated and was used by people., Yields information in movie film format of Ballarat trams in 1960, how the system operated and was used by people.Movie film - 8mm, approx. 17.5 mins, with leader strip on a plastic reel, within a black and white plastic box, titled "Ballarat No. 1. 1960" contained with a cardboard box, 'Tuscan Super 8 and Standard 8 Spool and Can' . Has been transferred to DVD - see Reg item 4100 as Segment No. 1. Filmed and made by Ben Parle. Also transferred to DVD by Rod Cook Oct. 2015, via Roger Greenwood for use in his DVD, "The City of Ballarat Trams, Gardens & Gold" of 2016. See Reg Item 6883. Synopsis: based on time. 0:00 Starts with bogies cars crossing railway level crossing (34?, 39?) 0:30 SEC Logo 0:45 Ballarat Station sign and intro “Some City Scenes” 0:49 35 turning from Lydiard St Nth to Sturt St towards Grenville St with Commonwealth Bank in view. and then 42 returning 1:19 42 showing Mt Pleasant, turns from Sturt St into Lydiard St Nth 1:53 Tramway road works in Lydiard St Nth, near intersection with Mair St with Jelbart Road roller in use, starts with an SEC roadworks sign. 2:12 39 passing the works out bound to Lydiard St Nth. 2:46 Good view of the roller working before 35 arrives. 3:01 35 passing the works in bound with 3:29 14 crossing Lydiard St in Sturt St, towards Grenville St 3:47 Trams in City Loop 3:55 21 coming up the hill 4:04 31 entering Bridge St from Sturt St with Bucks Head Hotel in the background. 4:27 Overhead work at corner of Sturt and Lydiard, with view of the sign at the City terminus “Trams leave here for Sebastopol, Gardens, View Point.” 4:34 Passengers getting off and then onto 38, ex Lydiard St Nth at city terminus including a young lady wearing gloves and a wheeling a pram hurriedly the photographer. A number of other prams in the view as well as. The Conductor helps to unload the pram. 5:07 41 proceeding up Sturt St, appears to have just rained. 5:26 11 using the Dawson St crossover, with a motor car doing a U turn as well. 6:00 14 descending Sturt St towards the City, filmed at Dawson St. 6:11 Title “The Gardens via Drummond St North Line” 6:16 19 showing Victoria St, turning from Drummond St Nth into Sturt St. 6:28 30 inbound in Drummond St Nth, approach and trailing shots. Trailing shot ahs the hospital in the background. 6:49 31 outbound, Drummond St Nth, approach and trailing shots, trees are in autumn colours. 7:04 12, inbound Drummond St Nth, with Macarthur St in the background, stopping to pick up a lady, approach and trailing shots and then entering the Mill St crossing loop. 7:53 14 outbound in Drummond St Nth, dropping a lady passenger off and then turning into Macarthur St and then tram going away. 8:37 View of overhead junction at View Point Jtn. 8:45 View of “Cars Stop Here” sign and pole sign “To City Only” 8:55 30 inbound in Wendouree Parade, stops to pick up passenger, and then a trailing shot of tram entering Macarthur St loop 9:37 View of “Cars Stop Here”, “End of Section” and timetable boards at Haddon St. 9:50 34, pausing at Haddon St and then proceeding towards depot – approach and trailing shots, with “Warning Oncoming Trams” sign in shot. 10:27 “Warning Oncoming Trams” sign 10:32 34 crossing 12 at the Martin Ave loop 10:48 39? Wendouree Parade, near Barrett Ave, stopping and letting off passengers. 11:24 30 passing depot junction and then trailing shot of it entering Tram Sheds or Depot Loop and then proceeding towards the City. 12:11 Shot of the “Caution Beware of Trams” sign at the depot. 12:14 25 stopping at depot junction and then trailing shot of it going toward Forrest St. 12:47 12 passing Depot Junction, trailing shot. 13:07 Shot of :Electricity Supply Department, Ballarat Branch” sign at depot. 13:13 View of a destination showing “Depot” on a bogie tram 13:15 Title “Some Depot Scenes” 13:19 View of a trolley pole and then 13 leaving the depot through the gates, destination showing “View Point”. 13:54 View of trolley pole and then 32 stopping at the depot gates. 14:08 12 (Sunny view) running out onto Wendouree Parade and then a bogie tram approaching Depot Loop. 14:43 View of 42 running in with a single trucker behind in Wendouree Parade, and another single trucker running out. 15:02 Title “Some Scenes in the Gardens” 15:05 25 running through the Gardens, approach and trailing shots, near our Depot Junction. 15:55 View of “No Parking East of Loop” sign 15:59 View of overhead and then trackwork (with points removed), but overhead still in position at the Old Gardens Loop or Gardens South Loop and then 12 entering the loop from the south and then a trailing shot looking along the Parade. 16:33 View of “Cars Stop Here” and “End of Section” and then timetable boards at Gardens Loop. 16:55 View of 34 leaving the loop 17:14 Title “The End”Written labels giving title information on outside of box.trams, tramways, ballarat, sebastopol, lydiard st north, victoria st, mt pleasant, sturt st west -
 Ballarat Tramway Museum
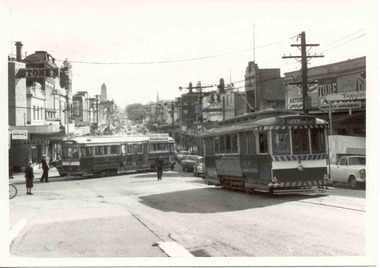
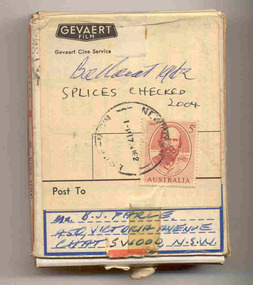
Film - Movie Film & Box, Gevaert, 1962
... Ballarat Gardens Victoria St Bridge St Sturt St tram 18 tram 37 ...Yields information in movie film format of Ballarat trams in 1962, a enthusiast tour, how the system operated and was used by people., Yields information in movie film format of Ballarat trams in 1962, a enthusiast tour, how the system operated and was used by people.Movie film - 8mm, approx. 4.15mins, with green leader strip on a plastic reel, within a Gevaert film cardboard box, with a Harvin Film Laboratory r, Marrickville NSW label and address to B.J. Parle, Chatswood and a 5d stamp. Titled "Ballarat 1962". Has been transferred to DVD - see Reg item 4100 as Segment No. 6. Filmed and made by Ben Parle. Also transferred to DVD by Rod Cook Oct. 2015, via Roger Greenwood for use in his DVD, "The City of Ballarat Trams, Gardens & Gold" of 2016. See Reg Item 6883. Synopsis: based on time - Black and White film Title "Ballarat 1962" 0:00 37 departing City Centre in Sturt St, east bound, followed by 18 0:23 18 and 37 arriving into City Loop from Bridge St. 0:40 18 and 37 passing through the Gregory St Loop 0:54 18 and 37 arriving and at Lydiard St Nth terminus 1:15 18 and 37 in Lydiard St Nth 1:22 18 and 37 at Railway St gates, with gates closed with B class hauled passenger train, wooden and air-conditioned carriages departing. 1:51 Interior view of passengers in 18 2:10 View from a side window of 18 turning from Lydiard St Nth into Sturt St, heading east, with an inspector getting off No. 18 2:23 View from front window in Victoria St and entering King St loop to cross No. 14. 2:55 18 and 37 departing King St loop, in bound. 3:10 18 in Barkly St, outbound 3:38 42 in bound Drummond St Nth and turning into Sturt St at Hospital corner. 4:16 End Written labels giving title information on outside of box.trams, tramways, ballarat, gardens, victoria st, bridge st, sturt st, tram 18, tram 37, tram 42 -
 Ballarat Tramway Museum
Film - Movie Film & Box, Kodak, 1960s
Yields information in movie film format of Ballarat trams in 1962, a enthusiast tour, how the system operated and was used by people., Yields information in movie film format of Ballarat trams in 1962, a enthusiast tour, how the system operated and was used by people.Movie film - 8mm, approx. 4.15mins, with green leader strip on a plastic reel, within a Kodachrome II colour movie cardboard box and addressed to B.J. Parle, Chatswood. Titled "Ballarat 1962" Has been transferred to DVD - see Reg item 4100 as Segment No. 3. Filmed and made by Ben Parle. Also transferred to DVD by Rod Cook Oct. 2015, via Roger Greenwood for use in his DVD, "The City of Ballarat Trams, Gardens & Gold" of 2016. See Reg Item 6883. Synopsis: based on time - Colour film Title "Ballarat 1962" 0:00 21 in Sturt St arriving City Centre tram stop from the west. 0:12 41 and another bogie car at City Centre tram stop, North side of Sturt St loading passengers 0:21 39 crosses Sturt St from Lydiard St Nth and pulls up at the tram stop in Sturt St. 0:55 39 leaves City centre and travels west along Sturt St – two sequences. 1:11 View from front of a single trucker, leaving Carlton St loop after crossing a bogie car and travelling along Wendouree Parade towards Gardens Loop 2:09 No. 20 in Gardens Loop and pan across to the Gardens Statuary pavilion with lots of flowers. 2:41 No. 20 leaving Gardens loop and heading north in Wendouree Parade. 2:54 Bogie tram in Wendouree Parade between depot and Gardens loop, southbound. 3:12 No. 32 leaving Victoria St terminus, with orphanage in the background, in bound, has a Trotting tonight sign on front of tram, and crossing the Eureka line rail bridge. 3:23 No. 20 in Bridge St, out bound, near Stones Corner 3:42 38 in bound from Mt Pleasant at Stones Corner, stops, lets of passengers and then proceeds along Bridge St into the City 4:15 endWritten labels giving title information on outside of box.trams, tramways, ballarat, wendouree parade, sturt st, victoria st, bridge st, tram 21, tram 41, tram 39, tram 20, tram 32, tram 38 -
 Ballarat Tramway Museum
Photograph - Black & White Photograph/s, David Clark, 17/02/1971 12:00:00 AM
Yields information about the Ballarat's tramcars in the months before closure and the appearance then of Stones Corner.Black and white photograph of Ballarat No. 21 in Victoria St, looking back to Stones Corner building. Photo by David Clark 17/2/1971. Tram has just left Bridge St. Stones Corner building in the background, and Viscount Ambassador Caravans to the left of the tram having replaced the Caltex Service Station on this location. Tram has the destination of Victoria St.On the rear in ink "Tram No. 21 in Victoria St, near Bridge St, looking to Sturt St. 17/2/71. Ballarat Tramways, Photo 30, Taken by David Clark", with David's address stamp "4 Adeney Ave Kew 3101" with "Melbourne" underneath.tramways, trams, victoria st, stones corner, bridge st, tram 21 -
 Ballarat Tramway Museum
Photograph - Black & White Photograph/s, David Clark, 17/02/1971 12:00:00 AM
Yields information about the Ballarat's tramcars in the early 1970's, the City Loop parking area and the Grenville St buildings.Black and white photograph of Ballarat No. 11 and 26 in the City Loop with the Grenville St buildings in the background. Photo by David Clark 17/2/1971. No. 11 and has the destination of "City". In the background are the Big W, Dickins store and Clifford and Young shops.On the rear in ink "Tram No. 1`1 & 26 in Sturt St at Lydiard St. looking to Bridge St. 17/2/71. Ballarat Tramways, Photo 27, Taken by David Clark", with David's address stamp "4 Adeney Ave Kew 3101" with "Melbourne" underneath.tramways, trams, sturt st, grenville st, bridge st, city loop, tram 26, tram 11 -
 Ballarat Tramway Museum
Photograph - B&W print of donated negative, John Webster, 11/4/1953
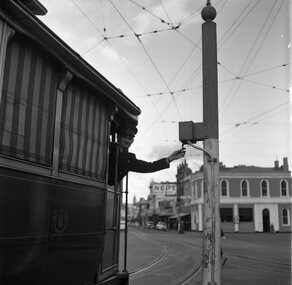
Yields information about the Bucks Head Hotel and demonstrates the way the signals were set in Bridge St for either the Mt Pleasant or Victoria St routesBlack and digital white print from a scan of a donated negative of a driver leaning out from a single trucker to set the switch on the signal for either the Victoria St or Mt Pleasant routes. Has the Bucks Head Hotel in the background. Shows the pole the signal controller or switch was mounted on. Black and White print made from scan of negative. Original Negative stored with Negatives. Image rescanned from copy neg and updated 31/5/2020. See On this basis, the envelope and marking matches that of Reg Item 4158, photo of No. 40, by John Webster and assumed taken on the same day as Item 4157, 4158, 4168, 4178 - 11/4/1953. Contained within Envelope No. 33.On left hand side of the negative in ink is "EI 35".tramways, trams, sturt st, grenville st, signals, bridge st