Showing 269 items
matching pretty's
-
 Eltham District Historical Society Inc
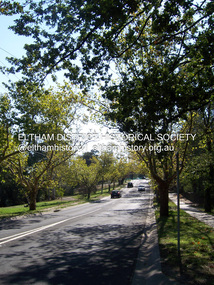
Photograph - Digital Photograph, Marguerite Marshall, Avenue of Honour, Main Road, Eltham, 20 April 2008
The suggestion of an Avenue of Honour may have been originally put forward by Lady Irvine who was a member of the Welcome Home Committee. The Avenue of Honour was established to memorialise all those from Eltham who enlisted (some of whom were still fighting overseas at the time), similarly as the Shire of Eltham (Soldiers) Memorial Park was in tribute to all from the Shire who enlisted. The twenty-seven names of those killed from Eltham were engraved on the Eltham War Memorial Obelisk unveiled in 1919 at the corner of Main Road and Bridge Street. From an article in the Heidelberg News and Greensborough, Eltham and Diamond Creek Chronicle, September 22, 1917, p. 2, it was reported: Some few weeks ago a public meeting was held in the Eltham Rechabite Hall for the purpose of forming a committee to make necessary arrangements for the return of our brave lads from the front, with the result that the following officers were elected, viz., Sir William Irvine. president; Cr. R. D. Taylor, vice-president; Rev. T. W. Sapsford, secretary; Mr R. E. Gilsenan, treasurer; with a very strong committee of local residents. Lady Irvine then suggested that it would be nice to plant an Avenue of Honor, which was carried out in a very cheerful and spirited manner on Saturday afternoon. Cr Taylor and Mr R. E. Gilsenan occupied themselves during the fore-forenoon in getting the lining-out and other preliminaries ready, but shortly after one o'clock the willing workers could be seen wending their way towards the township, with picks, shovels. &c., on their shoulders, and in a very short time the gang at work was in appearance a very lively and pretty sight, the only thing that was missing was the camera, to have had a few snapshots taken. A little after 3 o'clock Sir William and Lady Irvine, and Mr W. Gray and family, arrived by motor. Cr Taylor then explained that their object in gathering together so hurriedly to plant the avenue was on account of the lateness of the season, and being offered 100 trees, free of charge, by Cr. Wm. G. Gray; of Allwood Nursery, Hurst's Bridge (for which the committee are deeply grateful to him and the public highly appreciate his generous offer). Sir Wm. Irvine then spoke at some length on the ravages of this cruel war, and the good that must result therefrom in bringing all closer together; he also referred to our brave lads who were fighting for us, and thought it was for those at home to show their appreciation by planting the Avenue of Honor. Lady Irvine thou proceeded to plant the first tree, which was an English oak: Sir William following by planting a Spanish chestnut; and Mrs W. G. Gray a sycamore. After that the gathering refired to the entrance of Mr R. E. Gilsenan's green paddock to partake of refreshments, which the ladies had kindly provided for the willing band of workers. Work was again taken to in earnest, and the planting finished, all being satisfied that they had done good work. At the Eltham Shire Council’s monthly meeting held May 6, 1918, Cr. Gray promised to give Council £20 to £25 worth of trees if the Council would plant and guard them. His desire was that a tree be planted in the name of every soldier lad who has gone to the front. Each tree was later adorned with a brass plaque with the name of a soldier and a wooden tree guard placed around them. Over the years many trees died, and following roadworks were replanted on a new alignment. Nillumbik Shire Council is continuing this process of replanting trees in a new alignment to move them away from overhead power lines and to clear the VicRoads reserve. Covered under Heritage Overlay, Nillumbik Planning Scheme. Published: Nillumbik Now and Then / Marguerite Marshall 2008; photographs Alan King with Marguerite Marshall.; p119This collection of almost 130 photos about places and people within the Shire of Nillumbik, an urban and rural municipality in Melbourne's north, contributes to an understanding of the history of the Shire. Published in 2008 immediately prior to the Black Saturday bushfires of February 7, 2009, it documents sites that were impacted, and in some cases destroyed by the fires. It includes photographs taken especially for the publication, creating a unique time capsule representing the Shire in the early 21st century. It remains the most recent comprehenesive publication devoted to the Shire's history connecting local residents to the past. nillumbik now and then (marshall-king) collection, avenue of honour, main road, eltham -
 Eltham District Historical Society Inc
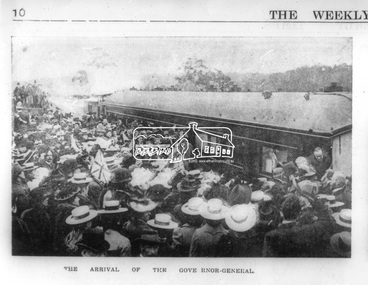
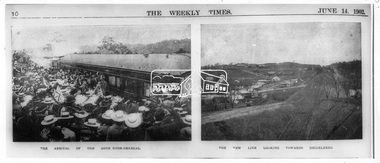
Photograph, Opening of the Railway Line; The arrival of the Governor-General, 6 June, 1902, 1902
Published: The opening of the railway line by His Excellency The Governor General, The Weekly Times, June 14, 1902, p10. Governor General was John Hope, Earl of Hopetoun THE HEIDELBERG TO ELTHAM RAILWAY. OPENING CEREMONY. The opening of the railway line from Heidelberg to Eltham took place on the 6th inst. The special train, containing a large number of members of Parliament, including Mr Trenwith, the Minister for Railways, left Prince's Bridge at half-past eleven, and arrived at Eltham at twenty minutes past twelve. The party was accompanied by Mr Fitzpatrick, Acting Commissioner for Railways; Mr Lockhead, the Traffic Manager; and Mr Norman, Engineer for Existing Lines. On arrival, the visitors were entertained at a banquet in the marquee, of which a photograph is given, erected close to the railway station. Mr E. H. Cameron, M.L.A., the member for the district, occupied the chair, and, seated on his right, was Mr Mason, the Speaker of the Legislative Assembly, and on his left the Minister of Rail-ways. After the banquet His Excellency the Governor-General arrived, and was received and welcomed by Mr Cameron, the local State school children singing the National Anthem. The Governor-General, in declaring the line open, said that he felt highly honored at being asked to perform the opening ceremony, and he trusted that the railway would be a source of great convenience to the inhabitants of the district. He was sorry to say that this would be the last opportunity he would have of seeing them. It cost him a great deal to leave them. (Hear, hear.) He had a great many friends amongst all sections of the community, and he could hardly bear to trust himself to speak about leaving them. (Hear, hear.) He was sorry Lady Hopetoun was on the high seas, and unable to accompany him that day. Mr Cameron thanked his Excellency for performing the opening ceremony, and hoped the trip home would have the effect of restoring His Excellency to good health again. In replying. Lord Hopetoun thanked them sincerely for the cordial vote of thanks. He hoped Providence would shower her blessings over them, and that they would have a series of good seasons. He would always keep a warm corner in his heart for the people of Victoria. (Loud cheers.) THE COUNTRY. In our illustrations, views are given of a couple of sections of the new line, and glimpses of the surrounding country are shown. The line is eight miles in length, and cost £51,000 in construction. Eltham, which is the terminus, possesses many of the features that go to make a favorite holiday resort. It is a quiet picturesque little hamlet, snugly ensconced on the slope of one of many sombre-tinted hills by which it is sur-rounded. Even when viewed under ad-verse conditions one could not fail to be-impressed with the natural, rugged beauty of the place. It is situated about sixteen miles from Melbourne, and the line takes a circuitous course through a continuation of pretty undulating country. At intervals on the slopes of the surrounding green-mantled hills, patches of brown, freshly tilled soil indicate that for all its serene reposeful-ness Eltham possesses its phases of industrial life as well. Looking down into this valley from the main road which skirts the slope of a hill, distant something less than a quarter of a mile from the railway station is one of the prettiest pieces of scenery in the district. Verdure-clad hills ascend on all sides, whilst beneath stretches a broad expanse of carpet-like green sward, dotted here and there with picturesque homesteads, each with its patches of tilled soil. In the township itself the dwelling-houses are comparatively few, the larger portion of the inhabitants residing in the scattered homesteads. Eltham is as yet only in its youth, but energetic and un-tiring public men can effect wonders in a community's prosperity, and Eltham, whatever other real or imaginary advantages it may lay claim to, certainly possesses this one. The railway is the result of their endeavor. 1902 'THE HEIDELBERG TO ELTHAM RAILWAY.', Weekly Times (Melbourne, Vic. : 1869 - 1954), 14 June, p. 14. , viewed 26 Sep 2018, http://nla.gov.au/nla.news-article221230719This photo forms part of a collection of photographs gathered by the Shire of Eltham for their centenary project book,"Pioneers and Painters: 100 years of the Shire of Eltham" by Alan Marshall (1971). The collection of over 500 images is held in partnership between Eltham District Historical Society and Yarra Plenty Regional Library (Eltham Library) and is now formally known as the 'The Shire of Eltham Pioneers Photograph Collection.' It is significant in being the first community sourced collection representing the places and people of the Shire's first one hundred years.Digital image Negative black and white film 120 6x9 format 2 stripsAgfa APX 100sepp, shire of eltham pioneers photograph collection, eltham, heidelberg-eltham railway extension, earl of hopetoun, john hope, opening day, railway line construction -
 Eltham District Historical Society Inc
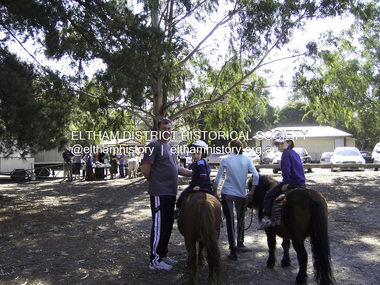
Photograph - Digital Photograph, Marguerite Marshall, Eltham Lower Park, 20 April 2008
Originally a race course, the park has brought the community together with a variety of activities. Published: Nillumbik Now and Then / Marguerite Marshall 2008; photographs Alan King with Marguerite Marshall.; p45 Once used for horse racing, which attracted visitors from Melbourne, the Eltham Lower Park has brought the community together with a wide range of activities. Horse riding is now enjoyed as a recreation in the park as are other sports. The park also includes the Diamond Valley Railway miniature trains and a sanctuary for the rare and vulnerable Eltham Copper Butterfly. Eltham Lower Park, with other parks, forms an almost continuous green band from Eltham’s centre, along the Diamond Creek to the Yarra River.1 Before European settlement the Wurundjeri people met on this land, particularly at the junction of the Diamond Creek with the Yarra River, which they called Birr-arung. This is commemorated by the sculpture, Not just a Pretty Place by Aleks Danko, winner of the 2000 Nillumbik Art in Public Places Award. The first European to settle here was probably Henry Foley, who in 1841 used it as part of his pastoral run. Foley sold his leasehold to Joseph Wilson in 1845, who soon after sold it to Frederick Falkiner.2 During the 1840s the future park was part of a government square mile (2.6 sqkm) reserve, north of the Yarra, within the Parish of Nillumbik, later named Eltham. Soon the land was used for horse racing after nearby residents cleared ten acres (4ha) in the early 1850s. A three-quarter of a mile (1.2km) race secured the winner the £10 Publican’s Prize. In response to popular demand, the newly formed Eltham District Road Board petitioned the Surveyor General of the Colony of Victoria, in 1856, for 36 acres (14.6ha) of crown land for a racecourse and recreation. By 1858 the Eltham races had become an institution. ‘Many skirmishes occurred and the way home was paved with temptation, with sly-grog for sale.3 In the early 1870s, two jockeys were sons of the police officer in charge of the Eltham Police Station, Miles S Lyons.4 Another ten acres (4ha) was added to the area in 1866 and 12 acres (4.8ha) – Hohnes Hill – in 1870. In 1866, two acres (0.8ha) on the creek banks became an animal pound with William Walsh the pound keeper in 1870, but this was later incorporated into the park. By 1877 the area was called a public park but horse racing and training continued into the 1920s. In the mid-1900s trotters were trained on a circuit road. In 1953 the Eltham Pony Club was established and used a cross-country course on Hohnes Hill. From the mid 1950s the club held the Eltham Easter Fair at the park, later to include a procession along Main Road from the town centre to the park. The park also attracted picnic parties and campers from the inner suburbs as did Wingrove Park, and businesses catering for visitors, sprang up on the opposite side of Main Road. Bus-loads of school children visited the park for Gould League bird days in the 1960s. In 1979 the Eltham Shire Council bought Lenister Farm, linking the park with the Yarra River. The Lenister Farm wetland includes a bird hide, viewing platform and interpretive signs.5 Pioneer Henry Stooke, later Road Board chairman, bought the 11 acres (4.5ha) - later to become Lenister Farm - from the Crown in 1862. Stooke never lived on this site and the two houses at Lenister Farm were built in the 20th century. Since its formation in 1871, the Council has controlled this crown land, which it named Eltham Park. But in the 1920s Eltham Council bought land near the town centre for a park, which it named Eltham Central Park. To avoid confusion the Council renamed Eltham Park, Eltham Lower Park. Since 2004 the Yarra footbridge has linked the park with the Yarra Valley Metropolitan Park and the Main Yarra Trail.This collection of almost 130 photos about places and people within the Shire of Nillumbik, an urban and rural municipality in Melbourne's north, contributes to an understanding of the history of the Shire. Published in 2008 immediately prior to the Black Saturday bushfires of February 7, 2009, it documents sites that were impacted, and in some cases destroyed by the fires. It includes photographs taken especially for the publication, creating a unique time capsule representing the Shire in the early 21st century. It remains the most recent comprehenesive publication devoted to the Shire's history connecting local residents to the past. nillumbik now and then (marshall-king) collection, eltham lower park, eltham park -
 Bendigo Military Museum
Postcard - POSTCARD, FARNHAM, U.K, Valentine's Series, cWW1
1. Florrie is a relative living in Farnham. 2. R.H. Baron married Elsie Keast in 1921. All cards relate to R.H. Baron's visits to Farnham whilst on leave to see Florrie. Part of the 'Robert H. Baron', no.3596 and Cooper Collection. See Catalogue No. 1981P for details of Baron's service.1. Coloured scene of a ruined castle and surrounding gardens. 2. Coloured scene of a garden with building and ruins in background. 3. Coloured photograph of a red brick building with battlement. 4. Coloured street scene with buildings, horse drawn transport and pedestrians. 5. Coloured photograph of the nave of a church looking towards the alter. 6. Coloured street scene with buildings and horse drawn transport. 7. Coloured view across a street to a white walled building with horse drawn transport. 8. Coloured photograph of a church, graveyard in foreground. 9. Black and white photograph of a castle surrounded by trees. 10. Black and white photograph of a forest scene with people standing on a bridge. 11. Black and white photograph of a street scene with buildings, horse drawn transport and people. 12. Black and white photograph of the tower of a church. Graveyard in the foreground. 13. Black and white photograph of a street scene with buildings, horse drawn transport and pedestrians. Castle on the hill in background. 14. Black and white photograph of a street scene with buildings, motor cars and pedestrians. 15. Black and white photograph of a street scene with buildings, motor cars, horse drawn transport and pedestrians. 16. Black and white photograph of a wooded valley. Houses on a hill in the background. 17. Black and white photograph of an avenue of trees. 18. Black and white photograph taken in a park. Three people standing on a bridge over a stream.1. The Keep, Farnham Castle. Handwritten in black ink on back: 'This is one of the pretty places around Farnham. I was all once here with Florrie. Bob' 2. In Castle grounds, Farnham. Handwritten in black ink on back: 'Dear Elsie, these are some places that visit... when I was down at Flories place. Bob xxxxxx' 3. Farnham Castle. 4. West Street, Farnham. 5. Parish Church, Farnham. 6. Castle Street, Farnham. 7. The Church House, Farnham. 8. Parish Church, Farnham. 9. Farnham Castle. 10. Red Hill Hanger, Farnham. Handwritten in black ink on back: 'Letter to R.H. Baron's sister - no date.' 11. South Street, Farnham. Handwritten in black ink on back: 'this part of the place I spent my leave at this is where Florrie is.' 12. Farnham Parish Church. Handwritten in black ink on back: 'Letter to R.H. Baron's mother - dated 24 July 1918.' 13. Castle Street, Farnham. Handwritten in black ink on back. 'I think you will know where this is as I have told you quite a lot about Farnham, it is where Florrie is. I spent my leave here. This is Castle Street and the castle is right on the top of the hill.' 14. Borough, Farnham. Handwritten in black ink on back. ' This is the place where Florrie lives. I spent my last leave their (sic), Bob.' 15. West Street, Farnham. Handwritten in pencil on back. 'Pte R.H. Baron, 57 Battalion, Australian Imperial Forces Abroad.' 16. Lower Bourne Valley, Farnham. Handwritten in black ink on back: 'Partial letter from R.H. Baron to his sweetheart.' 17. The Avenue, Farnham. Handwritten in black ink on back: 'Partial letter from R.H. Baron to his mother.' 18. Recreation Ground, Farnham. Handwritten in black ink on back: 'Letter to Doris from R.H. Baron - no date.' robert h. baron, cooper collection, postcards, farnham uk -
 Eltham District Historical Society Inc
Photograph, The Weekly Times, Opening of the Heidelberg-Eltham Railway Line, 6 June 1902, 1902
Reproduced from "The Weekly Times", 14th June 1902, page 10. 06 Jun 1902 Cross Reference Photo No.(s): 602, 604 Source: La Trobe Library and National Library, Canberra THE HEIDELBERG TO ELTHAM RAILWAY. OPENING CEREMONY. The opening of the railway line from Heidelberg to Eltham took place on the 6th inst. The special train, containing a large number of members of Parliament, including Mr Trenwith, the Minister for Railways, left Prince's Bridge at half-past eleven, and arrived at Eltham at twenty minutes past twelve. The party was accompanied by Mr Fitzpatrick, Acting Commissioner for Railways; Mr Lockhead, the Traffic Manager; and Mr Norman, Engineer for Existing Lines. On arrival, the visitors were entertained at a banquet in the marquee, of which a photograph is given, erected close to the railway station. Mr E. H. Cameron, M.L.A., the member for the district, occupied the chair, and, seated on his right, was Mr Mason, the Speaker of the Legislative Assembly, and on his left the Minister of Rail-ways. After the banquet His Excellency the Governor-General arrived, and was received and welcomed by Mr Cameron, the local State school children singing the National Anthem. The Governor-General, in declaring the line open, said that he felt highly honored at being asked to perform the opening ceremony, and he trusted that the railway would be a source of great convenience to the inhabitants of the district. He was sorry to say that this would be the last opportunity he would have of seeing them. It cost him a great deal to leave them. (Hear, hear.) He had a great many friends amongst all sections of the community, and he could hardly bear to trust himself to speak about leaving them. (Hear, hear.) He was sorry Lady Hopetoun was on the high seas, and unable to accompany him that day. Mr Cameron thanked his Excellency for performing the opening ceremony, and hoped the trip home would have the effect of restoring His Excellency to good health again. In replying. Lord Hopetoun thanked them sincerely for the cordial vote of thanks. He hoped Providence would shower her blessings over them, and that they would have a series of good seasons. He would always keep a warm corner in his heart for the people of Victoria. (Loud cheers.) THE COUNTRY. In our illustrations, views are given of a couple of sections of the new line, and glimpses of the surrounding country are shown. The line is eight miles in length, and cost £51,000 in construction. Eltham, which is the terminus, possesses many of the features that go to make a favorite holiday resort. It is a quiet picturesque little hamlet, snugly ensconced on the slope of one of many sombre-tinted hills by which it is sur-rounded. Even when viewed under ad-verse conditions one could not fail to be-impressed with the natural, rugged beauty of the place. It is situated about sixteen miles from Melbourne, and the line takes a circuitous course through a continuation of pretty undulating country. At intervals on the slopes of the surrounding green-mantled hills, patches of brown, freshly tilled soil indicate that for all its serene reposeful-ness Eltham possesses its phases of industrial life as well. Looking down into this valley from the main road which skirts the slope of a hill, distant something less than a quarter of a mile from the railway station is one of the prettiest pieces of scenery in the district. Verdure-clad hills ascend on all sides, whilst beneath stretches a broad expanse of carpet-like green sward, dotted here and there with picturesque homesteads, each with its patches of tilled soil. In the township itself the dwelling-houses are comparatively few, the larger portion of the inhabitants residing in the scattered homesteads. Eltham is as yet only in its youth, but energetic and un-tiring public men can effect wonders in a community's prosperity, and Eltham, whatever other real or imaginary advantages it may lay claim to, certainly possesses this one. The railway is the result of their endeavor. 1902 'THE HEIDELBERG TO ELTHAM RAILWAY.', Weekly Times (Melbourne, Vic. : 1869 - 1954), 14 June, p. 14. , viewed 26 Sep 2018, http://nla.gov.au/nla.news-article221230719This photo forms part of a collection of photographs gathered by the Shire of Eltham for their centenary project book,"Pioneers and Painters: 100 years of the Shire of Eltham" by Alan Marshall (1971). The collection of over 500 images is held in partnership between Eltham District Historical Society and Yarra Plenty Regional Library (Eltham Library) and is now formally known as the 'The Shire of Eltham Pioneers Photograph Collection.' It is significant in being the first community sourced collection representing the places and people of the Shire's first one hundred years.Digital image 35mm B&W negativesepp, shire of eltham pioneers photograph collection, eltham, heidelberg-eltham railway extension -
 Eltham District Historical Society Inc
Photograph - Digital Photograph, Alan King, Ellis Cottage, Diamond Creek, 23 January 2008
Built by William Ellis in 1865 of local uncut stone about 30cm thick, the cottage is now a museum and home to the Nillumbik Historical Society. Ellis Cottage is historically significant for its association with the Ellis family, who were pioneers of the Diamond Creek district and the benefactors of the notable Nillumbik Cemetery gateway. It illustrates the development of farming in the area. Ellis Cottage is historically and technically significant for its rare use of uncut local stone for building purposes. Covered under Heritage Overlay, Nillumbik Planning Scheme. National Estate Published: Nillumbik Now and Then / Marguerite Marshall 2008; photographs Alan King with Marguerite Marshall.; p79 Ellis Cottage, built by William Ellis, is a memorial to the courage of pioneers in the Diamond Valley area.1 Now a museum and home to the Nillumbik Historical Society, it is a fine example of an early settler’s house in Diamond Creek – and one of the few original buildings standing from the middle of the 19th century. It is a poor man’s cottage – typical of the dwellings of those who had to work hard to wrest a living in this district, because most of the land was not fertile enough for major forms of farming. The pretty stone cottage at 10 Nillumbik Square, built in 1865, is made of local uncut stone about one foot (30 cm) thick. It once stood near the centre of the 147 acres (59.4ha) Ellis bought in 1850. The property extended from Diamond Creek to Reynolds Road and from Perversi Avenue to the Wattle Glen School. It stood in the electoral parish of Nillumbik. The Nillumbik township (later called Diamond Creek) was not created until 1867. In 1912 the property was cut in half by the new railway to Hurstbridge. Ellis paid £147/10/- for the land - about three times what a Victorian farmer would usually earn in a year. Despite the poor quality soil Ellis became a very successful farmer with an orchard, vegetables and a dairy herd. Five years later, in 1855, Ellis bought 70 acres (28.3ha) from neighbour, Hugh Larimour. In 1857 Ellis bought 208 acres (84ha) at Yarra Glen. In 1877 he bought 122 acres (49.3ha) at Diamond Creek and later bought land at Greensborough and Woodstock. Ellis was born in 1815 at Blackawton, a small Devonshire village, and became a tenant farmer. It is not known why Ellis came out to Australia or settled in Diamond Creek. In 1847 he married Margaret Child at the Melbourne Presbyterian Church. Ellis and Child had no children and 18 years after the wedding, while probably living in Kangaroo Ground, Ellis built this small cottage. The simple cottage has a central hall and two rooms on each side. To maximise the small space the ceiling cavity was designed large enough to provide sleeping accommodation accessed via a ladder. Each room was heated by an open fireplace and the one in the kitchen was large enough to roast a sheep. A large cellar under the front room probably stored farm produce. Water came from a well as reticulated water did not arrive at Diamond Creek until 1914. In 1870 Ellis’ 22 year-old nephew Nathaniel joined him from England.2 Until 1890 they developed Ellis Park, praised in The Evelyn Observer, May 30,1890 as a model farm. Ellis had become wealthy, and on his death in 1896 his estate was valued at £9000. In his will he left £100 to construct memorial gates at the Nillumbik Cemetery where he was buried.3 Ellis left the farm to his second wife Louisa. As he had no children, upon her death the farm passed to Nathaniel, but he did not take it up. The farm was sold and leased several times until 1967, when engineer Phillip Lovitt bought the property and carried out major structural works. The Shire of Diamond Valley bought it in the 1980s and in 1989 restored it with the Nillumbik Historical Society. The stone walls of the cottage had been plastered with mud and straw mortar, which were removed as they were riddled with vermin. Doors, windows and a floor were replaced and the original roof of timber shingles had been replaced with slate. The well was too deeply cracked to be restored, so was used for a flower bed. Two mature Italian Cypresses at the entry are also heritage protected as they relate to similar trees planted at Shillinglaw Cottage and other early buildings in Nillumbik Shire.This collection of almost 130 photos about places and people within the Shire of Nillumbik, an urban and rural municipality in Melbourne's north, contributes to an understanding of the history of the Shire. Published in 2008 immediately prior to the Black Saturday bushfires of February 7, 2009, it documents sites that were impacted, and in some cases destroyed by the fires. It includes photographs taken especially for the publication, creating a unique time capsule representing the Shire in the early 21st century. It remains the most recent comprehenesive publication devoted to the Shire's history connecting local residents to the past. nillumbik now and then (marshall-king) collection, ellis cottage, diamond creek, nillumbik historical society, william ellis -
 Eltham District Historical Society Inc
Photograph - Digital Photograph, Marguerite Marshall, Uniting Church, Main Road, Eltham, 19 August 2008
Eltham's original Wesleyan Methodist Church Covered under Heritage Overlay, Nillumbik Planning Scheme. Published: Nillumbik Now and Then / Marguerite Marshall 2008; photographs Alan King with Marguerite Marshall.; p97 The pretty Uniting Church building at the corner of John and Main Roads Eltham has served the community since 1881.1 Originally called the Eltham Wesleyan Church, the church became the Eltham Methodist Church in 1902, the year it united with the Primitive Methodists.2 As the church community developed, influencing and being influenced by the wider community, its buildings changed accordingly. Eltham Wesleyans first worshiped together in 1850 at the home of William and Mary Crozier on 24 acres (9.7ha) bounded by Mount Pleasant Road and Pitt Street. From 1855 the Wesleyans worshipped in a slab-and-bark hut; then in 1858 in a chapel on Henry Street close to Maria Street (now Main Road). Meanwhile, in 1860, the Primitive Methodists opened a brick chapel at the corner of Susan and Bridge Streets. The John Street building – in the Early English Gothic style with biochrome brick window frames, buttress heads and pinnacle – was designed by architects Crouch and Wilson. Church member George Stebbing built the church as he did Eltham’s St Margaret’s Anglican Church and Shillinglaw Cottage. The Church Honour Roll is a poignant reminder of how church members have served the wider community: 27 members enlisted and 11 died in World War One. Despite the Great Depression, 1931 was a time of expansion for the church. Its red-brick hall was opened by prominent Methodist and philanthropist F J Cato of the Moran and Cato Grocery chain. The hall enabled the church to attract people from outside through activities like its gymnasium – with 40 boys and youth participating – and the girls’ callisthenics club, which competed at the Ballarat South Street Competitions. The church also held concerts, bazaars, picnics and sports, with badminton and tennis played on the church court at 23 John Street. Two stained-glass windows commemorate tragic events. A dove representing the Holy Spirit and Comforter marked the death in 1936 of member Effie Lowerson from scarlet fever at 14 years. The other depicting the Biblical story A sower went forth to sow, commemorates Ross Gangell, who died in 1961 at 23 years of a rare blood condition. Eltham’s population expanson resulted in the growth of the church and an extension in 1971, designed by member and architect Colin Jones. The church was linked to the hall and additions included a foyer, vestry, meeting room and toilets. The design reflected the Eltham style of the time, with its simplicity, extensive clear glass, reused baked clay-bricks from the 1881 church, heavy ceiling beams and solomite (compressed straw) ceiling. On June 26, 1977 the church became part of the new Uniting Church in Australia consisting of the former Methodist and Congregational and most of the Presbyterian Churches. In 1981 membership peaked at 159 – about 20 years after most Protestant churches – and continued to reach out to the wider community.3 In 1987, 147 children attended Selihoo, the weekly after-school program organised with St Margaret’s Anglican Church. From 1993, the church with other local churches, participated in LINC (Love in the Name of Christ), helping the wider community in various ways including babysitting, transport, gardening and visiting. Despite such initiatives, church numbers declined, and on June 23, 1996, the church merged with the Montmorency Uniting Church.4 However, the church continued to proclaim its message of love in community service and strong social justice action, such as in Jubilee 2000, supporting debt relief to the world’s 45 poorest countries. Some of the many church members who have had an outstanding impact on the wider community include Philip Shillinglaw, farmer and poet, and Arthur Bird (after whom the Arthur Bird Reserve is named), a pioneer orchardist and the Sunday School Superintendent for 33 years. Others were: the Rev Dr Cliff Wright, who established the Methodist Youth Fellowship and was prominent in the World Council of Churches, the Rev Brian Howe, who became Deputy Prime Minister and Tim Marshall, awarded the Order of Australia in 2000 for his work on salinity.This collection of almost 130 photos about places and people within the Shire of Nillumbik, an urban and rural municipality in Melbourne's north, contributes to an understanding of the history of the Shire. Published in 2008 immediately prior to the Black Saturday bushfires of February 7, 2009, it documents sites that were impacted, and in some cases destroyed by the fires. It includes photographs taken especially for the publication, creating a unique time capsule representing the Shire in the early 21st century. It remains the most recent comprehenesive publication devoted to the Shire's history connecting local residents to the past. nillumbik now and then (marshall-king) collection, eltham uniting church, eltham methodist church -
 Ringwood and District Historical Society
Biography, Ringwood and District Historical Society, Interview notes - short biography on Miss Daisy Paddock, teacher at Ringwood State School, circa 1970s, c.1970s
Single page of notes/interview record of Miss Daisy Paddock, teacher at the Ringwood State School in Greenwood Avenue (now Federation Estate) - Interview write-up by Ringwood History Group.Transcript: "Miss Janet Daisy Paddock She was an extremely well-liked and well-regarded teacher at the old RW State School in Greenwood Ave (Now Federation Estate). She taught between the years of 1927 until 1941, then again after the war from 1951 until final retirement in 1961. In fact she was so liked that her former pupils formed "The 2997 Club" , which met in her honour every year for a meal (and, of course, their guest of honour). 2997 was the RW SS number. In some of her letters about early life in RW, she recalls the RW Mail being produced and printed in a small wooden building in Adelaide St. [Adelaide St is officially no longer on the RW map but it went from the highway nearly to Mullum Creek, between Melbourne St and Warrandyte Road.^ In fact there is an unmarked 100 metres of road that is on the west side of Officeworks that ends in a roundabout at the bottom of Eastland carpark. I don't believe it is exactly in the same position as the old Adelaide Street but it pretty close. That would put the old Mail office in the vicinity of the Maroondah Council service centre in Eastland.] She also recalls that there were nearly a dam on every corner. In fact, I recall in my 1950s/60s childhood that there were still many dams around. As I previously mentioned, with the RW-Mitcham claybelt, there wasn't much top soil and the orange clay is very fine, so when the banks of the dam get wet, it wass very slippery. I often remember playing around in those dams, as most boys did in those days. A friend and I spied an old bath used to water some horses so after some trial and errors we made it waterproof and fashioned a couple of paddles out of wooden fence pailings. The first launch in the local dam was fine and we managed to manouver through the bullrushes into the middle. The only thing that I forgot about was that I had a d<^ that went everywhere with me and, rather than bark from the bank, he swam over to us and tried to get aboard. Bath tubs are not known for their seaworthness and he tipped us all in the drink. Of course the bath sank like a rock. We scrambled on the bank and he added insult to injury when, as all dogs do, gave the usual shake and sprayed us with water. My mind often comes back to one dam right next to the Croydon pub - that provided water to the Magg's orchard - dug in the usual fashion on about 3 metres deep scraped in the local clay, it was at this dam in the early sixties that a young boy drowned. After that we were pretty careful around dams. Going back to Daisy's memories, she recalls that the kids often started late on Monday mornings as Monday was Market Day at RW. They used to watch the stock being herded into the yards and people getting off the steam trains. Her family home was at Gruyere and her father used to drive to RW market and stop midway at the Burnt Bridge hotel and rest the horses. [I suspect that he may have watered other things besides the horses.] They eventually moved to RW in Thanet St. Miss Paddock still remembers the old RW school at the corner of RW St and Whitehorse Road, it was very small so they built the new school in Greenwood Ave. RW had a population of around 2,(K)0 when Daisy became an Assistant Class Five. She used to walk through the open paddocks, surrounded by bush and orchards. She goes on to say that the bush was alive with wildlife and a natural playground for the children. Miss Paddock was a member of the Soroptomist Club in RW (equivalent to Rotary), active in the church and local community. At our archives, we have a plaque that grac^ the entrance to the school, naming it the Miss Daisy Paddock library, in honour of a great woman in our city." -
 Kiewa Valley Historical Society
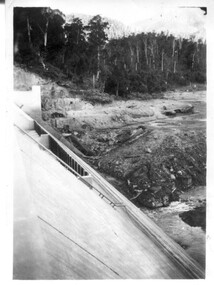
12 small black and white photgraphs of Junction Dam and surrounding area, Photo No. 1 c1940, all others c 1948
Junction Dam is a reinforced slab and buttress type construction and was commenced in February, 1940 by Lewis Construction Company. Stiff leg derricks were erected at appropriate locations at the site of the dam and used for the disposal of excavated material and the placing of concrete. A rock crushing and screening plant was established at a site a short distance upstream from the dam site and concrete was supplied from a central mixing plant placed close to the upstream toe of the structure. The SEC took over the construction in April 1942 and the dam wall was completed in March, 1944. Bogong township was commenced in early 1940 with the construction of a workmen's camp housing 96 men, (known as Junction camp). Construction of housing for families commenced shortly after. Forty houses, plus office, workshops, stores and laboratory accommodation were completed over the next 5 years,Of historical significance as a pictorial record of Junction Dam, Lake Guy and Bogong Village, as the photos were taken only 4 years after completion and one photo taken on completion of the dam wall but before the lake was filled with water.12 small black and white photographs of Junction Dam, Bogong Village and surrounding area.Photo 1 - On the back upper edge in pen 'Junction Dam'. Then '12' in pencil, circular stamp, printed in centre 'Print by Willson White Albury'. Photo 2 - On the back upper edge in pen 'Junction Dam October 1948'. Stamp as no. 1 photo. Stamp '998L' lower centre. Photo 3 - on the back upper edge in pen 'Junction Dam October 1948'. Circular stamp with 'Kodak Print' . Lower centre back is stamped 'velox' and '998L'. Photo 4 - upper back, in ink - 'Junction Dam Spion Kopje in background. October 1948'. Stamps as photo no. 4. Photo 5 - upper back, in ink - 'Lake Guy (orange filter) October 1948'. Centre back, in pencil '29' and circular stamp with words 'Print by Willson White Albury'. Photo 6 - upper back edge 'Junction, Bogong from Radio Receiving Shack Dec. 1948'. In pencil '14'. Photo 7 - On back of photo 'View of Mountains from Little Arthur Fire Track October 1948'. Two circular stamps with 'Kodak Print', another two stamps - 'Velox' and '998L'. Photo 8 - On back in ink 'Loone's Store Bogong with Spion Kopje in background. October 1948'. Lower down, stamps 'Velox' and '998L'. Part of circular stamp with one word 'Kodak'. Photo 9 - on back in ink 'Junction Camp, Bogong Village & Lake Guy from Little Arthur Fire Track. October 1948'. Stamped across writing '998L'. Lower down stamped 'Velox' and circular stamp with words 'Kodak Print'. Photo 10 - on back in ink 'Junction Camp & Bogong Village Lake Guy in Foreground. October 1948'. Stamps as photo 9. Photo 11 - on back in ink 'Junction Camp & Bogong Village, Lake Guy in Foreground. October 1948'. Lower stamp '998L'. Photo 12 - 'Junction of Rocky & Pretty Rivers with tennis courts in foreground October 1948' . Circular stamp with words, 'Print by Willson White Albury'. Number '29' written pencil.junction dam; bogong village; kiewa hydro electric scheme; lake guy -
 Melton City Libraries
Postcard, Postcards from Fred and Mattie Myers, 1909-1914
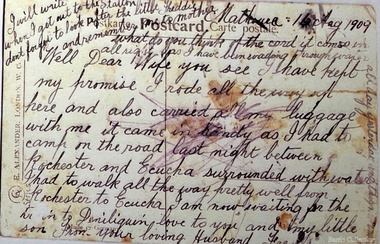
Post Card: Melton Railway Station 1909 Mattie to Fred My Dear Fred I received your letter and the L2 10/- I was very pleased to hear that I could write again. You say you will come home after the last shead. I should think so. I had a letter from E Jenkins so I am going down to see her next week we call the baby Fernie now I hope you will agree. Dear Fern has got the whooping cough. Written on the side: I suppose you will be away four weeks yet. Love from Mattie will write on Sunday. This letter appears to be connected with the post card Barwonleigh Saturday October 1908 handwriting My Dear Mattie I received your letter and was sorry to hear of our dear little babys misfortune how did it happen do you know what was the cause of it Mrs Watts must be a blind old fool not to have known what it was when you took him to her the first time poor dear you must be worried to death with all this trouble tell me what the doctor thinks of the rupture. I do hope dear he will get over this all right you must be nearly dead going without sleep for so long I had a bit of misfortune myself on Thursday the machine locked and jumped out of my hand and stuck in my bone I kept on working but it was very painful as all the holding is done with the..next page ..knee the boss also has been chipping a good deal this week he says the next time he has occasion to speak to me I will have to go he is very particular. I would like to go through if possible even if I do a lot less. I have about sixteen hundred done up to now and would get another nine hundred if I was let alone but I suppose we will live lovie even if I go do you know if they are full handed at Eynesbury if I thought I could get a week there I would cut myself out here quick. Well dear lovie I am sending you a couple of pounds as I suppose you will want it to get a truss. I don’t think they are very expensive and hope things will find this better with you. Well my dear love I must close with fond love for you and baby from your loving Husband Fred Post Card: 16 Aug 1909 - Mathoura The card depicts a small sailing boat laden with blue flowers. Well Dear Wife you see I have kept my promise. I rode all the way up here and also carried all my luggage with me it came in handy as I had to camp on the road last night between Rochester and Echuca surrounded by water. I had to walk all the way pretty well from Rochester to Echuca. I am now waiting for the train to Deniliquin. Love to you and my little son Fred. From you loving Husband Fred Written along the top and side of the card. what do you think if the card comes in all right as I have been wading through water all day yesterday and this might be …? will write when I get to the Station, don’t forget to look after the little Freddie and remember me to mother. Post Card: 1909 - view across the Flat from the Creek looking to the Presbyterian Church in the distance with some small dwellings in the foreground. To Mr Fred Myers Wandook Stn Denniliquin NSW Dear Fred, received your letter I am sorry to hear you are having such wet weather I will write a letter tomorrow baby is better With Love from M Post Card: 1910 Postmark Stamp 1d Aug 12 1910 Moama NSW Melton postmark stamped Aug 25? Hare Street, looking south Echuca Mrs F Myers, Melton P O Vic Dear Mattie, Just a line to let you know I got here all right I go to Pericotta tonight and to Cobran to morrow best love to all from yours Fred Letter Cobran Stn Via Deniliquin N.S.W. Sunday 21st Aug extract I am having a good time here, a good cook and the best of everything no fires to light or kettles to boil just get up and wire in… plenty hard work the sheep are pretty tough but much better than Wandook. I am well among them here we had a little rain on Friday but not enough to stop us so we have got one full week in .. the weather is lovely. I have been basking in the sunshine mainly in the morning and feel strong and fit a as fiddle, they are a grand lot of men here I only knew one out of the lots but know them all pretty well now, we have a bit of a concert here every nights almost there are a few good singers here and we also had a phonograph up from the station with all the latest records we have two dancers among ourselves very boisterous affairs indeed thy do make the dust fly. I have not ventured to take part in it and don’t think I will either. I get enough dancing all day long and besides I have to furnish the music you ought to see them going when I rattle up the concertina. Letter Cobran Stn via Deniliquin Thursday Sept 1st 1910 [abbreviated] My Dear Mattie, I received your welcome letter today. I though I was never going to get one as it was Sunday fortnight when I wrote to you but we only the mail here twice a week so it takes a long time to write and get an answer. I also got a reply from Eynesbury and a favourable reply it starts on the 13th Oct. …. I have 800 sheep shorn up to date and am fifth among about 30 men. I am sending two more [Ls] this time which I drew on Saturday. I don’t like sending too much more this time as there is a chance of it going astray and it is not very easily earned…. Things must be humming in Melton with all them babies coming and people getting married… I suppose we will be having new neighbours soon. If Mr Watts is selling out he was getting more property then he could keep. I hope you will soon have rain…. you will have to watch our little boy the dear little rascal he must be getting very cute opening the gates he will be tumbling into the tank …. I love to think of the happy times we have had together and hope that we will love one another to the end .. the mail will not leave here until Monday Love to you dear wife and baby Fred Post Card: – I Cling to you like Ivy Cobran September 18th 1910 Fred awaits a letter from Mattie I still have three weeks here yet.. I am sending L2 tell if you got the other 1L 1911 Letters Fred to Mattie October Spring Plains Oct 1911 Mia Mia Post Office I had a great job to catch the train at Diggers Rest as after I turned off the Keilor Rd it was very way and muddy and I had to walk a lot of the way and got there just in time. I came right into Redesdale by the train and stopped there last night… they had heavy rain on thursday up here and a tremendous fall of hail which covered the ground over a foot deep. There are only 4 shearers here yet.. I saw some of the sheep they look very rough and big so there will be no big tallies done, the men are saying he is giving 2s per hundred extra, so that will help a little. We are going to start Cobran via Deniliquin. Post Card: three scenes of Mathoura 10/9/1914 EB on a photo copy 10/9/12 ? Mathoura Thursday Dear Mattie, Just a line to let you know I got up here all right. I rode the seat out of my trousers. I have done 100 miles on the bike. I met none of the old hands this time so will go out on my own… Your loving husband Fred, did Marjie miss me at all. Post Card: Cobran 15th Sept 1912 Hearts and intertwined flowers and little envelope he has written Marjorie …just a line to let you know I will cut out here Friday next in find, we have had two falls of rain since I wrote and it has bean blowing a hurricane for couple of days and may blow up again however if we are delayed I will send you a card Wednesday I am longing to see you and the two little kiddies again…. Fred Copy only Golf Hill Sep 26th Cut out 31 Oct Total 2332 1913 Post Card: Scene View Street, Bendigo August 1913 Mathoura Tuesday My Dear Mattie Just a line to let you know I got up here all right. Teddy Ginger and another couple of chaps on the way ……. Letter Cobran Sunday Aug 7th 1913 My Dear Mattie Just a line to let you know that weather permitting we will cut out here about Thursday morning….I have not got any more shearing here. I have not heard from the other place…. Expect me about Friday …. I suppose Freddie and Marjie will be glad to see me, Marjie will climb all over me. I will be glad to se you all again you will have a fortnight before Golf Hill starts. I see in the Express you sent that Annie McPherson of (Dunvegan) is engaged to Len Farrell, she appears to be going to take no risks with him she wont let him slip through her hands like the banker did…… Fred Post Card: 1914 Garland of roses Warrambeen Stn Shelford PO October 14th 1914 Birthday wishes. Post Card: Love’s Golden Chain Golf Hill Tuesday Oct 17 1914 Birthday wishes [ this one might be a different year] Letter Cobran Wed 2nd Sept 1914 My Dear Mattie, I received your welcome letter today and also the papers which were very acceptable as we don’t get many papers here we only get see one at odd times as we get none for the hut this year.. I have not seen a bit of butter since I left home as it is too dear for us for sinners here. Poor Marjie had a cold.. so the little kid wants to go to the war, she must think it is good like a picnic. We had light rain on Monday as usual only half a day’s shearing in the shed so that is all we done this week, we took a vote 9 to 6 no shearing so nothing till to morrow morning Thursday so there is still a good fortnights shearing to do, will do nothing Saturday polling day as we have to go 13 miles is near Services where I was last year so we will want the full day 50 men to vote and some will probably have to walk to get there, all solid for Labour. I have just had an interval for lunch, pudding, yeast buns and rock cakes… We are doing nothing but eating and sleeping this week. Fred I am sending L1 in this which will do you till I come back if I keep drawing up I will have none when I finish so make the most of it. Post Card: Two doves with violets 1915 Cobran Wed 18th Sept [could be 1912] Sorry to tell you we are delayed with rain so will not be home till next week… only 3 days of shearing to do…. expect me about the middle of next week….I wish I was with you now and the dear little ones Fred Post Card: Iris Flowers Barwonleigh Stn Tuesday Oct 14th 1918 Happy birthday greetings from Fred Post Card: Irrigation channel Swan Hill 5 Year not shown Swan Hill Tuesday night Just a few lines to let you know I got this far all right. I had to walk nearly all the way to Gisborne and got there last night and took the train here today. It has been raining all the way between Gisborne and here. Moulamein tomorrow. I think it will be another case of walking as it is wet here no metal roads all mud. best love to yourself and the little ones and also mother. will write Sunday Post Card: The White Man’s Burden.The writing on the back rubbed out Mattie has written, I was weighed and I am 8 stone 10 pounds. 14 Post Cards, some have the original dates, others have the date added later by Martha. Two envelopes, one with addressed to Melton postmark Moule, stamp torn off, the other Cards from my dear Fred. The letters and the notebooks can be cross checked according the their contents. Italics show the dates added by Mattie local identities -
 Flagstaff Hill Maritime Museum and Village
Instrument - Optical, Binoculars, 1878 (estimated)
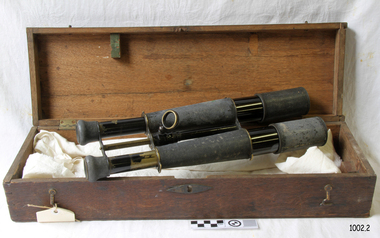
This pair of brass binoculars was presented to Tom Pearce in recognition of his heroic efforts at the wrecking of the Loch Ard and saving Eva Carmichael. They were presented to him by the Lady Mayoress of Sydney on 27th July 1878 on behalf of the colonists of New South Wales "In recognition of his gallant conduct on the occasion of the wreck of the Loch Ard". Tom (Thomas) Pearce was born in Ireland in 1859 and arrived in Melbourne two years later; he considered himself as Australian. Before sailing on the Loch Ard he had been at sea for three years as an apprentice sailor and had already experienced one shipwreck. Tom was on the deck of the Loch Ard with Captain Gibb throughout the night of May 31st 1878. It was mistakenly thought they were 150 miles (240 km) southwest of Cape Otway. By 2:00 am on June 1st, the wind was blowing "pretty fresh" but a thick haze remained and, when it eventually cleared, the land was so close the unsuccessful battle to save the Loch Ard began. After the ship struck Mutton Bird Island Tom and five others were sent to the lifeboats. Conditions were very dangerous as waves broke over the decks and they were all washed away. Tom found himself in the stormy waters and under a lifeboat, which had also been washed into the sea. After being swept into the gorge Tom left the boat and swam into shore; he was alone. Eva Carmichael, a passenger on the ship, had been snatched from her bed just before dawn and into the chaos, confusion and terror of the shipwreck, with rigging and rocks raining down. Thrown into the sea, she afterwards said: "God taught me to swim in my distressful plight, for I never swam before". Clinging to a spar, she was swept into the gorge and saw Tom Pearce walking along the beach. Upon hearing the cries of Eva, Tom swam out and with great difficulty brought her to the shore and placed her safely in a cave where he made a bed of grass and shrubs and gave her brandy to revive her. She sank into exhausted unconsciousness. Tom then scrambled to the top of the high cliff and after walking for some time he stumbled upon workers from Glenample Homestead. They rode back to the homestead for help but Tom insisted on returning to Eva. When Eva awoke she found herself alone, "cold, weak and terrified with the wild waves before me, and caves and cliffs around me" and upon hearing strange noises, which she imagined to be made by the local indigenous people, she hid. The noises were made by the rescue party from Glenample Homestead. After eventually discovering Eva they hauled her up the cliff in the darkness of night, “a work of great difficulty and danger” and took her to Glenample. Sadly, Tom and Eva were the only survivors of the 54 people on board the Loch Ard. Tom’s rewards for his bravery included the Gold Medal of the Humane Society, a gold watch and £1000 from the Victorian Government, a set of nautical instruments, (which included the binoculars) from the people of Sydney and £60 from the people of Warrnambool. He was also presented with a Bible by a “Friend of the Loyal Orange Institution of Victoria, Protestant Hall Melbourne” in August 1878. Coleman Jacobs composed the music "The Young Hero Schottische" and dedicated it, by permission, to Mr Thomas R. (Tom) Pearce. The sheet music was published in 1878 by Mr Roberts, professor of dancing and was on sale for 3/- (3 shillings) in aid of the "Loch Ard" fund. Tom Pearce went on to join the Loch Sunart on her return to England, only to be wrecked again off the Irish coast in January 1879. Tom left the Loch Line in 1883 and the following year married Edith Gurney Strasenbergh, the sister of his friend Robert who had died on the Loch Ard. They had three children, unfortunately, two of the male children were to die at sea. In 1895 Tom obtained his first command as Master of The Larne, a vessel with the Royal Mail Steam Packet Company. He remained with the company until he died in Southampton, England, on 14th December 1908. Tom Pearce never saw Eva Carmichael after he had fare welled her some 30 years before. Eveline Victoria Berta Carmichael was born in 1859 in Mountrath, Queens County, Ireland. After recovering from her ordeal in August 1878 Eva returned to Ireland and in 1884 married Thomas Achilles Townshend, a Civil Engineer. They had three sons, all of whom had successful military careers, and when Eva’s death notice appeared in the Melbourne Argus It read. "Townshend on 8th April 1934 aged 74 at her residence in Bedford, England, Evaline Victoria, widow of the late Thomas Archilles Townshend, C.E. of Co. Cork, Ireland. Mrs Townshend was the Eva Carmichael who, with the late Tom Pearce, were the only two survivors of the ship Loch Ard, which was wrecked near Port Campbell on June 1st 1878." The binoculars are significant for their association with the wreck of the Loch Ard and the only two surviving members of that wreck Tom Pearce and Eva Carmichael. Flagstaff Hill’s collection of artefacts from Loch Ard is significant for being one of the largest. The shipwreck of the Loch Ard is of significance for Victoria and is registered on the Victorian Heritage Register ( S 417). Flagstaff Hill has a varied collection of artefacts from Loch Ard and its collection is significant for being one of the largest accumulation of artefacts from this notable Victorian shipwreck. The collections object is to also give us a snapshot into history so we can interpret the story of this tragic event. The collection is also archaeologically significant as it represents aspects of Victoria's shipping history that allows us to interpret Victoria's social and historical themes of the time. The assemblage of items from the wreck is of historical significance in that they are associated with the worst and best-known shipwreck in Victoria's history. Pair of brass marine binoculars in a wooden box On the left hand eye piece, on the underside, is an engraved inscription and another engraved word. On the right hand eye piece there is another small inscription and on the underside there is a small green mark. The binoculars have a pattern of embossed tiny circles on the outside. Some of the patterning is very shiny due to wear and rubbing, there is a brass ring on the underside of the binoculars for the attachment of a lanyard. The wooden box has a hinged lid and on the front of the box in the centre is a lock, and at either end are two hooks and eyes. The box is split across the top for about 3/4 of the length. Marking on the left underside reads, 'Presented on behalf of the Colonists of New South Wales By the Mayoress of Sydney on 27th. July 1878 to Mr Thomas B Pearce. In recognition of his gallant conduct on the occasion of the wreck of the "Loch Ard"'. Underneath this inscription is engraved 'Sydney'. On the other eye piece is engraved what looks like 'Mac Donnell & Co' binoculars, flagstaff hill, warrnambool, shipwrecked coast, flagstaff hill maritime museum, maritime museum, shipwreck coast, flagstaff hill maritime village, loch ard shipwreck, tom pearce, thomas r pearce, eva carmichael, mutton bird island, loch ard survivor, loch ard hero, coleman jacobs, the young hero schottische, photograph of tom pearce, glenample homestead -
 Flagstaff Hill Maritime Museum and Village
Domestic object - Bowl, Late 19th or early 20th Century
The Process of Making Pottery Decorating, Firing, Glazing, Making, Technical There is a rhythm and flow to clay. It can’t be done all at once! Even the making process! It can take weeks to get everything done, especially if you can only work on your pottery once a week! Even though we have three hour classes, it’s often just not enough time! Here is an overview of some of the processes so you have a bit more grasp on some of the technical stuff! Step One – Design There are SO many ideas out there for making stuff in clay! From delicate porcelain jewellery, through to heavy sculptural work and everything in between. Deciding your direction is sometimes not that easy – when you first start, try everything, you will naturally gravitate to the style that you enjoy! The options and variations are endless and can get a wee bit overwhelming too! Check in with me before you start to ensure your ideas will work, what order you might do things, how you could achieve the look you are seeking and any other technical data required! Step Two – Making Clay is thixotropic. This means that as you work with it, the clay first gets sloppier and wetter, before is begins to dry in the atmosphere. For most things, you simply can’t do all parts of the project at once. An example of work order might look like: Get last weeks work out from the shelves Prepare clay for today’s work – roll your clay, prepare balls for throwing, make the first stage of a pinch pot) Clean up last week’s work and put it on the shelf for bisque firing Check that you have any glazing to do – and do enough of it that you will have time to finish your main project Do the next step of your next project – there might be a further step that can’t be complete immediately, in that case, wrap your work well and put onto the shelves. Letting your work rest for a while can really help keep your work clean and professional looking. Many things require bagging under plastic to keep it ready for work the next week – put your name on the outside of the bag so you can find your work easily. We have stickers and markers. Consider how you want to decorate your work – coloured slip can be applied at a fairly wet stage (remembering that it will make your work even wetter!). Trying to apply slip to dry clay won’t work! If you want to do sgraffito – you will need to keep the work leather hard (a state of dryness where you can still work the clay with a little effort and a little water and care). Step Three – Drying Most of the time your work can go into the rack uncovered to let it dry out for the following week. If you want to continue forming or shaping you will need to double bag your work – put your work on a suitable sized bat and put the bat in a bag so the base of the bag is under the bat, then put another bag over the top of the work and tuck the top of the bag under the bat. If you want to trim (or turn) your thrown work the following week, it should also be double bagged. If your work is large, delicate, or of uneven thicknesses, you should lightly cover your work for drying. When considering the drying process, bare in mind the weather, humidity and wind! The hotter and dryer, the faster things dry and work can dry unevenly in the shelves – this can lead to cracking – another time to lightly cover your work for drying. Step Four – Trimming and Cleaning Up Your work is dry! It is called greenware now and it is at it’s most fragile! Handle everything with two hands. I often refer to soft hands – keep everything gentle and with your fingers spread as much as possible. Try to not pick up things like plates too much, and always with both hands! Before your work can be bisque fired it should be “cleaned up”. You work won’t go into the kiln if it has sharp edges – when glazed, sharp edges turn into razor blades! Use a piece of fly wire to rub the work all over – this will scratch a little so be light handed. Use a knife or metal kidney to scrape any areas that require a bit more dynamic treatment than the fly wire offers! Finally, a very light wipe over with a slightly damp sponge can help soften and soothe all of your edges and dags! Trimming thrown work: If you are planning to trim (or turn) your thrown work (and you should be), make sure you bag it well – your work should be leather hard to almost dry for easiest trimming. Use this step to finish the work completely – use a metal kidney to polish the surface, or a slightly damp sponge to give a freshly thrown look. Wipe the sponge around the rim after trimming, and check the inside of the pot for dags! Trimming slip cast work: Usually I will trim the rims of your work on the wheel the following day to make that stage easier, however you will still need to check your work for lumps and bumps. Last but not least – check that your name is still clearly on the bottom of your work. Step Five – Bisque Firing When the work is completely dry it can go into the bisque kiln. The bisque kiln is fired to 1000°C. This process burns off the water in the clay as well as some of the chemically bound water. The structure of the clay is not altered that much at this temperature. Inside the bisque kiln, the work is stacked a little, small bowl inside a larger bowl and onto a heavy plate. Smaller items like decorations or drink coasters might get stacked several high. Consideration is paid to the weight of the stack and shape of the work. A bisque kiln can fire about one and a half times the amount of work that the glaze kiln can fire. The firing takes about 10 hours to complete the cycle and about two days to cool down. Once it has been emptied the work is placed in the glaze room ready for you to decorate! Step Six – Glazing Decorating your work with colour can be a lot of fun – and time consuming! There are three main options for surface treatment at this stage: Oxide Washes Underglazes Glazes Washes and underglazes do not “glaze” the work – It will still need a layer of glaze to fully seal the clay (washes don’t need glaze on surfaces not designed for food or liquid as they can gloss up a little on their own). Underglazes are stable colourants that turn out pretty much how they look in the jar. They can be mixed with each other to form other colours and can be used like water colours to paint onto your work. Mostly they should have a clear glaze on top to seal them. Oxides are a different species – the pink oxide (cobalt) wash turns out bright blue for instance. They don’t always need a glaze on top, and some glazes can change the colour of the wash! The glazes need no other “glaze” on top! Be careful of unknown glaze interactions – you can put any combination of glaze in a bowl or on a plate, but only a single glaze on the outside of any vertical surface! Glazes are a chemical reaction under heat. We don’t know the exact chemicals in the Mayco glazes we use. I can guess by the way they interact with each other, however, on the whole, you need to test every idea you have, and not run the test on a vertical surface! Simply put, glaze is a layer of glass like substance that bonds with the clay underneath. Clay is made of silica, alumina and water. Glaze is made of mostly silica. Silica has a melting point of 1700°C and we fire to 1240°C. The silica requires a “flux” to help it melt at the lower temperature. Fluxes can be all sorts of chemicals – a common one is calcium – calcium has a melting point of 2500°C, however, together they both melt at a much lower temperature! Colourants are metal oxides like cobalt (blue), chrome (green through black), copper (green, blue, even red!), manganese (black, purple and pink) iron (red brown), etc. Different chemicals in the glaze can have dramatic effects. for example, barium carbonate (which we don’t use) turns manganese bright pink! Other elements can turn manganese dioxide brown, blue, purple and reddish brown. Manganese dioxide is a flux in and of itself as well. So, glazes that get their black and purple colours, often interact with other glazes and RUN! Our mirror black is a good example – it mixes really well with many glazes because it fluxes them – causes them to melt faster. It will also bring out many beautiful colours in the glazes because it’s black colouring most definitely comes from manganese dioxide! Glaze chemistry is a whole subject on it’s own! We use commercial Mayco glazes on purpose – for their huge range of colour possibilities, stability, cool interactions, artistic freedom with the ability to easily brush the glazes on and ease of use. We currently have almost 50 glazes on hand! A major project is to test the interactions of all glazes with each other. That is 2,500 test tiles!!!! I’m going to make the wall behind the wheels the feature wall of pretty colours! Step Seven – Glaze (Gloss or sometimes called “Glost”) Firing Most of the time this is the final stage of making your creation (but not always!) The glaze kiln goes to 1240°C. This is called cone 6, or midrange. It is the low end of stoneware temperatures. Stoneware clays and glazes are typically fired at cone 8 – 10, that is 1260 – 1290°C. The energy requirement to go from 1240°C to 1280°C is almost a 30% more! Our clay is formulated to vitrify (mature, turn “glass-like”) at 1240°, as are our glazes. A glaze kiln take around 12 hours to reach temperature and two to three days to cool down. Sometimes a third firing process is required – this is for decoration that is added to work after the glaze firing. For example – adding precious metals and lustres. this firing temperature is usually around 600 – 800°C depending upon the techniques being used. There are many students interested in gold and silver trims – we will be doing this third type of firing soon! After firing your work will be in the student finished work shelves. Remember to pay for it before you head out the door! There is a small extra charge for using porcelain clay (it’s more than twice the price of regular clay), and for any third firing process! Once your work has been fired it can not turn back into clay for millennia – so don’t fire it if you don’t like it! Put it in the bucket for recycling. https://firebirdstudios.com.au/the-process-of-making-pottery/ The bowl is an example of kitchenware used in the 19th century and still in use today.Bowl white ceramic. Crack on side. Badly stained.Backstamp very faint and unable to be read.flagstaff hill, warrnambool, shipwrecked-coast, flagstaff-hill, flagstaff-hill-maritime-museum, maritime-museum, shipwreck-coast, flagstaff-hill-maritime-village, mixing bowl, food preparation, kitchen equipment, ceramic -
 Flagstaff Hill Maritime Museum and Village
Domestic object - Bowl
The Process of Making Pottery Decorating, Firing, Glazing, Making, Technical There is a rhythm and flow to clay. It can’t be done all at once! Even the making process! It can take weeks to get everything done, especially if you can only work on your pottery once a week! Even though we have three hour classes, it’s often just not enough time! Here is an overview of some of the processes so you have a bit more grasp on some of the technical stuff! Step One – Design There are SO many ideas out there for making stuff in clay! From delicate porcelain jewellery, through to heavy sculptural work and everything in between. Deciding your direction is sometimes not that easy – when you first start, try everything, you will naturally gravitate to the style that you enjoy! The options and variations are endless and can get a wee bit overwhelming too! Check in with me before you start to ensure your ideas will work, what order you might do things, how you could achieve the look you are seeking and any other technical data required! Step Two – Making Clay is thixotropic. This means that as you work with it, the clay first gets sloppier and wetter, before is begins to dry in the atmosphere. For most things, you simply can’t do all parts of the project at once. An example of work order might look like: Get last weeks work out from the shelves Prepare clay for today’s work – roll your clay, prepare balls for throwing, make the first stage of a pinch pot) Clean up last week’s work and put it on the shelf for bisque firing Check that you have any glazing to do – and do enough of it that you will have time to finish your main project Do the next step of your next project – there might be a further step that can’t be complete immediately, in that case, wrap your work well and put onto the shelves. Letting your work rest for a while can really help keep your work clean and professional looking. Many things require bagging under plastic to keep it ready for work the next week – put your name on the outside of the bag so you can find your work easily. We have stickers and markers. Consider how you want to decorate your work – coloured slip can be applied at a fairly wet stage (remembering that it will make your work even wetter!). Trying to apply slip to dry clay won’t work! If you want to do sgraffito – you will need to keep the work leather hard (a state of dryness where you can still work the clay with a little effort and a little water and care). Step Three – Drying Most of the time your work can go into the rack uncovered to let it dry out for the following week. If you want to continue forming or shaping you will need to double bag your work – put your work on a suitable sized bat and put the bat in a bag so the base of the bag is under the bat, then put another bag over the top of the work and tuck the top of the bag under the bat. If you want to trim (or turn) your thrown work the following week, it should also be double bagged. If your work is large, delicate, or of uneven thicknesses, you should lightly cover your work for drying. When considering the drying process, bare in mind the weather, humidity and wind! The hotter and dryer, the faster things dry and work can dry unevenly in the shelves – this can lead to cracking – another time to lightly cover your work for drying. Step Four – Trimming and Cleaning Up Your work is dry! It is called greenware now and it is at it’s most fragile! Handle everything with two hands. I often refer to soft hands – keep everything gentle and with your fingers spread as much as possible. Try to not pick up things like plates too much, and always with both hands! Before your work can be bisque fired it should be “cleaned up”. You work won’t go into the kiln if it has sharp edges – when glazed, sharp edges turn into razor blades! Use a piece of fly wire to rub the work all over – this will scratch a little so be light handed. Use a knife or metal kidney to scrape any areas that require a bit more dynamic treatment than the fly wire offers! Finally, a very light wipe over with a slightly damp sponge can help soften and soothe all of your edges and dags! Trimming thrown work: If you are planning to trim (or turn) your thrown work (and you should be), make sure you bag it well – your work should be leather hard to almost dry for easiest trimming. Use this step to finish the work completely – use a metal kidney to polish the surface, or a slightly damp sponge to give a freshly thrown look. Wipe the sponge around the rim after trimming, and check the inside of the pot for dags! Trimming slip cast work: Usually I will trim the rims of your work on the wheel the following day to make that stage easier, however you will still need to check your work for lumps and bumps. Last but not least – check that your name is still clearly on the bottom of your work. Step Five – Bisque Firing When the work is completely dry it can go into the bisque kiln. The bisque kiln is fired to 1000°C. This process burns off the water in the clay as well as some of the chemically bound water. The structure of the clay is not altered that much at this temperature. Inside the bisque kiln, the work is stacked a little, small bowl inside a larger bowl and onto a heavy plate. Smaller items like decorations or drink coasters might get stacked several high. Consideration is paid to the weight of the stack and shape of the work. A bisque kiln can fire about one and a half times the amount of work that the glaze kiln can fire. The firing takes about 10 hours to complete the cycle and about two days to cool down. Once it has been emptied the work is placed in the glaze room ready for you to decorate! Step Six – Glazing Decorating your work with colour can be a lot of fun – and time consuming! There are three main options for surface treatment at this stage: Oxide Washes Underglazes Glazes Washes and underglazes do not “glaze” the work – It will still need a layer of glaze to fully seal the clay (washes don’t need glaze on surfaces not designed for food or liquid as they can gloss up a little on their own). Underglazes are stable colourants that turn out pretty much how they look in the jar. They can be mixed with each other to form other colours and can be used like water colours to paint onto your work. Mostly they should have a clear glaze on top to seal them. Oxides are a different species – the pink oxide (cobalt) wash turns out bright blue for instance. They don’t always need a glaze on top, and some glazes can change the colour of the wash! The glazes need no other “glaze” on top! Be careful of unknown glaze interactions – you can put any combination of glaze in a bowl or on a plate, but only a single glaze on the outside of any vertical surface! Glazes are a chemical reaction under heat. We don’t know the exact chemicals in the Mayco glazes we use. I can guess by the way they interact with each other, however, on the whole, you need to test every idea you have, and not run the test on a vertical surface! Simply put, glaze is a layer of glass like substance that bonds with the clay underneath. Clay is made of silica, alumina and water. Glaze is made of mostly silica. Silica has a melting point of 1700°C and we fire to 1240°C. The silica requires a “flux” to help it melt at the lower temperature. Fluxes can be all sorts of chemicals – a common one is calcium – calcium has a melting point of 2500°C, however, together they both melt at a much lower temperature! Colourants are metal oxides like cobalt (blue), chrome (green through black), copper (green, blue, even red!), manganese (black, purple and pink) iron (red brown), etc. Different chemicals in the glaze can have dramatic effects. for example, barium carbonate (which we don’t use) turns manganese bright pink! Other elements can turn manganese dioxide brown, blue, purple and reddish brown. Manganese dioxide is a flux in and of itself as well. So, glazes that get their black and purple colours, often interact with other glazes and RUN! Our mirror black is a good example – it mixes really well with many glazes because it fluxes them – causes them to melt faster. It will also bring out many beautiful colours in the glazes because it’s black colouring most definitely comes from manganese dioxide! Glaze chemistry is a whole subject on it’s own! We use commercial Mayco glazes on purpose – for their huge range of colour possibilities, stability, cool interactions, artistic freedom with the ability to easily brush the glazes on and ease of use. We currently have almost 50 glazes on hand! A major project is to test the interactions of all glazes with each other. That is 2,500 test tiles!!!! I’m going to make the wall behind the wheels the feature wall of pretty colours! Step Seven – Glaze (Gloss or sometimes called “Glost”) Firing Most of the time this is the final stage of making your creation (but not always!) The glaze kiln goes to 1240°C. This is called cone 6, or midrange. It is the low end of stoneware temperatures. Stoneware clays and glazes are typically fired at cone 8 – 10, that is 1260 – 1290°C. The energy requirement to go from 1240°C to 1280°C is almost a 30% more! Our clay is formulated to vitrify (mature, turn “glass-like”) at 1240°, as are our glazes. A glaze kiln take around 12 hours to reach temperature and two to three days to cool down. Sometimes a third firing process is required – this is for decoration that is added to work after the glaze firing. For example – adding precious metals and lustres. this firing temperature is usually around 600 – 800°C depending upon the techniques being used. There are many students interested in gold and silver trims – we will be doing this third type of firing soon! After firing your work will be in the student finished work shelves. Remember to pay for it before you head out the door! There is a small extra charge for using porcelain clay (it’s more than twice the price of regular clay), and for any third firing process! Once your work has been fired it can not turn back into clay for millennia – so don’t fire it if you don’t like it! Put it in the bucket for recycling. https://firebirdstudios.com.au/the-process-of-making-pottery/ This bowl is an example of kitchenware used in the 19th century and still in use today.Bowl white ceramic plain that has two sets of edging around lip. Inside bowl has plaster designed to look like cooking mixture.flagstaff hill, warrnambool, shipwrecked-coast, flagstaff-hill, flagstaff-hill-maritime-museum, maritime-museum, shipwreck-coast, flagstaff-hill-maritime-village, kitchen equipment, ceramic -
 Flagstaff Hill Maritime Museum and Village
Domestic object - Bowl, J & G Meakin, Late 19th or early 20th Century
The Process of Making Pottery Decorating, Firing, Glazing, Making, Technical There is a rhythm and flow to clay. It can’t be done all at once! Even the making process! It can take weeks to get everything done, especially if you can only work on your pottery once a week! Even though we have three hour classes, it’s often just not enough time! Here is an overview of some of the processes so you have a bit more grasp on some of the technical stuff! Step One – Design There are SO many ideas out there for making stuff in clay! From delicate porcelain jewellery, through to heavy sculptural work and everything in between. Deciding your direction is sometimes not that easy – when you first start, try everything, you will naturally gravitate to the style that you enjoy! The options and variations are endless and can get a wee bit overwhelming too! Check in with me before you start to ensure your ideas will work, what order you might do things, how you could achieve the look you are seeking and any other technical data required! Step Two – Making Clay is thixotropic. This means that as you work with it, the clay first gets sloppier and wetter, before is begins to dry in the atmosphere. For most things, you simply can’t do all parts of the project at once. An example of work order might look like: Get last weeks work out from the shelves Prepare clay for today’s work – roll your clay, prepare balls for throwing, make the first stage of a pinch pot) Clean up last week’s work and put it on the shelf for bisque firing Check that you have any glazing to do – and do enough of it that you will have time to finish your main project Do the next step of your next project – there might be a further step that can’t be complete immediately, in that case, wrap your work well and put onto the shelves. Letting your work rest for a while can really help keep your work clean and professional looking. Many things require bagging under plastic to keep it ready for work the next week – put your name on the outside of the bag so you can find your work easily. We have stickers and markers. Consider how you want to decorate your work – coloured slip can be applied at a fairly wet stage (remembering that it will make your work even wetter!). Trying to apply slip to dry clay won’t work! If you want to do sgraffito – you will need to keep the work leather hard (a state of dryness where you can still work the clay with a little effort and a little water and care). Step Three – Drying Most of the time your work can go into the rack uncovered to let it dry out for the following week. If you want to continue forming or shaping you will need to double bag your work – put your work on a suitable sized bat and put the bat in a bag so the base of the bag is under the bat, then put another bag over the top of the work and tuck the top of the bag under the bat. If you want to trim (or turn) your thrown work the following week, it should also be double bagged. If your work is large, delicate, or of uneven thicknesses, you should lightly cover your work for drying. When considering the drying process, bare in mind the weather, humidity and wind! The hotter and dryer, the faster things dry and work can dry unevenly in the shelves – this can lead to cracking – another time to lightly cover your work for drying. Step Four – Trimming and Cleaning Up Your work is dry! It is called greenware now and it is at it’s most fragile! Handle everything with two hands. I often refer to soft hands – keep everything gentle and with your fingers spread as much as possible. Try to not pick up things like plates too much, and always with both hands! Before your work can be bisque fired it should be “cleaned up”. You work won’t go into the kiln if it has sharp edges – when glazed, sharp edges turn into razor blades! Use a piece of fly wire to rub the work all over – this will scratch a little so be light handed. Use a knife or metal kidney to scrape any areas that require a bit more dynamic treatment than the fly wire offers! Finally, a very light wipe over with a slightly damp sponge can help soften and soothe all of your edges and dags! Trimming thrown work: If you are planning to trim (or turn) your thrown work (and you should be), make sure you bag it well – your work should be leather hard to almost dry for easiest trimming. Use this step to finish the work completely – use a metal kidney to polish the surface, or a slightly damp sponge to give a freshly thrown look. Wipe the sponge around the rim after trimming, and check the inside of the pot for dags! Trimming slip cast work: Usually I will trim the rims of your work on the wheel the following day to make that stage easier, however you will still need to check your work for lumps and bumps. Last but not least – check that your name is still clearly on the bottom of your work. Step Five – Bisque Firing When the work is completely dry it can go into the bisque kiln. The bisque kiln is fired to 1000°C. This process burns off the water in the clay as well as some of the chemically bound water. The structure of the clay is not altered that much at this temperature. Inside the bisque kiln, the work is stacked a little, small bowl inside a larger bowl and onto a heavy plate. Smaller items like decorations or drink coasters might get stacked several high. Consideration is paid to the weight of the stack and shape of the work. A bisque kiln can fire about one and a half times the amount of work that the glaze kiln can fire. The firing takes about 10 hours to complete the cycle and about two days to cool down. Once it has been emptied the work is placed in the glaze room ready for you to decorate! Step Six – Glazing Decorating your work with colour can be a lot of fun – and time consuming! There are three main options for surface treatment at this stage: Oxide Washes Underglazes Glazes Washes and underglazes do not “glaze” the work – It will still need a layer of glaze to fully seal the clay (washes don’t need glaze on surfaces not designed for food or liquid as they can gloss up a little on their own). Underglazes are stable colourants that turn out pretty much how they look in the jar. They can be mixed with each other to form other colours and can be used like water colours to paint onto your work. Mostly they should have a clear glaze on top to seal them. Oxides are a different species – the pink oxide (cobalt) wash turns out bright blue for instance. They don’t always need a glaze on top, and some glazes can change the colour of the wash! The glazes need no other “glaze” on top! Be careful of unknown glaze interactions – you can put any combination of glaze in a bowl or on a plate, but only a single glaze on the outside of any vertical surface! Glazes are a chemical reaction under heat. We don’t know the exact chemicals in the Mayco glazes we use. I can guess by the way they interact with each other, however, on the whole, you need to test every idea you have, and not run the test on a vertical surface! Simply put, glaze is a layer of glass like substance that bonds with the clay underneath. Clay is made of silica, alumina and water. Glaze is made of mostly silica. Silica has a melting point of 1700°C and we fire to 1240°C. The silica requires a “flux” to help it melt at the lower temperature. Fluxes can be all sorts of chemicals – a common one is calcium – calcium has a melting point of 2500°C, however, together they both melt at a much lower temperature! Colourants are metal oxides like cobalt (blue), chrome (green through black), copper (green, blue, even red!), manganese (black, purple and pink) iron (red brown), etc. Different chemicals in the glaze can have dramatic effects. for example, barium carbonate (which we don’t use) turns manganese bright pink! Other elements can turn manganese dioxide brown, blue, purple and reddish brown. Manganese dioxide is a flux in and of itself as well. So, glazes that get their black and purple colours, often interact with other glazes and RUN! Our mirror black is a good example – it mixes really well with many glazes because it fluxes them – causes them to melt faster. It will also bring out many beautiful colours in the glazes because it’s black colouring most definitely comes from manganese dioxide! Glaze chemistry is a whole subject on it’s own! We use commercial Mayco glazes on purpose – for their huge range of colour possibilities, stability, cool interactions, artistic freedom with the ability to easily brush the glazes on and ease of use. We currently have almost 50 glazes on hand! A major project is to test the interactions of all glazes with each other. That is 2,500 test tiles!!!! I’m going to make the wall behind the wheels the feature wall of pretty colours! Step Seven – Glaze (Gloss or sometimes called “Glost”) Firing Most of the time this is the final stage of making your creation (but not always!) The glaze kiln goes to 1240°C. This is called cone 6, or midrange. It is the low end of stoneware temperatures. Stoneware clays and glazes are typically fired at cone 8 – 10, that is 1260 – 1290°C. The energy requirement to go from 1240°C to 1280°C is almost a 30% more! Our clay is formulated to vitrify (mature, turn “glass-like”) at 1240°, as are our glazes. A glaze kiln take around 12 hours to reach temperature and two to three days to cool down. Sometimes a third firing process is required – this is for decoration that is added to work after the glaze firing. For example – adding precious metals and lustres. this firing temperature is usually around 600 – 800°C depending upon the techniques being used. There are many students interested in gold and silver trims – we will be doing this third type of firing soon! After firing your work will be in the student finished work shelves. Remember to pay for it before you head out the door! There is a small extra charge for using porcelain clay (it’s more than twice the price of regular clay), and for any third firing process! Once your work has been fired it can not turn back into clay for millennia – so don’t fire it if you don’t like it! Put it in the bucket for recycling. https://firebirdstudios.com.au/the-process-of-making-pottery/This bowl was made by renowned pottery company J & G Meakin of England. The firm was established in the mid-1800's. The bowl is an example of kitchenware used in the 19th century and still in use today.Bowl; white ceramic, round and tapering inwards towards base. Made by J and G Meakin England.On base, 'Ironstone China Reg SOL 391413' with symbolflagstaff hill, flagstaff hill maritime museum and village, warrnambool, maritime museum, maritime village, great ocean road, shipwreck coast, mixing bowl, food preparation, j & g meakin, pottery, stoke-on-trent, kitchen equipment, ceramic -
 Flagstaff Hill Maritime Museum and Village
Domestic object - Plate
The Process of Making Pottery Decorating, Firing, Glazing, Making, Technical There is a rhythm and flow to clay. It can’t be done all at once! Even the making process! It can take weeks to get everything done, especially if you can only work on your pottery once a week! Even though we have three hour classes, it’s often just not enough time! Here is an overview of some of the processes so you have a bit more grasp on some of the technical stuff! Step One – Design There are SO many ideas out there for making stuff in clay! From delicate porcelain jewellery, through to heavy sculptural work and everything in between. Deciding your direction is sometimes not that easy – when you first start, try everything, you will naturally gravitate to the style that you enjoy! The options and variations are endless and can get a wee bit overwhelming too! Check in with me before you start to ensure your ideas will work, what order you might do things, how you could achieve the look you are seeking and any other technical data required! Step Two – Making Clay is thixotropic. This means that as you work with it, the clay first gets sloppier and wetter, before is begins to dry in the atmosphere. For most things, you simply can’t do all parts of the project at once. An example of work order might look like: Get last weeks work out from the shelves Prepare clay for today’s work – roll your clay, prepare balls for throwing, make the first stage of a pinch pot) Clean up last week’s work and put it on the shelf for bisque firing Check that you have any glazing to do – and do enough of it that you will have time to finish your main project Do the next step of your next project – there might be a further step that can’t be complete immediately, in that case, wrap your work well and put onto the shelves. Letting your work rest for a while can really help keep your work clean and professional looking. Many things require bagging under plastic to keep it ready for work the next week – put your name on the outside of the bag so you can find your work easily. We have stickers and markers. Consider how you want to decorate your work – coloured slip can be applied at a fairly wet stage (remembering that it will make your work even wetter!). Trying to apply slip to dry clay won’t work! If you want to do sgraffito – you will need to keep the work leather hard (a state of dryness where you can still work the clay with a little effort and a little water and care). Step Three – Drying Most of the time your work can go into the rack uncovered to let it dry out for the following week. If you want to continue forming or shaping you will need to double bag your work – put your work on a suitable sized bat and put the bat in a bag so the base of the bag is under the bat, then put another bag over the top of the work and tuck the top of the bag under the bat. If you want to trim (or turn) your thrown work the following week, it should also be double bagged. If your work is large, delicate, or of uneven thicknesses, you should lightly cover your work for drying. When considering the drying process, bare in mind the weather, humidity and wind! The hotter and dryer, the faster things dry and work can dry unevenly in the shelves – this can lead to cracking – another time to lightly cover your work for drying. Step Four – Trimming and Cleaning Up Your work is dry! It is called greenware now and it is at it’s most fragile! Handle everything with two hands. I often refer to soft hands – keep everything gentle and with your fingers spread as much as possible. Try to not pick up things like plates too much, and always with both hands! Before your work can be bisque fired it should be “cleaned up”. You work won’t go into the kiln if it has sharp edges – when glazed, sharp edges turn into razor blades! Use a piece of fly wire to rub the work all over – this will scratch a little so be light handed. Use a knife or metal kidney to scrape any areas that require a bit more dynamic treatment than the fly wire offers! Finally, a very light wipe over with a slightly damp sponge can help soften and soothe all of your edges and dags! Trimming thrown work: If you are planning to trim (or turn) your thrown work (and you should be), make sure you bag it well – your work should be leather hard to almost dry for easiest trimming. Use this step to finish the work completely – use a metal kidney to polish the surface, or a slightly damp sponge to give a freshly thrown look. Wipe the sponge around the rim after trimming, and check the inside of the pot for dags! Trimming slip cast work: Usually I will trim the rims of your work on the wheel the following day to make that stage easier, however you will still need to check your work for lumps and bumps. Last but not least – check that your name is still clearly on the bottom of your work. Step Five – Bisque Firing When the work is completely dry it can go into the bisque kiln. The bisque kiln is fired to 1000°C. This process burns off the water in the clay as well as some of the chemically bound water. The structure of the clay is not altered that much at this temperature. Inside the bisque kiln, the work is stacked a little, small bowl inside a larger bowl and onto a heavy plate. Smaller items like decorations or drink coasters might get stacked several high. Consideration is paid to the weight of the stack and shape of the work. A bisque kiln can fire about one and a half times the amount of work that the glaze kiln can fire. The firing takes about 10 hours to complete the cycle and about two days to cool down. Once it has been emptied the work is placed in the glaze room ready for you to decorate! Step Six – Glazing Decorating your work with colour can be a lot of fun – and time consuming! There are three main options for surface treatment at this stage: Oxide Washes Underglazes Glazes Washes and underglazes do not “glaze” the work – It will still need a layer of glaze to fully seal the clay (washes don’t need glaze on surfaces not designed for food or liquid as they can gloss up a little on their own). Underglazes are stable colourants that turn out pretty much how they look in the jar. They can be mixed with each other to form other colours and can be used like water colours to paint onto your work. Mostly they should have a clear glaze on top to seal them. Oxides are a different species – the pink oxide (cobalt) wash turns out bright blue for instance. They don’t always need a glaze on top, and some glazes can change the colour of the wash! The glazes need no other “glaze” on top! Be careful of unknown glaze interactions – you can put any combination of glaze in a bowl or on a plate, but only a single glaze on the outside of any vertical surface! Glazes are a chemical reaction under heat. We don’t know the exact chemicals in the Mayco glazes we use. I can guess by the way they interact with each other, however, on the whole, you need to test every idea you have, and not run the test on a vertical surface! Simply put, glaze is a layer of glass like substance that bonds with the clay underneath. Clay is made of silica, alumina and water. Glaze is made of mostly silica. Silica has a melting point of 1700°C and we fire to 1240°C. The silica requires a “flux” to help it melt at the lower temperature. Fluxes can be all sorts of chemicals – a common one is calcium – calcium has a melting point of 2500°C, however, together they both melt at a much lower temperature! Colourants are metal oxides like cobalt (blue), chrome (green through black), copper (green, blue, even red!), manganese (black, purple and pink) iron (red brown), etc. Different chemicals in the glaze can have dramatic effects. for example, barium carbonate (which we don’t use) turns manganese bright pink! Other elements can turn manganese dioxide brown, blue, purple and reddish brown. Manganese dioxide is a flux in and of itself as well. So, glazes that get their black and purple colours, often interact with other glazes and RUN! Our mirror black is a good example – it mixes really well with many glazes because it fluxes them – causes them to melt faster. It will also bring out many beautiful colours in the glazes because it’s black colouring most definitely comes from manganese dioxide! Glaze chemistry is a whole subject on it’s own! We use commercial Mayco glazes on purpose – for their huge range of colour possibilities, stability, cool interactions, artistic freedom with the ability to easily brush the glazes on and ease of use. We currently have almost 50 glazes on hand! A major project is to test the interactions of all glazes with each other. That is 2,500 test tiles!!!! I’m going to make the wall behind the wheels the feature wall of pretty colours! Step Seven – Glaze (Gloss or sometimes called “Glost”) Firing Most of the time this is the final stage of making your creation (but not always!) The glaze kiln goes to 1240°C. This is called cone 6, or midrange. It is the low end of stoneware temperatures. Stoneware clays and glazes are typically fired at cone 8 – 10, that is 1260 – 1290°C. The energy requirement to go from 1240°C to 1280°C is almost a 30% more! Our clay is formulated to vitrify (mature, turn “glass-like”) at 1240°, as are our glazes. A glaze kiln take around 12 hours to reach temperature and two to three days to cool down. Sometimes a third firing process is required – this is for decoration that is added to work after the glaze firing. For example – adding precious metals and lustres. this firing temperature is usually around 600 – 800°C depending upon the techniques being used. There are many students interested in gold and silver trims – we will be doing this third type of firing soon! After firing your work will be in the student finished work shelves. Remember to pay for it before you head out the door! There is a small extra charge for using porcelain clay (it’s more than twice the price of regular clay), and for any third firing process! Once your work has been fired it can not turn back into clay for millennia – so don’t fire it if you don’t like it! Put it in the bucket for recycling. https://firebirdstudios.com.au/the-process-of-making-pottery/Ceramics have evolved over thousands of years.White earthenware dinner plate. Crazing evident all over.Backstamped ‘Made in England S LTD’flagstaff hill, warrnambool, shipwrecked-coast, flagstaff-hill, flagstaff-hill-maritime-museum, maritime-museum, shipwreck-coast, flagstaff-hill-maritime-village, ceramics, tableware -
 Flagstaff Hill Maritime Museum and Village
Domestic object - Plate, Johnson Bros
The Process of Making Pottery Decorating, Firing, Glazing, Making, Technical There is a rhythm and flow to clay. It can’t be done all at once! Even the making process! It can take weeks to get everything done, especially if you can only work on your pottery once a week! Even though we have three hour classes, it’s often just not enough time! Here is an overview of some of the processes so you have a bit more grasp on some of the technical stuff! Step One – Design There are SO many ideas out there for making stuff in clay! From delicate porcelain jewellery, through to heavy sculptural work and everything in between. Deciding your direction is sometimes not that easy – when you first start, try everything, you will naturally gravitate to the style that you enjoy! The options and variations are endless and can get a wee bit overwhelming too! Check in with me before you start to ensure your ideas will work, what order you might do things, how you could achieve the look you are seeking and any other technical data required! Step Two – Making Clay is thixotropic. This means that as you work with it, the clay first gets sloppier and wetter, before is begins to dry in the atmosphere. For most things, you simply can’t do all parts of the project at once. An example of work order might look like: Get last weeks work out from the shelves Prepare clay for today’s work – roll your clay, prepare balls for throwing, make the first stage of a pinch pot) Clean up last week’s work and put it on the shelf for bisque firing Check that you have any glazing to do – and do enough of it that you will have time to finish your main project Do the next step of your next project – there might be a further step that can’t be complete immediately, in that case, wrap your work well and put onto the shelves. Letting your work rest for a while can really help keep your work clean and professional looking. Many things require bagging under plastic to keep it ready for work the next week – put your name on the outside of the bag so you can find your work easily. We have stickers and markers. Consider how you want to decorate your work – coloured slip can be applied at a fairly wet stage (remembering that it will make your work even wetter!). Trying to apply slip to dry clay won’t work! If you want to do sgraffito – you will need to keep the work leather hard (a state of dryness where you can still work the clay with a little effort and a little water and care). Step Three – Drying Most of the time your work can go into the rack uncovered to let it dry out for the following week. If you want to continue forming or shaping you will need to double bag your work – put your work on a suitable sized bat and put the bat in a bag so the base of the bag is under the bat, then put another bag over the top of the work and tuck the top of the bag under the bat. If you want to trim (or turn) your thrown work the following week, it should also be double bagged. If your work is large, delicate, or of uneven thicknesses, you should lightly cover your work for drying. When considering the drying process, bare in mind the weather, humidity and wind! The hotter and dryer, the faster things dry and work can dry unevenly in the shelves – this can lead to cracking – another time to lightly cover your work for drying. Step Four – Trimming and Cleaning Up Your work is dry! It is called greenware now and it is at it’s most fragile! Handle everything with two hands. I often refer to soft hands – keep everything gentle and with your fingers spread as much as possible. Try to not pick up things like plates too much, and always with both hands! Before your work can be bisque fired it should be “cleaned up”. You work won’t go into the kiln if it has sharp edges – when glazed, sharp edges turn into razor blades! Use a piece of fly wire to rub the work all over – this will scratch a little so be light handed. Use a knife or metal kidney to scrape any areas that require a bit more dynamic treatment than the fly wire offers! Finally, a very light wipe over with a slightly damp sponge can help soften and soothe all of your edges and dags! Trimming thrown work: If you are planning to trim (or turn) your thrown work (and you should be), make sure you bag it well – your work should be leather hard to almost dry for easiest trimming. Use this step to finish the work completely – use a metal kidney to polish the surface, or a slightly damp sponge to give a freshly thrown look. Wipe the sponge around the rim after trimming, and check the inside of the pot for dags! Trimming slip cast work: Usually I will trim the rims of your work on the wheel the following day to make that stage easier, however you will still need to check your work for lumps and bumps. Last but not least – check that your name is still clearly on the bottom of your work. Step Five – Bisque Firing When the work is completely dry it can go into the bisque kiln. The bisque kiln is fired to 1000°C. This process burns off the water in the clay as well as some of the chemically bound water. The structure of the clay is not altered that much at this temperature. Inside the bisque kiln, the work is stacked a little, small bowl inside a larger bowl and onto a heavy plate. Smaller items like decorations or drink coasters might get stacked several high. Consideration is paid to the weight of the stack and shape of the work. A bisque kiln can fire about one and a half times the amount of work that the glaze kiln can fire. The firing takes about 10 hours to complete the cycle and about two days to cool down. Once it has been emptied the work is placed in the glaze room ready for you to decorate! Step Six – Glazing Decorating your work with colour can be a lot of fun – and time consuming! There are three main options for surface treatment at this stage: Oxide Washes Underglazes Glazes Washes and underglazes do not “glaze” the work – It will still need a layer of glaze to fully seal the clay (washes don’t need glaze on surfaces not designed for food or liquid as they can gloss up a little on their own). Underglazes are stable colourants that turn out pretty much how they look in the jar. They can be mixed with each other to form other colours and can be used like water colours to paint onto your work. Mostly they should have a clear glaze on top to seal them. Oxides are a different species – the pink oxide (cobalt) wash turns out bright blue for instance. They don’t always need a glaze on top, and some glazes can change the colour of the wash! The glazes need no other “glaze” on top! Be careful of unknown glaze interactions – you can put any combination of glaze in a bowl or on a plate, but only a single glaze on the outside of any vertical surface! Glazes are a chemical reaction under heat. We don’t know the exact chemicals in the Mayco glazes we use. I can guess by the way they interact with each other, however, on the whole, you need to test every idea you have, and not run the test on a vertical surface! Simply put, glaze is a layer of glass like substance that bonds with the clay underneath. Clay is made of silica, alumina and water. Glaze is made of mostly silica. Silica has a melting point of 1700°C and we fire to 1240°C. The silica requires a “flux” to help it melt at the lower temperature. Fluxes can be all sorts of chemicals – a common one is calcium – calcium has a melting point of 2500°C, however, together they both melt at a much lower temperature! Colourants are metal oxides like cobalt (blue), chrome (green through black), copper (green, blue, even red!), manganese (black, purple and pink) iron (red brown), etc. Different chemicals in the glaze can have dramatic effects. for example, barium carbonate (which we don’t use) turns manganese bright pink! Other elements can turn manganese dioxide brown, blue, purple and reddish brown. Manganese dioxide is a flux in and of itself as well. So, glazes that get their black and purple colours, often interact with other glazes and RUN! Our mirror black is a good example – it mixes really well with many glazes because it fluxes them – causes them to melt faster. It will also bring out many beautiful colours in the glazes because it’s black colouring most definitely comes from manganese dioxide! Glaze chemistry is a whole subject on it’s own! We use commercial Mayco glazes on purpose – for their huge range of colour possibilities, stability, cool interactions, artistic freedom with the ability to easily brush the glazes on and ease of use. We currently have almost 50 glazes on hand! A major project is to test the interactions of all glazes with each other. That is 2,500 test tiles!!!! I’m going to make the wall behind the wheels the feature wall of pretty colours! Step Seven – Glaze (Gloss or sometimes called “Glost”) Firing Most of the time this is the final stage of making your creation (but not always!) The glaze kiln goes to 1240°C. This is called cone 6, or midrange. It is the low end of stoneware temperatures. Stoneware clays and glazes are typically fired at cone 8 – 10, that is 1260 – 1290°C. The energy requirement to go from 1240°C to 1280°C is almost a 30% more! Our clay is formulated to vitrify (mature, turn “glass-like”) at 1240°, as are our glazes. A glaze kiln take around 12 hours to reach temperature and two to three days to cool down. Sometimes a third firing process is required – this is for decoration that is added to work after the glaze firing. For example – adding precious metals and lustres. this firing temperature is usually around 600 – 800°C depending upon the techniques being used. There are many students interested in gold and silver trims – we will be doing this third type of firing soon! After firing your work will be in the student finished work shelves. Remember to pay for it before you head out the door! There is a small extra charge for using porcelain clay (it’s more than twice the price of regular clay), and for any third firing process! Once your work has been fired it can not turn back into clay for millennia – so don’t fire it if you don’t like it! Put it in the bucket for recycling. https://firebirdstudios.com.au/the-process-of-making-pottery/Ceramics have evolved over thousands of years.A white earthenware side plate with a gadroon edge. Has water marks and chips on front.‘Johnson Bros England Reg No 15587’flagstaff hill, warrnambool, shipwrecked-coast, flagstaff-hill, flagstaff-hill-maritime-museum, maritime-museum, shipwreck-coast, flagstaff-hill-maritime-village, johnson bros, ceramics, tableware -
 Flagstaff Hill Maritime Museum and Village
Domestic object - Plate, Alfred Meakin
The Process of Making Pottery Decorating, Firing, Glazing, Making, Technical There is a rhythm and flow to clay. It can’t be done all at once! Even the making process! It can take weeks to get everything done, especially if you can only work on your pottery once a week! Even though we have three hour classes, it’s often just not enough time! Here is an overview of some of the processes so you have a bit more grasp on some of the technical stuff! Step One – Design There are SO many ideas out there for making stuff in clay! From delicate porcelain jewellery, through to heavy sculptural work and everything in between. Deciding your direction is sometimes not that easy – when you first start, try everything, you will naturally gravitate to the style that you enjoy! The options and variations are endless and can get a wee bit overwhelming too! Check in with me before you start to ensure your ideas will work, what order you might do things, how you could achieve the look you are seeking and any other technical data required! Step Two – Making Clay is thixotropic. This means that as you work with it, the clay first gets sloppier and wetter, before is begins to dry in the atmosphere. For most things, you simply can’t do all parts of the project at once. An example of work order might look like: Get last weeks work out from the shelves Prepare clay for today’s work – roll your clay, prepare balls for throwing, make the first stage of a pinch pot) Clean up last week’s work and put it on the shelf for bisque firing Check that you have any glazing to do – and do enough of it that you will have time to finish your main project Do the next step of your next project – there might be a further step that can’t be complete immediately, in that case, wrap your work well and put onto the shelves. Letting your work rest for a while can really help keep your work clean and professional looking. Many things require bagging under plastic to keep it ready for work the next week – put your name on the outside of the bag so you can find your work easily. We have stickers and markers. Consider how you want to decorate your work – coloured slip can be applied at a fairly wet stage (remembering that it will make your work even wetter!). Trying to apply slip to dry clay won’t work! If you want to do sgraffito – you will need to keep the work leather hard (a state of dryness where you can still work the clay with a little effort and a little water and care). Step Three – Drying Most of the time your work can go into the rack uncovered to let it dry out for the following week. If you want to continue forming or shaping you will need to double bag your work – put your work on a suitable sized bat and put the bat in a bag so the base of the bag is under the bat, then put another bag over the top of the work and tuck the top of the bag under the bat. If you want to trim (or turn) your thrown work the following week, it should also be double bagged. If your work is large, delicate, or of uneven thicknesses, you should lightly cover your work for drying. When considering the drying process, bare in mind the weather, humidity and wind! The hotter and dryer, the faster things dry and work can dry unevenly in the shelves – this can lead to cracking – another time to lightly cover your work for drying. Step Four – Trimming and Cleaning Up Your work is dry! It is called greenware now and it is at it’s most fragile! Handle everything with two hands. I often refer to soft hands – keep everything gentle and with your fingers spread as much as possible. Try to not pick up things like plates too much, and always with both hands! Before your work can be bisque fired it should be “cleaned up”. You work won’t go into the kiln if it has sharp edges – when glazed, sharp edges turn into razor blades! Use a piece of fly wire to rub the work all over – this will scratch a little so be light handed. Use a knife or metal kidney to scrape any areas that require a bit more dynamic treatment than the fly wire offers! Finally, a very light wipe over with a slightly damp sponge can help soften and soothe all of your edges and dags! Trimming thrown work: If you are planning to trim (or turn) your thrown work (and you should be), make sure you bag it well – your work should be leather hard to almost dry for easiest trimming. Use this step to finish the work completely – use a metal kidney to polish the surface, or a slightly damp sponge to give a freshly thrown look. Wipe the sponge around the rim after trimming, and check the inside of the pot for dags! Trimming slip cast work: Usually I will trim the rims of your work on the wheel the following day to make that stage easier, however you will still need to check your work for lumps and bumps. Last but not least – check that your name is still clearly on the bottom of your work. Step Five – Bisque Firing When the work is completely dry it can go into the bisque kiln. The bisque kiln is fired to 1000°C. This process burns off the water in the clay as well as some of the chemically bound water. The structure of the clay is not altered that much at this temperature. Inside the bisque kiln, the work is stacked a little, small bowl inside a larger bowl and onto a heavy plate. Smaller items like decorations or drink coasters might get stacked several high. Consideration is paid to the weight of the stack and shape of the work. A bisque kiln can fire about one and a half times the amount of work that the glaze kiln can fire. The firing takes about 10 hours to complete the cycle and about two days to cool down. Once it has been emptied the work is placed in the glaze room ready for you to decorate! Step Six – Glazing Decorating your work with colour can be a lot of fun – and time consuming! There are three main options for surface treatment at this stage: Oxide Washes Underglazes Glazes Washes and underglazes do not “glaze” the work – It will still need a layer of glaze to fully seal the clay (washes don’t need glaze on surfaces not designed for food or liquid as they can gloss up a little on their own). Underglazes are stable colourants that turn out pretty much how they look in the jar. They can be mixed with each other to form other colours and can be used like water colours to paint onto your work. Mostly they should have a clear glaze on top to seal them. Oxides are a different species – the pink oxide (cobalt) wash turns out bright blue for instance. They don’t always need a glaze on top, and some glazes can change the colour of the wash! The glazes need no other “glaze” on top! Be careful of unknown glaze interactions – you can put any combination of glaze in a bowl or on a plate, but only a single glaze on the outside of any vertical surface! Glazes are a chemical reaction under heat. We don’t know the exact chemicals in the Mayco glazes we use. I can guess by the way they interact with each other, however, on the whole, you need to test every idea you have, and not run the test on a vertical surface! Simply put, glaze is a layer of glass like substance that bonds with the clay underneath. Clay is made of silica, alumina and water. Glaze is made of mostly silica. Silica has a melting point of 1700°C and we fire to 1240°C. The silica requires a “flux” to help it melt at the lower temperature. Fluxes can be all sorts of chemicals – a common one is calcium – calcium has a melting point of 2500°C, however, together they both melt at a much lower temperature! Colourants are metal oxides like cobalt (blue), chrome (green through black), copper (green, blue, even red!), manganese (black, purple and pink) iron (red brown), etc. Different chemicals in the glaze can have dramatic effects. for example, barium carbonate (which we don’t use) turns manganese bright pink! Other elements can turn manganese dioxide brown, blue, purple and reddish brown. Manganese dioxide is a flux in and of itself as well. So, glazes that get their black and purple colours, often interact with other glazes and RUN! Our mirror black is a good example – it mixes really well with many glazes because it fluxes them – causes them to melt faster. It will also bring out many beautiful colours in the glazes because it’s black colouring most definitely comes from manganese dioxide! Glaze chemistry is a whole subject on it’s own! We use commercial Mayco glazes on purpose – for their huge range of colour possibilities, stability, cool interactions, artistic freedom with the ability to easily brush the glazes on and ease of use. We currently have almost 50 glazes on hand! A major project is to test the interactions of all glazes with each other. That is 2,500 test tiles!!!! I’m going to make the wall behind the wheels the feature wall of pretty colours! Step Seven – Glaze (Gloss or sometimes called “Glost”) Firing Most of the time this is the final stage of making your creation (but not always!) The glaze kiln goes to 1240°C. This is called cone 6, or midrange. It is the low end of stoneware temperatures. Stoneware clays and glazes are typically fired at cone 8 – 10, that is 1260 – 1290°C. The energy requirement to go from 1240°C to 1280°C is almost a 30% more! Our clay is formulated to vitrify (mature, turn “glass-like”) at 1240°, as are our glazes. A glaze kiln take around 12 hours to reach temperature and two to three days to cool down. Sometimes a third firing process is required – this is for decoration that is added to work after the glaze firing. For example – adding precious metals and lustres. this firing temperature is usually around 600 – 800°C depending upon the techniques being used. There are many students interested in gold and silver trims – we will be doing this third type of firing soon! After firing your work will be in the student finished work shelves. Remember to pay for it before you head out the door! There is a small extra charge for using porcelain clay (it’s more than twice the price of regular clay), and for any third firing process! Once your work has been fired it can not turn back into clay for millennia – so don’t fire it if you don’t like it! Put it in the bucket for recycling. https://firebirdstudios.com.au/the-process-of-making-pottery/Ceramics have evolved over thousands of years.Earthenware dessert plate, cream colour. Made by Alfred Meakin, England. Backstamped ‘Alfred Meakin England’. flagstaff hill, warrnambool, shipwrecked-coast, flagstaff-hill, flagstaff-hill-maritime-museum, maritime-museum, shipwreck-coast, flagstaff-hill-maritime-village, alfred meakin, ceramics, earthenware, kitchenware -
 Flagstaff Hill Maritime Museum and Village
Domestic object - Jug
The Process of Making Pottery Decorating, Firing, Glazing, Making, Technical There is a rhythm and flow to clay. It can’t be done all at once! Even the making process! It can take weeks to get everything done, especially if you can only work on your pottery once a week! Even though we have three hour classes, it’s often just not enough time! Here is an overview of some of the processes so you have a bit more grasp on some of the technical stuff! Step One – Design There are SO many ideas out there for making stuff in clay! From delicate porcelain jewellery, through to heavy sculptural work and everything in between. Deciding your direction is sometimes not that easy – when you first start, try everything, you will naturally gravitate to the style that you enjoy! The options and variations are endless and can get a wee bit overwhelming too! Check in with me before you start to ensure your ideas will work, what order you might do things, how you could achieve the look you are seeking and any other technical data required! Step Two – Making Clay is thixotropic. This means that as you work with it, the clay first gets sloppier and wetter, before is begins to dry in the atmosphere. For most things, you simply can’t do all parts of the project at once. An example of work order might look like: Get last weeks work out from the shelves Prepare clay for today’s work – roll your clay, prepare balls for throwing, make the first stage of a pinch pot) Clean up last week’s work and put it on the shelf for bisque firing Check that you have any glazing to do – and do enough of it that you will have time to finish your main project Do the next step of your next project – there might be a further step that can’t be complete immediately, in that case, wrap your work well and put onto the shelves. Letting your work rest for a while can really help keep your work clean and professional looking. Many things require bagging under plastic to keep it ready for work the next week – put your name on the outside of the bag so you can find your work easily. We have stickers and markers. Consider how you want to decorate your work – coloured slip can be applied at a fairly wet stage (remembering that it will make your work even wetter!). Trying to apply slip to dry clay won’t work! If you want to do sgraffito – you will need to keep the work leather hard (a state of dryness where you can still work the clay with a little effort and a little water and care). Step Three – Drying Most of the time your work can go into the rack uncovered to let it dry out for the following week. If you want to continue forming or shaping you will need to double bag your work – put your work on a suitable sized bat and put the bat in a bag so the base of the bag is under the bat, then put another bag over the top of the work and tuck the top of the bag under the bat. If you want to trim (or turn) your thrown work the following week, it should also be double bagged. If your work is large, delicate, or of uneven thicknesses, you should lightly cover your work for drying. When considering the drying process, bare in mind the weather, humidity and wind! The hotter and dryer, the faster things dry and work can dry unevenly in the shelves – this can lead to cracking – another time to lightly cover your work for drying. Step Four – Trimming and Cleaning Up Your work is dry! It is called greenware now and it is at it’s most fragile! Handle everything with two hands. I often refer to soft hands – keep everything gentle and with your fingers spread as much as possible. Try to not pick up things like plates too much, and always with both hands! Before your work can be bisque fired it should be “cleaned up”. You work won’t go into the kiln if it has sharp edges – when glazed, sharp edges turn into razor blades! Use a piece of fly wire to rub the work all over – this will scratch a little so be light handed. Use a knife or metal kidney to scrape any areas that require a bit more dynamic treatment than the fly wire offers! Finally, a very light wipe over with a slightly damp sponge can help soften and soothe all of your edges and dags! Trimming thrown work: If you are planning to trim (or turn) your thrown work (and you should be), make sure you bag it well – your work should be leather hard to almost dry for easiest trimming. Use this step to finish the work completely – use a metal kidney to polish the surface, or a slightly damp sponge to give a freshly thrown look. Wipe the sponge around the rim after trimming, and check the inside of the pot for dags! Trimming slip cast work: Usually I will trim the rims of your work on the wheel the following day to make that stage easier, however you will still need to check your work for lumps and bumps. Last but not least – check that your name is still clearly on the bottom of your work. Step Five – Bisque Firing When the work is completely dry it can go into the bisque kiln. The bisque kiln is fired to 1000°C. This process burns off the water in the clay as well as some of the chemically bound water. The structure of the clay is not altered that much at this temperature. Inside the bisque kiln, the work is stacked a little, small bowl inside a larger bowl and onto a heavy plate. Smaller items like decorations or drink coasters might get stacked several high. Consideration is paid to the weight of the stack and shape of the work. A bisque kiln can fire about one and a half times the amount of work that the glaze kiln can fire. The firing takes about 10 hours to complete the cycle and about two days to cool down. Once it has been emptied the work is placed in the glaze room ready for you to decorate! Step Six – Glazing Decorating your work with colour can be a lot of fun – and time consuming! There are three main options for surface treatment at this stage: Oxide Washes Underglazes Glazes Washes and underglazes do not “glaze” the work – It will still need a layer of glaze to fully seal the clay (washes don’t need glaze on surfaces not designed for food or liquid as they can gloss up a little on their own). Underglazes are stable colourants that turn out pretty much how they look in the jar. They can be mixed with each other to form other colours and can be used like water colours to paint onto your work. Mostly they should have a clear glaze on top to seal them. Oxides are a different species – the pink oxide (cobalt) wash turns out bright blue for instance. They don’t always need a glaze on top, and some glazes can change the colour of the wash! The glazes need no other “glaze” on top! Be careful of unknown glaze interactions – you can put any combination of glaze in a bowl or on a plate, but only a single glaze on the outside of any vertical surface! Glazes are a chemical reaction under heat. We don’t know the exact chemicals in the Mayco glazes we use. I can guess by the way they interact with each other, however, on the whole, you need to test every idea you have, and not run the test on a vertical surface! Simply put, glaze is a layer of glass like substance that bonds with the clay underneath. Clay is made of silica, alumina and water. Glaze is made of mostly silica. Silica has a melting point of 1700°C and we fire to 1240°C. The silica requires a “flux” to help it melt at the lower temperature. Fluxes can be all sorts of chemicals – a common one is calcium – calcium has a melting point of 2500°C, however, together they both melt at a much lower temperature! Colourants are metal oxides like cobalt (blue), chrome (green through black), copper (green, blue, even red!), manganese (black, purple and pink) iron (red brown), etc. Different chemicals in the glaze can have dramatic effects. for example, barium carbonate (which we don’t use) turns manganese bright pink! Other elements can turn manganese dioxide brown, blue, purple and reddish brown. Manganese dioxide is a flux in and of itself as well. So, glazes that get their black and purple colours, often interact with other glazes and RUN! Our mirror black is a good example – it mixes really well with many glazes because it fluxes them – causes them to melt faster. It will also bring out many beautiful colours in the glazes because it’s black colouring most definitely comes from manganese dioxide! Glaze chemistry is a whole subject on it’s own! We use commercial Mayco glazes on purpose – for their huge range of colour possibilities, stability, cool interactions, artistic freedom with the ability to easily brush the glazes on and ease of use. We currently have almost 50 glazes on hand! A major project is to test the interactions of all glazes with each other. That is 2,500 test tiles!!!! I’m going to make the wall behind the wheels the feature wall of pretty colours! Step Seven – Glaze (Gloss or sometimes called “Glost”) Firing Most of the time this is the final stage of making your creation (but not always!) The glaze kiln goes to 1240°C. This is called cone 6, or midrange. It is the low end of stoneware temperatures. Stoneware clays and glazes are typically fired at cone 8 – 10, that is 1260 – 1290°C. The energy requirement to go from 1240°C to 1280°C is almost a 30% more! Our clay is formulated to vitrify (mature, turn “glass-like”) at 1240°, as are our glazes. A glaze kiln take around 12 hours to reach temperature and two to three days to cool down. Sometimes a third firing process is required – this is for decoration that is added to work after the glaze firing. For example – adding precious metals and lustres. this firing temperature is usually around 600 – 800°C depending upon the techniques being used. There are many students interested in gold and silver trims – we will be doing this third type of firing soon! After firing your work will be in the student finished work shelves. Remember to pay for it before you head out the door! There is a small extra charge for using porcelain clay (it’s more than twice the price of regular clay), and for any third firing process! Once your work has been fired it can not turn back into clay for millennia – so don’t fire it if you don’t like it! Put it in the bucket for recycling. https://firebirdstudios.com.au/the-process-of-making-pottery/The form of the jug has been in use for many centuries.Stoneware jug. Two tone brown glaze with pierced lip behind spout. Spout chipped.None.flagstaff hill, warrnambool, shipwrecked-coast, flagstaff-hill, flagstaff-hill-maritime-museum, maritime-museum, shipwreck-coast, flagstaff-hill-maritime-village, jug, ceramic jug -
 The Beechworth Burke Museum
Drawing, Ernest Marcuse, Bank of Victoria – Yackandandah III, c1983
Ernest Heinrich Marcuse was born on the 1st of December 1900 to Hedwig and Siegmund Marcuse in Berlin Germany. While Marcuse's artistic talent was apparent from a younger age, his earliest existing artwork was from when he was approximately 20 years old. Ernest's formal art training commenced in 1918 with a three year course at the Berlin school of Interior design. After completion he found work until 1924 when Germany's Great Depression took effect. To broaden his career opportunities he undertook a further 12 months study of fashion, drawing and advertising at Berlin's Reiman school of art. From 1925 to 1934 Ernest was primarily a freelance press artist specialising in industrial, architectural and figurative drawing. Prominent newspaper The Berliner Morgenpost was his largest client along with Gross Deutsche Rundfunaustellung (Germany's organisation for major trade shows). During this period he would create many significant works. Two months after Hitler and the Nazi part came to power in 1933, Ernest received a life changing letter stating that being Jewish he could no longer continue employment in Germany. Up until 1938 he would only be able to undertake private commissions and occasional unofficial work as a book illustrator and games designer. This was by arrangement with non Jewish artists who claimed his work as their own, they would then share the income with Ernest. With increasing unrest in Germany during late 1938 Ernest decided to move to London and there he married his girlfriend Lotte. In late 1939 Ernest and Lotte Marcuse embarked on an eight week journey to their new home in Australia where they had been accepted as refugees. Shortly after arriving in Australia Ernest presented his portfolio to an editor at the Argus newspaper and gained employment as a war events illustrator. He soon became well respected and known in particular for his detailed illustrations and cross sections of ships , artillery and aircrafts. His detailed depictions of battles were displayed on the front pages of The Argus newspaper on a number of occasions. In May 1940 as the war intensified Ernest was dismissed from The Argus newspaper due to his Australian government classification of 'stateless person of enemy origin' and was considered a potential security risk. The editor of the time commented "don't blame us, blame Hitler". Marcuse then began to establish himself as a commercial artist. Ernest was de-classified as a 'stateless person of enemy origin' and in early 1942. The Australian army heard of Ernest's artistic abilities and began to utilize his designs for visual training aids and posters. Ernest became Private E.H Marcuse V377746, his first army posting was as staff artist at The infantry officer's training school at Bonegilla. When off duty he was inspired by the beauty of the surrounding area creating the works in North east Victoria 'Kiewa river bridge', 'Hume weir', ' Dried up river bed' and 'Hawksview gold reef mine' from his 1942-1943 period at Bonegilla Victoria. Ernest returned to the area to create drawings and paintings from 1948 to 1983 in locations including Bright, Wandilligong, Bogong High plains and Wallace's Hut, Mt Buffalo, Beechworth, Pretty valley, Kiewa Hydro, Yackandandah and Bontherambo homestead. These sketches were often completed on location, photographs were also taken onsite to assist the works back at the studio. Occasionally Marcuse also painted in the field. Ernest's preferred choice of medium was pencil and ink. Up until 1952 he would often incorporate watercolour into his work. Later into his career he began introducing pastels, acrylic and mixed media. In earlier years Ernest Marcuse often signed his work Mar, later on the signing of works ranged from Marcuse, E.Marcuse, Ernest Marcuse, EHM or simply EM . If a work was considered incomplete or Marcuse did not like the work it would remain unsigned. From Bonegilla Marcuse was transferred to Woodside South Australia before his final posting in Melbourne until the end of 1945. Ernest's work from within his army posting 'Troop Train at Night' from his 1945 exhibition Australia at War are part of the permanent collection at Canberra's War Museum. Between 1946 and 1969 Ernest largely worked from home and concentrated on a career as a freelance commercial artist and graphic designer. During that time he created work for well known household names including CRA/Conzinc, Vacuum oil (Caltex), Cottee's Brand (Schweppes and Heinz), Home Beautiful magazine Fulton garden supplies, International Iveco trucks, Ego pharmaceuticals, QV and Sunsense. After retirement Ernest concentrated on his true love of fine art and focused on painting images of personal interest both across Australia and Internationally. Earnest never drove a car. He would often walk or use public transport or enlist in the help of family or artist friends to drive him. Throughout his career Ernest Marcuse's artworks were purchase by private collectors these included ACTU, Melbourne City council, Holland Constructions, Melbourne Metropolitan Tramways Board, GJ Coles and Australian Resources Bank. Ernest Marcuse permanent collections can be viewed at The National Gallery of Victoria , Sydney Jewish Museum, Jewish Holocaust Centre Melbourne, Canberra's War Museum, City of Melbourne, Shire of Yarra ranges and now the Burke Museum. © 2020 Art by Marcuse https://www.artbymarcuse.com.au/aboutDonated to the Burke Museum through the Australian Government's Cultural Gifts Program by Peter and Evelyn MarcusePen and pencil landscape drawing on paper.Obverse: ERNEST MARCUSE / BANK OF VICTORIA / YACKANDANDAH Reverse: Y 2 / 013 ernest marcuse, marcuse, art, artbymarcuse, beechworth, burke museum, indigo shire, landscape, illustration, drawing, pen and pencil, australian army, war events illustrator, the age, the sun, the argus, germany, refugee, industrial drawing, architectual drawing, figure drawing, berliner morgenpost, grosse deutsche rundfunaustellung, berlin’s reiman school of art., cultural gifts program -
 The Beechworth Burke Museum
Drawing, Ernest Marcuse, Yackandandah XI, c1972-1976
Ernest Heinrich Marcuse was born on the 1st of December 1900 to Hedwig and Siegmund Marcuse in Berlin Germany. While Marcuse's artistic talent was apparent from a younger age, his earliest existing artwork was from when he was approximately 20 years old. Ernest's formal art training commenced in 1918 with a three year course at the Berlin school of Interior design. After completion he found work until 1924 when Germany's Great Depression took effect. To broaden his career opportunities he undertook a further 12 months study of fashion, drawing and advertising at Berlin's Reiman school of art. From 1925 to 1934 Ernest was primarily a freelance press artist specialising in industrial, architectural and figurative drawing. Prominent newspaper The Berliner Morgenpost was his largest client along with Gross Deutsche Rundfunaustellung (Germany's organisation for major trade shows). During this period he would create many significant works. Two months after Hitler and the Nazi part came to power in 1933, Ernest received a life changing letter stating that being Jewish he could no longer continue employment in Germany. Up until 1938 he would only be able to undertake private commissions and occasional unofficial work as a book illustrator and games designer. This was by arrangement with non Jewish artists who claimed his work as their own, they would then share the income with Ernest. With increasing unrest in Germany during late 1938 Ernest decided to move to London and there he married his girlfriend Lotte. In late 1939 Ernest and Lotte Marcuse embarked on an eight week journey to their new home in Australia where they had been accepted as refugees. Shortly after arriving in Australia Ernest presented his portfolio to an editor at the Argus newspaper and gained employment as a war events illustrator. He soon became well respected and known in particular for his detailed illustrations and cross sections of ships , artillery and aircrafts. His detailed depictions of battles were displayed on the front pages of The Argus newspaper on a number of occasions. In May 1940 as the war intensified Ernest was dismissed from The Argus newspaper due to his Australian government classification of 'stateless person of enemy origin' and was considered a potential security risk. The editor of the time commented "don't blame us, blame Hitler". Marcuse then began to establish himself as a commercial artist. Ernest was de-classified as a 'stateless person of enemy origin' and in early 1942. The Australian army heard of Ernest's artistic abilities and began to utilize his designs for visual training aids and posters. Ernest became Private E.H Marcuse V377746, his first army posting was as staff artist at The infantry officer's training school at Bonegilla. When off duty he was inspired by the beauty of the surrounding area creating the works in North east Victoria 'Kiewa river bridge', 'Hume weir', ' Dried up river bed' and 'Hawksview gold reef mine' from his 1942-1943 period at Bonegilla Victoria. Ernest returned to the area to create drawings and paintings from 1948 to 1983 in locations including Bright, Wandilligong, Bogong High plains and Wallace's Hut, Mt Buffalo, Beechworth, Pretty valley, Kiewa Hydro, Yackandandah and Bontherambo homestead. These sketches were often completed on location, photographs were also taken onsite to assist the works back at the studio. Occasionally Marcuse also painted in the field. Ernest's preferred choice of medium was pencil and ink. Up until 1952 he would often incorporate watercolour into his work. Later into his career he began introducing pastels, acrylic and mixed media. In earlier years Ernest Marcuse often signed his work Mar, later on the signing of works ranged from Marcuse, E.Marcuse, Ernest Marcuse, EHM or simply EM . If a work was considered incomplete or Marcuse did not like the work it would remain unsigned. From Bonegilla Marcuse was transferred to Woodside South Australia before his final posting in Melbourne until the end of 1945. Ernest's work from within his army posting 'Troop Train at Night' from his 1945 exhibition Australia at War are part of the permanent collection at Canberra's War Museum. Between 1946 and 1969 Ernest largely worked from home and concentrated on a career as a freelance commercial artist and graphic designer. During that time he created work for well known household names including CRA/Conzinc, Vacuum oil (Caltex), Cottee's Brand (Schweppes and Heinz), Home Beautiful magazine Fulton garden supplies, International Iveco trucks, Ego pharmaceuticals, QV and Sunsense. After retirement Ernest concentrated on his true love of fine art and focused on painting images of personal interest both across Australia and Internationally. Earnest never drove a car. He would often walk or use public transport or enlist in the help of family or artist friends to drive him. Throughout his career Ernest Marcuse's artworks were purchase by private collectors these included ACTU, Melbourne City council, Holland Constructions, Melbourne Metropolitan Tramways Board, GJ Coles and Australian Resources Bank. Ernest Marcuse permanent collections can be viewed at The National Gallery of Victoria , Sydney Jewish Museum, Jewish Holocaust Centre Melbourne, Canberra's War Museum, City of Melbourne, Shire of Yarra ranges and now the Burke Museum. © 2020 Art by Marcuse https://www.artbymarcuse.com.au/aboutDonated to the Burke Museum through the Australian Government's Cultural Gifts Program by Peter and Evelyn MarcusePen and pencil landscape drawing on paper.Obverse: YACKANDANDAH / ERNEST MARCUSE Reverse: Y 1 / 012 ernest marcuse, marcuse, art, artbymarcuse, beechworth, burke museum, indigo shire, landscape, illustration, drawing, pen and pencil, australian army, war events illustrator, the age, the sun, the argus, germany, refugee, industrial drawing, architectual drawing, figure drawing, berliner morgenpost, grosse deutsche rundfunaustellung, berlin’s reiman school of art., cultural gifts program -
 The Beechworth Burke Museum
Drawing, Ernest Marcuse, Yackandandah VIII, c1983
Ernest Heinrich Marcuse was born on the 1st of December 1900 to Hedwig and Siegmund Marcuse in Berlin Germany. While Marcuse's artistic talent was apparent from a younger age, his earliest existing artwork was from when he was approximately 20 years old. Ernest's formal art training commenced in 1918 with a three year course at the Berlin school of Interior design. After completion he found work until 1924 when Germany's Great Depression took effect. To broaden his career opportunities he undertook a further 12 months study of fashion, drawing and advertising at Berlin's Reiman school of art. From 1925 to 1934 Ernest was primarily a freelance press artist specialising in industrial, architectural and figurative drawing. Prominent newspaper The Berliner Morgenpost was his largest client along with Gross Deutsche Rundfunaustellung (Germany's organisation for major trade shows). During this period he would create many significant works. Two months after Hitler and the Nazi part came to power in 1933, Ernest received a life changing letter stating that being Jewish he could no longer continue employment in Germany. Up until 1938 he would only be able to undertake private commissions and occasional unofficial work as a book illustrator and games designer. This was by arrangement with non Jewish artists who claimed his work as their own, they would then share the income with Ernest. With increasing unrest in Germany during late 1938 Ernest decided to move to London and there he married his girlfriend Lotte. In late 1939 Ernest and Lotte Marcuse embarked on an eight week journey to their new home in Australia where they had been accepted as refugees. Shortly after arriving in Australia Ernest presented his portfolio to an editor at the Argus newspaper and gained employment as a war events illustrator. He soon became well respected and known in particular for his detailed illustrations and cross sections of ships , artillery and aircrafts. His detailed depictions of battles were displayed on the front pages of The Argus newspaper on a number of occasions. In May 1940 as the war intensified Ernest was dismissed from The Argus newspaper due to his Australian government classification of 'stateless person of enemy origin' and was considered a potential security risk. The editor of the time commented "don't blame us, blame Hitler". Marcuse then began to establish himself as a commercial artist. Ernest was de-classified as a 'stateless person of enemy origin' and in early 1942. The Australian army heard of Ernest's artistic abilities and began to utilize his designs for visual training aids and posters. Ernest became Private E.H Marcuse V377746, his first army posting was as staff artist at The infantry officer's training school at Bonegilla. When off duty he was inspired by the beauty of the surrounding area creating the works in North east Victoria 'Kiewa river bridge', 'Hume weir', ' Dried up river bed' and 'Hawksview gold reef mine' from his 1942-1943 period at Bonegilla Victoria. Ernest returned to the area to create drawings and paintings from 1948 to 1983 in locations including Bright, Wandilligong, Bogong High plains and Wallace's Hut, Mt Buffalo, Beechworth, Pretty valley, Kiewa Hydro, Yackandandah and Bontherambo homestead. These sketches were often completed on location, photographs were also taken onsite to assist the works back at the studio. Occasionally Marcuse also painted in the field. Ernest's preferred choice of medium was pencil and ink. Up until 1952 he would often incorporate watercolour into his work. Later into his career he began introducing pastels, acrylic and mixed media. In earlier years Ernest Marcuse often signed his work Mar, later on the signing of works ranged from Marcuse, E.Marcuse, Ernest Marcuse, EHM or simply EM . If a work was considered incomplete or Marcuse did not like the work it would remain unsigned. From Bonegilla Marcuse was transferred to Woodside South Australia before his final posting in Melbourne until the end of 1945. Ernest's work from within his army posting 'Troop Train at Night' from his 1945 exhibition Australia at War are part of the permanent collection at Canberra's War Museum. Between 1946 and 1969 Ernest largely worked from home and concentrated on a career as a freelance commercial artist and graphic designer. During that time he created work for well known household names including CRA/Conzinc, Vacuum oil (Caltex), Cottee's Brand (Schweppes and Heinz), Home Beautiful magazine Fulton garden supplies, International Iveco trucks, Ego pharmaceuticals, QV and Sunsense. After retirement Ernest concentrated on his true love of fine art and focused on painting images of personal interest both across Australia and Internationally. Earnest never drove a car. He would often walk or use public transport or enlist in the help of family or artist friends to drive him. Throughout his career Ernest Marcuse's artworks were purchase by private collectors these included ACTU, Melbourne City council, Holland Constructions, Melbourne Metropolitan Tramways Board, GJ Coles and Australian Resources Bank. Ernest Marcuse permanent collections can be viewed at The National Gallery of Victoria , Sydney Jewish Museum, Jewish Holocaust Centre Melbourne, Canberra's War Museum, City of Melbourne, Shire of Yarra ranges and now the Burke Museum. © 2020 Art by Marcuse https://www.artbymarcuse.com.au/aboutDonated to the Burke Museum through the Australian Government's Cultural Gifts Program by Peter and Evelyn MarcusePen and pencil landscape drawing on paper.Obverse: MARCUSE / YACKANDANDAH / Reverse: Y 3 / 014 / ernest marcuse, marcuse, art, artbymarcuse, beechworth, burke museum, indigo shire, landscape, illustration, drawing, pen and pencil, australian army, war events illustrator, the age, the sun, the argus, germany, refugee, industrial drawing, architectual drawing, figure drawing, berliner morgenpost, grosse deutsche rundfunaustellung, berlin’s reiman school of art., cultural gifts program -
 The Beechworth Burke Museum
Drawing, Ernest Marcuse, Beechworth II, c1972-1976
Ernest Heinrich Marcuse was born on the 1st of December 1900 to Hedwig and Siegmund Marcuse in Berlin Germany. While Marcuse's artistic talent was apparent from a younger age, his earliest existing artwork was from when he was approximately 20 years old. Ernest's formal art training commenced in 1918 with a three year course at the Berlin school of Interior design. After completion he found work until 1924 when Germany's Great Depression took effect. To broaden his career opportunities he undertook a further 12 months study of fashion, drawing and advertising at Berlin's Reiman school of art. From 1925 to 1934 Ernest was primarily a freelance press artist specialising in industrial, architectural and figurative drawing. Prominent newspaper The Berliner Morgenpost was his largest client along with Gross Deutsche Rundfunaustellung (Germany's organisation for major trade shows). During this period he would create many significant works. Two months after Hitler and the Nazi part came to power in 1933, Ernest received a life changing letter stating that being Jewish he could no longer continue employment in Germany. Up until 1938 he would only be able to undertake private commissions and occasional unofficial work as a book illustrator and games designer. This was by arrangement with non Jewish artists who claimed his work as their own, they would then share the income with Ernest. With increasing unrest in Germany during late 1938 Ernest decided to move to London and there he married his girlfriend Lotte. In late 1939 Ernest and Lotte Marcuse embarked on an eight week journey to their new home in Australia where they had been accepted as refugees. Shortly after arriving in Australia Ernest presented his portfolio to an editor at the Argus newspaper and gained employment as a war events illustrator. He soon became well respected and known in particular for his detailed illustrations and cross sections of ships , artillery and aircrafts. His detailed depictions of battles were displayed on the front pages of The Argus newspaper on a number of occasions. In May 1940 as the war intensified Ernest was dismissed from The Argus newspaper due to his Australian government classification of 'stateless person of enemy origin' and was considered a potential security risk. The editor of the time commented "don't blame us, blame Hitler". Marcuse then began to establish himself as a commercial artist. Ernest was de-classified as a 'stateless person of enemy origin' and in early 1942. The Australian army heard of Ernest's artistic abilities and began to utilize his designs for visual training aids and posters. Ernest became Private E.H Marcuse V377746, his first army posting was as staff artist at The infantry officer's training school at Bonegilla. When off duty he was inspired by the beauty of the surrounding area creating the works in North east Victoria 'Kiewa river bridge', 'Hume weir', ' Dried up river bed' and 'Hawksview gold reef mine' from his 1942-1943 period at Bonegilla Victoria. Ernest returned to the area to create drawings and paintings from 1948 to 1983 in locations including Bright, Wandilligong, Bogong High plains and Wallace's Hut, Mt Buffalo, Beechworth, Pretty valley, Kiewa Hydro, Yackandandah and Bontherambo homestead. These sketches were often completed on location, photographs were also taken onsite to assist the works back at the studio. Occasionally Marcuse also painted in the field. Ernest's preferred choice of medium was pencil and ink. Up until 1952 he would often incorporate watercolour into his work. Later into his career he began introducing pastels, acrylic and mixed media. In earlier years Ernest Marcuse often signed his work Mar, later on the signing of works ranged from Marcuse, E.Marcuse, Ernest Marcuse, EHM or simply EM . If a work was considered incomplete or Marcuse did not like the work it would remain unsigned. From Bonegilla Marcuse was transferred to Woodside South Australia before his final posting in Melbourne until the end of 1945. Ernest's work from within his army posting 'Troop Train at Night' from his 1945 exhibition Australia at War are part of the permanent collection at Canberra's War Museum. Between 1946 and 1969 Ernest largely worked from home and concentrated on a career as a freelance commercial artist and graphic designer. During that time he created work for well known household names including CRA/Conzinc, Vacuum oil (Caltex), Cottee's Brand (Schweppes and Heinz), Home Beautiful magazine Fulton garden supplies, International Iveco trucks, Ego pharmaceuticals, QV and Sunsense. After retirement Ernest concentrated on his true love of fine art and focused on painting images of personal interest both across Australia and Internationally. Earnest never drove a car. He would often walk or use public transport or enlist in the help of family or artist friends to drive him. Throughout his career Ernest Marcuse's artworks were purchase by private collectors these included ACTU, Melbourne City council, Holland Constructions, Melbourne Metropolitan Tramways Board, GJ Coles and Australian Resources Bank. Ernest Marcuse permanent collections can be viewed at The National Gallery of Victoria , Sydney Jewish Museum, Jewish Holocaust Centre Melbourne, Canberra's War Museum, City of Melbourne, Shire of Yarra ranges and now the Burke Museum. © 2020 Art by Marcuse https://www.artbymarcuse.com.au/aboutDonated to the Burke Museum through the Australian Government's Cultural Gifts Program by Peter and Evelyn MarcusePen and pencil landscape drawing on paper.Obverse: (illegible) / BEECHWORTH Reverse: BEECHWORTH / MARCUSE BEECHWORTH NOSTALGIA BW-06 / B10 ernest marcuse, marcuse, art, artbymarcuse, beechworth, burke museum, indigo shire, landscape, illustration, drawing, pen and pencil, australian army, war events illustrator, the age, the sun, the argus, germany, refugee, industrial drawing, architectual drawing, figure drawing, berliner morgenpost, grosse deutsche rundfunaustellung, berlin’s reiman school of art., cultural gifts program -
 The Beechworth Burke Museum
Drawing, Ernest Marcuse, Beechworth Carriage Museum II, c1972-1976
Ernest Heinrich Marcuse was born on the 1st of December 1900 to Hedwig and Siegmund Marcuse in Berlin Germany. While Marcuse's artistic talent was apparent from a younger age, his earliest existing artwork was from when he was approximately 20 years old. Ernest's formal art training commenced in 1918 with a three year course at the Berlin school of Interior design. After completion he found work until 1924 when Germany's Great Depression took effect. To broaden his career opportunities he undertook a further 12 months study of fashion, drawing and advertising at Berlin's Reiman school of art. From 1925 to 1934 Ernest was primarily a freelance press artist specialising in industrial, architectural and figurative drawing. Prominent newspaper The Berliner Morgenpost was his largest client along with Gross Deutsche Rundfunaustellung (Germany's organisation for major trade shows). During this period he would create many significant works. Two months after Hitler and the Nazi part came to power in 1933, Ernest received a life changing letter stating that being Jewish he could no longer continue employment in Germany. Up until 1938 he would only be able to undertake private commissions and occasional unofficial work as a book illustrator and games designer. This was by arrangement with non Jewish artists who claimed his work as their own, they would then share the income with Ernest. With increasing unrest in Germany during late 1938 Ernest decided to move to London and there he married his girlfriend Lotte. In late 1939 Ernest and Lotte Marcuse embarked on an eight week journey to their new home in Australia where they had been accepted as refugees. Shortly after arriving in Australia Ernest presented his portfolio to an editor at the Argus newspaper and gained employment as a war events illustrator. He soon became well respected and known in particular for his detailed illustrations and cross sections of ships , artillery and aircrafts. His detailed depictions of battles were displayed on the front pages of The Argus newspaper on a number of occasions. In May 1940 as the war intensified Ernest was dismissed from The Argus newspaper due to his Australian government classification of 'stateless person of enemy origin' and was considered a potential security risk. The editor of the time commented "don't blame us, blame Hitler". Marcuse then began to establish himself as a commercial artist. Ernest was de-classified as a 'stateless person of enemy origin' and in early 1942. The Australian army heard of Ernest's artistic abilities and began to utilize his designs for visual training aids and posters. Ernest became Private E.H Marcuse V377746, his first army posting was as staff artist at The infantry officer's training school at Bonegilla. When off duty he was inspired by the beauty of the surrounding area creating the works in North east Victoria 'Kiewa river bridge', 'Hume weir', ' Dried up river bed' and 'Hawksview gold reef mine' from his 1942-1943 period at Bonegilla Victoria. Ernest returned to the area to create drawings and paintings from 1948 to 1983 in locations including Bright, Wandilligong, Bogong High plains and Wallace's Hut, Mt Buffalo, Beechworth, Pretty valley, Kiewa Hydro, Yackandandah and Bontherambo homestead. These sketches were often completed on location, photographs were also taken onsite to assist the works back at the studio. Occasionally Marcuse also painted in the field. Ernest's preferred choice of medium was pencil and ink. Up until 1952 he would often incorporate watercolour into his work. Later into his career he began introducing pastels, acrylic and mixed media. In earlier years Ernest Marcuse often signed his work Mar, later on the signing of works ranged from Marcuse, E.Marcuse, Ernest Marcuse, EHM or simply EM . If a work was considered incomplete or Marcuse did not like the work it would remain unsigned. From Bonegilla Marcuse was transferred to Woodside South Australia before his final posting in Melbourne until the end of 1945. Ernest's work from within his army posting 'Troop Train at Night' from his 1945 exhibition Australia at War are part of the permanent collection at Canberra's War Museum. Between 1946 and 1969 Ernest largely worked from home and concentrated on a career as a freelance commercial artist and graphic designer. During that time he created work for well known household names including CRA/Conzinc, Vacuum oil (Caltex), Cottee's Brand (Schweppes and Heinz), Home Beautiful magazine Fulton garden supplies, International Iveco trucks, Ego pharmaceuticals, QV and Sunsense. After retirement Ernest concentrated on his true love of fine art and focused on painting images of personal interest both across Australia and Internationally. Earnest never drove a car. He would often walk or use public transport or enlist in the help of family or artist friends to drive him. Throughout his career Ernest Marcuse's artworks were purchase by private collectors these included ACTU, Melbourne City council, Holland Constructions, Melbourne Metropolitan Tramways Board, GJ Coles and Australian Resources Bank. Ernest Marcuse permanent collections can be viewed at The National Gallery of Victoria , Sydney Jewish Museum, Jewish Holocaust Centre Melbourne, Canberra's War Museum, City of Melbourne, Shire of Yarra ranges and now the Burke Museum. © 2020 Art by Marcuse https://www.artbymarcuse.com.au/aboutDonated to the Burke Museum through the Australian Government's Cultural Gifts Program by Peter and Evelyn MarcusePen and pencil landscape drawing on paper.Obverse: Charatome / Corning Buggy / Braise & Drag / believed to (illegible) built by Crawford and (illegible) / COBB & CO / WAGONETTE / B'WORTH MUSEUM Reverse: BEECHWORTH NOSTALGIA / BW-07(a) / B 8 / ernest marcuse, marcuse, art, artbymarcuse, beechworth, burke museum, indigo shire, landscape, illustration, drawing, pen and pencil, australian army, war events illustrator, the age, the sun, the argus, germany, refugee, industrial drawing, architectual drawing, figure drawing, berliner morgenpost, grosse deutsche rundfunaustellung, berlin’s reiman school of art., cultural gifts program -
 The Beechworth Burke Museum
Drawing, Ernest Marcuse, Beechworth Carriage Museum III, c1972-1976
Ernest Heinrich Marcuse was born on the 1st of December 1900 to Hedwig and Siegmund Marcuse in Berlin Germany. While Marcuse's artistic talent was apparent from a younger age, his earliest existing artwork was from when he was approximately 20 years old. Ernest's formal art training commenced in 1918 with a three year course at the Berlin school of Interior design. After completion he found work until 1924 when Germany's Great Depression took effect. To broaden his career opportunities he undertook a further 12 months study of fashion, drawing and advertising at Berlin's Reiman school of art. From 1925 to 1934 Ernest was primarily a freelance press artist specialising in industrial, architectural and figurative drawing. Prominent newspaper The Berliner Morgenpost was his largest client along with Gross Deutsche Rundfunaustellung (Germany's organisation for major trade shows). During this period he would create many significant works. Two months after Hitler and the Nazi part came to power in 1933, Ernest received a life changing letter stating that being Jewish he could no longer continue employment in Germany. Up until 1938 he would only be able to undertake private commissions and occasional unofficial work as a book illustrator and games designer. This was by arrangement with non Jewish artists who claimed his work as their own, they would then share the income with Ernest. With increasing unrest in Germany during late 1938 Ernest decided to move to London and there he married his girlfriend Lotte. In late 1939 Ernest and Lotte Marcuse embarked on an eight week journey to their new home in Australia where they had been accepted as refugees. Shortly after arriving in Australia Ernest presented his portfolio to an editor at the Argus newspaper and gained employment as a war events illustrator. He soon became well respected and known in particular for his detailed illustrations and cross sections of ships , artillery and aircrafts. His detailed depictions of battles were displayed on the front pages of The Argus newspaper on a number of occasions. In May 1940 as the war intensified Ernest was dismissed from The Argus newspaper due to his Australian government classification of 'stateless person of enemy origin' and was considered a potential security risk. The editor of the time commented "don't blame us, blame Hitler". Marcuse then began to establish himself as a commercial artist. Ernest was de-classified as a 'stateless person of enemy origin' and in early 1942. The Australian army heard of Ernest's artistic abilities and began to utilize his designs for visual training aids and posters. Ernest became Private E.H Marcuse V377746, his first army posting was as staff artist at The infantry officer's training school at Bonegilla. When off duty he was inspired by the beauty of the surrounding area creating the works in North east Victoria 'Kiewa river bridge', 'Hume weir', ' Dried up river bed' and 'Hawksview gold reef mine' from his 1942-1943 period at Bonegilla Victoria. Ernest returned to the area to create drawings and paintings from 1948 to 1983 in locations including Bright, Wandilligong, Bogong High plains and Wallace's Hut, Mt Buffalo, Beechworth, Pretty valley, Kiewa Hydro, Yackandandah and Bontherambo homestead. These sketches were often completed on location, photographs were also taken onsite to assist the works back at the studio. Occasionally Marcuse also painted in the field. Ernest's preferred choice of medium was pencil and ink. Up until 1952 he would often incorporate watercolour into his work. Later into his career he began introducing pastels, acrylic and mixed media. In earlier years Ernest Marcuse often signed his work Mar, later on the signing of works ranged from Marcuse, E.Marcuse, Ernest Marcuse, EHM or simply EM . If a work was considered incomplete or Marcuse did not like the work it would remain unsigned. From Bonegilla Marcuse was transferred to Woodside South Australia before his final posting in Melbourne until the end of 1945. Ernest's work from within his army posting 'Troop Train at Night' from his 1945 exhibition Australia at War are part of the permanent collection at Canberra's War Museum. Between 1946 and 1969 Ernest largely worked from home and concentrated on a career as a freelance commercial artist and graphic designer. During that time he created work for well known household names including CRA/Conzinc, Vacuum oil (Caltex), Cottee's Brand (Schweppes and Heinz), Home Beautiful magazine Fulton garden supplies, International Iveco trucks, Ego pharmaceuticals, QV and Sunsense. After retirement Ernest concentrated on his true love of fine art and focused on painting images of personal interest both across Australia and Internationally. Earnest never drove a car. He would often walk or use public transport or enlist in the help of family or artist friends to drive him. Throughout his career Ernest Marcuse's artworks were purchase by private collectors these included ACTU, Melbourne City council, Holland Constructions, Melbourne Metropolitan Tramways Board, GJ Coles and Australian Resources Bank. Ernest Marcuse permanent collections can be viewed at The National Gallery of Victoria , Sydney Jewish Museum, Jewish Holocaust Centre Melbourne, Canberra's War Museum, City of Melbourne, Shire of Yarra ranges and now the Burke Museum. © 2020 Art by Marcuse https://www.artbymarcuse.com.au/aboutDonated to the Burke Museum through the Australian Government's Cultural Gifts Program by Peter and Evelyn MarcusePen and pencil landscape drawing on paper.Obverse: ABBOT BAGGY / B'WORTH / CARRIAGE MUSEUM Reverse: B7 / Beechworth Nostalgia / BW - 07 B (crossed out) / 008ernest marcuse, marcuse, art, artbymarcuse, beechworth, burke museum, indigo shire, landscape, illustration, drawing, pen and pencil, australian army, war events illustrator, the age, the sun, the argus, germany, refugee, industrial drawing, architectual drawing, figure drawing, berliner morgenpost, grosse deutsche rundfunaustellung, berlin’s reiman school of art., cultural gifts program -
 The Beechworth Burke Museum
Drawing, Ernest Marcuse, Beechworth Carriage Museum I, c1972-1976
Ernest Heinrich Marcuse was born on the 1st of December 1900 to Hedwig and Siegmund Marcuse in Berlin Germany. While Marcuse's artistic talent was apparent from a younger age, his earliest existing artwork was from when he was approximately 20 years old. Ernest's formal art training commenced in 1918 with a three year course at the Berlin school of Interior design. After completion he found work until 1924 when Germany's Great Depression took effect. To broaden his career opportunities he undertook a further 12 months study of fashion, drawing and advertising at Berlin's Reiman school of art. From 1925 to 1934 Ernest was primarily a freelance press artist specialising in industrial, architectural and figurative drawing. Prominent newspaper The Berliner Morgenpost was his largest client along with Gross Deutsche Rundfunaustellung (Germany's organisation for major trade shows). During this period he would create many significant works. Two months after Hitler and the Nazi part came to power in 1933, Ernest received a life changing letter stating that being Jewish he could no longer continue employment in Germany. Up until 1938 he would only be able to undertake private commissions and occasional unofficial work as a book illustrator and games designer. This was by arrangement with non Jewish artists who claimed his work as their own, they would then share the income with Ernest. With increasing unrest in Germany during late 1938 Ernest decided to move to London and there he married his girlfriend Lotte. In late 1939 Ernest and Lotte Marcuse embarked on an eight week journey to their new home in Australia where they had been accepted as refugees. Shortly after arriving in Australia Ernest presented his portfolio to an editor at the Argus newspaper and gained employment as a war events illustrator. He soon became well respected and known in particular for his detailed illustrations and cross sections of ships , artillery and aircrafts. His detailed depictions of battles were displayed on the front pages of The Argus newspaper on a number of occasions. In May 1940 as the war intensified Ernest was dismissed from The Argus newspaper due to his Australian government classification of 'stateless person of enemy origin' and was considered a potential security risk. The editor of the time commented "don't blame us, blame Hitler". Marcuse then began to establish himself as a commercial artist. Ernest was de-classified as a 'stateless person of enemy origin' and in early 1942. The Australian army heard of Ernest's artistic abilities and began to utilize his designs for visual training aids and posters. Ernest became Private E.H Marcuse V377746, his first army posting was as staff artist at The infantry officer's training school at Bonegilla. When off duty he was inspired by the beauty of the surrounding area creating the works in North east Victoria 'Kiewa river bridge', 'Hume weir', ' Dried up river bed' and 'Hawksview gold reef mine' from his 1942-1943 period at Bonegilla Victoria. Ernest returned to the area to create drawings and paintings from 1948 to 1983 in locations including Bright, Wandilligong, Bogong High plains and Wallace's Hut, Mt Buffalo, Beechworth, Pretty valley, Kiewa Hydro, Yackandandah and Bontherambo homestead. These sketches were often completed on location, photographs were also taken onsite to assist the works back at the studio. Occasionally Marcuse also painted in the field. Ernest's preferred choice of medium was pencil and ink. Up until 1952 he would often incorporate watercolour into his work. Later into his career he began introducing pastels, acrylic and mixed media. In earlier years Ernest Marcuse often signed his work Mar, later on the signing of works ranged from Marcuse, E.Marcuse, Ernest Marcuse, EHM or simply EM . If a work was considered incomplete or Marcuse did not like the work it would remain unsigned. From Bonegilla Marcuse was transferred to Woodside South Australia before his final posting in Melbourne until the end of 1945. Ernest's work from within his army posting 'Troop Train at Night' from his 1945 exhibition Australia at War are part of the permanent collection at Canberra's War Museum. Between 1946 and 1969 Ernest largely worked from home and concentrated on a career as a freelance commercial artist and graphic designer. During that time he created work for well known household names including CRA/Conzinc, Vacuum oil (Caltex), Cottee's Brand (Schweppes and Heinz), Home Beautiful magazine Fulton garden supplies, International Iveco trucks, Ego pharmaceuticals, QV and Sunsense. After retirement Ernest concentrated on his true love of fine art and focused on painting images of personal interest both across Australia and Internationally. Earnest never drove a car. He would often walk or use public transport or enlist in the help of family or artist friends to drive him. Throughout his career Ernest Marcuse's artworks were purchase by private collectors these included ACTU, Melbourne City council, Holland Constructions, Melbourne Metropolitan Tramways Board, GJ Coles and Australian Resources Bank. Ernest Marcuse permanent collections can be viewed at The National Gallery of Victoria , Sydney Jewish Museum, Jewish Holocaust Centre Melbourne, Canberra's War Museum, City of Melbourne, Shire of Yarra ranges and now the Burke Museum. © 2020 Art by Marcuse https://www.artbymarcuse.com.au/aboutDonated to the Burke Museum through the Australian Government's Cultural Gifts Program by Peter and Evelyn MarcusePen and pencil landscape drawing on paper.Obverse: BEECHWORTH CARRIAGE MUSEUM / MARCUSE Reverse: BEECHWORTH NOSTALGIA / BW-08 / B 9 ernest marcuse, marcuse, art, artbymarcuse, beechworth, burke museum, indigo shire, landscape, illustration, drawing, pen and pencil, australian army, war events illustrator, the age, the sun, the argus, germany, refugee, industrial drawing, architectual drawing, figure drawing, berliner morgenpost, grosse deutsche rundfunaustellung, berlin’s reiman school of art., cultural gifts program -
 The Beechworth Burke Museum
Drawing, Ernest Marcuse, Beechworth Carriage Museum IV, c1972-1976
Ernest Heinrich Marcuse was born on the 1st of December 1900 to Hedwig and Siegmund Marcuse in Berlin Germany. While Marcuse's artistic talent was apparent from a younger age, his earliest existing artwork was from when he was approximately 20 years old. Ernest's formal art training commenced in 1918 with a three year course at the Berlin school of Interior design. After completion he found work until 1924 when Germany's Great Depression took effect. To broaden his career opportunities he undertook a further 12 months study of fashion, drawing and advertising at Berlin's Reiman school of art. From 1925 to 1934 Ernest was primarily a freelance press artist specialising in industrial, architectural and figurative drawing. Prominent newspaper The Berliner Morgenpost was his largest client along with Gross Deutsche Rundfunaustellung (Germany's organisation for major trade shows). During this period he would create many significant works. Two months after Hitler and the Nazi part came to power in 1933, Ernest received a life changing letter stating that being Jewish he could no longer continue employment in Germany. Up until 1938 he would only be able to undertake private commissions and occasional unofficial work as a book illustrator and games designer. This was by arrangement with non Jewish artists who claimed his work as their own, they would then share the income with Ernest. With increasing unrest in Germany during late 1938 Ernest decided to move to London and there he married his girlfriend Lotte. In late 1939 Ernest and Lotte Marcuse embarked on an eight week journey to their new home in Australia where they had been accepted as refugees. Shortly after arriving in Australia Ernest presented his portfolio to an editor at the Argus newspaper and gained employment as a war events illustrator. He soon became well respected and known in particular for his detailed illustrations and cross sections of ships , artillery and aircrafts. His detailed depictions of battles were displayed on the front pages of The Argus newspaper on a number of occasions. In May 1940 as the war intensified Ernest was dismissed from The Argus newspaper due to his Australian government classification of 'stateless person of enemy origin' and was considered a potential security risk. The editor of the time commented "don't blame us, blame Hitler". Marcuse then began to establish himself as a commercial artist. Ernest was de-classified as a 'stateless person of enemy origin' and in early 1942. The Australian army heard of Ernest's artistic abilities and began to utilize his designs for visual training aids and posters. Ernest became Private E.H Marcuse V377746, his first army posting was as staff artist at The infantry officer's training school at Bonegilla. When off duty he was inspired by the beauty of the surrounding area creating the works in North east Victoria 'Kiewa river bridge', 'Hume weir', ' Dried up river bed' and 'Hawksview gold reef mine' from his 1942-1943 period at Bonegilla Victoria. Ernest returned to the area to create drawings and paintings from 1948 to 1983 in locations including Bright, Wandilligong, Bogong High plains and Wallace's Hut, Mt Buffalo, Beechworth, Pretty valley, Kiewa Hydro, Yackandandah and Bontherambo homestead. These sketches were often completed on location, photographs were also taken onsite to assist the works back at the studio. Occasionally Marcuse also painted in the field. Ernest's preferred choice of medium was pencil and ink. Up until 1952 he would often incorporate watercolour into his work. Later into his career he began introducing pastels, acrylic and mixed media. In earlier years Ernest Marcuse often signed his work Mar, later on the signing of works ranged from Marcuse, E.Marcuse, Ernest Marcuse, EHM or simply EM . If a work was considered incomplete or Marcuse did not like the work it would remain unsigned. From Bonegilla Marcuse was transferred to Woodside South Australia before his final posting in Melbourne until the end of 1945. Ernest's work from within his army posting 'Troop Train at Night' from his 1945 exhibition Australia at War are part of the permanent collection at Canberra's War Museum. Between 1946 and 1969 Ernest largely worked from home and concentrated on a career as a freelance commercial artist and graphic designer. During that time he created work for well known household names including CRA/Conzinc, Vacuum oil (Caltex), Cottee's Brand (Schweppes and Heinz), Home Beautiful magazine Fulton garden supplies, International Iveco trucks, Ego pharmaceuticals, QV and Sunsense. After retirement Ernest concentrated on his true love of fine art and focused on painting images of personal interest both across Australia and Internationally. Earnest never drove a car. He would often walk or use public transport or enlist in the help of family or artist friends to drive him. Throughout his career Ernest Marcuse's artworks were purchase by private collectors these included ACTU, Melbourne City council, Holland Constructions, Melbourne Metropolitan Tramways Board, GJ Coles and Australian Resources Bank. Ernest Marcuse permanent collections can be viewed at The National Gallery of Victoria , Sydney Jewish Museum, Jewish Holocaust Centre Melbourne, Canberra's War Museum, City of Melbourne, Shire of Yarra ranges and now the Burke Museum. © 2020 Art by Marcuse https://www.artbymarcuse.com.au/aboutDonated to the Burke Museum through the Australian Government's Cultural Gifts Program by Peter and Evelyn MarcusePen and pencil landscape drawing on paper.Obverse: B'worth / Marcuse Reverse: B6 / Beechworth Nostalgia / BW - 07 (crossed out)ernest marcuse, marcuse, art, artbymarcuse, beechworth, burke museum, indigo shire, landscape, illustration, drawing, pen and pencil, australian army, war events illustrator, the age, the sun, the argus, germany, refugee, industrial drawing, architectual drawing, figure drawing, berliner morgenpost, grosse deutsche rundfunaustellung, berlin’s reiman school of art., cultural gifts program -
 The Beechworth Burke Museum
Drawing, Ernest Marcuse, Beechworth III, c1972-1976
Ernest Heinrich Marcuse was born on the 1st of December 1900 to Hedwig and Siegmund Marcuse in Berlin Germany. While Marcuse's artistic talent was apparent from a younger age, his earliest existing artwork was from when he was approximately 20 years old. Ernest's formal art training commenced in 1918 with a three year course at the Berlin school of Interior design. After completion he found work until 1924 when Germany's Great Depression took effect. To broaden his career opportunities he undertook a further 12 months study of fashion, drawing and advertising at Berlin's Reiman school of art. From 1925 to 1934 Ernest was primarily a freelance press artist specialising in industrial, architectural and figurative drawing. Prominent newspaper The Berliner Morgenpost was his largest client along with Gross Deutsche Rundfunaustellung (Germany's organisation for major trade shows). During this period he would create many significant works. Two months after Hitler and the Nazi part came to power in 1933, Ernest received a life changing letter stating that being Jewish he could no longer continue employment in Germany. Up until 1938 he would only be able to undertake private commissions and occasional unofficial work as a book illustrator and games designer. This was by arrangement with non Jewish artists who claimed his work as their own, they would then share the income with Ernest. With increasing unrest in Germany during late 1938 Ernest decided to move to London and there he married his girlfriend Lotte. In late 1939 Ernest and Lotte Marcuse embarked on an eight week journey to their new home in Australia where they had been accepted as refugees. Shortly after arriving in Australia Ernest presented his portfolio to an editor at the Argus newspaper and gained employment as a war events illustrator. He soon became well respected and known in particular for his detailed illustrations and cross sections of ships , artillery and aircrafts. His detailed depictions of battles were displayed on the front pages of The Argus newspaper on a number of occasions. In May 1940 as the war intensified Ernest was dismissed from The Argus newspaper due to his Australian government classification of 'stateless person of enemy origin' and was considered a potential security risk. The editor of the time commented "don't blame us, blame Hitler". Marcuse then began to establish himself as a commercial artist. Ernest was de-classified as a 'stateless person of enemy origin' and in early 1942. The Australian army heard of Ernest's artistic abilities and began to utilize his designs for visual training aids and posters. Ernest became Private E.H Marcuse V377746, his first army posting was as staff artist at The infantry officer's training school at Bonegilla. When off duty he was inspired by the beauty of the surrounding area creating the works in North east Victoria 'Kiewa river bridge', 'Hume weir', ' Dried up river bed' and 'Hawksview gold reef mine' from his 1942-1943 period at Bonegilla Victoria. Ernest returned to the area to create drawings and paintings from 1948 to 1983 in locations including Bright, Wandilligong, Bogong High plains and Wallace's Hut, Mt Buffalo, Beechworth, Pretty valley, Kiewa Hydro, Yackandandah and Bontherambo homestead. These sketches were often completed on location, photographs were also taken onsite to assist the works back at the studio. Occasionally Marcuse also painted in the field. Ernest's preferred choice of medium was pencil and ink. Up until 1952 he would often incorporate watercolour into his work. Later into his career he began introducing pastels, acrylic and mixed media. In earlier years Ernest Marcuse often signed his work Mar, later on the signing of works ranged from Marcuse, E.Marcuse, Ernest Marcuse, EHM or simply EM . If a work was considered incomplete or Marcuse did not like the work it would remain unsigned. From Bonegilla Marcuse was transferred to Woodside South Australia before his final posting in Melbourne until the end of 1945. Ernest's work from within his army posting 'Troop Train at Night' from his 1945 exhibition Australia at War are part of the permanent collection at Canberra's War Museum. Between 1946 and 1969 Ernest largely worked from home and concentrated on a career as a freelance commercial artist and graphic designer. During that time he created work for well known household names including CRA/Conzinc, Vacuum oil (Caltex), Cottee's Brand (Schweppes and Heinz), Home Beautiful magazine Fulton garden supplies, International Iveco trucks, Ego pharmaceuticals, QV and Sunsense. After retirement Ernest concentrated on his true love of fine art and focused on painting images of personal interest both across Australia and Internationally. Earnest never drove a car. He would often walk or use public transport or enlist in the help of family or artist friends to drive him. Throughout his career Ernest Marcuse's artworks were purchase by private collectors these included ACTU, Melbourne City council, Holland Constructions, Melbourne Metropolitan Tramways Board, GJ Coles and Australian Resources Bank. Ernest Marcuse permanent collections can be viewed at The National Gallery of Victoria , Sydney Jewish Museum, Jewish Holocaust Centre Melbourne, Canberra's War Museum, City of Melbourne, Shire of Yarra ranges and now the Burke Museum. © 2020 Art by Marcuse https://www.artbymarcuse.com.au/aboutDonated to the Burke Museum through the Australian Government's Cultural Gifts Program by Peter and Evelyn MarcusePen and coloured pencil landscape drawing on paper.Obverse: BEECHWORTH / VIC. / MARCUSE Reverse: BEECHWORTH NOSTALGIA / BW – 03 (on masking tape) 003 (pencil) ernest marcuse, marcuse, art, artbymarcuse, beechworth, burke museum, indigo shire, landscape, illustration, drawing, pen and pencil, australian army, war events illustrator, the age, the sun, the argus, germany, refugee, industrial drawing, architectual drawing, figure drawing, berliner morgenpost, grosse deutsche rundfunaustellung, berlin’s reiman school of art., cultural gifts program -
 The Beechworth Burke Museum
Drawing, Ernest Marcuse, Beechworth – Opposite Crown Hotel (Tanswell Hotel), c1972-1976
Ernest Heinrich Marcuse was born on the 1st of December 1900 to Hedwig and Siegmund Marcuse in Berlin Germany. While Marcuse's artistic talent was apparent from a younger age, his earliest existing artwork was from when he was approximately 20 years old. Ernest's formal art training commenced in 1918 with a three year course at the Berlin school of Interior design. After completion he found work until 1924 when Germany's Great Depression took effect. To broaden his career opportunities he undertook a further 12 months study of fashion, drawing and advertising at Berlin's Reiman school of art. From 1925 to 1934 Ernest was primarily a freelance press artist specialising in industrial, architectural and figurative drawing. Prominent newspaper The Berliner Morgenpost was his largest client along with Gross Deutsche Rundfunaustellung (Germany's organisation for major trade shows). During this period he would create many significant works. Two months after Hitler and the Nazi part came to power in 1933, Ernest received a life changing letter stating that being Jewish he could no longer continue employment in Germany. Up until 1938 he would only be able to undertake private commissions and occasional unofficial work as a book illustrator and games designer. This was by arrangement with non Jewish artists who claimed his work as their own, they would then share the income with Ernest. With increasing unrest in Germany during late 1938 Ernest decided to move to London and there he married his girlfriend Lotte. In late 1939 Ernest and Lotte Marcuse embarked on an eight week journey to their new home in Australia where they had been accepted as refugees. Shortly after arriving in Australia Ernest presented his portfolio to an editor at the Argus newspaper and gained employment as a war events illustrator. He soon became well respected and known in particular for his detailed illustrations and cross sections of ships , artillery and aircrafts. His detailed depictions of battles were displayed on the front pages of The Argus newspaper on a number of occasions. In May 1940 as the war intensified Ernest was dismissed from The Argus newspaper due to his Australian government classification of 'stateless person of enemy origin' and was considered a potential security risk. The editor of the time commented "don't blame us, blame Hitler". Marcuse then began to establish himself as a commercial artist. Ernest was de-classified as a 'stateless person of enemy origin' and in early 1942. The Australian army heard of Ernest's artistic abilities and began to utilize his designs for visual training aids and posters. Ernest became Private E.H Marcuse V377746, his first army posting was as staff artist at The infantry officer's training school at Bonegilla. When off duty he was inspired by the beauty of the surrounding area creating the works in North east Victoria 'Kiewa river bridge', 'Hume weir', ' Dried up river bed' and 'Hawksview gold reef mine' from his 1942-1943 period at Bonegilla Victoria. Ernest returned to the area to create drawings and paintings from 1948 to 1983 in locations including Bright, Wandilligong, Bogong High plains and Wallace's Hut, Mt Buffalo, Beechworth, Pretty valley, Kiewa Hydro, Yackandandah and Bontherambo homestead. These sketches were often completed on location, photographs were also taken onsite to assist the works back at the studio. Occasionally Marcuse also painted in the field. Ernest's preferred choice of medium was pencil and ink. Up until 1952 he would often incorporate watercolour into his work. Later into his career he began introducing pastels, acrylic and mixed media. In earlier years Ernest Marcuse often signed his work Mar, later on the signing of works ranged from Marcuse, E.Marcuse, Ernest Marcuse, EHM or simply EM . If a work was considered incomplete or Marcuse did not like the work it would remain unsigned. From Bonegilla Marcuse was transferred to Woodside South Australia before his final posting in Melbourne until the end of 1945. Ernest's work from within his army posting 'Troop Train at Night' from his 1945 exhibition Australia at War are part of the permanent collection at Canberra's War Museum. Between 1946 and 1969 Ernest largely worked from home and concentrated on a career as a freelance commercial artist and graphic designer. During that time he created work for well known household names including CRA/Conzinc, Vacuum oil (Caltex), Cottee's Brand (Schweppes and Heinz), Home Beautiful magazine Fulton garden supplies, International Iveco trucks, Ego pharmaceuticals, QV and Sunsense. After retirement Ernest concentrated on his true love of fine art and focused on painting images of personal interest both across Australia and Internationally. Earnest never drove a car. He would often walk or use public transport or enlist in the help of family or artist friends to drive him. Throughout his career Ernest Marcuse's artworks were purchase by private collectors these included ACTU, Melbourne City council, Holland Constructions, Melbourne Metropolitan Tramways Board, GJ Coles and Australian Resources Bank. Ernest Marcuse permanent collections can be viewed at The National Gallery of Victoria , Sydney Jewish Museum, Jewish Holocaust Centre Melbourne, Canberra's War Museum, City of Melbourne, Shire of Yarra ranges and now the Burke Museum. © 2020 Art by Marcuse https://www.artbymarcuse.com.au/aboutDonated to the Burke Museum through the Australian Government's Cultural Gifts Program by Peter and Evelyn MarcusePen and coloured pencil landscape drawing on paper.Obverse: Opposite Crown Hotel / Tanswell Hotel / BEECHWORTH / (on tape) Reverse: BEECHWORTH NOSTALGIA / BW – 05 (on masking tape) 004 (pencil) ernest marcuse, marcuse, art, artbymarcuse, beechworth, burke museum, indigo shire, landscape, illustration, drawing, pen and pencil, australian army, war events illustrator, the age, the sun, the argus, germany, refugee, industrial drawing, architectual drawing, figure drawing, berliner morgenpost, grosse deutsche rundfunaustellung, berlin’s reiman school of art., cultural gifts program -
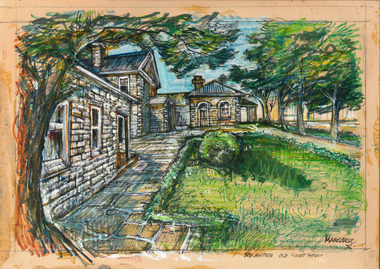 The Beechworth Burke Museum
Drawing, Ernest Marcuse, Beechworth – Old Court House, 1972
Ernest Heinrich Marcuse was born on the 1st of December 1900 to Hedwig and Siegmund Marcuse in Berlin Germany. While Marcuse's artistic talent was apparent from a younger age, his earliest existing artwork was from when he was approximately 20 years old. Ernest's formal art training commenced in 1918 with a three year course at the Berlin school of Interior design. After completion he found work until 1924 when Germany's Great Depression took effect. To broaden his career opportunities he undertook a further 12 months study of fashion, drawing and advertising at Berlin's Reiman school of art. From 1925 to 1934 Ernest was primarily a freelance press artist specialising in industrial, architectural and figurative drawing. Prominent newspaper The Berliner Morgenpost was his largest client along with Gross Deutsche Rundfunaustellung (Germany's organisation for major trade shows). During this period he would create many significant works. Two months after Hitler and the Nazi part came to power in 1933, Ernest received a life changing letter stating that being Jewish he could no longer continue employment in Germany. Up until 1938 he would only be able to undertake private commissions and occasional unofficial work as a book illustrator and games designer. This was by arrangement with non Jewish artists who claimed his work as their own, they would then share the income with Ernest. With increasing unrest in Germany during late 1938 Ernest decided to move to London and there he married his girlfriend Lotte. In late 1939 Ernest and Lotte Marcuse embarked on an eight week journey to their new home in Australia where they had been accepted as refugees. Shortly after arriving in Australia Ernest presented his portfolio to an editor at the Argus newspaper and gained employment as a war events illustrator. He soon became well respected and known in particular for his detailed illustrations and cross sections of ships , artillery and aircrafts. His detailed depictions of battles were displayed on the front pages of The Argus newspaper on a number of occasions. In May 1940 as the war intensified Ernest was dismissed from The Argus newspaper due to his Australian government classification of 'stateless person of enemy origin' and was considered a potential security risk. The editor of the time commented "don't blame us, blame Hitler". Marcuse then began to establish himself as a commercial artist. Ernest was de-classified as a 'stateless person of enemy origin' and in early 1942. The Australian army heard of Ernest's artistic abilities and began to utilize his designs for visual training aids and posters. Ernest became Private E.H Marcuse V377746, his first army posting was as staff artist at The infantry officer's training school at Bonegilla. When off duty he was inspired by the beauty of the surrounding area creating the works in North east Victoria 'Kiewa river bridge', 'Hume weir', ' Dried up river bed' and 'Hawksview gold reef mine' from his 1942-1943 period at Bonegilla Victoria. Ernest returned to the area to create drawings and paintings from 1948 to 1983 in locations including Bright, Wandilligong, Bogong High plains and Wallace's Hut, Mt Buffalo, Beechworth, Pretty valley, Kiewa Hydro, Yackandandah and Bontherambo homestead. These sketches were often completed on location, photographs were also taken onsite to assist the works back at the studio. Occasionally Marcuse also painted in the field. Ernest's preferred choice of medium was pencil and ink. Up until 1952 he would often incorporate watercolour into his work. Later into his career he began introducing pastels, acrylic and mixed media. In earlier years Ernest Marcuse often signed his work Mar, later on the signing of works ranged from Marcuse, E.Marcuse, Ernest Marcuse, EHM or simply EM . If a work was considered incomplete or Marcuse did not like the work it would remain unsigned. From Bonegilla Marcuse was transferred to Woodside South Australia before his final posting in Melbourne until the end of 1945. Ernest's work from within his army posting 'Troop Train at Night' from his 1945 exhibition Australia at War are part of the permanent collection at Canberra's War Museum. Between 1946 and 1969 Ernest largely worked from home and concentrated on a career as a freelance commercial artist and graphic designer. During that time he created work for well known household names including CRA/Conzinc, Vacuum oil (Caltex), Cottee's Brand (Schweppes and Heinz), Home Beautiful magazine Fulton garden supplies, International Iveco trucks, Ego pharmaceuticals, QV and Sunsense. After retirement Ernest concentrated on his true love of fine art and focused on painting images of personal interest both across Australia and Internationally. Earnest never drove a car. He would often walk or use public transport or enlist in the help of family or artist friends to drive him. Throughout his career Ernest Marcuse's artworks were purchase by private collectors these included ACTU, Melbourne City council, Holland Constructions, Melbourne Metropolitan Tramways Board, GJ Coles and Australian Resources Bank. Ernest Marcuse permanent collections can be viewed at The National Gallery of Victoria , Sydney Jewish Museum, Jewish Holocaust Centre Melbourne, Canberra's War Museum, City of Melbourne, Shire of Yarra ranges and now the Burke Museum. © 2020 Art by Marcuse https://www.artbymarcuse.com.au/aboutDonated to the Burke Museum through the Australian Government's Cultural Gifts Program by Peter and Evelyn MarcusePen and coloured pencil landscape drawing on paper.Obverse: Marcuse / Beechworth Old Courthouse / Reverse: B4 / BEECHWORTH OLD COURTHOUSE / BW - 09 (on masking tape) COURTHOUSE / BEECHWORTH / VICTORIA / NATIONAL TRUST / CLASS (A) ERNEST MARCUSE / 17 CADDOCK AVE / CAUFIELD / VIC / 53-7374 001 (pencil) ernest marcuse, marcuse, art, artbymarcuse, beechworth, burke museum, indigo shire, landscape, illustration, drawing, pen and pencil, australian army, war events illustrator, the age, the sun, the argus, germany, refugee, industrial drawing, architectual drawing, figure drawing, berliner morgenpost, grosse deutsche rundfunaustellung, berlin’s reiman school of art., cultural gifts program -
 The Beechworth Burke Museum
Drawing, Ernest Marcuse, Courthouse - Beechworth, 1974
Ernest Heinrich Marcuse was born on the 1st of December 1900 to Hedwig and Siegmund Marcuse in Berlin Germany. While Marcuse's artistic talent was apparent from a younger age, his earliest existing artwork was from when he was approximately 20 years old. Ernest's formal art training commenced in 1918 with a three year course at the Berlin school of Interior design. After completion he found work until 1924 when Germany's Great Depression took effect. To broaden his career opportunities he undertook a further 12 months study of fashion, drawing and advertising at Berlin's Reiman school of art. From 1925 to 1934 Ernest was primarily a freelance press artist specialising in industrial, architectural and figurative drawing. Prominent newspaper The Berliner Morgenpost was his largest client along with Gross Deutsche Rundfunaustellung (Germany's organisation for major trade shows). During this period he would create many significant works. Two months after Hitler and the Nazi part came to power in 1933, Ernest received a life changing letter stating that being Jewish he could no longer continue employment in Germany. Up until 1938 he would only be able to undertake private commissions and occasional unofficial work as a book illustrator and games designer. This was by arrangement with non Jewish artists who claimed his work as their own, they would then share the income with Ernest. With increasing unrest in Germany during late 1938 Ernest decided to move to London and there he married his girlfriend Lotte. In late 1939 Ernest and Lotte Marcuse embarked on an eight week journey to their new home in Australia where they had been accepted as refugees. Shortly after arriving in Australia Ernest presented his portfolio to an editor at the Argus newspaper and gained employment as a war events illustrator. He soon became well respected and known in particular for his detailed illustrations and cross sections of ships , artillery and aircrafts. His detailed depictions of battles were displayed on the front pages of The Argus newspaper on a number of occasions. In May 1940 as the war intensified Ernest was dismissed from The Argus newspaper due to his Australian government classification of 'stateless person of enemy origin' and was considered a potential security risk. The editor of the time commented "don't blame us, blame Hitler". Marcuse then began to establish himself as a commercial artist. Ernest was de-classified as a 'stateless person of enemy origin' and in early 1942. The Australian army heard of Ernest's artistic abilities and began to utilize his designs for visual training aids and posters. Ernest became Private E.H Marcuse V377746, his first army posting was as staff artist at The infantry officer's training school at Bonegilla. When off duty he was inspired by the beauty of the surrounding area creating the works in North east Victoria 'Kiewa river bridge', 'Hume weir', ' Dried up river bed' and 'Hawksview gold reef mine' from his 1942-1943 period at Bonegilla Victoria. Ernest returned to the area to create drawings and paintings from 1948 to 1983 in locations including Bright, Wandilligong, Bogong High plains and Wallace's Hut, Mt Buffalo, Beechworth, Pretty valley, Kiewa Hydro, Yackandandah and Bontherambo homestead. These sketches were often completed on location, photographs were also taken onsite to assist the works back at the studio. Occasionally Marcuse also painted in the field. Ernest's preferred choice of medium was pencil and ink. Up until 1952 he would often incorporate watercolour into his work. Later into his career he began introducing pastels, acrylic and mixed media. In earlier years Ernest Marcuse often signed his work Mar, later on the signing of works ranged from Marcuse, E.Marcuse, Ernest Marcuse, EHM or simply EM . If a work was considered incomplete or Marcuse did not like the work it would remain unsigned. From Bonegilla Marcuse was transferred to Woodside South Australia before his final posting in Melbourne until the end of 1945. Ernest's work from within his army posting 'Troop Train at Night' from his 1945 exhibition Australia at War are part of the permanent collection at Canberra's War Museum. Between 1946 and 1969 Ernest largely worked from home and concentrated on a career as a freelance commercial artist and graphic designer. During that time he created work for well known household names including CRA/Conzinc, Vacuum oil (Caltex), Cottee's Brand (Schweppes and Heinz), Home Beautiful magazine Fulton garden supplies, International Iveco trucks, Ego pharmaceuticals, QV and Sunsense. After retirement Ernest concentrated on his true love of fine art and focused on painting images of personal interest both across Australia and Internationally. Earnest never drove a car. He would often walk or use public transport or enlist in the help of family or artist friends to drive him. Throughout his career Ernest Marcuse's artworks were purchase by private collectors these included ACTU, Melbourne City council, Holland Constructions, Melbourne Metropolitan Tramways Board, GJ Coles and Australian Resources Bank. Ernest Marcuse permanent collections can be viewed at The National Gallery of Victoria , Sydney Jewish Museum, Jewish Holocaust Centre Melbourne, Canberra's War Museum, City of Melbourne, Shire of Yarra ranges and now the Burke Museum. © 2020 Art by Marcuse https://www.artbymarcuse.com.au/aboutDonated to the Burke Museum through the Australian Government's Cultural Gifts Program by Peter and Evelyn MarcusePen and coloured pencil landscape drawing on paper.Obverse: Marcuse 74 / Courthouse / Visitor Ned Kelly . B'worth Reverse: BEECHWORTH / COURTHOUSE / B5 / 06 ernest marcuse, marcuse, art, artbymarcuse, beechworth, burke museum, indigo shire, landscape, illustration, drawing, pen and pencil, australian army, war events illustrator, the age, the sun, the argus, germany, refugee, industrial drawing, architectual drawing, figure drawing, berliner morgenpost, grosse deutsche rundfunaustellung, berlin’s reiman school of art., cultural gifts program