Showing 338 items
matching city terminus
-
 Ballarat Tramway Museum
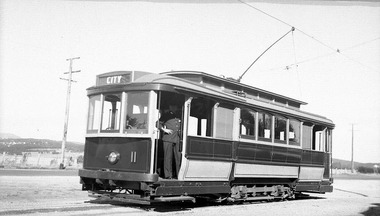
Photograph - Digital Image - tram 11 Sebastopol, c1937
... through the city to another terminus. See item 5578. Has... through the city to another terminus. See item 5578. Has ...Ballarat tram 11 at Sebastopol c1937 in the first SECV colour scheme or livery with cream rocker panels with the destination of City. Possibly, the photo was taken prior to the introduction of through routing of trams introduced in August 1937 when trams no longer terminated in the City at Grenville St but ran through the city to another terminus. See item 5578. Has the driver or motorman standing in the front doorway. Scan of negative collected by David Critchley of Sydney.Yield information about Ballarat 11, uniforms and the Sebastopol terminus c1938.Digital image of a scan of an original negative.tramways, trams, sebastopol, tram 11, uniforms, motormen -
 Melbourne Tram Museum
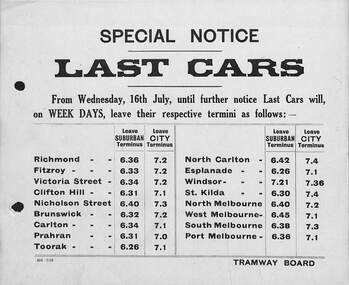
Document - Notice, Tramway Board, "Special Notice - Last Cars", Jul. 1919
... Cars" - giving times for the last cable cars from the city..." - giving times for the last cable cars from the city and suburban ...Notice, half foolscap sheet, titled "Special Notice - Last Cars" - giving times for the last cable cars from the city and suburban terminus - at about 7pm. A coal shortage due to strike action was the reason behind this. Issued by the Tramway Board. See Page 4 of The Argus 17/7/1919, https://trove.nla.gov.au/newspaper/article/4715364# accessed 29/12/2019.trams, tramways, tramway board, strike, cable trams, last tram -
 Ballarat Tramway Museum
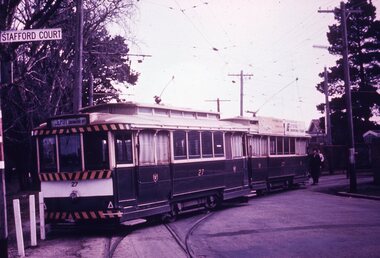
Slide - 35mm slide/s - set of 7, Noel Simons, 1970's
... St and Sturt St., at city terminus showing "Special" and tram... and Sturt St., at city terminus showing "Special" and tram 35 ...Set of 7 transparencies taken undated (appear to be 1970 or 71) on PAKON mounts. Also possibly copy slides as quality is poorish. 1175.1 - No. 27 has derailed at Depot, across Wendouree Parade, and No. 33 appears to be about to try and tow it back on. Wendouree Parade totally blocked. Adjacent pole has tram stop sign and has "Stafford Court" street sign mounted on it. 1175.2 - No. 43 at corner of Drummond St. South and Dana Street, with destination Lydiard St. North. 1175.3 - No. 42 (Mt Pleasant) and 21 (Gardens via Sturt St. West) crossing at Gardens Loop. 1175.4 - No. 42 bound for Lydiard St. Nth at intersection with Macarthur St. Shows the retaining wall for the cutting on the east side of Lydiard St. Nth. 1175.5 - No. 43 at corner of Lydiard St and Sturt St., at city terminus showing "Special" and tram 35 adjacent to Post Office in Lydiard St. Nth. Photo shows the small tram stop pole at this location and Post Office building. 1175.6 - No. 39 and 26 and 27 at the Mt Pleasant terminus. Near closure as a bus stop sign has been positioned on the west side of the road. No. 39 showing destination of "Gardens via Sturt St. West" 1175.7 - Nos 21 and 34 crossing at the Grant St. loop in Barkly St. 21 has destination of Mt Pleasant, while 34, - Gardens via Sturt St. West"All information on typed small white labels, on the top of the slides using black ink. 1175.1 - "27 derailed and 33 at depot" 1175.2 - "43 at cnr Drummond & Dana Sts" 1175.3 - "21 and 42 Gardens Terminus" 1175.4 - "42 at cnr Macarthur & Lydiard" 1175.5 - "43 & 35 at Post Office" 1175.6 - "39, 26 and 27 at Mt Pleasant" 1175.7 - "21 & 34 at Grant St"tramways, trams, wendouree parade, depot, accidents, derailments, drummond st. sth, gardens loop, post office, mt pleasant, grant st., tram 21, tram 26, tram 27, tram 33, tram 35, tram 42, tram 43 -
 Ballarat Tramway Museum
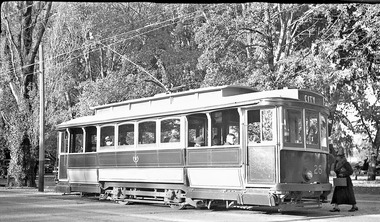
Photograph - Digital Image - tram 26 Gardens, c1937
... through the city to another terminus. See item 5578. A lady... through the city to another terminus. See item 5578. A lady ...Ballarat tram 26 at one of the Gardens Loops, c1937 with the destination of City. Possibly, the photo was taken prior to the introduction of through routing of trams introduced in August 1937 when trams no longer terminated in the City at Grenville St but ran through the city to another terminus. See item 5578. A lady in a fur collar coat carries a small case is boarding the tram. There are motor vehicles parked on the grounds behind the tram. Scan of negative collected by David Critchley of Sydney.Yield information about Ballarat 26 and the Gardens c1937.Digital image of a scan of an original negative.tramways, trams, tram 26, gardens, wendouree parade -
 Ballarat Tramway Museum
Slide - 35mm slide/s - set of 7, Noel Simons, 22/11/1962 12:00:00 AM
... with pedestrians. 1161.5 - tram 41 in Sturt St. at the City terminus.... at the City terminus, showing destination of Mt Pleasant with Post ...Set of 7 Kodachrome transparencies taken on 22/11/1962. 1161.1 - trams 38 and 20 in Sturt St. West at the Russell St. loop. No. 20 has possibly terminated and is showing "CITY" while 38 is showing "Mt Pleasant" Both trams fitted with dash canopy lighting, but no large white stripe. 20 has a Twin Lakes sign. 1161.2 - tram 33 just before Gardens Loop in Wendouree Parade, with destination of "Victoria St." Has a Twin Lakes sign. 1161.3 - tram 39 at corner of Lydiard St. North and Sturt St. with Post Office in background. 1161.4 - tram 40 turning from Sturt St into Lydiard St. North with Post Office in background and showing destination of Lydiard St. North. A blue Holden with red stripes for the Radio Cabs co. is in the foreground, along with pedestrians. 1161.5 - tram 41 in Sturt St. at the City terminus, showing destination of Mt Pleasant with Post Office and ANZ Bank buildings in background. Numerous people waiting on the seats at the tram stop. 1161.6 - tram 13 in Sturt St. near Doveton St. showing destination of Bell St. Many cars and pedestrians on the south side of Sturt St. Note the Austin motor car by the tram showing a stop signal. Tram 13 has a Twin Lakes sign. 1161.7 - trams 13, 26, and 39 in the City Loop near Bridge St. Has Morseheads and Grenville St. tram shelter in the background.1161.1 - "38 and 20 crossing in Sturt St. Ballarat near Russell Street" - in blue and black ink. The "Russell St" is a later addition, over white out. 1161.2 - "33 near Botanic Gardens terminus, Wendouree Parade, Ballarat" 1161.3 - "No. 39 in Lydiard St. Ballarat at Cnr. of Sturt St." 1161.4 - "No. 40 entering Lydiard St. from Sturt St. Ballarat" 1161.5 - "No. 41 in Sturt St. Ballarat at cnr of Lydiard St." 1161.6 - "No. 13 in Sturt St. Ballarat, at Cnr. of Doveton St." 1161.7 - "Nos. 13, 26, and 39 in Sturt St. Ballarat near Bridge St." All have date stamp of "22 Nov. 1962" in purple ink. All black ink unless otherwise noted.tramways, trams, ballarat, sturt st. west, wendouree parade, lydiard st., city loop, taxis, radio cabs, tram 13, tram 20, tram 26, tram 33, tram 38, tram 39, tram 40, tram 41 -
 Melbourne Tram Museum
Document - Folder with papers, Melbourne & Metropolitan Tramways Board (MMTB), "Notices to Staff", 1924 - 1944
... - 1941 Memo re timing of trams from city terminus account 3KZ... - 1941 Memo re timing of trams from city terminus account 3KZ ...Light grey card folder manufactured by the Roneo Printing Works of Rumford England with the file title "Fire Switches, glued to the top of the folder on the inside back cover. Contains many memos from the MMTB Traffic Managers, Depot Managers about the arrangements for the visit of the Royal Highnesses the Duke and Duchess of York in April 1927. Also contains memo re cable tram arrangements for this event from Port Melbourne depot, arrangements for Christmas holidays and other holidays from about 1924 to 1944, including a map of the procession and printed programs by the Government Printer. Documents either typed or hand written. Other documents include (Sample only): Camberwell extra for December 1944 Shopping Week Memos re traffic arrangements and shunting of trams for the 8 hour day procession Tables for Cable car operations from Port Melbourne depot 5/7/1925 Handwritten car timetables Costs associated with the royal visit Proposed service arrangements for Coburg Lines Christmas and New Year 1929 Cuttings regarding shopping hours for 1929-1930 Football posters - special trams - 1931 and 1932 All Night services - destination rolls to specific bogie trams Memos regarding cancelling of leave in Dec. 1941 Memos regarding services to Fisherman's bend and factory hours - 1941 - 42 Holiday loading returns for Southern System - 1941 Memo re timing of trams from city terminus account 3KZ Christmas Eve Choral festivaltrams, tramways, mmtb, port melbourne depot, notices and information, cable trams, holiday arrangements, royal visit, timetables, world war 2, football, all night services -
 Ballarat Tramway Museum
Slide - 35mm slide/s - set of 14, Noel Simons, 23/11/1962 12:00:00 AM
... to Sebastopol. 1162.5 - No. 40 at the City terminus, on the South side.... 1162.5 - No. 40 at the City terminus, on the South side of Sturt ...Set of 14 Kodachrome transparencies taken on 23/11/1962. 1162.1 - tram 38 turning into Lydiard St. North from Sturt St. with tram 20 in background. Many motor vehicles in photo. 1162.2 - as above, but a minute of so later. Has Mutual Life building in background as well as Town Hall. 1162.3 - No. 40 entering Albert St. from Skipton St. outbound to Sebastopol. 1162.4 - No. 40 near start of side of the road running in Albert St. heading to Sebastopol. 1162.5 - No. 40 at the City terminus, on the South side of Sturt St. Has Town Hall and other buildings along the south side of Sturt St. in the background. 1162.6 - No. 40 at Sebastopol terminus - shows arrangement of the signs at the terminus. 1162.7 - No. 40 and No. 38 crossing at loop between Sayle and Grey St. No. 40 inbound. 1162.8 - No. 40 turning from Drummond St. South to Sturt St. at Hospital Corner with Southern Cross Hotel in background. 1162.9 - No. 18 in Wendouree Parade near Forest St. heading east with destination of "Victoria St." 1162.10 - Nos 41 and 39 at Depot Junction. Both trams have SEC ads. 1162.11 - No. 39 turning into the depot from Wendouree Parade - showing destination of "Gardens via Drummond Nth" 1162.12- No. 17 at Lydiard St. North terminus, showing destination of "Grey St. Sebas". Has a Twin Lakes sign 1162.13 - ditto, but with trolley pole turned around. Has SEC Briquettes roof ad and Whitehorse whiskey ad on rear dash panel. 1162.14 - No. 40 outbound to Sebastopol crossing Albert St. 1162.1 -"Nos. 38 and 20 in Sturt St. Ballarat at corner of Lydiard St." 1162.2 - "No. 38 turns into Lydiard St. as No. 20 waits at stop in Sturt St. Ballarat" 1162.3 - "No. 40 entering Albert St. from Skipton St. Redan on Sebastopol route." 1162.4 - "No 40 at beginning of reserved track on Sebastopol route, Albert St. Redan." 1162.5 - "No. 40 in Sturt St. Ballarat near cnr. of Armstrong St." 1162.6 - "No. 40 at Sebastopol terminus" 1162.7 - "No. 38 and 40 crossing at Sayle St. Loop on Albert St. reserved track, Sebastopol route" 1162.8 - "No. 40 turning into Sturt St. from Drummond St." 1162.9 - "No. 18 in Wendouree Pde. Ballarat near tramway depot" 1162.10 - "No. 41 and 39 outside Ballarat tramway depot, Lake Wendouree in background" 1162.11 - "No. 39 entering tramway depot from Wendouree Parade, Ballarat" 1162.12 - "No 17 at Lydiard St. North terminus, Ballarat North" 1162.13 - "No 17 at Lydiard St. North terminus, Ballarat North" 1162.14 - "No. 40 crossing Albert St. Sebastopol as reserved track switches from left to right of road" All have date stamp of "23 Nov. 1962" in purple ink. All black ink unless otherwise noted.tramways, trams, ballarat, albert st., sturt st., sebastopol, grey st., hospital corner, wendouree parade, depot junction, lydiard st. north, tram 17, tram 18, tram 20, tram 38, tram 39, tram 40, tram 41 -
 Ballarat Tramway Museum
Photograph - Digital image Set of 10, Tony Smith, 1971
... the stationary tramcar. .2 - 13 and another single trucker at the City... and another single trucker at the City terminus, north side of Sturt ...Yields information about Ballarat Tramways and trams prior to the closure of the tramway system.Set of 10 digital images of Ballarat trams prior to closure, scanned from original slides by Tony Smith, 1971 prior to closure of the system. .1 - 13 at the Parker St loop, Sturt St west waiting for another tram to arrive - Mercedes Benz car pull out around the stationary tramcar. .2 - 13 and another single trucker at the City terminus, north side of Sturt St. Note the conductor in the distance with a point bar about to hop onto the tram turning into Lydiard St North. Has the Post Office in the background. .3 - 26 arriving at the City stop, with the Mechanics Institute and Cooks Provide Hotel in the background. Tram has destination of Gardens via Drummond St North. .4 - 33 and 12 in Lydiard St Nth at Sturt St. 33 (Lydiard St Nth), 12 (Sebastopol). Has the post office and other buildings in the background .5 - 12 and 26 at city stop, south side with Town Hall and Myers in the background. 12 has destination of Sebastopol. .6 - 12 at intersection of Drummond St and Sturt St with Mobil petrol station in background and ad for Marshall batteries. Has the tram stop sign on the left hand side. Tram has destination of Sebastopol and a Twin Lakes sign. .7 - 30 northbound in Drummond St south at Sturt St about to turn into Sturt St. Has destination of Lydiard St Nth. Has the Southern Cross hotel in the background. .8 - 31 turning from Drummond St North into Sturt St, en route to Victoria St with the Shell service station in the background. Hospital Corner. Tram has roof advertisements for Johnnie Walker whisky. .9 - 30 and 31 (from above photos) in Sturt St. .10 - Tony Smith standing on the doorstep of 26 at Mt Pleasant terminus. Has the store in the background with The Sun and Robur tea adverts. trams, tramways, parker st loop, sturt st west, sturt st, conductors, drummond st, hospital corner, mt pleasant, tram 13, tram 26, tram 12, tram 30, tram 33 -
 Ballarat Tramway Museum
Ephemera - Timetable, Wal Jack, notes on the Ballarat Tramways overhead, 1940's - 1950's
... , possible track extensions, Viewpoint terminus, Forest City signs... extensions, Viewpoint terminus, Forest City signs, View Point Loop ...Yields information about the Ballarat overhead, track layouts, terminals and the Sebastopol type cars.Three hand written foolscap pages with notes on the Ballarat Tramways overhead, the Sebastopol tramcars axle boxes, double ended sidings at Victoria St and Lydiard St North, possible track extensions, Viewpoint terminus, Forest City signs, View Point Loop and Bridge St relaying in 1957. Contained within Reg Item 5507 - Foolscap binder with green covers, black binding edge and metal clips. overhead, terminus, view point, signals, sebastopol type -
 Ballarat Tramway Museum
Slide - 35mm slide/s - set of 9, Noel Simons, Sept. 1971
... at the City Terminus, on the north side of Sturt St. Taken from.... 1174.8 - No. 30 and 17 at the City Terminus, on the north side ...Set of 9 Kodak Ready-mount with slides made from the Association of Railway Enthusiast Provincial Tramways film strip. Reference Item 2560 details the ARE Film Strip, and provide references to other slides. See also Reg. item 1164. 1174.9 on plain white mount. 1174.1 - Tram 40 North bound for Lydiard St. North at the Railway Gates, with the gates closed. Tram carrying a heavy load of passengers. Railway station building and car park in background. Taken from the signal box. 1174.2 - Tram 12 bound for Gardens, photographed across the median strip plantation near Dawson St. Image i2a - adjusted 9/2021 to remove colour cast. 1174.3 - Tram 43 in bound along Wendouree Parade near Barrett Ave, passing a former tram stop and with "Warning Oncoming Trams" sign mounted on an adjacent pole. See also Reg. item 1172.1 for a photo taken in May 1971. This photo taken after the closure of the Victoria St. line, as the tram stop has been painted out. 1174.4 - Looking along the track to Sebastopol terminus on the west side of Albert St. - telephoto shot showing bogie tram in the far distance. Shows the nature of the track, poles, tram stop frequency and in the fare distance the terminus. Also show the trees that used to be along this section of the track. 1174.5 - No. 42 showing "Special" in Macarthur St. approaching Drummond St. north. Photo taken from under the verandah of a shop on the south side of the street that were many years later to become the Tramcar Restaurant. Note metal fence to cemetery. 1174.6 - Nos. 21 (Sebastopol) crossing 14 (Lydiard St. Nth) at the loop between Sayle and Grey St. Photo taken looking south. 1174.7 - No. 12 bound for Mt Pleasant, in Bridge St. about to stop at the junction for the two routes. Telephoto photo looking west along Bridge St. with many cars in the photo. Very few people on the street itself. 1174.8 - No. 30 and 17 at the City Terminus, on the north side of Sturt St. Taken from the Post Office corner with the Town Hall in the background. 1174.9 - No. 39 inbound along Sturt St. West. with many cars on the road. Bus stop on a pole on the other side of the road.1174.1 - "No. 40 on Lydiard St. North service waits at the level crossing at Ballarat Railway Station." 1174.2 - "No. 12 bound for 'Gardens' seen across the centre plantation in Sturt St." 1174.3 - "Barrett Ave." 1174.4 - "The Sebastopol route near the terminus" 1174.6 - "Nos. 21 and 14 crossing at Sayle St. Loop on Sebastopol route" 1174.7 - "No. 12 at Eastern end of Bridge St." 1174.8 - "Nos. 30 and 17 in Sturt St. at Cnr of Lydiard St." 1174.9 - "No. 39 City bound from 'Gardens" in Sturt St. West" All have date stamp of "Sep 1971" in black ink. Writing in blue ink.tramways, trams, lydiard st. nth, railway crossing, sturt st, wendouree parade, sebastopol, macarthur st., bridge st., sturt st. west, tram 12, tram 14, tram 17, tram 21, tram 30, tram 39, tram 40, tram 42, tram 43 -
 Ballarat Tramway Museum
Film - Movie Film & Box, Kodak, 1960
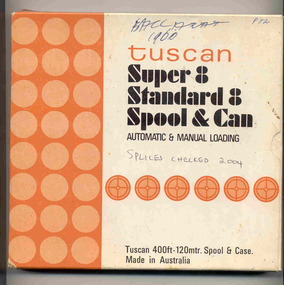
... at city terminus including a young lady wearing gloves... of the sign at the City terminus “Trams leave here for Sebastopol ...Yields information in movie film format of Ballarat trams in 1960, how the system operated and was used by people., Yields information in movie film format of Ballarat trams in 1960, how the system operated and was used by people.Movie film - 8mm, approx. 17.5 mins, with leader strip on a plastic reel, within a black and white plastic box, titled "Ballarat No. 1. 1960" contained with a cardboard box, 'Tuscan Super 8 and Standard 8 Spool and Can' . Has been transferred to DVD - see Reg item 4100 as Segment No. 1. Filmed and made by Ben Parle. Also transferred to DVD by Rod Cook Oct. 2015, via Roger Greenwood for use in his DVD, "The City of Ballarat Trams, Gardens & Gold" of 2016. See Reg Item 6883. Synopsis: based on time. 0:00 Starts with bogies cars crossing railway level crossing (34?, 39?) 0:30 SEC Logo 0:45 Ballarat Station sign and intro “Some City Scenes” 0:49 35 turning from Lydiard St Nth to Sturt St towards Grenville St with Commonwealth Bank in view. and then 42 returning 1:19 42 showing Mt Pleasant, turns from Sturt St into Lydiard St Nth 1:53 Tramway road works in Lydiard St Nth, near intersection with Mair St with Jelbart Road roller in use, starts with an SEC roadworks sign. 2:12 39 passing the works out bound to Lydiard St Nth. 2:46 Good view of the roller working before 35 arrives. 3:01 35 passing the works in bound with 3:29 14 crossing Lydiard St in Sturt St, towards Grenville St 3:47 Trams in City Loop 3:55 21 coming up the hill 4:04 31 entering Bridge St from Sturt St with Bucks Head Hotel in the background. 4:27 Overhead work at corner of Sturt and Lydiard, with view of the sign at the City terminus “Trams leave here for Sebastopol, Gardens, View Point.” 4:34 Passengers getting off and then onto 38, ex Lydiard St Nth at city terminus including a young lady wearing gloves and a wheeling a pram hurriedly the photographer. A number of other prams in the view as well as. The Conductor helps to unload the pram. 5:07 41 proceeding up Sturt St, appears to have just rained. 5:26 11 using the Dawson St crossover, with a motor car doing a U turn as well. 6:00 14 descending Sturt St towards the City, filmed at Dawson St. 6:11 Title “The Gardens via Drummond St North Line” 6:16 19 showing Victoria St, turning from Drummond St Nth into Sturt St. 6:28 30 inbound in Drummond St Nth, approach and trailing shots. Trailing shot ahs the hospital in the background. 6:49 31 outbound, Drummond St Nth, approach and trailing shots, trees are in autumn colours. 7:04 12, inbound Drummond St Nth, with Macarthur St in the background, stopping to pick up a lady, approach and trailing shots and then entering the Mill St crossing loop. 7:53 14 outbound in Drummond St Nth, dropping a lady passenger off and then turning into Macarthur St and then tram going away. 8:37 View of overhead junction at View Point Jtn. 8:45 View of “Cars Stop Here” sign and pole sign “To City Only” 8:55 30 inbound in Wendouree Parade, stops to pick up passenger, and then a trailing shot of tram entering Macarthur St loop 9:37 View of “Cars Stop Here”, “End of Section” and timetable boards at Haddon St. 9:50 34, pausing at Haddon St and then proceeding towards depot – approach and trailing shots, with “Warning Oncoming Trams” sign in shot. 10:27 “Warning Oncoming Trams” sign 10:32 34 crossing 12 at the Martin Ave loop 10:48 39? Wendouree Parade, near Barrett Ave, stopping and letting off passengers. 11:24 30 passing depot junction and then trailing shot of it entering Tram Sheds or Depot Loop and then proceeding towards the City. 12:11 Shot of the “Caution Beware of Trams” sign at the depot. 12:14 25 stopping at depot junction and then trailing shot of it going toward Forrest St. 12:47 12 passing Depot Junction, trailing shot. 13:07 Shot of :Electricity Supply Department, Ballarat Branch” sign at depot. 13:13 View of a destination showing “Depot” on a bogie tram 13:15 Title “Some Depot Scenes” 13:19 View of a trolley pole and then 13 leaving the depot through the gates, destination showing “View Point”. 13:54 View of trolley pole and then 32 stopping at the depot gates. 14:08 12 (Sunny view) running out onto Wendouree Parade and then a bogie tram approaching Depot Loop. 14:43 View of 42 running in with a single trucker behind in Wendouree Parade, and another single trucker running out. 15:02 Title “Some Scenes in the Gardens” 15:05 25 running through the Gardens, approach and trailing shots, near our Depot Junction. 15:55 View of “No Parking East of Loop” sign 15:59 View of overhead and then trackwork (with points removed), but overhead still in position at the Old Gardens Loop or Gardens South Loop and then 12 entering the loop from the south and then a trailing shot looking along the Parade. 16:33 View of “Cars Stop Here” and “End of Section” and then timetable boards at Gardens Loop. 16:55 View of 34 leaving the loop 17:14 Title “The End”Written labels giving title information on outside of box.trams, tramways, ballarat, sebastopol, lydiard st north, victoria st, mt pleasant, sturt st west -
 Ballarat Tramway Museum
Ephemera - Timetable/s, State Electricity Commission of Victoria (SECV), Timetable as from 29 June 1970 - Bendigo, 1970
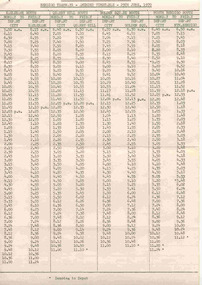
... for the departure from the City and the terminus for the Eaglehawk, Quarry... for the departure from the City and the terminus for the Eaglehawk, Quarry ...Two page Gestetner copy of an amended timetable for tram services in Bendigo for the SECV issued 29 June 1970. Gives times for the departure from the City and the terminus for the Eaglehawk, Quarry Hill, Golden Square and North Bendigo routes. Page 1 for Monday to Friday, page 2 for Saturday and on the bottom of page 2, details of Sunday services commencing from 2pm, until about 10.30pm. May have been the last timetable issued for Bendigo. On Gestetner foolscap sized paper, stapled in the top left corner. Headed the "Northern Electricity Supply Branch / Bendigo Tramways - Amended Timetable - 29th June, 1970" 1637.1 - 2nd copy added 22/08/04 - has two staples in top left hand corner. See pdf documents for good quality scans and history of record for details of source.bendigo, secv, timetables, tram services -
 Ballarat Tramway Museum
Photograph - Black & White Photograph/s - set of 4, Richard Gilbert, c August 1971
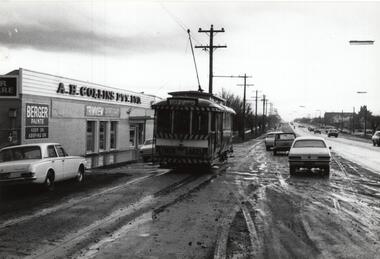
... in Albert St Sebastopol. .4 - Tram 26 at the Sebastopol terminus... in Albert St Sebastopol. .4 - Tram 26 at the Sebastopol terminus ...Yields information about the appearance of the Sebastopol line shortly before the closure of the first of the Ballarat tram lines. Series of 4 Black and white photographs of tram operations on the Sebastopol line, during August 1971. .1 - Tram 12, with the destination of Grey St and a twin lakes sign, pass the A H Collins hardware store, with adverts for Berger Paints and Trimview windows. shows the nature of Albert St after rain. .2 - Trams 27 (Sebastopol with a Twin Lakes sign) crossing 32 at the Grey St loop. .3 - Tram 12, showing Depot via Drummond North southbound in Albert St Sebastopol. .4 - Tram 26 at the Sebastopol terminus showing City Oval as its next destination. This may not be correct.trams, tramways, sebastopol, albert st, grey st, tram 12, tram 27, tram 26, tram 32 -
 Melbourne Tram Museum
Document - Instruction, Melbourne & Metropolitan Tramways Board (MMTB), "Christmas Eve - Sunday 24 December 1939 - Special late trams", 21/11/1939 12:00:00 AM
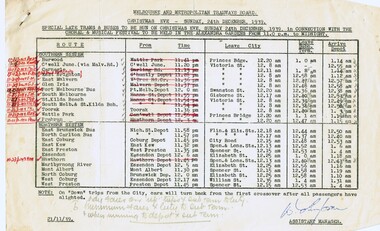
... , times from terminus, city, and arrive back at the depot. Gives... terminus, city, and arrive back at the depot. Gives details ....1 - Foolscap duplicated sheet with changes marked in red ink and pencil notes along the bottom edge, titled "Christmas Eve - Sunday 24 December 1939 - Special late trams and buses to be run in connection with the choral and musical festival to be held in Alexandra Gardens from 11pm to Midnight". Lists routes, times from terminus, city, and arrive back at the depot. Gives details for both the Southern and Northern systems. Dated 21/11/1939, signed W. Simpson Assistant Manager. .2 - Associated passenger check sheet - completed for St Kilda Road at intersection of City Road - records 10 trams with passenger number - does not give car number. Form No 3/201 - July 1939. .3 - Notice to Conductors and Bus Operators - all depots except Footscray and Clifton Hill dated 21/12/1939 on foolscap duplicated paper, advising crews of the event, minimum fares of 6d, special tickets and completion of revenue journals. signed by S. M. Richardson as Manager (stamped signature).trams, tramways, mmtb, public transport, holiday arrangements, buses, services, christmas, tickets, revenue journal, conductors -
 Melbourne Tram Museum
Album - Photo Album, Melbourne & Metropolitan Tramways Board (MMTB), "Types of Passenger Shelters MMTB", mid 1930's?
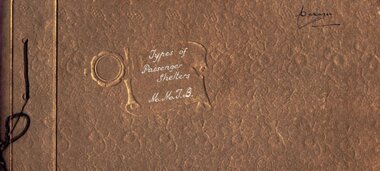
... and Nicholson St Coburg 10 - Market St terminus City. Images taken... and Nicholson St Coburg 10 - Market St terminus City. Images taken ...Photo Album - brown cards covers, containing 12 heavy card sheets bound with a brown cotton cord titled "Types of Passenger Shelters MMTB". Ten sheets have two photos of shelters except for the last one giving location and cost. Sheet 1 - Two shelters at Wattle Park 2 - Batman Ave and Peel St; Flemington Road with cable trams in the background. 3 - Victoria Parade and Smith St; Ballarat Road and Gordon St Footscray 4 - Dandenong Road and Hawthorn Road Caulfield; photos of the standard shelter, 6 Number, for St Kilda Road, Alfred Hospital and Gisborne St East Melbourne. 5 - East Kew terminus; Camberwell Road and Smith Road 6 - Oakover Road and Gilbert Rd Preston, Flemington Road at Abbotsford St North Melbourne 7 - Swanston St and Grattan St Women's Hospital with a Bundy clock and street fire alarm in the view; Victoria Parade Fitzroy opposite Eye and Ear hospital with a W class tramcar and the Eastern Hill fire station in the background. 8 - Two photos of the shelter at the corner of William St and Collins St Melbourne. 9 - Toorak Terminus; Rennie and Nicholson St Coburg 10 - Market St terminus City. Images taken from the website production 16-1-2019 - see - http://www.hawthorntramdepot.org.au/papers/shelteralbum.htm On inside back cover is a Kodak label "Scroll" with "3" entered in ink. Date unknown, thought to be mid 1930's - see Reg item 3361 of the construction of William St shelter post 1933.in black ink "Manager" in top right hand corner.trams, tramways, shelters, mmtb, wattle park, victoria parade, st kilda rd, flemington rd, toorak, camberwell, market st, coburg, footscray, preston, caulfield -
 Melbourne Tram Museum
Photograph - Set of 4 Black & White Photograph/s, Don Schulz, mid 1920's
... in Melbourne at the Bridge Road terminus or city during the mid 1920's... or city during the mid 1920's/ .1 - Bridge road terminus ...Series of four Black and White Photographs cable trams in Melbourne at the Bridge Road terminus or city during the mid 1920's/ .1 - Bridge road terminus with the car house or depot on the left hand side with the destination of Spencer St. .2 - Gripman possibly checking his watch with a depot worker? stepping off the tram. .3 - family stepping off the tram with cable trailer 368 in the view - Elizabeth St, near Flinders St? See Brian Weedon's notes re the photo and the trailer. .4 - As for .1 - with an X marked above the lady and a very large motor car passing. Printed on Kodak Paper. Adam Chandler advised by email 5/8/2020: " note there's a destination box fitted to the grip - from memory, these started to be used from the mid-1920s with the dummy and trailer repaints into the brown colour? That also looks to be either a 1925 or 26 Buick - the "moustache" shape at the top of the front radiator grille and the distinctly angled lower sash of the windscreen are further hints. Given the Richmond line closed in 1927 for conversion I'd say some time between 1924 and 29 June 1927." Also see image i5.pdf for further notes regarding the photographs and the Bridge Road tram depot building - use the original pdf file to read. Image i6, has had the "X" removed - done by Darren Hutchesson.On rear in ink in each print, "Cable car Melbourne" and "286 Anzac Hy/Marion Rd Adelaide SA, collection of late Don Schultz"trams, tramways, cable trams, bridge road, flinders st, richmond depot, hawthorn bridge, tram 368 -
 Melbourne Tram Museum
Album - Ron Scholten Slide Collection, Ron Scholten
... at a terminus RSC24 City of Northcote Cable cars passing in High St... at a terminus RSC24 City of Northcote Cable cars passing in High St ...Photo - see pdf file for further information. Number Brief Description RSC1 PCC 1041 at the gates of Preston Workshops on a test run without it’s trolley retriever RSC2 PCC 1041 in Glenhuntly Road on Route 67 en route to Carnegie crossing the Railway Gates at Glenhuntly Station RSC3 W2 482 stored at Malvern Depot with Olympic Park on the Destination RSC4 Cable Car Set 64 in Swanston St outside Princess Bridge Station in Bound with open top Double Deck Bus, Trak Motors ? Departing from Flinders St Station RSC5 W3 669 in St George Rd at Sumner St en route to Preston Workshops for scrapping RSC6 Cable Car in Lygon St en route to Carlton RSC7 PCC 1041 turning from St Georges Rd into Miller St to enter Preston Workshops RSC8 Flinders St Station with cable cars RSC9 PCC 1041 in strife on it’s maiden day in service. Trams on route 88 delayed in Queens Parade Clifton Hill RSC10 Flinders St at William St with Cable Cars RSC11 L 104 on the fan of the new shed at Malvern Depot on a TMSV tour RSC12 Cable Set 1 after it’s restoration at Preston Workshops on the fan near the front gate RSC13 X1 466 at a suburban terminus of the Footscray System RSC14 X2 680 at Point Ormond Terminus RSC15 An ex Launceston Tram at the outside terminus of the Penny Royal Complex Tramway in Launceston RSC16 Q 148 at Preston Workshops awaiting disposal RSC17 Elizabeth St with Cable Cars RSC18 Elizabeth and Bourke St corner outside the GPO with cable cars RSC19 Collins St with Cable Cars RSC20 A photo taken from the observation deck of the ICI building showing a view of Parliament house with a w class tram in Nicholson St RSC21 Auburn Horse car with a posed photo of all the tramwaymen employed RSC22 Cheltenham Double Deck Horsecar with a full load of passengers RSC23 City of Northcote cable trailer 3 at a terminus RSC24 City of Northcote Cable cars passing in High St Northcote RSC25 St Kilda Rd at Princes Bridge with Cable Cars RSC26 Flinders St with Cable Cars RSC27 Cable Cars RSC28 Bourke St looking towards Elizabeth St from Queen St RSC29 Cable cars in Bourke St at Elizabeth St looking East RSC30 Cable cars in Elizabeth St at the terminus at Flinders St RSC31 Cable cars in Bourke St at Swanston St looking west RSC32 Cable cars in Swanston St at Flinders St looking North RSC33 Cable cars in Collins St near Russell St RSC34 Cable cars in Elizabeth St at Bourke St RSC35 Cable cars in Collins St at Elizabeth St RSC36 Cable Cars in Swanston St at Flinders St RSC37 Cable cars in Collins St RSC38 Cable Cars RSC39 Cable cars in St Kilda Rd near Princes Bridge RSC40 Cable cars in Collins St East of Swanston St RSC41 Cable cars in Spring St outside Parliament house RSC42 K 92 in M&MTB Chocolate and cream livery but with a P&MTT Destination box on Route 14 RSC43 Thornbury depot viewed from Miller St and St Georges rd. Two W2 class cars are laying over between the peaks RSC44 Z3 201 in Met Livery passes D1 3510 in new M Tram livery. A Staff member in uniform stands in the doorway. Dandenong Rd RSC45 D1 3530 advertising Heinekin Super Golf on Route 55 in Royal Park RSC46 D1 3504 in M Tram livery on the reserved track in Matthews Ave near Essendon Airport showing Route 81 Travancore . I suspect it is a private enthusiasts charter due to the Malvern W class run number in the rear windscreen RSC47 D1 3504 on Route 64 in Dandenong Rd in M Tram Livery RSC48 D1 3504 in M Tram Livery at Airport West Terminus RSC49 D1 3504 in M Tram Livery in Union Rd outside the Showgrounds RSC50 D1 3504 at West Maribyrnong Terminus in M Tram Livery RSC51 D1 3503 in M Tram Livery in Malvern Depot RSC52 SW6 960 and VR 53 in Harbour Esplanade for the NMEL&T Co Centenary RSC53 Hawthorn Tramways Trust 32 in Harbour Esplanade for the NMEL&T Co Centenary RSC54 VR 53 & B 2042 in Harbour Esplanade for the NMEL&T Co Centenary RSC55 VR 53 & C 3016 in Harbour Esplanade for the NMEL&T Co Centenary RSC56 NMEL&T Co 13 usually V214 in Harbour Esplanade for the NMEL&T Co Centenary RSC57 NMEL&T Co 13 usually V214 at Preston Workshops for the NMEL&T Co Centenary RSC58 Hawthorn Tramways Trust Lettering on HTT 32 in Harbour Esplanade for the NMEL&T Co Centenary RSC59 Hawthorn Tramways Trust 32 in Harbour Esplanade for the NMEL&T Co Centenary RSC60 Hawthorn Tramways Trust 32in Harbour Esplanade for the NMEL&T Co Centenary RSC61 Hawthorn Tramways Trust 32 in Harbour Esplanade for the NMEL&T Co Centenary RSC62 NMEL&T Co 13 usually V214 at Preston Workshops for the NMEL&T Co Centenary RSC63 W2 516 and another on route 59 wait to shunt at Essendon Airdrome Terminus as W2 571 on route 49 departs. This was the last day of operation. RSC64 Australia’s First Electric Tram at Box Hill with Tramwaymen including H J Hilton who is in the centre RSC65 W2 484 en route to St Kilda Junction and another wait for passengers after a race meeting at Caulfield Racecourse RSC66 X1 463 on the Footscray system en route to Russell St RSC67 Geelong 35 on Chilwell Route, Formerly HTT 13, M&MTB 119, then Bendigo 1 and Ballarat 37 RSC68 P&MTT 4 on Opening Day of the system in Glenferrie Rd RSC69 Bendigo 6 in McCrae St near the Depot end route to North Bendigo RSC70 P&MTT 4 in Glenferrie on opening day of the System RSC71 Scrubber 3 stripped and awaiting scrapping at Preston Workshops RSC72 Scrubber 4 at South Melbourne Depot RSC73 Q 191 & 139 at Preston Workshops awaiting scrapping RSC74 Rail Grinder 3 at Preston Workshops as purchased from Sydney RSC75 Y 469 waits to shunt at Wattle Park Terminus as Y1 613 departs on driver training duties RSC76 VR 53 on the outside roads at Essendon Depot RSC77 W5 796 with three doors and square windows running out of Brunswick Depot in Cameron St, with a supplementary destination board showing “City via Swanston St” RSC78 W2 258 on the wheel grinder road at Brunswick depot RSC79 X2 676 on a TMSV tour, W5 817 & 836 & VR 53 on the open roads at Essendon Depot RSC80 PCC 1041 on test, passes W71035 in High St Preston RSC81 D1 class production number 7 as delivered on test in Matthews Ave RSC82 W2 383 on route 5 turning from the reserved track in Dandenong Rd into St Kilda Rd at St Kilda Junction RSC83 Z3 204 as advertising tram for Vodaphone Grand Prix running into Malvern Depot new shed RSC84 Z1 4 on test in St Georges Rd RSC85 PCC 1041 on Route 96 in Burke St near Exhibition St RSC86 Z1 3 without numbers on test turning from Miller St in St Georges Rd RSC87 Track components stored in Coldblo Rd at Malvern Depot with Z class cars adjacent RSC88 D1 3501 in M Tram Livery on Route 55 in Peel St at Franklin St RSC89 C 3001 in Yarra Trams Livery Porto 018 & D13502 in M Tram Livery on Display in Harbourside Esplanade RSC90 D1 class tram production number 7, in as delivered condition on test in Matthews Ave RSC91 D1 3503 inside Malvern Depot RSC92 SW6 955 and W6 974 in St Kilda at City Rd at Dusk RSC93 Freight Car 19 at Preston Workshops in green Livery RSC94 Rail Grinder 3 in green Livery at South Melb Per Way Yard RSC95 A SW6 class car on route 50 shunting at Elizabeth St Terminus at night, taken from Flinders St Station RSC96 W2 588 & 435 in St Kilda Rd at Batman Ave RSC97 Y1 613 in service at Wattle Park Terminus RSC98 W2 588 in Wellington Parade en-route to the City with a Grand Final Load of passengers followed closely by 384 RSC99 W2 558 on a MCG Footy Special entering the Simpson St sidings RSC100 W3 657 & an L Class in the new shed at Malvern Depot RSC101 Y1 613 in St Kilda Rd on an enthusiasts tour in St Kilda Rd south of St Kilda jun RSC102 Y1 613 on an enthusiasts tour in Clarendon St with the two extra tracks on the Viaduct under construction RSC103 W6 976 on the fan of the new shed at Malvern Depot RSC104 W7 1024 as an advertising car for Bank of NSW at the route 1 terminus at South Melb Beach RSC105 PCC 980 on route 96 in Nicholson St near North Fitzroy Depot RSC106 SW6 890 with dash canopy lighting in Market St on the opening day of William St Services RSC107 W2 444 with big numbers heads a line of footy specials in Simpson St Sidings RSC108 Cable Cars in Elizabeth St RSC109 NMEL&T co 2 with a trailer outside the power station in Mount Alexander Rd RSC110 Alf Twentyman’s cable car set in his Northcote backyard RSC111 Cable Cars in Queens Parade Clifton Hill RSC112 Cable cars in Collins St outside the Townhall RSC113 PCC 1041 at Carnegie terminus RSC114 Cable cars in Elizabeth St RSC115 Cable cars in Collins St near Swanston St RSC116 HTT 19 turns from Riversdale Rd into Camberwell Rd at Camberwell Junction RSC117 W1 419 official builders photo of first car of the class RSC118 Cable car with a full load of passengers RSC119 W1 422 illuminated for the visit of T.R.H. The Duke and Duchess of York RSC120 PCC 1041 in strife on it’s maiden day in service. Trams on route 88 delayed in Queens Parade Clifton Hill RSC121 Bendigo birney in Finn St near North Bendigo terminus RSC122 SW6 in St Kilda Rd at Domain Rd at night RSC123 All 3 of Alf Twentyman’s cable cars in his Northcote backyard RSC124 Cable trailer 256 being unloaded into the shed at Bylands RSC125 Cable grip car 1 being removed from the Melbourne Museum RSC126 Alf Twentyman's cable cars in his Northcote Backyard RSC127 Alf Twentyman's cable cars in his Northcote Backyard RSC128 Alf Twentyman's cable cars in his Northcote Backyard RSC129 Alf Twentyman's cable cars in his Northcote Backyard RSC130 W class car in Swanston St at Collins St RSC131 Y1 469, L & W3 on the run out of Glenhuntly Depot on a tour RSC132 W7 1024 as an advertising tram for Bank of NSW at Clifton Hill RSC133 W2 496 on a footy special in Simpson St Sidings RSC134 W2 as originally converted to a test car at Preston Workshops RSC135 W3 667 in Brunswick Depot with Ellen Butland at the controls RSC136 W3 669 on it’s final run at Victoria Prd & Brunswick St RSC137 W2 571 in Wellington Prd at Clarendon St with a Footy Final load of Passengers RSC138 Y1 613 shunts at Spencer St Terminus as X217 waits on Australia Day Pageant RSC139 PCC 1041 on Rt 96 in Burke St outside the Southern Cross Hotel RSC140 890 with accident damage on the outside roads at Preston Workshops c1978 RSC141 535 on Rt 4 at the old St Kilda Jun c1967 RSC142 1041 on Rt 88 turns from Bourke St into Spring St 1973 RSC143 102 on a tour at Albert Park Beach Terminus Feb 1972 RSC144 833, 835 & 834 in the shed at Malvern Depot c1976 RSC145 281 in Wellington Parade on a football very crowded special c1974 RSC146 464 Ballarat Rd 1960 RSC147 181 Explosives Fty - at Footscray Station - July 1960 RSC148 181 Williamstown Road 1960 RSC149 Cable car set at Alf Twentyman’s c1970 RSC150 X 217 at Malvern Depot c1970 RSC151 X1 465 and T181 Footscray Football ground in Barkly St. c1960 RSC152 Scrubber 5 at South Melbourne depot c1960 RSC153 X1 465 Footscray to Russell St, c1960 RSC154 X1 467 Leeds St Footscray 1960 RSC155 PMTT 4 Glenferrie Road, 1910 RSC156 S 164 at Malvern Depot c1970 RSC157 T178 Footscray c1960 RSC158 Cleaner No. 7 at South Melbourne depot c1960 RSC159 Two Y classes at Princes Bridge / Batman Ave mid 1950s RSC160 Swanston St – Nu color vue slide – M142 Demonstrates the work of Ron Scholten in photography, collection and/or production of duplicate slidesAssembled album in a black presentation folder of 160 colour slides, 8 slide sleeves, collected or produced by Ron Scholten. Many are TMSV or Windsor Publications slides. All photographs have been scanned and placed on the Museum's G drive. A list of all photographs with details has been compiled. melbourne, tramways, trams, cable trams -
 Bendigo Historical Society Inc.
Document - HOUSES OF ACCOMMODATION, BENDIGO PROGRESS ASSOCIATION
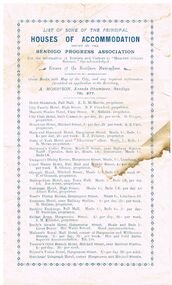
White document with blue printing. Has a border with circles and squares 1.5 cm from the edge of the paper. Lists some of the principal houses of accommodation issued by the Bendigo Progress Association. A. Morrison, Arcade Chambers, Bendigo. Listed are the: Hotel Shamrock, City Family Hotel, Masonic Shades Hotel, City Club Hotel, Hopetoun Hotel, Harp and Shamrock Hotel, Duke of York Hotel, Heywood's Coffee Palace, Trengrove's Dining Rooms, Court House Hotel, Olympic Hotel, Metropolitan Hotel, European Hotel, Reed's Dining Rooms, Terminus Hotel, Beehive Exchange, Belfast Arms, Brady's Arcade Hotel, Mulcare's Royal Mail Hotel, Tregear's Olive Branch Hotel, Bryant's Union Hotel, Hutchens' Telegraph Hotel.document, bendigo, houses of accommodation bendigo, hotel shamrock, city family hotel, masonic shades hotel, city club hotel, hopetoun hotel, harp and shamrock hotel, duke of york hotel, heywood's coffee palace, trengrove's dining rooms, court house hotel, olympic hotel, metropolitan hotel, european hotel, reed's dining rooms, terminus hotel, beehive exchange, belfast arms, brady's arcade hotel, mulcare's royal mail hotel, tregear's olive branch hotel, bryant's union hotel, hutchens' telegraph hotel -
 Bendigo Historical Society Inc.
Document - BASIL MILLER COLLECTION: TRAMS - JOURNAL 'ELECTRIC TRACTION', February 1963
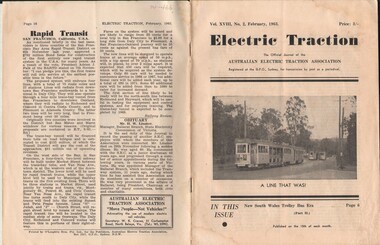
Journal of Australian Electric Traction Association, Volume XVIII, No. 2, February, 1963, 16 pages. History of document: Part of 'Basil Miller Collection', Also check 1411. Cover picture description: "tall gum trees provide a typical Australian background to four Brisbane tram cars at Toowong Cemetery terminus. Actually cars 305, 475, 346 and 466 (left to right) are less than three miles from the Brisbane City Hall, being surrounded by parklands and a cemetery at this point along the route, which was the most scenic of the four routes recently closed on trial".Pub: Australian Electric Traction Asscn. Printer: O'Loughlin Bros. Pty. Ltd., Sydney, NSWdocument -
 Bendigo Historical Society Inc.
Map - INDEXED GUIDE MAP OF BENDIGO CITY & EAGLEHAWK BOROUGH, Early to mid 1920's
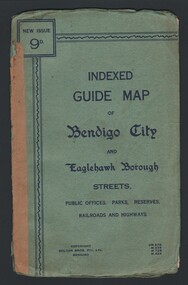
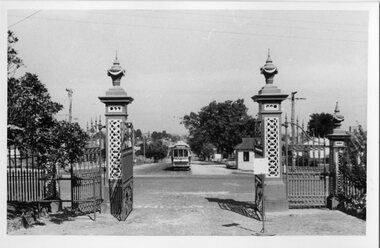
Map. Indexed Guide Map of Bendigo City & Eaglehawk Borough. Folded map contained within blue booklet. Booklet is light blue printed with dark blue ink. Copyright Bolton Bros. Pty. Ltd. Bendigo. Printed on front. Map shows the location of Sailors Gully, Peg Leg Gully, California Gully, Long Gully, Eaglehawk Creek, Bendigo Creek, Ironbark Creek. Shows location of Showgrounds between Park St, Baxter Street, Barnard St and Bridge Lane. Shows location of Golden Square Railway Station between Panton St and Allingham St. Shows what is now known as Creek St. Nth & Sth as Clark St Nth & Sth. Also shows Tramway Terminus along Carpenter St and Golden Square Tram Terminus on High St, Golden Square. Map has a street index and an index for Public Offices, Parks and Reserves.map, bendigo, township, indexed guide map of bendigo city and eaglehawk borough -
 Ballarat Tramway Museum
Photograph - Black & White Photograph/s, Len Millar, Oct. 1970
Yields information about the tram services in Ballarat in particular the Lydiard St terminus.Black and white photograph on card paper of SEC tram 34 at the Lydiard St North, Cemetery gates looking back towards the city. Has the shelter on the right hand side. Oct. 1970 Photo by Len Millar.Detailed notes on rear in ink and pencil by Len Millar and Keith Kings - see image i2.trams, tramways, lydiard st north, cemetery, shelters, tram 34 -
 Ballarat Tramway Museum
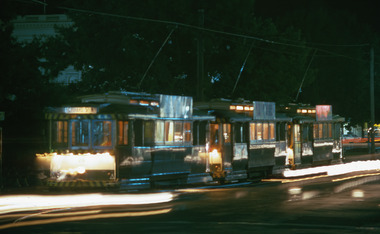
Photograph - Digital Image, Peter Knife, Night scene - Sturt St, 31/3/1971
... truckers lined up at night at the north side of Sturt St, City stop ...Digital image of three single truckers lined up at night at the north side of Sturt St, City stop - trams 26, 31 and 28. Photo by Peter Knife 31/3/1971.Yields information about Ballarat's trams and the practice of three of the four service cars meeting at the same time at the City tram terminus.Digital image of a colour slide.tramways, tramcars, ballarat, sturt st, tram 26, tram 31, tram 28 -
 Ballarat Tramway Museum
Photograph - Black & White Photograph/s, Charles Craig, 1950's
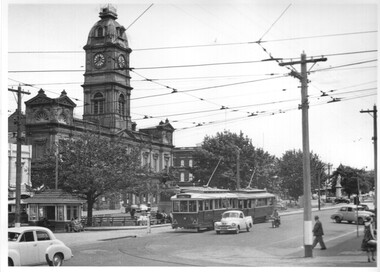
... the use of the appearance of City terminus and vehicles during ...Yields information about the use of the appearance of City terminus and vehicles during the late 1950's.Black and white photograph of Ballarat tram 11 and another single trucker at the City tram stop, Sturt St, with the Town Hall in the background. Tram 11 has the destination of Mt Pleasant. In the view is the City Shelter and a number of Holden motor cars. Photo by Charles Craig possibly late 1950's. trams, tramways, sturt st, town hall, city, shelters, tram 11 -
 Ballarat Tramway Museum
Photograph - Black & White Photograph/s, Charles Craig, early 1970's
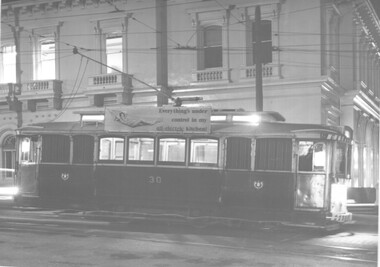
... the use of the appearance of City terminus and vehicles during ...Yields information about the use of the appearance of City terminus and vehicles during the early 1970's and demonstrates night photography.Black and white photograph of Ballarat tram 30, stopped at the intersection of Sturt and Lydiard St North with the Post Office in the background. The tram has a SEC roof advert - "Everything's Under control in my all electric kitchen" Photo by Charles Craig possibly early 1970's. trams, tramways, sturt st, city, night photo, lydiard st north, tram 30 -
 Ballarat Tramway Museum
Photograph - Black & White Photograph/s - set of 3, c1905
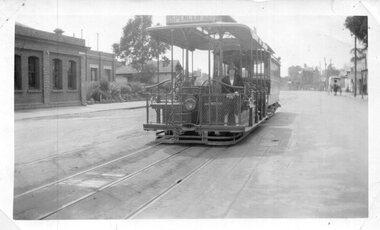
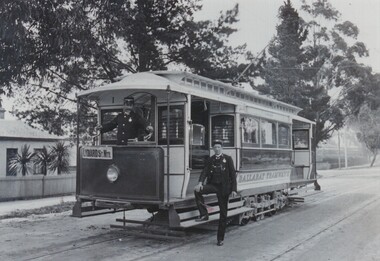
Has a strong association with the motorman involved in the opening of the Ballarat Electric Tram system and the person..1 - Black and White photograph of ESCo Ballarat No. 1in Ballarat, soon after opening in 1905, destination sign placed over front dash canopy. Has the driver (Rupert Bowd) at the controls. Has the destination of "Lydiard St Nth". (Rupert should be Robert - see page 138 of Alan Bradley's book, The Golden City and its Tramways) - at the Gregory St terminus. See Reg Item 4383 for another copy of this photograph. .2 - Letter from Mrs. I Gleeson? to Robert Green dated 1-12-1988, regarding the driver (says he was Rupert), worked for a while on loan to PMTT, the tram (No. 2) he drove on the first day and No. 1 as first car on the Lydiard St line. Also gives details of his life and family. .3 - Letter from ditto - dated 28-2-1989 - regarding the print and that she had visited the BTPS depot two weeks ago and spoke to Richard Gilbert. .4 - Envelope - pre stamped, featuring Clarendon house Evandale Tasmania. Has the senders address on rear - 41 Rosalind Cres, Blackburn Vic 3130.trams, tramways, drivers, motormen, esco, opening, pmtt, gregory st, tram 1 -
 Ballarat Tramway Museum
Photograph - Black & White Photograph/s, Leon Marshall-Wood, 29/03/1948 12:00:00 AM
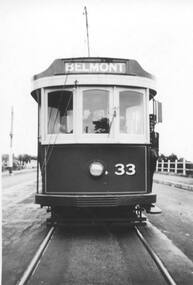
Yields information about Geelong trams in the late 1940's and the bogie trams.Black and white print of Geelong 33, rear end photo showing the conductor leaning from the tram slightly. In the background is a SEC Tramway signal - Forest City. Tram has the destination of Belmont. Photo could have been taken at the Belmont terminus. Photo dated 29/3/1948. Based on the handwriting on btm5869i, the photo is by Leon Marshal-Wood. Negative scanned at 3200dpi 9/6/2020 9/6/2020.On the rear in pencil "29/3/1948, Geelong"trams, tramways, geelong, north, belmont, signals, conductors, tram 33 -
 Ballarat Tramway Museum
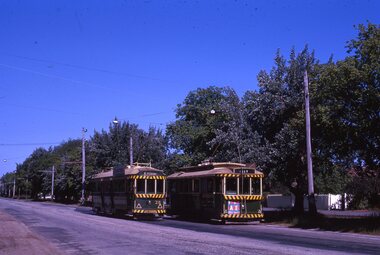
Slide - 35mm slide/s - set of 2, Robert Thomson, 21/04/1962 12:00:00 AM
Yields information about Ballarat's trams during 1963 and the Sebastopol terminus and AETA conventions.Set of two Kodachrome cardboard mount, colour slide of trams 18 and 37 and No. 11 at the Sebastopol terminus during an AETA Convention tour 21-4-1962. No. 37 has the destination of City Oval for show. Tram, 18 has adverts for The Age, while all the other trams have SEC cooking adverts."AETA Convention 21-4-62" in ink on both slides.tramways, trams, sebastopol, albert st, aeta tour, tram 18, tram 37, tram 11 -
 Ballarat Tramway Museum
Slide - 35mm slide/s, Robert Thomson, 11/04/1971 12:00:00 AM
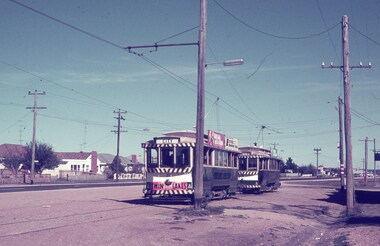
Yields information about Ballarat's trams at the Sebastopol terminus and the tram operations.Agfa blue/white mount, colour slide of trams 33 and 30 at the Sebastopol terminus. Tram 33 has roof adverts for Eureka Tiles and Bliss Bombs and a Twin Lakes sign on the front. Tram 33 has the destination of City, No. 30, Lydiard St North."11-4-71" in ink.tramways, trams, sebastopol, tram 33, tram 30 -
 Ballarat Tramway Museum
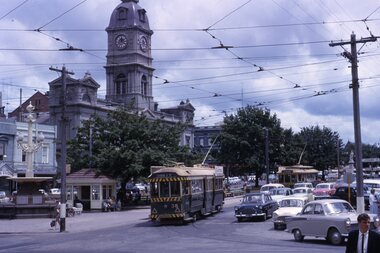
Slide - 35mm slide/s, Robert Thomson, c1966
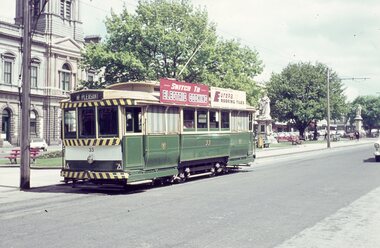
... Ballarat's trams during c1966 and the City terminus. Tramways trams ...Yields information about Ballarat's trams during c1966 and the City terminus.AGFA blue / white plastic mount, colour slide of No. 33, c1966, in Sturt St at the City or Lydiard St North stop. The Town Hall is in the background. Tram has the destination of Mt Pleasant and has the white on black destination roll. Has roof adverts for Electric Cooking and Eureka Roofing Tiles.tramways, trams, sturt st, town hall, tram 33 -
 Ballarat Tramway Museum
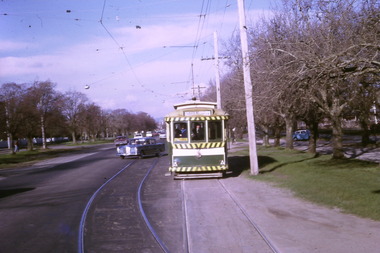
Slide - 35mm slide/s, Noel Simons, 28/04/1971 12:00:00 AM
Transparency slide of Ballarat No. 37 at the Lydiard St. North terminus, taken from the north side of Norman St. looking back over the city. Tram has destination of "Sebastopol". Alongside the tram is the tram terminus shelter building. Slide dated 28 April 1971. The slide does not have a manufacturer's name.In blue ink at the top of the slide "No. 37 at Lydiard St. North terminus" and on base "28 April 1971"tramways, trams, lydiard st. north, norman st., tram 37