Showing 557 items matching "light line"
-
 Flagstaff Hill Maritime Museum and Village
Fur Collar, 1930’S
The donors of this fur collar believe the collar to be between 80-90 years old. It was worn by the donor’s grandmother and mother as an accessory to Warrnambool and district balls and dances. It may have also been worn for warmth! The donors believe the fur would have been purchased in either Melbourne or Toorak. This fur could have been worn by either men or women. This fur collar is representative of fashion accessories in Warrnambool and District in the 1930’s.Fur collar, 1930’s. Rabbit fur collar, wide lapels, very soft fur with dyed pattern of light and dark brown stripes. Collar is lined with a heavy dark green woollen fabric. Between the fur and the lining there is a felt interfacingflagstaff hill, warrnambool, shipwrecked coast, flagstaff hill maritime museum, maritime museum, shipwreck coast, flagstaff hill maritime village, great ocean road, fur collar, fur stole, fur accessory, clothing 1930’s, fashion 1930’s, fashion accessory, rabbit fur -
 Flagstaff Hill Maritime Museum and Village
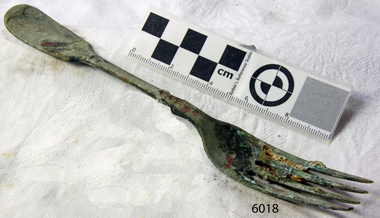
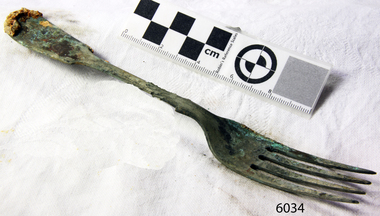
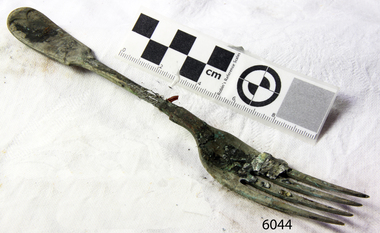
Fork
HISTORY OF THE LOCH ARD The LOCH ARD belonged to the famous Loch Line which sailed many ships from England to Australia. Built in Glasgow by Barclay, Curdle and Co. in 1873, the LOCH ARD was a three-masted square rigged iron sailing ship. The ship measured 262ft 7" (79.87m) in length, 38ft (11.58m) in width, 23ft (7m) in depth and had a gross tonnage of 1693 tons. The LOCH ARD's main mast measured a massive 150ft (45.7m) in height. LOCH ARD made three trips to Australia and one trip to Calcutta before its final voyage. LOCH ARD left England on March 2, 1878, under the command of Captain Gibbs, a newly married, 29 year old. She was bound for Melbourne with a crew of 37, plus 17 passengers and a load of cargo. The general cargo reflected the affluence of Melbourne at the time. On board were straw hats, umbrella, perfumes, clay pipes, pianos, clocks, confectionary, linen and candles, as well as a heavier load of railway irons, cement, lead and copper. There were items included that intended for display in the Melbourne International Exhibition in 1880. The voyage to Port Phillip was long but uneventful. At 3am on June 1, 1878, Captain Gibbs was expecting to see land and the passengers were becoming excited as they prepared to view their new homeland in the early morning. But LOCH ARD was running into a fog which greatly reduced visibility. Captain Gibbs was becoming anxious as there was no sign of land or the Cape Otway lighthouse. At 4am the fog lifted. A man aloft announced that he could see breakers. The sheer cliffs of Victoria's west coast came into view, and Captain Gibbs realised that the ship was much closer to them than expected. He ordered as much sail to be set as time would permit and then attempted to steer the vessel out to sea. On coming head on into the wind, the ship lost momentum, the sails fell limp and LOCH ARD's bow swung back. Gibbs then ordered the anchors to be released in an attempt to hold its position. The anchors sank some 50 fathoms - but did not hold. By this time LOCH ARD was among the breakers and the tall cliffs of Mutton Bird Island rose behind the ship. Just half a mile from the coast, the ship's bow was suddenly pulled around by the anchor. The captain tried to tack out to sea, but the ship struck a reef at the base of Mutton Bird Island, near Port Campbell. Waves broke over the ship and the top deck was loosened from the hull. The masts and rigging came crashing down knocking passengers and crew overboard. When a lifeboat was finally launched, it crashed into the side of LOCH ARD and capsized. Tom Pearce, who had launched the boat, managed to cling to its overturned hull and shelter beneath it. He drifted out to sea and then on the flood tide came into what is now known as LOCH ARD Gorge. He swam to shore, bruised and dazed, and found a cave in which to shelter. Some of the crew stayed below deck to shelter from the falling rigging but drowned when the ship slipped off the reef into deeper water. Eva Carmichael had raced onto deck to find out what was happening only to be confronted by towering cliffs looming above the stricken ship. In all the chaos, Captain Gibbs grabbed Eva and said, "If you are saved Eva, let my dear wife know that I died like a sailor". That was the last Eva Carmichael saw of the captain. She was swept off the ship by a huge wave. Eva saw Tom Pearce on a small rocky beach and yelled to attract his attention. He dived in and swam to the exhausted woman and dragged her to shore. He took her to the cave and broke open case of brandy which had washed up on the beach. He opened a bottle to revive the unconscious woman. A few hours later Tom scaled a cliff in search of help. He followed hoof prints and came by chance upon two men from nearby Glenample Station three and a half miles away. In a state of exhaustion, he told the men of the tragedy. Tom returned to the gorge while the two men rode back to the station to get help. By the time they reached LOCH ARD Gorge, it was cold and dark. The two shipwreck survivors were taken to Glenample Station to recover. Eva stayed at the station for six weeks before returning to Ireland, this time by steamship. In Melbourne, Tom Pearce received a hero's welcome. He was presented with the first gold medal of the Royal Humane Society of Victoria and a £1000 cheque from the Victorian Government. Concerts were performed to honour the young man's bravery and to raise money for those who lost family in the LOCH ARD disaster. Of the 54 crew members and passengers on board, only two survived: the apprentice, Tom Pearce and the young woman passenger, Eva Carmichael, who lost all of her family in the tragedy. Ten days after the LOCH ARD tragedy, salvage rights to the wreck were sold at auction for £2,120. Cargo valued at £3,000 was salvaged and placed on the beach, but most washed back into the sea when another storm developed. The wreck of LOCH ARD still lies at the base of Mutton Bird Island. Much of the cargo has now been salvaged and some was washed up into what is now known as LOCH ARD Gorge. Cargo and artefacts have also been illegally salvaged over many years before protective legislation was introduced. One of the most unlikely pieces of cargo to have survived the shipwreck was a Minton porcelain peacock - one of only seven in the world. The peacock was destined for the Melbourne International Exhibition in 1880. It had been well packed, which gave it adequate protection during the violent storm. Today, the Minton peacock can be seen at the Flagstaff Hill Maritime Museum in Warrnambool. From Australia's most dramatic shipwreck it has now become Australia's shipwreck artefact and is one of very few 'objects' on the Victorian State Heritage Register most valuable. The LOCH ARD shipwreck is of State significance – Victorian Heritage Register S 417 Flagstaff Hill’s collection of artefacts from LOCH ARD is significant for being one of the largest collections of artefacts from this shipwreck in Victoria. It is significant for its association with the shipwreck, which is on the Victorian Heritage Register (VHR S417). The collection is significant because of the relationship between the objects, as together they have a high potential to interpret the story of the LOCH ARD. The LOCH ARD collection is archaeologically significant as the remains of a large international passenger and cargo ship. The LOCH ARD collection is historically significant for representing aspects of Victoria’s shipping history and its potential to interpret sub-theme 1.5 of Victoria’s Framework of Historical Themes (living with natural processes). The collection is also historically significant for its association with the LOCH ARD, which was one of the worst and best known shipwrecks in Victoria’s history. Silver plated copper alloy table forks - entrèe, from the wreck of the Loch Ard. Some verdigris and silver oxide. Light encrustation on tines. Hallmark visible.flagstaff hill, warrnambool, shipwrecked coast, flagstaff hill maritime museum, maritime museum, shipwreck coast, flagstaff hill maritime village, great ocean road, loch line, loch ard, captain gibbs, eva carmichael, tom pearce, glenample station, mutton bird island, loch ard gorge, electroplated cutlery, fork -
 Flagstaff Hill Maritime Museum and Village
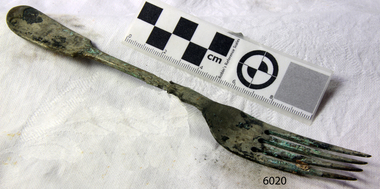
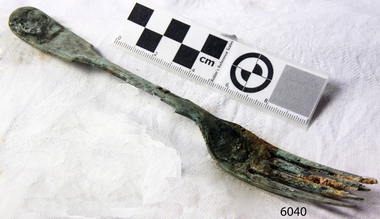
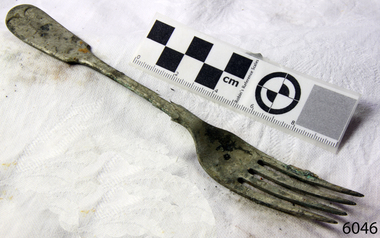
Fork
The LOCH ARD shipwreck is of State significance – Victorian Heritage Register S 417 Flagstaff Hill’s collection of artefacts from LOCH ARD is significant for being one of the largest collections of artefacts from this shipwreck in Victoria. It is significant for its association with the shipwreck, which is on the Victorian Heritage Register (VHR S417). The collection is significant because of the relationship between the objects, as together they have a high potential to interpret the story of the LOCH ARD. The LOCH ARD collection is archaeologically significant as the remains of a large international passenger and cargo ship. The LOCH ARD collection is historically significant for representing aspects of Victoria’s shipping history and its potential to interpret sub-theme 1.5 of Victoria’s Framework of Historical Themes (living with natural processes). The collection is also historically significant for its association with the LOCH ARD, which was one of the worst and best known shipwrecks in Victoria’s history. Silver plated copper alloy table forks - entrée from the wreck of the Loch Ard. Some verdigris and silver oxide. Light encrustation on tines and back of fork.flagstaff hill, warrnambool, shipwrecked coast, flagstaff hill maritime museum, maritime museum, shipwreck coast, flagstaff hill maritime village, great ocean road, loch line, loch ard, captain gibbs, eva carmichael, tom pearce, glenample station, mutton bird island, loch ard gorge, electroplated cutlery, fork -
 Flagstaff Hill Maritime Museum and Village
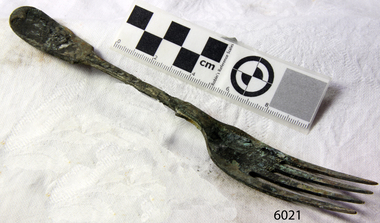
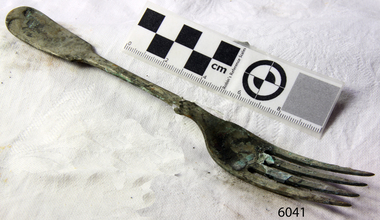
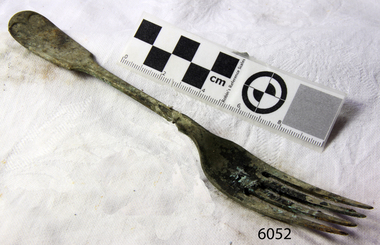
Fork
HISTORY OF THE LOCH ARD The LOCH ARD belonged to the famous Loch Line which sailed many ships from England to Australia. Built in Glasgow by Barclay, Curdle and Co. in 1873, the LOCH ARD was a three-masted square rigged iron sailing ship. The ship measured 262ft 7" (79.87m) in length, 38ft (11.58m) in width, 23ft (7m) in depth and had a gross tonnage of 1693 tons. The LOCH ARD's main mast measured a massive 150ft (45.7m) in height. LOCH ARD made three trips to Australia and one trip to Calcutta before its final voyage. LOCH ARD left England on March 2, 1878, under the command of Captain Gibbs, a newly married, 29 year old. She was bound for Melbourne with a crew of 37, plus 17 passengers and a load of cargo. The general cargo reflected the affluence of Melbourne at the time. On board were straw hats, umbrella, perfumes, clay pipes, pianos, clocks, confectionary, linen and candles, as well as a heavier load of railway irons, cement, lead and copper. There were items included that intended for display in the Melbourne International Exhibition in 1880. The voyage to Port Phillip was long but uneventful. At 3am on June 1, 1878, Captain Gibbs was expecting to see land and the passengers were becoming excited as they prepared to view their new homeland in the early morning. But LOCH ARD was running into a fog which greatly reduced visibility. Captain Gibbs was becoming anxious as there was no sign of land or the Cape Otway lighthouse. At 4am the fog lifted. A man aloft announced that he could see breakers. The sheer cliffs of Victoria's west coast came into view, and Captain Gibbs realised that the ship was much closer to them than expected. He ordered as much sail to be set as time would permit and then attempted to steer the vessel out to sea. On coming head on into the wind, the ship lost momentum, the sails fell limp and LOCH ARD's bow swung back. Gibbs then ordered the anchors to be released in an attempt to hold its position. The anchors sank some 50 fathoms - but did not hold. By this time LOCH ARD was among the breakers and the tall cliffs of Mutton Bird Island rose behind the ship. Just half a mile from the coast, the ship's bow was suddenly pulled around by the anchor. The captain tried to tack out to sea, but the ship struck a reef at the base of Mutton Bird Island, near Port Campbell. Waves broke over the ship and the top deck was loosened from the hull. The masts and rigging came crashing down knocking passengers and crew overboard. When a lifeboat was finally launched, it crashed into the side of LOCH ARD and capsized. Tom Pearce, who had launched the boat, managed to cling to its overturned hull and shelter beneath it. He drifted out to sea and then on the flood tide came into what is now known as LOCH ARD Gorge. He swam to shore, bruised and dazed, and found a cave in which to shelter. Some of the crew stayed below deck to shelter from the falling rigging but drowned when the ship slipped off the reef into deeper water. Eva Carmichael had raced onto deck to find out what was happening only to be confronted by towering cliffs looming above the stricken ship. In all the chaos, Captain Gibbs grabbed Eva and said, "If you are saved Eva, let my dear wife know that I died like a sailor". That was the last Eva Carmichael saw of the captain. She was swept off the ship by a huge wave. Eva saw Tom Pearce on a small rocky beach and yelled to attract his attention. He dived in and swam to the exhausted woman and dragged her to shore. He took her to the cave and broke open case of brandy which had washed up on the beach. He opened a bottle to revive the unconscious woman. A few hours later Tom scaled a cliff in search of help. He followed hoof prints and came by chance upon two men from nearby Glenample Station three and a half miles away. In a state of exhaustion, he told the men of the tragedy. Tom returned to the gorge while the two men rode back to the station to get help. By the time they reached LOCH ARD Gorge, it was cold and dark. The two shipwreck survivors were taken to Glenample Station to recover. Eva stayed at the station for six weeks before returning to Ireland, this time by steamship. In Melbourne, Tom Pearce received a hero's welcome. He was presented with the first gold medal of the Royal Humane Society of Victoria and a £1000 cheque from the Victorian Government. Concerts were performed to honour the young man's bravery and to raise money for those who lost family in the LOCH ARD disaster. Of the 54 crew members and passengers on board, only two survived: the apprentice, Tom Pearce and the young woman passenger, Eva Carmichael, who lost all of her family in the tragedy. Ten days after the LOCH ARD tragedy, salvage rights to the wreck were sold at auction for £2,120. Cargo valued at £3,000 was salvaged and placed on the beach, but most washed back into the sea when another storm developed. The wreck of LOCH ARD still lies at the base of Mutton Bird Island. Much of the cargo has now been salvaged and some was washed up into what is now known as LOCH ARD Gorge. Cargo and artefacts have also been illegally salvaged over many years before protective legislation was introduced. One of the most unlikely pieces of cargo to have survived the shipwreck was a Minton porcelain peacock - one of only seven in the world. The peacock was destined for the Melbourne International Exhibition in 1880. It had been well packed, which gave it adequate protection during the violent storm. Today, the Minton peacock can be seen at the Flagstaff Hill Maritime Museum in Warrnambool. From Australia's most dramatic shipwreck it has now become Australia's shipwreck artefact and is one of very few 'objects' on the Victorian State Heritage Register most valuable. The LOCH ARD shipwreck is of State significance – Victorian Heritage Register S 417 Flagstaff Hill’s collection of artefacts from LOCH ARD is significant for being one of the largest collections of artefacts from this shipwreck in Victoria. It is significant for its association with the shipwreck, which is on the Victorian Heritage Register (VHR S417). The collection is significant because of the relationship between the objects, as together they have a high potential to interpret the story of the LOCH ARD. The LOCH ARD collection is archaeologically significant as the remains of a large international passenger and cargo ship. The LOCH ARD collection is historically significant for representing aspects of Victoria’s shipping history and its potential to interpret sub-theme 1.5 of Victoria’s Framework of Historical Themes (living with natural processes). The collection is also historically significant for its association with the LOCH ARD, which was one of the worst and best known shipwrecks in Victoria’s history. Silver plated copper alloy table forks - entrée from the wreck of the Loch Ard. Some verdigris and silver oxide. Light encrustation on fork.flagstaff hill, warrnambool, shipwrecked coast, flagstaff hill maritime museum, maritime museum, shipwreck coast, flagstaff hill maritime village, great ocean road, loch line, loch ard, captain gibbs, eva carmichael, tom pearce, glenample station, mutton bird island, loch ard gorge, electroplated cutlery, fork -
 Flagstaff Hill Maritime Museum and Village
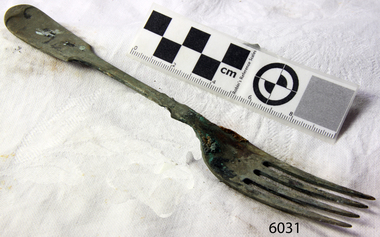
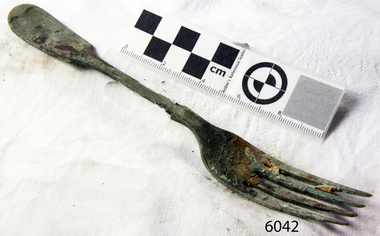
Fork
HISTORY OF THE LOCH ARD The LOCH ARD belonged to the famous Loch Line which sailed many ships from England to Australia. Built in Glasgow by Barclay, Curdle and Co. in 1873, the LOCH ARD was a three-masted square rigged iron sailing ship. The ship measured 262ft 7" (79.87m) in length, 38ft (11.58m) in width, 23ft (7m) in depth and had a gross tonnage of 1693 tons. The LOCH ARD's main mast measured a massive 150ft (45.7m) in height. LOCH ARD made three trips to Australia and one trip to Calcutta before its final voyage. LOCH ARD left England on March 2, 1878, under the command of Captain Gibbs, a newly married, 29 year old. She was bound for Melbourne with a crew of 37, plus 17 passengers and a load of cargo. The general cargo reflected the affluence of Melbourne at the time. On board were straw hats, umbrella, perfumes, clay pipes, pianos, clocks, confectionary, linen and candles, as well as a heavier load of railway irons, cement, lead and copper. There were items included that intended for display in the Melbourne International Exhibition in 1880. The voyage to Port Phillip was long but uneventful. At 3am on June 1, 1878, Captain Gibbs was expecting to see land and the passengers were becoming excited as they prepared to view their new homeland in the early morning. But LOCH ARD was running into a fog which greatly reduced visibility. Captain Gibbs was becoming anxious as there was no sign of land or the Cape Otway lighthouse. At 4am the fog lifted. A man aloft announced that he could see breakers. The sheer cliffs of Victoria's west coast came into view, and Captain Gibbs realised that the ship was much closer to them than expected. He ordered as much sail to be set as time would permit and then attempted to steer the vessel out to sea. On coming head on into the wind, the ship lost momentum, the sails fell limp and LOCH ARD's bow swung back. Gibbs then ordered the anchors to be released in an attempt to hold its position. The anchors sank some 50 fathoms - but did not hold. By this time LOCH ARD was among the breakers and the tall cliffs of Mutton Bird Island rose behind the ship. Just half a mile from the coast, the ship's bow was suddenly pulled around by the anchor. The captain tried to tack out to sea, but the ship struck a reef at the base of Mutton Bird Island, near Port Campbell. Waves broke over the ship and the top deck was loosened from the hull. The masts and rigging came crashing down knocking passengers and crew overboard. When a lifeboat was finally launched, it crashed into the side of LOCH ARD and capsized. Tom Pearce, who had launched the boat, managed to cling to its overturned hull and shelter beneath it. He drifted out to sea and then on the flood tide came into what is now known as LOCH ARD Gorge. He swam to shore, bruised and dazed, and found a cave in which to shelter. Some of the crew stayed below deck to shelter from the falling rigging but drowned when the ship slipped off the reef into deeper water. Eva Carmichael had raced onto deck to find out what was happening only to be confronted by towering cliffs looming above the stricken ship. In all the chaos, Captain Gibbs grabbed Eva and said, "If you are saved Eva, let my dear wife know that I died like a sailor". That was the last Eva Carmichael saw of the captain. She was swept off the ship by a huge wave. Eva saw Tom Pearce on a small rocky beach and yelled to attract his attention. He dived in and swam to the exhausted woman and dragged her to shore. He took her to the cave and broke open case of brandy which had washed up on the beach. He opened a bottle to revive the unconscious woman. A few hours later Tom scaled a cliff in search of help. He followed hoof prints and came by chance upon two men from nearby Glenample Station three and a half miles away. In a state of exhaustion, he told the men of the tragedy. Tom returned to the gorge while the two men rode back to the station to get help. By the time they reached LOCH ARD Gorge, it was cold and dark. The two shipwreck survivors were taken to Glenample Station to recover. Eva stayed at the station for six weeks before returning to Ireland, this time by steamship. In Melbourne, Tom Pearce received a hero's welcome. He was presented with the first gold medal of the Royal Humane Society of Victoria and a £1000 cheque from the Victorian Government. Concerts were performed to honour the young man's bravery and to raise money for those who lost family in the LOCH ARD disaster. Of the 54 crew members and passengers on board, only two survived: the apprentice, Tom Pearce and the young woman passenger, Eva Carmichael, who lost all of her family in the tragedy. Ten days after the LOCH ARD tragedy, salvage rights to the wreck were sold at auction for £2,120. Cargo valued at £3,000 was salvaged and placed on the beach, but most washed back into the sea when another storm developed. The wreck of LOCH ARD still lies at the base of Mutton Bird Island. Much of the cargo has now been salvaged and some was washed up into what is now known as LOCH ARD Gorge. Cargo and artefacts have also been illegally salvaged over many years before protective legislation was introduced. One of the most unlikely pieces of cargo to have survived the shipwreck was a Minton porcelain peacock - one of only seven in the world. The peacock was destined for the Melbourne International Exhibition in 1880. It had been well packed, which gave it adequate protection during the violent storm. Today, the Minton peacock can be seen at the Flagstaff Hill Maritime Museum in Warrnambool. From Australia's most dramatic shipwreck it has now become Australia's shipwreck artefact and is one of very few 'objects' on the Victorian State Heritage Register most valuable. The LOCH ARD shipwreck is of State significance – Victorian Heritage Register S 417 Flagstaff Hill’s collection of artefacts from LOCH ARD is significant for being one of the largest collections of artefacts from this shipwreck in Victoria. It is significant for its association with the shipwreck, which is on the Victorian Heritage Register (VHR S417). The collection is significant because of the relationship between the objects, as together they have a high potential to interpret the story of the LOCH ARD. The LOCH ARD collection is archaeologically significant as the remains of a large international passenger and cargo ship. The LOCH ARD collection is historically significant for representing aspects of Victoria’s shipping history and its potential to interpret sub-theme 1.5 of Victoria’s Framework of Historical Themes (living with natural processes). The collection is also historically significant for its association with the LOCH ARD, which was one of the worst and best known shipwrecks in Victoria’s history. Silver plated copper alloy table forks - entrée from the wreck of the Loch Ard. Some verdigris and silver oxide. Light encrustation on fork. Hallmark visible.flagstaff hill, warrnambool, shipwrecked coast, flagstaff hill maritime museum, maritime museum, shipwreck coast, flagstaff hill maritime village, great ocean road, loch line, loch ard, captain gibbs, eva carmichael, tom pearce, glenample station, mutton bird island, loch ard gorge, fork, entrée fork -
 Flagstaff Hill Maritime Museum and Village
Fork
HISTORY OF THE LOCH ARD The LOCH ARD belonged to the famous Loch Line which sailed many ships from England to Australia. Built in Glasgow by Barclay, Curdle and Co. in 1873, the LOCH ARD was a three-masted square rigged iron sailing ship. The ship measured 262ft 7" (79.87m) in length, 38ft (11.58m) in width, 23ft (7m) in depth and had a gross tonnage of 1693 tons. The LOCH ARD's main mast measured a massive 150ft (45.7m) in height. LOCH ARD made three trips to Australia and one trip to Calcutta before its final voyage. LOCH ARD left England on March 2, 1878, under the command of Captain Gibbs, a newly married, 29 year old. She was bound for Melbourne with a crew of 37, plus 17 passengers and a load of cargo. The general cargo reflected the affluence of Melbourne at the time. On board were straw hats, umbrella, perfumes, clay pipes, pianos, clocks, confectionary, linen and candles, as well as a heavier load of railway irons, cement, lead and copper. There were items included that intended for display in the Melbourne International Exhibition in 1880. The voyage to Port Phillip was long but uneventful. At 3am on June 1, 1878, Captain Gibbs was expecting to see land and the passengers were becoming excited as they prepared to view their new homeland in the early morning. But LOCH ARD was running into a fog which greatly reduced visibility. Captain Gibbs was becoming anxious as there was no sign of land or the Cape Otway lighthouse. At 4am the fog lifted. A man aloft announced that he could see breakers. The sheer cliffs of Victoria's west coast came into view, and Captain Gibbs realised that the ship was much closer to them than expected. He ordered as much sail to be set as time would permit and then attempted to steer the vessel out to sea. On coming head on into the wind, the ship lost momentum, the sails fell limp and LOCH ARD's bow swung back. Gibbs then ordered the anchors to be released in an attempt to hold its position. The anchors sank some 50 fathoms - but did not hold. By this time LOCH ARD was among the breakers and the tall cliffs of Mutton Bird Island rose behind the ship. Just half a mile from the coast, the ship's bow was suddenly pulled around by the anchor. The captain tried to tack out to sea, but the ship struck a reef at the base of Mutton Bird Island, near Port Campbell. Waves broke over the ship and the top deck was loosened from the hull. The masts and rigging came crashing down knocking passengers and crew overboard. When a lifeboat was finally launched, it crashed into the side of LOCH ARD and capsized. Tom Pearce, who had launched the boat, managed to cling to its overturned hull and shelter beneath it. He drifted out to sea and then on the flood tide came into what is now known as LOCH ARD Gorge. He swam to shore, bruised and dazed, and found a cave in which to shelter. Some of the crew stayed below deck to shelter from the falling rigging but drowned when the ship slipped off the reef into deeper water. Eva Carmichael had raced onto deck to find out what was happening only to be confronted by towering cliffs looming above the stricken ship. In all the chaos, Captain Gibbs grabbed Eva and said, "If you are saved Eva, let my dear wife know that I died like a sailor". That was the last Eva Carmichael saw of the captain. She was swept off the ship by a huge wave. Eva saw Tom Pearce on a small rocky beach and yelled to attract his attention. He dived in and swam to the exhausted woman and dragged her to shore. He took her to the cave and broke open case of brandy which had washed up on the beach. He opened a bottle to revive the unconscious woman. A few hours later Tom scaled a cliff in search of help. He followed hoof prints and came by chance upon two men from nearby Glenample Station three and a half miles away. In a state of exhaustion, he told the men of the tragedy. Tom returned to the gorge while the two men rode back to the station to get help. By the time they reached LOCH ARD Gorge, it was cold and dark. The two shipwreck survivors were taken to Glenample Station to recover. Eva stayed at the station for six weeks before returning to Ireland, this time by steamship. In Melbourne, Tom Pearce received a hero's welcome. He was presented with the first gold medal of the Royal Humane Society of Victoria and a £1000 cheque from the Victorian Government. Concerts were performed to honour the young man's bravery and to raise money for those who lost family in the LOCH ARD disaster. Of the 54 crew members and passengers on board, only two survived: the apprentice, Tom Pearce and the young woman passenger, Eva Carmichael, who lost all of her family in the tragedy. Ten days after the LOCH ARD tragedy, salvage rights to the wreck were sold at auction for £2,120. Cargo valued at £3,000 was salvaged and placed on the beach, but most washed back into the sea when another storm developed. The wreck of LOCH ARD still lies at the base of Mutton Bird Island. Much of the cargo has now been salvaged and some was washed up into what is now known as LOCH ARD Gorge. Cargo and artefacts have also been illegally salvaged over many years before protective legislation was introduced. One of the most unlikely pieces of cargo to have survived the shipwreck was a Minton porcelain peacock - one of only seven in the world. The peacock was destined for the Melbourne International Exhibition in 1880. It had been well packed, which gave it adequate protection during the violent storm. Today, the Minton peacock can be seen at the Flagstaff Hill Maritime Museum in Warrnambool. From Australia's most dramatic shipwreck it has now become Australia's shipwreck artefact and is one of very few 'objects' on the Victorian State Heritage Register most valuable. The LOCH ARD shipwreck is of State significance – Victorian Heritage Register S 417 Flagstaff Hill’s collection of artefacts from LOCH ARD is significant for being one of the largest collections of artefacts from this shipwreck in Victoria. It is significant for its association with the shipwreck, which is on the Victorian Heritage Register (VHR S417). The collection is significant because of the relationship between the objects, as together they have a high potential to interpret the story of the LOCH ARD. The LOCH ARD collection is archaeologically significant as the remains of a large international passenger and cargo ship. The LOCH ARD collection is historically significant for representing aspects of Victoria’s shipping history and its potential to interpret sub-theme 1.5 of Victoria’s Framework of Historical Themes (living with natural processes). The collection is also historically significant for its association with the LOCH ARD, which was one of the worst and best known shipwrecks in Victoria’s history. Silver plated copper alloy table forks - entrè from the wreck of the Loch Ard. Some verdigris and silver oxide. Light encrustation on fork. Hallmark visible.flagstaff hill, warrnambool, shipwrecked coast, flagstaff hill maritime museum, maritime museum, shipwreck coast, flagstaff hill maritime village, great ocean road, loch line, loch ard, captain gibbs, eva carmichael, tom pearce, glenample station, mutton bird island, loch ard gorge, forks - entrè, fork, entrè fork -
 Flagstaff Hill Maritime Museum and Village
Fork
HISTORY OF THE LOCH ARD The LOCH ARD belonged to the famous Loch Line which sailed many ships from England to Australia. Built in Glasgow by Barclay, Curdle and Co. in 1873, the LOCH ARD was a three-masted square rigged iron sailing ship. The ship measured 262ft 7" (79.87m) in length, 38ft (11.58m) in width, 23ft (7m) in depth and had a gross tonnage of 1693 tons. The LOCH ARD's main mast measured a massive 150ft (45.7m) in height. LOCH ARD made three trips to Australia and one trip to Calcutta before its final voyage. LOCH ARD left England on March 2, 1878, under the command of Captain Gibbs, a newly married, 29 year old. She was bound for Melbourne with a crew of 37, plus 17 passengers and a load of cargo. The general cargo reflected the affluence of Melbourne at the time. On board were straw hats, umbrella, perfumes, clay pipes, pianos, clocks, confectionary, linen and candles, as well as a heavier load of railway irons, cement, lead and copper. There were items included that intended for display in the Melbourne International Exhibition in 1880. The voyage to Port Phillip was long but uneventful. At 3am on June 1, 1878, Captain Gibbs was expecting to see land and the passengers were becoming excited as they prepared to view their new homeland in the early morning. But LOCH ARD was running into a fog which greatly reduced visibility. Captain Gibbs was becoming anxious as there was no sign of land or the Cape Otway lighthouse. At 4am the fog lifted. A man aloft announced that he could see breakers. The sheer cliffs of Victoria's west coast came into view, and Captain Gibbs realised that the ship was much closer to them than expected. He ordered as much sail to be set as time would permit and then attempted to steer the vessel out to sea. On coming head on into the wind, the ship lost momentum, the sails fell limp and LOCH ARD's bow swung back. Gibbs then ordered the anchors to be released in an attempt to hold its position. The anchors sank some 50 fathoms - but did not hold. By this time LOCH ARD was among the breakers and the tall cliffs of Mutton Bird Island rose behind the ship. Just half a mile from the coast, the ship's bow was suddenly pulled around by the anchor. The captain tried to tack out to sea, but the ship struck a reef at the base of Mutton Bird Island, near Port Campbell. Waves broke over the ship and the top deck was loosened from the hull. The masts and rigging came crashing down knocking passengers and crew overboard. When a lifeboat was finally launched, it crashed into the side of LOCH ARD and capsized. Tom Pearce, who had launched the boat, managed to cling to its overturned hull and shelter beneath it. He drifted out to sea and then on the flood tide came into what is now known as LOCH ARD Gorge. He swam to shore, bruised and dazed, and found a cave in which to shelter. Some of the crew stayed below deck to shelter from the falling rigging but drowned when the ship slipped off the reef into deeper water. Eva Carmichael had raced onto deck to find out what was happening only to be confronted by towering cliffs looming above the stricken ship. In all the chaos, Captain Gibbs grabbed Eva and said, "If you are saved Eva, let my dear wife know that I died like a sailor". That was the last Eva Carmichael saw of the captain. She was swept off the ship by a huge wave. Eva saw Tom Pearce on a small rocky beach and yelled to attract his attention. He dived in and swam to the exhausted woman and dragged her to shore. He took her to the cave and broke open case of brandy which had washed up on the beach. He opened a bottle to revive the unconscious woman. A few hours later Tom scaled a cliff in search of help. He followed hoof prints and came by chance upon two men from nearby Glenample Station three and a half miles away. In a state of exhaustion, he told the men of the tragedy. Tom returned to the gorge while the two men rode back to the station to get help. By the time they reached LOCH ARD Gorge, it was cold and dark. The two shipwreck survivors were taken to Glenample Station to recover. Eva stayed at the station for six weeks before returning to Ireland, this time by steamship. In Melbourne, Tom Pearce received a hero's welcome. He was presented with the first gold medal of the Royal Humane Society of Victoria and a £1000 cheque from the Victorian Government. Concerts were performed to honour the young man's bravery and to raise money for those who lost family in the LOCH ARD disaster. Of the 54 crew members and passengers on board, only two survived: the apprentice, Tom Pearce and the young woman passenger, Eva Carmichael, who lost all of her family in the tragedy. Ten days after the LOCH ARD tragedy, salvage rights to the wreck were sold at auction for £2,120. Cargo valued at £3,000 was salvaged and placed on the beach, but most washed back into the sea when another storm developed. The wreck of LOCH ARD still lies at the base of Mutton Bird Island. Much of the cargo has now been salvaged and some was washed up into what is now known as LOCH ARD Gorge. Cargo and artefacts have also been illegally salvaged over many years before protective legislation was introduced. One of the most unlikely pieces of cargo to have survived the shipwreck was a Minton porcelain peacock - one of only seven in the world. The peacock was destined for the Melbourne International Exhibition in 1880. It had been well packed, which gave it adequate protection during the violent storm. Today, the Minton peacock can be seen at the Flagstaff Hill Maritime Museum in Warrnambool. From Australia's most dramatic shipwreck it has now become Australia's shipwreck artefact and is one of very few 'objects' on the Victorian State Heritage Register most valuable. The LOCH ARD shipwreck is of State significance – Victorian Heritage Register S 417 Flagstaff Hill’s collection of artefacts from LOCH ARD is significant for being one of the largest collections of artefacts from this shipwreck in Victoria. It is significant for its association with the shipwreck, which is on the Victorian Heritage Register (VHR S417). The collection is significant because of the relationship between the objects, as together they have a high potential to interpret the story of the LOCH ARD. The LOCH ARD collection is archaeologically significant as the remains of a large international passenger and cargo ship. The LOCH ARD collection is historically significant for representing aspects of Victoria’s shipping history and its potential to interpret sub-theme 1.5 of Victoria’s Framework of Historical Themes (living with natural processes). The collection is also historically significant for its association with the LOCH ARD, which was one of the worst and best known shipwrecks in Victoria’s history. Silver plated copper alloy table fork - entrée, from the wreck of the Loch Ard. Length 7⅛ " Some verdigris and silver oxide. Light encrustation on fork. Hallmark visible.flagstaff hill, warrnambool, shipwrecked coast, flagstaff hill maritime museum, maritime museum, shipwreck coast, flagstaff hill maritime village, great ocean road, loch line, loch ard, captain gibbs, eva carmichael, tom pearce, glenample station, mutton bird island, loch ard gorge, table fork - entrée, table fork, loch ard, entrée fork -
 Flagstaff Hill Maritime Museum and Village
Fork
HISTORY OF THE LOCH ARD The LOCH ARD belonged to the famous Loch Line which sailed many ships from England to Australia. Built in Glasgow by Barclay, Curdle and Co. in 1873, the LOCH ARD was a three-masted square rigged iron sailing ship. The ship measured 262ft 7" (79.87m) in length, 38ft (11.58m) in width, 23ft (7m) in depth and had a gross tonnage of 1693 tons. The LOCH ARD's main mast measured a massive 150ft (45.7m) in height. LOCH ARD made three trips to Australia and one trip to Calcutta before its final voyage. LOCH ARD left England on March 2, 1878, under the command of Captain Gibbs, a newly married, 29 year old. She was bound for Melbourne with a crew of 37, plus 17 passengers and a load of cargo. The general cargo reflected the affluence of Melbourne at the time. On board were straw hats, umbrella, perfumes, clay pipes, pianos, clocks, confectionary, linen and candles, as well as a heavier load of railway irons, cement, lead and copper. There were items included that intended for display in the Melbourne International Exhibition in 1880. The voyage to Port Phillip was long but uneventful. At 3am on June 1, 1878, Captain Gibbs was expecting to see land and the passengers were becoming excited as they prepared to view their new homeland in the early morning. But LOCH ARD was running into a fog which greatly reduced visibility. Captain Gibbs was becoming anxious as there was no sign of land or the Cape Otway lighthouse. At 4am the fog lifted. A man aloft announced that he could see breakers. The sheer cliffs of Victoria's west coast came into view, and Captain Gibbs realised that the ship was much closer to them than expected. He ordered as much sail to be set as time would permit and then attempted to steer the vessel out to sea. On coming head on into the wind, the ship lost momentum, the sails fell limp and LOCH ARD's bow swung back. Gibbs then ordered the anchors to be released in an attempt to hold its position. The anchors sank some 50 fathoms - but did not hold. By this time LOCH ARD was among the breakers and the tall cliffs of Mutton Bird Island rose behind the ship. Just half a mile from the coast, the ship's bow was suddenly pulled around by the anchor. The captain tried to tack out to sea, but the ship struck a reef at the base of Mutton Bird Island, near Port Campbell. Waves broke over the ship and the top deck was loosened from the hull. The masts and rigging came crashing down knocking passengers and crew overboard. When a lifeboat was finally launched, it crashed into the side of LOCH ARD and capsized. Tom Pearce, who had launched the boat, managed to cling to its overturned hull and shelter beneath it. He drifted out to sea and then on the flood tide came into what is now known as LOCH ARD Gorge. He swam to shore, bruised and dazed, and found a cave in which to shelter. Some of the crew stayed below deck to shelter from the falling rigging but drowned when the ship slipped off the reef into deeper water. Eva Carmichael had raced onto deck to find out what was happening only to be confronted by towering cliffs looming above the stricken ship. In all the chaos, Captain Gibbs grabbed Eva and said, "If you are saved Eva, let my dear wife know that I died like a sailor". That was the last Eva Carmichael saw of the captain. She was swept off the ship by a huge wave. Eva saw Tom Pearce on a small rocky beach and yelled to attract his attention. He dived in and swam to the exhausted woman and dragged her to shore. He took her to the cave and broke open case of brandy which had washed up on the beach. He opened a bottle to revive the unconscious woman. A few hours later Tom scaled a cliff in search of help. He followed hoof prints and came by chance upon two men from nearby Glenample Station three and a half miles away. In a state of exhaustion, he told the men of the tragedy. Tom returned to the gorge while the two men rode back to the station to get help. By the time they reached LOCH ARD Gorge, it was cold and dark. The two shipwreck survivors were taken to Glenample Station to recover. Eva stayed at the station for six weeks before returning to Ireland, this time by steamship. In Melbourne, Tom Pearce received a hero's welcome. He was presented with the first gold medal of the Royal Humane Society of Victoria and a £1000 cheque from the Victorian Government. Concerts were performed to honour the young man's bravery and to raise money for those who lost family in the LOCH ARD disaster. Of the 54 crew members and passengers on board, only two survived: the apprentice, Tom Pearce and the young woman passenger, Eva Carmichael, who lost all of her family in the tragedy. Ten days after the LOCH ARD tragedy, salvage rights to the wreck were sold at auction for £2,120. Cargo valued at £3,000 was salvaged and placed on the beach, but most washed back into the sea when another storm developed. The wreck of LOCH ARD still lies at the base of Mutton Bird Island. Much of the cargo has now been salvaged and some was washed up into what is now known as LOCH ARD Gorge. Cargo and artefacts have also been illegally salvaged over many years before protective legislation was introduced. One of the most unlikely pieces of cargo to have survived the shipwreck was a Minton porcelain peacock - one of only seven in the world. The peacock was destined for the Melbourne International Exhibition in 1880. It had been well packed, which gave it adequate protection during the violent storm. Today, the Minton peacock can be seen at the Flagstaff Hill Maritime Museum in Warrnambool. From Australia's most dramatic shipwreck it has now become Australia's shipwreck artefact and is one of very few 'objects' on the Victorian State Heritage Register most valuable. The LOCH ARD shipwreck is of State significance – Victorian Heritage Register S 417 Flagstaff Hill’s collection of artefacts from LOCH ARD is significant for being one of the largest collections of artefacts from this shipwreck in Victoria. It is significant for its association with the shipwreck, which is on the Victorian Heritage Register (VHR S417). The collection is significant because of the relationship between the objects, as together they have a high potential to interpret the story of the LOCH ARD. The LOCH ARD collection is archaeologically significant as the remains of a large international passenger and cargo ship. The LOCH ARD collection is historically significant for representing aspects of Victoria’s shipping history and its potential to interpret sub-theme 1.5 of Victoria’s Framework of Historical Themes (living with natural processes). The collection is also historically significant for its association with the LOCH ARD, which was one of the worst and best known shipwrecks in Victoria’s history. Silver plated copper alloy table fork - entrée from the wreck of the Loch Ard. Some verdigris and silver oxide. Light encrustation on tines. Hallmark visible.flagstaff hill, warrnambool, shipwrecked coast, flagstaff hill maritime museum, maritime museum, shipwreck coast, flagstaff hill maritime village, great ocean road, loch line, loch ard, captain gibbs, eva carmichael, tom pearce, glenample station, mutton bird island, loch ard gorge, fork, loch ard, electroplated cutlery -
 Flagstaff Hill Maritime Museum and Village
Fork
HISTORY OF THE LOCH ARD The LOCH ARD belonged to the famous Loch Line which sailed many ships from England to Australia. Built in Glasgow by Barclay, Curdle and Co. in 1873, the LOCH ARD was a three-masted square rigged iron sailing ship. The ship measured 262ft 7" (79.87m) in length, 38ft (11.58m) in width, 23ft (7m) in depth and had a gross tonnage of 1693 tons. The LOCH ARD's main mast measured a massive 150ft (45.7m) in height. LOCH ARD made three trips to Australia and one trip to Calcutta before its final voyage. LOCH ARD left England on March 2, 1878, under the command of Captain Gibbs, a newly married, 29 year old. She was bound for Melbourne with a crew of 37, plus 17 passengers and a load of cargo. The general cargo reflected the affluence of Melbourne at the time. On board were straw hats, umbrella, perfumes, clay pipes, pianos, clocks, confectionary, linen and candles, as well as a heavier load of railway irons, cement, lead and copper. There were items included that intended for display in the Melbourne International Exhibition in 1880. The voyage to Port Phillip was long but uneventful. At 3am on June 1, 1878, Captain Gibbs was expecting to see land and the passengers were becoming excited as they prepared to view their new homeland in the early morning. But LOCH ARD was running into a fog which greatly reduced visibility. Captain Gibbs was becoming anxious as there was no sign of land or the Cape Otway lighthouse. At 4am the fog lifted. A man aloft announced that he could see breakers. The sheer cliffs of Victoria's west coast came into view, and Captain Gibbs realised that the ship was much closer to them than expected. He ordered as much sail to be set as time would permit and then attempted to steer the vessel out to sea. On coming head on into the wind, the ship lost momentum, the sails fell limp and LOCH ARD's bow swung back. Gibbs then ordered the anchors to be released in an attempt to hold its position. The anchors sank some 50 fathoms - but did not hold. By this time LOCH ARD was among the breakers and the tall cliffs of Mutton Bird Island rose behind the ship. Just half a mile from the coast, the ship's bow was suddenly pulled around by the anchor. The captain tried to tack out to sea, but the ship struck a reef at the base of Mutton Bird Island, near Port Campbell. Waves broke over the ship and the top deck was loosened from the hull. The masts and rigging came crashing down knocking passengers and crew overboard. When a lifeboat was finally launched, it crashed into the side of LOCH ARD and capsized. Tom Pearce, who had launched the boat, managed to cling to its overturned hull and shelter beneath it. He drifted out to sea and then on the flood tide came into what is now known as LOCH ARD Gorge. He swam to shore, bruised and dazed, and found a cave in which to shelter. Some of the crew stayed below deck to shelter from the falling rigging but drowned when the ship slipped off the reef into deeper water. Eva Carmichael had raced onto deck to find out what was happening only to be confronted by towering cliffs looming above the stricken ship. In all the chaos, Captain Gibbs grabbed Eva and said, "If you are saved Eva, let my dear wife know that I died like a sailor". That was the last Eva Carmichael saw of the captain. She was swept off the ship by a huge wave. Eva saw Tom Pearce on a small rocky beach and yelled to attract his attention. He dived in and swam to the exhausted woman and dragged her to shore. He took her to the cave and broke open case of brandy which had washed up on the beach. He opened a bottle to revive the unconscious woman. A few hours later Tom scaled a cliff in search of help. He followed hoof prints and came by chance upon two men from nearby Glenample Station three and a half miles away. In a state of exhaustion, he told the men of the tragedy. Tom returned to the gorge while the two men rode back to the station to get help. By the time they reached LOCH ARD Gorge, it was cold and dark. The two shipwreck survivors were taken to Glenample Station to recover. Eva stayed at the station for six weeks before returning to Ireland, this time by steamship. In Melbourne, Tom Pearce received a hero's welcome. He was presented with the first gold medal of the Royal Humane Society of Victoria and a £1000 cheque from the Victorian Government. Concerts were performed to honour the young man's bravery and to raise money for those who lost family in the LOCH ARD disaster. Of the 54 crew members and passengers on board, only two survived: the apprentice, Tom Pearce and the young woman passenger, Eva Carmichael, who lost all of her family in the tragedy. Ten days after the LOCH ARD tragedy, salvage rights to the wreck were sold at auction for £2,120. Cargo valued at £3,000 was salvaged and placed on the beach, but most washed back into the sea when another storm developed. The wreck of LOCH ARD still lies at the base of Mutton Bird Island. Much of the cargo has now been salvaged and some was washed up into what is now known as LOCH ARD Gorge. Cargo and artefacts have also been illegally salvaged over many years before protective legislation was introduced. One of the most unlikely pieces of cargo to have survived the shipwreck was a Minton porcelain peacock - one of only seven in the world. The peacock was destined for the Melbourne International Exhibition in 1880. It had been well packed, which gave it adequate protection during the violent storm. Today, the Minton peacock can be seen at the Flagstaff Hill Maritime Museum in Warrnambool. From Australia's most dramatic shipwreck it has now become Australia's shipwreck artefact and is one of very few 'objects' on the Victorian State Heritage Register most valuable. The LOCH ARD shipwreck is of State significance – Victorian Heritage Register S 417 Flagstaff Hill’s collection of artefacts from LOCH ARD is significant for being one of the largest collections of artefacts from this shipwreck in Victoria. It is significant for its association with the shipwreck, which is on the Victorian Heritage Register (VHR S417). The collection is significant because of the relationship between the objects, as together they have a high potential to interpret the story of the LOCH ARD. The LOCH ARD collection is archaeologically significant as the remains of a large international passenger and cargo ship. The LOCH ARD collection is historically significant for representing aspects of Victoria’s shipping history and its potential to interpret sub-theme 1.5 of Victoria’s Framework of Historical Themes (living with natural processes). The collection is also historically significant for its association with the LOCH ARD, which was one of the worst and best known shipwrecks in Victoria’s history. Silver plated copper alloy table forks - entrée from the wreck of the Loch Ard. Some verdigris and silver oxide. Light encrustation on tines. Hallmark visible.flagstaff hill, warrnambool, shipwrecked coast, flagstaff hill maritime museum, maritime museum, shipwreck coast, flagstaff hill maritime village, great ocean road, loch line, loch ard, captain gibbs, eva carmichael, tom pearce, glenample station, mutton bird island, loch ard gorge, fork, electroplated cutlery -
 Flagstaff Hill Maritime Museum and Village
Fork
HISTORY OF THE LOCH ARD The LOCH ARD belonged to the famous Loch Line which sailed many ships from England to Australia. Built in Glasgow by Barclay, Curdle and Co. in 1873, the LOCH ARD was a three-masted square rigged iron sailing ship. The ship measured 262ft 7" (79.87m) in length, 38ft (11.58m) in width, 23ft (7m) in depth and had a gross tonnage of 1693 tons. The LOCH ARD's main mast measured a massive 150ft (45.7m) in height. LOCH ARD made three trips to Australia and one trip to Calcutta before its final voyage. LOCH ARD left England on March 2, 1878, under the command of Captain Gibbs, a newly married, 29 year old. She was bound for Melbourne with a crew of 37, plus 17 passengers and a load of cargo. The general cargo reflected the affluence of Melbourne at the time. On board were straw hats, umbrella, perfumes, clay pipes, pianos, clocks, confectionary, linen and candles, as well as a heavier load of railway irons, cement, lead and copper. There were items included that intended for display in the Melbourne International Exhibition in 1880. The voyage to Port Phillip was long but uneventful. At 3am on June 1, 1878, Captain Gibbs was expecting to see land and the passengers were becoming excited as they prepared to view their new homeland in the early morning. But LOCH ARD was running into a fog which greatly reduced visibility. Captain Gibbs was becoming anxious as there was no sign of land or the Cape Otway lighthouse. At 4am the fog lifted. A man aloft announced that he could see breakers. The sheer cliffs of Victoria's west coast came into view, and Captain Gibbs realised that the ship was much closer to them than expected. He ordered as much sail to be set as time would permit and then attempted to steer the vessel out to sea. On coming head on into the wind, the ship lost momentum, the sails fell limp and LOCH ARD's bow swung back. Gibbs then ordered the anchors to be released in an attempt to hold its position. The anchors sank some 50 fathoms - but did not hold. By this time LOCH ARD was among the breakers and the tall cliffs of Mutton Bird Island rose behind the ship. Just half a mile from the coast, the ship's bow was suddenly pulled around by the anchor. The captain tried to tack out to sea, but the ship struck a reef at the base of Mutton Bird Island, near Port Campbell. Waves broke over the ship and the top deck was loosened from the hull. The masts and rigging came crashing down knocking passengers and crew overboard. When a lifeboat was finally launched, it crashed into the side of LOCH ARD and capsized. Tom Pearce, who had launched the boat, managed to cling to its overturned hull and shelter beneath it. He drifted out to sea and then on the flood tide came into what is now known as LOCH ARD Gorge. He swam to shore, bruised and dazed, and found a cave in which to shelter. Some of the crew stayed below deck to shelter from the falling rigging but drowned when the ship slipped off the reef into deeper water. Eva Carmichael had raced onto deck to find out what was happening only to be confronted by towering cliffs looming above the stricken ship. In all the chaos, Captain Gibbs grabbed Eva and said, "If you are saved Eva, let my dear wife know that I died like a sailor". That was the last Eva Carmichael saw of the captain. She was swept off the ship by a huge wave. Eva saw Tom Pearce on a small rocky beach and yelled to attract his attention. He dived in and swam to the exhausted woman and dragged her to shore. He took her to the cave and broke open case of brandy which had washed up on the beach. He opened a bottle to revive the unconscious woman. A few hours later Tom scaled a cliff in search of help. He followed hoof prints and came by chance upon two men from nearby Glenample Station three and a half miles away. In a state of exhaustion, he told the men of the tragedy. Tom returned to the gorge while the two men rode back to the station to get help. By the time they reached LOCH ARD Gorge, it was cold and dark. The two shipwreck survivors were taken to Glenample Station to recover. Eva stayed at the station for six weeks before returning to Ireland, this time by steamship. In Melbourne, Tom Pearce received a hero's welcome. He was presented with the first gold medal of the Royal Humane Society of Victoria and a £1000 cheque from the Victorian Government. Concerts were performed to honour the young man's bravery and to raise money for those who lost family in the LOCH ARD disaster. Of the 54 crew members and passengers on board, only two survived: the apprentice, Tom Pearce and the young woman passenger, Eva Carmichael, who lost all of her family in the tragedy. Ten days after the LOCH ARD tragedy, salvage rights to the wreck were sold at auction for £2,120. Cargo valued at £3,000 was salvaged and placed on the beach, but most washed back into the sea when another storm developed. The wreck of LOCH ARD still lies at the base of Mutton Bird Island. Much of the cargo has now been salvaged and some was washed up into what is now known as LOCH ARD Gorge. Cargo and artefacts have also been illegally salvaged over many years before protective legislation was introduced. One of the most unlikely pieces of cargo to have survived the shipwreck was a Minton porcelain peacock - one of only seven in the world. The peacock was destined for the Melbourne International Exhibition in 1880. It had been well packed, which gave it adequate protection during the violent storm. Today, the Minton peacock can be seen at the Flagstaff Hill Maritime Museum in Warrnambool. From Australia's most dramatic shipwreck it has now become Australia's shipwreck artefact and is one of very few 'objects' on the Victorian State Heritage Register most valuable. The LOCH ARD shipwreck is of State significance – Victorian Heritage Register S 417 Flagstaff Hill’s collection of artefacts from LOCH ARD is significant for being one of the largest collections of artefacts from this shipwreck in Victoria. It is significant for its association with the shipwreck, which is on the Victorian Heritage Register (VHR S417). The collection is significant because of the relationship between the objects, as together they have a high potential to interpret the story of the LOCH ARD. The LOCH ARD collection is archaeologically significant as the remains of a large international passenger and cargo ship. The LOCH ARD collection is historically significant for representing aspects of Victoria’s shipping history and its potential to interpret sub-theme 1.5 of Victoria’s Framework of Historical Themes (living with natural processes). The collection is also historically significant for its association with the LOCH ARD, which was one of the worst and best known shipwrecks in Victoria’s history. Silver plated copper alloy table fork - entrée from the wreck of the Loch Ard. Some verdigris and silver oxide. Light encrustation on tines. Hallmark visible.flagstaff hill, warrnambool, shipwrecked coast, flagstaff hill maritime museum, maritime museum, shipwreck coast, flagstaff hill maritime village, great ocean road, loch line, loch ard, captain gibbs, eva carmichael, tom pearce, glenample station, mutton bird island, loch ard gorge, fork, electroplated cutlery -
 Flagstaff Hill Maritime Museum and Village
Fork
HISTORY OF THE LOCH ARD The LOCH ARD belonged to the famous Loch Line which sailed many ships from England to Australia. Built in Glasgow by Barclay, Curdle and Co. in 1873, the LOCH ARD was a three-masted square rigged iron sailing ship. The ship measured 262ft 7" (79.87m) in length, 38ft (11.58m) in width, 23ft (7m) in depth and had a gross tonnage of 1693 tons. The LOCH ARD's main mast measured a massive 150ft (45.7m) in height. LOCH ARD made three trips to Australia and one trip to Calcutta before its final voyage. LOCH ARD left England on March 2, 1878, under the command of Captain Gibbs, a newly married, 29 year old. She was bound for Melbourne with a crew of 37, plus 17 passengers and a load of cargo. The general cargo reflected the affluence of Melbourne at the time. On board were straw hats, umbrella, perfumes, clay pipes, pianos, clocks, confectionary, linen and candles, as well as a heavier load of railway irons, cement, lead and copper. There were items included that intended for display in the Melbourne International Exhibition in 1880. The voyage to Port Phillip was long but uneventful. At 3am on June 1, 1878, Captain Gibbs was expecting to see land and the passengers were becoming excited as they prepared to view their new homeland in the early morning. But LOCH ARD was running into a fog which greatly reduced visibility. Captain Gibbs was becoming anxious as there was no sign of land or the Cape Otway lighthouse. At 4am the fog lifted. A man aloft announced that he could see breakers. The sheer cliffs of Victoria's west coast came into view, and Captain Gibbs realised that the ship was much closer to them than expected. He ordered as much sail to be set as time would permit and then attempted to steer the vessel out to sea. On coming head on into the wind, the ship lost momentum, the sails fell limp and LOCH ARD's bow swung back. Gibbs then ordered the anchors to be released in an attempt to hold its position. The anchors sank some 50 fathoms - but did not hold. By this time LOCH ARD was among the breakers and the tall cliffs of Mutton Bird Island rose behind the ship. Just half a mile from the coast, the ship's bow was suddenly pulled around by the anchor. The captain tried to tack out to sea, but the ship struck a reef at the base of Mutton Bird Island, near Port Campbell. Waves broke over the ship and the top deck was loosened from the hull. The masts and rigging came crashing down knocking passengers and crew overboard. When a lifeboat was finally launched, it crashed into the side of LOCH ARD and capsized. Tom Pearce, who had launched the boat, managed to cling to its overturned hull and shelter beneath it. He drifted out to sea and then on the flood tide came into what is now known as LOCH ARD Gorge. He swam to shore, bruised and dazed, and found a cave in which to shelter. Some of the crew stayed below deck to shelter from the falling rigging but drowned when the ship slipped off the reef into deeper water. Eva Carmichael had raced onto deck to find out what was happening only to be confronted by towering cliffs looming above the stricken ship. In all the chaos, Captain Gibbs grabbed Eva and said, "If you are saved Eva, let my dear wife know that I died like a sailor". That was the last Eva Carmichael saw of the captain. She was swept off the ship by a huge wave. Eva saw Tom Pearce on a small rocky beach and yelled to attract his attention. He dived in and swam to the exhausted woman and dragged her to shore. He took her to the cave and broke open case of brandy which had washed up on the beach. He opened a bottle to revive the unconscious woman. A few hours later Tom scaled a cliff in search of help. He followed hoof prints and came by chance upon two men from nearby Glenample Station three and a half miles away. In a state of exhaustion, he told the men of the tragedy. Tom returned to the gorge while the two men rode back to the station to get help. By the time they reached LOCH ARD Gorge, it was cold and dark. The two shipwreck survivors were taken to Glenample Station to recover. Eva stayed at the station for six weeks before returning to Ireland, this time by steamship. In Melbourne, Tom Pearce received a hero's welcome. He was presented with the first gold medal of the Royal Humane Society of Victoria and a £1000 cheque from the Victorian Government. Concerts were performed to honour the young man's bravery and to raise money for those who lost family in the LOCH ARD disaster. Of the 54 crew members and passengers on board, only two survived: the apprentice, Tom Pearce and the young woman passenger, Eva Carmichael, who lost all of her family in the tragedy. Ten days after the LOCH ARD tragedy, salvage rights to the wreck were sold at auction for £2,120. Cargo valued at £3,000 was salvaged and placed on the beach, but most washed back into the sea when another storm developed. The wreck of LOCH ARD still lies at the base of Mutton Bird Island. Much of the cargo has now been salvaged and some was washed up into what is now known as LOCH ARD Gorge. Cargo and artefacts have also been illegally salvaged over many years before protective legislation was introduced. One of the most unlikely pieces of cargo to have survived the shipwreck was a Minton porcelain peacock - one of only seven in the world. The peacock was destined for the Melbourne International Exhibition in 1880. It had been well packed, which gave it adequate protection during the violent storm. Today, the Minton peacock can be seen at the Flagstaff Hill Maritime Museum in Warrnambool. From Australia's most dramatic shipwreck it has now become Australia's shipwreck artefact and is one of very few 'objects' on the Victorian State Heritage Register most valuable. The LOCH ARD shipwreck is of State significance – Victorian Heritage Register S 417 Flagstaff Hill’s collection of artefacts from LOCH ARD is significant for being one of the largest collections of artefacts from this shipwreck in Victoria. It is significant for its association with the shipwreck, which is on the Victorian Heritage Register (VHR S417). The collection is significant because of the relationship between the objects, as together they have a high potential to interpret the story of the LOCH ARD. The LOCH ARD collection is archaeologically significant as the remains of a large international passenger and cargo ship. The LOCH ARD collection is historically significant for representing aspects of Victoria’s shipping history and its potential to interpret sub-theme 1.5 of Victoria’s Framework of Historical Themes (living with natural processes). The collection is also historically significant for its association with the LOCH ARD, which was one of the worst and best known shipwrecks in Victoria’s history. Silver plated copper alloy table fork - entrée from the wreck of the Loch Ard. Some verdigris and silver oxide. Light encrustation on tines. Hallmark visible.flagstaff hill, warrnambool, shipwrecked coast, flagstaff hill maritime museum, maritime museum, shipwreck coast, flagstaff hill maritime village, great ocean road, loch line, loch ard, captain gibbs, eva carmichael, tom pearce, glenample station, mutton bird island, loch ard gorge, fork, loch ard, electroplated cutlery -
 Flagstaff Hill Maritime Museum and Village
Fork
HISTORY OF THE LOCH ARD The LOCH ARD belonged to the famous Loch Line which sailed many ships from England to Australia. Built in Glasgow by Barclay, Curdle and Co. in 1873, the LOCH ARD was a three-masted square rigged iron sailing ship. The ship measured 262ft 7" (79.87m) in length, 38ft (11.58m) in width, 23ft (7m) in depth and had a gross tonnage of 1693 tons. The LOCH ARD's main mast measured a massive 150ft (45.7m) in height. LOCH ARD made three trips to Australia and one trip to Calcutta before its final voyage. LOCH ARD left England on March 2, 1878, under the command of Captain Gibbs, a newly married, 29 year old. She was bound for Melbourne with a crew of 37, plus 17 passengers and a load of cargo. The general cargo reflected the affluence of Melbourne at the time. On board were straw hats, umbrella, perfumes, clay pipes, pianos, clocks, confectionary, linen and candles, as well as a heavier load of railway irons, cement, lead and copper. There were items included that intended for display in the Melbourne International Exhibition in 1880. The voyage to Port Phillip was long but uneventful. At 3am on June 1, 1878, Captain Gibbs was expecting to see land and the passengers were becoming excited as they prepared to view their new homeland in the early morning. But LOCH ARD was running into a fog which greatly reduced visibility. Captain Gibbs was becoming anxious as there was no sign of land or the Cape Otway lighthouse. At 4am the fog lifted. A man aloft announced that he could see breakers. The sheer cliffs of Victoria's west coast came into view, and Captain Gibbs realised that the ship was much closer to them than expected. He ordered as much sail to be set as time would permit and then attempted to steer the vessel out to sea. On coming head on into the wind, the ship lost momentum, the sails fell limp and LOCH ARD's bow swung back. Gibbs then ordered the anchors to be released in an attempt to hold its position. The anchors sank some 50 fathoms - but did not hold. By this time LOCH ARD was among the breakers and the tall cliffs of Mutton Bird Island rose behind the ship. Just half a mile from the coast, the ship's bow was suddenly pulled around by the anchor. The captain tried to tack out to sea, but the ship struck a reef at the base of Mutton Bird Island, near Port Campbell. Waves broke over the ship and the top deck was loosened from the hull. The masts and rigging came crashing down knocking passengers and crew overboard. When a lifeboat was finally launched, it crashed into the side of LOCH ARD and capsized. Tom Pearce, who had launched the boat, managed to cling to its overturned hull and shelter beneath it. He drifted out to sea and then on the flood tide came into what is now known as LOCH ARD Gorge. He swam to shore, bruised and dazed, and found a cave in which to shelter. Some of the crew stayed below deck to shelter from the falling rigging but drowned when the ship slipped off the reef into deeper water. Eva Carmichael had raced onto deck to find out what was happening only to be confronted by towering cliffs looming above the stricken ship. In all the chaos, Captain Gibbs grabbed Eva and said, "If you are saved Eva, let my dear wife know that I died like a sailor". That was the last Eva Carmichael saw of the captain. She was swept off the ship by a huge wave. Eva saw Tom Pearce on a small rocky beach and yelled to attract his attention. He dived in and swam to the exhausted woman and dragged her to shore. He took her to the cave and broke open case of brandy which had washed up on the beach. He opened a bottle to revive the unconscious woman. A few hours later Tom scaled a cliff in search of help. He followed hoof prints and came by chance upon two men from nearby Glenample Station three and a half miles away. In a state of exhaustion, he told the men of the tragedy. Tom returned to the gorge while the two men rode back to the station to get help. By the time they reached LOCH ARD Gorge, it was cold and dark. The two shipwreck survivors were taken to Glenample Station to recover. Eva stayed at the station for six weeks before returning to Ireland, this time by steamship. In Melbourne, Tom Pearce received a hero's welcome. He was presented with the first gold medal of the Royal Humane Society of Victoria and a £1000 cheque from the Victorian Government. Concerts were performed to honour the young man's bravery and to raise money for those who lost family in the LOCH ARD disaster. Of the 54 crew members and passengers on board, only two survived: the apprentice, Tom Pearce and the young woman passenger, Eva Carmichael, who lost all of her family in the tragedy. Ten days after the LOCH ARD tragedy, salvage rights to the wreck were sold at auction for £2,120. Cargo valued at £3,000 was salvaged and placed on the beach, but most washed back into the sea when another storm developed. The wreck of LOCH ARD still lies at the base of Mutton Bird Island. Much of the cargo has now been salvaged and some was washed up into what is now known as LOCH ARD Gorge. Cargo and artefacts have also been illegally salvaged over many years before protective legislation was introduced. One of the most unlikely pieces of cargo to have survived the shipwreck was a Minton porcelain peacock - one of only seven in the world. The peacock was destined for the Melbourne International Exhibition in 1880. It had been well packed, which gave it adequate protection during the violent storm. Today, the Minton peacock can be seen at the Flagstaff Hill Maritime Museum in Warrnambool. From Australia's most dramatic shipwreck it has now become Australia's shipwreck artefact and is one of very few 'objects' on the Victorian State Heritage Register most valuable. The LOCH ARD shipwreck is of State significance – Victorian Heritage Register S 417 Flagstaff Hill’s collection of artefacts from LOCH ARD is significant for being one of the largest collections of artefacts from this shipwreck in Victoria. It is significant for its association with the shipwreck, which is on the Victorian Heritage Register (VHR S417). The collection is significant because of the relationship between the objects, as together they have a high potential to interpret the story of the LOCH ARD. The LOCH ARD collection is archaeologically significant as the remains of a large international passenger and cargo ship. The LOCH ARD collection is historically significant for representing aspects of Victoria’s shipping history and its potential to interpret sub-theme 1.5 of Victoria’s Framework of Historical Themes (living with natural processes). The collection is also historically significant for its association with the LOCH ARD, which was one of the worst and best known shipwrecks in Victoria’s history Silver plated copper alloy table fork - entrée from the wreck of the Loch Ard. Some verdigris and silver oxide. Light encrustation on tines. Hallmark visible.flagstaff hill, warrnambool, shipwrecked coast, flagstaff hill maritime museum, maritime museum, shipwreck coast, flagstaff hill maritime village, great ocean road, loch line, loch ard, captain gibbs, eva carmichael, tom pearce, glenample station, mutton bird island, loch ard gorge, fork, lock ard, electroplated cutlery -
 Flagstaff Hill Maritime Museum and Village
Fork
HISTORY OF THE LOCH ARD The LOCH ARD belonged to the famous Loch Line which sailed many ships from England to Australia. Built in Glasgow by Barclay, Curdle and Co. in 1873, the LOCH ARD was a three-masted square rigged iron sailing ship. The ship measured 262ft 7" (79.87m) in length, 38ft (11.58m) in width, 23ft (7m) in depth and had a gross tonnage of 1693 tons. The LOCH ARD's main mast measured a massive 150ft (45.7m) in height. LOCH ARD made three trips to Australia and one trip to Calcutta before its final voyage. LOCH ARD left England on March 2, 1878, under the command of Captain Gibbs, a newly married, 29 year old. She was bound for Melbourne with a crew of 37, plus 17 passengers and a load of cargo. The general cargo reflected the affluence of Melbourne at the time. On board were straw hats, umbrella, perfumes, clay pipes, pianos, clocks, confectionary, linen and candles, as well as a heavier load of railway irons, cement, lead and copper. There were items included that intended for display in the Melbourne International Exhibition in 1880. The voyage to Port Phillip was long but uneventful. At 3am on June 1, 1878, Captain Gibbs was expecting to see land and the passengers were becoming excited as they prepared to view their new homeland in the early morning. But LOCH ARD was running into a fog which greatly reduced visibility. Captain Gibbs was becoming anxious as there was no sign of land or the Cape Otway lighthouse. At 4am the fog lifted. A man aloft announced that he could see breakers. The sheer cliffs of Victoria's west coast came into view, and Captain Gibbs realised that the ship was much closer to them than expected. He ordered as much sail to be set as time would permit and then attempted to steer the vessel out to sea. On coming head on into the wind, the ship lost momentum, the sails fell limp and LOCH ARD's bow swung back. Gibbs then ordered the anchors to be released in an attempt to hold its position. The anchors sank some 50 fathoms - but did not hold. By this time LOCH ARD was among the breakers and the tall cliffs of Mutton Bird Island rose behind the ship. Just half a mile from the coast, the ship's bow was suddenly pulled around by the anchor. The captain tried to tack out to sea, but the ship struck a reef at the base of Mutton Bird Island, near Port Campbell. Waves broke over the ship and the top deck was loosened from the hull. The masts and rigging came crashing down knocking passengers and crew overboard. When a lifeboat was finally launched, it crashed into the side of LOCH ARD and capsized. Tom Pearce, who had launched the boat, managed to cling to its overturned hull and shelter beneath it. He drifted out to sea and then on the flood tide came into what is now known as LOCH ARD Gorge. He swam to shore, bruised and dazed, and found a cave in which to shelter. Some of the crew stayed below deck to shelter from the falling rigging but drowned when the ship slipped off the reef into deeper water. Eva Carmichael had raced onto deck to find out what was happening only to be confronted by towering cliffs looming above the stricken ship. In all the chaos, Captain Gibbs grabbed Eva and said, "If you are saved Eva, let my dear wife know that I died like a sailor". That was the last Eva Carmichael saw of the captain. She was swept off the ship by a huge wave. Eva saw Tom Pearce on a small rocky beach and yelled to attract his attention. He dived in and swam to the exhausted woman and dragged her to shore. He took her to the cave and broke open case of brandy which had washed up on the beach. He opened a bottle to revive the unconscious woman. A few hours later Tom scaled a cliff in search of help. He followed hoof prints and came by chance upon two men from nearby Glenample Station three and a half miles away. In a state of exhaustion, he told the men of the tragedy. Tom returned to the gorge while the two men rode back to the station to get help. By the time they reached LOCH ARD Gorge, it was cold and dark. The two shipwreck survivors were taken to Glenample Station to recover. Eva stayed at the station for six weeks before returning to Ireland, this time by steamship. In Melbourne, Tom Pearce received a hero's welcome. He was presented with the first gold medal of the Royal Humane Society of Victoria and a £1000 cheque from the Victorian Government. Concerts were performed to honour the young man's bravery and to raise money for those who lost family in the LOCH ARD disaster. Of the 54 crew members and passengers on board, only two survived: the apprentice, Tom Pearce and the young woman passenger, Eva Carmichael, who lost all of her family in the tragedy. Ten days after the LOCH ARD tragedy, salvage rights to the wreck were sold at auction for £2,120. Cargo valued at £3,000 was salvaged and placed on the beach, but most washed back into the sea when another storm developed. The wreck of LOCH ARD still lies at the base of Mutton Bird Island. Much of the cargo has now been salvaged and some was washed up into what is now known as LOCH ARD Gorge. Cargo and artefacts have also been illegally salvaged over many years before protective legislation was introduced. One of the most unlikely pieces of cargo to have survived the shipwreck was a Minton porcelain peacock - one of only seven in the world. The peacock was destined for the Melbourne International Exhibition in 1880. It had been well packed, which gave it adequate protection during the violent storm. Today, the Minton peacock can be seen at the Flagstaff Hill Maritime Museum in Warrnambool. From Australia's most dramatic shipwreck it has now become Australia's shipwreck artefact and is one of very few 'objects' on the Victorian State Heritage Register most valuable The LOCH ARD shipwreck is of State significance – Victorian Heritage Register S 417 Flagstaff Hill’s collection of artefacts from LOCH ARD is significant for being one of the largest collections of artefacts from this shipwreck in Victoria. It is significant for its association with the shipwreck, which is on the Victorian Heritage Register (VHR S417). The collection is significant because of the relationship between the objects, as together they have a high potential to interpret the story of the LOCH ARD. The LOCH ARD collection is archaeologically significant as the remains of a large international passenger and cargo ship. The LOCH ARD collection is historically significant for representing aspects of Victoria’s shipping history and its potential to interpret sub-theme 1.5 of Victoria’s Framework of Historical Themes (living with natural processes). The collection is also historically significant for its association with the LOCH ARD, which was one of the worst and best known shipwrecks in Victoria’s history. Silver plated copper alloy table forks - entrêe from the wreck of the Loch Ard. Some verdigris and silver oxide. Very light encrustation on tine. Hallmark visible.flagstaff hill, warrnambool, shipwrecked coast, flagstaff hill maritime museum, maritime museum, shipwreck coast, flagstaff hill maritime village, great ocean road, loch line, loch ard, captain gibbs, eva carmichael, tom pearce, glenample station, mutton bird island, loch ard gorge, electroplated cutlery, fork -
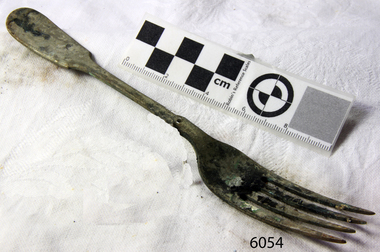 Flagstaff Hill Maritime Museum and Village
Fork
HISTORY OF THE LOCH ARD The LOCH ARD belonged to the famous Loch Line which sailed many ships from England to Australia. Built in Glasgow by Barclay, Curdle and Co. in 1873, the LOCH ARD was a three-masted square rigged iron sailing ship. The ship measured 262ft 7" (79.87m) in length, 38ft (11.58m) in width, 23ft (7m) in depth and had a gross tonnage of 1693 tons. The LOCH ARD's main mast measured a massive 150ft (45.7m) in height. LOCH ARD made three trips to Australia and one trip to Calcutta before its final voyage. LOCH ARD left England on March 2, 1878, under the command of Captain Gibbs, a newly married, 29 year old. She was bound for Melbourne with a crew of 37, plus 17 passengers and a load of cargo. The general cargo reflected the affluence of Melbourne at the time. On board were straw hats, umbrella, perfumes, clay pipes, pianos, clocks, confectionary, linen and candles, as well as a heavier load of railway irons, cement, lead and copper. There were items included that intended for display in the Melbourne International Exhibition in 1880. The voyage to Port Phillip was long but uneventful. At 3am on June 1, 1878, Captain Gibbs was expecting to see land and the passengers were becoming excited as they prepared to view their new homeland in the early morning. But LOCH ARD was running into a fog which greatly reduced visibility. Captain Gibbs was becoming anxious as there was no sign of land or the Cape Otway lighthouse. At 4am the fog lifted. A man aloft announced that he could see breakers. The sheer cliffs of Victoria's west coast came into view, and Captain Gibbs realised that the ship was much closer to them than expected. He ordered as much sail to be set as time would permit and then attempted to steer the vessel out to sea. On coming head on into the wind, the ship lost momentum, the sails fell limp and LOCH ARD's bow swung back. Gibbs then ordered the anchors to be released in an attempt to hold its position. The anchors sank some 50 fathoms - but did not hold. By this time LOCH ARD was among the breakers and the tall cliffs of Mutton Bird Island rose behind the ship. Just half a mile from the coast, the ship's bow was suddenly pulled around by the anchor. The captain tried to tack out to sea, but the ship struck a reef at the base of Mutton Bird Island, near Port Campbell. Waves broke over the ship and the top deck was loosened from the hull. The masts and rigging came crashing down knocking passengers and crew overboard. When a lifeboat was finally launched, it crashed into the side of LOCH ARD and capsized. Tom Pearce, who had launched the boat, managed to cling to its overturned hull and shelter beneath it. He drifted out to sea and then on the flood tide came into what is now known as LOCH ARD Gorge. He swam to shore, bruised and dazed, and found a cave in which to shelter. Some of the crew stayed below deck to shelter from the falling rigging but drowned when the ship slipped off the reef into deeper water. Eva Carmichael had raced onto deck to find out what was happening only to be confronted by towering cliffs looming above the stricken ship. In all the chaos, Captain Gibbs grabbed Eva and said, "If you are saved Eva, let my dear wife know that I died like a sailor". That was the last Eva Carmichael saw of the captain. She was swept off the ship by a huge wave. Eva saw Tom Pearce on a small rocky beach and yelled to attract his attention. He dived in and swam to the exhausted woman and dragged her to shore. He took her to the cave and broke open case of brandy which had washed up on the beach. He opened a bottle to revive the unconscious woman. A few hours later Tom scaled a cliff in search of help. He followed hoof prints and came by chance upon two men from nearby Glenample Station three and a half miles away. In a state of exhaustion, he told the men of the tragedy. Tom returned to the gorge while the two men rode back to the station to get help. By the time they reached LOCH ARD Gorge, it was cold and dark. The two shipwreck survivors were taken to Glenample Station to recover. Eva stayed at the station for six weeks before returning to Ireland, this time by steamship. In Melbourne, Tom Pearce received a hero's welcome. He was presented with the first gold medal of the Royal Humane Society of Victoria and a £1000 cheque from the Victorian Government. Concerts were performed to honour the young man's bravery and to raise money for those who lost family in the LOCH ARD disaster. Of the 54 crew members and passengers on board, only two survived: the apprentice, Tom Pearce and the young woman passenger, Eva Carmichael, who lost all of her family in the tragedy. Ten days after the LOCH ARD tragedy, salvage rights to the wreck were sold at auction for £2,120. Cargo valued at £3,000 was salvaged and placed on the beach, but most washed back into the sea when another storm developed. The wreck of LOCH ARD still lies at the base of Mutton Bird Island. Much of the cargo has now been salvaged and some was washed up into what is now known as LOCH ARD Gorge. Cargo and artefacts have also been illegally salvaged over many years before protective legislation was introduced. One of the most unlikely pieces of cargo to have survived the shipwreck was a Minton porcelain peacock - one of only nine in the world. The peacock was destined for the Melbourne International Exhibition in 1880. It had been well packed, which gave it adequate protection during the violent storm. Today, the Minton peacock can be seen at the Flagstaff Hill Maritime Museum in Warrnambool. From Australia's most dramatic shipwreck it has now become Australia's most valuable shipwreck artefact and is one of very few 'objects' on the Victorian State Heritage Register. [References: Flagstaff Hill Maritime Village information sheets and documents] Flagstaff Hill’s collection of artefacts from LOCH ARD is significant for being one of the largest collections of artefacts from this shipwreck in Victoria. It is significant for its association with the shipwreck, which is on the Victorian Heritage Register (VHR S417). The collection is significant because of the relationship between the objects, as together they have a high potential to interpret the story of the LOCH ARD. The LOCH ARD collection is archaeologically significant as the remains of a large international passenger and cargo ship. The LOCH ARD collection is historically significant for representing aspects of Victoria’s shipping history and its potential to interpret sub-theme 1.5 of Victoria’s Framework of Historical Themes (living with natural processes). The collection is also historically significant for its association with the LOCH ARD, which was one of the worst and best known shipwrecks in Victoria’s history. Silver plated copper alloy table forks - entrè from the wreck of the Loch Ard. Some verdigris and silver oxide. Very light encrustation on fork. Hallmark visible.flagstaff hill, warrnambool, shipwrecked coast, flagstaff hill maritime museum, maritime museum, shipwreck coast, flagstaff hill maritime village, great ocean road, loch line, loch ard, captain gibbs, eva carmichael, tom pearce, glenample station, mutton bird island, loch ard gorge, fork -
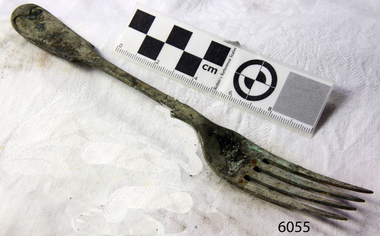 Flagstaff Hill Maritime Museum and Village
Fork
HISTORY OF THE LOCH ARD The LOCH ARD belonged to the famous Loch Line which sailed many ships from England to Australia. Built in Glasgow by Barclay, Curdle and Co. in 1873, the LOCH ARD was a three-masted square rigged iron sailing ship. The ship measured 262ft 7" (79.87m) in length, 38ft (11.58m) in width, 23ft (7m) in depth and had a gross tonnage of 1693 tons. The LOCH ARD's main mast measured a massive 150ft (45.7m) in height. LOCH ARD made three trips to Australia and one trip to Calcutta before its final voyage. LOCH ARD left England on March 2, 1878, under the command of Captain Gibbs, a newly married, 29 year old. She was bound for Melbourne with a crew of 37, plus 17 passengers and a load of cargo. The general cargo reflected the affluence of Melbourne at the time. On board were straw hats, umbrella, perfumes, clay pipes, pianos, clocks, confectionary, linen and candles, as well as a heavier load of railway irons, cement, lead and copper. There were items included that intended for display in the Melbourne International Exhibition in 1880. The voyage to Port Phillip was long but uneventful. At 3am on June 1, 1878, Captain Gibbs was expecting to see land and the passengers were becoming excited as they prepared to view their new homeland in the early morning. But LOCH ARD was running into a fog which greatly reduced visibility. Captain Gibbs was becoming anxious as there was no sign of land or the Cape Otway lighthouse. At 4am the fog lifted. A man aloft announced that he could see breakers. The sheer cliffs of Victoria's west coast came into view, and Captain Gibbs realised that the ship was much closer to them than expected. He ordered as much sail to be set as time would permit and then attempted to steer the vessel out to sea. On coming head on into the wind, the ship lost momentum, the sails fell limp and LOCH ARD's bow swung back. Gibbs then ordered the anchors to be released in an attempt to hold its position. The anchors sank some 50 fathoms - but did not hold. By this time LOCH ARD was among the breakers and the tall cliffs of Mutton Bird Island rose behind the ship. Just half a mile from the coast, the ship's bow was suddenly pulled around by the anchor. The captain tried to tack out to sea, but the ship struck a reef at the base of Mutton Bird Island, near Port Campbell. Waves broke over the ship and the top deck was loosened from the hull. The masts and rigging came crashing down knocking passengers and crew overboard. When a lifeboat was finally launched, it crashed into the side of LOCH ARD and capsized. Tom Pearce, who had launched the boat, managed to cling to its overturned hull and shelter beneath it. He drifted out to sea and then on the flood tide came into what is now known as LOCH ARD Gorge. He swam to shore, bruised and dazed, and found a cave in which to shelter. Some of the crew stayed below deck to shelter from the falling rigging but drowned when the ship slipped off the reef into deeper water. Eva Carmichael had raced onto deck to find out what was happening only to be confronted by towering cliffs looming above the stricken ship. In all the chaos, Captain Gibbs grabbed Eva and said, "If you are saved Eva, let my dear wife know that I died like a sailor". That was the last Eva Carmichael saw of the captain. She was swept off the ship by a huge wave. Eva saw Tom Pearce on a small rocky beach and yelled to attract his attention. He dived in and swam to the exhausted woman and dragged her to shore. He took her to the cave and broke open case of brandy which had washed up on the beach. He opened a bottle to revive the unconscious woman. A few hours later Tom scaled a cliff in search of help. He followed hoof prints and came by chance upon two men from nearby Glenample Station three and a half miles away. In a state of exhaustion, he told the men of the tragedy. Tom returned to the gorge while the two men rode back to the station to get help. By the time they reached LOCH ARD Gorge, it was cold and dark. The two shipwreck survivors were taken to Glenample Station to recover. Eva stayed at the station for six weeks before returning to Ireland, this time by steamship. In Melbourne, Tom Pearce received a hero's welcome. He was presented with the first gold medal of the Royal Humane Society of Victoria and a £1000 cheque from the Victorian Government. Concerts were performed to honour the young man's bravery and to raise money for those who lost family in the LOCH ARD disaster. Of the 54 crew members and passengers on board, only two survived: the apprentice, Tom Pearce and the young woman passenger, Eva Carmichael, who lost all of her family in the tragedy. Ten days after the LOCH ARD tragedy, salvage rights to the wreck were sold at auction for £2,120. Cargo valued at £3,000 was salvaged and placed on the beach, but most washed back into the sea when another storm developed. The wreck of LOCH ARD still lies at the base of Mutton Bird Island. Much of the cargo has now been salvaged and some was washed up into what is now known as LOCH ARD Gorge. Cargo and artefacts have also been illegally salvaged over many years before protective legislation was introduced. One of the most unlikely pieces of cargo to have survived the shipwreck was a Minton porcelain peacock - one of only nine in the world. The peacock was destined for the Melbourne International Exhibition in 1880. It had been well packed, which gave it adequate protection during the violent storm. Today, the Minton peacock can be seen at the Flagstaff Hill Maritime Museum in Warrnambool. From Australia's most dramatic shipwreck it has now become Australia's most valuable shipwreck artefact and is one of very few 'objects' on the Victorian State Heritage Register. [References: Flagstaff Hill Maritime Village information sheets and documents] Flagstaff Hill’s collection of artefacts from LOCH ARD is significant for being one of the largest collections of artefacts from this shipwreck in Victoria. It is significant for its association with the shipwreck, which is on the Victorian Heritage Register (VHR S417). The collection is significant because of the relationship between the objects, as together they have a high potential to interpret the story of the LOCH ARD. The LOCH ARD collection is archaeologically significant as the remains of a large international passenger and cargo ship. The LOCH ARD collection is historically significant for representing aspects of Victoria’s shipping history and its potential to interpret sub-theme 1.5 of Victoria’s Framework of Historical Themes (living with natural processes). The collection is also historically significant for its association with the LOCH ARD, which was one of the worst and best known shipwrecks in Victoria’s history. Silver plated copper alloy table forks - entrèe from the wreck of the Loch Ard. Length 7⅛ " Some verdigris and silver oxide. Very light encrustation on fork. Hallmark visible.flagstaff hill, warrnambool, shipwrecked coast, flagstaff hill maritime museum, maritime museum, shipwreck coast, flagstaff hill maritime village, great ocean road, loch line, loch ard, captain gibbs, eva carmichael, tom pearce, glenample station, mutton bird island, loch ard gorge, fork -
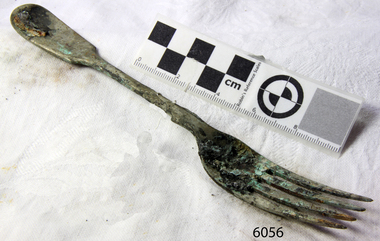 Flagstaff Hill Maritime Museum and Village
Fork
HISTORY OF THE LOCH ARD The LOCH ARD belonged to the famous Loch Line which sailed many ships from England to Australia. Built in Glasgow by Barclay, Curdle and Co. in 1873, the LOCH ARD was a three-masted square rigged iron sailing ship. The ship measured 262ft 7" (79.87m) in length, 38ft (11.58m) in width, 23ft (7m) in depth and had a gross tonnage of 1693 tons. The LOCH ARD's main mast measured a massive 150ft (45.7m) in height. LOCH ARD made three trips to Australia and one trip to Calcutta before its final voyage. LOCH ARD left England on March 2, 1878, under the command of Captain Gibbs, a newly married, 29 year old. She was bound for Melbourne with a crew of 37, plus 17 passengers and a load of cargo. The general cargo reflected the affluence of Melbourne at the time. On board were straw hats, umbrella, perfumes, clay pipes, pianos, clocks, confectionary, linen and candles, as well as a heavier load of railway irons, cement, lead and copper. There were items included that intended for display in the Melbourne International Exhibition in 1880. The voyage to Port Phillip was long but uneventful. At 3am on June 1, 1878, Captain Gibbs was expecting to see land and the passengers were becoming excited as they prepared to view their new homeland in the early morning. But LOCH ARD was running into a fog which greatly reduced visibility. Captain Gibbs was becoming anxious as there was no sign of land or the Cape Otway lighthouse. At 4am the fog lifted. A man aloft announced that he could see breakers. The sheer cliffs of Victoria's west coast came into view, and Captain Gibbs realised that the ship was much closer to them than expected. He ordered as much sail to be set as time would permit and then attempted to steer the vessel out to sea. On coming head on into the wind, the ship lost momentum, the sails fell limp and LOCH ARD's bow swung back. Gibbs then ordered the anchors to be released in an attempt to hold its position. The anchors sank some 50 fathoms - but did not hold. By this time LOCH ARD was among the breakers and the tall cliffs of Mutton Bird Island rose behind the ship. Just half a mile from the coast, the ship's bow was suddenly pulled around by the anchor. The captain tried to tack out to sea, but the ship struck a reef at the base of Mutton Bird Island, near Port Campbell. Waves broke over the ship and the top deck was loosened from the hull. The masts and rigging came crashing down knocking passengers and crew overboard. When a lifeboat was finally launched, it crashed into the side of LOCH ARD and capsized. Tom Pearce, who had launched the boat, managed to cling to its overturned hull and shelter beneath it. He drifted out to sea and then on the flood tide came into what is now known as LOCH ARD Gorge. He swam to shore, bruised and dazed, and found a cave in which to shelter. Some of the crew stayed below deck to shelter from the falling rigging but drowned when the ship slipped off the reef into deeper water. Eva Carmichael had raced onto deck to find out what was happening only to be confronted by towering cliffs looming above the stricken ship. In all the chaos, Captain Gibbs grabbed Eva and said, "If you are saved Eva, let my dear wife know that I died like a sailor". That was the last Eva Carmichael saw of the captain. She was swept off the ship by a huge wave. Eva saw Tom Pearce on a small rocky beach and yelled to attract his attention. He dived in and swam to the exhausted woman and dragged her to shore. He took her to the cave and broke open case of brandy which had washed up on the beach. He opened a bottle to revive the unconscious woman. A few hours later Tom scaled a cliff in search of help. He followed hoof prints and came by chance upon two men from nearby Glenample Station three and a half miles away. In a state of exhaustion, he told the men of the tragedy. Tom returned to the gorge while the two men rode back to the station to get help. By the time they reached LOCH ARD Gorge, it was cold and dark. The two shipwreck survivors were taken to Glenample Station to recover. Eva stayed at the station for six weeks before returning to Ireland, this time by steamship. In Melbourne, Tom Pearce received a hero's welcome. He was presented with the first gold medal of the Royal Humane Society of Victoria and a £1000 cheque from the Victorian Government. Concerts were performed to honour the young man's bravery and to raise money for those who lost family in the LOCH ARD disaster. Of the 54 crew members and passengers on board, only two survived: the apprentice, Tom Pearce and the young woman passenger, Eva Carmichael, who lost all of her family in the tragedy. Ten days after the LOCH ARD tragedy, salvage rights to the wreck were sold at auction for £2,120. Cargo valued at £3,000 was salvaged and placed on the beach, but most washed back into the sea when another storm developed. The wreck of LOCH ARD still lies at the base of Mutton Bird Island. Much of the cargo has now been salvaged and some was washed up into what is now known as LOCH ARD Gorge. Cargo and artefacts have also been illegally salvaged over many years before protective legislation was introduced. One of the most unlikely pieces of cargo to have survived the shipwreck was a Minton porcelain peacock - one of only seven in the world. The peacock was destined for the Melbourne International Exhibition in 1880. It had been well packed, which gave it adequate protection during the violent storm. Today, the Minton peacock can be seen at the Flagstaff Hill Maritime Museum in Warrnambool. From Australia's most dramatic shipwreck it has now become Australia's shipwreck artefact and is one of very few 'objects' on the Victorian State Heritage Register most valuable. The LOCH ARD shipwreck is of State significance – Victorian Heritage Register S 417 Flagstaff Hill’s collection of artefacts from LOCH ARD is significant for being one of the largest collections of artefacts from this shipwreck in Victoria. It is significant for its association with the shipwreck, which is on the Victorian Heritage Register (VHR S417). The collection is significant because of the relationship between the objects, as together they have a high potential to interpret the story of the LOCH ARD. The LOCH ARD collection is archaeologically significant as the remains of a large international passenger and cargo ship. The LOCH ARD collection is historically significant for representing aspects of Victoria’s shipping history and its potential to interpret sub-theme 1.5 of Victoria’s Framework of Historical Themes (living with natural processes). The collection is also historically significant for its association with the LOCH ARD, which was one of the worst and best known shipwrecks in Victoria’s history. Silver plated copper alloy table forks - entrêe from the wreck of the Loch Ard. Some verdigris and silver oxide. Very light encrustation on fork. Hallmark visible.flagstaff hill, warrnambool, shipwrecked coast, flagstaff hill maritime museum, maritime museum, shipwreck coast, flagstaff hill maritime village, great ocean road, loch line, loch ard, captain gibbs, eva carmichael, tom pearce, glenample station, mutton bird island, loch ard gorge, electroplated cutlery, fork -
 Flagstaff Hill Maritime Museum and Village
Fork
HISTORY OF THE LOCH ARD The LOCH ARD belonged to the famous Loch Line which sailed many ships from England to Australia. Built in Glasgow by Barclay, Curdle and Co. in 1873, the LOCH ARD was a three-masted square rigged iron sailing ship. The ship measured 262ft 7" (79.87m) in length, 38ft (11.58m) in width, 23ft (7m) in depth and had a gross tonnage of 1693 tons. The LOCH ARD's main mast measured a massive 150ft (45.7m) in height. LOCH ARD made three trips to Australia and one trip to Calcutta before its final voyage. LOCH ARD left England on March 2, 1878, under the command of Captain Gibbs, a newly married, 29 year old. She was bound for Melbourne with a crew of 37, plus 17 passengers and a load of cargo. The general cargo reflected the affluence of Melbourne at the time. On board were straw hats, umbrella, perfumes, clay pipes, pianos, clocks, confectionary, linen and candles, as well as a heavier load of railway irons, cement, lead and copper. There were items included that intended for display in the Melbourne International Exhibition in 1880. The voyage to Port Phillip was long but uneventful. At 3am on June 1, 1878, Captain Gibbs was expecting to see land and the passengers were becoming excited as they prepared to view their new homeland in the early morning. But LOCH ARD was running into a fog which greatly reduced visibility. Captain Gibbs was becoming anxious as there was no sign of land or the Cape Otway lighthouse. At 4am the fog lifted. A man aloft announced that he could see breakers. The sheer cliffs of Victoria's west coast came into view, and Captain Gibbs realised that the ship was much closer to them than expected. He ordered as much sail to be set as time would permit and then attempted to steer the vessel out to sea. On coming head on into the wind, the ship lost momentum, the sails fell limp and LOCH ARD's bow swung back. Gibbs then ordered the anchors to be released in an attempt to hold its position. The anchors sank some 50 fathoms - but did not hold. By this time LOCH ARD was among the breakers and the tall cliffs of Mutton Bird Island rose behind the ship. Just half a mile from the coast, the ship's bow was suddenly pulled around by the anchor. The captain tried to tack out to sea, but the ship struck a reef at the base of Mutton Bird Island, near Port Campbell. Waves broke over the ship and the top deck was loosened from the hull. The masts and rigging came crashing down knocking passengers and crew overboard. When a lifeboat was finally launched, it crashed into the side of LOCH ARD and capsized. Tom Pearce, who had launched the boat, managed to cling to its overturned hull and shelter beneath it. He drifted out to sea and then on the flood tide came into what is now known as LOCH ARD Gorge. He swam to shore, bruised and dazed, and found a cave in which to shelter. Some of the crew stayed below deck to shelter from the falling rigging but drowned when the ship slipped off the reef into deeper water. Eva Carmichael had raced onto deck to find out what was happening only to be confronted by towering cliffs looming above the stricken ship. In all the chaos, Captain Gibbs grabbed Eva and said, "If you are saved Eva, let my dear wife know that I died like a sailor". That was the last Eva Carmichael saw of the captain. She was swept off the ship by a huge wave. Eva saw Tom Pearce on a small rocky beach and yelled to attract his attention. He dived in and swam to the exhausted woman and dragged her to shore. He took her to the cave and broke open case of brandy which had washed up on the beach. He opened a bottle to revive the unconscious woman. A few hours later Tom scaled a cliff in search of help. He followed hoof prints and came by chance upon two men from nearby Glenample Station three and a half miles away. In a state of exhaustion, he told the men of the tragedy. Tom returned to the gorge while the two men rode back to the station to get help. By the time they reached LOCH ARD Gorge, it was cold and dark. The two shipwreck survivors were taken to Glenample Station to recover. Eva stayed at the station for six weeks before returning to Ireland, this time by steamship. In Melbourne, Tom Pearce received a hero's welcome. He was presented with the first gold medal of the Royal Humane Society of Victoria and a £1000 cheque from the Victorian Government. Concerts were performed to honour the young man's bravery and to raise money for those who lost family in the LOCH ARD disaster. Of the 54 crew members and passengers on board, only two survived: the apprentice, Tom Pearce and the young woman passenger, Eva Carmichael, who lost all of her family in the tragedy. Ten days after the LOCH ARD tragedy, salvage rights to the wreck were sold at auction for £2,120. Cargo valued at £3,000 was salvaged and placed on the beach, but most washed back into the sea when another storm developed. The wreck of LOCH ARD still lies at the base of Mutton Bird Island. Much of the cargo has now been salvaged and some was washed up into what is now known as LOCH ARD Gorge. Cargo and artefacts have also been illegally salvaged over many years before protective legislation was introduced. One of the most unlikely pieces of cargo to have survived the shipwreck was a Minton porcelain peacock - one of only seven in the world. The peacock was destined for the Melbourne International Exhibition in 1880. It had been well packed, which gave it adequate protection during the violent storm. Today, the Minton peacock can be seen at the Flagstaff Hill Maritime Museum in Warrnambool. From Australia's most dramatic shipwreck it has now become Australia's shipwreck artefact and is one of very few 'objects' on the Victorian State Heritage Register most valuable The LOCH ARD shipwreck is of State significance – Victorian Heritage Register S 417 Flagstaff Hill’s collection of artefacts from LOCH ARD is significant for being one of the largest collections of artefacts from this shipwreck in Victoria. It is significant for its association with the shipwreck, which is on the Victorian Heritage Register (VHR S417). The collection is significant because of the relationship between the objects, as together they have a high potential to interpret the story of the LOCH ARD. The LOCH ARD collection is archaeologically significant as the remains of a large international passenger and cargo ship. The LOCH ARD collection is historically significant for representing aspects of Victoria’s shipping history and its potential to interpret sub-theme 1.5 of Victoria’s Framework of Historical Themes (living with natural processes). The collection is also historically significant for its association with the LOCH ARD, which was one of the worst and best known shipwrecks in Victoria’s history. Silver plated copper alloy dessert fork from the wreck of the Loch Ard. Some verdigris and silver oxide. Light encrustation on fork.flagstaff hill, warrnambool, shipwrecked coast, flagstaff hill maritime museum, maritime museum, shipwreck coast, flagstaff hill maritime village, great ocean road, loch line, loch ard, captain gibbs, eva carmichael, tom pearce, glenample station, mutton bird island, loch ard gorge, electroplated cutlery, fork, dessert fork -
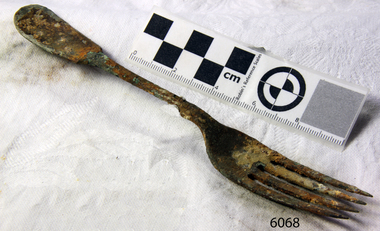 Flagstaff Hill Maritime Museum and Village
Fork
HISTORY OF THE LOCH ARD The LOCH ARD belonged to the famous Loch Line which sailed many ships from England to Australia. Built in Glasgow by Barclay, Curdle and Co. in 1873, the LOCH ARD was a three-masted square rigged iron sailing ship. The ship measured 262ft 7" (79.87m) in length, 38ft (11.58m) in width, 23ft (7m) in depth and had a gross tonnage of 1693 tons. The LOCH ARD's main mast measured a massive 150ft (45.7m) in height. LOCH ARD made three trips to Australia and one trip to Calcutta before its final voyage. LOCH ARD left England on March 2, 1878, under the command of Captain Gibbs, a newly married, 29 year old. She was bound for Melbourne with a crew of 37, plus 17 passengers and a load of cargo. The general cargo reflected the affluence of Melbourne at the time. On board were straw hats, umbrella, perfumes, clay pipes, pianos, clocks, confectionary, linen and candles, as well as a heavier load of railway irons, cement, lead and copper. There were items included that intended for display in the Melbourne International Exhibition in 1880. The voyage to Port Phillip was long but uneventful. At 3am on June 1, 1878, Captain Gibbs was expecting to see land and the passengers were becoming excited as they prepared to view their new homeland in the early morning. But LOCH ARD was running into a fog which greatly reduced visibility. Captain Gibbs was becoming anxious as there was no sign of land or the Cape Otway lighthouse. At 4am the fog lifted. A man aloft announced that he could see breakers. The sheer cliffs of Victoria's west coast came into view, and Captain Gibbs realised that the ship was much closer to them than expected. He ordered as much sail to be set as time would permit and then attempted to steer the vessel out to sea. On coming head on into the wind, the ship lost momentum, the sails fell limp and LOCH ARD's bow swung back. Gibbs then ordered the anchors to be released in an attempt to hold its position. The anchors sank some 50 fathoms - but did not hold. By this time LOCH ARD was among the breakers and the tall cliffs of Mutton Bird Island rose behind the ship. Just half a mile from the coast, the ship's bow was suddenly pulled around by the anchor. The captain tried to tack out to sea, but the ship struck a reef at the base of Mutton Bird Island, near Port Campbell. Waves broke over the ship and the top deck was loosened from the hull. The masts and rigging came crashing down knocking passengers and crew overboard. When a lifeboat was finally launched, it crashed into the side of LOCH ARD and capsized. Tom Pearce, who had launched the boat, managed to cling to its overturned hull and shelter beneath it. He drifted out to sea and then on the flood tide came into what is now known as LOCH ARD Gorge. He swam to shore, bruised and dazed, and found a cave in which to shelter. Some of the crew stayed below deck to shelter from the falling rigging but drowned when the ship slipped off the reef into deeper water. Eva Carmichael had raced onto deck to find out what was happening only to be confronted by towering cliffs looming above the stricken ship. In all the chaos, Captain Gibbs grabbed Eva and said, "If you are saved Eva, let my dear wife know that I died like a sailor". That was the last Eva Carmichael saw of the captain. She was swept off the ship by a huge wave. Eva saw Tom Pearce on a small rocky beach and yelled to attract his attention. He dived in and swam to the exhausted woman and dragged her to shore. He took her to the cave and broke open case of brandy which had washed up on the beach. He opened a bottle to revive the unconscious woman. A few hours later Tom scaled a cliff in search of help. He followed hoof prints and came by chance upon two men from nearby Glenample Station three and a half miles away. In a state of exhaustion, he told the men of the tragedy. Tom returned to the gorge while the two men rode back to the station to get help. By the time they reached LOCH ARD Gorge, it was cold and dark. The two shipwreck survivors were taken to Glenample Station to recover. Eva stayed at the station for six weeks before returning to Ireland, this time by steamship. In Melbourne, Tom Pearce received a hero's welcome. He was presented with the first gold medal of the Royal Humane Society of Victoria and a £1000 cheque from the Victorian Government. Concerts were performed to honour the young man's bravery and to raise money for those who lost family in the LOCH ARD disaster. Of the 54 crew members and passengers on board, only two survived: the apprentice, Tom Pearce and the young woman passenger, Eva Carmichael, who lost all of her family in the tragedy. Ten days after the LOCH ARD tragedy, salvage rights to the wreck were sold at auction for £2,120. Cargo valued at £3,000 was salvaged and placed on the beach, but most washed back into the sea when another storm developed. The wreck of LOCH ARD still lies at the base of Mutton Bird Island. Much of the cargo has now been salvaged and some was washed up into what is now known as LOCH ARD Gorge. Cargo and artefacts have also been illegally salvaged over many years before protective legislation was introduced. One of the most unlikely pieces of cargo to have survived the shipwreck was a Minton porcelain peacock - one of only seven in the world. The peacock was destined for the Melbourne International Exhibition in 1880. It had been well packed, which gave it adequate protection during the violent storm. Today, the Minton peacock can be seen at the Flagstaff Hill Maritime Museum in Warrnambool. From Australia's most dramatic shipwreck it has now become Australia's shipwreck artefact and is one of very few 'objects' on the Victorian State Heritage Register most valuable The LOCH ARD shipwreck is of State significance – Victorian Heritage Register S 417 Flagstaff Hill’s collection of artefacts from LOCH ARD is significant for being one of the largest collections of artefacts from this shipwreck in Victoria. It is significant for its association with the shipwreck, which is on the Victorian Heritage Register (VHR S417). The collection is significant because of the relationship between the objects, as together they have a high potential to interpret the story of the LOCH ARD. The LOCH ARD collection is archaeologically significant as the remains of a large international passenger and cargo ship. The LOCH ARD collection is historically significant for representing aspects of Victoria’s shipping history and its potential to interpret sub-theme 1.5 of Victoria’s Framework of Historical Themes (living with natural processes). The collection is also historically significant for its association with the LOCH ARD, which was one of the worst and best known shipwrecks in Victoria’s history. Silver plated copper alloy dessert fork from the wreck of the Loch Ard. Some verdigris. Light encrustation on fork.flagstaff hill, warrnambool, shipwrecked coast, flagstaff hill maritime museum, maritime museum, shipwreck coast, flagstaff hill maritime village, great ocean road, loch line, loch ard, captain gibbs, eva carmichael, tom pearce, glenample station, mutton bird island, loch ard gorge, electroplated cutlery, fork, dessert fork -
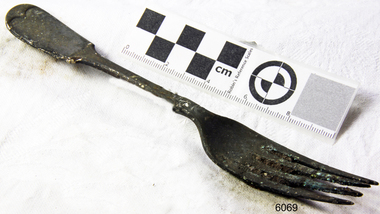 Flagstaff Hill Maritime Museum and Village
Domestic object - Fork, c. 19th century
HISTORY OF THE LOCH ARD The LOCH ARD belonged to the famous Loch Line which sailed many ships from England to Australia. Built in Glasgow by Barclay, Curdle and Co. in 1873, the LOCH ARD was a three-masted square rigged iron sailing ship. The ship measured 262ft 7" (79.87m) in length, 38ft (11.58m) in width, 23ft (7m) in depth and had a gross tonnage of 1693 tons. The LOCH ARD's main mast measured a massive 150ft (45.7m) in height. LOCH ARD made three trips to Australia and one trip to Calcutta before its final voyage. LOCH ARD left England on March 2, 1878, under the command of Captain Gibbs, a newly married, 29 year old. She was bound for Melbourne with a crew of 37, plus 17 passengers and a load of cargo. The general cargo reflected the affluence of Melbourne at the time. On board were straw hats, umbrella, perfumes, clay pipes, pianos, clocks, confectionary, linen and candles, as well as a heavier load of railway irons, cement, lead and copper. There were items included that intended for display in the Melbourne International Exhibition in 1880. The voyage to Port Phillip was long but uneventful. At 3am on June 1, 1878, Captain Gibbs was expecting to see land and the passengers were becoming excited as they prepared to view their new homeland in the early morning. But LOCH ARD was running into a fog which greatly reduced visibility. Captain Gibbs was becoming anxious as there was no sign of land or the Cape Otway lighthouse. At 4am the fog lifted. A man aloft announced that he could see breakers. The sheer cliffs of Victoria's west coast came into view, and Captain Gibbs realised that the ship was much closer to them than expected. He ordered as much sail to be set as time would permit and then attempted to steer the vessel out to sea. On coming head on into the wind, the ship lost momentum, the sails fell limp and LOCH ARD's bow swung back. Gibbs then ordered the anchors to be released in an attempt to hold its position. The anchors sank some 50 fathoms - but did not hold. By this time LOCH ARD was among the breakers and the tall cliffs of Mutton Bird Island rose behind the ship. Just half a mile from the coast, the ship's bow was suddenly pulled around by the anchor. The captain tried to tack out to sea, but the ship struck a reef at the base of Mutton Bird Island, near Port Campbell. Waves broke over the ship and the top deck was loosened from the hull. The masts and rigging came crashing down knocking passengers and crew overboard. When a lifeboat was finally launched, it crashed into the side of LOCH ARD and capsized. Tom Pearce, who had launched the boat, managed to cling to its overturned hull and shelter beneath it. He drifted out to sea and then on the flood tide came into what is now known as LOCH ARD Gorge. He swam to shore, bruised and dazed, and found a cave in which to shelter. Some of the crew stayed below deck to shelter from the falling rigging but drowned when the ship slipped off the reef into deeper water. Eva Carmichael had raced onto deck to find out what was happening only to be confronted by towering cliffs looming above the stricken ship. In all the chaos, Captain Gibbs grabbed Eva and said, "If you are saved Eva, let my dear wife know that I died like a sailor". That was the last Eva Carmichael saw of the captain. She was swept off the ship by a huge wave. Eva saw Tom Pearce on a small rocky beach and yelled to attract his attention. He dived in and swam to the exhausted woman and dragged her to shore. He took her to the cave and broke open case of brandy which had washed up on the beach. He opened a bottle to revive the unconscious woman. A few hours later Tom scaled a cliff in search of help. He followed hoof prints and came by chance upon two men from nearby Glenample Station three and a half miles away. In a state of exhaustion, he told the men of the tragedy. Tom returned to the gorge while the two men rode back to the station to get help. By the time they reached LOCH ARD Gorge, it was cold and dark. The two shipwreck survivors were taken to Glenample Station to recover. Eva stayed at the station for six weeks before returning to Ireland, this time by steamship. In Melbourne, Tom Pearce received a hero's welcome. He was presented with the first gold medal of the Royal Humane Society of Victoria and a £1000 cheque from the Victorian Government. Concerts were performed to honour the young man's bravery and to raise money for those who lost family in the LOCH ARD disaster. Of the 54 crew members and passengers on board, only two survived: the apprentice, Tom Pearce and the young woman passenger, Eva Carmichael, who lost all of her family in the tragedy. Ten days after the LOCH ARD tragedy, salvage rights to the wreck were sold at auction for £2,120. Cargo valued at £3,000 was salvaged and placed on the beach, but most washed back into the sea when another storm developed. The wreck of LOCH ARD still lies at the base of Mutton Bird Island. Much of the cargo has now been salvaged and some was washed up into what is now known as LOCH ARD Gorge. Cargo and artefacts have also been illegally salvaged over many years before protective legislation was introduced. One of the most unlikely pieces of cargo to have survived the shipwreck was a Minton porcelain peacock - one of only seven in the world. The peacock was destined for the Melbourne International Exhibition in 1880. It had been well packed, which gave it adequate protection during the violent storm. Today, the Minton peacock can be seen at the Flagstaff Hill Maritime Museum in Warrnambool. From Australia's most dramatic shipwreck it has now become Australia's shipwreck artefact and is one of very few 'objects' on the Victorian State Heritage Register most valuable. The LOCH ARD shipwreck is of State significance – Victorian Heritage Register S 417 Flagstaff Hill’s collection of artefacts from LOCH ARD is significant for being one of the largest collections of artefacts from this shipwreck in Victoria. It is significant for its association with the shipwreck, which is on the Victorian Heritage Register (VHR S417). The collection is significant because of the relationship between the objects, as together they have a high potential to interpret the story of the LOCH ARD. The LOCH ARD collection is archaeologically significant as the remains of a large international passenger and cargo ship. The LOCH ARD collection is historically significant for representing aspects of Victoria’s shipping history and its potential to interpret sub-theme 1.5 of Victoria’s Framework of Historical Themes (living with natural processes). The collection is also historically significant for its association with the LOCH ARD, which was one of the worst and best known shipwrecks in Victoria’s history. Silver plated copper alloy dessert fork from the wreck of the Loch Ard. , Covered in Silver oxide. Light encrustation on fork between tines.flagstaff hill maritime museum, shipwreck coast, great ocean road, loch line, loch ard, mutton bird island, loch ard gorge, electroplated cutlery, fork, dessert fork -
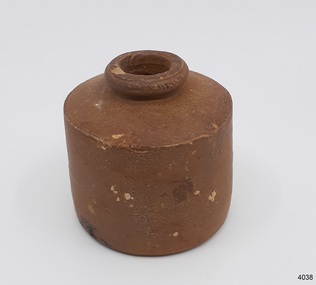 Flagstaff Hill Maritime Museum and Village
Container - Ink Bottle, Prior to 1878
This design of ink bottle was commonly referred to as a ‘penny ink well’ because it was very inexpensive to produce. It is also known as a dwarf ink bottle. Pen and ink has been in use for hand writing from about the seventh century up until the mid-20th century up until around the mid-19th century a quill pen made from a bird’s feather was used. In the 1850s the steel point pen was invented and could be manufactured on machines in large quantities. In the 1880s a successful portable fountain pen was designed, giving a smooth flowing ink and ease of use replacing the quill or dip pen. History of the Loch Ard: The Loch Ard got its name from "Loch Ard" a loch that lies to the west of Aberfoyle, and the east of Loch Lomond. It means "high lake" in Scottish Gaelic. The vessel belonged to the famous Loch Line which sailed many vessels from England to Australia. The Loch Ard was built in Glasgow by Barclay, Curle & Co. in 1873, the vessel was a three-masted square-rigged iron sailing ship that measured 79.87 meters in length, 11.58 m in width, and 7 m in depth with a gross tonnage of 1693 tons with a mainmast that measured a massive 45.7 m in height. Loch Ard made three trips to Australia and one trip to Calcutta before its fateful voyage. Loch Ard left England on March 2, 1878, under the command of 29-year-old Captain Gibbs, who was newly married. The ship was bound for Melbourne with a crew of 37, plus 17 passengers. The general cargo reflected the affluence of Melbourne at the time. Onboard were straw hats, umbrellas, perfumes, clay pipes, pianos, clocks, confectionery, linen, and candles, as well as a heavier load of railway irons, cement, lead, and copper. There were other items included that were intended for display in the Melbourne International Exhibition of 1880. The voyage to Port Phillip was long but uneventful. Then at 3 am on June 1, 1878, Captain Gibbs was expecting to see land. But the Loch Ard was running into a fog which greatly reduced visibility. Captain Gibbs was becoming anxious as there was no sign of land or the Cape Otway lighthouse. At 4 am the fog lifted and a lookout aloft announced that he could see breakers. The sheer cliffs of Victoria's west coast came into view, and Captain Gibbs realised that the ship was much closer to them than expected. He ordered as much sail to be set as time would permit and then attempted to steer the vessel out to sea. On coming head-on into the wind, the ship lost momentum, the sails fell limp and Loch Ard's bow swung back towards land. Gibbs then ordered the anchors to be released in an attempt to hold their position. The anchors sank some 50 fathoms - but did not hold. By this time the ship was among the breakers and the tall cliffs of Mutton Bird Island rose behind. Just half a mile from the coast, the ship's bow was suddenly pulled around by the anchor. The captain tried to tack out to sea, but the ship struck a reef at the base of Mutton Bird Island, near Port Campbell. Waves subsequently broke over the ship and the top deck became loosened from the hull. The masts and rigging came crashing down knocking passengers and crew overboard. When a lifeboat was finally launched, it crashed into the side of Loch Ard and capsized. Tom Pearce, who had launched the boat, managed to cling to its overturned hull and shelter beneath it. He drifted out to sea and then on the flood tide came into what is now known as Lochard Gorge. He swam to shore, bruised and dazed, and found a cave in which to shelter. Some of the crew stayed below deck to shelter from the falling rigging but drowned when the ship slipped off the reef into deeper water. Eva Carmichael a passenger had raced onto the deck to find out what was happening only to be confronted by towering cliffs looming above the stricken ship. In all the chaos, Captain Gibbs grabbed Eva and said, "If you are saved Eva, let my dear wife know that I died like a sailor". That was the last Eva Carmichael saw of the captain. She was swept off the ship by a huge wave. Eva saw Tom Pearce on a small rocky beach and yelled to attract his attention. He dived in and swam to the exhausted woman and dragged her to shore. He took her to the cave and broke the open case of brandy that had washed up on the beach. He opened a bottle to revive the unconscious woman. A few hours later Tom scaled a cliff in search of help. He followed hoof prints and came by chance upon two men from nearby Glenample Station three and a half miles away. In a complete state of exhaustion, he told the men of the tragedy. Tom then returned to the gorge while the two men rode back to the station to get help. By the time they reached Loch Ard Gorge, it was cold and dark. The two shipwreck survivors were taken to Glenample Station to recover. Eva stayed at the station for six weeks before returning to Ireland by steamship. In Melbourne, Tom Pearce received a hero's welcome. He was presented with the first gold medal of the Royal Humane Society of Victoria and a £1000 cheque from the Victorian Government. Concerts were performed to honour the young man's bravery and to raise money for those who lost families in the disaster. Of the 54 crew members and passengers on board, only two survived: the apprentice, Tom Pearce, and the young woman passenger, Eva Carmichael, who lost her family in the tragedy. Ten days after the Lochard tragedy, salvage rights to the wreck were sold at auction for £2,120. Cargo valued at £3,000 was salvaged and placed on the beach, but most washed back into the sea when another storm developed. The wreck of Lochard still lies at the base of Mutton Bird Island. Much of the cargo has now been salvaged and some items were washed up into Lochard Gorge. Cargo and artefact's have also been illegally salvaged over many years before protective legislation was introduced in March 1982. One of the most unlikely pieces of cargo to have survived the shipwreck was a Minton majolica peacock- one of only nine in the world. The peacock was destined for the Melbourne 1880 International Exhibition. It had been well packed, which gave it adequate protection during the violent storm. Today the Minton peacock can be seen at the Flagstaff Hill Maritime Museum in Warrnambool. From Australia's most dramatic shipwreck it has now become Australia's most valuable shipwreck artifact and is one of very few 'objects' on the Victorian State Heritage Register.This ink well is historically significant as it represents methods of hand written communication that were still common up until the mid-20th century, when fountain pens and ballpoint pens took over in popularity and convenience. The shipwreck of the Loch Ard is of significance for Victoria and is registered on the Victorian Heritage Register ( S 417). Flagstaff Hill has a varied collection of artefact's from Loch Ard and its collection is significant for being one of the largest accumulation of artefact's from this notable Victorian shipwreck of which the subject items are a small part. The collection's objects give us a snapshot of how we can interpret the story of this tragic event. The collection is also archaeologically significant as it represents aspects of Victoria's shipping history that allows us to interpret Victoria's social and historical themes of the time. Through is associated with the worst and best-known shipwreck in Victoria's history.Stoneware penny Ink bottle ironstone salt-glazed, stoneware cylindrical shape with small mouth and squat neck, broad shoulders brown colour, . with light coloured encrustation spots.flagstaff hill, warrnambool, flagstaff hill maritime museum, shipwreck coast, flagstaff hill maritime village, great ocean road, loch line, loch ard, captain gibbs, eva carmichael, tom pearce, glenample station, mutton bird island, loch ard gorge, penny ink well, writing equipment, domestic, stoneware, clay, ceramic, pottery, ink well, inkwell, ink bottle, dip pen, ink, hand writing, business, vintage, dwarf ink -
 Mission to Seafarers Victoria
Photograph - Reproduction, Jay Miller, 6 June 2019
This photograph was published in the Geelong Advertiser on Friday 23 November 1906, page 4 with this article: "Owing to the generosity of an anonymous donor, the Victorian Missions to Seamen has been supplied with a long felt want in the shape of a modern motor launch to facilitate and render more efficient the work among the vessels in the Yarra and Hobson's Bay. The order for the construction of the boat, was placed with Mr. Chas. Blunt, of the Eastern Beach, and complimentary references were made to her graceful line- as she rode in light .trim after the launching on Wednesday afternoon. She is 31ft. long. Oft. beam, and has a depth of 3ft. The frame is of jarrah and ben* blackwood. and inch kauri planking has been used in building Iter. A neat deck-house with Oft. headroom is situat ed-umidsliip*. and a short mast is pro vided to carry the well-known blue flag of the -.fission. The launch motors will develop a speed of between nine and ten miles an hour: The finishing touches have yet to be given her. and she will afterwards be row«l to have her engines fitted in. -The launch will he ready for service for the busy wheat season com mencing at- the end of the year. The launching ceremony took place at 6 p.m. on Wednesday at the builder's yards, in the .presence of njarge gather ing of spectators. The Archdeacon of Geelong. the Rev. O. P. C'ros-.ley. ecu ducted a short dedication service, and the other clergymen who took part in the service were the Primate of Aus tralia. the Right Rev. Dr. Sauiuarcz Smith: the Rev. A. Giirney Goldsmith, the Missions chaplain: and the Rev. H. Kelly. The Bishop of Newcastle, Dr. Stretch, and the chaplain of the New castle Mission, the Rev. AYnddy. and Canon Nash were also present. The Primpte. addressing the gar boring as "My good friends of Geelong." said be had never been in sight of the hay before. bill had'gladly accepted the in vitation to say a few words in connec tion with the dedication of tiro launch. He had always been interested in mis sions of all sorts, as they ali as Christian men and women 110 doubt- were, and lie was particularly interested in Missions to Seamen, because in the Society at' borne, with which this Society was con nected, he had a son-in-law who was mission chaplain in the Medway. He therefore know something about a launch for the purpose of a mission like this, and also knew 'something about missions to seamen. In Sydney for some time past it had been doing good work—work which he was sure they would all feel was of the widest possible value. This year he was at the annual meeting of the Missions to Seamen in London presided over by the Bishop o-f Stcphney. -He (the Primate) at that meeting remarked that the Mission in it, value was personal, local and Im perial. It was of personal value to thee who came under the ministra tions of the church, and in the social as pect : it was local because where the Mission existed the feelings of the lo cality were thrown out. in sympathy with j tlie -Mission, and the people themselves thus benefited. It was also a matter of Imperial interest because it- was really i a world-wide Mission, inasmuch as the | sailors as they" went from one part of the world to another were in themselves j missionaries either for evil or for good, i Thev might he missionaries with a mcs i sago which might degrade and "work ail I evil influence amongst, men, and with i conduct which might reflect a reproach !' upon Christian profession. On the other hand, they might be Chrisian men endeavoring more and more to show the .example of the Christian life in the J midst of very big difficulties and tempta tions. • -Ho came to show liis sympathy with tlio appropriately-named '"'Southern Cross," and from what lie had boon told he believed she was a good boat, a good gift, and launched for a good purpose. They should be thankful that it was a good boat and .thankful because it was a good gift by an anonymous donor, whom he congratulated on doing such a useful thing." The idea of the launch ing ceremony was to ask the blessing of God because ".Except the Lord hless'the house their labor is hut lost'that build it." The Archdeacon expressed thanks to the Primate for attending the cere mony, and regretted that the Arch bishop was unable to attend. They dc- | sired that the boat- should always be as sociated with the.Church Congress 1906. I The opening hymn was "For those in j peril on the sea," followed hv Psalm I 107, "'They'that, go down to the sea in 1 Ships." Tlio prayers included an ap peal foiUDirine blessing on .the launch, and for tho preservation of those who may travel in her. ' Xlio Benediction was pronounced by the Primate, and the christening cere mony performed by Hiss Connibere. From the bow there was suspended a bottle of pure water covered with red, white and blue streamers and roses. Dashing the bottle in,fragments against the launch's bow. Miss Connibere named her the "Southern Cross." Cheers were given for the launch/and as she travell ed down the slip further cheers were given. She carried the Mission flag at tho masthead, and between Union Jacks at tho bow and stern, a long string of flags fluttered gaily* in the breeze. The collection was in aid of the Mis sions to Seamen and the Geelong Sailors' Rest.Reproduction of a photograph from a newspaper.Fujifilm / Quality Dry Photo papersouthern cross, motor boat, mission to seamen, seamen's mission, charles blunt, blunt boatbuilders, geelong -
 Mission to Seafarers Victoria
Souvenir - Menu, MV Neptunia Crossing the Line Menu
MV Neptunia ship's menu for the February 1959 equator crossing. Extra historical context by the addition of ship's passengers and crew signing their names and providing contact details. Representative cruise ship paraphernalia of the period, showing the significance and tradition of celebrating a ship's crossing of the equator. Ship's restaurant menu consisting of single folded light card, with vivid watercolour painting of flowers of orange and purple on the front cover. On opening the card, printed menu selection in Spanish is on the left and is in English on the right. Guests and crew have signed randomly over and around the menu listings. menu, crossing-the-line, equator, neptunia, nick garlick -
 Mission to Seafarers Victoria
Journal (item) - Periodicals-Annual, Shiplovers' Society of Victoria, The Annual Dog Watch
This journal provides the reader with glimpses of the adventures and hardships of a seaman's life. Many of the stories are of sailing ships.Contributes to our knowledge of the importance of shipping and places on record those stories of the sea which would otherwise be lost.Contents Foreword - Commander R. S. .Veale, C.M.G. V.R.D. - 5 Editorial - - 7 Light Houses - N. S. Smith - 11 On Passing for Second Mate - R. Thiele - 18 Passenger Steamers on the Tasman Sea - I. Mackay - 22 Dune Ship - Dr. Philip Martin - 37 The Rum Runners - S. A. E. Strom - 38 To Australia Amongst Emigrants - S. Duncan - 43 The Persian Gulf or "Hells Kitchen" - K. Bull - 49 Monkey Business - Captn. James Gaby - 51 Anchor Hardy - Capt. R. G. Edwards - 52 Light Houses - C. E. Bonwick - 58 The Forlorn Hope - N. S. Smith - 59 Robert Louis Stevenson in The South Seas - Captn. Fred Klebingat - 68 Eastward-Ho! - Charles E. Howlett, B.A, LL.B. - 73 Commonwealth Government Rewards for School Boys - I. Wilson, M.P., Minister for Home Affairs - 78 Protection of Historic Wrecks off Queensland Coast - I. Wilson, M.P. - 79 The s.s. New Texas --Elder Dempster Line - Captn. L. Gibson - 83 Carmichael's Golden Fleece Line - L. Holmes - 89 Passing the Buck - - 95 Ice Barrier - D. M. Fyfe - 96 A Dream Come True - W. P. Shemmeld - 97 Homeward Bound - R. W. Rudd - 105 More of the Wreck of The City of York - A. T. Wreford and E. M. Christie - 110 A Fortunate Rescue - Captn. J. Gaby - 112 More About Sail - Capt. W. J. Cowling - 113 Book Reviews - 120sailing ships, steamships, shipping, seafaring life, shiplovers' society of victoria, dog watch -
Glenelg Shire Council Cultural Collection
Painting, Captain James Fawthrop, n.d
Small oil on paper painting of Captain James Fawthrop, wearing his gold Admella medal. He is wearing a dark-coloured uniform jacket & cap with letters "HD" in gold. Blue sky & clouds in background. The painting is covered with glass and is set in an oval, dark wooden frame, that has a gold inner line. The painting is bordered by three mat boards, dark grey, light grey and gold. The back is covered in brown paper, with cord between the two metal 'eyes' for hanging. -
Glenelg Shire Council Cultural Collection
Functional object - Horvex Light Meter and Box, 1960s
Metrawatt of Germany made the Horvex line of meters, of which there are three major versions. The original came out just before the war. The Horvex 2 is from the mid-50s, and this Horvex 3 showed up around 1960.a) 'Horvex 3' light or exposure meter made in Germany. Cream bakelite enclosing metal meter. 'Horvex 3 ' on front panel b) Brown leather case for the 'Horvex 3 ' embossed on front loops for strap on backphotography, light meter, exposure, german, 1960 -
Glenelg Shire Council Cultural Collection
Booklet - Brochure - Promoting Portland, Victoria, Victorian Railways Print, Oct-38
Brochure promoting Portland, folds out to A3 printed on light card. Front cover, white and blue stylised sky with sea and a seabird. 'PORTLAND, VICTORIA, AUSTRALIA' -printed in red. Back cover, black line map with roads marked in orange. Black and white photos of harbour, Dutton Beach, Gardens cottage, Henty Beach, 'Burswood', Henty Memorial, plus printed information about Portland and district.portland -
Glenelg Shire Council Cultural Collection
Administrative record - Administrative record - School Committee Book, Lyons State School, Victoria, 1929-1970
Bowerbird MuseumSchool Committee's book, Lyons State School, No. 3254, 1929-1970. Dark grey, light card covers, blue spine. White lined pages, minutes handwritten, pen.Front: 'School Committee's Book of State School at Lyons 3254' -
Glenelg Shire Council Cultural Collection
Souvenir - Badge, Stokes, Melbourne, n.d
Casterton Angling Club badge. Gold coloured metal. Enamelled round badge in light and dark blue, gold fish on line in centre. Gold laurel leaf border on bottom section of badge. 'CASTERTON ANGLING SOCIETY' in gold on dark blue border. -
Glenelg Shire Council Cultural Collection
Administrative record - Administrative record - School Committee book, Lyons State School, Victoria, 1970-1972
Bowerbird MuseumSchool Committee's book, Lyons State School 1970-1972. Grey light card covers, dark grey spine. White, lined pages, minutes handwritten in pen -
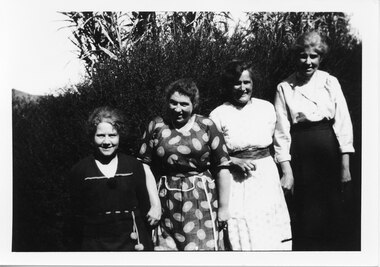 Halls Gap & Grampians Historical Society
Photograph - B/W, C 1920s
From left to right the women are: Miss Vine (dark dress, draw cord at waist with pom-poms on end), Miss Hocking (dress with large spots), Mrs Thomson (light coloured dress with dark sash at waist) and Mrs Paddy Smith (light coloured blouse and dark skirt).The photo shows four women, standing in line from shortest to tallest, standing in front of bushes.people