Showing 164 items
matching night light
-
 Melbourne Tram Museum
Album - David Frost Slide Collection, David Frost
Photo - see pdf file for further information. Number Brief Description date DFC1 A general view from the former railway platform at Port Melb Station looking towards Station Pier on opening day 20-12-1987 DFC2 A2 285 in the Tramway Platform at Port Melbourne Station on opening Day 20-12-1987 DFC3 A2 285 in the Tramway Platform at Port Melbourne Station on opening Day 20-12-1987 DFC4 A2 285 in the Tramway Platform at Port Melbourne Station on opening Day 20-12-1987 DFC5 A2 273 at St Kilda Tramway Station on opening day 22-11-1987 DFC6 A2 273 turning from Fitzroy St into St Kilda Tramway Station on opening day 22-11-1987 DFC7 B1 2001 at St Kilda Tramway Station turning into Fitzroy St on opening day 22-11-1987 DFC8 B1 2002 enters St Kilda Tramway Station on opening day 22-11-1987 DFC9 An A2 approaches St Kilda Tramway Station on opening day 22-11-1987 DFC10 Concreting the connecting curve from Fitroy St into St Kilda Station c July 1987 DFC11 An MTA AEC MKVI bus in Grey St St Kilda at Dalgety St with Tramway works in the background c July 1987 DFC12 Grey St St Kilda at Dalgety St with Tramway works in the background in Fitzroy St c July 1987 DFC13 Concreting the connecting curve from Fitroy St into St Kilda Station c July 1987 DFC14 Restaurant Tram 442 in Fitzroy St at Grey St Passing MTA bus 59 outside St Kilda Station c1986 DFC15 Former VR tram stop sign painted on a pole at Glenhuntly Rd & Broadway DFC16 Former VR Elwood Tram Depot under demolition 1996 DFC17 Former VR Elwood Tram Depot under demolition 1996 DFC18 Former VR Elwood Tram Depot under demolition 1996 DFC19 Former VR Elwood Tram Depot under demolition 1996 DFC20 Former VR Elwood Tram Depot under demolition 1996 DFC21 Former VR Elwood Tram Depot under demolition 1996 DFC22 Former VR Elwood Tram Depot under demolition 1996 DFC23 Former VR Elwood Tram Depot under demolition 1996 DFC24 MTS Tower waggon in use at the former VR Elwood Tram Depot under demolition 1996 DFC25 A Sign advertising the sale of the Former VR Elwood Tram Depot – 10/8/1996 1996 DFC26 Former VR Elwood Tram Depot under demolition 1996 DFC27 Interior of a shed at the former VR Elwood Tram Depot under demolition 1996 DFC28 Former VR Elwood Tram Depot under demolition 1996 DFC29 Former VR Elwood Tram Depot under demolition 1996 DFC30 Former VR Elwood Tram Depot under demolition 1996 DFC31 VR 20, former breakdown car in Bob Prentice’s Back Yard Jan 1974 DFC32 VR 20 on a low loader en route to Bob Prentice’s for preservation 1959 DFC33 VR 20 as the breakdown car on the St Kilda Electric Street Railway c1955 DFC34 VR 39 waits in St Kilda St as breakdown car 20 enters Elwood Depot c1955 DFC35 VR 54 and 50 in the rear yard of Elwood Depot c1958 DFC36 VR 50 in the rear yard of Elwood Depot c1958 DFC37 VR 50 in the rear yard of Elwood Depot c1958 DFC38 VR 28 in St Kilda St outside Elwood depot after the line had been cut back to this point c1958 DFC39 VR 29 in St Kilda St outside Elwood depot after the line had been cut back to this point c1958 DFC40 VR 35 passes 28 on the St Kilda Electric Street Railway c1955 DFC41 VR 39 on the St Kilda Electric Street Railway c1955 DFC42 Y1 613 on a tour c1970 DFC43 VR 54 in St Kilda St outside Elwood Depot c1955 DFC44 VR 28 at Brighton Beach Terminus c1955 DFC45 VR 33 being washed in the wash bay at the rear of Elwood Depot c1955 DFC46 VR 20 breakdown car running into Elwood Depot c1955 DFC47 VR 3 in the rear yard at Elwood Depot c1955 DFC48 VR 51 on an AETA Tour running out of Elwood Depot c1958 DFC49 VR 28 on the St Kilda Electric Street Railway c1955 DFC50 VR 28 with crew in St Kilda St outside Elwood depot after the line had been cut back to this point 1959 DFC51 VR 52 in Grey St near Fitzroy St c1958 DFC52 VR 51 on a AETA Tour passes 33 in Grey St near Fitzroy St c1958 DFC53 VR 29 in Grey St near Fitzroy St c1958 DFC54 VR51 on an AETA Tour shunts as 52 waits on the St Kilda Electric Street Railway c1958 DFC55 VR 51 on the Black Rock Electric Street Railway c1955 DFC56 VR 28 in St Kilda St outside Elwood depot after the line had been cut back to this point c1958 DFC57 Combined Rail-Tram Tickets of the Black Rock Electric Street Railway Feb 1975 DFC58 Combined Rail-Tram Tickets of the St Kilda Electric Street Railway Feb 1975 DFC59 Electric Street Railway & Motor Coach Paper Tear off Tickets Feb 1975 DFC60 VR 52 & 53 on Rt 82 pass in Cordite Ave near Wests Rd Sept 1975 DFC61 Z 68 & 52 in East Preston Depot in M&MTB Livery c1977 DFC62 Copy photo of VR 18 in Elwood Depot c1910 DFC63 VR 51 as a one man car at Black Rock Terminus c1955 DFC64 VR 53 on Rt 82 in Droop St Footscray Jan 1974 DFC65 B2 2027 on Rt 96 in South Melb Station c1988 DFC66 VR 20 as preserved in Bob Prentice’s backyard High St Prahran Jan 1974 DFC67 VR 700 on Rt 82 in Droop St Footsray c1978 DFC68 VR 28 as the last car from ST Kilda Station 28-2-1959 DFC69 VR 700 at the Rt 82 Moonee Ponds Terminus c1978 DFC70 VR 52 waiting time at the Rt 82 Footscray Terminus, the driver intently stares at the bundy clock as the Braid and the Connie gossip Jul 1972 DFC71 VR 54 shunting outside Elwood Depot to return to St Kilda Station 1959 DFC72 SW6 969 in MTA Livery blocking the entrance to South Melb Depot presumably during the scratch ticket dispute Jan 1990 DFC73 VR 52 & 53 on Rt 82 pass in Droop St Footscray Sept 1975 DFC74 VR 700 after withdrawl in the Newport Railway museum in the process of a repaint c1985 DFC75 VR 700 after withdrawl in the Newport Railway museum in the process of a repaint c1985 DFC76 VR 700 on Rt 82 in Droop St Footsray at The Cresent c1978 DFC77 VR 700 on Rt 82 in Droop St Footsray c1978 DFC78 Former VR tram depot in use as an MTA Bus depot c1990 DFC79 VR 52 waiting time at the Rt 82 Footscray Terminus Jul 1972 DFC80 VR 52 waiting time at the Rt 82 Footscray Terminus with Connie changing the pole Jul 1972 DFC81 VR 52 at the Rt 82 Moonee Ponds Terminus with the crew chatting 7-12-1974 DFC82 VR 52 on Rt 82 on the reserved track in Raleigh Rd Ascot Vale Jan 1974 DFC83 VR 53 on Rt 82 in Leeds St Footscray about to turn into Hopkins St April 1976 DFC84 VR 53 on Rt 82 in Droop St Footsray Jan 1974 DFC85 VR 700 on Rt 82 in Droop St Footsray at Hopkins St c1978 DFC86 Z 52 in MTA livery on Rt 19 in Elizabeth St near Bourke St c1985 DFC87 VR 52 at the Rt 82 Moonee Ponds Terminus Jul 1972 DFC88 VR 53 at the Rt 82 Footscray Terminus Jan 1974 DFC89 VR 52 freshly outshopped from the workshops and W7 1011 at the Bourke St Terminus with 52 on display for the 1968 railway exhibition 1968 DFC90 Painting of W class 369 in Chocolate & Cream c1930 DFC91 Charing Cross, Bendigo at night c1965 DFC92 Ballarat ? c1965 DFC93 Bendigo 18 on an AETA tour in McCrae St near Tramway Ave c1965 DFC94 View from the roof of a tram in the body shop at Preston Workshops 1977 DFC95 View from the roof of a tram in the body shop at Preston Workshops 1977 DFC96 View from the roof of a tram in the body shop at Preston Workshops showing the panto on 546 1977 DFC97 Interior view of Carlton Control Centre showing desk and wall panel c1968 DFC98 W2 493 on Rt 55 in Kingsway outside South Melb Depot Aug 1973 DFC99 W2 496 in Sturt St at Kingsway on Rt 1 Jul 1973 DFC100 Z class truck c1975 DFC101 Z3 116 in Bourke St at King St as new c1979 DFC102 Bob Prentice on tour c1968 DFC103 SW6 900 as an advertising tram for Newsday at night 1969 DFC104 597 Jul 1973 DFC105 W2 480 on Rt 3 passing under the railway bridge at Caulfield Oct 1972 DFC106 Interior view of Carlton Control Centre showing desk c1968 DFC107 SW6 856 on Rt 77 at night Jul 1973 DFC108 W2 496 in Sturt St at Kingsway on Rt 1 Jul 1973 DFC109 PCC 980 on a tour at South Melb Depot c1968 DFC110 SW6 856 on Rt 77 at night Jul 1973 DFC111 View from the roof of a tram in the body shop at Preston Workshops showing the panto on 546 1977 DFC112 Dandenong Rd from Chapel St Nov 1968 DFC113 A Z class car turns from Gertrude into Nicholson St c1990 DFC114 SW6 900 as an advertising tram for Newsday at night 1969 DFC115 Port Melbourne Station showing Centennial bridge and station building prior to closure. 10-1987 DFC116 Port Melbourne station with train prior to closure, looking south 10-1987 Demonstrates the work of David Frost in photography and or collecting slides.Assembled album in a black presentation folder of 116 colour slides, 6 slide sleeves, collected or photographed by David Frost. Many are TMSV or Windsor Publications slides. All photographs have been scanned and placed on the Museum's G drive. A list of all photographs with details has been compiled. melbourne, tramways, trams, vr trams, elwood, st kilda light rail, port melbourne, opening, elwood depot, buses -
 Lakes Entrance Historical Society
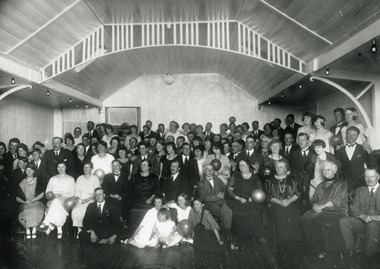
Photograph, 1924c
Original 14 x 20 photograph mounted on card in archive box, some identities in photograph named, also black and white 20 x 25 copy.Black and white photograph of the crowd of people who attended the opening night of the new ballroom at Broomes Federal Hotel. Ballroom has coped ceiling of timber, decorative frieze across centre, globular light from ceiling, light globes set around wall projections. Lakes Entrance Victoriahotels, celebrations, architecture -
 Ballarat Tramway Museum
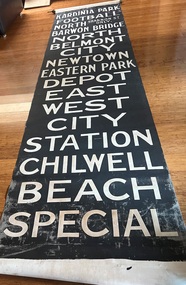
Functional object - Destination Roll, State Electricity Commission of Victoria (SECV), " Geelong" (black background) - Pengelley, 1954
Destination roll used to indicate to passengers the destination or route of the tram. At night the roll was back lit by two light bulbs fitted to the destination box on the tram. Item used in Geelong until 1956. Based on the hand written marking, used on a Pengelley type tram and painted in 1954. This roll is See Reg Item 2906 and 9619 for a smaller side destination roll and 4122 for a wide roll fitted to bogie tram No. 39. The Destinations have a different arrangement to that of item 4122. Item 4122 is an earlier formation based while 9618 is a later format set out to minimize the amount of movement on the roll between the various destinations introduced with changed through routing in 1954. The second image shows two rolls side by side showing the set out. This roll is on the right side or is the shorter one.Yields information and demonstrates aspects about Geelong's destination rolls used in trams up to 1956 when the system closed.Destination roll - white lettering on black background - using black paint leaving the lettering transparent at night. Uses a book binders cloth. Attached to a wooden blind roller, as used in the destination box to keep the blind tight. One loose roller that was attached to the other end of the roll. The wooden roller has a "Hartshorn's" and "Stewart Gladstone" name lables attached to it.In pencil as base of roll "Pengelley Dest End. B.G.L.M Flat, 31/7/54" tram, trams, geelong, destination roll, pengelley -
 Whitehorse Historical Society Inc.
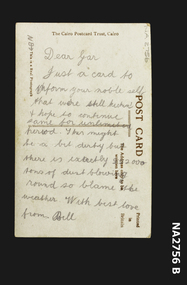
Postcard
Sent to Mrs Garnet O'Neill from her brother Bill Beaty, Light Horseman, sent c1915Black and white postcard with verse.|'Sweet Thoughts'|While slowly sinks the sun from view,|Gilding the west with rosy light,|Come fond memories, dear, of you,|To brighten my deepest thoughts to-night.|Richer than golden clouds above,|Pictures of ne'er forgotten hours,|Visions of our unchanging love,|Thoughts of each promise dear, of ours.|WillmerDear Gar........From Billdocuments, postcards -
 Bendigo Historical Society Inc.
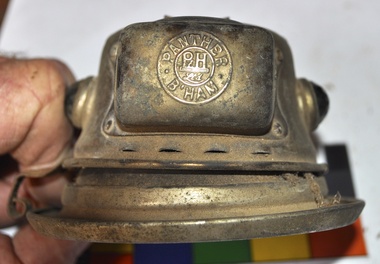
Vehicle - CARBIDE VEHICLE LAMP: PANTHER BIRMINGHAM
The Panther lamp was made by Powell and Hanmer of Birmingham. (see Item 7354) This model appears to be dated from the 1920's. Early models of the automobile, motorbike and bicycles used carbide lamps as headlamps. Acetylene gas, derived from carbide, enabled early automobiles to drive safely at night. Thick concave mirrors combined with magnifying lenses projected the acetylene flame light. These type of lights were used until reliable batteries and dynamos became available, and manufacturers switched to electric lights.Carbide Vehicle Lamp.-Silvered Metal, Lens Assembly . Small Green lens on both sides of the assembly, with a clear lens in front. 'Panther B'Ham' is stamped on the lower part of the assembly. In addition a Logo is Stamped with 'P H' and 'Ltd' under those letters. Carbide Gas section missing.Panther B'Ham -
 Melbourne Tram Museum
Negative, Travis Jeffrey, c1963
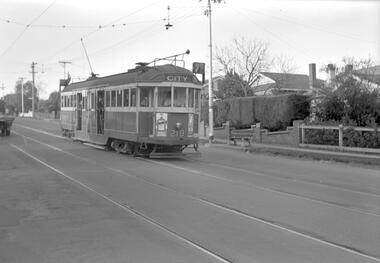
Negative of tram 219 at a tram stop. Tram has destination City and Route No 7. Photo looks staged as a school child in uniform leaning at door, driver and passenger in front window are all staring at the photographer. Note the tram has a trolley wheel fitted, the stop is a compulsory stop and that there is a light fitting above the tram with a tinted glass shield that indicated the type of stops at night. Possibly in Burke Road, between Leura Grove and Toorak Road.Paper folder that contained the negative had "NR99A" in red ink, "M5" in pencil, 58A in green ink, date stamp "1 Jan 1963" on front, and date stamp on rear "26 Sep 1962".trams, tramways, w2 class, route 7, tram stops, burke rd, tram 219 -
 Melbourne Tram Museum
Document - Folder with papers, Public Transport Victoria (PTV), "Night Network", Dec. 2015
... Folder - Press Pack, containing 10 sheets of light card... of light card about the Night Network trial that was to commenced ...Folder - Press Pack, containing 10 sheets of light card about the Night Network trial that was to commenced on 1/1/2016. Provides information on the proposed 1 year trial (which was continued), trains, buses, trams, coaches, maps, costs, security and locations of the services in the CBD area. Published by the PTV 12/2015.trams, tramways, night trams, public transport, ptv, buses, railways, all night services -
 Melbourne Tram Museum
Document - Folder with papers, Melbourne & Metropolitan Tramways Board (MMTB), "Notices to Staff", 1924 - 1944
... War 2 Football All night services Light grey card folder ...Light grey card folder manufactured by the Roneo Printing Works of Rumford England with the file title "Fire Switches, glued to the top of the folder on the inside back cover. Contains many memos from the MMTB Traffic Managers, Depot Managers about the arrangements for the visit of the Royal Highnesses the Duke and Duchess of York in April 1927. Also contains memo re cable tram arrangements for this event from Port Melbourne depot, arrangements for Christmas holidays and other holidays from about 1924 to 1944, including a map of the procession and printed programs by the Government Printer. Documents either typed or hand written. Other documents include (Sample only): Camberwell extra for December 1944 Shopping Week Memos re traffic arrangements and shunting of trams for the 8 hour day procession Tables for Cable car operations from Port Melbourne depot 5/7/1925 Handwritten car timetables Costs associated with the royal visit Proposed service arrangements for Coburg Lines Christmas and New Year 1929 Cuttings regarding shopping hours for 1929-1930 Football posters - special trams - 1931 and 1932 All Night services - destination rolls to specific bogie trams Memos regarding cancelling of leave in Dec. 1941 Memos regarding services to Fisherman's bend and factory hours - 1941 - 42 Holiday loading returns for Southern System - 1941 Memo re timing of trams from city terminus account 3KZ Christmas Eve Choral festivaltrams, tramways, mmtb, port melbourne depot, notices and information, cable trams, holiday arrangements, royal visit, timetables, world war 2, football, all night services -
 Flagstaff Hill Maritime Museum and Village
Photograph - Historical, building, Late 19th to early 20th century
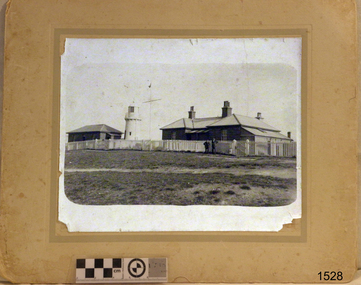
The black and white photograph depicts the Lady Bay Lighthouse Complex at Flagstaff Hill, Warrnambool. It was opened on this site in 1871. From left to right, the Chartroom (previously named the Store), Upper Lighthouse, Flagstaff, Lighthouse Keeper's Quarters. The bluestone buildings are facing North on Merri Street. The Harbour Pilot's Lodgings were on the east of the Complex. There are two unknown male figures standing in front of the light-coloured picket fence that encompasses the Complex. The photograph is mounted on card. WARRNAMBOOL'S LADY BAY LIGHTHOUSES In the 1800s ships sailing from England to Australia began to use Bass Strait as a faster route to Melbourne. Small navigation errors led to many tragic shipwrecks. From 1848 lighthouses were operating along Victoria’s southern coast as a guide for sailors. Coastal towns such as Warrnambool grew and the exchange of trade and passengers was of great benefit. However, the uncertain weather changes, relatively shallow waters and treacherous, hidden rocky reefs were not really suitable for a Harbour and in the 1840s and 1850s, there were many shipwrecks in the area, with some even stranded in its Lady Bay harbour. A jetty was built in 1850 and a flagstaff to guide seafarers was placed up high on what became known now as Flagstaff Hill. In November 1857 the Victorian Government recommended that Warrnambool Harbour had beacons and two lighthouses to guide vessels into and out of the Harbour safely. The white light of the Middle Island lighthouse was to be used for the first time on September 1, 1859. The red light of the Beach Lighthouse, a wooden obelisk structure, was first operated on March 25, 1860, but in 1868 this light was ‘discontinued’ due to it being too low. Melbourne’s Department of Public Works decided to relocate the Middle Island Lighthouse Complex - Lighthouse, Keeper’s Quarters, Privy, Store Room and even water tanks - to Flagstaff Hill. The lower obelisk was shortened, and a protruding gallery, railing, and external ladder were added, and the light from the Beach Lighthouse. A green guiding light was erected on the end of the jetty. The transfer of the Complex began in March 1871. Each shaped stone of the lighthouse was carefully numbered, removed then reassembled on Flagstaff Hill. In 1872 the well was sunk behind the Lighthouse Keeper’s Cottage. The Keepers and families had left Middle Island in April and moved to Flagstaff Hill in October 1871. Vessels entering Lady Bay align the Upper and Lower Lighthouse towers during the day and the lights at night. The Upper Lighthouse is a round tower, and the Lower Light is square. The Lighthouses were categorised as harbour lights rather than coastal lights, so they remain under the control of the Victorian Government’s Ports and Harbours section. The lights were originally powered by oil, then acetylene gas, later by electricity, and then converted to solar power in 1988. In 1993 the solar panel was replaced by a battery charger. A decision was made in 1936 to replace the lighthouses’ lights with unattended lights that no longer required Keepers and Assistants. At least 29 Keepers had attended to the lighthouse from its opening in 1859 to when the last official Lightkeepers left In April 1916. The Warrnambool Harbour Board rented out the Quarters from 1916 to 1936. The Board closed down but the rentals continued with other unknown landlords. In the 1970s the Flagstaff Hill Planning Board was set up under the chairmanship of John Lindsay. The Board was to make recommendations to the Warrnambool City Council regarding using the buildings and the rest of the Crown Land on the site. The Flagstaff Hill Maritime Village opened in 1975 and began renovating the Cottage in stages, during which time evidence of a 1920s fire was found in the eastern section of the cottage. Additions of a porch on the west and a washroom on the east were made in the 1980s. The western part of the building is now a Shipwreck Museum and the east has returned to a late 19th-century Lighthouse Keeper’s cottage and includes the screen made by Assistant Lighthouse Keeper Thomas Hope in the late 19th century. He served as Assistant Keeper in Warrnambool for two periods.The Warrnambool Lighthouse Complex is now listed on the Victorian Heritage Register, H1520, for being of historical, scientific (technological) and architectural significance to the State of Victoria. The Complex is significant as an example of early colonial development. The buildings are significant for their connection with the important navigational function of the Lighthouses, a function still being performed to this day. The buildings are also significant as an example of structures designed and works carried out by the Public Works Department in Victoria in the mid-to-late 19th century. The structures still stand strong. Photograph; Warrnambool Lighthouse Keeper's cottage, lighthouse, flagstaff and chartroom at Flagstaff Hill, and a light-coloured picket fence with gate. Two male figures are in front of the fence. Black and white print glued to a yellow card. The inscription is indecipherable. The right side of the cottage has a built-in, enclosed addition.Ink stamped in lower right hand corner, too faded to be legible.flagstaff hill, flagstaff hill maritime museum, flagstaff hill maritime village, warrnambool, maritime museum, shipwreck coast, lighthouse keeper's cottage, lighthouse residence, lighthouse, chart room, quarters, privy, middle island, beach lighthouse, obelisk, lighthouse complex, lady bay complex, warrnambool port, warrnambool harbour, lady bay, keepers, lighthouse keeper, upper lighthouse, lower lighthouse, assistant keeper, ports and harbours, cottage -
 Ballarat Tramway Museum
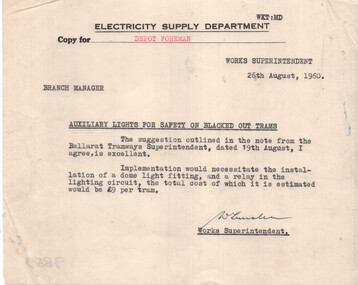
Document - Memo, State Electricity Commission of Victoria (SECV), Auxillary lights for safety on blacked out trams, August 1960
Memo dated 26/8/1960, titled Auxillary lights for safety on blacked out trams from Works Supt to Branch Manager about the installation of a dome light (inside trams?) when the tram is blacked out at a terminus or when the pole has come off the overhead. Suggests a good idea at a cost of 9 pounds / tram. Yields information about the possibility of installing lights inside a tram when it was blacked out. Not know if there was any further work on this.Document - memo - typed on half size foolscap sheet.tramways, emergencies, lights, tramcars, night lighting -
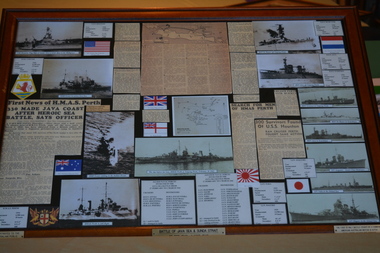 Wangaratta RSL Sub Branch
Memorabilia - Framed newspaper articles photos and flags
The Battle of Sunda Strait was a naval battle which occurred during World War II in the Sunda Strait between the islands of Java, and Sumatra. On the night of 28 February – 1 March 1942, the Australian light cruiser HMAS Perth and the American heavy cruiser USS Houston faced a major Imperial Japanese Navy task force. After a fierce battle of several hours duration, both Allied ships were sunk. The sinking of HMAS Perth at the Battle of Sunda Strait 28 February -1 March 1942 cost 357 Australian lives. A further 324 crewmen fell into enemy hands. Two and a half years of brutal captivity claimed the lives of 106 of these men - 53 on the Thai Burma Railway alone.Framed cuttings of newspaper articles,13 photographs and 7 flags As Portrayed to the Australian Public 1942-1945 BATTLE OF JAVA SEA & SUNDA STRAIT 27 FEB - 1 MAR 1942 The first and only battle fought by a combined American Australian British and Dutch Naval Force against the Japanesesunda strait, hmas perth -
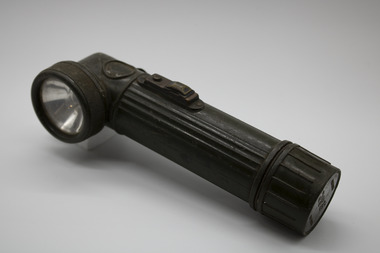 National Vietnam Veterans Museum (NVVM)
Functional Object - Torch, anglehead
Standard issue item, the torch could be clipped onto uniform or webbing leaving the soldier's hands free and used for constant light or signaling position. The bottom section has a compartment containing four different coloured filters /lenses that make the use of the torch at night less visible to enemy.Dark green coloured ribbed tube/handle with globe in right-angled section at top. Can be unscrewed at both ends and has metal clip to attach to webbing or uniform.62'30.89-910 5033torch, flashlight, angle head torch, vietnam war, tunnel rat, field torch -
 Bendigo Military Museum
Photograph - SOLDIERS MEMORIAL, FRAMED, Post 2000
Evening performance of a band on the Portico of Soldiers Memorial Institute post 2000.Bendigo RSL and Soldiers Memorial Institute Hall Pall Mall. Colour night time photograph of Bendigo Soldiers Memorial Institute Hall. White cardboard border surrounds photograph, light wooden frame, glass protection.brsl, smirsl, photograph -
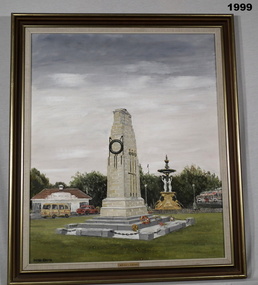 Bendigo Military Museum
Painting - BENDIGO CENOTAPH, FRAMED, 1988
Bendigo's Cenotaph by Dacre Smyth 1988. Bendigo's War Memorial in the city centre is a half size replica of the famous Cenotaph in London. Some 4-1/2 metres high, the Bendigo RSL President described it as the best country Memorial in Australia during its rededication just before ANZAC Day 1988 following its extensive refurbishment. It had first been dedicated in June 1957 and it is normally flood lit at night. It is not known for sure when the painting was donated to the Bendigo RSL but it was hanging in the Foyer years before the Soldiers Memorial Institute became a Museum in 1998. Frame - Light timber, gold trim, no glass. Original coloured oil painting of the Cenotaph, Bendigo in foreground with Charing Cross buildings & fountain in the background. Label black print on gold bottom centre: "Bendigo's Cenotaph" Rear of painting hand written in black felt pen & black ink: "History of the Cenotaph by Dacre Smyth, 1988" cenotaph, bendigo, painting, brsl, smirsl