Showing 277 items
matching sec tramways geelong
-
 Ballarat Tramway Museum
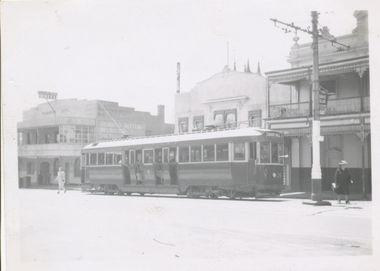
Photograph - Black & White Photograph/s, Wal Jack, 7/03/1954 12:00:00 AM
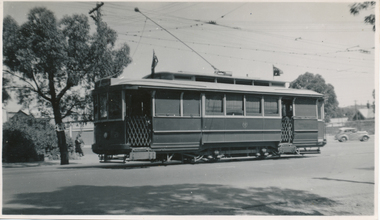
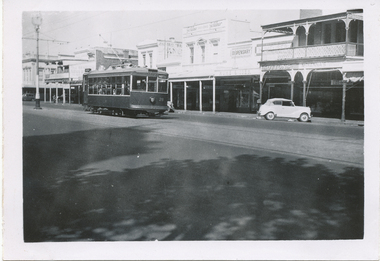
Black and White print contained within the Wal Jack Bendigo and Geelong Album, see Reg Item 5003 for more details. Photo of No. 21 in Mitchell St, near the Railway Station, 7-3-1954. Photo by Wal Jack. Printed on Ilford paper. See image i2 for rear of photograph. See image i3 for hi res scan of negative On the rear in blue ink "SEC Bendigo No 21 in Mitchell St near Rly Stn Sunday morning 7-3-54" with Wal Jack copyright stamp in the top right hand corner and the number "T67PC" written in.trams, tramways, bendigo, mitchell st, tram 21 -
 Ballarat Tramway Museum
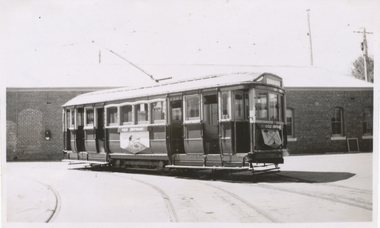
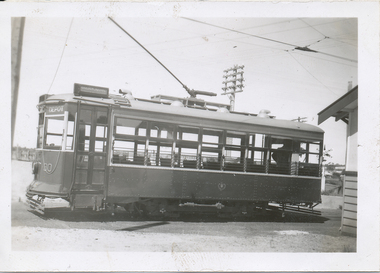
Photograph - Black & White Photograph/s, Wal Jack, 10/04/1950 12:00:00 AM
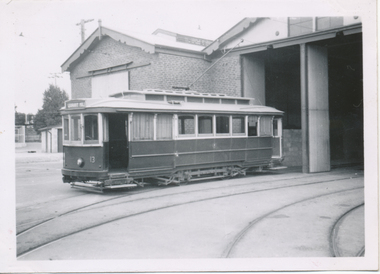
Black and White print contained within the Wal Jack Bendigo and Geelong Album, see Reg Item 5003 for more details. Photo of 13 outside the Bendigo tram depot. Photo by Wal Jack - 10-4-1950. i1 - scan of print in the album i2 - rear of image i3 - scan of negative at 3200dpi added 6/6/2020. On the rear in blue ink "SEC Bendigo No. 13 fitted with "Ballarat" type end doors. Bendigo Depot 10-4-50" "W. Jack copyright stamp in top right hand corner with the number "T212" written in.trams, tramways, bendigo, depot, tram 13 -
 Ballarat Tramway Museum
Photograph - Black & White Photograph/s, Wal Jack, 7/10/1939 12:00:00 AM
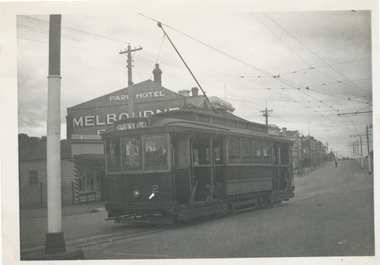
Black and White print contained within the Wal Jack Bendigo and Geelong Album, see Reg Item 5003 for more details. Photo of No. 2 at the Eaglehawk terminus, 7-10-1939, High St, with the Park Hotel in the background. Photo by Wal Jack. Tram has the destination of Quarry Hill. Printed on Ilford paper. i1 - scan of print in the album i2 - rear of image i3 - scan of negative at 3200dpi added 7/6/2020. On the rear in blue ink "SEC Bendigo No 2 (ex MMTB 115 M class) in High St Eaglehawk (terminus) 7th Oct. 1939." with Wal Jack copyright stamp in the top right hand corner and the number "T194" written in.trams, tramways, bendigo, high st, eaglehawk, tram 2 -
 Ballarat Tramway Museum
Photograph - Black & White Photograph/s, Wal Jack, 7/10/1939 12:00:00 AM
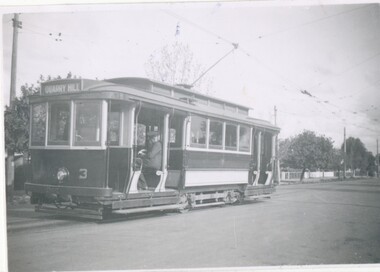
Black and White print contained within the Wal Jack Bendigo and Geelong Album, see Reg Item 5003 for more details. Photo of No. 3 at Quarry Hill 7-10-1939, has the driver sitting in the front of the tram. The tram has the destination of Quarry Hill. Photo by Wal Jack/ i1 - scan of print in the album i2 - rear of image i3 - scan of negative at 3200dpi added 6/6/2020. On the rear in blue ink "SEC Bendigo No 3 at Quarry Hill, Rly Picnic Day 7/10/39" with Wal Jack copyright stamp in the top right hand corner and the number "T193" written in.trams, tramways, bendigo, quarry hill, crews, tram 3 -
 Ballarat Tramway Museum
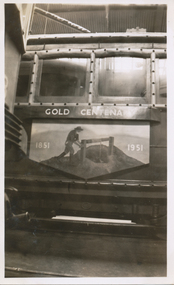
Photograph - Black & White Photograph/s - set of 2, Keith Kings, 14/07/1951 12:00:00 AM
Black and White prints contained within the Wal Jack Bendigo and Geelong Album, see Reg Item 5003 for more details. Set of two photographs of Bendigo 22 decorated for the Centenary of the discovery of Gold Celebrations inside the depot on 14-7-1951 by Keith Kings. .1 - a side view of the tram in side the depot. .2 - an end view of the tram On the rear in blue ink .1 - "SEC Bendigo No. 22 decorated for "Gold" celebrations 1951, side view / 14.7.51" .2 - "SEC Bendigo No. 22 decorated for "Gold" celebrations 1951, end view / 14.7.51". Both have the K. S. Kings copyright stamp in the top right hand corner, and the numbers E(w)(vi) and E(w)(v) written in respectively.trams, tramways, bendigo, gold, gold centenary, gold tram, depot, tram 22 -
 Ballarat Tramway Museum
Photograph - Black & White Photograph/s, Keith Kings, 9/01/1952 12:00:00 AM
Black and White print contained within the Wal Jack Bendigo and Geelong Album, see Reg Item 5003 for more details. Photograph of Bendigo 22 decorated for the Centenary of the discovery of Gold Celebrations outside the depot by Keith Kings 9-1-1952. On the rear in blue ink - "SEC Bendigo No. 22 decorated and illuminated for "Discovery of Gold" celebrations 1951 / 9.1.52. Has the K. S. Kings copyright stamp in the top right hand corner, and the number F(k)(i) written in.trams, tramways, bendigo, gold, gold centenary, gold tram, depot, tram 22 -
 Ballarat Tramway Museum
Photograph - Bendigo tram 22 decorated for Queens visit, Wal Jack, 7/03/1954
Photograph of No. 22 decorated for the Queen's visit (Royal visit) at the depot 7-3-1954. Photos by Wal Jack. Shows the decorations applied to the tram. The first has a depot worker standing in the drivers doorway. Single copy from the Ken Magor collection also held. Printed on Ilford paper. See Reg Item 7878 for a photo of the same tram on the depot access track. See image i2 for rear of photograph. See image i3 for hi res scan of negative Yields information about Bendigo tram 22 decorated for the 1954 visit of Queen Elizabeth IIBlack and White prints contained within the Wal Jack Bendigo and Geelong Album, see Reg Item 5003 for more details.On the rear in blue ink "SEC Bendigo No 22 decorated for Queen's visit, outside depot 7-3-54" with Wal Jack copyright stamp in the top right hand corner and the number "T74PC" written in.trams, tramways, bendigo, royal visit, decorated trams, depot, tram 22 -
 Ballarat Tramway Museum
Photograph - Black & White Photograph/s, Keith Kings, 29/12/1947 12:00:00 AM
Black and White print contained within the Wal Jack Bendigo and Geelong Album, see Reg Item 5003 for more details. Photograph of No. 26 in Mitchell St Bendigo, outbound to Quarry Hill with the Terminus Hotel in the background. Wal's album notes date the photo as 29-12-1947. Photo by Leon Marshall Wood. In ink on rear "SEC of Victoria, Bendigo, Bogie drop centre car No.26 acquired from M&MTB 1947, ex MMTB "C" class, owned originally by Hawthorn Tramways Trust". In pencil, different hand writing "ex 135" and in bottom left hand corner, Leon Marshall Wood photo number "SEC 22" written in.trams, tramways, bendigo, bogie trams, quarry hill, mitchell st, tram 26 -
 Ballarat Tramway Museum
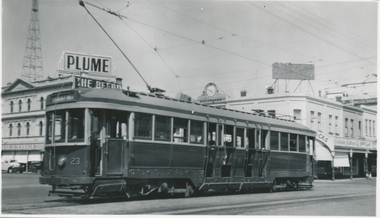
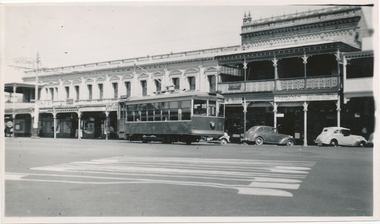
Photograph, Wal Jack, Bendigo No. 23 at Charing Cross, 3/01/1954
Photo of No. 23 at Charing Cross with the destination of Quarry Hill, photo by Wal Jack 3-1-1954. Has the Beehive in the background, a Plume petrol sign and the watchmaker's clock in the background. Printed on Ilford paper. Two prints held. See image i2 for rear of photograph. See image i3 for hi res scan of negative Yields information about Bendigo tram 23 in 1954 and Charing Cross.Black and White print contained within the Wal Jack Bendigo and Geelong Album, see Reg Item 5003 for more details. On the rear in blue ink "SEC Bendigo No 23 bogie to Quarry Hill at Fountain (Charing Cross) Bendigo 3-1-54" with Wal Jack copyright stamp in the top right hand corner and the number "T59PC" written in.trams, tramways, bendigo, charing cross, tram 23 -
 Ballarat Tramway Museum
Photograph - Black & White Photograph/s, Wal Jack, 10/04/1950 12:00:00 AM
Black and White print contained within the Wal Jack Bendigo and Geelong Album, see Reg Item 5003 for more details. Photo of No. 24 leaving Charing Cross in View St with the destination of Eaglehawk, photo by Wal Jack 10-4-1950. Has the Beehive in the background, a single trucker at Charing Cross, and other buildings. i1 - scan of print in the album i2 - rear of image i3 - scan of negative at 3200dpi added 6/6/2020. On the rear in blue ink "SEC Bendigo No 24 bogie in View St Bendigo 10-4-50" with Wal Jack copyright stamp in the top right hand corner and the number "T216" written in.trams, tramways, bendigo, charing cross, view st, tram 24 -
 Ballarat Tramway Museum
Photograph - Black & White Photograph/s, Wal Jack, 7/03/1954 12:00:00 AM
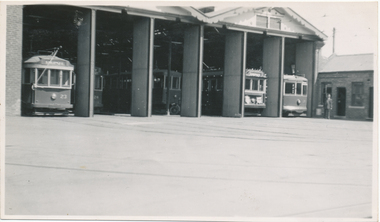
Black and White print contained within the Wal Jack Bendigo and Geelong Album, see Reg Item 5003 for more details. Photo of the front of the Bendigo depot, 7-3-1954, by Wal Jack, with bogie trams 23 and 24, "new" scrubber, No. 22 decorated, 28 Birney. Printed on Ilford paper. See image i2 for rear of photograph. See image i3 for hi res scan of negative On the rear in blue ink "SEC Bendigo Nos 23 24)bogies, new scrubber, No. 22 decorated, 28 Birney at depot 7-3-54" with Wal Jack copyright stamp in the top right hand corner and the number "T68PC" written in.trams, tramways, bendigo, depot, tram 24, tram 23, tram 22, tram 28, scrubber -
 Ballarat Tramway Museum
Photograph - Black & White Photograph/s, Wal Jack, 3/01/1954 12:00:00 AM
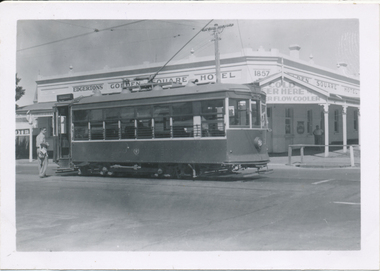
Black and White print contained within the Wal Jack Bendigo and Geelong Album, see Reg Item 5003 for more details. Photo of Bendigo Birney No. 30 at Golden Square Terminus, 3/1/1954. Has Edgerton's Golden Square Hotel in the background with date of 1857 on building corner and "Cold Beer Here and "?..er flow cooler" on the front verandah of the hotel. Note the railing around the drainage channel. i1 - scan of print in the album i2 - rear of image i3 - scan of negative at 3200dpi added 6/6/2020. On the rear in blue ink "SEC Bendigo Birney No. 30 at Golden Square terminus 3rd Jan '54" with Wal Jack copyright stamp in the top right hand corner and the number "T215" written in.trams, tramways, bendigo, golden square, birney, tram 30 -
 Ballarat Tramway Museum
Photograph - Black & White Photograph/s, Wal Jack, 12/04/1959 12:00:00 AM
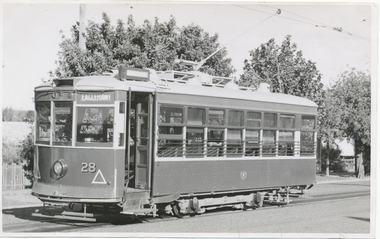
Black and White print contained within the Wal Jack Bendigo and Geelong Album, see Reg Item 5003 for more details. Photo of Bendigo Birney No.28 at Quarry Hill, Photo Wal Jack, with the destination of Eaglehawk - 12/4/1959. i1 - scan of print in the album i2 - rear of image i3 - scan of negative at 3200dpi added 6/6/2020. On the rear in black ink "SEC Bendigo #28 at Quarry Hill, about to leave for Eaglehawk, 4.00pm, Sun 12th April 1959", in bottom left hand corner "Wal Jack Photo"trams, tramways, bendigo, quarry hill, birney, tram 28 -
 Ballarat Tramway Museum
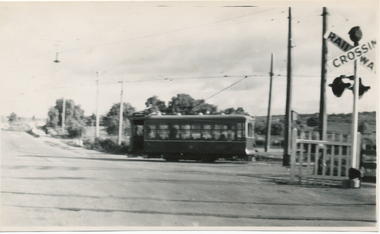
Photograph - Black & White Photograph/s, Wal Jack, 12/04/1950 12:00:00 AM
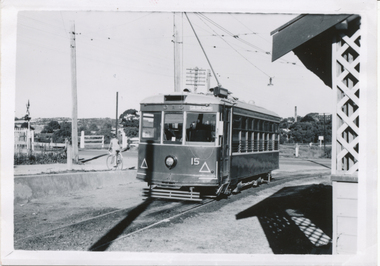
Black and White print contained within the Wal Jack Bendigo and Geelong Album, see Reg Item 5003 for more details. Photo of Bendigo Birney No.15 at North Bendigo, Photo Wal Jack, with the destination of Golden Square - 12-4-1959. Has the level crossing and rail line in the background and part of the tram stop shelter. i1 - scan of print in the album i2 - rear of image i3 - scan of negative at 3200dpi added 6/6/2020. On the rear in black ink "SEC Bendigo, No. 15 at Nth Bendigo 12-4-1959. Has the Wal Jack copyright stamp in the top right corner with the number "T219" written in.trams, tramways, bendigo, north bendigo, level crossings, birney, tram 15 -
 Ballarat Tramway Museum
Photograph - Black & White Photograph/s, Wal Jack, 12/04/1959 12:00:00 AM
Black and White print contained within the Wal Jack Bendigo and Geelong Album, see Reg Item 5003 for more details. Photo of Bendigo Birney No. 29 and 15 in Pall Mall, near Charing Cross, 12-4-1959, Photo by Wal Jack. Has in the background, The Beehive buildings, Jopp? Cafe, Wm Jones building, Chemist, and A.G. Trello? Opticians. i1 - scan of print in the album i2 - rear of image i3 - scan of negative at 3200dpi added 6/6/2020. On the rear in black ink "SEC Bendigo #29 (left) for North Bendigo, and 15 (right) for Golden Square, photographed from #28, at Pall Mall 3.40pm, Sun 12th April 1959", in bottom left hand corner "Wal Jack Photo"trams, tramways, bendigo, pall mall, charing cross, birney, tram 15, tram 29 -
 Ballarat Tramway Museum
Photograph - Black & White Photograph/s, Leon Marshall Wood, 29/12/1947 12:00:00 AM
Black and White print contained within the Wal Jack Bendigo and Geelong Album, see Reg Item 5003 for more details. Photo of Bendigo Birney No.30 at North Bendigo, Photo Leon Marshall Wood, with the destination of Golden Square - 29-12-1947. Has the level crossing and rail line in the background and part of the tram stop shelter. On the rear in black ink "SEC of Victoria Bendigo, ex Geelong "Birney" car No. 30 Nth Bendigo terminus. In the bottom left hand corner "29.12.1947" The Leon Marshall Wood stamp in green ink and the number "SEC 15" written in.trams, tramways, bendigo, north bendigo, level crossings, birney, tram 30 -
 Ballarat Tramway Museum
Photograph - Black & White Photograph/s, Wal Jack, 3/01/1954 12:00:00 AM
Black and White print contained within the Wal Jack Bendigo and Geelong Album, see Reg Item 5003 for more details. Photo of Bendigo Birney No.28 in High St Bendigo, 3-1-1954, Photo Wal Jack. Has in the background the City Club Hotel, Desmond's Radio Parts and a Ice cream shop and Marshalls Fruit Shop Printed on Ilford Paper. See image i2 for rear of photograph. See image i3 for hi res scan of negative On the rear in black ink "SEC Bendigo Birney 28 to Golden Square, High St Bendigo, 3-1-54", in the top left hand corner, the Wal Jack copyright stamp but with no number written in.trams, tramways, bendigo, high st, birney, tram 28 -
 Ballarat Tramway Museum
Photograph - Black & White Photograph/s, c1950
Black and White print contained within the Wal Jack Bendigo and Geelong Album, see Reg Item 5003 for more details. Photo of Bendigo Birney No. 30 leaving North Bendigo terminus, crossing Thunder St with the level crossing in the foreground. Photo c1950. On rear in ink "SEC B"trams, tramways, bendigo, birney, north bendigo, level crossings, tram 30 -
 Ballarat Tramway Museum
Photograph - Black & White Photograph/s, Wal Jack, 3/01/1954 12:00:00 AM
Black and White print contained within the Wal Jack Bendigo and Geelong Album, see Reg Item 5003 for more details. Photo of Bendigo Birney No. 28 in Pall Mall opposite near Post Office, Photo by Wal Jack, 3-1-54. In the background are shops for: Suttons Furniture, McKenna's, Hume & Iser Dispensary, and Gestetner Sales and Service. On the rear in blue ink "SEC Bendigo Birney No. 28 Birney ex North opposite Post Office 3-1-54" with Wal Jack copyright stamp in the top right hand corner and the number "T214" written in.trams, tramways, bendigo, pall mall, birney, tram 28 -
 Ballarat Tramway Museum
Photograph - Black & White Photograph/s, Wal Jack, 10/04/1950 12:00:00 AM
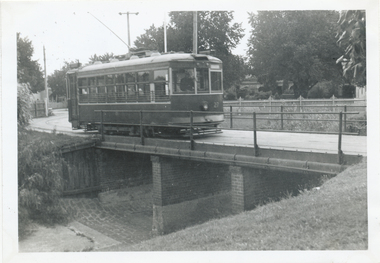
Black and White print contained within the Wal Jack Bendigo and Geelong Album, see Reg Item 5003 for more details. Photo of Bendigo Birney No. 27 crossing the bridge entering the depot 10-4-1950, Photo by Wal Jack. Printed on Ilford paper. i1 - scan of print in the album i2 - rear of image i3 - scan of negative at 3200dpi added 6/6/2020. On the rear in blue ink "SEC Bendigo Birney #27 crossing over creek near depot 10-4-50" with Wal Jack copyright stamp in the top right hand corner and the number "T210" written in.trams, tramways, bendigo, depot, birney, tram 27 -
 Ballarat Tramway Museum
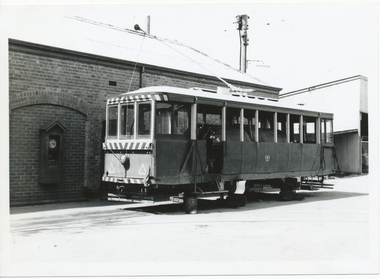
Photograph - Bendigo new scrubber outside the depot, Wal Jack, 7/03/1954
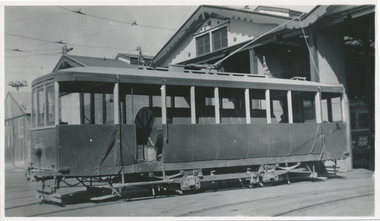
Photo of Bendigo of the then new scrubber outside the depot, 7-3-1954, Wal notes say converted from No. 17 Summer car. Photo by Wal Jack. Printed on Ilford paper. The Bendigo Trust rebuilt the tram back to its cross bench form during the 1970s. See image i2 for rear of photograph. See image i3 for hi res scan of negative See image i4 for hi res scan of negative of a second almost identical photograph.Yields information about the Bendigo scrubber converted from a cross bench tram.Black and White print contained within the Wal Jack Bendigo and Geelong Album, see Reg Item 5003 for more details.On the rear in blue ink "SEC Bendigo "New" water scrubber converted from No. 17 Summer car Bendigo Depot 7-3-54" with Wal Jack copyright stamp in the top right hand corner and the number "T70PC" written in.trams, tramways, bendigo, depot, scrubber tram, scrubber -
 Ballarat Tramway Museum
Photograph - Black & White Photograph/s, Wal Jack, 7/03/1954 12:00:00 AM
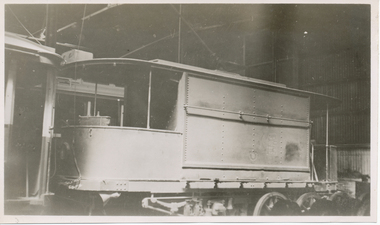
Black and White print contained within the Wal Jack Bendigo and Geelong Album, see Reg Item 5003 for more details. Photo of the first or old Bendigo Water tram or scrubber inside the depot, 7-3-1954, Photo by Wal Jack. Wal's album notes say that the vehicle is "now out of use". See Reg Item 7880 for another photograph from the other side. See image i2 for rear of photograph. See image i3 for hi res scan of negative On the rear in blue ink "SEC old "Brush" scrubber inside depot 7-3-54" with Wal Jack copyright stamp in the top right hand corner and the number "T73PC" written in.trams, tramways, bendigo, depot, scrubber tram, sprinkler tram, scrubber, sprinkler -
 Ballarat Tramway Museum
Photograph - Black & White Photograph/s, Wal Jack, 6/01/1963 12:00:00 AM
Black and White print contained within the Wal Jack Bendigo and Geelong Album, see Reg Item 5003 for more details. Photo of the Bendigo Scrubber tram with the truck removed and placed on blocks etc in the depot yard track extension. Photo by Wal Jack 6-1-1963. Has the Bundy clock to the side of the tram. Note how the trolley pole has been held down and there is a flag on the running side of the tram. Printed on Ilford Paper. i1 - scan of print in the album i2 - rear of image i3 - scan of negative at 3200dpi added 6/6/2020. On the rear in blue ink "SEC Bendigo, Scrubber on block, depot yards, 6-1-63" with Wal Jack copyright stamp in the top right hand corner and the number "T222" written in.trams, tramways, bendigo, depot, scrubber tram, sprinkler tram, sprinkler, scrubber -
 Ballarat Tramway Museum
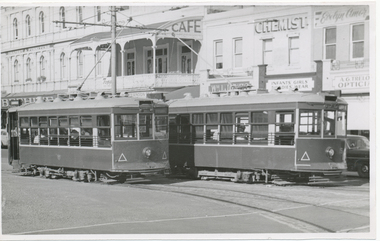
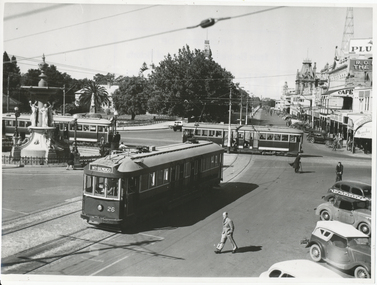
Photograph - Black & White Photograph/s, State Electricity Commission of Victoria (SECV), late 1940's
Black and White print contained within the Wal Jack Bendigo and Geelong Album, see Reg Item 5003 for more details. Photo of the Charing Cross with three bogie trams at the intersection, SEC publicity photo c1950. Two of the bogies crossing on the Eaglehawk - Quarry Hill line have white or cream strips on the lower edge of the body. No 26 has the destination of North Bendigo, though it is on Golden Square line with the driver standing just inside the doorway. In the background is the fountain, the Gardens and Pall Mall. SEC Publicity Photo, see Inscriptions for notes re photo. On the rear is the SEC Publicity Photo stamp, with negative number 21.1 written in, "Yallourn" in pencil and a typed piece of paper taped to the rear of the photo noting the Provincial tramways owned by the SEC, but that it is loss making.trams, tramways, bendigo, charing cross, secv, pall mall, tram 26 -
 Ballarat Tramway Museum
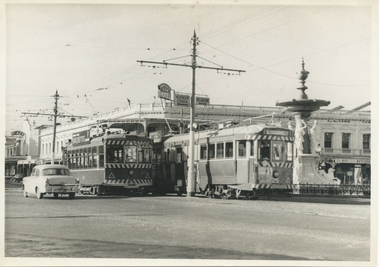
Photograph - Black & White Photograph/s, 25/09/1961 12:00:00 AM
Black and White print contained within the Wal Jack Bendigo and Geelong Album, see Reg Item 5003 for more details. Photo of Birney No. 28 and Bogie tram No. 25 Bendigo, at Charing Cross with the fountain in the background along with the City Club Hotel). No. 28 has the destination of Special and a SEC roof advertisement for Briquettes, No. 25 Eaglehawk? and has a white disk showing a tram following. Note the direction signs on the pole between the tram for Heathcote and Echuca and Melbourne. Photo by Jim Seletto, 25/9/1961. On rear in ink "No. 28 Birney, No. 25 Bogie", Jim Seletto stamp, with date stamp of "25 Sep 1951" and "Bendigo" in red ink.trams, tramways, bendigo, charing cross, birney, tram 25, tram 28 -
 Ballarat Tramway Museum
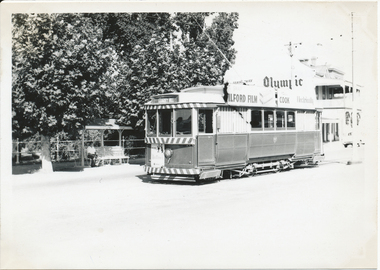
Photograph - Black & White Photograph/s, Wal Jack, 6/01/1963 12:00:00 AM
Black and White print contained within the Wal Jack Bendigo and Geelong Album, see Reg Item 5003 for more details. Photo of the Bendigo 7 at Eaglehawk 6-1-1963. Wal's album notes note that the tram ex Ballarat No. 19. The tram has the destination of Eaglehawk and has advertisements for Ilford Film and Electricity cooking on roof and Hutton's ham on rear drivers dash panel. In the background is the Park Hotel with the wall painted for Beaurepaires Olympic tyres. Printed on Ilford Paper. i1 - scan of print in the album i2 - rear of image i3 - scan of negative at 3200dpi added 6/6/2020. On the rear in blue ink "SEC Bendigo, 3rd No. 7 ex Ballarat No. 19. Eaglehawk, 6-1-63" with Wal Jack copyright stamp in the top right hand corner and the number "T1311" written in.trams, tramways, bendigo, eaglehawk, tram 7 -
 Ballarat Tramway Museum
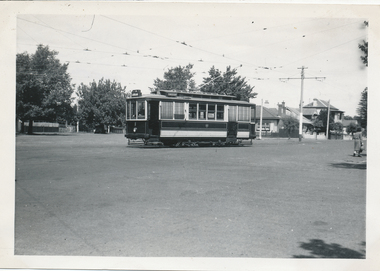
Photograph - Black & White Photograph/s, Wal Jack, 3/01/1945 12:00:00 AM
Black and White print contained within the Wal Jack Bendigo and Geelong Album, see Reg Item 5003 for more details. Photo of Geelong No. 1 turning out of Ryrie St into Garden St 3rd January 1945, with destination of East. Photo by Wal Jack. See also Reg Item 4395 for another copy of this photograph used by W. F. Scott. Printed on Ilford Paper. i1 - scan of print in the album i2 - rear of image i3 - scan of negative at 3200dpi added 27/6/2020. On the rear in blue ink "SEC Geelong No. 1 to East, turning out of Ryrie St into Garden St 3rd January 1945" with Wal Jack copyright stamp in the top right hand corner and the number "T318" written in.trams, tramways, geelong, ryrie st, tram 1 -
 Ballarat Tramway Museum
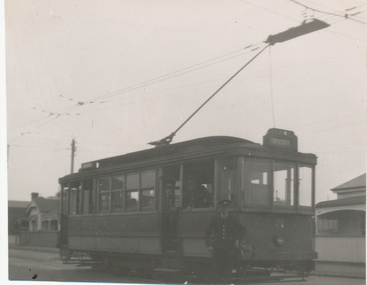
Photograph - Black & White Photograph/s, Ken Magor?, c1940
Black and White print contained within the Wal Jack Bendigo and Geelong Album, see Reg Item 5003 for more details. Photo of Geelong No. 8 at the West terminus. The tram has the destination of West and has a driver standing by the rear of the tram. Photographer Ken Magor? - same hand writing as Reg Item 5837. c1940? On rear in pencil " SEC Geelong No. 8 at West terminus"trams, tramways, geelong, west, tram 8 -
 Ballarat Tramway Museum
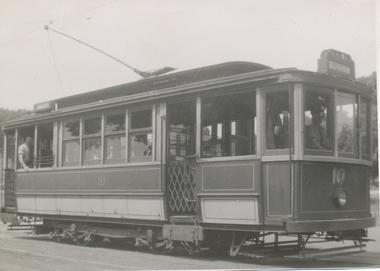
Photograph - Black & White Photograph/s, Ken Magor, Geelong 10 at Beach terminus, 26/2/1948
Yields information about Geelong tram No. 10 in 1948.Black and White print contained within the Wal Jack Bendigo and Geelong Album, see Reg Item 5003 for more details. Photo of Geelong No. 10 at the Beach terminus, 1940's. Photos by Ken Magor, Negative No. 3103. Taken on a summers day as the crew are in rolled up shirt sleeves. Two copies held - second is dated 26/2/1948.On rear in ink "SEC Geelong, No. 10 at Beach terminus" Has in bottom right hand corner Ken Magor stamp with negative number "3103" written in. In the bottom left hand corners has details of the photograph itself.trams, tramways, geelong, beach, tram 10 -
 Ballarat Tramway Museum
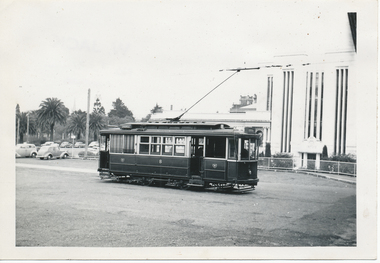
Photograph - Black & White Photograph/s, Wal Jack, 27/06/1955 12:00:00 AM
Black and White print contained within the Wal Jack Bendigo and Geelong Album, see Reg Item 5003 for more details. Photo of Geelong No. 8 at the Railway Station with the Gordon Institute buildings in the background. The tram has the destination of Chilwell. Photo by Wal Jack 27/6/1955. Printed on Ilford paper. i1 - scan of print in the album i2 - rear of image i3 - scan of negative at 3200dpi added 27/6/2020. On rear in ink "SEC Geelong No. 8 to Chilwell at Geelong Station". Has the Wal Jack copyright stamp in the top right hand corner with the number "T331" written in and the date "27 Jun 1955" stamped with a purple ink hand date stamp.trams, tramways, geelong, railway station, tram 8