Showing 8392 items
matching u-49
-
 Ballarat Tramway Museum
Film - Movie Film & Box, Kodak, 1960
Yields information in movie film format of Ballarat trams in 1960, how the system operated and was used by people., Yields information in movie film format of Ballarat trams in 1960, how the system operated and was used by people.Movie film - 8mm, approx. 30mins, with leader strip on a plastic reel, within a black and white plastic box, titled "Ballarat No. 1. 1960". Has been transferred to DVD - see Reg item 4100 as Segment No. 2. Made by Ben Parle. Also transferred to DVD by Rod Cook Oct. 2015, via Roger Greenwood for use in his DVD, "The City of Ballarat Trams, Gardens & Gold" of 2016. See Reg Item 6883. Synopsis: based on time. 0:00 View of typed introduction, noting that this is a pictorial record of Ballarat. 0:10 Title “The Tramways of Ballarat 1960, Part 1” 0:16 13, showing “View Point” at Stones Corner, Bridge St, east end, with trolley pole being turned, while another single trucker heads out towards Mt Pleasant. 0:25 13 leaving Stones Corner, short approach and then longer trailing shot of the tram going towards the City in Bridge St. 0:44 View out of front of tram in Bridge St heading towards the City, with cars in the photo, then passing through city Loop, no trams in the loop and running up to Lydiard St Nth and crossing the road. 1:22 Running up Sturt St from Armstrong St, passes over Dawson St X-over and up to the next intersection, Lyons St. 1:54 Title “The View Point Line” 1:59 19 inbound, in Ripon St, from crossing Mair St, towards camera and then passing away and turning into Sturt St. 2:49 View of a “Warning Oncoming Trams” sign 2:52 19 in Ripon St, going to View Point, crossing Webster St towards camera, then going away through the disconnected Victoria Ave loop, pass the “Warning Oncoming Trams” sign. Note very windy scene with people running across roads. 3:17 19 in Wendouree Parade, in bound, though showing destination View Point, going away from the camera, past the View Point Hotel. 3:39 19 coming towards camera near Excerpt or Devon St and then going away towards the terminus. 4:04 19 at the terminus, stationary, with a single trucker 3?, passing from Macarthur St into Wendouree Parade, behind 19. 4:20 33 coming towards camera in Wendouree Parade from St Aidans Drive, stopping to pick up passenger at Forest St and then going away towards the City, photographed from near the depot, on a wet and windy day. 4:54 35 in Wendouree Parade, coming towards the Camera from St Aidans Drive and then going away with the Gardens Loop area in the background. Tram stops at stop to let a passenger off. 5:28 21 leaving Gardens Loop for the City via the Depot, green light in signal can be seen. 5:43 28?, closely followed by 26 turn from Drummond St South into Sturt St. 6:18 Scene opens with shot of “Sebastopol” destination on a bogie tram. 6:21 Title “The Sebastopol Line” 6:24 21 turning from Sturt St into Drummond St Sth with destination of Bell St and then going away from the camera. 6:55 38 in Drummond St Sth, coming towards the camera and then passing the camera with Sturt St just in the view. 7:10 21, showing Gregory St, in Drummond St Sth, approaching and then going away, entering the Urquhart St Loop, 7:39 34 in Drummond St Sth (location check required (Latrobe?)), approaches camera, picks up passengers and the goes away. 8:09 39 at ? Street, turns from Drummond St Sth into Skipton St, after picking up and setting down passengers, bound for Sebastopol 8:55 35 inbound in Skipton St passes through the Bell Street Loop, and then goes away from the camera. 9:33 42 outbound in Skipton St, approaches the camera, passes and then crosses over the half the road into Albert St. 10:00 39 inbound in Albert St – location? 10:31 34 outbound for Sebastopol, approaches camera and just starts to pass by. 10:36 34 in Grey St crossing loop, crosses 42 inbound. 10:59 39 outbound in Albert St, with shopping centre in bound, approaches camera, passes and then crosses over Albert St. Mid morning scene. 11:39 39 inbound, Albert St south, approaches camera and then passes and the crosses over Albert St. 12:16 41 outbound in Albert St passes the camera, and pulls into the terminus with the conductor getting out on the back bumper to pull the pole down as the tram stops and a passenger walks into the Royal Hotel. 12:39 Title “The Lydiard Street North Line” 12:44 Filmed from the Hotel balcony, 21 inbound in Lydiard St Nth passes over Mair St, stops while 33 passes in the other direction. 13:18 With the red light showing on the Seymour St loop signal, 33 inbound for Sebastopol stops and picks up many passengers, passes the camera and runs past the VRI building in the background and through the loop. Possibly filmed on a Sunday given the ladies dresses and quieter streets. 14:01 30 outbound, passes the camera and stops at Macarthur St. Filmed alongside the brick wall of the cutting. 14:28 30 inbound arrives, passes through the Gregory St loop and then proceeds past the camera, making a stop to pick up passengers. 15:14 28 in Lydiard St Nth – location?, approaches and goes away from the camera, north of Gregory St. 15:34 28 ditto location? 15:53 21 arrives at the terminus with passengers getting on and off. 16:11 View of the a vertical positioned “End of Section” sign on a pole at the terminus and then lifting the camera to see the timetable board and the stop sign. 16:33 31 in Bridge St passing Morseheads and then turning into Sturt St, stops at the Grenville St stop, while another single trucker comes down to the stop from the City. 16:58 31 outbound in Bridge St, with destination of Victoria St. 17:14 Title “The Victoria Street Line” 17:18 31 outbound to Victoria St from Stones Corner. Starts with an overhead shot, shows clock at the Caltex service station,. 17:37 31 inbound approaching Bakery Hill and then descending to the junction after it passes camera. 18:09 25 climbing outbound in Victoria St, passing the camera, to then pass through the King St loop. 18:47 25 inbound in Victoria St, passing the camera, then pass through the King St loop, with St Alypius Church in the background. 19:36 14 approaching the rail bridge in Victoria St and stopping at the 2nd last stop to left of passengers. 20:01 14 leaving the terminus and approaching the camera and the a short sequence going away, to the next stop to pick up quite a few passengers. 20:14 “Trams Stop Here” sign, metal wrap around on a steel pole. 20:16 Title “The Mount Pleasant Line” 20:21 11 inbound in Main St, with a passenger leaping off the tramcar and another getting off just before the junction. 20:45 11 passes the junction and then proceeds away from the camera in Bridge St. 21:04 30 outbound in Main St, then turns into Barkly St, a bus (Eclipse Motors) passes in Main St just before the sequence ends. 21:31 30 inbound near Steinfield St. (exact location?) 21:49 25 approaches the camera, then proceeds away and passes through the Grant St. loop. 22:29 25 inbound, windy day, between Grant and Cobden, (exact location?), with a horse drawn bread van in the view and the breadman walking behind the tram as it passes. 23:02 11 outbound in Barkly St, (exact location?) 23:37 11 inbound in Barkly St (exact location?) 23:44 Mt Pleasant terminus signage 23:50 30 approaches the terminus and then stops with the conductor alighting turning the pole, passengers getting on and off and the driver appearing at the other end. 24:32 Title “The Gardens Via Sturt St. West Line” 24:35 21 outbound in Sturt St near Raglan St, approaches and passes the Camera. 25:09 12, showing City Oval, approaches and passes the camera, outbound near Windermere St. 25:33 13 showing View Point, goes away from the camera – location? 25:44 12 comes from St. West, inbound passes the camera and then stop as the next stop next Talbot St? 26:21 Short sequence of a “Warning Oncoming Trams” sign 26:28 42 inbound in Sturt St West, just before Ripon St, view coming towards camera and then going away to cross Ripon St. 27:10 34 passes through the Parker St loop 27:25 35 or 39 inbound past the college in Sturt St West 28:04 41 outbound at the Russell St curve, passes away from the camera. 28:11 35? inbound passes away from the camera through the Victoria Park or Morrison St loop, swinging out into the roadway. 28:29 View of timetable sign at Hamilton Ave. 28:37 35 turning from Sturt St West into Hamilton Ave, can see the conductor changing over the barrier rails. 29:11 42 inbound, crosses another bogie tram (35?) at Carlton St loop then passes the camera and goes past the Olympic rings monument. 29:42 12 approaches the Carlton St gates. 30:07 12 outbound, crosses a bogie tram in the loop with both trams then leaving the loop. 30:20 Title “End of Part One” Written labels giving title information on outside of box.trams, tramways, ballarat, sebastopol, lydiard st north, victoria st, mt pleasant, sturt st west -
 University of Melbourne, Burnley Campus Archives
Album - Black and white and colour slides, Burnley Views, 1947-1955
Contributor: T.H. KneenCardboard box of 108 35mm glass slides in metal frames made by "Gnome." Box labelled "Burnley Gardens Slides." Also 16 unused slides (1) Swan Street entrance c. (2) Orchid? b/w. (3) Nursery b/w. (4) Pasture area with man working b/w. (5) Draught horse working in the Orchard b/w. (6) Crop of corn in the Orchard c. (7) Magnolia c. (Magnolia x soulangeana). (8) Display of orange flowers c. (9) Lemon tree in the Orchard c. (10) Sign advertising 'Fruit Tree Pruning Demonstarion Sat. 2nd July (1949) c. (11) Jersey cow c. (12) Rock Point c. (13) Dahlias in the Orchard c. (14) Foundation Stone '28th August, 1946' c. (15) Felled Cypress tree 1951 b/w. (16) School truck in front of glasshouses and cacti b/w. (17)Administration Building completed but surrounded by rubble C.1949 c. (18) Plant Research Institute c. (19) Inside a glasshouse. c. (20) Administration Building c. (21) Group of female students dressed up for a function c. (22) Solenostemon (Syn. Coleus) in a glasshouse. (23, 24)Stock Matthiola incana. (25) Blossom in the Orchard c. (26) Orchard c. (27) Picking fruit in the Orchard c. (28) 2 female students holdong large bunches of poppies c. (29) Flowers growing in the Orchard c. (30) House - not Burnley c. (31) Students on an excursion c. (32) Staff member with Gladioli c. (33) Garden view - not Burnley? c. (34) Administration Building c. (35) Roses c. (36) Flowers in the Orchard c. (37) Draught horse working in the Orchard c. (38) Staff member amongst flowers in the Orchard c. (39) Garden view c. ((40) Blossom in the Orchard c. (41) Orchard c. (42) Flowers inside glasshouse c. (43) Mesembryanthemums in pots possibly in the nursery c. (44) Tree b/w. (45) Garden bed c. (46) Sign, 'Agrostology Branch, pasture Plant Research Field,' c. (47) Path to Principal's Residence c. (48) Irrigation in the Orchard b/w. (49) Cactus flowers b/w. (50) Garden view with T.H. Kneen children playing c. (51) (52) Cinerarias (now Pericallis x hybrida) in pots c. (53) Temporary building where the Grey Garden is now b/w. (54) Garden view b/w. (55) Unknown building b/w. (56) Person pruning in the Orchard c. (57) Students working in the Orchard c. (58) Swan Street with recently completed rock wall constructed by the Public Works Department b/w. (59) Lagoon paddock b/w. (60,62) Pavilion and new Administration Building before the Pavilion was removed b/w. (61) As (60) but viewed from a different direction c. (63) Plant c. (64) View through a window on the stairs in the Administration Building c. (65) Plant c. (66) Garden view of trees c. (67) Garden View b/w. (68) Blossom tree c. (69 )Garden view along path to Principal's Residence c. (70) Lagoon Paddock c. (71) Lagoon Paddock with cows b/w. (72) Inside a glasshouse b/w. (73) Entrance sign- Department of Agriculture Burnley Gardens, School of Horticulture & Primary Agriculture, Plant Research laboratory, Agrostology Branch, Fruit Preserving Branch c. (74) Plant Research Laboratory b/w. (75) Students on an excursion c. (76) Glasshouses b/w. (77) Garden view b/w. (78) Kniphophia c. (79) Hibiscus c. (80) Garden view c. (81) Dairy, Silo and dog b/w. (82) Irrigation in then Orchard b/w. (83) Garden view with magnolia c. (84) Flower plots in the Orchard c. (85) Pruning demonstration b/w. (86) Administration Building under construction c. (87) Rock Point c. (88) Mrs Kneen and Magnolia c. (89) Glasshouses c. (90) Sequoia sempervirens b/w. (91) Inside Administration Building c. (92) Luffmann Ponds b/w. (93) Sequoia sempervirend, Mrs Kneen and child c. (94) Garden bed in front of Sequoian sempervirens c. (95) Principals Residence b/w. (96) Poultry pens b/w. 1947 (97) Principals Residence b/w. (98) Student picking fruit from netted tree b/w. (99) Rock Point and Long Border c. (100) Administration Building under construction c. (101) Greenhouse b/w. (102) Rock Point c. (103) Flowers in the Orchard c. (104) Waterlilies in the Pond c. (105) Blossom tree c. (106) Hilda Kirkhope Rockery c. (107) Long Border c. (108) Plant Research Institute with flower border along drive c.burnley gardens, flower, nursery, pasture, draught horse, orchard, crops, magnolia, chicken coops, egg laying competition -
 Victorian Bands' League
Notebook, Victorian Bands' League Contest Records (1939 - 1950)
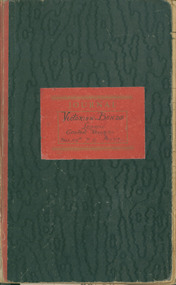
This book contains some of the earliest details of competition results formalized in a notebook format. The competitions date from 1939 and proceed until 1950. As special interest it contains details of events held during the years of the Second World War when the South Street Competition was in recess. Basic details on the competitions covered by this book, and the pages they are listed on can be found below: Table of Contents: 2. 1939 Bendigo Contest – A Grade 4. 1939 Bendigo Contest – B Grade 5. 1939 Bendigo Contest – Street March 6. 1939 Bendigo Contest - C Grade 8. 1939 Bendigo Contest – D Grade 9. 21/05/1939 – Hawthorn Band Contest 11. 29/01/1940 – Kyneton Contest 13. 23/03/1940 – Bendigo Contest – C Grade 15. 12/10/1941 – Massed Bands M.C.G. – Oval March / Street March 16. 21/09/1941 / 05/10/1941 / 19/10/1941 / 09/11/1941 – Group Contest 17. 02/12/1944 - 03/12/1944 – Frankston – A Grade 18. 02/12/1944 - 03/12/1944 – Frankston – B Grade 19. 02/12/1944 – 03/12/1944 – Frankston – C Grade 20. 02/12/1944 – 03/12/1944 – Frankston – D Grade 21. 02/12/1944 – 03/12/1944 – Standard Newspapers Shield, Frankston – Full Results Table 23. 04/02/1945 – Williamstown 25. 27/04/1945 – Solo & Party Championships (Kelvin Hall) 26. 27/04/1945 – 28/04/1945 – Solo & Party Championships (Kelvin Hall) 27. 28/04/1945 – Solo & Party Championships (Kelvin Hall) 29. 26/12/1945 – Fern Tree Gully – D Grade & C Grade 30. 26/12/1945 – Fern Tree Gully – B Grade & A Grade 31. 29/12/1945 – Frankston – D Grade 32. 29/12/1945 – Frankston – C Grade 33. 29/12/1945 – Frankston – B Grade 34. 01/01/1946 – Frankston – A Grade (Australian Championship) 35. 01/01/1946 – Standard Newspapers Shield, Frankston – Full Results Table 36. 29/12/1945 – Frankston – Solo & Party Competitions – Events 1 - 6 37. 29/12/1945 – Frankston – Solo & Party Competitions – Events 7 – 10 38. 29/12/1945 – Frankston – Solo & Party Competitions – Events 11 – 13 39. 22/04/1946 – Colac Contest 41. 01/01/1948 – Maryborough Contest – D Grade 47. 28/03/1948 – 29/03/1948 – Bendigo Contest – B Grade 48. 28/03/1948 – 29/03/1948 – Bendigo Contest – C Grade 49. 28/03/1948 – 29/03/1948 – Bendigo Contest – D Grade 50. 28/03/1948 – 29/03/1948 – Bendigo Contest – Aggregates 52. 06/09/1948 – St Kilda 53. 05/09/1948 – Heidelberg 57. 28/10/1948 – Ballarat – D Grade 58. 28/10/1948 – Ballarat – C Grade 59. 30/10/1948 – Ballarat – B Grade 60. 30/10/1948 – Ballarat – B Grade (Cont.) 61. 30/10/1948 – Ballarat – A Grade 62. 30/10/1948 – Ballarat – A Grade (Cont.) 63. 28/10/1948 – Ballarat - D & C Grades – Street March 64. 28/10/1948 – Ballarat – B & A Grades – Street March 65. 30/10/1948 – Ballarat – A & B Grades – Trophy listing 66. 30/10/1948 – Ballarat – C & D Grades – Trophy listing 67. 26/10/1948 – Ballarat – Solo & Party Competition 68. 26/10/1948 – Ballarat – Solo & Party Competition (Cont.) 69. 27/10/1948 – Ballarat – Solo & Party Competition 70. 27/10/1948 – Ballarat – Solo & Party Competition (Cont.) 71. 27/10/1948 – Ballarat – Solo & Party Competition 72. 27/10/1948 – Ballarat – Solo & Party Competition (Cont.) 73. 27/10/1948 – Ballarat – Solo & Party Competition 79. 13/03/1949 – Bendigo Group Contest 81. 20/03/1949 – Gippsland Group Contest 83-84. 17/04/1949 – Bendigo Easter Contest – C Grade 85. 07/10/1949 – Heidelberg – C Grade 87. 27/10/1949 – Ballarat – D Grade 88. 27/10/1949 – Ballarat – D Grade (Cont.) 89. 28/10/1949 – Ballarat – C Grade 90. 28/10/1949 – Ballarat – C Grade (Cont.) 91. 29/10/1949 – Ballarat – B Grade 92. 29/10/1949 – Ballarat – B Grade (Cont.) 93. 29/10/1949 – Ballarat – A Grade 94. 29/10/1949 – Ballarat – A Grade (Cont.) 95. 25/10/1949 – Ballarat – Solos 96. 25/10/1949 – Ballarat – Solos (Cont.) 97. 25/10/1949 – 26/10/1949 – Ballarat – Solos 98. 26/10/1949 – Ballarat – Champion of Champions / Solos 99. 29/10/1949 – Ballarat – Special Quickstep 100. 29/10/1949 – Ballarat – Special Quickstep 101. 19/02/1950 – Leongatha – D Grade 102. 19/02/1950 – Leongatha – D Grade – Full Results Table 103. 12/03/1950 – Bendigo Easter Fair Contest 104. 12/03/1950 – Bendigo Easter Fair Contest – Full Results Table 105. 12/03/1950 – Bendigo Easter Fair Contest – Selection / Hymn / Aggregate 106. 28/08/1950 - 01/09/1950 – Solo & Party Competitions (Assembly Hall) – Events 1 - 2 107. 28/08/1950 - 01/09/1950 – Solo & Party Competitions (Assembly Hall) – Events 3 - 7 108. 28/08/1950 - 01/09/1950 – Solo & Party Competitions (Assembly Hall) – Events 8 – 11 109. 28/08/1950 - 01/09/1950 – Solo & Party Competitions (Assembly Hall) – Events 12 – 15 110. 28/08/1950 - 01/09/1950 – Solo & Party Competitions (Assembly Hall) – Events 16 – 20 111. 10/10/1950 – 12/10/1950 – Heidelberg Contest – Solos – Events 2 – 11 112. 13/10/1950 – Heidelberg Contest – C Grade 113. 24/10/1950 – South Street Victorian Championships – Solo & Party Competition 114. 25/10/1950 – South Street Victorian Championships – Solo & Party CompetitionThis book is very significant to the history of the Victorian Bands' League due to the richness of historical data that it contains and the amount of competitions that were covered. Leather bound notebook, 190. -
 Melbourne Tram Museum
Album - Photo Album, John Etkins, Ray Marsh, 1990's
Photo Album - 48 sheets bound with a white circular metal/plastic spiral bound within a heavy duty cardboard cover, with glued cover pages, plastic covered with an index sheet. Allows for three photographs per page. Not known whether the plastic envelope for each photograph is of archival quality. No Manufacture detail, though has a bar code on the bottom left hand corner of the rear cover. Cover is a reproduction from a painted art piece. Listing of photographs given on htd1800-RayMarshalbum.pdf Dates given when written on the rear of the photograph. Compiled by John Etkins from photographs given to him by Ray Marsh. 1990's to 1993 generally. Page Tram/s Notes – dates given when on rear of photograph. 1 226 Loading passengers – ex MMTB Annual Report? 1 957 City Circle 1 “hands off our trams” protest march 2 2100, 231 South Melbourne Depot – 10-4-1993 2 676 And many others – Hawthorn Depot 2 217 Princes Bridges 3 380, 104 St Kilda Road 3 106, 104 Essendon Depot 3 431 As a W1 4 1011 Fresh fruit tram, Preston Depot 6-12-1992, 4 824 Day in Day out, Brunswick and Victoria Parade 29-4-1993 4 722 Art tram 5 ? Advert tram – Imperial China 5 237 Stubbsy tram – TrippleM? 6 856 City Circle – with gas and fuel building – 31-7-1994 6 925 City Circle - with gas and fuel building – 31-7-1994 6 728 City Circle – 10-8-1994 7 246 Navy tram x three pics – July 1992 8 ? Gold tram advertising Georges 8 990 Advertising Telstra– 29-4-1993 8 749 Art tram? 9 990 NRMA - 1-3-1994 9 727, 215 Public Transport 9 920 Advert tram with a picket fence 10 Bendigo 21 Preston Workshops 11-3-1993 10 774? W5 being rebuilt at Preston – 21-10-1991 11 ? Bogie cable trailer at Preston – 29-4-1993 11 922 Interior view of a tram – being modernised – 11-3-1993 11 922 Preston Workshops 29-4-1993 12 1018 Workcare tram at Preston 1994 – 11-8-1994 12 774 Preston Workshops – 20-12-1993 12 8 Preston Workshops – 1-10-1992 13 380 Preston Workshops 13 8 Preston Workshops 13 20, 8 Preston Workshops 14 721 Preston Workshops 20-12-1993 14 ? Tramways painted artist tram featuring a driver and workshop 14 Traverser Preston Workshops 15 2110, 2106 Preston Workshops 15 ? Preston Workshops 15 2130 Interior Preston Workshops 20-12-1993 16 Set of three pics Elizabeth St floods – 17-2-1972 17 Set of three pics Elizabeth St floods – 17-2-1972 18 676 Turning into Swanston St from Batman Ave 18 676 Kew Depot – 10-11-1991 18 237, 676, 611 Kew Depot – 10-11-1991 19 214, 676 South Melbourne Depot – Kingsway 19 217 Spencer St 19 214 Advertising Kew Depot Open Day -8-12-1991 20 231, 676 Advertising Kew Depot Open Day -8-12-1991 20 Zoo tram, 256 Outside Kew Depot 20 214 Hawthorn Open Day with band 21 Zoo tram x 3 pics And horses, Kew Open day 22 231, 431 Kew Depot 22 892, 214 Kew Depot 75 years, Postcard – 1991 22 282 Kew Depot – with the name Monique on the tram and a lady standing alongside 23 238, 233 Kew Depot 23 236, 892, 282 Kew Depot – 25-4-1992 23 232, 236, 282 Kew Depot 24 2112 Port Melbourne line – with long grass – 11-4-1993 24 469, 2037, ? 2015 South Melbourne Depot 24 1018 or 976? Advertising a PTC Open Day – 20-10-1991 – In Swanston St - see Reg Item 1845 25 250 Bourke St 25 2100 Running into Preston Workshops 25 282, 1003 Collins St in the rain 26 Logo PMTT 26 Point cover With P&MTT cast into the cover 26 Foundation Stone Person reblocking in gold, a PMTT Foundation Stone 27 Logo Tramway Board 27 Logo MMTB logo 27 Logo Footscray Tramways Trust 28 217 And 2’gauge W2 – South Melbourne Depot – 20-10-1991 28 164 Somewhere? 28 1018 Advert tram – “Moro”, Preston flyover 29 V214 x 3 pics Kew Depot 30 611 Whitehorse Road, Balwyn 5-10-1991 30 976 x 2 pics Advert tram – have a red instead 31 610 Malvern Depot 31 138 (max tract) Flinders St 31 138 (max tract) Bourke into Spencer 32 844 Victoria Parade with R10 behind 32 264 With a TV interview being undertaken 32 2066 Elizabeth St – 29-4-1993 33 255 x 2 pics Derailed at Kew Depot 33 253 Derailed outside the Beehive Hotel 34 214, 892, 611 Re-enactment of Victoria Bridge to Esplanade service – 10-11-91 34 726 Art tram? – Swanston St with overhead trucks in background 34 10W Reblocking scrubber car at Brunswick Depot 1999 35 2085 At Preston workshops over an inspection track section 35 731 St Georges Road, road being rebuilt – Nov. 1991 35 Preston Jtn Junction at Workshops being relaid 36 1003 St Georges Road, Nov. 1991 trackworks 36 St Georges Rd Track being rebuilt – Nov. 1991 has temp track cross over 36 Victoria St Victoria St being reconstructed 6-9-1992 37 East Burwood Extension works – 18-2-1993 37 East Burwood Re-building crossover – 18-2-1993 37 Victoria St Victoria St being reconstructed 6-9-1992 38 19W, 16W Bylands – 5-12-1993 38 R10 Kew Depot 38 Workers Kew Depot pushing on a post 39 R10 R10 towing a B class tram- Royal Parade? 39 11W, 10W? South Melbourne Depot 39 Overhead Overhead truck at Kew Depot 40 Kew Depot Demolition works opposite depot 40 613? Malvern Depot on special tram 40 256 zoo tram Royal Park tram at Kew Depot 41 B class Bundoora line 1993 41 231, 611 Kew depot 75th anniversary tram 41 469, 287 Kew depot 42 510 Spring St into Bourke St – 28-4-1993. “42nd street promotion. 42 153 High St Northcote, Bundoora 42 611 Kew Depot, Nov. 1991 43 195? Simpson St siding – 25-4-1993 – 7 trams in all 43 646 Route 12, with fire station in background – Gisborne and Victoria 43 961 Burke Road, Camberwell, 10-8-1994 44 760 Art tram 44 938 Sam the tram, Flinders St 44 1014 Gilbert Road, West Preston, June 1994, advert for AGC 45 965 Daimaru advert tram, Swanston St 45 1018 Express post advert tram, Swanston St. 45 1024 Advert – lego exhibition – Swanston St 46 104 Camberwell depot 46 611 Looking towards driver’s controls from interior. 46 W1 Interior photo showing tip over seats 47 Cable car Interior photo – could be zoo tram 47 510 Interior, 28-4-1993 47 214 Kew Depot, night shot, Oct. 1991 48 246, 237 Kew depot, 13-9-1993 – Stubbsy and Energy Victoria advert 48 246, 231, 237 Kew depot, Navy, 75th anniversary of Kew and Fox Fm advert 48 2014, 2072 South Melbourne – tt line? Advert tram 49 59 And six other trams in front of Preston Workshops 49 1024 MMTB Christmas Tram, 1970 49 2001 Camberwell Depot 50 725 Preston depot area – tram has a red upper half 50 725 South Melbourne depot – now has Xmas decorations 50 1026 Bourke St, Christmas 6-12-1993 51 933 Victoria Parade shunt and other A class tram – Autumn 51 829 Art tram 51 39 Advert tram – Crime prevention 52 Connie Connie at night = has jeans on 52 1?? Has a MET inspector standing in front of number – Latrobe uni tram 52 611 Kew Depot 53 237 Fox FM Black Thunder tram at Kew Depot, August 1992 53 237, 611, 892 Victoria Bridge re-enactment – 10-11-1991 53 237 At Kew depot with 4 people, including Hugh Waldron 53 442, 10W South Melbourne Restaurant tram and works car 53 W2 At Wattle Park 53 School art Photo of students holding artwork on the zoo tram 256 at Kew 54 138 And many others 54 469 Launch of the Melbourne Tram by the PTC 54 School art Photo of students holding artwork on the zoo tram 256 at Kew 55 B2 Elizabeth St terminus, Christmas 1994 55 8 Z8 Swanston St, April 1993 55 504 Clifton Pugh – Preston Workshops 56 138, 180, 214 Hawthorn Depot display 56 650, 510 Hawthorn Depot 56 469 Camberwell 57 568 Bridge Road Richmond by cable tram depot 57 ? Advert tram – Falls Creek 57 995 Malvern Road, 18-5-1992 58 457, 217 etc Swanston St display 58 231, 611 Kew 75th Anniversary 58 682 Artist tram at Malvern Depot – 18-5-1992 59 1018 Country Road advert tram 59 8 Z class – decorated tram – Essendon Depot 59 947 Metland Safety Express – safety tram – Kew depot 60 101 x 2pics Decorated for RAAF 70th Anniversary 60 2082 Near East Preston Depot, with destination “Next Stop Mill Park” 61 475 After sale and disposal 61 585 After sale and disposal 61 651 After sale and disposal – Diamond Creek – 9-8-1994 62 386 After sale and disposal – Sunbury 62 590 After sale and disposal – Hall ACT 62 476 After sale and disposal – Kinglake 63 11W Bundoora Extension – track being opened 63 947 Metland Safety Express – safety tram – Kew depot 63 Model 2,3 2’ gauge model trams 64 Model 2 Ditto 64 250 After sale and disposal 64 293 After sale and disposal – Diamond Ck – 9-8-1994 65 246, 231, 237 Kew depot, Navy, 75th anniversary of Kew and Fox Fm advert 65 1002 Advert tram – Salvation Army 65 231, 29 Kew Depot 66 246, 231, 237 Kew depot, Navy, 75th anniversary of Kew and Fox Fm advert 66 646, 935, 1002 Kew depot 66 220, 60 Preston Workshops? 67 851, 814 Malvern Depot 3-9-1992 67 726 Malvern Rd at Glenferrie Road – 18-5-1992 67 237, 133 Victoria Parade 1996 68 814 and others Interior Malvern Depot – 18-5-1992 68 231 75th Kew depot anniversary at depot 68 231 75th Kew depot anniversary at depot 69 1024 Malvern Depot 10-11-1991 69 1011 Advert tram Melbourne City Toyota 69 106, 180 Swanston St 70 190, 568 Camberwell Depot 70 431 Flinders St – tram event 70 20, 138 Camberwell Depot 71 431 Flinders St – tram event 71 237 Fox FM Thunder Tram 71 2057, 2014 Elizabeth St, Vic Market 29-4-1993 72 676, 611, 892 Victoria Bridge re-enactment – 10-11-1991 72 Ceremony Victoria Bridge – mayor and others event 72 214 214 on the bridge 73 164 Lygon St – former outer circle line level crossing in view 73 841 Swanston Walk 29-4-1993 74 821 St Georges Road, April 1993 74 431, 231 Victoria Parade 74 217, 676 Passing Camberwell Depot 75 Oporto 018 Clarendon St 6-3-2003 75 3007 Albert Park – 7-3-2003 75 3001, 018, 3502 Docklands – 10-3-2003 76 Oporto 018 Docklands – 16-1-2003 76 Oporto 018 Flinders St 7-3-2003 76 3502 Swanston St at Flinders St -8-3-2003 77 16 Kew Depot, Jan 1991 77 112, 110 Bundoora 4-9-1992 77 738 Camberwell Feb 1991 78 1011 Thornbury Jan 1991 advert for City Toyota 78 101 Bundoora – RAAF tram 4-9-1992 78 814 Art tram – Swanston St August 1992 79 1024, 469, Z3 Preston Workshops – 469 as the Melbourne Tram – 9-9-1992 79 961 Malvern Depot 3-9-1992 79 242 Single line working in Victoria St 6-9-1992 80 781 Thornbury, the hump, Preston Workshops Jan 1991 80 2104 Preston Workshops 9-9-1992 80 2100 Launch, Preston Workshops 9-9-1992 81 5W + 1A 5 x W at Kew Depot 3-2-1991 81 676 Kew Depot 21-2-1991 81 873, 2016 Brunswick depot 2-3-1991 82 231 Kew Depot Yard – 21-1-1991 82 157, 158 Brunswick Depot – 2-3-1991 82 2057, 873, 158 Brunswick Depot – 2-3-1991 83 802 Art Tram - Franklin St from the signal box 2-3-1991 83 990 990 Evian advert tram, Franklin St signal box 2-3-1991 83 920 GIO Advert Tram with Bushels tea and Yellow Pages? Adverts 84 721 Art Tram, Franklin St signal box 84 976 St Georges Road, Jan 1991 – advert tram Capital society 84 731 St Georges Road, Jan. 1991 Art tram 85 10W Victoria Parade, Brunswick St, 1/3/1991 85 10W, 9 or 11W South Melbourne depot 85 10W Bundoora Terminus 4-2-1991 86 11W City Baths 86 10, 16 Camberwell Depot 6-12-1990 86 944 Glenhuntly Depot 18-2-1991 87 2011 Spring St – Princess Theatre, March 1990 87 294, 239, 277, 243, 259, 280 Kew Depot 87 296 Kew Depot 88 1015, 16 Batman Ave 19-1-1991 88 963, 948, 935, 996, 892 Kew Depot 3-2-1991 88 Victoria St Victoria St Richmond Reconstruction 6-2-1992 89 1014, 990 Batman Ave 19-1-1991 (Image added i5 and rear view added 23-12-2018, scanned for Dale Budd. 89 920 920 – GIO advert tram, 760 art Tram Collins at Spencer 17-10-1990 89 610, 611 Kooyong Station level crossing 30-12-1990 90 95 Royal Park, 15-2-1991 90 2057, 873, 158 Brunswick Depot – 2-3-1991 90 10 Camberwell Depot 6-12-1990 91 Bendigo 44 In Prahran and Malvern Tramways Trust Colours 1986 –Black and white photo. Listed 5-11-2016See note page 1 and on image 3trams, tramways, album, photo album, tramcars, the met, yarra trams, kew depot, brunswick depot, advertising trams, transporting art, preston depot, hawthorn, bundoora, st georges rd, victoria st, camberwell depot, tram r10, 8, 10w, 10, 11w, 16, 16w, oporto 018, 19w, 20, bendigo 21, 29, 39, bendigo 44, 59, 60, 95, 101, 104, 106, 110, 112, 133, 138, 153, 157, 158, 164, 180, 190, 195?, 214, 215, 217, 220, 226, 231, 232, 233, 236, 237, 238, 239, 242, 243, 246, 250, 253, 255, 256, 259, 264, 277, 280, 282, 287, 293, 294, 296, 380, 386, 431, 442, 457, 469, 475, 476, 504, 510, 568, 585, 590, 610, 611, 613?, 646, 651, 676, 682, 721, 722, 725, 726, 727, 728, 731, 738, 749, 760, 774, 781, 802, 814, 821, 824, 829, 841, 844, 851, 856, 873, 892, 920, 922, 925, 933, 935, 938, 944, 947, 948, 957, 961, 963, 965, 976, 990, 995, 996, 1002, 1003, 1011, 1014, 1015, 1018, 1024, 1026, 2001, 2011, 2014, 2015, 2016, 2037, 2057, 2057, 2066, 2072, 2082, 2085, 2100, 2104, 2106, 2112, 2130, 3001, 3007, 3502 -
 Bendigo Military Museum
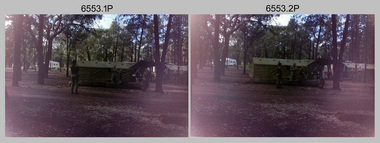
Photograph - 4th Field Survey Squadron Adventurous Training, Wilpena pound, Flinders Ranges, SA, 1989
This is a set of 55 photographs of a 4th Field Survey Squadron adventurous training held at Wilpena pound, in the Flinders Ranges of South Australia in 1989. It is evident the training focussed on teamwork, leadership, abseiling, rock climbing, field craft and living off the land survival skills. Elements from units of the Army Reserve also participated in the training. In this photo set, one of 4th Field Survey’s sections participated in abseiling and trekked to the highest mountain in the Flinders Ranges – St. Mary’s Peak. Refer to item 6552.43P for black & white photographs taken during the adventurous training exercise.This is a set of 55 photographs of 4th Field Survey Squadron personnel undergoing adventurous training held at Wilpena pound, in the Flinders Ranges of South Australia in 1989. The colour photographs are on 35mm negative film and are part of the Army Survey Regiment’s Collection. The photographs were scanned at 96 dpi. .1) & 2)- Photo, colour, 1989. Base camp. WO1 Bill Griggs 2nd from left, remainder unidentified. .3) - Photo, colour, 1989. Old homestead inside Wilpena Pound. SPR Cheryl Deluca-Cardillo, 2nd from left, remainder unidentified. .4) - Photo, colour, 1989. Wilpena Pound topography. .5) - Photo, colour, 1989. Abseiling activities, unidentified personnel. .6) & .7) - Photo, colour, 1989. Flinders Ranges topography. .8) - Photo, colour, 1989. Abseiling activities. L to R: SSGT Max Coletti, SGT Stu Symonds. .9) - Photo, colour, 1989. Abseiling activities, unidentified personnel. .10) - Photo, colour, 1989. Flinders Ranges topography. .11) - Photo, colour, 1989. Abseiling activities. L to R: unidentified, CPL Michelle Griffith, SGT Stu Symonds. .12) - Photo, colour, 1989. Abseiling activities. L to R: unidentified, SPR Andrew Quin, SGT Laurie Justin, SGT Stu Symonds. .13) - Photo, colour, 1989. Abseiling activities. L to R: SGT Stu Symonds SGT Laurie Justin. .14) - Photo, colour, 1989. Abseiling activities. L to R: unidentified, SGT Stu Symonds. .15) - Photo, colour, 1989. Abseiling activities. SGT Laurie Justin. .16) - Photo, colour, 1989. Abseiling activities. SGT Stu Symonds. .17) & .18) - Photo, colour, 1989. Abseiling activities. SPR Cheryl Deluca-Cardillo. .19) - Photo, colour, 1989. Abseiling activities. L to R: SPR Cheryl Deluca-Cardillo, unidentified. .20) - Photo, colour, 1989. Abseiling activities. SSGT Max Coletti. .21) - Photo, colour, 1989. Abseiling activities. SPR Andrew Quin. .22) - Photo, colour, 1989. Abseiling activities. CPL Michelle Griffith. .23) - Photo, colour, 1989. Abseiling activities. CPL Michelle Griffith. .24) - Photo, colour, 1989. Flinders Ranges topography, unidentified personnel. .25) - Photo, colour, 1989. Flinders Ranges topography, unidentified SGT. .26) to .30) - Photo, colour, 1989. Flinders Ranges topography. .31) - Photo, colour, 1989. Flinders Ranges topography, unidentified personnel. .32) & .33) - Photo, colour, 1989. Flinders Ranges topography. L to R: unidentified, CPL Michelle Griffith, SGT Stu Symonds, CPL Roger Graf, SSGT Max Coletti, SGT Laurie Justin. .34) - Photo, colour, 1989. St. Mary’s Peak. L to R: unidentified, CPL Michelle Griffith, CPL Steve Nokes, SGT Stu Symonds. .35) - Photo, colour, 1989. St. Mary’s Peak. SGT Stu Symonds. .36) & .37) - Photo, colour, 1989. St. Mary’s Peak. CPL Steve Nokes. .38) - Photo, colour, 1989. Flinders Ranges topography. .39) - Photo, colour, 1989. St. Mary’s Peak. SGT Laurie Justin. .40) - Photo, colour, 1989. St. Mary’s Peak. SPR Cheryl Deluca-Cardillo. .41) - Photo, colour, 1989. St. Mary’s Peak. SPR Andrew Quin. .42) - Photo, colour, 1989. Flinders Ranges topography, SGT Stu Symonds. .43) - Photo, colour, 1989. Social activities. L to R: unidentified (x6), CPL Perry Langeberg, SGT Laurie Justin. .44) - Photo, colour, 1989. Social activities. L to R: CPL Perry Langeberg, SGT John Zuringer, SGT Laurie Justin, SGT Mick Hogan, unidentified, SGT Stu Symonds. .45) - Photo, colour, 1989. Social activities. L to R: unidentified (x6), CPL Perry Langeberg, SGT John Zuringer. .46) - Photo, colour, 1989. Social activities. L to R: CPL Jamie McRae, SGT Laurie Justin, SGT Mick Hogan, unidentified, SGT Stu Symonds, SPR Cheryl Deluca-Cardillo, WO1 Bill Griggs. .47) - Photo, colour, 1989. Social activities. L to R: SGT Laurie Justin, unidentified, CPL Steve Nokes, SGT Stu Symonds, SPR Cheryl Deluca-Cardillo, WO1 Bill Griggs, unidentified (x2). .48) - Photo, colour, 1989. Social activities. L to R: CPL Steve Nokes, WO1 Bill Griggs, SPR Cheryl Deluca-Cardillo, unidentified (x2), CPL Steve Ellis, CPL Michelle Griffith, SGT Gill Park. .49) - Photo, colour, 1989. Social activities. L to R: CPL Perry Langeberg, SGT John Zuringer, CPL Jamie McRae, SGT Laurie Justin, SGT Mick Hogan, unidentified, SGT Stu Symonds. .50) - Photo, colour, 1989. Sheep cooking in fire pit. L to R: WO2 Peter Symmans, unidentified (x5), CPL Steve Ellis. .51) - Photo, colour, 1989. Sheep cooking in fire pit. L to R: WO2 Peter Symmans, unidentified. .52) - Photo, colour, 1989. Sheep cooking in fire pit. Unidentified personnel. .53) - Photo, colour, 1989. Cooked sheep removed from fire pit. L to R: unidentified. WO2 Peter Symmans, unidentified. .54) - Photo, colour, 1989. Cooked sheep removed from fire pit. L to R: CPL Michelle Griffith, SGT Gill Park, unidentified, SSGT Max Coletti, unidentified, SPR Cheryl Deluca-Cardillo. .55) - Photo, colour, 1989. Cooked sheep removed from fire pit. L to R: unidentified, CPL Michelle Griffith, WO2 Peter Symmans..1P to .55P – There are no personnel identified. ‘1989 ADV TRAINING’ annotated on negatives sleeve.royal australian survey corps, rasvy, 4 fd svy sqn -
 Wodonga & District Historical Society Inc
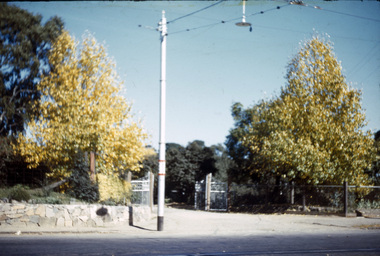
Photograph - Civic Leaders Wodonga 1876 - 1994
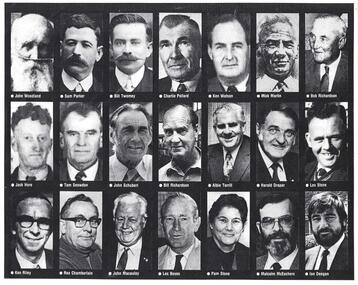
Wodonga Shire was created in 1876 when the colonial government agreed to ratepayers' petitions to have their part of the local government district severed from the Yackandandah Shire to form a new municipality. In March 1973 Wodonga was declared as the first Rural City in Australia. This was officially proclaimed by the Governor of Victoria, Sir Rohan Delacombe at an open-air ceremony in Hovell Street following a procession along High Street led by the Victorian Police Band. The first meeting of the held in the open air immediately after the proclamation. In 1994, the Jeff Kennett government restructured local government in Victoria. His reforms dissolved 210 councils and sacked 1600 elected councillors. Commissioners were appointed in their place. Wodonga’s Commissioners were Mel Reid, Des Kelly and Michael Hanson. Reforms introduced created 78 new councils through amalgamations. Democratically elected councillors returned to Wodonga in 1997, with Graham Crapp as Mayor.This item documents the leaders of local government in Wodonga since its inception in 1876 until Local Government reform in 1994.A photo collage representing Shire Presidents and Mayors of Wodonga, including a typed list of names and dates. All Shire Presidents and Mayors of Wodonga from 1876 – 1994 J. Woodland 1876-7, J. Bambrick 1877-78, G. Street 1878-79, W. L. Ferrier 1879-80, T. Reidy 1880-81, J. Bambrick 1881-82, A. Schlink 1882-83, T. Reidy 1883-84, N. P. Newnan 1884-86, J. Bambrick 1886-87, H. Harkin 1887-88, T. Johnston 1888-89, W.C. McFarlane 1889-91, P. Adams 1891-92, J. G. Shields 1892-93, H. Harkin 1893-94, W.C. McFarlane 1894-95, N. P. Newnan 1895-96, J. Bassett 1896-97, R. Morrison 1897-98, G. S. Manns 1898-99, H. Smith 1899-1900, H. Beardmore 1900-1901, G. Leighton 1901-02, J. H. McGeoch 1902-03, H. Beardmore 1903-1904, J. Whan 1904-05, A.E. Müller 1905-06, A. L. Wright 1906-07, J. H. McGeoch 1907-08, H. Beardmore 1908-1910, G. Leighton 1910-11, H. Beardmore 1911-1912, J. H. McGeoch 1912-13, G. Leighton 1913-14, H. Beardmore 1914-1917, S. T. Parker 1917-19, W. Twomey 1919-21, T. Ryan 1921-23, W. Twomey 1923-25, T. Ryan 1925-26, C. F. Pollard 1926-27, W. Twomey 1927-28, C. S. Street 1928-29, K. D. Watson 1929-30, M. Martin 1930-31, R, Richardson 1933-36, T. Ryan 1936-38, M. Martin 1938-39, R, Richardson 1939-41, J. S. Hore 1941-43, K. D. Watson 1943-45, C. F. Pollard 1945-47, C.C. Sheather 1947-48, T. E. Snowdon 1948-49, J. S. Hore 1949-50, G.A.W. Boyes 1950-52, D. J. Schubert 1952-54, V. R. Peard 1954-55, M. E. Morrison 1955-56, M. E. Morrison 1956-57, J. S. Hore 1957-60, D.J. Schubert 1960-61, A.B.S. Collins 1961-62, A. G. Richardson 1962-63, J. S. Hore 1963-65, J. A. Terrill 1965-67, H. W Draper 1967-68, J.A. Terrill 1968-71, *L.E. Stone 1971-74, K.T. Riley 1974-76, H. Draper 1976-77, Rex. Chamberlain 1977-80, H. W. Draper 1980-82, R. J. Macaulay 1982-84, L.O. Boyes 1984-85, **Pamela Stone 1985-86, M. McEachern 1986-87, R.J Macaulay 1987-88, I. Deegan 1988-89, Valentina Gillard 1989-90, R. J. Macaulay 1990-91, L. C. Boyes 1991-92, T. Corcoran 1992-94 *Last Shire President & first Mayor of the City ** First woman Mayor, Widow of L.B. Stonewodonga council, wodonga shire council, civic leaders -
 Flagstaff Hill Maritime Museum and Village
Photograph, early 1900's
This photograph of the 10 crew of the SPECULANT would have been taken prior to Feb 10th 1911, when the ship was wrecked on the south coast of Victoria at a place called Cape Patton. The barquentine SPECULANT was a steel, three-masted sailing ship built in 1895 in Inverkeithing, Scotland, registered in Warrnambool, Victoria and wrecked at Cape Paton, Victoria, 10th February 1911. The SPECULANT had been involved in the timber trade between the United Kingdom and Russia, until sold to its Warrnambool owners and timber merchants Messrs. P.J. McGennan & Co. (Peter John McGennan) in 1902 for 3000 pounds and had her sailed to Warrnambool as her new port. Peter John McGennan was born in 1844 and worked as a builder and cooper in Holyhead, Anglesea, Wales. He immigrated to Australia in 1869 as a free settler and arrived in Warrnambool in 1871 and undertook management of a property in Grassmere for Mr. Palmer. Peter met his wife Emily in South Melbourne and they married in 1873. They had ten children including Harry who lived to 1965, and Andrew who lived until 1958. (The other children were their four brothers - John who was killed in the Dardenalles aged 35, Frederick who died aged 8, Peter who died aged 28, Frank who died aged 5 weeks - and four sisters - Beatrice who died age 89, Edith who died aged 49, Blanche who died aged 89 and Eveline who died aged 48.) In 1874 Peter starting a boating establishment on the Hopkins River. In 1875 he opened up a Coopers business in Kepler Street next to what was Bateman, Smith and Co., moving to Liebig Street, next to the Victoria Hotel, in 1877. In 1882 he then moved to Lava Street (which in later years was the site of Chandlers Hardware Store). He was associated with the establishment of the Butter Factory at Allansford. He started making Butter Boxes to his own design and cheese batts for the Butter Factory. In 1896 established a Box Factory in Davis Street Merrivale, employing 24 people at its peak, (it was burnt down in 1923); and in Pertobe Road from 1912 (now the Army Barracks building). Peter was a Borough Councillor for Albert Ward from 1885 to 1891, he commenced the Foreshore Trust (including the camping grounds along Pertobe Road), and he was an inaugural Director of the Woollen Mill in Harris Street, buying an extensive share-holding in 1908 from the share trader Edward Vidler. They lobbied the Town Hall to have a formal ‘Cutting’ for the waters of the Merri River to be redirected from its natural opening south of Dennington, to its existing opening near Viaduct Road, in order to have the scourings from the wool at the Woollen Mill discharged into the sea. He sold Butter Boxes around the state, and had to ship them to Melbourne by rail. Peter’s purchase of the SPECULANT in 1902 enabled him to back-load white pine from Kaipara, New Zealand to Warrnambool to make his butter boxes then, to gain profitability, buy and ship potatoes and other primary produce bound to Melbourne. (McGennan & Co. had also owned the LA BELLA, which had traded in timber as well, until she was tragically wrecked with the loss of seven lives, after missing the entrance channel to Warrnambool harbour in 1905. It appears that the SPECULANT was bought to replace the LA BELLA.) In 1911 the SPECULANT had been attempting to depart Warrnambool for almost the entire month of January to undergo docking and overhaul in Melbourne. A month of east and south-easterly winds had forced her to remain sheltered in Lady Bay, Warrnambool apart from one morning of northerlies, when an attempt was made to round Cape Otway; she had to return to shelter in Portland after failing to make any headway. With only 140 tons of sand ballast aboard, the ship would not have been easy to handle. Captain Jacobsen and his crew of nine, mainly Swedes, decided to make for Melbourne, leaving Portland Harbour on 5th February 1911. By the 9th they had reached Cape Otway, where they encountered a moonless night, constant heavy rain, and a heavy sea with a south-easterly wind blowing. After safely rounding Cape Otway the course was changed to east, then north-east to take the vessel to a point six miles off Cape Patton, following the orders of Captain Jacobsen, who told the crew to be very careful with the steering, as the wind and sea was running to leeward. The patent log (used to measure speed) had been out of order for the last four months as no-one in Warrnambool was able to fix it: it was intended to have it repaired in Melbourne. In the meantime the crew measured the vessel's speed by looking over the side and estimating wind strength. This compounded the difficulties of imprecise positioning, as the strong cross wind and sea were acting on the lightly laden vessel to steadily drive it towards the shore. At 3.30am on Friday 10 February 1911 Captain Jacobsen and the first mate were looking over the side of the vessel when they heard the sound of breakers and suddenly struck the rocks. The crew immediately knew they had no chance of getting the SPECULANT off, and attempted to rescue themselves by launching the lifeboat, which was instantly smashed to pieces. One of the crew then volunteered to take a line ashore, and the rest of the crew were all able to drag themselves to shore, some suffering hand lacerations from the rocks. Once ashore they began to walk along the coast towards Lorne, believing it was the nearest settlement. Realising their mistake as dawn broke they returned westwards to Cape Patton, and found a farm belonging to Mr C. Ramsden, who took them in and gave them a change of clothes and food. After resting for a day and returning to the wreck to salvage some of their personal possessions, at 10am on Saturday they set out for Apollo Bay, a voyage that took six hours, sometimes wading through flooded creeks up to their necks. The Age described the wreck as "listed to starboard. All the cabin is gutted and the ballast gone. There is a big rock right through the bottom of her, and there is not the slightest hope of getting her off". A Board of Marine inquiry found that Captain Jacobson was guilty of careless navigation by not taking steps to accurately verify the position of the vessel with respect to Cape Otway when the light was visible and by not setting a safe and proper course with respect to the wind and sea. It suspended his certificate for 6 months and ordered him to pay costs. The location of the wreck site was marked for a long time by two anchors on the shoreline, until in 1970 the larger of the two anchors was recovered by the Underwater Explorers' Club and mounted on the foreshore at Apollo Bay. The bell from the wreck was also donated to the Apollo Bay Surf Lifesaving Club but is recorded to have been stolen. Rusting remains of the wreck can still be found on the shoreline on the southern side of, and directly below Cape Patton. Parts of the SPECULANT site have been buried by rubble from construction and maintenance works to the Great Ocean Road, as well as by naturally occurring landslides. Peter J McGennan passed away in 1920. The Gates in the western wall of the Anglican Church in Henna Street/Koroit St are dedicated to him for his time of community work, which is matched with other prominent Warrnambool citizens; Fletcher Jones, John Younger, J.D.E (Tag) Walter, and Edward Vidler. After Peter J McGennan's death Harry, Andrew and Edith continued to operate the family business until July 11th 1923 when the company was wound up. (Andrew lived in Ryot Street Warrnambool, near Lava Street.) Harry McGennan (Peter and Emily’s son) owned the Criterion Hotel in Kepler Street Warrnambool (now demolished). His son Sid and wife Dot lived in 28 Howard Street (corner of Nelson Street) and Sid managed the Criterion until it was decided by the family to sell, and for he remained Manager for the new owners until he retired. Harry commenced the Foreshore Trust in Warrnambool around 1950. The McGennan Carpark in Pertobe Road is named after Harry and there are Memorial-Stone Gates in his memory. (The Gates were once the original entrance to the carpark but are now the exit.). Peter’s great-grandson, also called Andrew, is a Security Officer in Warrnambool. The Patent Log (also called a Taffrail log) from the SPECULANT, mentioned above, and a number of photographs, are now part of the Collection at Flagstaff Hill Maritime Village. The SPECULANT is historically significant as the largest ship to have been registered in Warrnambool, and is believed to have been the largest barquentine to visit Melbourne. It is evidence of the final days of large commercial sailing vessels involved in the Victorian and New Zealand timber trade. The SPECULANT is listed on the Victorian Heritage Register VHR S626Photograph, black and white. of the 10 crew of the SPECULANT on board the ship holding two 'Speculant Warrnambool' lifebuoys. Taken early 1900's flagstaff hill, warrnambool, shipwrecked-coast, flagstaff-hill, flagstaff-hill-maritime-museum, maritime-museum, shipwreck-coast, flagstaff-hill-maritime-village, warrnambool historical photograph, la bella, speculant, cumming and ellis, international timber trade, p. j. mcgennan and co. warrnambool, peter mcgennan, capt. james jacobsen, warrnambool maritime history, h. pengilley apollo bay -
 Flagstaff Hill Maritime Museum and Village
Photograph, early 1900's
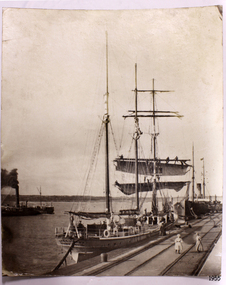
This photograph of the SPECULANT was taken while she was in dock at the Warrnambool, Victoria, Breakwater in the early 1900's. Crew seem busy on her decks and others are watching from the breakwater. There are also 2 steamships in the photograph. The barquentine SPECULANT was a steel, three-masted sailing ship built in 1895 in Inverkeithing, Scotland, registered in Warrnambool, Victoria and wrecked at Cape Paton, Victoria, 10th February 1911. The SPECULANT had been involved in the timber trade between the United Kingdom and Russia, until sold to its Warrnambool owners and timber merchants Messrs. P.J. McGennan & Co. (Peter John McGennan) in 1902 for 3000 pounds and had her sailed to Warrnambool as her new port. Peter John McGennan was born in 1844 and worked as a builder and cooper in Holyhead, Anglesea, Wales. He immigrated to Australia in 1869 as a free settler and arrived in Warrnambool in 1871 and undertook management of a property in Grassmere for Mr. Palmer. Peter met his wife Emily in South Melbourne and they married in 1873. They had ten children including Harry who lived to 1965, and Andrew who lived until 1958. (The other children were their four brothers - John who was killed in the Dardenalles aged 35, Frederick who died aged 8, Peter who died aged 28, Frank who died aged 5 weeks - and four sisters - Beatrice who died age 89, Edith who died aged 49, Blanche who died aged 89 and Eveline who died aged 48.) In 1874 Peter starting a boating establishment on the Hopkins River. In 1875 he opened up a Coopers business in Kepler Street next to what was Bateman, Smith and Co., moving to Liebig Street, next to the Victoria Hotel, in 1877. In 1882 he then moved to Lava Street (which in later years was the site of Chandlers Hardware Store). He was associated with the establishment of the Butter Factory at Allansford. He started making Butter Boxes to his own design and cheese batts for the Butter Factory. In 1896 established a Box Factory in Davis Street Merrivale, employing 24 people at its peak, (it was burnt down in 1923); and in Pertobe Road from 1912 (now the Army Barracks building). Peter was a Borough Councillor for Albert Ward from 1885 to 1891, he commenced the Foreshore Trust (including the camping grounds along Pertobe Road), and he was an inaugural Director of the Woollen Mill in Harris Street, buying an extensive share-holding in 1908 from the share trader Edward Vidler. They lobbied the Town Hall to have a formal ‘Cutting’ for the waters of the Merri River to be redirected from its natural opening south of Dennington, to its existing opening near Viaduct Road, in order to have the scourings from the wool at the Woollen Mill discharged into the sea. He sold Butter Boxes around the state, and had to ship them to Melbourne by rail. Peter’s purchase of the SPECULANT in 1902 enabled him to back-load white pine from Kaipara, New Zealand to Warrnambool to make his butter boxes then, to gain profitability, buy and ship potatoes and other primary produce bound to Melbourne. (McGennan & Co. had also owned the LA BELLA, which had traded in timber as well, until she was tragically wrecked with the loss of seven lives, after missing the entrance channel to Warrnambool harbour in 1905. It appears that the SPECULANT was bought to replace the LA BELLA.) In 1911 the SPECULANT had been attempting to depart Warrnambool for almost the entire month of January to undergo docking and overhaul in Melbourne. A month of east and south-easterly winds had forced her to remain sheltered in Lady Bay, Warrnambool apart from one morning of northerlies, when an attempt was made to round Cape Otway; she had to return to shelter in Portland after failing to make any headway. With only 140 tons of sand ballast aboard, the ship would not have been easy to handle. Captain Jacobsen and his crew of nine, mainly Swedes, decided to make for Melbourne, leaving Portland Harbour on 5th February 1911. By the 9th they had reached Cape Otway, where they encountered a moonless night, constant heavy rain, and a heavy sea with a south-easterly wind blowing. After safely rounding Cape Otway the course was changed to east, then north-east to take the vessel to a point six miles off Cape Patton, following the orders of Captain Jacobsen, who told the crew to be very careful with the steering, as the wind and sea was running to leeward. The patent log (used to measure speed) had been out of order for the last four months as no-one in Warrnambool was able to fix it: it was intended to have it repaired in Melbourne. In the meantime the crew measured the vessel's speed by looking over the side and estimating wind strength. This compounded the difficulties of imprecise positioning, as the strong cross wind and sea were acting on the lightly laden vessel to steadily drive it towards the shore. At 3.30am on Friday 10 February 1911 Captain Jacobsen and the first mate were looking over the side of the vessel when they heard the sound of breakers and suddenly struck the rocks. The crew immediately knew they had no chance of getting the SPECULANT off, and attempted to rescue themselves by launching the lifeboat, which was instantly smashed to pieces. One of the crew then volunteered to take a line ashore, and the rest of the crew were all able to drag themselves to shore, some suffering hand lacerations from the rocks. Once ashore they began to walk along the coast towards Lorne, believing it was the nearest settlement. Realising their mistake as dawn broke they returned westwards to Cape Patton, and found a farm belonging to Mr C. Ramsden, who took them in and gave them a change of clothes and food. After resting for a day and returning to the wreck to salvage some of their personal possessions, at 10am on Saturday they set out for Apollo Bay, a voyage that took six hours, sometimes wading through flooded creeks up to their necks. The Age described the wreck as "listed to starboard. All the cabin is gutted and the ballast gone. There is a big rock right through the bottom of her, and there is not the slightest hope of getting her off". A Board of Marine inquiry found that Captain Jacobson was guilty of careless navigation by not taking steps to accurately verify the position of the vessel with respect to Cape Otway when the light was visible and by not setting a safe and proper course with respect to the wind and sea. It suspended his certificate for 6 months and ordered him to pay costs. The location of the wreck site was marked for a long time by two anchors on the shoreline, until in 1970 the larger of the two anchors was recovered by the Underwater Explorers' Club and mounted on the foreshore at Apollo Bay. The bell from the wreck was also donated to the Apollo Bay Surf Lifesaving Club but is recorded to have been stolen. Rusting remains of the wreck can still be found on the shoreline on the southern side of, and directly below Cape Patton. Parts of the SPECULANT site have been buried by rubble from construction and maintenance works to the Great Ocean Road, as well as by naturally occurring landslides. Peter J McGennan passed away in 1920. The Gates in the western wall of the Anglican Church in Henna Street/Koroit St are dedicated to him for his time of community work, which is matched with other prominent Warrnambool citizens; Fletcher Jones, John Younger, J.D.E (Tag) Walter, and Edward Vidler. After Peter J McGennan's death Harry, Andrew and Edith continued to operate the family business until July 11th 1923 when the company was wound up. (Andrew lived in Ryot Street Warrnambool, near Lava Street.) Harry McGennan (Peter and Emily’s son) owned the Criterion Hotel in Kepler Street Warrnambool (now demolished). His son Sid and wife Dot lived in 28 Howard Street (corner of Nelson Street) and Sid managed the Criterion until it was decided by the family to sell, and for he remained Manager for the new owners until he retired. Harry commenced the Foreshore Trust in Warrnambool around 1950. The McGennan Carpark in Pertobe Road is named after Harry and there are Memorial-Stone Gates in his memory. (The Gates were once the original entrance to the carpark but are now the exit.). Peter’s great-grandson, also called Andrew, is a Security Officer in Warrnambool. The Patent Log (also called a Taffrail log) from the SPECULANT, mentioned above, and a number of photographs, are now part of the Collection at Flagstaff Hill Maritime Village. The SPECULANT is historically significant as the largest ship to have been registered in Warrnambool, and is believed to have been the largest barquentine to visit Melbourne. It is evidence of the final days of large commercial sailing vessels involved in the Victorian and New Zealand timber trade. The SPECULANT is listed on the Victorian Heritage Register VHR S626Photograph. black and white, of the three-masted barque SPECULANT in dock at the Warrnambool Breakwater in the early 1900's. A steam ship is docked behind her and another steamship is in Lady Bay on her left. There are people on the SPECULANT and others walking nearby. flagstaff hill, warrnambool, shipwrecked-coast, flagstaff-hill, flagstaff-hill-maritime-museum, maritime-museum, shipwreck-coast, flagstaff-hill-maritime-village, la bella, speculant, cumming and ellis, international timber trade, p. j. mcgennan and co. warrnambool, peter mcgennan, capt. james jacobsen, warrnambool maritime history, h. pengilley apollo bay -
 Flagstaff Hill Maritime Museum and Village
Domestic object - Spoon, circa 1878
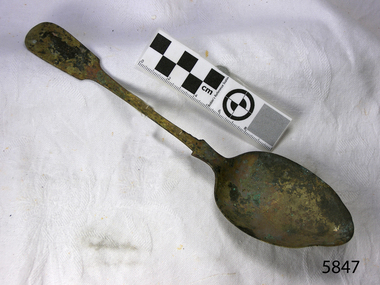
This dessert spoon is from the wreck of the LOCH ARD, a Loch Line ship of 1,693 tons which sailed from Gravesend, London, on 2 March 1878 with 17 passengers and a crew of 36 under Captain George Gibbs. “The intention was to discharge cargo in Melbourne, before returning to London via the Horn with wool and wheat”. Instead, on 1 June 1878, after 90 days at sea, she struck the sandstone cliffs of Mutton Bird Island on the south west coast of Victoria, and sank with the loss of 52 lives and all her cargo. The manifest of the LOCH ARD listed an array of manufactured goods and bulk metals being exported to the Colony of Victoria, with a declared value of £53,700. (202 bills of lading show an actual invoice value of £68, 456, with insurance underwriting to £30,000 of all cargo). Included in the manifest is the item of “Tin hardware & cutlery £7,530”. This dessert spoon is one of 482 similar items of electro-plated cutlery from the LOCH ARD site, comprising spoons and forks of various sizes but all sharing the same general shape or design and metallic composition. 49 of these pieces display a legible makers’ mark — the initials “W” and “P” placed within a raised diamond outline, which is in turn contained within a sunken crown shape — identifying the manufacturer as William Page & Co of Birmingham. An electroplater’s makers’ marks, unlike sterling silver hallmarks, are not consistent identifiers of quality or date and place of manufacture. A similar line of five impressions was usually made to impress the consumer with an implication of industry standards, but what each one actually signified was not regulated and so they varied according to the whim of the individual foundry. In this case, the maker’s marks are often obscured by sedimentary accretion or removed by corrosion after a century of submersion in the ocean. However sufficient detail has survived to indicate that these samples of electro-plated cutlery probably originated from the same consignment in the LOCH ARD’s cargo. The generally common range of marks are drawn from 255 tea spoons, 125 dessert spoons, and 99 table forks. These marks are clearly visible in 66 instances, while the same sequence of general outlines, or depression shapes, is discernible in another 166 examples. Suggested trade names for William Page & Co’s particular blend of brass plating are ‘roman silver’ or ‘silverite’. This copper alloy polishes to a lustrous gold when new, discolouring to a murky grey with greenish hue when neglected. HISTORY OF THE LOCH ARD The LOCH ARD belonged to the famous Loch Line which sailed many ships from England to Australia. Built in Glasgow by Barclay, Curdle and Co. in 1873, the LOCH ARD was a three-masted square rigged iron sailing ship. The ship measured 262ft 7" (79.87m) in length, 38ft (11.58m) in width, 23ft (7m) in depth and had a gross tonnage of 1693 tons. The LOCH ARD's main mast measured a massive 150ft (45.7m) in height. LOCH ARD made three trips to Australia and one trip to Calcutta before its final voyage. LOCH ARD left England on March 2, 1878, under the command of Captain Gibbs, a newly married, 29 year old. She was bound for Melbourne with a crew of 37, plus 17 passengers and a load of cargo. The general cargo reflected the affluence of Melbourne at the time. On board were straw hats, umbrella, perfumes, clay pipes, pianos, clocks, confectionary, linen and candles, as well as a heavier load of railway irons, cement, lead and copper. There were items included that intended for display in the Melbourne International Exhibition in 1880. The voyage to Port Phillip was long but uneventful. At 3am on June 1, 1878, Captain Gibbs was expecting to see land and the passengers were becoming excited as they prepared to view their new homeland in the early morning. But LOCH ARD was running into a fog which greatly reduced visibility. Captain Gibbs was becoming anxious as there was no sign of land or the Cape Otway lighthouse. At 4am the fog lifted. A man aloft announced that he could see breakers. The sheer cliffs of Victoria's west coast came into view, and Captain Gibbs realised that the ship was much closer to them than expected. He ordered as much sail to be set as time would permit and then attempted to steer the vessel out to sea. On coming head on into the wind, the ship lost momentum, the sails fell limp and LOCH ARD's bow swung back. Gibbs then ordered the anchors to be released in an attempt to hold its position. The anchors sank some 50 fathoms - but did not hold. By this time LOCH ARD was among the breakers and the tall cliffs of Mutton Bird Island rose behind the ship. Just half a mile from the coast, the ship's bow was suddenly pulled around by the anchor. The captain tried to tack out to sea, but the ship struck a reef at the base of Mutton Bird Island, near Port Campbell. Waves broke over the ship and the top deck was loosened from the hull. The masts and rigging came crashing down knocking passengers and crew overboard. When a lifeboat was finally launched, it crashed into the side of LOCH ARD and capsized. Tom Pearce, who had launched the boat, managed to cling to its overturned hull and shelter beneath it. He drifted out to sea and then on the flood tide came into what is now known as LOCH ARD Gorge. He swam to shore, bruised and dazed, and found a cave in which to shelter. Some of the crew stayed below deck to shelter from the falling rigging but drowned when the ship slipped off the reef into deeper water. Eva Carmichael had raced onto deck to find out what was happening only to be confronted by towering cliffs looming above the stricken ship. In all the chaos, Captain Gibbs grabbed Eva and said, "If you are saved Eva, let my dear wife know that I died like a sailor". That was the last Eva Carmichael saw of the captain. She was swept off the ship by a huge wave. Eva saw Tom Pearce on a small rocky beach and yelled to attract his attention. He dived in and swam to the exhausted woman and dragged her to shore. He took her to the cave and broke open case of brandy which had washed up on the beach. He opened a bottle to revive the unconscious woman. A few hours later Tom scaled a cliff in search of help. He followed hoof prints and came by chance upon two men from nearby Glenample Station three and a half miles away. In a state of exhaustion, he told the men of the tragedy. Tom returned to the gorge while the two men rode back to the station to get help. By the time they reached LOCH ARD Gorge, it was cold and dark. The two shipwreck survivors were taken to Glenample Station to recover. Eva stayed at the station for six weeks before returning to Ireland, this time by steamship. In Melbourne, Tom Pearce received a hero's welcome. He was presented with the first gold medal of the Royal Humane Society of Victoria and a £1000 cheque from the Victorian Government. Concerts were performed to honour the young man's bravery and to raise money for those who lost family in the LOCH ARD disaster. Of the 54 crew members and passengers on board, only two survived: the apprentice, Tom Pearce and the young woman passenger, Eva Carmichael, who lost all of her family in the tragedy. Ten days after the LOCH ARD tragedy, salvage rights to the wreck were sold at auction for £2,120. Cargo valued at £3,000 was salvaged and placed on the beach, but most washed back into the sea when another storm developed. The wreck of LOCH ARD still lies at the base of Mutton Bird Island. Much of the cargo has now been salvaged and some was washed up into what is now known as LOCH ARD Gorge. Cargo and artefacts have also been illegally salvaged over many years before protective legislation was introduced. One of the most unlikely pieces of cargo to have survived the shipwreck was a Minton porcelain peacock - one of only seven in the world. The peacock was destined for the Melbourne International Exhibition in 1880. It had been well packed, which gave it adequate protection during the violent storm. Today, the Minton peacock can be seen at the Flagstaff Hill Maritime Museum in Warrnambool. From Australia's most dramatic shipwreck it has now become Australia's shipwreck artefact and is one of very few 'objects' on the Victorian State Heritage Register most valuable. The LOCH ARD shipwreck is of State significance – Victorian Heritage Register S 417. Flagstaff Hill’s collection of artefacts from LOCH ARD is significant for being one of the largest collections of artefacts from this shipwreck in Victoria. It is significant for its association with the shipwreck, which is on the Victorian Heritage Register (VHR S417). The collection is significant because of the relationship between the objects, as together they have a high potential to interpret the story of the LOCH ARD. The LOCH ARD collection is archaeologically significant as the remains of a large international passenger and cargo ship. The LOCH ARD collection is historically significant for representing aspects of Victoria’s shipping history and its potential to interpret sub-theme 1.5 of Victoria’s Framework of Historical Themes (living with natural processes). The collection is also historically significant for its association with the LOCH ARD, which was one of the worst and best known shipwrecks in Victoria’s history. Unrestored dessert spoon from the wreck of the LOCH ARD. The spoon design has a flattened fiddle-back handle, with a thin stem or shank, flared collar, and a shallow rounded bowl. The spoons metallic composition is a thin layer of brass alloy which has partially corroded back to a nickel-silver base metal. Approximately 65% of original plate remains with some verdigris. The end of the bowl is bent and there is a small amount of concreted sediment on the rear of handle.flagstaff hill maritime museum, maritime museum, shipwreck coast, great ocean road, loch line, loch ard, mutton bird island, loch ard gorge, electroplated cutlery, loch ard shipwreck, william page and co, birmingham brass plating -
 Flagstaff Hill Maritime Museum and Village
Domestic object - Spoon, circa 1878
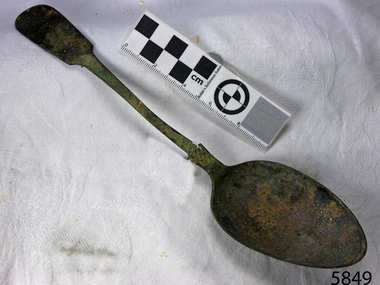
This dessert spoon is from the wreck of the LOCH ARD, a Loch Line ship of 1,693 tons which sailed from Gravesend, London, on 2 March 1878 with 17 passengers and a crew of 36 under Captain George Gibbs. “The intention was to discharge cargo in Melbourne, before returning to London via the Horn with wool and wheat”. Instead, on 1 June 1878, after 90 days at sea, she struck the sandstone cliffs of Mutton Bird Island on the south west coast of Victoria, and sank with the loss of 52 lives and all her cargo. The manifest of the LOCH ARD listed an array of manufactured goods and bulk metals being exported to the Colony of Victoria, with a declared value of £53,700. (202 bills of lading show an actual invoice value of £68, 456, with insurance underwriting to £30,000 of all cargo). Included in the manifest is the item of “Tin hardware & cutlery £7,530”. This dessert spoon is one of 482 similar items of electro-plated cutlery from the LOCH ARD site, comprising spoons and forks of various sizes but all sharing the same general shape or design and metallic composition. 49 of these pieces display a legible makers’ mark — the initials “W” and “P” placed within a raised diamond outline, which is in turn contained within a sunken crown shape — identifying the manufacturer as William Page & Co of Birmingham. An electroplater’s makers’ marks, unlike sterling silver hallmarks, are not consistent identifiers of quality or date and place of manufacture. A similar line of five impressions was usually made to impress the consumer with an implication of industry standards, but what each one actually signified was not regulated and so they varied according to the whim of the individual foundry. In this case, the maker’s marks are often obscured by sedimentary accretion or removed by corrosion after a century of submersion in the ocean. However sufficient detail has survived to indicate that these samples of electro-plated cutlery probably originated from the same consignment in the LOCH ARD’s cargo. The generally common range of marks are drawn from 255 tea spoons, 125 dessert spoons, and 99 table forks. These marks are clearly visible in 66 instances, while the same sequence of general outlines, or depression shapes, is discernible in another 166 examples. Suggested trade names for William Page & Co’s particular blend of brass plating are ‘roman silver’ or ‘silverite’. This copper alloy polishes to a lustrous gold when new, discolouring to a murky grey with greenish hue when neglected. HISTORY OF THE LOCH ARD The LOCH ARD belonged to the famous Loch Line which sailed many ships from England to Australia. Built in Glasgow by Barclay, Curdle and Co. in 1873, the LOCH ARD was a three-masted square rigged iron sailing ship. The ship measured 262ft 7" (79.87m) in length, 38ft (11.58m) in width, 23ft (7m) in depth and had a gross tonnage of 1693 tons. The LOCH ARD's main mast measured a massive 150ft (45.7m) in height. LOCH ARD made three trips to Australia and one trip to Calcutta before its final voyage. LOCH ARD left England on March 2, 1878, under the command of Captain Gibbs, a newly married, 29 year old. She was bound for Melbourne with a crew of 37, plus 17 passengers and a load of cargo. The general cargo reflected the affluence of Melbourne at the time. On board were straw hats, umbrella, perfumes, clay pipes, pianos, clocks, confectionary, linen and candles, as well as a heavier load of railway irons, cement, lead and copper. There were items included that intended for display in the Melbourne International Exhibition in 1880. The voyage to Port Phillip was long but uneventful. At 3am on June 1, 1878, Captain Gibbs was expecting to see land and the passengers were becoming excited as they prepared to view their new homeland in the early morning. But LOCH ARD was running into a fog which greatly reduced visibility. Captain Gibbs was becoming anxious as there was no sign of land or the Cape Otway lighthouse. At 4am the fog lifted. A man aloft announced that he could see breakers. The sheer cliffs of Victoria's west coast came into view, and Captain Gibbs realised that the ship was much closer to them than expected. He ordered as much sail to be set as time would permit and then attempted to steer the vessel out to sea. On coming head on into the wind, the ship lost momentum, the sails fell limp and LOCH ARD's bow swung back. Gibbs then ordered the anchors to be released in an attempt to hold its position. The anchors sank some 50 fathoms - but did not hold. By this time LOCH ARD was among the breakers and the tall cliffs of Mutton Bird Island rose behind the ship. Just half a mile from the coast, the ship's bow was suddenly pulled around by the anchor. The captain tried to tack out to sea, but the ship struck a reef at the base of Mutton Bird Island, near Port Campbell. Waves broke over the ship and the top deck was loosened from the hull. The masts and rigging came crashing down knocking passengers and crew overboard. When a lifeboat was finally launched, it crashed into the side of LOCH ARD and capsized. Tom Pearce, who had launched the boat, managed to cling to its overturned hull and shelter beneath it. He drifted out to sea and then on the flood tide came into what is now known as LOCH ARD Gorge. He swam to shore, bruised and dazed, and found a cave in which to shelter. Some of the crew stayed below deck to shelter from the falling rigging but drowned when the ship slipped off the reef into deeper water. Eva Carmichael had raced onto deck to find out what was happening only to be confronted by towering cliffs looming above the stricken ship. In all the chaos, Captain Gibbs grabbed Eva and said, "If you are saved Eva, let my dear wife know that I died like a sailor". That was the last Eva Carmichael saw of the captain. She was swept off the ship by a huge wave. Eva saw Tom Pearce on a small rocky beach and yelled to attract his attention. He dived in and swam to the exhausted woman and dragged her to shore. He took her to the cave and broke open case of brandy which had washed up on the beach. He opened a bottle to revive the unconscious woman. A few hours later Tom scaled a cliff in search of help. He followed hoof prints and came by chance upon two men from nearby Glenample Station three and a half miles away. In a state of exhaustion, he told the men of the tragedy. Tom returned to the gorge while the two men rode back to the station to get help. By the time they reached LOCH ARD Gorge, it was cold and dark. The two shipwreck survivors were taken to Glenample Station to recover. Eva stayed at the station for six weeks before returning to Ireland, this time by steamship. In Melbourne, Tom Pearce received a hero's welcome. He was presented with the first gold medal of the Royal Humane Society of Victoria and a £1000 cheque from the Victorian Government. Concerts were performed to honour the young man's bravery and to raise money for those who lost family in the LOCH ARD disaster. Of the 54 crew members and passengers on board, only two survived: the apprentice, Tom Pearce and the young woman passenger, Eva Carmichael, who lost all of her family in the tragedy. Ten days after the LOCH ARD tragedy, salvage rights to the wreck were sold at auction for £2,120. Cargo valued at £3,000 was salvaged and placed on the beach, but most washed back into the sea when another storm developed. The wreck of LOCH ARD still lies at the base of Mutton Bird Island. Much of the cargo has now been salvaged and some was washed up into what is now known as LOCH ARD Gorge. Cargo and artefacts have also been illegally salvaged over many years before protective legislation was introduced. One of the most unlikely pieces of cargo to have survived the shipwreck was a Minton porcelain peacock - one of only seven in the world. The peacock was destined for the Melbourne International Exhibition in 1880. It had been well packed, which gave it adequate protection during the violent storm. Today, the Minton peacock can be seen at the Flagstaff Hill Maritime Museum in Warrnambool. From Australia's most dramatic shipwreck it has now become Australia's shipwreck artefact and is one of very few 'objects' on the Victorian State Heritage Register most valuable. The LOCH ARD shipwreck is of State significance – Victorian Heritage Register S 417. Flagstaff Hill’s collection of artefacts from LOCH ARD is significant for being one of the largest collections of artefacts from this shipwreck in Victoria. It is significant for its association with the shipwreck, which is on the Victorian Heritage Register (VHR S417). The collection is significant because of the relationship between the objects, as together they have a high potential to interpret the story of the LOCH ARD. The LOCH ARD collection is archaeologically significant as the remains of a large international passenger and cargo ship. The LOCH ARD collection is historically significant for representing aspects of Victoria’s shipping history and its potential to interpret sub-theme 1.5 of Victoria’s Framework of Historical Themes (living with natural processes). The collection is also historically significant for its association with the LOCH ARD, which was one of the worst and best known shipwrecks in Victoria’s history. Unrestored dessert spoon from the wreck of the LOCH ARD. The spoon design has a flattened fiddle-back handle, with a thin stem or shank, flared collar, and a shallow rounded bowl. The spoons metallic composition is a thin layer of brass alloy which has partially corroded back to a nickel-silver base metal. Approximately 85% of original plate remains. The outlines of five makers marks are visible and the details of two of these are clear - (1) WP&Co trademark, (3) Maltese Cross.flagstaff hill maritime museum, shipwreck coast, great ocean road, loch line, loch ard, mutton bird island, loch ard gorge, electroplated cutlery, loch ard shipwreck, william page and co, birmingham brass plating -
 Flagstaff Hill Maritime Museum and Village
Domestic object - Spoon, circa 1878
This dessert spoon is from the wreck of the LOCH ARD, a Loch Line ship of 1,693 tons which sailed from Gravesend, London, on 2 March 1878 with 17 passengers and a crew of 36 under Captain George Gibbs. “The intention was to discharge cargo in Melbourne, before returning to London via the Horn with wool and wheat”. Instead, on 1 June 1878, after 90 days at sea, she struck the sandstone cliffs of Mutton Bird Island on the south west coast of Victoria, and sank with the loss of 52 lives and all her cargo. The manifest of the LOCH ARD listed an array of manufactured goods and bulk metals being exported to the Colony of Victoria, with a declared value of £53,700. (202 bills of lading show an actual invoice value of £68, 456, with insurance underwriting to £30,000 of all cargo). Included in the manifest is the item of “Tin hardware & cutlery £7,530”. This dessert spoon is one of 482 similar items of electro-plated cutlery from the LOCH ARD site, comprising spoons and forks of various sizes but all sharing the same general shape or design and metallic composition. 49 of these pieces display a legible makers’ mark — the initials “W” and “P” placed within a raised diamond outline, which is in turn contained within a sunken crown shape — identifying the manufacturer as William Page & Co of Birmingham. An electroplater’s makers’ marks, unlike sterling silver hallmarks, are not consistent identifiers of quality or date and place of manufacture. A similar line of five impressions was usually made to impress the consumer with an implication of industry standards, but what each one actually signified was not regulated and so they varied according to the whim of the individual foundry. In this case, the maker’s marks are often obscured by sedimentary accretion or removed by corrosion after a century of submersion in the ocean. However sufficient detail has survived to indicate that these samples of electro-plated cutlery probably originated from the same consignment in the LOCH ARD’s cargo. The generally common range of marks are drawn from 255 tea spoons, 125 dessert spoons, and 99 table forks. These marks are clearly visible in 66 instances, while the same sequence of general outlines, or depression shapes, is discernible in another 166 examples. Suggested trade names for William Page & Co’s particular blend of brass plating are ‘roman silver’ or ‘silverite’. This copper alloy polishes to a lustrous gold when new, discolouring to a murky grey with greenish hue when neglected. HISTORY OF THE LOCH ARD The LOCH ARD belonged to the famous Loch Line which sailed many ships from England to Australia. Built in Glasgow by Barclay, Curdle and Co. in 1873, the LOCH ARD was a three-masted square rigged iron sailing ship. The ship measured 262ft 7" (79.87m) in length, 38ft (11.58m) in width, 23ft (7m) in depth and had a gross tonnage of 1693 tons. The LOCH ARD's main mast measured a massive 150ft (45.7m) in height. LOCH ARD made three trips to Australia and one trip to Calcutta before its final voyage. LOCH ARD left England on March 2, 1878, under the command of Captain Gibbs, a newly married, 29 year old. She was bound for Melbourne with a crew of 37, plus 17 passengers and a load of cargo. The general cargo reflected the affluence of Melbourne at the time. On board were straw hats, umbrella, perfumes, clay pipes, pianos, clocks, confectionary, linen and candles, as well as a heavier load of railway irons, cement, lead and copper. There were items included that intended for display in the Melbourne International Exhibition in 1880. The voyage to Port Phillip was long but uneventful. At 3am on June 1, 1878, Captain Gibbs was expecting to see land and the passengers were becoming excited as they prepared to view their new homeland in the early morning. But LOCH ARD was running into a fog which greatly reduced visibility. Captain Gibbs was becoming anxious as there was no sign of land or the Cape Otway lighthouse. At 4am the fog lifted. A man aloft announced that he could see breakers. The sheer cliffs of Victoria's west coast came into view, and Captain Gibbs realised that the ship was much closer to them than expected. He ordered as much sail to be set as time would permit and then attempted to steer the vessel out to sea. On coming head on into the wind, the ship lost momentum, the sails fell limp and LOCH ARD's bow swung back. Gibbs then ordered the anchors to be released in an attempt to hold its position. The anchors sank some 50 fathoms - but did not hold. By this time LOCH ARD was among the breakers and the tall cliffs of Mutton Bird Island rose behind the ship. Just half a mile from the coast, the ship's bow was suddenly pulled around by the anchor. The captain tried to tack out to sea, but the ship struck a reef at the base of Mutton Bird Island, near Port Campbell. Waves broke over the ship and the top deck was loosened from the hull. The masts and rigging came crashing down knocking passengers and crew overboard. When a lifeboat was finally launched, it crashed into the side of LOCH ARD and capsized. Tom Pearce, who had launched the boat, managed to cling to its overturned hull and shelter beneath it. He drifted out to sea and then on the flood tide came into what is now known as LOCH ARD Gorge. He swam to shore, bruised and dazed, and found a cave in which to shelter. Some of the crew stayed below deck to shelter from the falling rigging but drowned when the ship slipped off the reef into deeper water. Eva Carmichael had raced onto deck to find out what was happening only to be confronted by towering cliffs looming above the stricken ship. In all the chaos, Captain Gibbs grabbed Eva and said, "If you are saved Eva, let my dear wife know that I died like a sailor". That was the last Eva Carmichael saw of the captain. She was swept off the ship by a huge wave. Eva saw Tom Pearce on a small rocky beach and yelled to attract his attention. He dived in and swam to the exhausted woman and dragged her to shore. He took her to the cave and broke open case of brandy which had washed up on the beach. He opened a bottle to revive the unconscious woman. A few hours later Tom scaled a cliff in search of help. He followed hoof prints and came by chance upon two men from nearby Glenample Station three and a half miles away. In a state of exhaustion, he told the men of the tragedy. Tom returned to the gorge while the two men rode back to the station to get help. By the time they reached LOCH ARD Gorge, it was cold and dark. The two shipwreck survivors were taken to Glenample Station to recover. Eva stayed at the station for six weeks before returning to Ireland, this time by steamship. In Melbourne, Tom Pearce received a hero's welcome. He was presented with the first gold medal of the Royal Humane Society of Victoria and a £1000 cheque from the Victorian Government. Concerts were performed to honour the young man's bravery and to raise money for those who lost family in the LOCH ARD disaster. Of the 54 crew members and passengers on board, only two survived: the apprentice, Tom Pearce and the young woman passenger, Eva Carmichael, who lost all of her family in the tragedy. Ten days after the LOCH ARD tragedy, salvage rights to the wreck were sold at auction for £2,120. Cargo valued at £3,000 was salvaged and placed on the beach, but most washed back into the sea when another storm developed. The wreck of LOCH ARD still lies at the base of Mutton Bird Island. Much of the cargo has now been salvaged and some was washed up into what is now known as LOCH ARD Gorge. Cargo and artefacts have also been illegally salvaged over many years before protective legislation was introduced. One of the most unlikely pieces of cargo to have survived the shipwreck was a Minton porcelain peacock - one of only seven in the world. The peacock was destined for the Melbourne International Exhibition in 1880. It had been well packed, which gave it adequate protection during the violent storm. Today, the Minton peacock can be seen at the Flagstaff Hill Maritime Museum in Warrnambool. From Australia's most dramatic shipwreck it has now become Australia's shipwreck artefact and is one of very few 'objects' on the Victorian State Heritage Register most valuable. The LOCH ARD shipwreck is of State significance – Victorian Heritage Register S 417. Flagstaff Hill’s collection of artefacts from LOCH ARD is significant for being one of the largest collections of artefacts from this shipwreck in Victoria. It is significant for its association with the shipwreck, which is on the Victorian Heritage Register (VHR S417). The collection is significant because of the relationship between the objects, as together they have a high potential to interpret the story of the LOCH ARD. The LOCH ARD collection is archaeologically significant as the remains of a large international passenger and cargo ship. The LOCH ARD collection is historically significant for representing aspects of Victoria’s shipping history and its potential to interpret sub-theme 1.5 of Victoria’s Framework of Historical Themes (living with natural processes). The collection is also historically significant for its association with the LOCH ARD, which was one of the worst and best known shipwrecks in Victoria’s history. Unrestored dessert spoon from the wreck of the LOCH ARD. The spoon design has a flattened fiddle-back handle, with a thin stem or shank, flared collar, and a shallow rounded bowl. The spoons metallic composition is a thin layer of brass alloy which has partially corroded back to a nickel-silver base metal. Approximately 40% of original plate remains, in a dull grey/green condition. Outlines of five makers marks are visible, with two that are legible - (1) WP&Co trademark, (4) Crab design. flagstaff hill maritime museum, shipwreck coast, great ocean road, loch line, loch ard, mutton bird island, loch ard gorge, electroplated cutlery, loch ard shipwreck, william page and co, birmingham brass plating, dessert spoons -
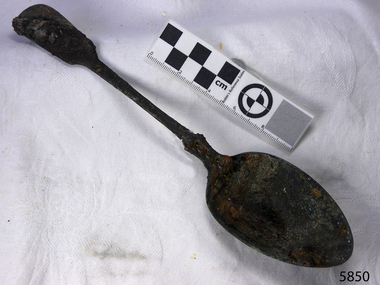 Flagstaff Hill Maritime Museum and Village
Domestic object - Spoon, circa 1878
This dessert spoon is from the wreck of the LOCH ARD, a Loch Line ship of 1,693 tons which sailed from Gravesend, London, on 2 March 1878 with 17 passengers and a crew of 36 under Captain George Gibbs. “The intention was to discharge cargo in Melbourne, before returning to London via the Horn with wool and wheat”. Instead, on 1 June 1878, after 90 days at sea, she struck the sandstone cliffs of Mutton Bird Island on the south west coast of Victoria, and sank with the loss of 52 lives and all her cargo. The manifest of the LOCH ARD listed an array of manufactured goods and bulk metals being exported to the Colony of Victoria, with a declared value of £53,700. (202 bills of lading show an actual invoice value of £68, 456, with insurance underwriting to £30,000 of all cargo). Included in the manifest is the item of “Tin hardware & cutlery £7,530”. This dessert spoon is one of 482 similar items of electro-plated cutlery from the LOCH ARD site, comprising spoons and forks of various sizes but all sharing the same general shape or design and metallic composition. 49 of these pieces display a legible makers’ mark — the initials “W” and “P” placed within a raised diamond outline, which is in turn contained within a sunken crown shape — identifying the manufacturer as William Page & Co of Birmingham. An electroplater’s makers’ marks, unlike sterling silver hallmarks, are not consistent identifiers of quality or date and place of manufacture. A similar line of five impressions was usually made to impress the consumer with an implication of industry standards, but what each one actually signified was not regulated and so they varied according to the whim of the individual foundry. In this case, the maker’s marks are often obscured by sedimentary accretion or removed by corrosion after a century of submersion in the ocean. However sufficient detail has survived to indicate that these samples of electro-plated cutlery probably originated from the same consignment in the LOCH ARD’s cargo. The generally common range of marks are drawn from 255 tea spoons, 125 dessert spoons, and 99 table forks. These marks are clearly visible in 66 instances, while the same sequence of general outlines, or depression shapes, is discernible in another 166 examples. Suggested trade names for William Page & Co’s particular blend of brass plating are ‘roman silver’ or ‘silverite’. This copper alloy polishes to a lustrous gold when new, discolouring to a murky grey with greenish hue when neglected. HISTORY OF THE LOCH ARD The LOCH ARD belonged to the famous Loch Line which sailed many ships from England to Australia. Built in Glasgow by Barclay, Curdle and Co. in 1873, the LOCH ARD was a three-masted square rigged iron sailing ship. The ship measured 262ft 7" (79.87m) in length, 38ft (11.58m) in width, 23ft (7m) in depth and had a gross tonnage of 1693 tons. The LOCH ARD's main mast measured a massive 150ft (45.7m) in height. LOCH ARD made three trips to Australia and one trip to Calcutta before its final voyage. LOCH ARD left England on March 2, 1878, under the command of Captain Gibbs, a newly married, 29 year old. She was bound for Melbourne with a crew of 37, plus 17 passengers and a load of cargo. The general cargo reflected the affluence of Melbourne at the time. On board were straw hats, umbrella, perfumes, clay pipes, pianos, clocks, confectionary, linen and candles, as well as a heavier load of railway irons, cement, lead and copper. There were items included that intended for display in the Melbourne International Exhibition in 1880. The voyage to Port Phillip was long but uneventful. At 3am on June 1, 1878, Captain Gibbs was expecting to see land and the passengers were becoming excited as they prepared to view their new homeland in the early morning. But LOCH ARD was running into a fog which greatly reduced visibility. Captain Gibbs was becoming anxious as there was no sign of land or the Cape Otway lighthouse. At 4am the fog lifted. A man aloft announced that he could see breakers. The sheer cliffs of Victoria's west coast came into view, and Captain Gibbs realised that the ship was much closer to them than expected. He ordered as much sail to be set as time would permit and then attempted to steer the vessel out to sea. On coming head on into the wind, the ship lost momentum, the sails fell limp and LOCH ARD's bow swung back. Gibbs then ordered the anchors to be released in an attempt to hold its position. The anchors sank some 50 fathoms - but did not hold. By this time LOCH ARD was among the breakers and the tall cliffs of Mutton Bird Island rose behind the ship. Just half a mile from the coast, the ship's bow was suddenly pulled around by the anchor. The captain tried to tack out to sea, but the ship struck a reef at the base of Mutton Bird Island, near Port Campbell. Waves broke over the ship and the top deck was loosened from the hull. The masts and rigging came crashing down knocking passengers and crew overboard. When a lifeboat was finally launched, it crashed into the side of LOCH ARD and capsized. Tom Pearce, who had launched the boat, managed to cling to its overturned hull and shelter beneath it. He drifted out to sea and then on the flood tide came into what is now known as LOCH ARD Gorge. He swam to shore, bruised and dazed, and found a cave in which to shelter. Some of the crew stayed below deck to shelter from the falling rigging but drowned when the ship slipped off the reef into deeper water. Eva Carmichael had raced onto deck to find out what was happening only to be confronted by towering cliffs looming above the stricken ship. In all the chaos, Captain Gibbs grabbed Eva and said, "If you are saved Eva, let my dear wife know that I died like a sailor". That was the last Eva Carmichael saw of the captain. She was swept off the ship by a huge wave. Eva saw Tom Pearce on a small rocky beach and yelled to attract his attention. He dived in and swam to the exhausted woman and dragged her to shore. He took her to the cave and broke open case of brandy which had washed up on the beach. He opened a bottle to revive the unconscious woman. A few hours later Tom scaled a cliff in search of help. He followed hoof prints and came by chance upon two men from nearby Glenample Station three and a half miles away. In a state of exhaustion, he told the men of the tragedy. Tom returned to the gorge while the two men rode back to the station to get help. By the time they reached LOCH ARD Gorge, it was cold and dark. The two shipwreck survivors were taken to Glenample Station to recover. Eva stayed at the station for six weeks before returning to Ireland, this time by steamship. In Melbourne, Tom Pearce received a hero's welcome. He was presented with the first gold medal of the Royal Humane Society of Victoria and a £1000 cheque from the Victorian Government. Concerts were performed to honour the young man's bravery and to raise money for those who lost family in the LOCH ARD disaster. Of the 54 crew members and passengers on board, only two survived: the apprentice, Tom Pearce and the young woman passenger, Eva Carmichael, who lost all of her family in the tragedy. Ten days after the LOCH ARD tragedy, salvage rights to the wreck were sold at auction for £2,120. Cargo valued at £3,000 was salvaged and placed on the beach, but most washed back into the sea when another storm developed. The wreck of LOCH ARD still lies at the base of Mutton Bird Island. Much of the cargo has now been salvaged and some was washed up into what is now known as LOCH ARD Gorge. Cargo and artefacts have also been illegally salvaged over many years before protective legislation was introduced. One of the most unlikely pieces of cargo to have survived the shipwreck was a Minton porcelain peacock - one of only seven in the world. The peacock was destined for the Melbourne International Exhibition in 1880. It had been well packed, which gave it adequate protection during the violent storm. Today, the Minton peacock can be seen at the Flagstaff Hill Maritime Museum in Warrnambool. From Australia's most dramatic shipwreck it has now become Australia's shipwreck artefact and is one of very few 'objects' on the Victorian State Heritage Register most valuable. The LOCH ARD shipwreck is of State significance – Victorian Heritage Register S 417. Flagstaff Hill’s collection of artefacts from LOCH ARD is significant for being one of the largest collections of artefacts from this shipwreck in Victoria. It is significant for its association with the shipwreck, which is on the Victorian Heritage Register (VHR S417). The collection is significant because of the relationship between the objects, as together they have a high potential to interpret the story of the LOCH ARD. The LOCH ARD collection is archaeologically significant as the remains of a large international passenger and cargo ship. The LOCH ARD collection is historically significant for representing aspects of Victoria’s shipping history and its potential to interpret sub-theme 1.5 of Victoria’s Framework of Historical Themes (living with natural processes). The collection is also historically significant for its association with the LOCH ARD, which was one of the worst and best known shipwrecks in Victoria’s history Unrestored dessert spoon from the wreck of the LOCH ARD. The spoon design has a flattened fiddle-back handle, with a thin stem or shank, flared collar, and a shallow rounded bowl. The spoons metallic composition is a thin layer of brass alloy which has partially corroded back to a nickel-silver base metal. Surface area of spoon is 10% sediment, 10% original plate, 1o% verdigris, and balance 70% almost black oxidisation. flagstaff hill maritime museum, shipwreck coast, great ocean road, loch line, loch ard, mutton bird island, loch ard gorge, electroplated cutlery, loch ard shipwreck, william page and co, birmingham brass plating, dessert spoons -
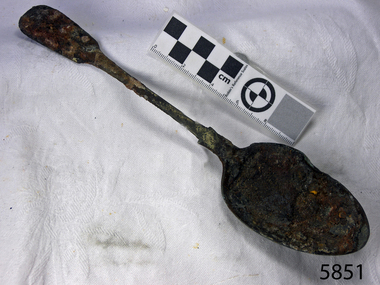 Flagstaff Hill Maritime Museum and Village
Domestic object - Spoon, circa 1878
This dessert spoon is from the wreck of the LOCH ARD, a Loch Line ship of 1,693 tons which sailed from Gravesend, London, on 2 March 1878 with 17 passengers and a crew of 36 under Captain George Gibbs. “The intention was to discharge cargo in Melbourne, before returning to London via the Horn with wool and wheat”. Instead, on 1 June 1878, after 90 days at sea, she struck the sandstone cliffs of Mutton Bird Island on the south west coast of Victoria, and sank with the loss of 52 lives and all her cargo. The manifest of the LOCH ARD listed an array of manufactured goods and bulk metals being exported to the Colony of Victoria, with a declared value of £53,700. (202 bills of lading show an actual invoice value of £68, 456, with insurance underwriting to £30,000 of all cargo). Included in the manifest is the item of “Tin hardware & cutlery £7,530”. This dessert spoon is one of 482 similar items of electro-plated cutlery from the LOCH ARD site, comprising spoons and forks of various sizes but all sharing the same general shape or design and metallic composition. 49 of these pieces display a legible makers’ mark — the initials “W” and “P” placed within a raised diamond outline, which is in turn contained within a sunken crown shape — identifying the manufacturer as William Page & Co of Birmingham. An electroplater’s makers’ marks, unlike sterling silver hallmarks, are not consistent identifiers of quality or date and place of manufacture. A similar line of five impressions was usually made to impress the consumer with an implication of industry standards, but what each one actually signified was not regulated and so they varied according to the whim of the individual foundry. In this case, the maker’s marks are often obscured by sedimentary accretion or removed by corrosion after a century of submersion in the ocean. However sufficient detail has survived to indicate that these samples of electro-plated cutlery probably originated from the same consignment in the LOCH ARD’s cargo. The generally common range of marks are drawn from 255 tea spoons, 125 dessert spoons, and 99 table forks. These marks are clearly visible in 66 instances, while the same sequence of general outlines, or depression shapes, is discernible in another 166 examples. Suggested trade names for William Page & Co’s particular blend of brass plating are ‘roman silver’ or ‘silverite’. This copper alloy polishes to a lustrous gold when new, discolouring to a murky grey with greenish hue when neglected. HISTORY OF THE LOCH ARD The LOCH ARD belonged to the famous Loch Line which sailed many ships from England to Australia. Built in Glasgow by Barclay, Curdle and Co. in 1873, the LOCH ARD was a three-masted square rigged iron sailing ship. The ship measured 262ft 7" (79.87m) in length, 38ft (11.58m) in width, 23ft (7m) in depth and had a gross tonnage of 1693 tons. The LOCH ARD's main mast measured a massive 150ft (45.7m) in height. LOCH ARD made three trips to Australia and one trip to Calcutta before its final voyage. LOCH ARD left England on March 2, 1878, under the command of Captain Gibbs, a newly married, 29 year old. She was bound for Melbourne with a crew of 37, plus 17 passengers and a load of cargo. The general cargo reflected the affluence of Melbourne at the time. On board were straw hats, umbrella, perfumes, clay pipes, pianos, clocks, confectionary, linen and candles, as well as a heavier load of railway irons, cement, lead and copper. There were items included that intended for display in the Melbourne International Exhibition in 1880. The voyage to Port Phillip was long but uneventful. At 3am on June 1, 1878, Captain Gibbs was expecting to see land and the passengers were becoming excited as they prepared to view their new homeland in the early morning. But LOCH ARD was running into a fog which greatly reduced visibility. Captain Gibbs was becoming anxious as there was no sign of land or the Cape Otway lighthouse. At 4am the fog lifted. A man aloft announced that he could see breakers. The sheer cliffs of Victoria's west coast came into view, and Captain Gibbs realised that the ship was much closer to them than expected. He ordered as much sail to be set as time would permit and then attempted to steer the vessel out to sea. On coming head on into the wind, the ship lost momentum, the sails fell limp and LOCH ARD's bow swung back. Gibbs then ordered the anchors to be released in an attempt to hold its position. The anchors sank some 50 fathoms - but did not hold. By this time LOCH ARD was among the breakers and the tall cliffs of Mutton Bird Island rose behind the ship. Just half a mile from the coast, the ship's bow was suddenly pulled around by the anchor. The captain tried to tack out to sea, but the ship struck a reef at the base of Mutton Bird Island, near Port Campbell. Waves broke over the ship and the top deck was loosened from the hull. The masts and rigging came crashing down knocking passengers and crew overboard. When a lifeboat was finally launched, it crashed into the side of LOCH ARD and capsized. Tom Pearce, who had launched the boat, managed to cling to its overturned hull and shelter beneath it. He drifted out to sea and then on the flood tide came into what is now known as LOCH ARD Gorge. He swam to shore, bruised and dazed, and found a cave in which to shelter. Some of the crew stayed below deck to shelter from the falling rigging but drowned when the ship slipped off the reef into deeper water. Eva Carmichael had raced onto deck to find out what was happening only to be confronted by towering cliffs looming above the stricken ship. In all the chaos, Captain Gibbs grabbed Eva and said, "If you are saved Eva, let my dear wife know that I died like a sailor". That was the last Eva Carmichael saw of the captain. She was swept off the ship by a huge wave. Eva saw Tom Pearce on a small rocky beach and yelled to attract his attention. He dived in and swam to the exhausted woman and dragged her to shore. He took her to the cave and broke open case of brandy which had washed up on the beach. He opened a bottle to revive the unconscious woman. A few hours later Tom scaled a cliff in search of help. He followed hoof prints and came by chance upon two men from nearby Glenample Station three and a half miles away. In a state of exhaustion, he told the men of the tragedy. Tom returned to the gorge while the two men rode back to the station to get help. By the time they reached LOCH ARD Gorge, it was cold and dark. The two shipwreck survivors were taken to Glenample Station to recover. Eva stayed at the station for six weeks before returning to Ireland, this time by steamship. In Melbourne, Tom Pearce received a hero's welcome. He was presented with the first gold medal of the Royal Humane Society of Victoria and a £1000 cheque from the Victorian Government. Concerts were performed to honour the young man's bravery and to raise money for those who lost family in the LOCH ARD disaster. Of the 54 crew members and passengers on board, only two survived: the apprentice, Tom Pearce and the young woman passenger, Eva Carmichael, who lost all of her family in the tragedy. Ten days after the LOCH ARD tragedy, salvage rights to the wreck were sold at auction for £2,120. Cargo valued at £3,000 was salvaged and placed on the beach, but most washed back into the sea when another storm developed. The wreck of LOCH ARD still lies at the base of Mutton Bird Island. Much of the cargo has now been salvaged and some was washed up into what is now known as LOCH ARD Gorge. Cargo and artefacts have also been illegally salvaged over many years before protective legislation was introduced. One of the most unlikely pieces of cargo to have survived the shipwreck was a Minton porcelain peacock - one of only seven in the world. The peacock was destined for the Melbourne International Exhibition in 1880. It had been well packed, which gave it adequate protection during the violent storm. Today, the Minton peacock can be seen at the Flagstaff Hill Maritime Museum in Warrnambool. From Australia's most dramatic shipwreck it has now become Australia's shipwreck artefact and is one of very few 'objects' on the Victorian State Heritage Register most valuable. The LOCH ARD shipwreck is of State significance – Victorian Heritage Register S 417. Flagstaff Hill’s collection of artefacts from LOCH ARD is significant for being one of the largest collections of artefacts from this shipwreck in Victoria. It is significant for its association with the shipwreck, which is on the Victorian Heritage Register (VHR S417). The collection is significant because of the relationship between the objects, as together they have a high potential to interpret the story of the LOCH ARD. The LOCH ARD collection is archaeologically significant as the remains of a large international passenger and cargo ship. The LOCH ARD collection is historically significant for representing aspects of Victoria’s shipping history and its potential to interpret sub-theme 1.5 of Victoria’s Framework of Historical Themes (living with natural processes). The collection is also historically significant for its association with the LOCH ARD, which was one of the worst and best known shipwrecks in Victoria’s history. Unrestored dessert spoon from the wreck of the LOCH ARD. The spoon design has a flattened fiddle-back handle, with a thin stem or shank, flared collar, and a shallow rounded bowl. The spoons metallic composition is a thin layer of brass alloy which has partially corroded back to a nickel-silver base metal. Some verdigris and concretion on front and back of spoon. Spoon bowl is dented and cracked. 70% of surface area covered in dark Silver Oxide.flagstaff hill maritime museum, shipwreck coast, great ocean road, loch line, loch ard, mutton bird island, loch ard gorge, electroplated cutlery, loch ard shipwreck, william page and co, birmingham brass plating, dessert spoons -
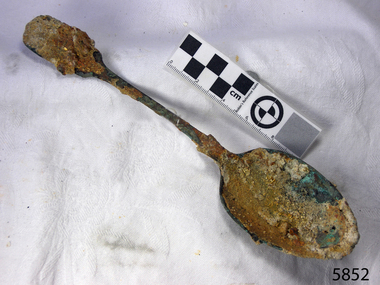 Flagstaff Hill Maritime Museum and Village
Domestic object - Spoon, circa 1878
This dessert spoon is from the wreck of the LOCH ARD, a Loch Line ship of 1,693 tons which sailed from Gravesend, London, on 2 March 1878 with 17 passengers and a crew of 36 under Captain George Gibbs. “The intention was to discharge cargo in Melbourne, before returning to London via the Horn with wool and wheat”. Instead, on 1 June 1878, after 90 days at sea, she struck the sandstone cliffs of Mutton Bird Island on the south west coast of Victoria, and sank with the loss of 52 lives and all her cargo. The manifest of the LOCH ARD listed an array of manufactured goods and bulk metals being exported to the Colony of Victoria, with a declared value of £53,700. (202 bills of lading show an actual invoice value of £68, 456, with insurance underwriting to £30,000 of all cargo). Included in the manifest is the item of “Tin hardware & cutlery £7,530”. This dessert spoon is one of 482 similar items of electro-plated cutlery from the LOCH ARD site, comprising spoons and forks of various sizes but all sharing the same general shape or design and metallic composition. 49 of these pieces display a legible makers’ mark — the initials “W” and “P” placed within a raised diamond outline, which is in turn contained within a sunken crown shape — identifying the manufacturer as William Page & Co of Birmingham. An electroplater’s makers’ marks, unlike sterling silver hallmarks, are not consistent identifiers of quality or date and place of manufacture. A similar line of five impressions was usually made to impress the consumer with an implication of industry standards, but what each one actually signified was not regulated and so they varied according to the whim of the individual foundry. In this case, the maker’s marks are often obscured by sedimentary accretion or removed by corrosion after a century of submersion in the ocean. However sufficient detail has survived to indicate that these samples of electro-plated cutlery probably originated from the same consignment in the LOCH ARD’s cargo. The generally common range of marks are drawn from 255 tea spoons, 125 dessert spoons, and 99 table forks. These marks are clearly visible in 66 instances, while the same sequence of general outlines, or depression shapes, is discernible in another 166 examples. Suggested trade names for William Page & Co’s particular blend of brass plating are ‘roman silver’ or ‘silverite’. This copper alloy polishes to a lustrous gold when new, discolouring to a murky grey with greenish hue when neglected. HISTORY OF THE LOCH ARD The LOCH ARD belonged to the famous Loch Line which sailed many ships from England to Australia. Built in Glasgow by Barclay, Curdle and Co. in 1873, the LOCH ARD was a three-masted square rigged iron sailing ship. The ship measured 262ft 7" (79.87m) in length, 38ft (11.58m) in width, 23ft (7m) in depth and had a gross tonnage of 1693 tons. The LOCH ARD's main mast measured a massive 150ft (45.7m) in height. LOCH ARD made three trips to Australia and one trip to Calcutta before its final voyage. LOCH ARD left England on March 2, 1878, under the command of Captain Gibbs, a newly married, 29 year old. She was bound for Melbourne with a crew of 37, plus 17 passengers and a load of cargo. The general cargo reflected the affluence of Melbourne at the time. On board were straw hats, umbrella, perfumes, clay pipes, pianos, clocks, confectionary, linen and candles, as well as a heavier load of railway irons, cement, lead and copper. There were items included that intended for display in the Melbourne International Exhibition in 1880. The voyage to Port Phillip was long but uneventful. At 3am on June 1, 1878, Captain Gibbs was expecting to see land and the passengers were becoming excited as they prepared to view their new homeland in the early morning. But LOCH ARD was running into a fog which greatly reduced visibility. Captain Gibbs was becoming anxious as there was no sign of land or the Cape Otway lighthouse. At 4am the fog lifted. A man aloft announced that he could see breakers. The sheer cliffs of Victoria's west coast came into view, and Captain Gibbs realised that the ship was much closer to them than expected. He ordered as much sail to be set as time would permit and then attempted to steer the vessel out to sea. On coming head on into the wind, the ship lost momentum, the sails fell limp and LOCH ARD's bow swung back. Gibbs then ordered the anchors to be released in an attempt to hold its position. The anchors sank some 50 fathoms - but did not hold. By this time LOCH ARD was among the breakers and the tall cliffs of Mutton Bird Island rose behind the ship. Just half a mile from the coast, the ship's bow was suddenly pulled around by the anchor. The captain tried to tack out to sea, but the ship struck a reef at the base of Mutton Bird Island, near Port Campbell. Waves broke over the ship and the top deck was loosened from the hull. The masts and rigging came crashing down knocking passengers and crew overboard. When a lifeboat was finally launched, it crashed into the side of LOCH ARD and capsized. Tom Pearce, who had launched the boat, managed to cling to its overturned hull and shelter beneath it. He drifted out to sea and then on the flood tide came into what is now known as LOCH ARD Gorge. He swam to shore, bruised and dazed, and found a cave in which to shelter. Some of the crew stayed below deck to shelter from the falling rigging but drowned when the ship slipped off the reef into deeper water. Eva Carmichael had raced onto deck to find out what was happening only to be confronted by towering cliffs looming above the stricken ship. In all the chaos, Captain Gibbs grabbed Eva and said, "If you are saved Eva, let my dear wife know that I died like a sailor". That was the last Eva Carmichael saw of the captain. She was swept off the ship by a huge wave. Eva saw Tom Pearce on a small rocky beach and yelled to attract his attention. He dived in and swam to the exhausted woman and dragged her to shore. He took her to the cave and broke open case of brandy which had washed up on the beach. He opened a bottle to revive the unconscious woman. A few hours later Tom scaled a cliff in search of help. He followed hoof prints and came by chance upon two men from nearby Glenample Station three and a half miles away. In a state of exhaustion, he told the men of the tragedy. Tom returned to the gorge while the two men rode back to the station to get help. By the time they reached LOCH ARD Gorge, it was cold and dark. The two shipwreck survivors were taken to Glenample Station to recover. Eva stayed at the station for six weeks before returning to Ireland, this time by steamship. In Melbourne, Tom Pearce received a hero's welcome. He was presented with the first gold medal of the Royal Humane Society of Victoria and a £1000 cheque from the Victorian Government. Concerts were performed to honour the young man's bravery and to raise money for those who lost family in the LOCH ARD disaster. Of the 54 crew members and passengers on board, only two survived: the apprentice, Tom Pearce and the young woman passenger, Eva Carmichael, who lost all of her family in the tragedy. Ten days after the LOCH ARD tragedy, salvage rights to the wreck were sold at auction for £2,120. Cargo valued at £3,000 was salvaged and placed on the beach, but most washed back into the sea when another storm developed. The wreck of LOCH ARD still lies at the base of Mutton Bird Island. Much of the cargo has now been salvaged and some was washed up into what is now known as LOCH ARD Gorge. Cargo and artefacts have also been illegally salvaged over many years before protective legislation was introduced. One of the most unlikely pieces of cargo to have survived the shipwreck was a Minton porcelain peacock - one of only seven in the world. The peacock was destined for the Melbourne International Exhibition in 1880. It had been well packed, which gave it adequate protection during the violent storm. Today, the Minton peacock can be seen at the Flagstaff Hill Maritime Museum in Warrnambool. From Australia's most dramatic shipwreck it has now become Australia's shipwreck artefact and is one of very few 'objects' on the Victorian State Heritage Register most valuable. The LOCH ARD shipwreck is of State significance – Victorian Heritage Register S 417. Flagstaff Hill’s collection of artefacts from LOCH ARD is significant for being one of the largest collections of artefacts from this shipwreck in Victoria. It is significant for its association with the shipwreck, which is on the Victorian Heritage Register (VHR S417). The collection is significant because of the relationship between the objects, as together they have a high potential to interpret the story of the LOCH ARD. The LOCH ARD collection is archaeologically significant as the remains of a large international passenger and cargo ship. The LOCH ARD collection is historically significant for representing aspects of Victoria’s shipping history and its potential to interpret sub-theme 1.5 of Victoria’s Framework of Historical Themes (living with natural processes). The collection is also historically significant for its association with the LOCH ARD, which was one of the worst and best known shipwrecks in Victoria’s history. Unrestored dessert spoon from the wreck of the LOCH ARD. The spoon design has a flattened fiddle-back handle, with a thin stem or shank, flared collar, and a shallow rounded bowl. The spoons metallic composition is a thin layer of brass alloy which has partially corroded back to a nickel-silver base metal. Approximately 85% of spoon surface area bears red/white encrustation and balance has verdigris.Spoon is bent out of shape.flagstaff hill maritime museum, shipwreck coast, great ocean road, loch line, loch ard, mutton bird island, loch ard gorge, electroplated cutlery, loch ard shipwreck, william page and co, birmingham brass plating, dessert spoons -
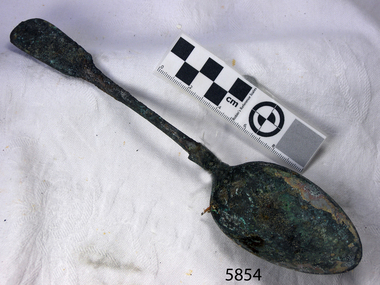 Flagstaff Hill Maritime Museum and Village
Domestic object - Spoon, circa 1878
This table spoon is from the wreck of the LOCH ARD, a Loch Line ship of 1,693 tons which sailed from Gravesend, London, on 2 March 1878 with 17 passengers and a crew of 36 under Captain George Gibbs. “The intention was to discharge cargo in Melbourne, before returning to London via the Horn with wool and wheat”. Instead, on 1 June 1878, after 90 days at sea, she struck the sandstone cliffs of Mutton Bird Island on the south west coast of Victoria, and sank with the loss of 52 lives and all her cargo. The manifest of the LOCH ARD listed an array of manufactured goods and bulk metals being exported to the Colony of Victoria, with a declared value of £53,700. (202 bills of lading show an actual invoice value of £68, 456, with insurance underwriting to £30,000 of all cargo). Included in the manifest is the item of “Tin hardware & cutlery £7,530”. This table spoon is one of 482 similar items of electro-plated cutlery from the LOCH ARD site, comprising spoons and forks of various sizes but all sharing the same general shape or design and metallic composition. 49 of these pieces display a legible makers’ mark — the initials “W” and “P” placed within a raised diamond outline, which is in turn contained within a sunken crown shape — identifying the manufacturer as William Page & Co of Birmingham. An electroplater’s makers’ marks, unlike sterling silver hallmarks, are not consistent identifiers of quality or date and place of manufacture. A similar line of five impressions was usually made to impress the consumer with an implication of industry standards, but what each one actually signified was not regulated and so they varied according to the whim of the individual foundry. In this case, the maker’s marks are often obscured by sedimentary accretion or removed by corrosion after a century of submersion in the ocean. However sufficient detail has survived to indicate that these samples of electro-plated cutlery probably originated from the same consignment in the LOCH ARD’s cargo. The generally common range of marks are drawn from 255 tea spoons, 125 dessert spoons, and 99 table forks. These marks are clearly visible in 66 instances, while the same sequence of general outlines, or depression shapes, is discernible in another 166 examples. Suggested trade names for William Page & Co’s particular blend of brass plating are ‘roman silver’ or ‘silverite’. This copper alloy polishes to a lustrous gold when new, discolouring to a murky grey with greenish hue when neglected. HISTORY OF THE LOCH ARD The LOCH ARD belonged to the famous Loch Line which sailed many ships from England to Australia. Built in Glasgow by Barclay, Curdle and Co. in 1873, the LOCH ARD was a three-masted square rigged iron sailing ship. The ship measured 262ft 7" (79.87m) in length, 38ft (11.58m) in width, 23ft (7m) in depth and had a gross tonnage of 1693 tons. The LOCH ARD's main mast measured a massive 150ft (45.7m) in height. LOCH ARD made three trips to Australia and one trip to Calcutta before its final voyage. LOCH ARD left England on March 2, 1878, under the command of Captain Gibbs, a newly married, 29 year old. She was bound for Melbourne with a crew of 37, plus 17 passengers and a load of cargo. The general cargo reflected the affluence of Melbourne at the time. On board were straw hats, umbrella, perfumes, clay pipes, pianos, clocks, confectionary, linen and candles, as well as a heavier load of railway irons, cement, lead and copper. There were items included that intended for display in the Melbourne International Exhibition in 1880. The voyage to Port Phillip was long but uneventful. At 3am on June 1, 1878, Captain Gibbs was expecting to see land and the passengers were becoming excited as they prepared to view their new homeland in the early morning. But LOCH ARD was running into a fog which greatly reduced visibility. Captain Gibbs was becoming anxious as there was no sign of land or the Cape Otway lighthouse. At 4am the fog lifted. A man aloft announced that he could see breakers. The sheer cliffs of Victoria's west coast came into view, and Captain Gibbs realised that the ship was much closer to them than expected. He ordered as much sail to be set as time would permit and then attempted to steer the vessel out to sea. On coming head on into the wind, the ship lost momentum, the sails fell limp and LOCH ARD's bow swung back. Gibbs then ordered the anchors to be released in an attempt to hold its position. The anchors sank some 50 fathoms - but did not hold. By this time LOCH ARD was among the breakers and the tall cliffs of Mutton Bird Island rose behind the ship. Just half a mile from the coast, the ship's bow was suddenly pulled around by the anchor. The captain tried to tack out to sea, but the ship struck a reef at the base of Mutton Bird Island, near Port Campbell. Waves broke over the ship and the top deck was loosened from the hull. The masts and rigging came crashing down knocking passengers and crew overboard. When a lifeboat was finally launched, it crashed into the side of LOCH ARD and capsized. Tom Pearce, who had launched the boat, managed to cling to its overturned hull and shelter beneath it. He drifted out to sea and then on the flood tide came into what is now known as LOCH ARD Gorge. He swam to shore, bruised and dazed, and found a cave in which to shelter. Some of the crew stayed below deck to shelter from the falling rigging but drowned when the ship slipped off the reef into deeper water. Eva Carmichael had raced onto deck to find out what was happening only to be confronted by towering cliffs looming above the stricken ship. In all the chaos, Captain Gibbs grabbed Eva and said, "If you are saved Eva, let my dear wife know that I died like a sailor". That was the last Eva Carmichael saw of the captain. She was swept off the ship by a huge wave. Eva saw Tom Pearce on a small rocky beach and yelled to attract his attention. He dived in and swam to the exhausted woman and dragged her to shore. He took her to the cave and broke open case of brandy which had washed up on the beach. He opened a bottle to revive the unconscious woman. A few hours later Tom scaled a cliff in search of help. He followed hoof prints and came by chance upon two men from nearby Glenample Station three and a half miles away. In a state of exhaustion, he told the men of the tragedy. Tom returned to the gorge while the two men rode back to the station to get help. By the time they reached LOCH ARD Gorge, it was cold and dark. The two shipwreck survivors were taken to Glenample Station to recover. Eva stayed at the station for six weeks before returning to Ireland, this time by steamship. In Melbourne, Tom Pearce received a hero's welcome. He was presented with the first gold medal of the Royal Humane Society of Victoria and a £1000 cheque from the Victorian Government. Concerts were performed to honour the young man's bravery and to raise money for those who lost family in the LOCH ARD disaster. Of the 54 crew members and passengers on board, only two survived: the apprentice, Tom Pearce and the young woman passenger, Eva Carmichael, who lost all of her family in the tragedy. Ten days after the LOCH ARD tragedy, salvage rights to the wreck were sold at auction for £2,120. Cargo valued at £3,000 was salvaged and placed on the beach, but most washed back into the sea when another storm developed. The wreck of LOCH ARD still lies at the base of Mutton Bird Island. Much of the cargo has now been salvaged and some was washed up into what is now known as LOCH ARD Gorge. Cargo and artefacts have also been illegally salvaged over many years before protective legislation was introduced. One of the most unlikely pieces of cargo to have survived the shipwreck was a Minton porcelain peacock - one of only seven in the world. The peacock was destined for the Melbourne International Exhibition in 1880. It had been well packed, which gave it adequate protection during the violent storm. Today, the Minton peacock can be seen at the Flagstaff Hill Maritime Museum in Warrnambool. From Australia's most dramatic shipwreck it has now become Australia's shipwreck artefact and is one of very few 'objects' on the Victorian State Heritage Register most valuable. The LOCH ARD shipwreck is of State significance – Victorian Heritage Register S 417. Flagstaff Hill’s collection of artefacts from LOCH ARD is significant for being one of the largest collections of artefacts from this shipwreck in Victoria. It is significant for its association with the shipwreck, which is on the Victorian Heritage Register (VHR S417). The collection is significant because of the relationship between the objects, as together they have a high potential to interpret the story of the LOCH ARD. The LOCH ARD collection is archaeologically significant as the remains of a large international passenger and cargo ship. The LOCH ARD collection is historically significant for representing aspects of Victoria’s shipping history and its potential to interpret sub-theme 1.5 of Victoria’s Framework of Historical Themes (living with natural processes). The collection is also historically significant for its association with the LOCH ARD, which was one of the worst and best known shipwrecks in Victoria’s history. Unrestored table spoon from the wreck of the LOCH ARD. The spoon design has a flattened fiddle-back handle, with a thin stem or shank, flared collar, and a shallow rounded bowl. The spoons metallic composition is a thin layer of brass alloy which has partially corroded back to a nickel-silver base metal. Approximately 10% of original plate remains. Some verdigris and concretion on front and back of spoon, with balance covered in Silver Oxide.flagstaff hill maritime museum, shipwreck coast, great ocean road, loch line, loch ard, mutton bird island, loch ard gorge, electroplated cutlery, loch ard shipwreck, william page and co, birmingham brass plating, table spoons -
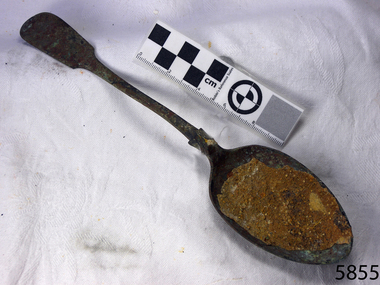 Flagstaff Hill Maritime Museum and Village
Domestic object - Spoon, circa 1878
This table spoon is from the wreck of the LOCH ARD, a Loch Line ship of 1,693 tons which sailed from Gravesend, London, on 2 March 1878 with 17 passengers and a crew of 36 under Captain George Gibbs. “The intention was to discharge cargo in Melbourne, before returning to London via the Horn with wool and wheat”. Instead, on 1 June 1878, after 90 days at sea, she struck the sandstone cliffs of Mutton Bird Island on the south west coast of Victoria, and sank with the loss of 52 lives and all her cargo. The manifest of the LOCH ARD listed an array of manufactured goods and bulk metals being exported to the Colony of Victoria, with a declared value of £53,700. (202 bills of lading show an actual invoice value of £68, 456, with insurance underwriting to £30,000 of all cargo). Included in the manifest is the item of “Tin hardware & cutlery £7,530”. This table spoon is one of 482 similar items of electro-plated cutlery from the LOCH ARD site, comprising spoons and forks of various sizes but all sharing the same general shape or design and metallic composition. 49 of these pieces display a legible makers’ mark — the initials “W” and “P” placed within a raised diamond outline, which is in turn contained within a sunken crown shape — identifying the manufacturer as William Page & Co of Birmingham. An electroplater’s makers’ marks, unlike sterling silver hallmarks, are not consistent identifiers of quality or date and place of manufacture. A similar line of five impressions was usually made to impress the consumer with an implication of industry standards, but what each one actually signified was not regulated and so they varied according to the whim of the individual foundry. In this case, the maker’s marks are often obscured by sedimentary accretion or removed by corrosion after a century of submersion in the ocean. However sufficient detail has survived to indicate that these samples of electro-plated cutlery probably originated from the same consignment in the LOCH ARD’s cargo. The generally common range of marks are drawn from 255 tea spoons, 125 dessert spoons, and 99 table forks. These marks are clearly visible in 66 instances, while the same sequence of general outlines, or depression shapes, is discernible in another 166 examples. Suggested trade names for William Page & Co’s particular blend of brass plating are ‘roman silver’ or ‘silverite’. This copper alloy polishes to a lustrous gold when new, discolouring to a murky grey with greenish hue when neglected. HISTORY OF THE LOCH ARD The LOCH ARD belonged to the famous Loch Line which sailed many ships from England to Australia. Built in Glasgow by Barclay, Curdle and Co. in 1873, the LOCH ARD was a three-masted square rigged iron sailing ship. The ship measured 262ft 7" (79.87m) in length, 38ft (11.58m) in width, 23ft (7m) in depth and had a gross tonnage of 1693 tons. The LOCH ARD's main mast measured a massive 150ft (45.7m) in height. LOCH ARD made three trips to Australia and one trip to Calcutta before its final voyage. LOCH ARD left England on March 2, 1878, under the command of Captain Gibbs, a newly married, 29 year old. She was bound for Melbourne with a crew of 37, plus 17 passengers and a load of cargo. The general cargo reflected the affluence of Melbourne at the time. On board were straw hats, umbrella, perfumes, clay pipes, pianos, clocks, confectionary, linen and candles, as well as a heavier load of railway irons, cement, lead and copper. There were items included that intended for display in the Melbourne International Exhibition in 1880. The voyage to Port Phillip was long but uneventful. At 3am on June 1, 1878, Captain Gibbs was expecting to see land and the passengers were becoming excited as they prepared to view their new homeland in the early morning. But LOCH ARD was running into a fog which greatly reduced visibility. Captain Gibbs was becoming anxious as there was no sign of land or the Cape Otway lighthouse. At 4am the fog lifted. A man aloft announced that he could see breakers. The sheer cliffs of Victoria's west coast came into view, and Captain Gibbs realised that the ship was much closer to them than expected. He ordered as much sail to be set as time would permit and then attempted to steer the vessel out to sea. On coming head on into the wind, the ship lost momentum, the sails fell limp and LOCH ARD's bow swung back. Gibbs then ordered the anchors to be released in an attempt to hold its position. The anchors sank some 50 fathoms - but did not hold. By this time LOCH ARD was among the breakers and the tall cliffs of Mutton Bird Island rose behind the ship. Just half a mile from the coast, the ship's bow was suddenly pulled around by the anchor. The captain tried to tack out to sea, but the ship struck a reef at the base of Mutton Bird Island, near Port Campbell. Waves broke over the ship and the top deck was loosened from the hull. The masts and rigging came crashing down knocking passengers and crew overboard. When a lifeboat was finally launched, it crashed into the side of LOCH ARD and capsized. Tom Pearce, who had launched the boat, managed to cling to its overturned hull and shelter beneath it. He drifted out to sea and then on the flood tide came into what is now known as LOCH ARD Gorge. He swam to shore, bruised and dazed, and found a cave in which to shelter. Some of the crew stayed below deck to shelter from the falling rigging but drowned when the ship slipped off the reef into deeper water. Eva Carmichael had raced onto deck to find out what was happening only to be confronted by towering cliffs looming above the stricken ship. In all the chaos, Captain Gibbs grabbed Eva and said, "If you are saved Eva, let my dear wife know that I died like a sailor". That was the last Eva Carmichael saw of the captain. She was swept off the ship by a huge wave. Eva saw Tom Pearce on a small rocky beach and yelled to attract his attention. He dived in and swam to the exhausted woman and dragged her to shore. He took her to the cave and broke open case of brandy which had washed up on the beach. He opened a bottle to revive the unconscious woman. A few hours later Tom scaled a cliff in search of help. He followed hoof prints and came by chance upon two men from nearby Glenample Station three and a half miles away. In a state of exhaustion, he told the men of the tragedy. Tom returned to the gorge while the two men rode back to the station to get help. By the time they reached LOCH ARD Gorge, it was cold and dark. The two shipwreck survivors were taken to Glenample Station to recover. Eva stayed at the station for six weeks before returning to Ireland, this time by steamship. In Melbourne, Tom Pearce received a hero's welcome. He was presented with the first gold medal of the Royal Humane Society of Victoria and a £1000 cheque from the Victorian Government. Concerts were performed to honour the young man's bravery and to raise money for those who lost family in the LOCH ARD disaster. Of the 54 crew members and passengers on board, only two survived: the apprentice, Tom Pearce and the young woman passenger, Eva Carmichael, who lost all of her family in the tragedy. Ten days after the LOCH ARD tragedy, salvage rights to the wreck were sold at auction for £2,120. Cargo valued at £3,000 was salvaged and placed on the beach, but most washed back into the sea when another storm developed. The wreck of LOCH ARD still lies at the base of Mutton Bird Island. Much of the cargo has now been salvaged and some was washed up into what is now known as LOCH ARD Gorge. Cargo and artefacts have also been illegally salvaged over many years before protective legislation was introduced. One of the most unlikely pieces of cargo to have survived the shipwreck was a Minton porcelain peacock - one of only seven in the world. The peacock was destined for the Melbourne International Exhibition in 1880. It had been well packed, which gave it adequate protection during the violent storm. Today, the Minton peacock can be seen at the Flagstaff Hill Maritime Museum in Warrnambool. From Australia's most dramatic shipwreck it has now become Australia's shipwreck artefact and is one of very few 'objects' on the Victorian State Heritage Register most valuable. The LOCH ARD shipwreck is of State significance – Victorian Heritage Register S 417. Flagstaff Hill’s collection of artefacts from LOCH ARD is significant for being one of the largest collections of artefacts from this shipwreck in Victoria. It is significant for its association with the shipwreck, which is on the Victorian Heritage Register (VHR S417). The collection is significant because of the relationship between the objects, as together they have a high potential to interpret the story of the LOCH ARD. The LOCH ARD collection is archaeologically significant as the remains of a large international passenger and cargo ship. The LOCH ARD collection is historically significant for representing aspects of Victoria’s shipping history and its potential to interpret sub-theme 1.5 of Victoria’s Framework of Historical Themes (living with natural processes). The collection is also historically significant for its association with the LOCH ARD, which was one of the worst and best known shipwrecks in Victoria’s history. Unrestored table spoon from the wreck of the LOCH ARD. The spoon design has a flattened fiddle-back handle, with a thin stem or shank, flared collar, and a shallow rounded bowl. The spoons metallic composition is a thin layer of brass alloy which has partially corroded back to a nickel-silver base metal. Approximately 35% of surface area has red and cream encrustation. Minimal original plate has survived but outlines of 5 makers marks are visible - Crown, Ellipse, Rounded Square, Circle, Diamond.flagstaff hill maritime museum, shipwreck coast, great ocean road, loch line, loch ard, mutton bird island, loch ard gorge, electroplated cutlery, loch ard shipwreck, william page and co, birmingham brass plating, table spoons -
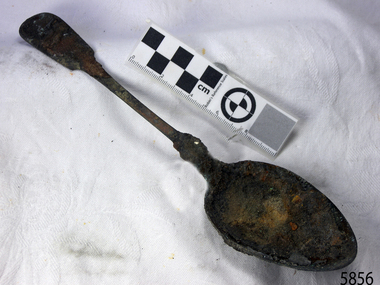 Flagstaff Hill Maritime Museum and Village
Domestic object - Spoon, circa 1878
This table spoon is from the wreck of the LOCH ARD, a Loch Line ship of 1,693 tons which sailed from Gravesend, London, on 2 March 1878 with 17 passengers and a crew of 36 under Captain George Gibbs. “The intention was to discharge cargo in Melbourne, before returning to London via the Horn with wool and wheat”. Instead, on 1 June 1878, after 90 days at sea, she struck the sandstone cliffs of Mutton Bird Island on the south west coast of Victoria, and sank with the loss of 52 lives and all her cargo. The manifest of the LOCH ARD listed an array of manufactured goods and bulk metals being exported to the Colony of Victoria, with a declared value of £53,700. (202 bills of lading show an actual invoice value of £68, 456, with insurance underwriting to £30,000 of all cargo). Included in the manifest is the item of “Tin hardware & cutlery £7,530”. This table spoon is one of 482 similar items of electro-plated cutlery from the LOCH ARD site, comprising spoons and forks of various sizes but all sharing the same general shape or design and metallic composition. 49 of these pieces display a legible makers’ mark — the initials “W” and “P” placed within a raised diamond outline, which is in turn contained within a sunken crown shape — identifying the manufacturer as William Page & Co of Birmingham. An electroplater’s makers’ marks, unlike sterling silver hallmarks, are not consistent identifiers of quality or date and place of manufacture. A similar line of five impressions was usually made to impress the consumer with an implication of industry standards, but what each one actually signified was not regulated and so they varied according to the whim of the individual foundry. In this case, the maker’s marks are often obscured by sedimentary accretion or removed by corrosion after a century of submersion in the ocean. However sufficient detail has survived to indicate that these samples of electro-plated cutlery probably originated from the same consignment in the LOCH ARD’s cargo. The generally common range of marks are drawn from 255 tea spoons, 125 dessert spoons, and 99 table forks. These marks are clearly visible in 66 instances, while the same sequence of general outlines, or depression shapes, is discernible in another 166 examples. Suggested trade names for William Page & Co’s particular blend of brass plating are ‘roman silver’ or ‘silverite’. This copper alloy polishes to a lustrous gold when new, discolouring to a murky grey with greenish hue when neglected. HISTORY OF THE LOCH ARD The LOCH ARD belonged to the famous Loch Line which sailed many ships from England to Australia. Built in Glasgow by Barclay, Curdle and Co. in 1873, the LOCH ARD was a three-masted square rigged iron sailing ship. The ship measured 262ft 7" (79.87m) in length, 38ft (11.58m) in width, 23ft (7m) in depth and had a gross tonnage of 1693 tons. The LOCH ARD's main mast measured a massive 150ft (45.7m) in height. LOCH ARD made three trips to Australia and one trip to Calcutta before its final voyage. LOCH ARD left England on March 2, 1878, under the command of Captain Gibbs, a newly married, 29 year old. She was bound for Melbourne with a crew of 37, plus 17 passengers and a load of cargo. The general cargo reflected the affluence of Melbourne at the time. On board were straw hats, umbrella, perfumes, clay pipes, pianos, clocks, confectionary, linen and candles, as well as a heavier load of railway irons, cement, lead and copper. There were items included that intended for display in the Melbourne International Exhibition in 1880. The voyage to Port Phillip was long but uneventful. At 3am on June 1, 1878, Captain Gibbs was expecting to see land and the passengers were becoming excited as they prepared to view their new homeland in the early morning. But LOCH ARD was running into a fog which greatly reduced visibility. Captain Gibbs was becoming anxious as there was no sign of land or the Cape Otway lighthouse. At 4am the fog lifted. A man aloft announced that he could see breakers. The sheer cliffs of Victoria's west coast came into view, and Captain Gibbs realised that the ship was much closer to them than expected. He ordered as much sail to be set as time would permit and then attempted to steer the vessel out to sea. On coming head on into the wind, the ship lost momentum, the sails fell limp and LOCH ARD's bow swung back. Gibbs then ordered the anchors to be released in an attempt to hold its position. The anchors sank some 50 fathoms - but did not hold. By this time LOCH ARD was among the breakers and the tall cliffs of Mutton Bird Island rose behind the ship. Just half a mile from the coast, the ship's bow was suddenly pulled around by the anchor. The captain tried to tack out to sea, but the ship struck a reef at the base of Mutton Bird Island, near Port Campbell. Waves broke over the ship and the top deck was loosened from the hull. The masts and rigging came crashing down knocking passengers and crew overboard. When a lifeboat was finally launched, it crashed into the side of LOCH ARD and capsized. Tom Pearce, who had launched the boat, managed to cling to its overturned hull and shelter beneath it. He drifted out to sea and then on the flood tide came into what is now known as LOCH ARD Gorge. He swam to shore, bruised and dazed, and found a cave in which to shelter. Some of the crew stayed below deck to shelter from the falling rigging but drowned when the ship slipped off the reef into deeper water. Eva Carmichael had raced onto deck to find out what was happening only to be confronted by towering cliffs looming above the stricken ship. In all the chaos, Captain Gibbs grabbed Eva and said, "If you are saved Eva, let my dear wife know that I died like a sailor". That was the last Eva Carmichael saw of the captain. She was swept off the ship by a huge wave. Eva saw Tom Pearce on a small rocky beach and yelled to attract his attention. He dived in and swam to the exhausted woman and dragged her to shore. He took her to the cave and broke open case of brandy which had washed up on the beach. He opened a bottle to revive the unconscious woman. A few hours later Tom scaled a cliff in search of help. He followed hoof prints and came by chance upon two men from nearby Glenample Station three and a half miles away. In a state of exhaustion, he told the men of the tragedy. Tom returned to the gorge while the two men rode back to the station to get help. By the time they reached LOCH ARD Gorge, it was cold and dark. The two shipwreck survivors were taken to Glenample Station to recover. Eva stayed at the station for six weeks before returning to Ireland, this time by steamship. In Melbourne, Tom Pearce received a hero's welcome. He was presented with the first gold medal of the Royal Humane Society of Victoria and a £1000 cheque from the Victorian Government. Concerts were performed to honour the young man's bravery and to raise money for those who lost family in the LOCH ARD disaster. Of the 54 crew members and passengers on board, only two survived: the apprentice, Tom Pearce and the young woman passenger, Eva Carmichael, who lost all of her family in the tragedy. Ten days after the LOCH ARD tragedy, salvage rights to the wreck were sold at auction for £2,120. Cargo valued at £3,000 was salvaged and placed on the beach, but most washed back into the sea when another storm developed. The wreck of LOCH ARD still lies at the base of Mutton Bird Island. Much of the cargo has now been salvaged and some was washed up into what is now known as LOCH ARD Gorge. Cargo and artefacts have also been illegally salvaged over many years before protective legislation was introduced. One of the most unlikely pieces of cargo to have survived the shipwreck was a Minton porcelain peacock - one of only seven in the world. The peacock was destined for the Melbourne International Exhibition in 1880. It had been well packed, which gave it adequate protection during the violent storm. Today, the Minton peacock can be seen at the Flagstaff Hill Maritime Museum in Warrnambool. From Australia's most dramatic shipwreck it has now become Australia's shipwreck artefact and is one of very few 'objects' on the Victorian State Heritage Register most valuable. The LOCH ARD shipwreck is of State significance – Victorian Heritage Register S 417. Flagstaff Hill’s collection of artefacts from LOCH ARD is significant for being one of the largest collections of artefacts from this shipwreck in Victoria. It is significant for its association with the shipwreck, which is on the Victorian Heritage Register (VHR S417). The collection is significant because of the relationship between the objects, as together they have a high potential to interpret the story of the LOCH ARD. The LOCH ARD collection is archaeologically significant as the remains of a large international passenger and cargo ship. The LOCH ARD collection is historically significant for representing aspects of Victoria’s shipping history and its potential to interpret sub-theme 1.5 of Victoria’s Framework of Historical Themes (living with natural processes). The collection is also historically significant for its association with the LOCH ARD, which was one of the worst and best known shipwrecks in Victoria’s history. Unrestored table spoon from the wreck of the LOCH ARD. The spoon design has a flattened fiddle-back handle, with a thin stem or shank, flared collar, and a shallow rounded bowl. The spoons metallic composition is a thin layer of brass alloy which has partially corroded back to a nickel-silver base metal. Only 15% of original plating remains. Balance is dark silver oxide stained concretion and base metal. No makers marks are visible.flagstaff hill maritime museum, shipwreck coast, great ocean road, loch line, loch ard, mutton bird island, loch ard gorge, electroplated cutlery, loch ard shipwreck, william page and co, birmingham brass plating, table spoons -
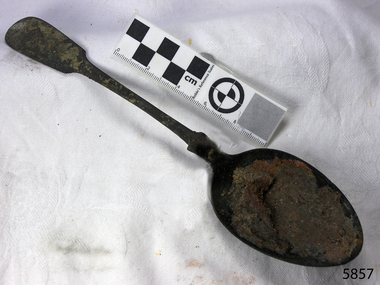 Flagstaff Hill Maritime Museum and Village
Domestic object - Spoon, circa 1878
This table spoon is from the wreck of the LOCH ARD, a Loch Line ship of 1,693 tons which sailed from Gravesend, London, on 2 March 1878 with 17 passengers and a crew of 36 under Captain George Gibbs. “The intention was to discharge cargo in Melbourne, before returning to London via the Horn with wool and wheat”. Instead, on 1 June 1878, after 90 days at sea, she struck the sandstone cliffs of Mutton Bird Island on the south west coast of Victoria, and sank with the loss of 52 lives and all her cargo. The manifest of the LOCH ARD listed an array of manufactured goods and bulk metals being exported to the Colony of Victoria, with a declared value of £53,700. (202 bills of lading show an actual invoice value of £68, 456, with insurance underwriting to £30,000 of all cargo). Included in the manifest is the item of “Tin hardware & cutlery £7,530”. This table spoon is one of 482 similar items of electro-plated cutlery from the LOCH ARD site, comprising spoons and forks of various sizes but all sharing the same general shape or design and metallic composition. 49 of these pieces display a legible makers’ mark — the initials “W” and “P” placed within a raised diamond outline, which is in turn contained within a sunken crown shape — identifying the manufacturer as William Page & Co of Birmingham. An electroplater’s makers’ marks, unlike sterling silver hallmarks, are not consistent identifiers of quality or date and place of manufacture. A similar line of five impressions was usually made to impress the consumer with an implication of industry standards, but what each one actually signified was not regulated and so they varied according to the whim of the individual foundry. In this case, the maker’s marks are often obscured by sedimentary accretion or removed by corrosion after a century of submersion in the ocean. However sufficient detail has survived to indicate that these samples of electro-plated cutlery probably originated from the same consignment in the LOCH ARD’s cargo. The generally common range of marks are drawn from 255 tea spoons, 125 dessert spoons, and 99 table forks. These marks are clearly visible in 66 instances, while the same sequence of general outlines, or depression shapes, is discernible in another 166 examples. Suggested trade names for William Page & Co’s particular blend of brass plating are ‘roman silver’ or ‘silverite’. This copper alloy polishes to a lustrous gold when new, discolouring to a murky grey with greenish hue when neglected. HISTORY OF THE LOCH ARD The LOCH ARD belonged to the famous Loch Line which sailed many ships from England to Australia. Built in Glasgow by Barclay, Curdle and Co. in 1873, the LOCH ARD was a three-masted square rigged iron sailing ship. The ship measured 262ft 7" (79.87m) in length, 38ft (11.58m) in width, 23ft (7m) in depth and had a gross tonnage of 1693 tons. The LOCH ARD's main mast measured a massive 150ft (45.7m) in height. LOCH ARD made three trips to Australia and one trip to Calcutta before its final voyage. LOCH ARD left England on March 2, 1878, under the command of Captain Gibbs, a newly married, 29 year old. She was bound for Melbourne with a crew of 37, plus 17 passengers and a load of cargo. The general cargo reflected the affluence of Melbourne at the time. On board were straw hats, umbrella, perfumes, clay pipes, pianos, clocks, confectionary, linen and candles, as well as a heavier load of railway irons, cement, lead and copper. There were items included that intended for display in the Melbourne International Exhibition in 1880. The voyage to Port Phillip was long but uneventful. At 3am on June 1, 1878, Captain Gibbs was expecting to see land and the passengers were becoming excited as they prepared to view their new homeland in the early morning. But LOCH ARD was running into a fog which greatly reduced visibility. Captain Gibbs was becoming anxious as there was no sign of land or the Cape Otway lighthouse. At 4am the fog lifted. A man aloft announced that he could see breakers. The sheer cliffs of Victoria's west coast came into view, and Captain Gibbs realised that the ship was much closer to them than expected. He ordered as much sail to be set as time would permit and then attempted to steer the vessel out to sea. On coming head on into the wind, the ship lost momentum, the sails fell limp and LOCH ARD's bow swung back. Gibbs then ordered the anchors to be released in an attempt to hold its position. The anchors sank some 50 fathoms - but did not hold. By this time LOCH ARD was among the breakers and the tall cliffs of Mutton Bird Island rose behind the ship. Just half a mile from the coast, the ship's bow was suddenly pulled around by the anchor. The captain tried to tack out to sea, but the ship struck a reef at the base of Mutton Bird Island, near Port Campbell. Waves broke over the ship and the top deck was loosened from the hull. The masts and rigging came crashing down knocking passengers and crew overboard. When a lifeboat was finally launched, it crashed into the side of LOCH ARD and capsized. Tom Pearce, who had launched the boat, managed to cling to its overturned hull and shelter beneath it. He drifted out to sea and then on the flood tide came into what is now known as LOCH ARD Gorge. He swam to shore, bruised and dazed, and found a cave in which to shelter. Some of the crew stayed below deck to shelter from the falling rigging but drowned when the ship slipped off the reef into deeper water. Eva Carmichael had raced onto deck to find out what was happening only to be confronted by towering cliffs looming above the stricken ship. In all the chaos, Captain Gibbs grabbed Eva and said, "If you are saved Eva, let my dear wife know that I died like a sailor". That was the last Eva Carmichael saw of the captain. She was swept off the ship by a huge wave. Eva saw Tom Pearce on a small rocky beach and yelled to attract his attention. He dived in and swam to the exhausted woman and dragged her to shore. He took her to the cave and broke open case of brandy which had washed up on the beach. He opened a bottle to revive the unconscious woman. A few hours later Tom scaled a cliff in search of help. He followed hoof prints and came by chance upon two men from nearby Glenample Station three and a half miles away. In a state of exhaustion, he told the men of the tragedy. Tom returned to the gorge while the two men rode back to the station to get help. By the time they reached LOCH ARD Gorge, it was cold and dark. The two shipwreck survivors were taken to Glenample Station to recover. Eva stayed at the station for six weeks before returning to Ireland, this time by steamship. In Melbourne, Tom Pearce received a hero's welcome. He was presented with the first gold medal of the Royal Humane Society of Victoria and a £1000 cheque from the Victorian Government. Concerts were performed to honour the young man's bravery and to raise money for those who lost family in the LOCH ARD disaster. Of the 54 crew members and passengers on board, only two survived: the apprentice, Tom Pearce and the young woman passenger, Eva Carmichael, who lost all of her family in the tragedy. Ten days after the LOCH ARD tragedy, salvage rights to the wreck were sold at auction for £2,120. Cargo valued at £3,000 was salvaged and placed on the beach, but most washed back into the sea when another storm developed. The wreck of LOCH ARD still lies at the base of Mutton Bird Island. Much of the cargo has now been salvaged and some was washed up into what is now known as LOCH ARD Gorge. Cargo and artefacts have also been illegally salvaged over many years before protective legislation was introduced. One of the most unlikely pieces of cargo to have survived the shipwreck was a Minton porcelain peacock - one of only seven in the world. The peacock was destined for the Melbourne International Exhibition in 1880. It had been well packed, which gave it adequate protection during the violent storm. Today, the Minton peacock can be seen at the Flagstaff Hill Maritime Museum in Warrnambool. From Australia's most dramatic shipwreck it has now become Australia's shipwreck artefact and is one of very few 'objects' on the Victorian State Heritage Register most valuable. The LOCH ARD shipwreck is of State significance – Victorian Heritage Register S 417. Flagstaff Hill’s collection of artefacts from LOCH ARD is significant for being one of the largest collections of artefacts from this shipwreck in Victoria. It is significant for its association with the shipwreck, which is on the Victorian Heritage Register (VHR S417). The collection is significant because of the relationship between the objects, as together they have a high potential to interpret the story of the LOCH ARD. The LOCH ARD collection is archaeologically significant as the remains of a large international passenger and cargo ship. The LOCH ARD collection is historically significant for representing aspects of Victoria’s shipping history and its potential to interpret sub-theme 1.5 of Victoria’s Framework of Historical Themes (living with natural processes). The collection is also historically significant for its association with the LOCH ARD, which was one of the worst and best known shipwrecks in Victoria’s history Unrestored table spoon from the wreck of the LOCH ARD. The spoon design has a flattened fiddle-back handle, with a thin stem or shank, flared collar, and a shallow rounded bowl. The spoons metallic composition is a thin layer of brass alloy which has partially corroded back to a nickel-silver base metal. Some verdigris and 50% of surface area is covered by sedimentary concretion. Only 10% of original plate remains. There is evidence of where another spoon was attached to back of this complete spoon. Balance blackened in Silver Oxide.flagstaff hill maritime museum, shipwreck coast, great ocean road, loch line, loch ard, mutton bird island, loch ard gorge, electroplated cutlery, loch ard shipwreck, william page and co, birmingham brass plating, table spoon, spoon -
 Flagstaff Hill Maritime Museum and Village
Domestic object - Spoon, c.1878
This table spoon is from the wreck of the LOCH ARD, a Loch Line ship of 1,693 tons which sailed from Gravesend, London, on 2 March 1878 with 17 passengers and a crew of 36 under Captain George Gibbs. “The intention was to discharge cargo in Melbourne, before returning to London via the Horn with wool and wheat”. Instead, on 1 June 1878, after 90 days at sea, she struck the sandstone cliffs of Mutton Bird Island on the south west coast of Victoria, and sank with the loss of 52 lives and all her cargo. The manifest of the LOCH ARD listed an array of manufactured goods and bulk metals being exported to the Colony of Victoria, with a declared value of £53,700. (202 bills of lading show an actual invoice value of £68, 456, with insurance underwriting to £30,000 of all cargo). Included in the manifest is the item of “Tin hardware & cutlery £7,530”. This table spoon is one of 482 similar items of electro-plated cutlery from the LOCH ARD site, comprising spoons and forks of various sizes but all sharing the same general shape or design and metallic composition. 49 of these pieces display a legible makers’ mark — the initials “W” and “P” placed within a raised diamond outline, which is in turn contained within a sunken crown shape — identifying the manufacturer as William Page & Co of Birmingham. An electroplater’s makers’ marks, unlike sterling silver hallmarks, are not consistent identifiers of quality or date and place of manufacture. A similar line of five impressions was usually made to impress the consumer with an implication of industry standards, but what each one actually signified was not regulated and so they varied according to the whim of the individual foundry. In this case, the maker’s marks are often obscured by sedimentary accretion or removed by corrosion after a century of submersion in the ocean. However sufficient detail has survived to indicate that these samples of electro-plated cutlery probably originated from the same consignment in the LOCH ARD’s cargo. The generally common range of marks are drawn from 255 tea spoons, 125 dessert spoons, and 99 table forks. These marks are clearly visible in 66 instances, while the same sequence of general outlines, or depression shapes, is discernible in another 166 examples. Suggested trade names for William Page & Co’s particular blend of brass plating are ‘roman silver’ or ‘silverite’. This copper alloy polishes to a lustrous gold when new, discolouring to a murky grey with greenish hue when neglected. HISTORY OF THE LOCH ARD The LOCH ARD belonged to the famous Loch Line which sailed many ships from England to Australia. Built in Glasgow by Barclay, Curdle and Co. in 1873, the LOCH ARD was a three-masted square rigged iron sailing ship. The ship measured 262ft 7" (79.87m) in length, 38ft (11.58m) in width, 23ft (7m) in depth and had a gross tonnage of 1693 tons. The LOCH ARD's main mast measured a massive 150ft (45.7m) in height. LOCH ARD made three trips to Australia and one trip to Calcutta before its final voyage. LOCH ARD left England on March 2, 1878, under the command of Captain Gibbs, a newly married, 29 year old. She was bound for Melbourne with a crew of 37, plus 17 passengers and a load of cargo. The general cargo reflected the affluence of Melbourne at the time. On board were straw hats, umbrella, perfumes, clay pipes, pianos, clocks, confectionary, linen and candles, as well as a heavier load of railway irons, cement, lead and copper. There were items included that intended for display in the Melbourne International Exhibition in 1880. The voyage to Port Phillip was long but uneventful. At 3am on June 1, 1878, Captain Gibbs was expecting to see land and the passengers were becoming excited as they prepared to view their new homeland in the early morning. But LOCH ARD was running into a fog which greatly reduced visibility. Captain Gibbs was becoming anxious as there was no sign of land or the Cape Otway lighthouse. At 4am the fog lifted. A man aloft announced that he could see breakers. The sheer cliffs of Victoria's west coast came into view, and Captain Gibbs realised that the ship was much closer to them than expected. He ordered as much sail to be set as time would permit and then attempted to steer the vessel out to sea. On coming head on into the wind, the ship lost momentum, the sails fell limp and LOCH ARD's bow swung back. Gibbs then ordered the anchors to be released in an attempt to hold its position. The anchors sank some 50 fathoms - but did not hold. By this time LOCH ARD was among the breakers and the tall cliffs of Mutton Bird Island rose behind the ship. Just half a mile from the coast, the ship's bow was suddenly pulled around by the anchor. The captain tried to tack out to sea, but the ship struck a reef at the base of Mutton Bird Island, near Port Campbell. Waves broke over the ship and the top deck was loosened from the hull. The masts and rigging came crashing down knocking passengers and crew overboard. When a lifeboat was finally launched, it crashed into the side of LOCH ARD and capsized. Tom Pearce, who had launched the boat, managed to cling to its overturned hull and shelter beneath it. He drifted out to sea and then on the flood tide came into what is now known as LOCH ARD Gorge. He swam to shore, bruised and dazed, and found a cave in which to shelter. Some of the crew stayed below deck to shelter from the falling rigging but drowned when the ship slipped off the reef into deeper water. Eva Carmichael had raced onto deck to find out what was happening only to be confronted by towering cliffs looming above the stricken ship. In all the chaos, Captain Gibbs grabbed Eva and said, "If you are saved Eva, let my dear wife know that I died like a sailor". That was the last Eva Carmichael saw of the captain. She was swept off the ship by a huge wave. Eva saw Tom Pearce on a small rocky beach and yelled to attract his attention. He dived in and swam to the exhausted woman and dragged her to shore. He took her to the cave and broke open case of brandy which had washed up on the beach. He opened a bottle to revive the unconscious woman. A few hours later Tom scaled a cliff in search of help. He followed hoof prints and came by chance upon two men from nearby Glenample Station three and a half miles away. In a state of exhaustion, he told the men of the tragedy. Tom returned to the gorge while the two men rode back to the station to get help. By the time they reached LOCH ARD Gorge, it was cold and dark. The two shipwreck survivors were taken to Glenample Station to recover. Eva stayed at the station for six weeks before returning to Ireland, this time by steamship. In Melbourne, Tom Pearce received a hero's welcome. He was presented with the first gold medal of the Royal Humane Society of Victoria and a £1000 cheque from the Victorian Government. Concerts were performed to honour the young man's bravery and to raise money for those who lost family in the LOCH ARD disaster. Of the 54 crew members and passengers on board, only two survived: the apprentice, Tom Pearce and the young woman passenger, Eva Carmichael, who lost all of her family in the tragedy. Ten days after the LOCH ARD tragedy, salvage rights to the wreck were sold at auction for £2,120. Cargo valued at £3,000 was salvaged and placed on the beach, but most washed back into the sea when another storm developed. The wreck of LOCH ARD still lies at the base of Mutton Bird Island. Much of the cargo has now been salvaged and some was washed up into what is now known as LOCH ARD Gorge. Cargo and artefacts have also been illegally salvaged over many years before protective legislation was introduced. One of the most unlikely pieces of cargo to have survived the shipwreck was a Minton porcelain peacock - one of only seven in the world. The peacock was destined for the Melbourne International Exhibition in 1880. It had been well packed, which gave it adequate protection during the violent storm. Today, the Minton peacock can be seen at the Flagstaff Hill Maritime Museum in Warrnambool. From Australia's most dramatic shipwreck it has now become Australia's shipwreck artefact and is one of very few 'objects' on the Victorian State Heritage Register most valuable. The LOCH ARD shipwreck is of State significance – Victorian Heritage Register S 417. Flagstaff Hill’s collection of artefacts from LOCH ARD is significant for being one of the largest collections of artefacts from this shipwreck in Victoria. It is significant for its association with the shipwreck, which is on the Victorian Heritage Register (VHR S417). The collection is significant because of the relationship between the objects, as together they have a high potential to interpret the story of the LOCH ARD. The LOCH ARD collection is archaeologically significant as the remains of a large international passenger and cargo ship. The LOCH ARD collection is historically significant for representing aspects of Victoria’s shipping history and its potential to interpret sub-theme 1.5 of Victoria’s Framework of Historical Themes (living with natural processes). The collection is also historically significant for its association with the LOCH ARD, which was one of the worst and best known shipwrecks in Victoria’s history. Unrestored table spoon from the wreck of the LOCH ARD. The spoon design has a flattened fiddle-back handle, with a thin stem or shank, flared collar, and a shallow rounded bowl. The spoons metallic composition is a thin layer of brass alloy which has partially corroded back to a nickel-silver base metal. Sediment covers 65% of spoon, only 5% of original plate remains, with 10% of surface area bearing aquamarine verdigris. Balance blackened with Silver Oxide.flagstaff hill maritime museum, flagstaff hill maritime village, great ocean road, loch line, loch ard, mutton bird island, loch ard gorge, electroplated cutlery, loch ard shipwreck, william page and co, table spoons -
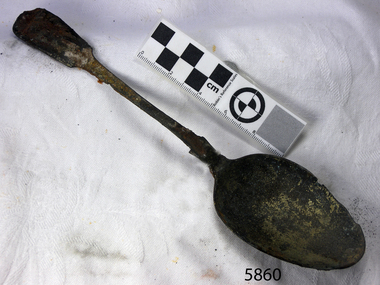 Flagstaff Hill Maritime Museum and Village
Domestic object - Spoon, circa 1878
This table spoon is from the wreck of the LOCH ARD, a Loch Line ship of 1,693 tons which sailed from Gravesend, London, on 2 March 1878 with 17 passengers and a crew of 36 under Captain George Gibbs. “The intention was to discharge cargo in Melbourne, before returning to London via the Horn with wool and wheat”. Instead, on 1 June 1878, after 90 days at sea, she struck the sandstone cliffs of Mutton Bird Island on the south west coast of Victoria, and sank with the loss of 52 lives and all her cargo. The manifest of the LOCH ARD listed an array of manufactured goods and bulk metals being exported to the Colony of Victoria, with a declared value of £53,700. (202 bills of lading show an actual invoice value of £68, 456, with insurance underwriting to £30,000 of all cargo). Included in the manifest is the item of “Tin hardware & cutlery £7,530”. This table spoon is one of 482 similar items of electro-plated cutlery from the LOCH ARD site, comprising spoons and forks of various sizes but all sharing the same general shape or design and metallic composition. 49 of these pieces display a legible makers’ mark — the initials “W” and “P” placed within a raised diamond outline, which is in turn contained within a sunken crown shape — identifying the manufacturer as William Page & Co of Birmingham. An electroplater’s makers’ marks, unlike sterling silver hallmarks, are not consistent identifiers of quality or date and place of manufacture. A similar line of five impressions was usually made to impress the consumer with an implication of industry standards, but what each one actually signified was not regulated and so they varied according to the whim of the individual foundry. In this case, the maker’s marks are often obscured by sedimentary accretion or removed by corrosion after a century of submersion in the ocean. However sufficient detail has survived to indicate that these samples of electro-plated cutlery probably originated from the same consignment in the LOCH ARD’s cargo. The generally common range of marks are drawn from 255 tea spoons, 125 dessert spoons, and 99 table forks. These marks are clearly visible in 66 instances, while the same sequence of general outlines, or depression shapes, is discernible in another 166 examples. Suggested trade names for William Page & Co’s particular blend of brass plating are ‘roman silver’ or ‘silverite’. This copper alloy polishes to a lustrous gold when new, discolouring to a murky grey with greenish hue when neglected. HISTORY OF THE LOCH ARD The LOCH ARD belonged to the famous Loch Line which sailed many ships from England to Australia. Built in Glasgow by Barclay, Curdle and Co. in 1873, the LOCH ARD was a three-masted square rigged iron sailing ship. The ship measured 262ft 7" (79.87m) in length, 38ft (11.58m) in width, 23ft (7m) in depth and had a gross tonnage of 1693 tons. The LOCH ARD's main mast measured a massive 150ft (45.7m) in height. LOCH ARD made three trips to Australia and one trip to Calcutta before its final voyage. LOCH ARD left England on March 2, 1878, under the command of Captain Gibbs, a newly married, 29 year old. She was bound for Melbourne with a crew of 37, plus 17 passengers and a load of cargo. The general cargo reflected the affluence of Melbourne at the time. On board were straw hats, umbrella, perfumes, clay pipes, pianos, clocks, confectionary, linen and candles, as well as a heavier load of railway irons, cement, lead and copper. There were items included that intended for display in the Melbourne International Exhibition in 1880. The voyage to Port Phillip was long but uneventful. At 3am on June 1, 1878, Captain Gibbs was expecting to see land and the passengers were becoming excited as they prepared to view their new homeland in the early morning. But LOCH ARD was running into a fog which greatly reduced visibility. Captain Gibbs was becoming anxious as there was no sign of land or the Cape Otway lighthouse. At 4am the fog lifted. A man aloft announced that he could see breakers. The sheer cliffs of Victoria's west coast came into view, and Captain Gibbs realised that the ship was much closer to them than expected. He ordered as much sail to be set as time would permit and then attempted to steer the vessel out to sea. On coming head on into the wind, the ship lost momentum, the sails fell limp and LOCH ARD's bow swung back. Gibbs then ordered the anchors to be released in an attempt to hold its position. The anchors sank some 50 fathoms - but did not hold. By this time LOCH ARD was among the breakers and the tall cliffs of Mutton Bird Island rose behind the ship. Just half a mile from the coast, the ship's bow was suddenly pulled around by the anchor. The captain tried to tack out to sea, but the ship struck a reef at the base of Mutton Bird Island, near Port Campbell. Waves broke over the ship and the top deck was loosened from the hull. The masts and rigging came crashing down knocking passengers and crew overboard. When a lifeboat was finally launched, it crashed into the side of LOCH ARD and capsized. Tom Pearce, who had launched the boat, managed to cling to its overturned hull and shelter beneath it. He drifted out to sea and then on the flood tide came into what is now known as LOCH ARD Gorge. He swam to shore, bruised and dazed, and found a cave in which to shelter. Some of the crew stayed below deck to shelter from the falling rigging but drowned when the ship slipped off the reef into deeper water. Eva Carmichael had raced onto deck to find out what was happening only to be confronted by towering cliffs looming above the stricken ship. In all the chaos, Captain Gibbs grabbed Eva and said, "If you are saved Eva, let my dear wife know that I died like a sailor". That was the last Eva Carmichael saw of the captain. She was swept off the ship by a huge wave. Eva saw Tom Pearce on a small rocky beach and yelled to attract his attention. He dived in and swam to the exhausted woman and dragged her to shore. He took her to the cave and broke open case of brandy which had washed up on the beach. He opened a bottle to revive the unconscious woman. A few hours later Tom scaled a cliff in search of help. He followed hoof prints and came by chance upon two men from nearby Glenample Station three and a half miles away. In a state of exhaustion, he told the men of the tragedy. Tom returned to the gorge while the two men rode back to the station to get help. By the time they reached LOCH ARD Gorge, it was cold and dark. The two shipwreck survivors were taken to Glenample Station to recover. Eva stayed at the station for six weeks before returning to Ireland, this time by steamship. In Melbourne, Tom Pearce received a hero's welcome. He was presented with the first gold medal of the Royal Humane Society of Victoria and a £1000 cheque from the Victorian Government. Concerts were performed to honour the young man's bravery and to raise money for those who lost family in the LOCH ARD disaster. Of the 54 crew members and passengers on board, only two survived: the apprentice, Tom Pearce and the young woman passenger, Eva Carmichael, who lost all of her family in the tragedy. Ten days after the LOCH ARD tragedy, salvage rights to the wreck were sold at auction for £2,120. Cargo valued at £3,000 was salvaged and placed on the beach, but most washed back into the sea when another storm developed. The wreck of LOCH ARD still lies at the base of Mutton Bird Island. Much of the cargo has now been salvaged and some was washed up into what is now known as LOCH ARD Gorge. Cargo and artefacts have also been illegally salvaged over many years before protective legislation was introduced. One of the most unlikely pieces of cargo to have survived the shipwreck was a Minton porcelain peacock - one of only seven in the world. The peacock was destined for the Melbourne International Exhibition in 1880. It had been well packed, which gave it adequate protection during the violent storm. Today, the Minton peacock can be seen at the Flagstaff Hill Maritime Museum in Warrnambool. From Australia's most dramatic shipwreck it has now become Australia's shipwreck artefact and is one of very few 'objects' on the Victorian State Heritage Register most valuable. The LOCH ARD shipwreck is of State significance – Victorian Heritage Register S 417 Flagstaff Hill’s collection of artefacts from LOCH ARD is significant for being one of the largest collections of artefacts from this shipwreck in Victoria. It is significant for its association with the shipwreck, which is on the Victorian Heritage Register (VHR S417). The collection is significant because of the relationship between the objects, as together they have a high potential to interpret the story of the LOCH ARD. The LOCH ARD collection is archaeologically significant as the remains of a large international passenger and cargo ship. The LOCH ARD collection is historically significant for representing aspects of Victoria’s shipping history and its potential to interpret sub-theme 1.5 of Victoria’s Framework of Historical Themes (living with natural processes). The collection is also historically significant for its association with the LOCH ARD, which was one of the worst and best known shipwrecks in Victoria’s history. Unrestored table spoon from the wreck of the LOCH ARD. The spoon design has a flattened fiddle-back handle, with a thin stem or shank, flared collar, and a shallow rounded bowl. The spoons metallic composition is a thin layer of brass alloy which has partially corroded back to a nickel-silver base metal. Approximately 20% of original plate remains and 20% surface area is covered with sediment. Some verdigris is visible and spoon bowl is cracked.flagstaff hill maritime museum, shipwreck coast, great ocean road, loch line, loch ard, mutton bird island, loch ard gorge, electroplated cutlery, loch ard shipwreck, william page and co, birmingham brass plating, table spoons -
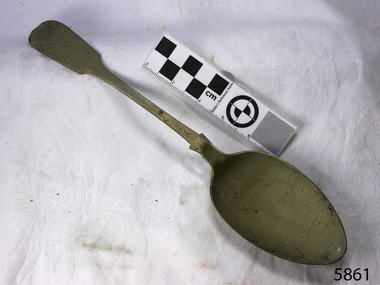 Flagstaff Hill Maritime Museum and Village
Domestic object - Spoon, circa 1878
This table spoon is from the wreck of the LOCH ARD, a Loch Line ship of 1,693 tons which sailed from Gravesend, London, on 2 March 1878 with 17 passengers and a crew of 36 under Captain George Gibbs. “The intention was to discharge cargo in Melbourne, before returning to London via the Horn with wool and wheat”. Instead, on 1 June 1878, after 90 days at sea, she struck the sandstone cliffs of Mutton Bird Island on the south west coast of Victoria, and sank with the loss of 52 lives and all her cargo. The manifest of the LOCH ARD listed an array of manufactured goods and bulk metals being exported to the Colony of Victoria, with a declared value of £53,700. (202 bills of lading show an actual invoice value of £68, 456, with insurance underwriting to £30,000 of all cargo). Included in the manifest is the item of “Tin hardware & cutlery £7,530”. This table spoon is one of 482 similar items of electro-plated cutlery from the LOCH ARD site, comprising spoons and forks of various sizes but all sharing the same general shape or design and metallic composition. 49 of these pieces display a legible makers’ mark — the initials “W” and “P” placed within a raised diamond outline, which is in turn contained within a sunken crown shape — identifying the manufacturer as William Page & Co of Birmingham. An electroplater’s makers’ marks, unlike sterling silver hallmarks, are not consistent identifiers of quality or date and place of manufacture. A similar line of five impressions was usually made to impress the consumer with an implication of industry standards, but what each one actually signified was not regulated and so they varied according to the whim of the individual foundry. In this case, the maker’s marks are often obscured by sedimentary accretion or removed by corrosion after a century of submersion in the ocean. However sufficient detail has survived to indicate that these samples of electro-plated cutlery probably originated from the same consignment in the LOCH ARD’s cargo. The generally common range of marks are drawn from 255 tea spoons, 125 dessert spoons, and 99 table forks. These marks are clearly visible in 66 instances, while the same sequence of general outlines, or depression shapes, is discernible in another 166 examples. Suggested trade names for William Page & Co’s particular blend of brass plating are ‘roman silver’ or ‘silverite’. This copper alloy polishes to a lustrous gold when new, discolouring to a murky grey with greenish hue when neglected. HISTORY OF THE LOCH ARD The LOCH ARD belonged to the famous Loch Line which sailed many ships from England to Australia. Built in Glasgow by Barclay, Curdle and Co. in 1873, the LOCH ARD was a three-masted square rigged iron sailing ship. The ship measured 262ft 7" (79.87m) in length, 38ft (11.58m) in width, 23ft (7m) in depth and had a gross tonnage of 1693 tons. The LOCH ARD's main mast measured a massive 150ft (45.7m) in height. LOCH ARD made three trips to Australia and one trip to Calcutta before its final voyage. LOCH ARD left England on March 2, 1878, under the command of Captain Gibbs, a newly married, 29 year old. She was bound for Melbourne with a crew of 37, plus 17 passengers and a load of cargo. The general cargo reflected the affluence of Melbourne at the time. On board were straw hats, umbrella, perfumes, clay pipes, pianos, clocks, confectionary, linen and candles, as well as a heavier load of railway irons, cement, lead and copper. There were items included that intended for display in the Melbourne International Exhibition in 1880. The voyage to Port Phillip was long but uneventful. At 3am on June 1, 1878, Captain Gibbs was expecting to see land and the passengers were becoming excited as they prepared to view their new homeland in the early morning. But LOCH ARD was running into a fog which greatly reduced visibility. Captain Gibbs was becoming anxious as there was no sign of land or the Cape Otway lighthouse. At 4am the fog lifted. A man aloft announced that he could see breakers. The sheer cliffs of Victoria's west coast came into view, and Captain Gibbs realised that the ship was much closer to them than expected. He ordered as much sail to be set as time would permit and then attempted to steer the vessel out to sea. On coming head on into the wind, the ship lost momentum, the sails fell limp and LOCH ARD's bow swung back. Gibbs then ordered the anchors to be released in an attempt to hold its position. The anchors sank some 50 fathoms - but did not hold. By this time LOCH ARD was among the breakers and the tall cliffs of Mutton Bird Island rose behind the ship. Just half a mile from the coast, the ship's bow was suddenly pulled around by the anchor. The captain tried to tack out to sea, but the ship struck a reef at the base of Mutton Bird Island, near Port Campbell. Waves broke over the ship and the top deck was loosened from the hull. The masts and rigging came crashing down knocking passengers and crew overboard. When a lifeboat was finally launched, it crashed into the side of LOCH ARD and capsized. Tom Pearce, who had launched the boat, managed to cling to its overturned hull and shelter beneath it. He drifted out to sea and then on the flood tide came into what is now known as LOCH ARD Gorge. He swam to shore, bruised and dazed, and found a cave in which to shelter. Some of the crew stayed below deck to shelter from the falling rigging but drowned when the ship slipped off the reef into deeper water. Eva Carmichael had raced onto deck to find out what was happening only to be confronted by towering cliffs looming above the stricken ship. In all the chaos, Captain Gibbs grabbed Eva and said, "If you are saved Eva, let my dear wife know that I died like a sailor". That was the last Eva Carmichael saw of the captain. She was swept off the ship by a huge wave. Eva saw Tom Pearce on a small rocky beach and yelled to attract his attention. He dived in and swam to the exhausted woman and dragged her to shore. He took her to the cave and broke open case of brandy which had washed up on the beach. He opened a bottle to revive the unconscious woman. A few hours later Tom scaled a cliff in search of help. He followed hoof prints and came by chance upon two men from nearby Glenample Station three and a half miles away. In a state of exhaustion, he told the men of the tragedy. Tom returned to the gorge while the two men rode back to the station to get help. By the time they reached LOCH ARD Gorge, it was cold and dark. The two shipwreck survivors were taken to Glenample Station to recover. Eva stayed at the station for six weeks before returning to Ireland, this time by steamship. In Melbourne, Tom Pearce received a hero's welcome. He was presented with the first gold medal of the Royal Humane Society of Victoria and a £1000 cheque from the Victorian Government. Concerts were performed to honour the young man's bravery and to raise money for those who lost family in the LOCH ARD disaster. Of the 54 crew members and passengers on board, only two survived: the apprentice, Tom Pearce and the young woman passenger, Eva Carmichael, who lost all of her family in the tragedy. Ten days after the LOCH ARD tragedy, salvage rights to the wreck were sold at auction for £2,120. Cargo valued at £3,000 was salvaged and placed on the beach, but most washed back into the sea when another storm developed. The wreck of LOCH ARD still lies at the base of Mutton Bird Island. Much of the cargo has now been salvaged and some was washed up into what is now known as LOCH ARD Gorge. Cargo and artefacts have also been illegally salvaged over many years before protective legislation was introduced. One of the most unlikely pieces of cargo to have survived the shipwreck was a Minton porcelain peacock - one of only seven in the world. The peacock was destined for the Melbourne International Exhibition in 1880. It had been well packed, which gave it adequate protection during the violent storm. Today, the Minton peacock can be seen at the Flagstaff Hill Maritime Museum in Warrnambool. From Australia's most dramatic shipwreck it has now become Australia's shipwreck artefact and is one of very few 'objects' on the Victorian State Heritage Register most valuable. The LOCH ARD shipwreck is of State significance – Victorian Heritage Register S 417. Flagstaff Hill’s collection of artefacts from LOCH ARD is significant for being one of the largest collections of artefacts from this shipwreck in Victoria. It is significant for its association with the shipwreck, which is on the Victorian Heritage Register (VHR S417). The collection is significant because of the relationship between the objects, as together they have a high potential to interpret the story of the LOCH ARD. The LOCH ARD collection is archaeologically significant as the remains of a large international passenger and cargo ship. The LOCH ARD collection is historically significant for representing aspects of Victoria’s shipping history and its potential to interpret sub-theme 1.5 of Victoria’s Framework of Historical Themes (living with natural processes). The collection is also historically significant for its association with the LOCH ARD, which was one of the worst and best known shipwrecks in Victoria’s history. Unrestored table spoon from the wreck of the LOCH ARD. The spoon design has a flattened fiddle-back handle, with a thin stem or shank, flared collar, and a shallow rounded bowl. The spoons metallic composition is a thin layer of brass alloy which has partially corroded back to a nickel-silver base metal. In this case nearly all of the original plate has remained and spoon is in excellent condition. On the upper rear of the bowl is a plain heraldic shield. Visible makers marks are (1) WP&Co trademark and (2) Lazy 'B'. Three outlines, Rounded Square, Circle, and Diamond, are also evident but the internal details of these marks are unclear.flagstaff hill maritime museum, shipwreck coast, great ocean road, loch line, loch ard, mutton bird island, loch ard gorge, electroplated cutlery, loch ard shipwreck, william page and co, birmingham brass plating, table spoons -
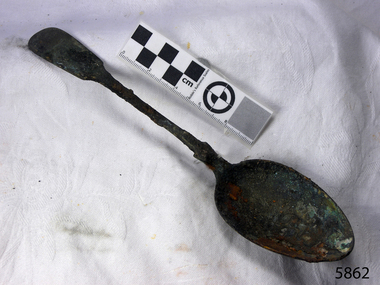 Flagstaff Hill Maritime Museum and Village
Domestic object - Spoon, circa 1878
This table spoon is from the wreck of the LOCH ARD, a Loch Line ship of 1,693 tons which sailed from Gravesend, London, on 2 March 1878 with 17 passengers and a crew of 36 under Captain George Gibbs. “The intention was to discharge cargo in Melbourne, before returning to London via the Horn with wool and wheat”. Instead, on 1 June 1878, after 90 days at sea, she struck the sandstone cliffs of Mutton Bird Island on the south west coast of Victoria, and sank with the loss of 52 lives and all her cargo. The manifest of the LOCH ARD listed an array of manufactured goods and bulk metals being exported to the Colony of Victoria, with a declared value of £53,700. (202 bills of lading show an actual invoice value of £68, 456, with insurance underwriting to £30,000 of all cargo). Included in the manifest is the item of “Tin hardware & cutlery £7,530”. This table spoon is one of 482 similar items of electro-plated cutlery from the LOCH ARD site, comprising spoons and forks of various sizes but all sharing the same general shape or design and metallic composition. 49 of these pieces display a legible makers’ mark — the initials “W” and “P” placed within a raised diamond outline, which is in turn contained within a sunken crown shape — identifying the manufacturer as William Page & Co of Birmingham. An electroplater’s makers’ marks, unlike sterling silver hallmarks, are not consistent identifiers of quality or date and place of manufacture. A similar line of five impressions was usually made to impress the consumer with an implication of industry standards, but what each one actually signified was not regulated and so they varied according to the whim of the individual foundry. In this case, the maker’s marks are often obscured by sedimentary accretion or removed by corrosion after a century of submersion in the ocean. However sufficient detail has survived to indicate that these samples of electro-plated cutlery probably originated from the same consignment in the LOCH ARD’s cargo. The generally common range of marks are drawn from 255 tea spoons, 125 dessert spoons, and 99 table forks. These marks are clearly visible in 66 instances, while the same sequence of general outlines, or depression shapes, is discernible in another 166 examples. Suggested trade names for William Page & Co’s particular blend of brass plating are ‘roman silver’ or ‘silverite’. This copper alloy polishes to a lustrous gold when new, discolouring to a murky grey with greenish hue when neglected. HISTORY OF THE LOCH ARD The LOCH ARD belonged to the famous Loch Line which sailed many ships from England to Australia. Built in Glasgow by Barclay, Curdle and Co. in 1873, the LOCH ARD was a three-masted square rigged iron sailing ship. The ship measured 262ft 7" (79.87m) in length, 38ft (11.58m) in width, 23ft (7m) in depth and had a gross tonnage of 1693 tons. The LOCH ARD's main mast measured a massive 150ft (45.7m) in height. LOCH ARD made three trips to Australia and one trip to Calcutta before its final voyage. LOCH ARD left England on March 2, 1878, under the command of Captain Gibbs, a newly married, 29 year old. She was bound for Melbourne with a crew of 37, plus 17 passengers and a load of cargo. The general cargo reflected the affluence of Melbourne at the time. On board were straw hats, umbrella, perfumes, clay pipes, pianos, clocks, confectionary, linen and candles, as well as a heavier load of railway irons, cement, lead and copper. There were items included that intended for display in the Melbourne International Exhibition in 1880. The voyage to Port Phillip was long but uneventful. At 3am on June 1, 1878, Captain Gibbs was expecting to see land and the passengers were becoming excited as they prepared to view their new homeland in the early morning. But LOCH ARD was running into a fog which greatly reduced visibility. Captain Gibbs was becoming anxious as there was no sign of land or the Cape Otway lighthouse. At 4am the fog lifted. A man aloft announced that he could see breakers. The sheer cliffs of Victoria's west coast came into view, and Captain Gibbs realised that the ship was much closer to them than expected. He ordered as much sail to be set as time would permit and then attempted to steer the vessel out to sea. On coming head on into the wind, the ship lost momentum, the sails fell limp and LOCH ARD's bow swung back. Gibbs then ordered the anchors to be released in an attempt to hold its position. The anchors sank some 50 fathoms - but did not hold. By this time LOCH ARD was among the breakers and the tall cliffs of Mutton Bird Island rose behind the ship. Just half a mile from the coast, the ship's bow was suddenly pulled around by the anchor. The captain tried to tack out to sea, but the ship struck a reef at the base of Mutton Bird Island, near Port Campbell. Waves broke over the ship and the top deck was loosened from the hull. The masts and rigging came crashing down knocking passengers and crew overboard. When a lifeboat was finally launched, it crashed into the side of LOCH ARD and capsized. Tom Pearce, who had launched the boat, managed to cling to its overturned hull and shelter beneath it. He drifted out to sea and then on the flood tide came into what is now known as LOCH ARD Gorge. He swam to shore, bruised and dazed, and found a cave in which to shelter. Some of the crew stayed below deck to shelter from the falling rigging but drowned when the ship slipped off the reef into deeper water. Eva Carmichael had raced onto deck to find out what was happening only to be confronted by towering cliffs looming above the stricken ship. In all the chaos, Captain Gibbs grabbed Eva and said, "If you are saved Eva, let my dear wife know that I died like a sailor". That was the last Eva Carmichael saw of the captain. She was swept off the ship by a huge wave. Eva saw Tom Pearce on a small rocky beach and yelled to attract his attention. He dived in and swam to the exhausted woman and dragged her to shore. He took her to the cave and broke open case of brandy which had washed up on the beach. He opened a bottle to revive the unconscious woman. A few hours later Tom scaled a cliff in search of help. He followed hoof prints and came by chance upon two men from nearby Glenample Station three and a half miles away. In a state of exhaustion, he told the men of the tragedy. Tom returned to the gorge while the two men rode back to the station to get help. By the time they reached LOCH ARD Gorge, it was cold and dark. The two shipwreck survivors were taken to Glenample Station to recover. Eva stayed at the station for six weeks before returning to Ireland, this time by steamship. In Melbourne, Tom Pearce received a hero's welcome. He was presented with the first gold medal of the Royal Humane Society of Victoria and a £1000 cheque from the Victorian Government. Concerts were performed to honour the young man's bravery and to raise money for those who lost family in the LOCH ARD disaster. Of the 54 crew members and passengers on board, only two survived: the apprentice, Tom Pearce and the young woman passenger, Eva Carmichael, who lost all of her family in the tragedy. Ten days after the LOCH ARD tragedy, salvage rights to the wreck were sold at auction for £2,120. Cargo valued at £3,000 was salvaged and placed on the beach, but most washed back into the sea when another storm developed. The wreck of LOCH ARD still lies at the base of Mutton Bird Island. Much of the cargo has now been salvaged and some was washed up into what is now known as LOCH ARD Gorge. Cargo and artefacts have also been illegally salvaged over many years before protective legislation was introduced. One of the most unlikely pieces of cargo to have survived the shipwreck was a Minton porcelain peacock - one of only seven in the world. The peacock was destined for the Melbourne International Exhibition in 1880. It had been well packed, which gave it adequate protection during the violent storm. Today, the Minton peacock can be seen at the Flagstaff Hill Maritime Museum in Warrnambool. From Australia's most dramatic shipwreck it has now become Australia's shipwreck artefact and is one of very few 'objects' on the Victorian State Heritage Register most valuable. The LOCH ARD shipwreck is of State significance – Victorian Heritage Register S 417. Flagstaff Hill’s collection of artefacts from LOCH ARD is significant for being one of the largest collections of artefacts from this shipwreck in Victoria. It is significant for its association with the shipwreck, which is on the Victorian Heritage Register (VHR S417). The collection is significant because of the relationship between the objects, as together they have a high potential to interpret the story of the LOCH ARD. The LOCH ARD collection is archaeologically significant as the remains of a large international passenger and cargo ship. The LOCH ARD collection is historically significant for representing aspects of Victoria’s shipping history and its potential to interpret sub-theme 1.5 of Victoria’s Framework of Historical Themes (living with natural processes). The collection is also historically significant for its association with the LOCH ARD, which was one of the worst and best known shipwrecks in Victoria’s history. Unrestored table spoon from the wreck of the LOCH ARD. The spoon design has a flattened fiddle-back handle, with a thin stem or shank, flared collar, and a shallow rounded bowl. The spoons metallic composition is a thin layer of brass alloy which has partially corroded back to a nickel-silver base metal. Approximately 15% of original plate remains, sediment with a red stain covers 15% of the spoon surface, and oxidation another 15%.flagstaff hill maritime museum, shipwreck coast, great ocean road, loch line, loch ard, mutton bird island, loch ard gorge, electroplated cutlery, loch ard shipwreck, william page and co, table spoons -
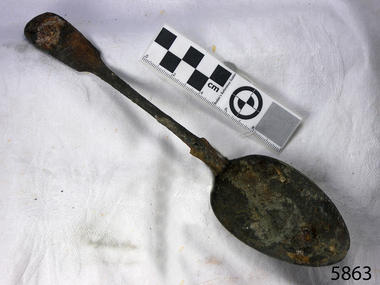 Flagstaff Hill Maritime Museum and Village
Domestic object - Spoon, circa 1878
This table spoon is from the wreck of the LOCH ARD, a Loch Line ship of 1,693 tons which sailed from Gravesend, London, on 2 March 1878 with 17 passengers and a crew of 36 under Captain George Gibbs. “The intention was to discharge cargo in Melbourne, before returning to London via the Horn with wool and wheat”. Instead, on 1 June 1878, after 90 days at sea, she struck the sandstone cliffs of Mutton Bird Island on the south west coast of Victoria, and sank with the loss of 52 lives and all her cargo. The manifest of the LOCH ARD listed an array of manufactured goods and bulk metals being exported to the Colony of Victoria, with a declared value of £53,700. (202 bills of lading show an actual invoice value of £68, 456, with insurance underwriting to £30,000 of all cargo). Included in the manifest is the item of “Tin hardware & cutlery £7,530”. This table spoon is one of 482 similar items of electro-plated cutlery from the LOCH ARD site, comprising spoons and forks of various sizes but all sharing the same general shape or design and metallic composition. 49 of these pieces display a legible makers’ mark — the initials “W” and “P” placed within a raised diamond outline, which is in turn contained within a sunken crown shape — identifying the manufacturer as William Page & Co of Birmingham. An electroplater’s makers’ marks, unlike sterling silver hallmarks, are not consistent identifiers of quality or date and place of manufacture. A similar line of five impressions was usually made to impress the consumer with an implication of industry standards, but what each one actually signified was not regulated and so they varied according to the whim of the individual foundry. In this case, the maker’s marks are often obscured by sedimentary accretion or removed by corrosion after a century of submersion in the ocean. However sufficient detail has survived to indicate that these samples of electro-plated cutlery probably originated from the same consignment in the LOCH ARD’s cargo. The generally common range of marks are drawn from 255 tea spoons, 125 dessert spoons, and 99 table forks. These marks are clearly visible in 66 instances, while the same sequence of general outlines, or depression shapes, is discernible in another 166 examples. Suggested trade names for William Page & Co’s particular blend of brass plating are ‘roman silver’ or ‘silverite’. This copper alloy polishes to a lustrous gold when new, discolouring to a murky grey with greenish hue when neglected. HISTORY OF THE LOCH ARD The LOCH ARD belonged to the famous Loch Line which sailed many ships from England to Australia. Built in Glasgow by Barclay, Curdle and Co. in 1873, the LOCH ARD was a three-masted square rigged iron sailing ship. The ship measured 262ft 7" (79.87m) in length, 38ft (11.58m) in width, 23ft (7m) in depth and had a gross tonnage of 1693 tons. The LOCH ARD's main mast measured a massive 150ft (45.7m) in height. LOCH ARD made three trips to Australia and one trip to Calcutta before its final voyage. LOCH ARD left England on March 2, 1878, under the command of Captain Gibbs, a newly married, 29 year old. She was bound for Melbourne with a crew of 37, plus 17 passengers and a load of cargo. The general cargo reflected the affluence of Melbourne at the time. On board were straw hats, umbrella, perfumes, clay pipes, pianos, clocks, confectionary, linen and candles, as well as a heavier load of railway irons, cement, lead and copper. There were items included that intended for display in the Melbourne International Exhibition in 1880. The voyage to Port Phillip was long but uneventful. At 3am on June 1, 1878, Captain Gibbs was expecting to see land and the passengers were becoming excited as they prepared to view their new homeland in the early morning. But LOCH ARD was running into a fog which greatly reduced visibility. Captain Gibbs was becoming anxious as there was no sign of land or the Cape Otway lighthouse. At 4am the fog lifted. A man aloft announced that he could see breakers. The sheer cliffs of Victoria's west coast came into view, and Captain Gibbs realised that the ship was much closer to them than expected. He ordered as much sail to be set as time would permit and then attempted to steer the vessel out to sea. On coming head on into the wind, the ship lost momentum, the sails fell limp and LOCH ARD's bow swung back. Gibbs then ordered the anchors to be released in an attempt to hold its position. The anchors sank some 50 fathoms - but did not hold. By this time LOCH ARD was among the breakers and the tall cliffs of Mutton Bird Island rose behind the ship. Just half a mile from the coast, the ship's bow was suddenly pulled around by the anchor. The captain tried to tack out to sea, but the ship struck a reef at the base of Mutton Bird Island, near Port Campbell. Waves broke over the ship and the top deck was loosened from the hull. The masts and rigging came crashing down knocking passengers and crew overboard. When a lifeboat was finally launched, it crashed into the side of LOCH ARD and capsized. Tom Pearce, who had launched the boat, managed to cling to its overturned hull and shelter beneath it. He drifted out to sea and then on the flood tide came into what is now known as LOCH ARD Gorge. He swam to shore, bruised and dazed, and found a cave in which to shelter. Some of the crew stayed below deck to shelter from the falling rigging but drowned when the ship slipped off the reef into deeper water. Eva Carmichael had raced onto deck to find out what was happening only to be confronted by towering cliffs looming above the stricken ship. In all the chaos, Captain Gibbs grabbed Eva and said, "If you are saved Eva, let my dear wife know that I died like a sailor". That was the last Eva Carmichael saw of the captain. She was swept off the ship by a huge wave. Eva saw Tom Pearce on a small rocky beach and yelled to attract his attention. He dived in and swam to the exhausted woman and dragged her to shore. He took her to the cave and broke open case of brandy which had washed up on the beach. He opened a bottle to revive the unconscious woman. A few hours later Tom scaled a cliff in search of help. He followed hoof prints and came by chance upon two men from nearby Glenample Station three and a half miles away. In a state of exhaustion, he told the men of the tragedy. Tom returned to the gorge while the two men rode back to the station to get help. By the time they reached LOCH ARD Gorge, it was cold and dark. The two shipwreck survivors were taken to Glenample Station to recover. Eva stayed at the station for six weeks before returning to Ireland, this time by steamship. In Melbourne, Tom Pearce received a hero's welcome. He was presented with the first gold medal of the Royal Humane Society of Victoria and a £1000 cheque from the Victorian Government. Concerts were performed to honour the young man's bravery and to raise money for those who lost family in the LOCH ARD disaster. Of the 54 crew members and passengers on board, only two survived: the apprentice, Tom Pearce and the young woman passenger, Eva Carmichael, who lost all of her family in the tragedy. Ten days after the LOCH ARD tragedy, salvage rights to the wreck were sold at auction for £2,120. Cargo valued at £3,000 was salvaged and placed on the beach, but most washed back into the sea when another storm developed. The wreck of LOCH ARD still lies at the base of Mutton Bird Island. Much of the cargo has now been salvaged and some was washed up into what is now known as LOCH ARD Gorge. Cargo and artefacts have also been illegally salvaged over many years before protective legislation was introduced. One of the most unlikely pieces of cargo to have survived the shipwreck was a Minton porcelain peacock - one of only seven in the world. The peacock was destined for the Melbourne International Exhibition in 1880. It had been well packed, which gave it adequate protection during the violent storm. Today, the Minton peacock can be seen at the Flagstaff Hill Maritime Museum in Warrnambool. From Australia's most dramatic shipwreck it has now become Australia's shipwreck artefact and is one of very few 'objects' on the Victorian State Heritage Register most valuable. The LOCH ARD shipwreck is of State significance – Victorian Heritage Register S 417. Flagstaff Hill’s collection of artefacts from LOCH ARD is significant for being one of the largest collections of artefacts from this shipwreck in Victoria. It is significant for its association with the shipwreck, which is on the Victorian Heritage Register (VHR S417). The collection is significant because of the relationship between the objects, as together they have a high potential to interpret the story of the LOCH ARD. The LOCH ARD collection is archaeologically significant as the remains of a large international passenger and cargo ship. The LOCH ARD collection is historically significant for representing aspects of Victoria’s shipping history and its potential to interpret sub-theme 1.5 of Victoria’s Framework of Historical Themes (living with natural processes). The collection is also historically significant for its association with the LOCH ARD, which was one of the worst and best known shipwrecks in Victoria’s history. Physical Description: Unrestored table spoon from the wreck of the LOCH ARD. The spoon design has a flattened fiddle-back handle, with a thin stem or shank, flared collar, and a shallow rounded bowl. The spoons metallic composition is a thin layer of brass alloy which has partially corroded back to a nickel-silver base metal. Sediment concretion 35% and 40% of original plate remains. No visible makers marks.flagstaff hill maritime museum, shipwreck coast, great ocean road, loch line, loch ard, mutton bird island, loch ard gorge, electroplated cutlery, loch ard shipwreck, william page and co, birmingham brass plating, spoon, table spoon -
 Flagstaff Hill Maritime Museum and Village
Domestic object - Spoon, circa 1878
This table spoon is from the wreck of the LOCH ARD, a Loch Line ship of 1,693 tons which sailed from Gravesend, London, on 2 March 1878 with 17 passengers and a crew of 36 under Captain George Gibbs. “The intention was to discharge cargo in Melbourne, before returning to London via the Horn with wool and wheat”. Instead, on 1 June 1878, after 90 days at sea, she struck the sandstone cliffs of Mutton Bird Island on the south west coast of Victoria, and sank with the loss of 52 lives and all her cargo. The manifest of the LOCH ARD listed an array of manufactured goods and bulk metals being exported to the Colony of Victoria, with a declared value of £53,700. (202 bills of lading show an actual invoice value of £68, 456, with insurance underwriting to £30,000 of all cargo). Included in the manifest is the item of “Tin hardware & cutlery £7,530”. This table spoon is one of 482 similar items of electro-plated cutlery from the LOCH ARD site, comprising spoons and forks of various sizes but all sharing the same general shape or design and metallic composition. 49 of these pieces display a legible makers’ mark — the initials “W” and “P” placed within a raised diamond outline, which is in turn contained within a sunken crown shape — identifying the manufacturer as William Page & Co of Birmingham. An electroplater’s makers’ marks, unlike sterling silver hallmarks, are not consistent identifiers of quality or date and place of manufacture. A similar line of five impressions was usually made to impress the consumer with an implication of industry standards, but what each one actually signified was not regulated and so they varied according to the whim of the individual foundry. In this case, the maker’s marks are often obscured by sedimentary accretion or removed by corrosion after a century of submersion in the ocean. However sufficient detail has survived to indicate that these samples of electro-plated cutlery probably originated from the same consignment in the LOCH ARD’s cargo. The generally common range of marks are drawn from 255 tea spoons, 125 dessert spoons, and 99 table forks. These marks are clearly visible in 66 instances, while the same sequence of general outlines, or depression shapes, is discernible in another 166 examples. Suggested trade names for William Page & Co’s particular blend of brass plating are ‘roman silver’ or ‘silverite’. This copper alloy polishes to a lustrous gold when new, discolouring to a murky grey with greenish hue when neglected. HISTORY OF THE LOCH ARD The LOCH ARD belonged to the famous Loch Line which sailed many ships from England to Australia. Built in Glasgow by Barclay, Curdle and Co. in 1873, the LOCH ARD was a three-masted square rigged iron sailing ship. The ship measured 262ft 7" (79.87m) in length, 38ft (11.58m) in width, 23ft (7m) in depth and had a gross tonnage of 1693 tons. The LOCH ARD's main mast measured a massive 150ft (45.7m) in height. LOCH ARD made three trips to Australia and one trip to Calcutta before its final voyage. LOCH ARD left England on March 2, 1878, under the command of Captain Gibbs, a newly married, 29 year old. She was bound for Melbourne with a crew of 37, plus 17 passengers and a load of cargo. The general cargo reflected the affluence of Melbourne at the time. On board were straw hats, umbrella, perfumes, clay pipes, pianos, clocks, confectionary, linen and candles, as well as a heavier load of railway irons, cement, lead and copper. There were items included that intended for display in the Melbourne International Exhibition in 1880. The voyage to Port Phillip was long but uneventful. At 3am on June 1, 1878, Captain Gibbs was expecting to see land and the passengers were becoming excited as they prepared to view their new homeland in the early morning. But LOCH ARD was running into a fog which greatly reduced visibility. Captain Gibbs was becoming anxious as there was no sign of land or the Cape Otway lighthouse. At 4am the fog lifted. A man aloft announced that he could see breakers. The sheer cliffs of Victoria's west coast came into view, and Captain Gibbs realised that the ship was much closer to them than expected. He ordered as much sail to be set as time would permit and then attempted to steer the vessel out to sea. On coming head on into the wind, the ship lost momentum, the sails fell limp and LOCH ARD's bow swung back. Gibbs then ordered the anchors to be released in an attempt to hold its position. The anchors sank some 50 fathoms - but did not hold. By this time LOCH ARD was among the breakers and the tall cliffs of Mutton Bird Island rose behind the ship. Just half a mile from the coast, the ship's bow was suddenly pulled around by the anchor. The captain tried to tack out to sea, but the ship struck a reef at the base of Mutton Bird Island, near Port Campbell. Waves broke over the ship and the top deck was loosened from the hull. The masts and rigging came crashing down knocking passengers and crew overboard. When a lifeboat was finally launched, it crashed into the side of LOCH ARD and capsized. Tom Pearce, who had launched the boat, managed to cling to its overturned hull and shelter beneath it. He drifted out to sea and then on the flood tide came into what is now known as LOCH ARD Gorge. He swam to shore, bruised and dazed, and found a cave in which to shelter. Some of the crew stayed below deck to shelter from the falling rigging but drowned when the ship slipped off the reef into deeper water. Eva Carmichael had raced onto deck to find out what was happening only to be confronted by towering cliffs looming above the stricken ship. In all the chaos, Captain Gibbs grabbed Eva and said, "If you are saved Eva, let my dear wife know that I died like a sailor". That was the last Eva Carmichael saw of the captain. She was swept off the ship by a huge wave. Eva saw Tom Pearce on a small rocky beach and yelled to attract his attention. He dived in and swam to the exhausted woman and dragged her to shore. He took her to the cave and broke open case of brandy which had washed up on the beach. He opened a bottle to revive the unconscious woman. A few hours later Tom scaled a cliff in search of help. He followed hoof prints and came by chance upon two men from nearby Glenample Station three and a half miles away. In a state of exhaustion, he told the men of the tragedy. Tom returned to the gorge while the two men rode back to the station to get help. By the time they reached LOCH ARD Gorge, it was cold and dark. The two shipwreck survivors were taken to Glenample Station to recover. Eva stayed at the station for six weeks before returning to Ireland, this time by steamship. In Melbourne, Tom Pearce received a hero's welcome. He was presented with the first gold medal of the Royal Humane Society of Victoria and a £1000 cheque from the Victorian Government. Concerts were performed to honour the young man's bravery and to raise money for those who lost family in the LOCH ARD disaster. Of the 54 crew members and passengers on board, only two survived: the apprentice, Tom Pearce and the young woman passenger, Eva Carmichael, who lost all of her family in the tragedy. Ten days after the LOCH ARD tragedy, salvage rights to the wreck were sold at auction for £2,120. Cargo valued at £3,000 was salvaged and placed on the beach, but most washed back into the sea when another storm developed. The wreck of LOCH ARD still lies at the base of Mutton Bird Island. Much of the cargo has now been salvaged and some was washed up into what is now known as LOCH ARD Gorge. Cargo and artefacts have also been illegally salvaged over many years before protective legislation was introduced. One of the most unlikely pieces of cargo to have survived the shipwreck was a Minton porcelain peacock - one of only seven in the world. The peacock was destined for the Melbourne International Exhibition in 1880. It had been well packed, which gave it adequate protection during the violent storm. Today, the Minton peacock can be seen at the Flagstaff Hill Maritime Museum in Warrnambool. From Australia's most dramatic shipwreck it has now become Australia's shipwreck artefact and is one of very few 'objects' on the Victorian State Heritage Register most valuable. The LOCH ARD shipwreck is of State significance – Victorian Heritage Register S 417. Flagstaff Hill’s collection of artefacts from LOCH ARD is significant for being one of the largest collections of artefacts from this shipwreck in Victoria. It is significant for its association with the shipwreck, which is on the Victorian Heritage Register (VHR S417). The collection is significant because of the relationship between the objects, as together they have a high potential to interpret the story of the LOCH ARD. The LOCH ARD collection is archaeologically significant as the remains of a large international passenger and cargo ship. The LOCH ARD collection is historically significant for representing aspects of Victoria’s shipping history and its potential to interpret sub-theme 1.5 of Victoria’s Framework of Historical Themes (living with natural processes). The collection is also historically significant for its association with the LOCH ARD, which was one of the worst and best known shipwrecks in Victoria’s history. Unrestored table spoon from the wreck of the LOCH ARD. The spoon design has a flattened fiddle-back handle, with a thin stem or shank, flared collar, and a shallow rounded bowl. The spoons metallic composition is a thin layer of brass alloy which has partially corroded back to a nickel-silver base metal. Approximately 40% of spoon is concreted with sediment and 20% of original plate is visible.flagstaff hill maritime museum, shipwreck coast, great ocean road, loch line, loch ard, mutton bird island, loch ard gorge, electroplated cutlery, loch ard shipwreck, william page and co, birmingham brass plating, table spoon, spoon -
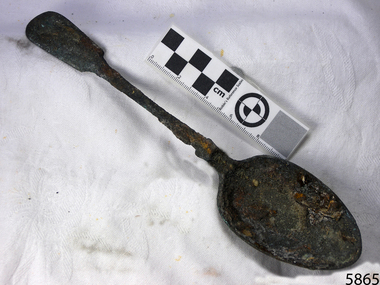 Flagstaff Hill Maritime Museum and Village
Domestic object - Spoon, circa 1878
This table spoon is from the wreck of the LOCH ARD, a Loch Line ship of 1,693 tons which sailed from Gravesend, London, on 2 March 1878 with 17 passengers and a crew of 36 under Captain George Gibbs. “The intention was to discharge cargo in Melbourne, before returning to London via the Horn with wool and wheat”. Instead, on 1 June 1878, after 90 days at sea, she struck the sandstone cliffs of Mutton Bird Island on the south west coast of Victoria, and sank with the loss of 52 lives and all her cargo. The manifest of the LOCH ARD listed an array of manufactured goods and bulk metals being exported to the Colony of Victoria, with a declared value of £53,700. (202 bills of lading show an actual invoice value of £68, 456, with insurance underwriting to £30,000 of all cargo). Included in the manifest is the item of “Tin hardware & cutlery £7,530”. This table spoon is one of 482 similar items of electro-plated cutlery from the LOCH ARD site, comprising spoons and forks of various sizes but all sharing the same general shape or design and metallic composition. 49 of these pieces display a legible makers’ mark — the initials “W” and “P” placed within a raised diamond outline, which is in turn contained within a sunken crown shape — identifying the manufacturer as William Page & Co of Birmingham. An electroplater’s makers’ marks, unlike sterling silver hallmarks, are not consistent identifiers of quality or date and place of manufacture. A similar line of five impressions was usually made to impress the consumer with an implication of industry standards, but what each one actually signified was not regulated and so they varied according to the whim of the individual foundry. In this case, the maker’s marks are often obscured by sedimentary accretion or removed by corrosion after a century of submersion in the ocean. However sufficient detail has survived to indicate that these samples of electro-plated cutlery probably originated from the same consignment in the LOCH ARD’s cargo. The generally common range of marks are drawn from 255 tea spoons, 125 dessert spoons, and 99 table forks. These marks are clearly visible in 66 instances, while the same sequence of general outlines, or depression shapes, is discernible in another 166 examples. Suggested trade names for William Page & Co’s particular blend of brass plating are ‘roman silver’ or ‘silverite’. This copper alloy polishes to a lustrous gold when new, discolouring to a murky grey with greenish hue when neglected. HISTORY OF THE LOCH ARD The LOCH ARD belonged to the famous Loch Line which sailed many ships from England to Australia. Built in Glasgow by Barclay, Curdle and Co. in 1873, the LOCH ARD was a three-masted square rigged iron sailing ship. The ship measured 262ft 7" (79.87m) in length, 38ft (11.58m) in width, 23ft (7m) in depth and had a gross tonnage of 1693 tons. The LOCH ARD's main mast measured a massive 150ft (45.7m) in height. LOCH ARD made three trips to Australia and one trip to Calcutta before its final voyage. LOCH ARD left England on March 2, 1878, under the command of Captain Gibbs, a newly married, 29 year old. She was bound for Melbourne with a crew of 37, plus 17 passengers and a load of cargo. The general cargo reflected the affluence of Melbourne at the time. On board were straw hats, umbrella, perfumes, clay pipes, pianos, clocks, confectionary, linen and candles, as well as a heavier load of railway irons, cement, lead and copper. There were items included that intended for display in the Melbourne International Exhibition in 1880. The voyage to Port Phillip was long but uneventful. At 3am on June 1, 1878, Captain Gibbs was expecting to see land and the passengers were becoming excited as they prepared to view their new homeland in the early morning. But LOCH ARD was running into a fog which greatly reduced visibility. Captain Gibbs was becoming anxious as there was no sign of land or the Cape Otway lighthouse. At 4am the fog lifted. A man aloft announced that he could see breakers. The sheer cliffs of Victoria's west coast came into view, and Captain Gibbs realised that the ship was much closer to them than expected. He ordered as much sail to be set as time would permit and then attempted to steer the vessel out to sea. On coming head on into the wind, the ship lost momentum, the sails fell limp and LOCH ARD's bow swung back. Gibbs then ordered the anchors to be released in an attempt to hold its position. The anchors sank some 50 fathoms - but did not hold. By this time LOCH ARD was among the breakers and the tall cliffs of Mutton Bird Island rose behind the ship. Just half a mile from the coast, the ship's bow was suddenly pulled around by the anchor. The captain tried to tack out to sea, but the ship struck a reef at the base of Mutton Bird Island, near Port Campbell. Waves broke over the ship and the top deck was loosened from the hull. The masts and rigging came crashing down knocking passengers and crew overboard. When a lifeboat was finally launched, it crashed into the side of LOCH ARD and capsized. Tom Pearce, who had launched the boat, managed to cling to its overturned hull and shelter beneath it. He drifted out to sea and then on the flood tide came into what is now known as LOCH ARD Gorge. He swam to shore, bruised and dazed, and found a cave in which to shelter. Some of the crew stayed below deck to shelter from the falling rigging but drowned when the ship slipped off the reef into deeper water. Eva Carmichael had raced onto deck to find out what was happening only to be confronted by towering cliffs looming above the stricken ship. In all the chaos, Captain Gibbs grabbed Eva and said, "If you are saved Eva, let my dear wife know that I died like a sailor". That was the last Eva Carmichael saw of the captain. She was swept off the ship by a huge wave. Eva saw Tom Pearce on a small rocky beach and yelled to attract his attention. He dived in and swam to the exhausted woman and dragged her to shore. He took her to the cave and broke open case of brandy which had washed up on the beach. He opened a bottle to revive the unconscious woman. A few hours later Tom scaled a cliff in search of help. He followed hoof prints and came by chance upon two men from nearby Glenample Station three and a half miles away. In a state of exhaustion, he told the men of the tragedy. Tom returned to the gorge while the two men rode back to the station to get help. By the time they reached LOCH ARD Gorge, it was cold and dark. The two shipwreck survivors were taken to Glenample Station to recover. Eva stayed at the station for six weeks before returning to Ireland, this time by steamship. In Melbourne, Tom Pearce received a hero's welcome. He was presented with the first gold medal of the Royal Humane Society of Victoria and a £1000 cheque from the Victorian Government. Concerts were performed to honour the young man's bravery and to raise money for those who lost family in the LOCH ARD disaster. Of the 54 crew members and passengers on board, only two survived: the apprentice, Tom Pearce and the young woman passenger, Eva Carmichael, who lost all of her family in the tragedy. Ten days after the LOCH ARD tragedy, salvage rights to the wreck were sold at auction for £2,120. Cargo valued at £3,000 was salvaged and placed on the beach, but most washed back into the sea when another storm developed. The wreck of LOCH ARD still lies at the base of Mutton Bird Island. Much of the cargo has now been salvaged and some was washed up into what is now known as LOCH ARD Gorge. Cargo and artefacts have also been illegally salvaged over many years before protective legislation was introduced. One of the most unlikely pieces of cargo to have survived the shipwreck was a Minton porcelain peacock - one of only seven in the world. The peacock was destined for the Melbourne International Exhibition in 1880. It had been well packed, which gave it adequate protection during the violent storm. Today, the Minton peacock can be seen at the Flagstaff Hill Maritime Museum in Warrnambool. From Australia's most dramatic shipwreck it has now become Australia's shipwreck artefact and is one of very few 'objects' on the Victorian State Heritage Register most valuable. The LOCH ARD shipwreck is of State significance – Victorian Heritage Register S 417. Flagstaff Hill’s collection of artefacts from LOCH ARD is significant for being one of the largest collections of artefacts from this shipwreck in Victoria. It is significant for its association with the shipwreck, which is on the Victorian Heritage Register (VHR S417). The collection is significant because of the relationship between the objects, as together they have a high potential to interpret the story of the LOCH ARD. The LOCH ARD collection is archaeologically significant as the remains of a large international passenger and cargo ship. The LOCH ARD collection is historically significant for representing aspects of Victoria’s shipping history and its potential to interpret sub-theme 1.5 of Victoria’s Framework of Historical Themes (living with natural processes). The collection is also historically significant for its association with the LOCH ARD, which was one of the worst and best known shipwrecks in Victoria’s history. Unrestored table spoon from the wreck of the LOCH ARD. The spoon design has a flattened fiddle-back handle, with a thin stem or shank, flared collar, and a shallow rounded bowl. The spoons metallic composition is a thin layer of brass alloy which has partially corroded back to a nickel-silver base metal. Approximately 10% of original plate remains, and 15% of surface area bears verdigris. Outlines of five makers marks are discernible - Diamond shape, Ellipse, Rounded square, Circle, Diamond.flagstaff hill maritime museum, shipwreck coast, great ocean road, loch line, loch ard, mutton bird island, loch ard gorge, electroplated cutlery, loch ard shipwreck, nickel silver, william page & co, birmingham, brass plating, makers marks, table spoon, spoon -
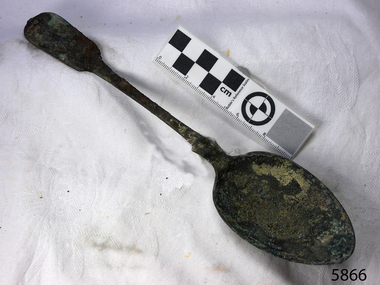 Flagstaff Hill Maritime Museum and Village
Domestic object - Spoon, circa 1878
This table spoon is from the wreck of the LOCH ARD, a Loch Line ship of 1,693 tons which sailed from Gravesend, London, on 2 March 1878 with 17 passengers and a crew of 36 under Captain George Gibbs. “The intention was to discharge cargo in Melbourne, before returning to London via the Horn with wool and wheat”. Instead, on 1 June 1878, after 90 days at sea, she struck the sandstone cliffs of Mutton Bird Island on the south west coast of Victoria, and sank with the loss of 52 lives and all her cargo. The manifest of the LOCH ARD listed an array of manufactured goods and bulk metals being exported to the Colony of Victoria, with a declared value of £53,700. (202 bills of lading show an actual invoice value of £68, 456, with insurance underwriting to £30,000 of all cargo). Included in the manifest is the item of “Tin hardware & cutlery £7,530”. This table spoon is one of 482 similar items of electro-plated cutlery from the LOCH ARD site, comprising spoons and forks of various sizes but all sharing the same general shape or design and metallic composition. 49 of these pieces display a legible makers’ mark — the initials “W” and “P” placed within a raised diamond outline, which is in turn contained within a sunken crown shape — identifying the manufacturer as William Page & Co of Birmingham. An electroplater’s makers’ marks, unlike sterling silver hallmarks, are not consistent identifiers of quality or date and place of manufacture. A similar line of five impressions was usually made to impress the consumer with an implication of industry standards, but what each one actually signified was not regulated and so they varied according to the whim of the individual foundry. In this case, the maker’s marks are often obscured by sedimentary accretion or removed by corrosion after a century of submersion in the ocean. However sufficient detail has survived to indicate that these samples of electro-plated cutlery probably originated from the same consignment in the LOCH ARD’s cargo. The generally common range of marks are drawn from 255 tea spoons, 125 dessert spoons, and 99 table forks. These marks are clearly visible in 66 instances, while the same sequence of general outlines, or depression shapes, is discernible in another 166 examples. Suggested trade names for William Page & Co’s particular blend of brass plating are ‘roman silver’ or ‘silverite’. This copper alloy polishes to a lustrous gold when new, discolouring to a murky grey with greenish hue when neglected. HISTORY OF THE LOCH ARD The LOCH ARD belonged to the famous Loch Line which sailed many ships from England to Australia. Built in Glasgow by Barclay, Curdle and Co. in 1873, the LOCH ARD was a three-masted square rigged iron sailing ship. The ship measured 262ft 7" (79.87m) in length, 38ft (11.58m) in width, 23ft (7m) in depth and had a gross tonnage of 1693 tons. The LOCH ARD's main mast measured a massive 150ft (45.7m) in height. LOCH ARD made three trips to Australia and one trip to Calcutta before its final voyage. LOCH ARD left England on March 2, 1878, under the command of Captain Gibbs, a newly married, 29 year old. She was bound for Melbourne with a crew of 37, plus 17 passengers and a load of cargo. The general cargo reflected the affluence of Melbourne at the time. On board were straw hats, umbrella, perfumes, clay pipes, pianos, clocks, confectionary, linen and candles, as well as a heavier load of railway irons, cement, lead and copper. There were items included that intended for display in the Melbourne International Exhibition in 1880. The voyage to Port Phillip was long but uneventful. At 3am on June 1, 1878, Captain Gibbs was expecting to see land and the passengers were becoming excited as they prepared to view their new homeland in the early morning. But LOCH ARD was running into a fog which greatly reduced visibility. Captain Gibbs was becoming anxious as there was no sign of land or the Cape Otway lighthouse. At 4am the fog lifted. A man aloft announced that he could see breakers. The sheer cliffs of Victoria's west coast came into view, and Captain Gibbs realised that the ship was much closer to them than expected. He ordered as much sail to be set as time would permit and then attempted to steer the vessel out to sea. On coming head on into the wind, the ship lost momentum, the sails fell limp and LOCH ARD's bow swung back. Gibbs then ordered the anchors to be released in an attempt to hold its position. The anchors sank some 50 fathoms - but did not hold. By this time LOCH ARD was among the breakers and the tall cliffs of Mutton Bird Island rose behind the ship. Just half a mile from the coast, the ship's bow was suddenly pulled around by the anchor. The captain tried to tack out to sea, but the ship struck a reef at the base of Mutton Bird Island, near Port Campbell. Waves broke over the ship and the top deck was loosened from the hull. The masts and rigging came crashing down knocking passengers and crew overboard. When a lifeboat was finally launched, it crashed into the side of LOCH ARD and capsized. Tom Pearce, who had launched the boat, managed to cling to its overturned hull and shelter beneath it. He drifted out to sea and then on the flood tide came into what is now known as LOCH ARD Gorge. He swam to shore, bruised and dazed, and found a cave in which to shelter. Some of the crew stayed below deck to shelter from the falling rigging but drowned when the ship slipped off the reef into deeper water. Eva Carmichael had raced onto deck to find out what was happening only to be confronted by towering cliffs looming above the stricken ship. In all the chaos, Captain Gibbs grabbed Eva and said, "If you are saved Eva, let my dear wife know that I died like a sailor". That was the last Eva Carmichael saw of the captain. She was swept off the ship by a huge wave. Eva saw Tom Pearce on a small rocky beach and yelled to attract his attention. He dived in and swam to the exhausted woman and dragged her to shore. He took her to the cave and broke open case of brandy which had washed up on the beach. He opened a bottle to revive the unconscious woman. A few hours later Tom scaled a cliff in search of help. He followed hoof prints and came by chance upon two men from nearby Glenample Station three and a half miles away. In a state of exhaustion, he told the men of the tragedy. Tom returned to the gorge while the two men rode back to the station to get help. By the time they reached LOCH ARD Gorge, it was cold and dark. The two shipwreck survivors were taken to Glenample Station to recover. Eva stayed at the station for six weeks before returning to Ireland, this time by steamship. In Melbourne, Tom Pearce received a hero's welcome. He was presented with the first gold medal of the Royal Humane Society of Victoria and a £1000 cheque from the Victorian Government. Concerts were performed to honour the young man's bravery and to raise money for those who lost family in the LOCH ARD disaster. Of the 54 crew members and passengers on board, only two survived: the apprentice, Tom Pearce and the young woman passenger, Eva Carmichael, who lost all of her family in the tragedy. Ten days after the LOCH ARD tragedy, salvage rights to the wreck were sold at auction for £2,120. Cargo valued at £3,000 was salvaged and placed on the beach, but most washed back into the sea when another storm developed. The wreck of LOCH ARD still lies at the base of Mutton Bird Island. Much of the cargo has now been salvaged and some was washed up into what is now known as LOCH ARD Gorge. Cargo and artefacts have also been illegally salvaged over many years before protective legislation was introduced. One of the most unlikely pieces of cargo to have survived the shipwreck was a Minton porcelain peacock - one of only seven in the world. The peacock was destined for the Melbourne International Exhibition in 1880. It had been well packed, which gave it adequate protection during the violent storm. Today, the Minton peacock can be seen at the Flagstaff Hill Maritime Museum in Warrnambool. From Australia's most dramatic shipwreck it has now become Australia's shipwreck artefact and is one of very few 'objects' on the Victorian State Heritage Register most valuable The LOCH ARD shipwreck is of State significance – Victorian Heritage Register S 417. Flagstaff Hill’s collection of artefacts from LOCH ARD is significant for being one of the largest collections of artefacts from this shipwreck in Victoria. It is significant for its association with the shipwreck, which is on the Victorian Heritage Register (VHR S417). The collection is significant because of the relationship between the objects, as together they have a high potential to interpret the story of the LOCH ARD. The LOCH ARD collection is archaeologically significant as the remains of a large international passenger and cargo ship. The LOCH ARD collection is historically significant for representing aspects of Victoria’s shipping history and its potential to interpret sub-theme 1.5 of Victoria’s Framework of Historical Themes (living with natural processes). The collection is also historically significant for its association with the LOCH ARD, which was one of the worst and best known shipwrecks in Victoria’s history. Unrestored table spoon from the wreck of the LOCH ARD. The spoon design has a flattened fiddle-back handle, with a thin stem or shank, flared collar, and a shallow rounded bowl. The spoons metallic composition is a thin layer of brass alloy which has partially corroded back to a nickel-silver base metal. 15% of original plating remains and 15% of spoon surface area is covered by sediment. No makers marks are visible.flagstaff hill maritime museum, maritime museum, shipwreck coast, great ocean road, loch line, loch ard, mutton bird island, loch ard gorge, electroplated cutlery, loch ard shipwreck, william page and co, birmingham brass plating, table spoons -
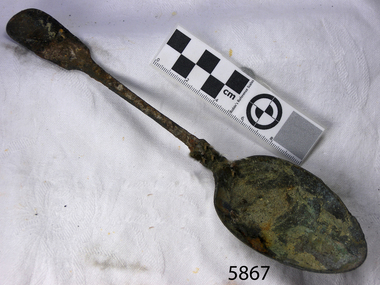 Flagstaff Hill Maritime Museum and Village
Domestic object - Spoon, circa 1878
This table spoon is from the wreck of the LOCH ARD, a Loch Line ship of 1,693 tons which sailed from Gravesend, London, on 2 March 1878 with 17 passengers and a crew of 36 under Captain George Gibbs. “The intention was to discharge cargo in Melbourne, before returning to London via the Horn with wool and wheat”. Instead, on 1 June 1878, after 90 days at sea, she struck the sandstone cliffs of Mutton Bird Island on the south west coast of Victoria, and sank with the loss of 52 lives and all her cargo. The manifest of the LOCH ARD listed an array of manufactured goods and bulk metals being exported to the Colony of Victoria, with a declared value of £53,700. (202 bills of lading show an actual invoice value of £68, 456, with insurance underwriting to £30,000 of all cargo). Included in the manifest is the item of “Tin hardware & cutlery £7,530”. This table spoon is one of 482 similar items of electro-plated cutlery from the LOCH ARD site, comprising spoons and forks of various sizes but all sharing the same general shape or design and metallic composition. 49 of these pieces display a legible makers’ mark — the initials “W” and “P” placed within a raised diamond outline, which is in turn contained within a sunken crown shape — identifying the manufacturer as William Page & Co of Birmingham. An electroplater’s makers’ marks, unlike sterling silver hallmarks, are not consistent identifiers of quality or date and place of manufacture. A similar line of five impressions was usually made to impress the consumer with an implication of industry standards, but what each one actually signified was not regulated and so they varied according to the whim of the individual foundry. In this case, the maker’s marks are often obscured by sedimentary accretion or removed by corrosion after a century of submersion in the ocean. However sufficient detail has survived to indicate that these samples of electro-plated cutlery probably originated from the same consignment in the LOCH ARD’s cargo. The generally common range of marks are drawn from 255 tea spoons, 125 dessert spoons, and 99 table forks. These marks are clearly visible in 66 instances, while the same sequence of general outlines, or depression shapes, is discernible in another 166 examples. Suggested trade names for William Page & Co’s particular blend of brass plating are ‘roman silver’ or ‘silverite’. This copper alloy polishes to a lustrous gold when new, discolouring to a murky grey with greenish hue when neglected. HISTORY OF THE LOCH ARD The LOCH ARD belonged to the famous Loch Line which sailed many ships from England to Australia. Built in Glasgow by Barclay, Curdle and Co. in 1873, the LOCH ARD was a three-masted square rigged iron sailing ship. The ship measured 262ft 7" (79.87m) in length, 38ft (11.58m) in width, 23ft (7m) in depth and had a gross tonnage of 1693 tons. The LOCH ARD's main mast measured a massive 150ft (45.7m) in height. LOCH ARD made three trips to Australia and one trip to Calcutta before its final voyage. LOCH ARD left England on March 2, 1878, under the command of Captain Gibbs, a newly married, 29 year old. She was bound for Melbourne with a crew of 37, plus 17 passengers and a load of cargo. The general cargo reflected the affluence of Melbourne at the time. On board were straw hats, umbrella, perfumes, clay pipes, pianos, clocks, confectionary, linen and candles, as well as a heavier load of railway irons, cement, lead and copper. There were items included that intended for display in the Melbourne International Exhibition in 1880. The voyage to Port Phillip was long but uneventful. At 3am on June 1, 1878, Captain Gibbs was expecting to see land and the passengers were becoming excited as they prepared to view their new homeland in the early morning. But LOCH ARD was running into a fog which greatly reduced visibility. Captain Gibbs was becoming anxious as there was no sign of land or the Cape Otway lighthouse. At 4am the fog lifted. A man aloft announced that he could see breakers. The sheer cliffs of Victoria's west coast came into view, and Captain Gibbs realised that the ship was much closer to them than expected. He ordered as much sail to be set as time would permit and then attempted to steer the vessel out to sea. On coming head on into the wind, the ship lost momentum, the sails fell limp and LOCH ARD's bow swung back. Gibbs then ordered the anchors to be released in an attempt to hold its position. The anchors sank some 50 fathoms - but did not hold. By this time LOCH ARD was among the breakers and the tall cliffs of Mutton Bird Island rose behind the ship. Just half a mile from the coast, the ship's bow was suddenly pulled around by the anchor. The captain tried to tack out to sea, but the ship struck a reef at the base of Mutton Bird Island, near Port Campbell. Waves broke over the ship and the top deck was loosened from the hull. The masts and rigging came crashing down knocking passengers and crew overboard. When a lifeboat was finally launched, it crashed into the side of LOCH ARD and capsized. Tom Pearce, who had launched the boat, managed to cling to its overturned hull and shelter beneath it. He drifted out to sea and then on the flood tide came into what is now known as LOCH ARD Gorge. He swam to shore, bruised and dazed, and found a cave in which to shelter. Some of the crew stayed below deck to shelter from the falling rigging but drowned when the ship slipped off the reef into deeper water. Eva Carmichael had raced onto deck to find out what was happening only to be confronted by towering cliffs looming above the stricken ship. In all the chaos, Captain Gibbs grabbed Eva and said, "If you are saved Eva, let my dear wife know that I died like a sailor". That was the last Eva Carmichael saw of the captain. She was swept off the ship by a huge wave. Eva saw Tom Pearce on a small rocky beach and yelled to attract his attention. He dived in and swam to the exhausted woman and dragged her to shore. He took her to the cave and broke open case of brandy which had washed up on the beach. He opened a bottle to revive the unconscious woman. A few hours later Tom scaled a cliff in search of help. He followed hoof prints and came by chance upon two men from nearby Glenample Station three and a half miles away. In a state of exhaustion, he told the men of the tragedy. Tom returned to the gorge while the two men rode back to the station to get help. By the time they reached LOCH ARD Gorge, it was cold and dark. The two shipwreck survivors were taken to Glenample Station to recover. Eva stayed at the station for six weeks before returning to Ireland, this time by steamship. In Melbourne, Tom Pearce received a hero's welcome. He was presented with the first gold medal of the Royal Humane Society of Victoria and a £1000 cheque from the Victorian Government. Concerts were performed to honour the young man's bravery and to raise money for those who lost family in the LOCH ARD disaster. Of the 54 crew members and passengers on board, only two survived: the apprentice, Tom Pearce and the young woman passenger, Eva Carmichael, who lost all of her family in the tragedy. Ten days after the LOCH ARD tragedy, salvage rights to the wreck were sold at auction for £2,120. Cargo valued at £3,000 was salvaged and placed on the beach, but most washed back into the sea when another storm developed. The wreck of LOCH ARD still lies at the base of Mutton Bird Island. Much of the cargo has now been salvaged and some was washed up into what is now known as LOCH ARD Gorge. Cargo and artefacts have also been illegally salvaged over many years before protective legislation was introduced. One of the most unlikely pieces of cargo to have survived the shipwreck was a Minton porcelain peacock - one of only seven in the world. The peacock was destined for the Melbourne International Exhibition in 1880. It had been well packed, which gave it adequate protection during the violent storm. Today, the Minton peacock can be seen at the Flagstaff Hill Maritime Museum in Warrnambool. From Australia's most dramatic shipwreck it has now become Australia's shipwreck artefact and is one of very few 'objects' on the Victorian State Heritage Register most valuable. The LOCH ARD shipwreck is of State significance – Victorian Heritage Register S 417. Flagstaff Hill’s collection of artefacts from LOCH ARD is significant for being one of the largest collections of artefacts from this shipwreck in Victoria. It is significant for its association with the shipwreck, which is on the Victorian Heritage Register (VHR S417). The collection is significant because of the relationship between the objects, as together they have a high potential to interpret the story of the LOCH ARD. The LOCH ARD collection is archaeologically significant as the remains of a large international passenger and cargo ship. The LOCH ARD collection is historically significant for representing aspects of Victoria’s shipping history and its potential to interpret sub-theme 1.5 of Victoria’s Framework of Historical Themes (living with natural processes). The collection is also historically significant for its association with the LOCH ARD, which was one of the worst and best known shipwrecks in Victoria’s history. Unrestored table spoon from the wreck of the LOCH ARD. The spoon design has a flattened fiddle-back handle, with a thin stem or shank, flared collar, and a shallow rounded bowl. The spoons metallic composition is a thin layer of brass alloy which has partially corroded back to a nickel-silver base metal. Only 10% of original plate remains and no makers marks are visible. Some verdigris and encrustation on front of spoon. Bowl is cracked.flagstaff hill maritime museum, shipwreck coast, great ocean road, loch line, loch ard, mutton bird island, loch ard gorge, electroplated cutlery, loch ard shipwreck, william page and co, birmingham brass plating, table spoons -
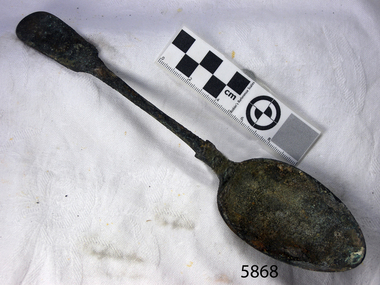 Flagstaff Hill Maritime Museum and Village
Domestic object - Spoon, circa 1878
This table spoon is from the wreck of the LOCH ARD, a Loch Line ship of 1,693 tons which sailed from Gravesend, London, on 2 March 1878 with 17 passengers and a crew of 36 under Captain George Gibbs. “The intention was to discharge cargo in Melbourne, before returning to London via the Horn with wool and wheat”. Instead, on 1 June 1878, after 90 days at sea, she struck the sandstone cliffs of Mutton Bird Island on the south west coast of Victoria, and sank with the loss of 52 lives and all her cargo. The manifest of the LOCH ARD listed an array of manufactured goods and bulk metals being exported to the Colony of Victoria, with a declared value of £53,700. (202 bills of lading show an actual invoice value of £68, 456, with insurance underwriting to £30,000 of all cargo). Included in the manifest is the item of “Tin hardware & cutlery £7,530”. This table spoon is one of 482 similar items of electro-plated cutlery from the LOCH ARD site, comprising spoons and forks of various sizes but all sharing the same general shape or design and metallic composition. 49 of these pieces display a legible makers’ mark — the initials “W” and “P” placed within a raised diamond outline, which is in turn contained within a sunken crown shape — identifying the manufacturer as William Page & Co of Birmingham. An electroplater’s makers’ marks, unlike sterling silver hallmarks, are not consistent identifiers of quality or date and place of manufacture. A similar line of five impressions was usually made to impress the consumer with an implication of industry standards, but what each one actually signified was not regulated and so they varied according to the whim of the individual foundry. In this case, the maker’s marks are often obscured by sedimentary accretion or removed by corrosion after a century of submersion in the ocean. However sufficient detail has survived to indicate that these samples of electro-plated cutlery probably originated from the same consignment in the LOCH ARD’s cargo. The generally common range of marks are drawn from 255 tea spoons, 125 dessert spoons, and 99 table forks. These marks are clearly visible in 66 instances, while the same sequence of general outlines, or depression shapes, is discernible in another 166 examples. Suggested trade names for William Page & Co’s particular blend of brass plating are ‘roman silver’ or ‘silverite’. This copper alloy polishes to a lustrous gold when new, discolouring to a murky grey with greenish hue when neglected. HISTORY OF THE LOCH ARD The LOCH ARD belonged to the famous Loch Line which sailed many ships from England to Australia. Built in Glasgow by Barclay, Curdle and Co. in 1873, the LOCH ARD was a three-masted square rigged iron sailing ship. The ship measured 262ft 7" (79.87m) in length, 38ft (11.58m) in width, 23ft (7m) in depth and had a gross tonnage of 1693 tons. The LOCH ARD's main mast measured a massive 150ft (45.7m) in height. LOCH ARD made three trips to Australia and one trip to Calcutta before its final voyage. LOCH ARD left England on March 2, 1878, under the command of Captain Gibbs, a newly married, 29 year old. She was bound for Melbourne with a crew of 37, plus 17 passengers and a load of cargo. The general cargo reflected the affluence of Melbourne at the time. On board were straw hats, umbrella, perfumes, clay pipes, pianos, clocks, confectionary, linen and candles, as well as a heavier load of railway irons, cement, lead and copper. There were items included that intended for display in the Melbourne International Exhibition in 1880. The voyage to Port Phillip was long but uneventful. At 3am on June 1, 1878, Captain Gibbs was expecting to see land and the passengers were becoming excited as they prepared to view their new homeland in the early morning. But LOCH ARD was running into a fog which greatly reduced visibility. Captain Gibbs was becoming anxious as there was no sign of land or the Cape Otway lighthouse. At 4am the fog lifted. A man aloft announced that he could see breakers. The sheer cliffs of Victoria's west coast came into view, and Captain Gibbs realised that the ship was much closer to them than expected. He ordered as much sail to be set as time would permit and then attempted to steer the vessel out to sea. On coming head on into the wind, the ship lost momentum, the sails fell limp and LOCH ARD's bow swung back. Gibbs then ordered the anchors to be released in an attempt to hold its position. The anchors sank some 50 fathoms - but did not hold. By this time LOCH ARD was among the breakers and the tall cliffs of Mutton Bird Island rose behind the ship. Just half a mile from the coast, the ship's bow was suddenly pulled around by the anchor. The captain tried to tack out to sea, but the ship struck a reef at the base of Mutton Bird Island, near Port Campbell. Waves broke over the ship and the top deck was loosened from the hull. The masts and rigging came crashing down knocking passengers and crew overboard. When a lifeboat was finally launched, it crashed into the side of LOCH ARD and capsized. Tom Pearce, who had launched the boat, managed to cling to its overturned hull and shelter beneath it. He drifted out to sea and then on the flood tide came into what is now known as LOCH ARD Gorge. He swam to shore, bruised and dazed, and found a cave in which to shelter. Some of the crew stayed below deck to shelter from the falling rigging but drowned when the ship slipped off the reef into deeper water. Eva Carmichael had raced onto deck to find out what was happening only to be confronted by towering cliffs looming above the stricken ship. In all the chaos, Captain Gibbs grabbed Eva and said, "If you are saved Eva, let my dear wife know that I died like a sailor". That was the last Eva Carmichael saw of the captain. She was swept off the ship by a huge wave. Eva saw Tom Pearce on a small rocky beach and yelled to attract his attention. He dived in and swam to the exhausted woman and dragged her to shore. He took her to the cave and broke open case of brandy which had washed up on the beach. He opened a bottle to revive the unconscious woman. A few hours later Tom scaled a cliff in search of help. He followed hoof prints and came by chance upon two men from nearby Glenample Station three and a half miles away. In a state of exhaustion, he told the men of the tragedy. Tom returned to the gorge while the two men rode back to the station to get help. By the time they reached LOCH ARD Gorge, it was cold and dark. The two shipwreck survivors were taken to Glenample Station to recover. Eva stayed at the station for six weeks before returning to Ireland, this time by steamship. In Melbourne, Tom Pearce received a hero's welcome. He was presented with the first gold medal of the Royal Humane Society of Victoria and a £1000 cheque from the Victorian Government. Concerts were performed to honour the young man's bravery and to raise money for those who lost family in the LOCH ARD disaster. Of the 54 crew members and passengers on board, only two survived: the apprentice, Tom Pearce and the young woman passenger, Eva Carmichael, who lost all of her family in the tragedy. Ten days after the LOCH ARD tragedy, salvage rights to the wreck were sold at auction for £2,120. Cargo valued at £3,000 was salvaged and placed on the beach, but most washed back into the sea when another storm developed. The wreck of LOCH ARD still lies at the base of Mutton Bird Island. Much of the cargo has now been salvaged and some was washed up into what is now known as LOCH ARD Gorge. Cargo and artefacts have also been illegally salvaged over many years before protective legislation was introduced. One of the most unlikely pieces of cargo to have survived the shipwreck was a Minton porcelain peacock - one of only seven in the world. The peacock was destined for the Melbourne International Exhibition in 1880. It had been well packed, which gave it adequate protection during the violent storm. Today, the Minton peacock can be seen at the Flagstaff Hill Maritime Museum in Warrnambool. From Australia's most dramatic shipwreck it has now become Australia's shipwreck artefact and is one of very few 'objects' on the Victorian State Heritage Register most valuable. The LOCH ARD shipwreck is of State significance – Victorian Heritage Register S 417. Flagstaff Hill’s collection of artefacts from LOCH ARD is significant for being one of the largest collections of artefacts from this shipwreck in Victoria. It is significant for its association with the shipwreck, which is on the Victorian Heritage Register (VHR S417). The collection is significant because of the relationship between the objects, as together they have a high potential to interpret the story of the LOCH ARD. The LOCH ARD collection is archaeologically significant as the remains of a large international passenger and cargo ship. The LOCH ARD collection is historically significant for representing aspects of Victoria’s shipping history and its potential to interpret sub-theme 1.5 of Victoria’s Framework of Historical Themes (living with natural processes). The collection is also historically significant for its association with the LOCH ARD, which was one of the worst and best known shipwrecks in Victoria’s history. Unrestored table spoon from the wreck of the LOCH ARD. The spoon design has a flattened fiddle-back handle, with a thin stem or shank, flared collar, and a shallow rounded bowl. The spoons metallic composition is a thin layer of brass alloy which has partially corroded back to a nickel-silver base metal. Approximately 65% of spoon surface area is covered by sediment and 10% bears some verdigris. No makers marks are visible.flagstaff hill maritime museum, shipwreck coast, great ocean road, loch line, loch ard, mutton bird island, loch ard gorge, electroplated cutlery, loch ard shipwreck, william page and co, birmingham brass plating, table spoons -
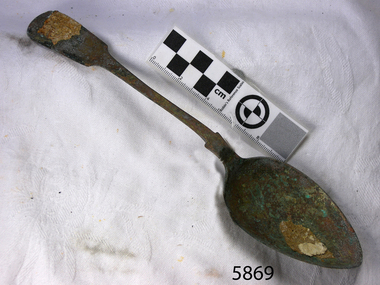 Flagstaff Hill Maritime Museum and Village
Domestic object - Spoon, circa 1878
This table spoon is from the wreck of the LOCH ARD, a Loch Line ship of 1,693 tons which sailed from Gravesend, London, on 2 March 1878 with 17 passengers and a crew of 36 under Captain George Gibbs. “The intention was to discharge cargo in Melbourne, before returning to London via the Horn with wool and wheat”. Instead, on 1 June 1878, after 90 days at sea, she struck the sandstone cliffs of Mutton Bird Island on the south west coast of Victoria, and sank with the loss of 52 lives and all her cargo. The manifest of the LOCH ARD listed an array of manufactured goods and bulk metals being exported to the Colony of Victoria, with a declared value of £53,700. (202 bills of lading show an actual invoice value of £68, 456, with insurance underwriting to £30,000 of all cargo). Included in the manifest is the item of “Tin hardware & cutlery £7,530”. This table spoon is one of 482 similar items of electro-plated cutlery from the LOCH ARD site, comprising spoons and forks of various sizes but all sharing the same general shape or design and metallic composition. 49 of these pieces display a legible makers’ mark — the initials “W” and “P” placed within a raised diamond outline, which is in turn contained within a sunken crown shape — identifying the manufacturer as William Page & Co of Birmingham. An electroplater’s makers’ marks, unlike sterling silver hallmarks, are not consistent identifiers of quality or date and place of manufacture. A similar line of five impressions was usually made to impress the consumer with an implication of industry standards, but what each one actually signified was not regulated and so they varied according to the whim of the individual foundry. In this case, the maker’s marks are often obscured by sedimentary accretion or removed by corrosion after a century of submersion in the ocean. However sufficient detail has survived to indicate that these samples of electro-plated cutlery probably originated from the same consignment in the LOCH ARD’s cargo. The generally common range of marks are drawn from 255 tea spoons, 125 dessert spoons, and 99 table forks. These marks are clearly visible in 66 instances, while the same sequence of general outlines, or depression shapes, is discernible in another 166 examples. Suggested trade names for William Page & Co’s particular blend of brass plating are ‘roman silver’ or ‘silverite’. This copper alloy polishes to a lustrous gold when new, discolouring to a murky grey with greenish hue when neglected. HISTORY OF THE LOCH ARD The LOCH ARD belonged to the famous Loch Line which sailed many ships from England to Australia. Built in Glasgow by Barclay, Curdle and Co. in 1873, the LOCH ARD was a three-masted square rigged iron sailing ship. The ship measured 262ft 7" (79.87m) in length, 38ft (11.58m) in width, 23ft (7m) in depth and had a gross tonnage of 1693 tons. The LOCH ARD's main mast measured a massive 150ft (45.7m) in height. LOCH ARD made three trips to Australia and one trip to Calcutta before its final voyage. LOCH ARD left England on March 2, 1878, under the command of Captain Gibbs, a newly married, 29 year old. She was bound for Melbourne with a crew of 37, plus 17 passengers and a load of cargo. The general cargo reflected the affluence of Melbourne at the time. On board were straw hats, umbrella, perfumes, clay pipes, pianos, clocks, confectionary, linen and candles, as well as a heavier load of railway irons, cement, lead and copper. There were items included that intended for display in the Melbourne International Exhibition in 1880. The voyage to Port Phillip was long but uneventful. At 3am on June 1, 1878, Captain Gibbs was expecting to see land and the passengers were becoming excited as they prepared to view their new homeland in the early morning. But LOCH ARD was running into a fog which greatly reduced visibility. Captain Gibbs was becoming anxious as there was no sign of land or the Cape Otway lighthouse. At 4am the fog lifted. A man aloft announced that he could see breakers. The sheer cliffs of Victoria's west coast came into view, and Captain Gibbs realised that the ship was much closer to them than expected. He ordered as much sail to be set as time would permit and then attempted to steer the vessel out to sea. On coming head on into the wind, the ship lost momentum, the sails fell limp and LOCH ARD's bow swung back. Gibbs then ordered the anchors to be released in an attempt to hold its position. The anchors sank some 50 fathoms - but did not hold. By this time LOCH ARD was among the breakers and the tall cliffs of Mutton Bird Island rose behind the ship. Just half a mile from the coast, the ship's bow was suddenly pulled around by the anchor. The captain tried to tack out to sea, but the ship struck a reef at the base of Mutton Bird Island, near Port Campbell. Waves broke over the ship and the top deck was loosened from the hull. The masts and rigging came crashing down knocking passengers and crew overboard. When a lifeboat was finally launched, it crashed into the side of LOCH ARD and capsized. Tom Pearce, who had launched the boat, managed to cling to its overturned hull and shelter beneath it. He drifted out to sea and then on the flood tide came into what is now known as LOCH ARD Gorge. He swam to shore, bruised and dazed, and found a cave in which to shelter. Some of the crew stayed below deck to shelter from the falling rigging but drowned when the ship slipped off the reef into deeper water. Eva Carmichael had raced onto deck to find out what was happening only to be confronted by towering cliffs looming above the stricken ship. In all the chaos, Captain Gibbs grabbed Eva and said, "If you are saved Eva, let my dear wife know that I died like a sailor". That was the last Eva Carmichael saw of the captain. She was swept off the ship by a huge wave. Eva saw Tom Pearce on a small rocky beach and yelled to attract his attention. He dived in and swam to the exhausted woman and dragged her to shore. He took her to the cave and broke open case of brandy which had washed up on the beach. He opened a bottle to revive the unconscious woman. A few hours later Tom scaled a cliff in search of help. He followed hoof prints and came by chance upon two men from nearby Glenample Station three and a half miles away. In a state of exhaustion, he told the men of the tragedy. Tom returned to the gorge while the two men rode back to the station to get help. By the time they reached LOCH ARD Gorge, it was cold and dark. The two shipwreck survivors were taken to Glenample Station to recover. Eva stayed at the station for six weeks before returning to Ireland, this time by steamship. In Melbourne, Tom Pearce received a hero's welcome. He was presented with the first gold medal of the Royal Humane Society of Victoria and a £1000 cheque from the Victorian Government. Concerts were performed to honour the young man's bravery and to raise money for those who lost family in the LOCH ARD disaster. Of the 54 crew members and passengers on board, only two survived: the apprentice, Tom Pearce and the young woman passenger, Eva Carmichael, who lost all of her family in the tragedy. Ten days after the LOCH ARD tragedy, salvage rights to the wreck were sold at auction for £2,120. Cargo valued at £3,000 was salvaged and placed on the beach, but most washed back into the sea when another storm developed. The wreck of LOCH ARD still lies at the base of Mutton Bird Island. Much of the cargo has now been salvaged and some was washed up into what is now known as LOCH ARD Gorge. Cargo and artefacts have also been illegally salvaged over many years before protective legislation was introduced. One of the most unlikely pieces of cargo to have survived the shipwreck was a Minton porcelain peacock - one of only seven in the world. The peacock was destined for the Melbourne International Exhibition in 1880. It had been well packed, which gave it adequate protection during the violent storm. Today, the Minton peacock can be seen at the Flagstaff Hill Maritime Museum in Warrnambool. From Australia's most dramatic shipwreck it has now become Australia's shipwreck artefact and is one of very few 'objects' on the Victorian State Heritage Register most valuable. The LOCH ARD shipwreck is of State significance – Victorian Heritage Register S 417. Flagstaff Hill’s collection of artefacts from LOCH ARD is significant for being one of the largest collections of artefacts from this shipwreck in Victoria. It is significant for its association with the shipwreck, which is on the Victorian Heritage Register (VHR S417). The collection is significant because of the relationship between the objects, as together they have a high potential to interpret the story of the LOCH ARD. The LOCH ARD collection is archaeologically significant as the remains of a large international passenger and cargo ship. The LOCH ARD collection is historically significant for representing aspects of Victoria’s shipping history and its potential to interpret sub-theme 1.5 of Victoria’s Framework of Historical Themes (living with natural processes). The collection is also historically significant for its association with the LOCH ARD, which was one of the worst and best known shipwrecks in Victoria’s history. Unrestored table spoon from the wreck of the LOCH ARD. The spoon design has a flattened fiddle-back handle, with a thin stem or shank, flared collar, and a shallow rounded bowl. The spoons metallic composition is a thin layer of brass alloy which has partially corroded back to a nickel-silver base metal. 15% verdigris and 10% encrustation on front of handle. Spoon is bent. William Page & Co makers mark in Crown shape is clear. Outlines of four others are visible although details are obscure - Ellipse, Rounded square, Circle, Diamond.flagstaff hill maritime museum, shipwreck coast, great ocean road, loch line, loch ard, mutton bird island, loch ard gorge, electroplated cutlery, loch ard shipwreck, william page and co, birmingham brass plating, table spoons -
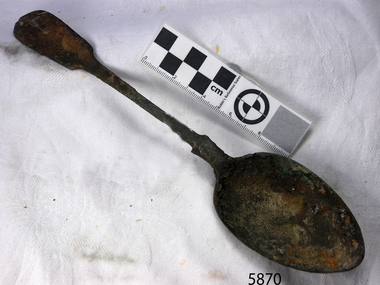 Flagstaff Hill Maritime Museum and Village
Domestic object - Spoon, circa 1878
This table spoon is from the wreck of the LOCH ARD, a Loch Line ship of 1,693 tons which sailed from Gravesend, London, on 2 March 1878 with 17 passengers and a crew of 36 under Captain George Gibbs. “The intention was to discharge cargo in Melbourne, before returning to London via the Horn with wool and wheat”. Instead, on 1 June 1878, after 90 days at sea, she struck the sandstone cliffs of Mutton Bird Island on the south west coast of Victoria, and sank with the loss of 52 lives and all her cargo. The manifest of the LOCH ARD listed an array of manufactured goods and bulk metals being exported to the Colony of Victoria, with a declared value of £53,700. (202 bills of lading show an actual invoice value of £68, 456, with insurance underwriting to £30,000 of all cargo). Included in the manifest is the item of “Tin hardware & cutlery £7,530”. This table spoon is one of 482 similar items of electro-plated cutlery from the LOCH ARD site, comprising spoons and forks of various sizes but all sharing the same general shape or design and metallic composition. 49 of these pieces display a legible makers’ mark — the initials “W” and “P” placed within a raised diamond outline, which is in turn contained within a sunken crown shape — identifying the manufacturer as William Page & Co of Birmingham. An electroplater’s makers’ marks, unlike sterling silver hallmarks, are not consistent identifiers of quality or date and place of manufacture. A similar line of five impressions was usually made to impress the consumer with an implication of industry standards, but what each one actually signified was not regulated and so they varied according to the whim of the individual foundry. In this case, the maker’s marks are often obscured by sedimentary accretion or removed by corrosion after a century of submersion in the ocean. However sufficient detail has survived to indicate that these samples of electro-plated cutlery probably originated from the same consignment in the LOCH ARD’s cargo. The generally common range of marks are drawn from 255 tea spoons, 125 dessert spoons, and 99 table forks. These marks are clearly visible in 66 instances, while the same sequence of general outlines, or depression shapes, is discernible in another 166 examples. Suggested trade names for William Page & Co’s particular blend of brass plating are ‘roman silver’ or ‘silverite’. This copper alloy polishes to a lustrous gold when new, discolouring to a murky grey with greenish hue when neglected. HISTORY OF THE LOCH ARD The LOCH ARD belonged to the famous Loch Line which sailed many ships from England to Australia. Built in Glasgow by Barclay, Curdle and Co. in 1873, the LOCH ARD was a three-masted square rigged iron sailing ship. The ship measured 262ft 7" (79.87m) in length, 38ft (11.58m) in width, 23ft (7m) in depth and had a gross tonnage of 1693 tons. The LOCH ARD's main mast measured a massive 150ft (45.7m) in height. LOCH ARD made three trips to Australia and one trip to Calcutta before its final voyage. LOCH ARD left England on March 2, 1878, under the command of Captain Gibbs, a newly married, 29 year old. She was bound for Melbourne with a crew of 37, plus 17 passengers and a load of cargo. The general cargo reflected the affluence of Melbourne at the time. On board were straw hats, umbrella, perfumes, clay pipes, pianos, clocks, confectionary, linen and candles, as well as a heavier load of railway irons, cement, lead and copper. There were items included that intended for display in the Melbourne International Exhibition in 1880. The voyage to Port Phillip was long but uneventful. At 3am on June 1, 1878, Captain Gibbs was expecting to see land and the passengers were becoming excited as they prepared to view their new homeland in the early morning. But LOCH ARD was running into a fog which greatly reduced visibility. Captain Gibbs was becoming anxious as there was no sign of land or the Cape Otway lighthouse. At 4am the fog lifted. A man aloft announced that he could see breakers. The sheer cliffs of Victoria's west coast came into view, and Captain Gibbs realised that the ship was much closer to them than expected. He ordered as much sail to be set as time would permit and then attempted to steer the vessel out to sea. On coming head on into the wind, the ship lost momentum, the sails fell limp and LOCH ARD's bow swung back. Gibbs then ordered the anchors to be released in an attempt to hold its position. The anchors sank some 50 fathoms - but did not hold. By this time LOCH ARD was among the breakers and the tall cliffs of Mutton Bird Island rose behind the ship. Just half a mile from the coast, the ship's bow was suddenly pulled around by the anchor. The captain tried to tack out to sea, but the ship struck a reef at the base of Mutton Bird Island, near Port Campbell. Waves broke over the ship and the top deck was loosened from the hull. The masts and rigging came crashing down knocking passengers and crew overboard. When a lifeboat was finally launched, it crashed into the side of LOCH ARD and capsized. Tom Pearce, who had launched the boat, managed to cling to its overturned hull and shelter beneath it. He drifted out to sea and then on the flood tide came into what is now known as LOCH ARD Gorge. He swam to shore, bruised and dazed, and found a cave in which to shelter. Some of the crew stayed below deck to shelter from the falling rigging but drowned when the ship slipped off the reef into deeper water. Eva Carmichael had raced onto deck to find out what was happening only to be confronted by towering cliffs looming above the stricken ship. In all the chaos, Captain Gibbs grabbed Eva and said, "If you are saved Eva, let my dear wife know that I died like a sailor". That was the last Eva Carmichael saw of the captain. She was swept off the ship by a huge wave. Eva saw Tom Pearce on a small rocky beach and yelled to attract his attention. He dived in and swam to the exhausted woman and dragged her to shore. He took her to the cave and broke open case of brandy which had washed up on the beach. He opened a bottle to revive the unconscious woman. A few hours later Tom scaled a cliff in search of help. He followed hoof prints and came by chance upon two men from nearby Glenample Station three and a half miles away. In a state of exhaustion, he told the men of the tragedy. Tom returned to the gorge while the two men rode back to the station to get help. By the time they reached LOCH ARD Gorge, it was cold and dark. The two shipwreck survivors were taken to Glenample Station to recover. Eva stayed at the station for six weeks before returning to Ireland, this time by steamship. In Melbourne, Tom Pearce received a hero's welcome. He was presented with the first gold medal of the Royal Humane Society of Victoria and a £1000 cheque from the Victorian Government. Concerts were performed to honour the young man's bravery and to raise money for those who lost family in the LOCH ARD disaster. Of the 54 crew members and passengers on board, only two survived: the apprentice, Tom Pearce and the young woman passenger, Eva Carmichael, who lost all of her family in the tragedy. Ten days after the LOCH ARD tragedy, salvage rights to the wreck were sold at auction for £2,120. Cargo valued at £3,000 was salvaged and placed on the beach, but most washed back into the sea when another storm developed. The wreck of LOCH ARD still lies at the base of Mutton Bird Island. Much of the cargo has now been salvaged and some was washed up into what is now known as LOCH ARD Gorge. Cargo and artefacts have also been illegally salvaged over many years before protective legislation was introduced. One of the most unlikely pieces of cargo to have survived the shipwreck was a Minton porcelain peacock - one of only seven in the world. The peacock was destined for the Melbourne International Exhibition in 1880. It had been well packed, which gave it adequate protection during the violent storm. Today, the Minton peacock can be seen at the Flagstaff Hill Maritime Museum in Warrnambool. From Australia's most dramatic shipwreck it has now become Australia's shipwreck The LOCH ARD shipwreck is of State significance – Victorian Heritage Register S 417 Flagstaff Hill’s collection of artefacts from LOCH ARD is significant for being one of the largest collections of artefacts from this shipwreck in Victoria. It is significant for its association with the shipwreck, which is on the Victorian Heritage Register (VHR S417). The collection is significant because of the relationship between the objects, as together they have a high potential to interpret the story of the LOCH ARD. The LOCH ARD collection is archaeologically significant as the remains of a large international passenger and cargo ship. The LOCH ARD collection is historically significant for representing aspects of Victoria’s shipping history and its potential to interpret sub-theme 1.5 of Victoria’s Framework of Historical Themes (living with natural processes). The collection is also historically significant for its association with the LOCH ARD, which was one of the worst and best known shipwrecks in Victoria’s history. Unrestored table spoon from the wreck of the LOCH ARD. The spoon design has a flattened fiddle-back handle, with a thin stem or shank, flared collar, and a shallow rounded bowl. The spoons metallic composition is a thin layer of brass alloy which has partially corroded back to a nickel-silver base metal. Some verdigris and red-stained concretion on front and back of spoon. Only 5% of original plate remains, with balance covered in dark green silver-oxide.flagstaff hill maritime museum, shipwreck coast, great ocean road, loch line, loch ard, mutton bird island, loch ard gorge, electroplated cutlery, loch ard shipwreck, william page and co, birmingham brass plating, table spoons