Showing 2440 items
matching goldfields north
-
 Ballarat Tramway Museum
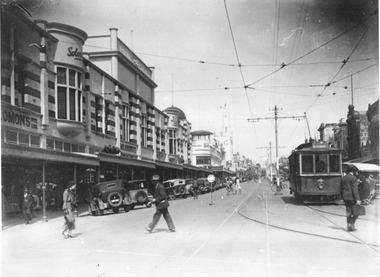
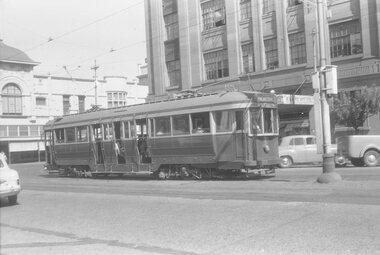
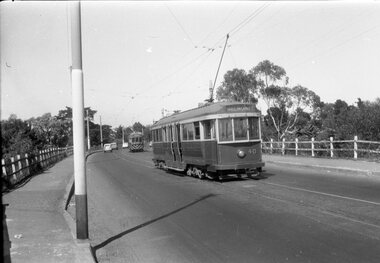
Photograph - Geelong 4 - Moorabool St, late 1930s
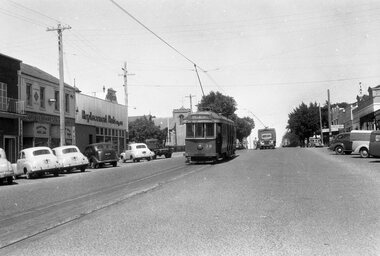
The photo taken at the corner of Moorabool and Malop Streets is looking south along Moorabool St. Shows Geelong tram 4 with the destination of North, about to turn into Malop St with several passengers boarding the tram. In the background is a safety zone sign, the Solomons store, the T&G building, and many angle-parked motor cars. The T&G building is finished. The bar traffic lights don’t appear to be at the Moorabool and Ryrie St corner yet so the photo was taken between 1934 and 1939Yields information about Geelong late 1930s and tramway operations.Black and white photograph - plain back.geelong, moorabool st, malop st, tramways, tram 4, safety zone -
 Ballarat Tramway Museum
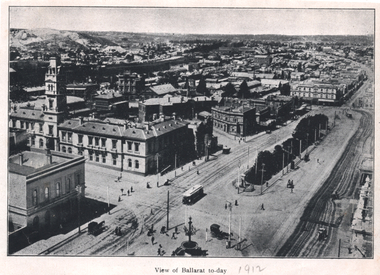
Photograph - Illustration, "View of Ballarat today", c1910
Illustration or photograph taken from the Town Hall, looking North East towards Black Hill. The Post Office, railway yards, Sturt St buildings are in view. Has a tram eastbound at Lydiard St and another waiting to depart Grenville St. There are two horse-drawn cabs in the view. The road surfaces have marks - either from being watered or graded. On the rear is a photograph of R O Henderson's New Furniture warehouse, View Point Bendigo. Yields information of Ballarat c1910.Black and white Illustration cut from a journal"1912" in pencil alongside the image title.tramways, trams, sturt st, esco, grenville st, bridge st, lydiard st north, black hill, post office -
 Ballarat Tramway Museum
Pamphlet, City of Ballarat, "Wetlands in Ballarat", early 1990s
The pamphlet provides information about the wetland areas in the Ballarat district, in particular the ones in the North Gardens Reserve and Lake Wendouree. Provides information on the importance of the Wetlands, locations and a map. As well, provides contact details for the Department of Conservation and Natural Resources and the City of Ballaarat. Based on the spelling of the City of Ballaarat pamphlet early 1990s.Yields information about the Ballarat's wetlands within in which the tramway museum operates.Pamphlet - 4 fold DL printed in red and green ink.city of ballarat, wetlands, lake wendouree, conservation -
 Ballarat Tramway Museum
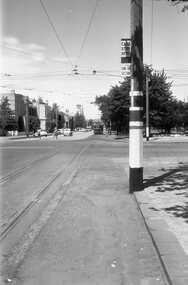
Negative - Corner Drummond and Sturt Street tram stop, mid 1950s
Photo shows the inbound tram stop pole on the North west corner of Sturt and Drummond Streets Ballarat. Note the vertical "End Section" sign along with usual "End of Section" and "Cars stop here" sign at this compulsory tram stop. Another stop can be see on the other side of Drummond St along with No. 14 on its way to the City. Photographer unknown.Yields information about the tram stop at the corner of Sturt and Drummond St and signage.Black and white Negative - 120 sizetram stops, tramways, sturt st, drummond st, end of section sign, tram stop, sign -
 Ballarat Tramway Museum
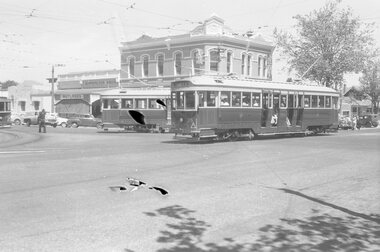
Negative - Hospital corner - Drummond and Sturt Streets, 1950s
The photo shows three trams at Hospital Corner, during the mid to late1950s. Tram 35 turns from Drummond Street South on its way to Lydiard St North. Another bogie tram is turning into Drummond St South while No. 25 waits at the tram stop. A conductor can be seen walking forward with a point bar. In the background is the sign for Rimmiington Bros Butchers and the Southern Cross Hotel. The negative has been damaged - photographer unknown.Yields information about the tram operations at Hospital Corner Ballarat.Black and white Negative - 120 sizetram stops, tramways, sturt st, drummond st, tram 25, tram 35, conductor -
 Ballarat Tramway Museum
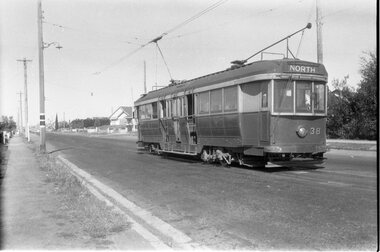
Negative - Geelong Belmont terminus tram 38, early 1956
Photo shows Geelong No. 38 at the Belmont terminus, High Street with the return destination of North. Note the compulsory tram stop on the left-hand pole. One of a set of photos was taken between 15/2/1956 and 3/3/1956 when services operated only between Belmont and North before the final closure of the Belmont route on 25/31956 and that bogie tram 31 is not shown on the board, having gone to Ballarat on 15/2/1956 - see item 5554. See item 8213 for an article on the Geelong system by Keith Kings. Yields information about the Belmont tram terminus prior to closure.Black and white Negative - 120 sizetram stops, tramways, high st, geelong, tram 38, belmont -
 Ballarat Tramway Museum
Negative - Geelong tram inbound Mercer Street, early 1956
Photo shows a Geelong tram inbound in Mercer Street, near The Esplanade. Tram has the destination of Belmont. Based on the running board at item 8267, most likely No. 33. One of a set of photos was taken between 15/2/1956 and 3/3/1956 when services operated only between Belmont and North before the final closure of the Belmont route on 25/31956 and that bogie tram 31 is not shown on the board, having gone to Ballarat on 15/2/1956 - see item 5554. See item 8213 for an article on the Geelong system by Keith Kings. Yields information about tramway operations prior to closure of the Geelong system.Black and white Negative - 120 sizetram stops, tramways, geelong, mercer st, tram 33 -
 Ballarat Tramway Museum
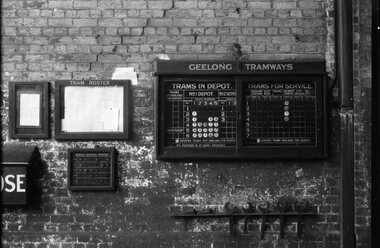
Negative - Tramcar allocation board - Geelong, early 1956
Photo shows the Tramcar allocation board - in the Geelong depot. Shows the four bogie cars in operation or available on the day the photograph was taken. Shows that some of the Meadowbank-built trams and bogie trams had already left the depot. One of a set of photos was taken between 15/2/1956 and 3/3/1956 when services operated only between Belmont and North before the final closure of the Belmont route on 25/31956 and that bogie tram 31 is not shown on the board, having gone to Ballarat on 15/2/1956 - see item 5554. See item 8213 for an article on the Geelong system by Keith Kings. Yields information about the Geelong depot allocation board that showed the location and use of the tramcars on the day.Black and white Negative - 120 sizetramways, geelong, depot, depot allocation, tramcar allocation -
 Ballarat Tramway Museum
Negative - Geelong 38 and welding truck - Moorabool St, early 1956
Photo shows Geelong 38 south bound to Belmont and welding truck - Moorabool St between Myers and McKillop Streets. The welding with the power supply from the overhead would most likely be repairing a broken joint. One of a set of photos was taken between 15/2/1956 and 3/3/1956 when services operated only between Belmont and North before the final closure of the Belmont route on 25/31956 and that bogie tram 31 is not shown on the board, having gone to Ballarat on 15/2/1956 - see item 5554. See item 8213 for an article on the Geelong system by Keith Kings. Yields information about the Geelong operations toward the closure of the tram system.Black and white Negative - 120 sizetramways, geelong, tram 38, moorabool st, welding truck, track repairs -
 Ballarat Tramway Museum
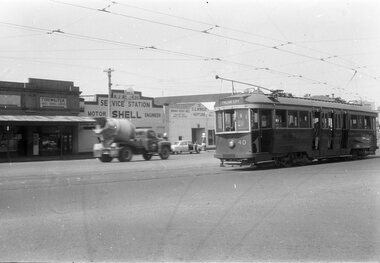
Negative - Tram 40 - Moorabool & Malop Streets, early 1956
Photo shows Geelong 40 on its way to North Geelong, turning from Moorabool St into Malop St. In the background are now the National Mutual and Market Square buildings. One of a set of photos was taken between 15/2/1956 and 3/3/1956 when services operated only between Belmont and North before the final closure of the Belmont route on 25/31956 and that bogie tram 31 is not shown on the board, having gone to Ballarat on 15/2/1956 - see item 5554. See item 8213 for an article on the Geelong system by Keith Kings. Yields information about the Geelong operations toward the closure of the tram system.Black and white Negative - 120 sizetramways, geelong, moorabool st, malop st, tram 40 -
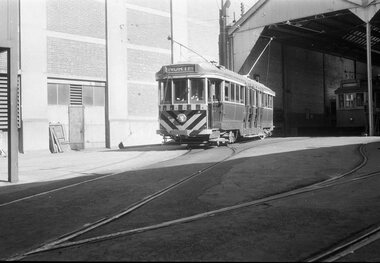 Ballarat Tramway Museum
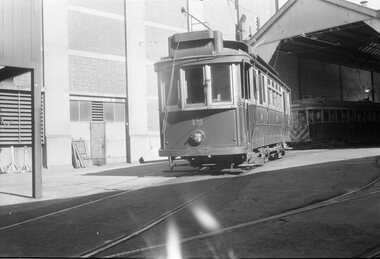
Negative - Tram 33 Geelong depot, early 1956
Photo shows Geelong 33 on No. 5 road at Geelong depot being driven out with the destination set to North. One of a set of photos was taken between 15/2/1956 and 3/3/1956 when services operated only between Belmont and North before the final closure of the Belmont route on 25/31956 and that bogie tram 31 is not shown on the board, having gone to Ballarat on 15/2/1956 - see item 5554. See item 8213 for an article on the Geelong system by Keith Kings. Yields information about the Geelong operations toward the closure of the tram system.Black and white Negative - 120 sizetramways, geelong, geelong depot, tram 33 -
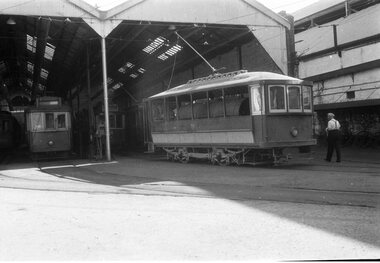 Ballarat Tramway Museum
Negative - Geelong scrubber at depot, early 1956
The photo shows the Geelong scrubber on the front of No. 2 road with No. 16 behind and No. 19 alongside. One of a set of photos was taken between 15/2/1956 and 3/3/1956 when services operated only between Belmont and North before the final closure of the Belmont route on 25/31956 and that bogie tram 31 is not shown on the board, having gone to Ballarat on 15/2/1956 - see item 5554. See item 8213 for an article on the Geelong system by Keith Kings. Yields information about the Geelong operations toward the closure of the tram system and in particular the Geelong scrubber or track cleaning tram.Black and white Negative - 120 sizetramways, geelong, geelong depot, scrubber, geelong 16, geelong 19 -
 Ballarat Tramway Museum
Negative - Tram 40 at the North terminus, early 1956
Photo shows Geelong tram 40 at the North Terminus, with the Pilkington glass factory behind. The tram has the destination of Belmont. One of a set of photos was taken between 15/2/1956 and 3/3/1956 when services operated only between Belmont and North before the final closure of the Belmont route on 25/31956 and that bogie tram 31 is not shown on the board, having gone to Ballarat on 15/2/1956 - see item 5554. See item 8213 for an article on the Geelong system by Keith Kings. Yields information about the Geelong operations toward the closure of the tram system and the North terminus.Black and white Negative - 120 sizetramways, geelong, geelong depot, tram 40, north -
 Ballarat Tramway Museum
Negative - Tram 40 - Mercer St, city end, early 1956
Photo shows Geelong tram 40 Mercer St, city end. The tram has the destination of North. In the background is a typewriter shop, R J Reynolds? Shell service station and S G Winkler Service station with a Neptune sign. The driver has his hand on the air brake and the controller with the front driver's window open. One of a set of photos was taken between 15/2/1956 and 3/3/1956 when services operated only between Belmont and North before the final closure of the Belmont route on 25/31956 and that bogie tram 31 is not shown on the board, having gone to Ballarat on 15/2/1956 - see item 5554. See item 8213 for an article on the Geelong system by Keith Kings. Yields information about the Geelong operations toward the closure of the tram system.Black and white Negative - 120 sizetramways, geelong, tram 40, north, mercer st -
 Ballarat Tramway Museum
Negative - Tram 19 at Geelong Depot, early 1956
Photo shows Tram 19 at Geelong Depot One of a set of photos was taken between 15/2/1956 and 3/3/1956 when services operated only between Belmont and North before the final closure of the Belmont route on 25/31956 and that bogie tram 31 is not shown on the board, having gone to Ballarat on 15/2/1956 - see item 5554. See item 8213 for an article on the Geelong system by Keith Kings. Yields information about the Geelong operations toward the closure of the tram system.Black and white Negative - 120 sizetramways, geelong, geelong depot, tram 19 -
 Ballarat Tramway Museum
Negative - Tram 38 Mercer Street, early 1956
Photo shows Tram 38 Mercer Street, near The Esplanade with the destination of Belmont. One of a set of photos was taken between 15/2/1956 and 3/3/1956 when services operated only between Belmont and North before the final closure of the Belmont route on 25/31956 and that bogie tram 31 is not shown on the board, having gone to Ballarat on 15/2/1956 - see item 5554. See item 8213 for an article on the Geelong system by Keith Kings. Yields information about the Geelong operations toward the closure of the tram system.Black and white Negative - 120 sizetramways, geelong, tram 38, mercer st -
 Ballarat Tramway Museum
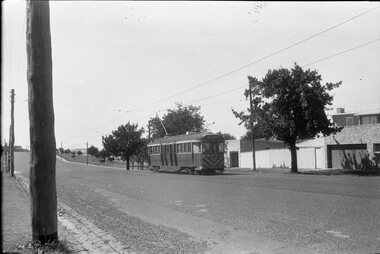
Negative - Moorabool St, looking south at the Kardinia Park loop, early 1956
Photo shows Moorabool St, looking south at the Kardinia Park loop. One of a set of photos was taken between 15/2/1956 and 3/3/1956 when services operated only between Belmont and North before the final closure of the Belmont route on 25/31956 and that bogie tram 31 is not shown on the board, having gone to Ballarat on 15/2/1956 - see item 5554. See item 8213 for an article on the Geelong system by Keith Kings. Yields information about the Geelong tram system.Black and white Negative - 120 sizetramways, geelong, moorabool st, kardinia park loop -
 Ballarat Tramway Museum
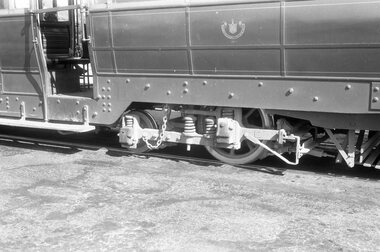
Negative - Brill 22E bogie or truck - Geelong tramcar, early 1956
Photo shows Brill 22E Maximum Traction bogie or truck - Geelong tramcar, has the SEC logo on the side of the tramcar in the view. One of a set of photos was taken between 15/2/1956 and 3/3/1956 when services operated only between Belmont and North before the final closure of the Belmont route on 25/31956 and that bogie tram 31 is not shown on the board, having gone to Ballarat on 15/2/1956 - see item 5554. See item 8213 for an article on the Geelong system by Keith Kings. Yields information about the Geelong bogie trams.Black and white Negative - 120 sizetramways, geelong, brill 22e, maximum traction, bogie trams -
 Ballarat Tramway Museum
Negative - Geelong trams 33 & 40 Barwon Bridge, early 1956
Photo shows Geelong trams 33 & 40 in Moorabool St just south of the Barwon Bridge on the long crossing loop. Based on the running board at item 8267, most likely tram No. 33. One of a set of photos was taken between 15/2/1956 and 3/3/1956 when services operated only between Belmont and North before the final closure of the Belmont route on 25/31956 and that bogie tram 31 is not shown on the board, having gone to Ballarat on 15/2/1956 - see item 5554. See item 8213 for an article on the Geelong system by Keith Kings. Yields information about the Geelong operations toward the closure of the tram system.Black and white Negative - 120 sizetramways, geelong, moorabool st, tram 33, tram 40, barwon river -
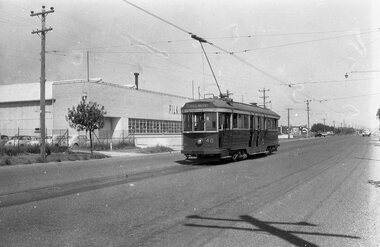
 Ballarat Tramway Museum
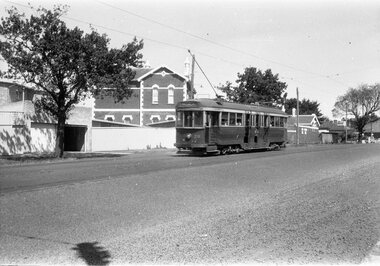
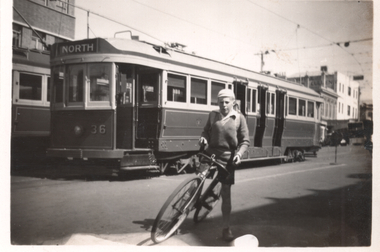
Photograph - Geelong tram 36 Moorabool St, c1948
Photo shows Geelong bogie tram No. 36 in Moorabool St with the destination of North. Another bogie tram is behind No. 36. No 36 was purchased by the SEC in 1948 from the MMTB. Based on three other photos by "CF" - c1948. The photographer has been "photobombed" by a boy on a bike.Yields information about the Geelong tram 36Black and white photograph, plain back.Has the initials "CF" in pencil on the rear. tramways, trams, geelong, railway station, tram 36 -
 Ballarat Tramway Museum
Postcard, Valentine & Sons Publishing Co, "Moorabool Street Geelong", c1950
Postcard produced by the Valentine publishing company of Moorabool St looking north. In the view is tram No. 10 and another tram picking up passengers at a safety zone at the corner of Malop St. In the view are Solomons, Bon Accord cafe, and Hoopers stores. The rear of the card notes it is a genuine photograph. Photo c1950.Yields information about the view of Moorabool St at Malop St c1950.Black and white Postcard undivided back, unused. Card No. V23.tramways, trams, geelong, moorabool st, malop st, tram 10 -
 Ballarat Tramway Museum
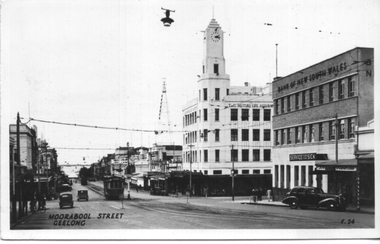
Postcard, Valentine & Sons Publishing Co, "Moorabool Street Geelong", c1950
Postcard produced by the Valentine publishing company of Moorabool St looking north and the corner of Ryrie St. In the view is tram No. 17 and another tram further north. Note the safety zone sign. In the view is the T&G building, the Bank of NSW, with a sign "Service for the Sick". The rear of the card notes it is a genuine photograph. Photo c1950.Yields information about the view of Moorabool St at Ryrie St c1950.Black and white Postcard undivided back, unused. Card No. V24.tramways, trams, geelong, moorabool st, tram 17 -
 Ballarat Tramway Museum
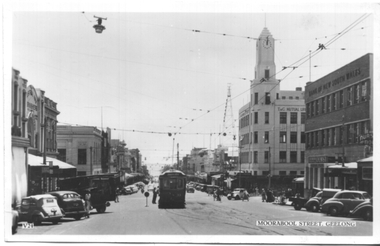
Postcard, Valentine & Sons Publishing Co, "Moorabool Street Geelong", early 1950s
Postcard produced by the Valentine publishing company of Moorabool St looking north at the corner of Ryrie St. Tram No. 33 is picking up passengers at the safety zone at the intersection with Ryrie St where the front of another bogie tram can be seen. In the view are the T&G building, the Bank of NSW which has a chemist shop, and the Savoia cafe. The rear of the card notes it is a genuine photograph. The card number V24 is the same number used in item 9064, but a later version, the early 1950s. The note on the rear of the card gives details of Ken's Victorian trip during Jan 1954.Yields information about the view of Moorabool St at Ryrie St early 1950s.Black and white Postcard undivided back, unused. Card No. V24.Has a note written to Ken Magor from Ken Winney? dated 14-1-1954 - see image 2tramways, trams, geelong, moorabool st, tram 33 -
 The Beechworth Burke Museum
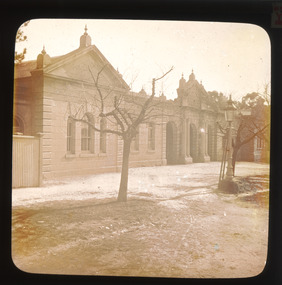
Photograph - Lantern Slide, c1900
This lantern slide shows the Ovens District Hospital (also called the Ovens Goldfields Hospital) in Beechworth in approximately 1900. The Hospital was built as part of a community push to develop the infrastructure needed for a permanent town in the 1850s. At the time there was no hospital located between Melbourne and the NSW town of Goulburn and it was recognised that the nature of mining and agricultural work predisposed people to serious injury. The community voted in 1853 to raise funds for a hospital and a voluntary committee elected from people who contributed £2 or more annually determined the organisation's management policies, which aimed to provide care for poor people at rates levied according to the person's means. Ongoing operations of the hospital were primarily supported by Government grants, however. The foundation stone was laid at a site in Church Street at a ceremony held 1st September 1856 which was attended by 2000 people using a locally crafted trowel with a tin ore handle and pure gold blade. The hospital, which was designed by J.H. Dobbyn, cost £2347. The hospital had two wards, a dispensary, apartments for a resident surgeon and the matron, an operating theatre and a board room. Further medical facilities including services to meet the cultural and health needs of the local Chinese community were later added, in addition to a Palladian-style cut-granite face built in 1862-63. It functioned as the region's primary hospital until surpassed by the Wangaratta Hospital in 1910. In the 1940s much of the building materials were salvaged and repurposed, with the exception of the facade which was restored in 1963 by the Beechworth Lions Club and still stands today. The facade featured on the covers of local history volume 'Beechworth: a Titan's Field' by Carole Woods and heritage-focused travel guide the 'Readers Digest Book of Historic Australian Towns'. Lantern slides, sometimes called 'magic lantern' slides, are glass plates on which an image has been secured for the purpose of projection. Glass slides were etched or hand-painted for this purpose from the Eighteenth Century but the process became more popular and accessible to the public with the development of photographic-emulsion slides used with a 'Magic Lantern' device in the mid-Nineteenth Century. Photographic lantern slides comprise a double-negative emulsion layer (forming a positive image) between thin glass plates that are bound together. A number of processes existed to form and bind the emulsion layer to the base plate, including the albumen, wet plate collodion, gelatine dry plate and woodburytype techniques. Lantern slides and magic lantern technologies are seen as foundational precursors to the development of modern photography and film-making techniques.This glass slide is significant because it provides insight into Beechworth's built environment and infrastructure in the early Twentieth Century, around the time of Australia's Federation. It is also an example of an early photographic and film-making technology in use in regional Victoria in the time period.Thin translucent sheet of glass with a round-edged square image printed on the front and framed in a black backing. It is held together by metal strips to secure the edges of the slide.Obverse: Y /burke museum, beechworth, lantern slide, slide, glass slide, plate, burke museum collection, photograph, monochrome, ovens district hospital, indigo shire, north-east victoria, hospital, palladian architecture, granite, community fundraising, community infrastructure, j.h. dobbyn, beechworth lions club, ovens goldfields hospital, chinese community -
 Clunes Museum
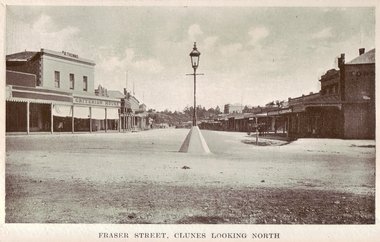
Photograph
.1 ORIGINAL BLACK AND WHITE PHOTOGRAPH POSTCARD OF FRASER STREET, CLUNES. LOOKING NORTH, GAS LIGHT IN CENTRE OF STREET. INCLUDES, CRITERION HOUSE, R THOMAS .2 .3 BLACK AND WHITE COPIES OF THE ABOVE PHOTOGRAPH ON GLOSS PHOTOGRAPHIC PAPER .4 BLACK AND WHITE COPY OF THE ABOVE PHOTOGRAPH ON MATTE PHOTOGRAPHIC PAPERFRASER STREET CLUNES. LOOKING NORTH local history, document, postcard, shops- r.thomas criterion house., clunes township -
 Clunes Museum
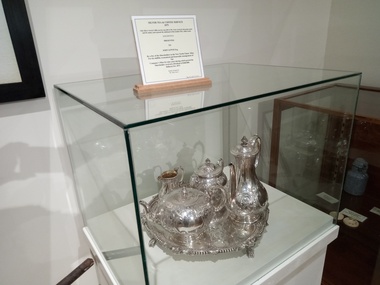
domestic object - SILVER TEA & COFFEE SERVICE, 1876
PRESENTED TO JOHN LEWIS ESQ. BY A FEW OF THE SHAREHOLDERS IN THE NEW NORTH CLUNES QUARTZ MINING CO. IN RECOGNITION OF HIS SKILFUL, ECONOMICAL AND HONOURABLE MANAGEMENT OF THE COMPANY MINE FOR NINE YEARS, DURING WHICH PERIOD THE SHAREHOLDERS RECEIVED IN DIVIDENDS Pounds 450,000 BALLARAT OCTOBER 1876ORNATE SILVER TEA & COFFEE SERVICE COMPRISING; .1 TEAPOT .2 COFFEE POT .3 SUGAR BOWL .4 CREAM JUG .5 CIRCULAR TRAYINSCRIPTION ON TRAY: Presented to John Lewis Esq. By a few of the shareholders in the New North Clunes Quartz Mining Co. In recognition of his skilful economical and honourable management of the Company mine for nine years during which period the shareholders received in dividends 460,000 Pounds Ballarat October 1876local history, metalcraft, silverware, mining, lewis, john -
 Clunes Museum
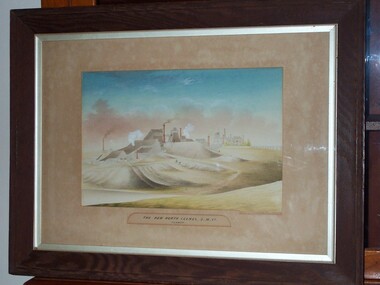
Painting - WATERCOLOUR, WILLIAM TIBBITS, C1870
IT IS ON PERMAMENT LOAN FROM HEPBURN SHIRE, PAINTING BY WILLIAM TIBBITS, CIRCA 1870. HE WAS A WELL KNOWN FIGURE TO BE SEEN RIDING HIS BICYCLE FROM GOLD FIELD TO ANOTHER WHERE HE PAINTED MANY OF HIS FAMOUS PAINTINFS.WATERCOLOUR PAINTING OF NEW NORTH CLUNES MINE. ARTIST WILLIAM TIBBITS - FRAMEDTHE NEW NORTH CLUNES, Q.M.C. CLUNES. DRAWN BY W. TIBBITS 22 NEIL ST. BALLARAT.local history, illustration, watercolour, hepburn shire -
 Clunes Museum
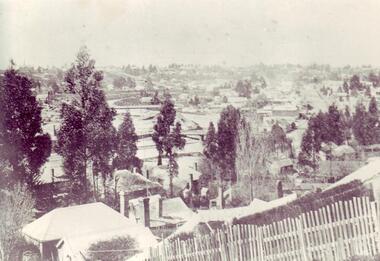
Photograph, 1880
.1 BLACK AND WHITE PHOTOGRAPH OF PART OF CLUNES 1880 .2 LETTER IDENTIFYING FEATURES, BY LENA WATTLEWORTH - NEE WEICKHARDT (IN SUPP FILE F8).1 A PHOTO OF CLUNES FROM NORTH END OF CAMP PARADE 1880 .2 LETTER (SUPP. FILE) IDENTIFYING FEATURES AND BUILDINGSCLUNES 1880 - TAKEN FROM NORTH END OF CAMP PARADElocal history, photography, photographs, weickhardt -
 Clunes Museum
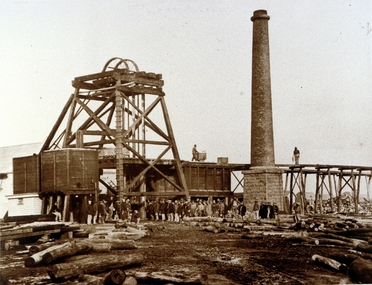
Photograph, C 1865
PHOTOGRAPH - ORIGINAL SEPIA - PORT PHILLIP AND COLONIAL GOLD MINE, CLUNES. NORTH SHAFT, SHOWING POPPET HEAD AND CHIMNEY. .1 MOUNTED ON CARDBOARD .2 - .4 PHOTO PRINTS .5 PHOTO PRINTPORT PHILLIP AND COLONIAL GOLD MINING COMPANY, CLUNES. CLUNES QUARTZ MINING COMPANY'S NORTH SHAFT. CHANGING SHIFTS. TIME, THREE PM. C. NETTLETON, PHOTO.local history, photography, photographs, mining -
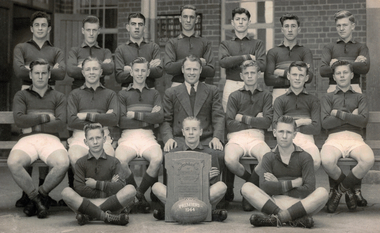 Bendigo Historical Society Inc.
Photograph - Photo of the Premier Football Team. The Thompson Shield, 1944
BHS Collection Photo of the Northern District Technical Schools Football Premiers Team 1944. Black and White Photo of The Thompson Shield. This was a school competition in the Northern District Technical School Association., 1944. Sixteen uniformed players sitting with a man in a suit (possibly the coach). The player in the middle front is holding a shield and in front of him is a football with Premiers 1944 inscribed on it. On the rear is written in ink, "North Bendigo Football Club 1944 Max Roberts Absent". Joan Filbey Collection:history, bendigo, north bendigo football premiers 1944, north bendigo, joan filbey collection