Showing 1965 items
matching victoria railway
-
 Ballarat Tramway Museum
Document - Calendar, Comeng Rolling Stock Division and Phil Belbin, 1984
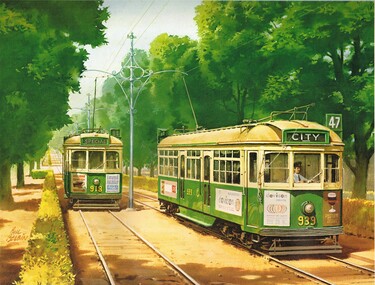
... Painting Victoria Parade Railways Calendar - large wall with clear ...testCalendar - large wall with clear plastic sheet - spiral wire bound at top issued by Comeng Rolling Stock division of ANI Corporation in 1985. Features 6 paintings by Phil Belbin. 1 - (Jan - Feb) NSW 8029 leading the southbound Intercapital Daylight out of the Bowral tunnel. 2 - (Mar - Apr) - trams 939 and 918 - Victoria Parade reserved track. 3 - (May - Jun) - South African Railways Blue Train 4 - (Jul - Aug) - VR S300 and 301 5 - (Sep - Oct) - QR 1298 on the Sunlander crossing a 2' gauge cane steam loco. 6 - (Nov - Dec) - Commonwealth Railways - Rawlina - Transcontinental train leaving Rawlinna - with the Tea and Sugar Train. For details of the artist see - https://en.wikipedia.org/wiki/Phil_Belbin (accessed 2-1-2018). See btm7022note from Bruce Belbin his son re use of the image. tramways, trams, art work, painting, victoria parade, railways -
 Ballarat Tramway Museum
Ephemera, Victorian Railways, Set of railway tickets - Ballarat, 1970s
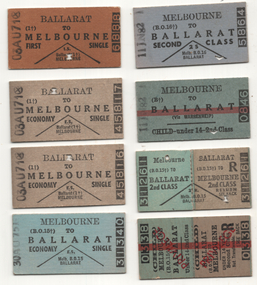
Tickets used by passengers to or from Ballarat: 1 - First class single - brown - Ballarat to Melbourne - 3 August 1971 - No. 6888 2 & 3 - Economy single - fawn - Ballarat to Melbourne - 3 August 1971 - Nos. 45816 and 817 4 - Economy single - blue - Melbourne to Ballarat - 30 August 1975 - No. 31340 5 - Second class single - blue - Melbourne to Ballarat - 11 June 1982 - No. 5864 6 - Second class child single - blue with red strip - Melbourne to Ballarat - 11 June 1982 - No. 0846 7 - Second class return - blue and fawn - Melbourne to Ballarat - 4 April 1970 - No. 31261 8 - Second class child return - blue and fawn with red strip - Melbourne to Ballarat - overprinted Privilege - No. 0338 9 - Economy return - blue and fawn - North Geelong to Ballarat - not used - No. 4559 10 - Second class - Departmental - blue - Ballarat to Geelong - issued at Melbourne - not used No. 0252 11 - Second class single - blue - Ballarat to Bald Hills - 24 July 1971 - No. 20061 12 - Second class single - fawn - Ballarat to Dunnswtown - 24 July 1971 - No. 15531 13 - Second class child single - blue - Ballarat to Creswick - 24 July 1971 - No. 4389 14 - Second class single - blue - Ballarat to Smythesdale - 24 July 1971 - No. 26763 15 - Ballarat Platform - offwhite with brown stripes - No. 28855 16 - Facsimile ticket - First class Holiday return excursion to Tourello - No. 0021 17 - facsimile ticket - 2nd class holiday return excursion to Tourelle - No. 0021 16 and 17 issued by the Ballarat Tramway Museum and the Model Traction Association of Victoria tour ticket - not know when produced. Demonstrates styles of tickets issued by the Victorian Railways during the 1970s.Set of 17 Edmondson type card railway tickets - printed for use at Ballarat or other Railway Stations, various colours in accordance with the ticketting manuals.railways, tickets, platform ticket, ballarat -
 Ballarat Tramway Museum
Photograph - Black and White - tram 11 Victoria St, A T Miles, 26/11/1969
Black and White - tram 11 in Victoria St crossing over the Eureka line bridge - former Buninyong railway line. Taken by A T Miles 26/11/1969. The tram has a Twin Lakes advert on the front. The destination has been changed for the return trip to the Gardens via Sturt St West.Yields information about services to Victoria St.Photograph - black and white print with notes on rear. A T Miles stamp and location and date notes.tramways, trams, tram 11, victoria st, eureka line, bridge, buninyong -
 Melbourne Tram Museum
Document - Report, Australian Electric Traction Association (AETA), Set of 6 options for Doncaster Light Rail Line, 1991
In 1991, the Australian Electric Traction Association (AETA) produced 7 different options to provide public transport to the Doncaster area. See reference for background to the proposals. Six of the seven options have been found and collected. Each option provides a summary, costing based in a scope of works. The Options were: 1 - Light Rail to Doncaster Shoppingtown via Eastern Freeway/Doncaster Road 2 - Light rail to Mitcham Road/Springvale Road 3 - High-performance train to Doncaster Shoppingtown via Victoria Park station Eastern Freeway/Doncaster Road 4 - Heavy rail to Doncaster Shoppingtown via Eastern Freeway to Bulleen Road and underground to Shoppingtown 5 - Heavy Rail to Blackburn Road/George St East Doncaster 7 - Extension of the Camberwell Tram (72) along Burke Road from Cotham Road to Doncaster Road. Out of all the studies, nothing happened.Yields information about the early 1990s proposal to provide public transport to the Doncaster area.Set of 6 reports or options printed on A4 paper, stapled in top left hand corner.tramcars, tramways, aeta, new tramways, doncaster, railways, light rail -
 Ballarat Tramway Museum
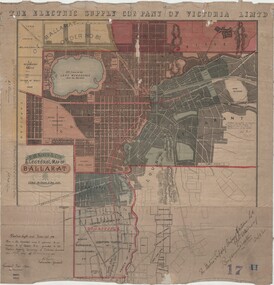
Map, Electric Supply Co. of Vic (ESCo), Ballarat Electoral Map - ESCo, 1900
Document prepared by the Electric Supply Co of Victoria, as part of an order under the Electric Light and Power Act 1896, section 5 of order No. 17 granted to company. Dated 19/2/1901 and signed by the Postmaster-General. Shows the order area being parts of the City of Ballaarat, Sebastopol and Ballarat East. Shows the street names, boundaries, principal power line routes, land reserves, parks, mine locations, railways and Lake Wendouree. Signed by R L Williams Town Clerk City of Ballarat, J R Hall for the Borough of Sebastopol, and John Gent for the Town of Ballarat EastYields information about the power supply to the Ballarat area.Cloth backed paper map, coloured and marked up as exhibit 17.Notes in ink including the signature of Benjamin Deakin 24/9/00 and certified by the three involved municipal Town Clerks.ballarat power supply, esco, electric supply co of victoria, city of ballaarat, east ballarat, sebastopol, orders, power lines, power supply -
 Ballarat Tramway Museum
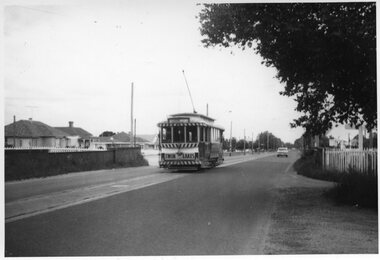
Photograph - View from Ballarat Railway Station footbridge, Ken Magor, c1950
The photo shows an SEC tram crossing the railway level crossing in Lydiard St North from the Ballarat Railway station footbridge. Shows shelters and closed gates at the end of the platforms used to control passenger access. Victoria House in the background. Not dated, probably during the early 1950s. See also item 8897 for a similar photograph.Yields information Ballarat Railway Station and the level crossing.Black and white print with notes on rear."Ken Magor Neg No. 1902" and two pencil numbers "91" and "19"trams, tramways, lydiard st north, level crossing, railway station, ballarat railway station -
 Ballarat Tramway Museum
Photograph - View from Ballarat Railway Station footbridge, Ken McCarthy, 6-1-1951
The photo shows an SEC tram No. 20, crossing the railway level crossing in Lydiard St North from the Ballarat Railway station footbridge. Shows shelters and closed gates at the end of the platforms used to control passenger access. Victoria House in the background. A side entry or dogbox-type carriage is in platform No. 2. Noted the dog boxes at the end of platform 1 just before the gates. Dated 6-1-1951, photo by Ken Mcarthy. See also item 8896 for a similar photograph.Yields information Ballarat Railway Station and the level crossing.Black and white print with notes on rear."In ink on rear "#20 on Lydiard St xing Ballarat from station 6-1-51" and Ken McCarthy stamp with photo Number 761trams, tramways, lydiard st north, level crossing, railway station, ballarat railway station, tram 20 -
 Melbourne Tram Museum
Slide - Set of 11, Ron Scholten, Tram 1041, 1973/1974
Set of 11 colour slides of PCC car 1041 taken during its early operations around Melbourne. Where the slide has a printed date, it is listed. 1 - Collins St, between Elizabeth St and Swanston St, route 47, Depot - Sept. 1973 2 - Batman Ave in Swanston St, route 15, with W2 383 alongside - Sept. 1973 3 - Elizabeth St terminus with Flinders St station in the background - route 19, North Coburg - Sept. 1973 4 - Arriving Batman Ave terminus, route 70, - Sept. 1973 5 - ditto 6 - Bourke St Mall, route 96 East Brunswick - during a trial closure of Bourke St between Elizabeth Street and Swanston Street , given the seats outside Buckley's store - Nov. 1973 7 - Night photo - TMSV slide - MP166 8 - turning from Glenferrie Road into High St - route 6 Glen Iris - a very tight turn - TMSV slide 9 - Wattle Park terminus, route 70 - 1974 10 - Flinders St -route 74 near William St with the railway viaduct in the background. 1974 11 - Interior photo - Ron Scholten - 1973Yields information about PCC car 1041, a prototype all electric tramcarSet of 11 Kodachrome colour slides, cardboard mounts.tramways, pcc class, tram 1041, collins st, elizabeth st, batman ave, st kilda rd., glenferrie road, wattle park, flinders st, interior, bourke st, route 19, route 70, route 74, route 15, route 47, w2 class, tram 383, route 6, route 96, trams -
 Melbourne Tram Museum
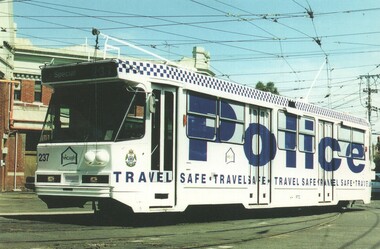
Postcard, Association of Railway Enthusiasts (ARE), A 237 for Victoria Police, Travel Safe campaign, 2007
Colour postcard of Melbourne all over advertising tram A 237 for Victoria Police, Travel Safe campaign, departing Malvern Depot. Photo Ray Marsh, March 1994. http://vicsig.net/index.php?page=trams&article=adtrams - gives the date of 19/3/1994 for entry into service for this advertising - accessed 13/4/2017. Postcard produced by Railcard for the Association of Railway Enthusiasts, ARE No.13/07. Has ARE logo, shop details and hours, space for small message, address and stamp.trams, tramways, melbourne, a class, malvern depot, advertising trams, decorated trams, tram 237 -
 Melbourne Tram Museum
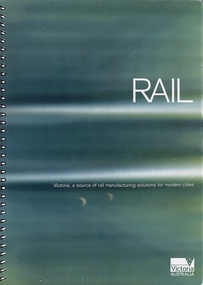
Document, Government of Victoria, "Rail - Victoria, a sources of rail manufacturing solutions for modern cities", c2003
... railways Victoria vehicles equipment consultants Rob Hulls ...Information document providing details of Victoria's rail equipment and vehicle manufacturers and their capabilities. Has a forward by the Minister for Manufacturing Industry Rob Hulls, undated. Includes a list of suppliers, their contact details and activity or service provided. Includes consultants, engineers manufacturers, suppliers etc. Rob Hulls was Minister 2002 to 2005. See item 7263 for a similar document c1998Yields information about the Victorian rail and tram equipment suppliers and consultants.Document - 16 pages, + plastic cover, A4, wire bound with 4 loose pages.tramways, melbourne, railways, victoria, vehicles, equipment, consultants, rob hulls, victorian government -
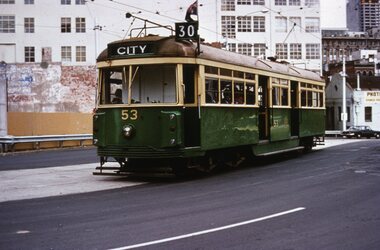 Melbourne Tram Museum
Slide, Tramway Museum Society of Victoria (TMSV), Tram VR 53 La Trobe St, c1974
Colour slide of VR class tram 53, route 30, westbound in La Trobe St on the bypass built to enable the construction of the Melbourne Central or Museum station between Dec 1973 and 1978 - see reference. The concrete looks relatively new in the photograph. The tram was originally built by the Victorian Railways for their St Kilda Brighton tramway in 1942. It is currently on display at the Melbourne Tram Museum. Many of the buildings in the background have since been demolished. The former Myer warehouse can be seen in the top right-hand corner of the photo.Yields information about VR tram 53 and Latrobe St c1974.Kodachrome colour slides, cardboard mount.Has "MP146" in pencil and stamped "Tramways Museum Society Victoria" on rear.tramways, vr class, tram 53, route 30, latrobe st -
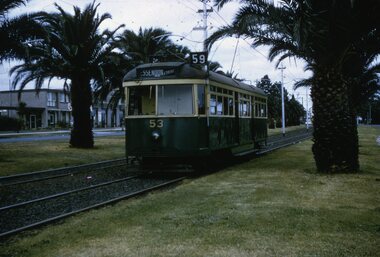 Melbourne Tram Museum
Slide, Tramway Museum Society of Victoria (TMSV), Tram VR 53 in Mt Alexander Road North Essendon, c1975
Colour slide of VR class tram 53, route 59 Essendon Aerodrome in Mt Alexander Road just to the north of Shamrock St, North Essendon. Has the Ambasador Motel in the background. The tram was built for the Victorian Railways St Kilda - Brighton tram line in 1942 and sold to the MMTB when that line closed. On display at the Melbourne Tram Museum.Yields information about VR tram 52 in Mt Alexander Road c1975.Kodachrome colour slides, cardboard mount.Has "MP146" in pencil and stamped "Tramways Museum Society Victoria" on rear.tramways, vr class, tram 52, route 59, mt alexander road -
 Melbourne Tram Museum
Slide - T class 181 Footscray Explosives Factory, Tramway Museum Society of Victoria (TMSV), late 1950s
Colour slide of T class 181 with the destination of Explosives Factory leaving Leeds St Footscray. Has the various shops and the Railway Station in the background.Yields information about Footscray trams to the Explosives Factory.Kodachrome colour slides, cardboard mount, duplicate.Stamped "Tramways Museum Society Victoria". In pencil "181 Footscray"tramcars, leeds st, footscray, explosives factory, t class, tram 181 -
 Wodonga & District Historical Society Inc
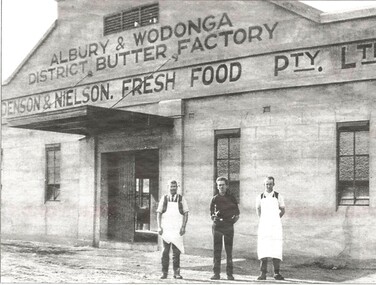
Photograph - Albury & Wodonga District Butter Factory
Holdenson and Nielson Fresh Food Pty Ltd was founded in 1903 by Poul Jorgenson Holdenson and Andrew Nielson, after acquiring the Fresh Food and Storage Co, which had plants throughout Australia, including Albury. The plant was moved to Wodonga that year. Cream was collected from all areas of North East Victoria and the Riverina, with contractors carting it to the railway stations for rail travel to Wodonga. The Butter Factory was built on the Lincoln Causeway in 1926, and the Cheese Factory in 1942 as a wartime emergency project. At the same time, a pasteurising plant was installed in the complex, and so whole milk was collected from dairy farmers, rather than just cream. The company was bought out by the North Eastern Dairy Co-operative in 1962. It became a retail milk depot also involved in ice-making and cold storage. In 1985, Goulburn Murray bought the complex and as the site was surplus to requirements, it was sold to Wodonga Council. The buildings were adapted for other uses. The Butter Factory was modified and extended and for some time was occupied by the Albury- Wodonga Visitor Centre. The Creator's Gallery was established in the engine room, and the loading area and ice-making works were extended and modified for use as the HotHouse Theatre. The Cheese Factory was adapted for use as a theatre and jazz venue, and housed the HotHouse office. The various outbuildings, such as garages and storage areas, were adapted for use as shops and craft outlets.This collection is significant because it documents an important industry in Wodonga.A collection of images and advertisements promoting Holdenson and Nielsen of Wodongaholdenson & nielson, wodonga dairies, victorian dairy industry -
 Melbourne Tram Museum
Album - Robert Thomson Slide Collection, "9.9.1988 to 16.9.1988", 9.9.1988 to 16.9.1988
Photo - see pdf file for further information. Number Brief Description RT055 Bundoora Extension - RT056 Bundoora Extension - tram 261 - "Special" route 00 RT057 Bundoora Extension - tram 86 - "Bundoora" route 86 RT058 St Kilda - Esplanade - Carlisle RT059 Relay - Danks St RT060 "City Brunswick St" - route 12 RT061 tram 1003 - "City Brunswick St"- route 12 RT062 track work on route 12 RT063 tram 774 - "City Brunswick St"- route 12 RT064 track work RT065 light rail - tram 2005 - "Depot" RT066 light rail - tram 273 - "Port Melbourne" - route 111 RT067 St Kilda Light Rail Station -tram 291- "St Kilkda Beach - route 06 RT068 St Kilda Rd - tram 830 - "City" - route 6 RT069 StKildaRd-tram928-"??"-route05 RT070 St Kilda - tram 272 - "East Brunswick" - route 96 RT071 Elizabeth St Terminus - tram 80 - "Ascot Vale" - route 9 RT072 West Coburg Reserved Track - tram 78 - "Domain & St Kilda Rds" - route 56 RT073 West Coburg Terminus - tram 66 - "Domain & St Kilda Rds" - route 56 RT074 West Coburg Terminus - tram 87 - "Domain & St Kilda Rds" - route 56 RT075 Batman Ave Terminus - tram 118 - "Wattle Park" - route 70 RT076 Collins St Terminus - tram 1022 - "West Preston" - route 11 RT077 North Balwyn Terminus - tram 255 - "City - Lonsdale St" - route 48 RT078 Kew Cotham Rd Terminus - tram 865 - "St Kilda Beach via Balaclava Rd" - route 69 RT079 St Kilda esplanade - Carlisle - tram 946 - "Kew Cotham Rd" - route 69 - tram 295 - "East Brunswick" - route 96 RT080 West Preston Terminus - tram 943 - "St Kilda Beach" - route 10 RT081 Mont Albert Terminus - tram 250 - "Mont Albert" - route 42 RT082 Carnegie Single Line - tram 998 - "City" - route 67 RT083 Carnegie Single Line - tram 736 - "Carnegie" - route 67 RT084 Carnegie terminus - tram 736 - "City" - route 67 RT085 East Brighton Terminus - tram 914 - "City" - route 64 RT086 St Kilda Jct - tram 998 - "East Malvern Darling Rd" - route 3 & tram 969 - "City" route 3 RT087 Bourke St Spencer St - tram 271 - "St Kilda Beach" - route 96 RT088 Preston Railway Overbridge - "Northcote via St Georges Rd" - route 9 RT089 Victoria Parade - tram 906 - "Mont Albert" - route 42 & tram 252 - "City" - route 42 RT090 Victoria Parade - tram 1025 - "City Spencer St" - route 31Demonstrates the work of Robert Thomson in photography, collection and/or production of slidesAssembled album in a black presentation folder of 36 colour slides, collected or produced by Robert Thomson. All photographs have been scanned and placed on the Museum's G drive. A list of all photographs with details has been compiled. melbourne, tramways, trams, track construction -
 Federation University Historical Collection
Document, Albert E. Stohr, Curriculum Vitae of A.E.Stohr, 1970, 19/01/1970
Albert E. Stohr was a member of the Council of the Ballarat School of Mines for 24 years, a member of the Council of the Ballarat grammar School for 24 years, represented all Provincial Sewerage Authorities in Victoria on the Plumbers and gasfitters registration Board of Victoria for 25 years, member of the Institution of Engineers (Australia) for 46 years, member of the Association of Professional Engineers of Australia for 22 years, and chairman of the Ballarat Group of the Association . Member of the Rotary Club of Ballarat for 24 years, and many other organisational.Five foolscap pages relating to the education and career of Albert Edward Stohr. Work places include: Broken Hill Proprietary Co. Ltd; Victorian Railways Construction Branch; Melbourne & Metropolitan Board of Works; Sewerage and Main Drainage Branch; Water Supply Branch; United States Army Services of Supply; Department of the Australian Army; Ballarat Water Commissioners; Ballarat Sewerage Authority. His projects include the White Swan Reservoir, Gong Gong Reservoir Spillway Channel; Installation of Venturi Meters at Brown Hill; Sewerage treatment Works; Nightsoil Dumping and Pan Washing Depot. stohr, bert stohr, a.e. stohr, white swan reservoir, engineering alumni, engineer, ballarat school of mines. -
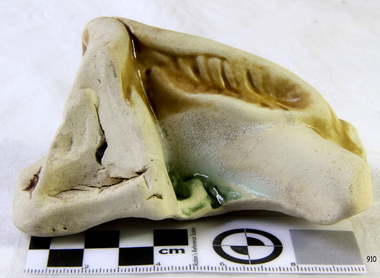
 Flagstaff Hill Maritime Museum and Village
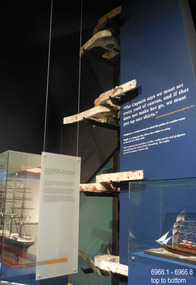
Equipment - Rudder Pintles and Gudgeons, Alexander Hall and Son, ca. 1855
This set of pairs of pintles and gudgeons was recovered from the wreck of the sailing ship Schomberg and was part of its rudder steering system. A reconstruction that includes four pairs is currently on display at Flagstaff Hill. The rudder installation of the Schomberg was almost seven metres tall. A pintle and gudgeon pair is a mechanical fitting that works like a pair of door hinges. One of the uses for this type of fitting is for ships’ rudders. On a ship, one or several gudgeons would be attached to the vertical rudder stempost on the rear of the ship’s hull. On the ship's rudder, an equal number of pintles would be fitted onto it. The rudder assembly would then fit down into the gudgeons on the ship and would be connected to its steering mechanism, allowing it to be moved from side to side and steer the vessel. The SCHOMBERG- The three-masted clipper ship Schomberg was built in 1855 by Alexander Hall and Co in Aberdeen, Scotland, for James Baines' famous Black Ball line. It measured 288 feet (88 meters) in length, with a beam of 45 feet (14 meters), a depth of 29.5 feet (8.99 meters) and 2,284 tons. The mainmast was 210 feet (64 meters) high and the ship carried 3.3 acres of sail. The wooden vessel was constructed with three skins; one planked fore and aft, and two diagonally planked. All skins were fastened together with screw-threaded trunnels (wooden rails). The Schomberg was one of only three clippers wrecked in Victorian waters that operated the England-to-Australia run. It was built to outrun Donald MacKay’s two American-built ships, the Empress of the Sea and the Lightning. It was hoped that Schomberg would make Liverpool to Melbourne voyage in sixty days, setting a record for the voyage. The Schomberg sailed from Liverpool on 6 October 1855 on her maiden voyage, under the command of Captain James Forbes. Her general cargo for Australia included jewellery, spirits, machinery, and 2,000 tons of iron rails and equipment for building the Melbourne to Geelong Railway and a bridge over the Yarra from Melbourne to Hawthorn, and17,000 letters and 31,800 newspapers. She also carried a cow for fresh milk, pens for fowls and pigs, plus 90,000 gallons of water for washing and drinking on board. There were approximately 473 passengers, including migrants for Australia, and a crew of 105. Light winds encountered at the equator dashed the expectations of a record-breaking voyage. On Christmas day the ship sighted Moonlight Head in southwest Victoria and even though there was a deadly combination of wind, currents and unmarked sand spits, the vessel continued on. Then the next day, December 26th 1855, the huge ship gently ran aground on a spit that juts into Newfield Bay, east of Curdies Inlet and the present town of Peterborough. Fortunately, the coastal trader, SS Queen, was nearby and managed to save all passengers and crew. In 1975 Flagstaff Hill’s former Director Peter Ronald and the team of divers recovered many objects and artefacts from the wreck of the Schomberg such as the ship’s fittings, equipment and personal effects including a diamond hidden for years in a communion set. This set of pintles and gudgeons is an example of steering equipment used on ships over 150 years ago, equipment that is still in use in today's shipping industry as well as many other everyday hardware applications.. The equipment is significant for its association with the ill-fated vessel Schomberg, which was wrecked in the local water in 1855 on its maiden voyage. The ship was built for speed and luxury, to sail on journeys with passengers, including migrants, travelling from Liverpool to Melbourne.Pintles and gudgeons, six pairs, plus one single pintle, from the wreck of the SCHOMBERG. Cast iron horse-shoe-shaped fittings with tapered ends. each with metal bars between the long sides. One piece of each pair has a round hollow cylinder and the other has a round solid shank. The single pintle has a tall shank with a pintle hook through it. Some pieces have remnants of grey paint.flagstaff hill, warrnambool, maritime village, maritime museum, shipwreck coast, great ocean road, schomberg, shipwreck, pintles, gudgeons, ship's rudder, ship's steering, clipper ship, james bain, black ball line, alexander hall and co., capt. james bully forbes, rudder pintles and gudgeons, rudder steering, pintles and braces, immigrant ship, maiden voyage, peterborough, 1855, marine technology -
 Ballarat Tramway Museum
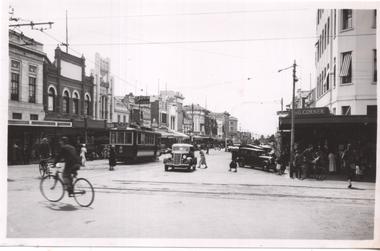
Photograph - Geelong tram No. 2 at T&G Corner Geelong, c1938
The photo shows Geelong No. 2 in Moorabool St at the intersection with Ryrie St. The tram has the destination of North. The tram is in its modified form that provides for one-man operation. In the photo are Edments, Savoia Cafe, Commercial Bank of Australia, and the T&G building. The photo has been dated between 1935 when the tram was converted and 1939 when the bar neon traffic lights were installed at the intersection. The photograph was taken from a Victorian Railways glass negative held at the State Library of Victoria. See item 8360 for a digital copy of the SLV scan - http://handle.slv.vic.gov.au/10381/97173Yields information about Geelong No.2 and the intersection of Ryrie and Moorabool Streets Geelong.Black and white photograph with a number of rear.In pencil "2171" on rear.tramways, trams, geelong, ryrie st, moorabool st, temperance & general, tram 2 -
 Victorian Railway History Library
Book, Kings, Keith, The Ballarat Tramways An Illustrated History, 1971
A short illustrated history of the Ballarat tramways in Victoria.ill, maps, p.64.non-fictionA short illustrated history of the Ballarat tramways in Victoria.electric trams - australia - history, tramways - ballarat -
 Victorian Railway History Library
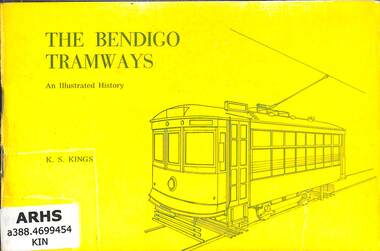
Book, Kings, Keith, The Bendigo Tramways An Illustrated History, 1972
A short illustrated history of the Bendigo tramways in Victoria.ill, maps, p.80.non-fictionA short illustrated history of the Bendigo tramways in Victoria.tramways - bendigo - history, electric trams - australia - history -
 Flagstaff Hill Maritime Museum and Village
Ceramic - Ceramic Piece, Minton Potteries, ca 1877
The ceramic piece is one of four porcelain fragments washed up from the Loch Ard wreck near Port Campbell Victoria. These fragments resemble the foot and leg of a large bird and legend has it that another bird had drifted ashore at the same time the Loch Ard peacock. This figurine is on display at Flagstaff Hill Maritime Museum and regarded as the most valuable shipwreck relic. It is believed that all four fragments could belong to another peacock or a Minton porcelain stork that had been photographed in a Home Beautiful magazine in 1928. This stork appeared to be missing a leg and foot and experts have hypothesized that the four fragments could belong to this stork, the whereabouts of which are currently unknown. History of the Loch Ard: The Loch Ard got its name from ”Loch Ard” a loch which lies to the west of Aberfoyle, and the east of Loch Lomond. It means "high lake" in Scottish Gaelic. The vessel belonged to the famous Loch Line which sailed many vessels from England to Australia. The Loch Ard was built in Glasgow by Barclay, Curdle and Co. in 1873, the vessel was a three-masted square-rigged iron sailing ship that measured 79.87 meters in length, 11.58 m in width, and 7 m in depth with a gross tonnage of 1693 tons with a mainmast that measured a massive 45.7 m in height. Loch Ard made three trips to Australia and one trip to Calcutta before its fateful voyage. Loch Ard left England on March 2, 1878, under the command of 29-year-old Captain Gibbs, who was newly married. The ship was bound for Melbourne with a crew of 37, plus 17 passengers. The general cargo reflected the affluence of Melbourne at the time. Onboard were straw hats, umbrella, perfumes, clay pipes, pianos, clocks, confectionery, linen and candles, as well as a heavier load of railway irons, cement, lead and copper. There were other items included that were intended for display in the Melbourne International Exhibition of 1880. The voyage to Port Phillip was long but uneventful. Then at 3 am on June 1, 1878, Captain Gibbs was expecting to see land. But the Loch Ard was running into a fog which greatly reduced visibility. Captain Gibbs was becoming anxious as there was no sign of land or the Cape Otway lighthouse. At 4 am the fog lifted and a lookout aloft announced that he could see breakers. The sheer cliffs of Victoria's west coast came into view, and Captain Gibbs realised that the ship was much closer to them than expected. He ordered as much sail to be set as time would permit and then attempted to steer the vessel out to sea. On coming head-on into the wind, the ship lost momentum, the sails fell limp and Loch Ard's bow swung back towards land. Gibbs then ordered the anchors to be released in an attempt to hold its position. The anchors sank some 50 fathoms - but did not hold. By this time the ship was among the breakers and the tall cliffs of Mutton Bird Island rose behind. Just half a mile from the coast, the ship's bow was suddenly pulled around by the anchor. The captain tried to tack out to sea, but the ship struck a reef at the base of Mutton Bird Island, near Port Campbell. Waves subsequently broke over the ship and the top deck became loosened from the hull. The masts and rigging came crashing down knocking passengers and crew overboard. When a lifeboat was finally launched, it crashed into the side of Loch Ard and capsized. Tom Pearce, who had launched the boat, managed to cling to its overturned hull and shelter beneath it. He drifted out to sea and then on the flood tide came into what is now known as Loch Ard Gorge. He swam to shore, bruised and dazed, and found a cave in which to shelter. Some of the crew stayed below deck to shelter from the falling rigging but drowned when the ship slipped off the reef into deeper water. Eva Carmichael a passenger had raced onto the deck to find out what was happening only to be confronted by towering cliffs looming above the stricken ship. In all the chaos, Captain Gibbs grabbed Eva and said, "If you are saved Eva, let my dear wife know that I died like a sailor". That was the last Eva Carmichael saw of the captain. She was swept off the ship by a huge wave. Eva saw Tom Pearce on a small rocky beach and yelled to attract his attention. He dived in and swam to the exhausted woman and dragged her to shore. He took her to the cave and broke the open case of brandy which had washed up on the beach. He opened a bottle to revive the unconscious woman. A few hours later Tom scaled a cliff in search of help. He followed hoof prints and came by chance upon two men from nearby Glenample Station three and a half miles away. In a complete state of exhaustion, he told the men of the tragedy. Tom then returned to the gorge while the two men rode back to the station to get help. By the time they reached Loch Ard Gorge, it was cold and dark. The two shipwreck survivors were taken to Glenample Station to recover. Eva stayed at the station for six weeks before returning to Ireland by steamship. In Melbourne, Tom Pearce received a hero's welcome. He was presented with the first gold medal of the Royal Humane Society of Victoria and a £1000 cheque from the Victorian Government. Concerts were performed to honour the young man's bravery and to raise money for those who lost family in the disaster. Of the 54 crew members and passengers on board, only two survived: the apprentice, Tom Pearce and the young woman passenger, Eva Carmichael, who lost her family in the tragedy. Ten days after the Loch Ard tragedy, salvage rights to the wreck were sold at auction for £2,120. Cargo valued at £3,000 was salvaged and placed on the beach, but most washed back into the sea when another storm developed. The wreck of Loch Ard still lies at the base of Mutton Bird Island. Much of the cargo has now been salvaged and some items were washed up into Loch Ard Gorge. Cargo and artefacts have also been illegally salvaged over many years before protective legislation was introduced in March 1982. One of the most unlikely pieces of cargo to have survived the shipwreck was a Minton majolica peacock- one of only nine in the world. The peacock was destined for the Melbourne 1880 International Exhibition in. It had been well packed, which gave it adequate protection during the violent storm. Today the Minton peacock can be seen at the Flagstaff Hill Maritime Museum in Warrnambool. From Australia's most dramatic shipwreck it has now become Australia's most valuable shipwreck artifact and is one of very few 'objects' on the Victorian State Heritage Register.The shipwreck of the Loch Ard is of significance for Victoria and is registered on the Victorian Heritage Register ( S 417). Flagstaff Hill has a varied collection of artefacts from Loch Ard and its collection is significant for being one of the largest accumulation of artefacts from this notable Victorian shipwreck. The collections object is to also give us a snapshot into history so we can interpret the story of this tragic event. The collection is also archaeologically significant as it represents aspects of Victoria's shipping history that allows us to interpret Victoria's social and historical themes of the time. The collections historically significance is that it is associated unfortunately with the worst and best-known shipwreck in Victoria's history.Ceramic piece, broken, with remnants of burgundy, green and yellow glaze. The piece has been shaped. It could be a peacock leg section with green foliage with glaze. Noneflagstaff hill, flagstaff hill maritime museum and village, warrnambool, maritime museum, maritime village, great ocean road, shipwreck coast, ceramic, porcelain, piece, fragment, ceramic bird, loch ard, shipwreck, salvage, recover, 1877, 1878, minton, shard -
 Flagstaff Hill Maritime Museum and Village
Ceramic - Ceramic Piece, Minton Potteries, ca 1877
The ceramic piece is one of four porcelain fragments washed up from the Loch Ard wreck near Port Campbell Victoria. These fragments resemble the foot and leg of a large bird and legend has it that another bird had drifted ashore at the same time the Loch Ard peacock. This figurine is on display at Flagstaff Hill Maritime Museum and regarded as the most valuable shipwreck relic. It is believed that all four fragments could belong to another peacock or a Minton porcelain stork that had been photographed in a Home Beautiful magazine in 1928. This stork appeared to be missing a leg and foot and experts have hypothesized that the four fragments could belong to this stork, the whereabouts of which are currently unknown. History of the Loch Ard: The Loch Ard got its name from ”Loch Ard” a loch which lies to the west of Aberfoyle, and the east of Loch Lomond. It means "high lake" in Scottish Gaelic. The vessel belonged to the famous Loch Line which sailed many vessels from England to Australia. The Loch Ard was built in Glasgow by Barclay, Curdle and Co. in 1873, the vessel was a three-masted square-rigged iron sailing ship that measured 79.87 meters in length, 11.58 m in width, and 7 m in depth with a gross tonnage of 1693 tons with a mainmast that measured a massive 45.7 m in height. Loch Ard made three trips to Australia and one trip to Calcutta before its fateful voyage. Loch Ard left England on March 2, 1878, under the command of 29-year-old Captain Gibbs, who was newly married. The ship was bound for Melbourne with a crew of 37, plus 17 passengers. The general cargo reflected the affluence of Melbourne at the time. Onboard were straw hats, umbrella, perfumes, clay pipes, pianos, clocks, confectionery, linen and candles, as well as a heavier load of railway irons, cement, lead and copper. There were other items included that were intended for display in the Melbourne International Exhibition of 1880. The voyage to Port Phillip was long but uneventful. Then at 3 am on June 1, 1878, Captain Gibbs was expecting to see land. But the Loch Ard was running into a fog which greatly reduced visibility. Captain Gibbs was becoming anxious as there was no sign of land or the Cape Otway lighthouse. At 4 am the fog lifted and a lookout aloft announced that he could see breakers. The sheer cliffs of Victoria's west coast came into view, and Captain Gibbs realised that the ship was much closer to them than expected. He ordered as much sail to be set as time would permit and then attempted to steer the vessel out to sea. On coming head-on into the wind, the ship lost momentum, the sails fell limp and Loch Ard's bow swung back towards land. Gibbs then ordered the anchors to be released in an attempt to hold its position. The anchors sank some 50 fathoms - but did not hold. By this time the ship was among the breakers and the tall cliffs of Mutton Bird Island rose behind. Just half a mile from the coast, the ship's bow was suddenly pulled around by the anchor. The captain tried to tack out to sea, but the ship struck a reef at the base of Mutton Bird Island, near Port Campbell. Waves subsequently broke over the ship and the top deck became loosened from the hull. The masts and rigging came crashing down knocking passengers and crew overboard. When a lifeboat was finally launched, it crashed into the side of Loch Ard and capsized. Tom Pearce, who had launched the boat, managed to cling to its overturned hull and shelter beneath it. He drifted out to sea and then on the flood tide came into what is now known as Loch Ard Gorge. He swam to shore, bruised and dazed, and found a cave in which to shelter. Some of the crew stayed below deck to shelter from the falling rigging but drowned when the ship slipped off the reef into deeper water. Eva Carmichael a passenger had raced onto the deck to find out what was happening only to be confronted by towering cliffs looming above the stricken ship. In all the chaos, Captain Gibbs grabbed Eva and said, "If you are saved Eva, let my dear wife know that I died like a sailor". That was the last Eva Carmichael saw of the captain. She was swept off the ship by a huge wave. Eva saw Tom Pearce on a small rocky beach and yelled to attract his attention. He dived in and swam to the exhausted woman and dragged her to shore. He took her to the cave and broke the open case of brandy which had washed up on the beach. He opened a bottle to revive the unconscious woman. A few hours later Tom scaled a cliff in search of help. He followed hoof prints and came by chance upon two men from nearby Glenample Station three and a half miles away. In a complete state of exhaustion, he told the men of the tragedy. Tom then returned to the gorge while the two men rode back to the station to get help. By the time they reached Loch Ard Gorge, it was cold and dark. The two shipwreck survivors were taken to Glenample Station to recover. Eva stayed at the station for six weeks before returning to Ireland by steamship. In Melbourne, Tom Pearce received a hero's welcome. He was presented with the first gold medal of the Royal Humane Society of Victoria and a £1000 cheque from the Victorian Government. Concerts were performed to honour the young man's bravery and to raise money for those who lost family in the disaster. Of the 54 crew members and passengers on board, only two survived: the apprentice, Tom Pearce and the young woman passenger, Eva Carmichael, who lost her family in the tragedy. Ten days after the Loch Ard tragedy, salvage rights to the wreck were sold at auction for £2,120. Cargo valued at £3,000 was salvaged and placed on the beach, but most washed back into the sea when another storm developed. The wreck of Loch Ard still lies at the base of Mutton Bird Island. Much of the cargo has now been salvaged and some items were washed up into Loch Ard Gorge. Cargo and artefacts have also been illegally salvaged over many years before protective legislation was introduced in March 1982. One of the most unlikely pieces of cargo to have survived the shipwreck was a Minton majolica peacock- one of only nine in the world. The peacock was destined for the Melbourne 1880 International Exhibition in. It had been well packed, which gave it adequate protection during the violent storm. Today the Minton peacock can be seen at the Flagstaff Hill Maritime Museum in Warrnambool. From Australia's most dramatic shipwreck it has now become Australia's most valuable shipwreck artifact and is one of very few 'objects' on the Victorian State Heritage Register.The shipwreck of the Loch Ard is of significance for Victoria and is registered on the Victorian Heritage Register ( S 417). Flagstaff Hill has a varied collection of artefacts from Loch Ard and its collection is significant for being one of the largest accumulation of artefacts from this notable Victorian shipwreck. The collections object is to also give us a snapshot into history so we can interpret the story of this tragic event. The collection is also archaeologically significant as it represents aspects of Victoria's shipping history that allows us to interpret Victoria's social and historical themes of the time. The collections historically significance is that it is associated unfortunately with the worst and best-known shipwreck in Victoria's history.Ceramic piece, broken with remnants of glaze. It has been shaped. It may be from a peacock leg section.Noneflagstaff hill, flagstaff hill maritime museum and village, warrnambool, maritime museum, maritime village, great ocean road, shipwreck coast, ceramic, porcelain, piece, fragment, ceramic bird, loch ard, shipwreck, salvage, recover, 1877, 1878, minton, shard -
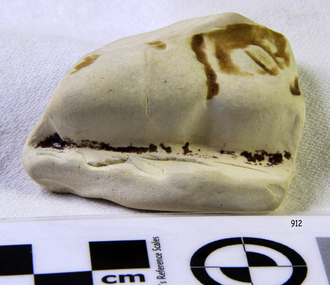
 Flagstaff Hill Maritime Museum and Village
Ceramic - Ceramic Piece, Minton Potteries, ca. 1877
The ceramic piece is one of four porcelain fragments washed up from the Loch Ard wreck near Port Campbell Victoria. These shards resemble the foot and leg of a large bird and legend has it that another bird had drifted ashore at the same time the Loch Ard peacock. This figurine is on display at Flagstaff Hill Maritime Museum and regarded as the most valuable shipwreck relic. It is believed that all four fragments could belong to another peacock or a Minton porcelain stork that had been photographed in a Home Beautiful magazine in 1928. This stork appeared to be missing a leg and foot and experts have hypothesized that the four fragments could belong to this stork, the whereabouts of which are currently unknown. History of the Loch Ard: The Loch Ard got its name from ”Loch Ard” a loch which lies to the west of Aberfoyle, and the east of Loch Lomond. It means "high lake" in Scottish Gaelic. The vessel belonged to the famous Loch Line which sailed many vessels from England to Australia. The Loch Ard was built in Glasgow by Barclay, Curdle and Co. in 1873, the vessel was a three-masted square-rigged iron sailing ship that measured 79.87 meters in length, 11.58 m in width, and 7 m in depth with a gross tonnage of 1693 tons with a mainmast that measured a massive 45.7 m in height. Loch Ard made three trips to Australia and one trip to Calcutta before its fateful voyage. Loch Ard left England on March 2, 1878, under the command of 29-year-old Captain Gibbs, who was newly married. The ship was bound for Melbourne with a crew of 37, plus 17 passengers. The general cargo reflected the affluence of Melbourne at the time. Onboard were straw hats, umbrella, perfumes, clay pipes, pianos, clocks, confectionery, linen and candles, as well as a heavier load of railway irons, cement, lead and copper. There were other items included that were intended for display in the Melbourne International Exhibition of 1880. The voyage to Port Phillip was long but uneventful. Then at 3 am on June 1, 1878, Captain Gibbs was expecting to see land. But the Loch Ard was running into a fog which greatly reduced visibility. Captain Gibbs was becoming anxious as there was no sign of land or the Cape Otway lighthouse. At 4 am the fog lifted and a lookout aloft announced that he could see breakers. The sheer cliffs of Victoria's west coast came into view, and Captain Gibbs realised that the ship was much closer to them than expected. He ordered as much sail to be set as time would permit and then attempted to steer the vessel out to sea. On coming head-on into the wind, the ship lost momentum, the sails fell limp and Loch Ard's bow swung back towards land. Gibbs then ordered the anchors to be released in an attempt to hold its position. The anchors sank some 50 fathoms - but did not hold. By this time the ship was among the breakers and the tall cliffs of Mutton Bird Island rose behind. Just half a mile from the coast, the ship's bow was suddenly pulled around by the anchor. The captain tried to tack out to sea, but the ship struck a reef at the base of Mutton Bird Island, near Port Campbell. Waves subsequently broke over the ship and the top deck became loosened from the hull. The masts and rigging came crashing down knocking passengers and crew overboard. When a lifeboat was finally launched, it crashed into the side of Loch Ard and capsized. Tom Pearce, who had launched the boat, managed to cling to its overturned hull and shelter beneath it. He drifted out to sea and then on the flood tide came into what is now known as Loch Ard Gorge. He swam to shore, bruised and dazed, and found a cave in which to shelter. Some of the crew stayed below deck to shelter from the falling rigging but drowned when the ship slipped off the reef into deeper water. Eva Carmichael a passenger had raced onto the deck to find out what was happening only to be confronted by towering cliffs looming above the stricken ship. In all the chaos, Captain Gibbs grabbed Eva and said, "If you are saved Eva, let my dear wife know that I died like a sailor". That was the last Eva Carmichael saw of the captain. She was swept off the ship by a huge wave. Eva saw Tom Pearce on a small rocky beach and yelled to attract his attention. He dived in and swam to the exhausted woman and dragged her to shore. He took her to the cave and broke the open case of brandy which had washed up on the beach. He opened a bottle to revive the unconscious woman. A few hours later Tom scaled a cliff in search of help. He followed hoof prints and came by chance upon two men from nearby Glenample Station three and a half miles away. In a complete state of exhaustion, he told the men of the tragedy. Tom then returned to the gorge while the two men rode back to the station to get help. By the time they reached Loch Ard Gorge, it was cold and dark. The two shipwreck survivors were taken to Glenample Station to recover. Eva stayed at the station for six weeks before returning to Ireland by steamship. In Melbourne, Tom Pearce received a hero's welcome. He was presented with the first gold medal of the Royal Humane Society of Victoria and a £1000 cheque from the Victorian Government. Concerts were performed to honour the young man's bravery and to raise money for those who lost family in the disaster. Of the 54 crew members and passengers on board, only two survived: the apprentice, Tom Pearce and the young woman passenger, Eva Carmichael, who lost her family in the tragedy. Ten days after the Loch Ard tragedy, salvage rights to the wreck were sold at auction for £2,120. Cargo valued at £3,000 was salvaged and placed on the beach, but most washed back into the sea when another storm developed. The wreck of Loch Ard still lies at the base of Mutton Bird Island. Much of the cargo has now been salvaged and some items were washed up into Loch Ard Gorge. Cargo and artefacts have also been illegally salvaged over many years before protective legislation was introduced in March 1982. One of the most unlikely pieces of cargo to have survived the shipwreck was a Minton majolica peacock- one of only nine in the world. The peacock was destined for the Melbourne 1880 International Exhibition in. It had been well packed, which gave it adequate protection during the violent storm. Today the Minton peacock can be seen at the Flagstaff Hill Maritime Museum in Warrnambool. From Australia's most dramatic shipwreck it has now become Australia's most valuable shipwreck artefact and is one of very few 'objects' on the Victorian State Heritage Register.The shipwreck of the Loch Ard is of significance for Victoria and is registered on the Victorian Heritage Register ( S 417). Flagstaff Hill has a varied collection of artefacts from Loch Ard and its collection is significant for being one of the largest accumulation of artefacts from this notable Victorian shipwreck. The collections object is to also give us a snapshot into history so we can interpret the story of this tragic event. The collection is also archaeologically significant as it represents aspects of Victoria's shipping history that allows us to interpret Victoria's social and historical themes of the time. The collections historically significance is that it is associated unfortunately with the worst and best-known shipwreck in Victoria's history.Ceramic shard, broken piece of pottery with some diagonally carved features. It is possibly a peacock leg section and green foliage. The ceramic piece has remnants of a coloured glaze.flagstaff hill, flagstaff hill maritime museum and village, warrnambool, maritime museum, maritime village, great ocean road, shipwreck coast, ceramic, porcelain, piece, fragment, ceramic bird, loch ard, shipwreck, salvage, recover, 1877, 1878, minton, shard -
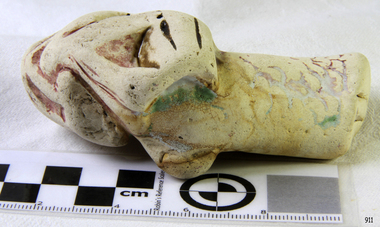
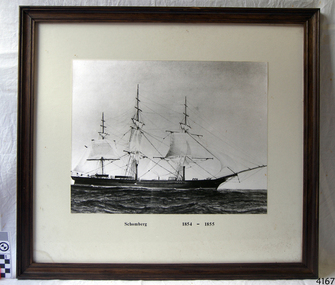 Flagstaff Hill Maritime Museum and Village
Photograph - Vessel - Sailing Ship, Schomberg 1854 - 1855, Ca. 20th century
When the ship Schomberg was launched in 1855, she was considered the most perfect clipper ship ever to be built. James Blaine’s Black Ball Line had commissioned her to be built for their fleet of passenger liners. At a cost of £43,103, the Aberdeen builders designed her to sail faster than the quick clippers designed by North American Donald McKay. She was a three masted wooden clipper ship, built with diagonal planking of British oak with layers of Scottish larch. This luxury vessel was designed to transport emigrants to Melbourne in superior comfort. She had ventilation ducts to provide air to the lower decks and a dining saloon, smoking room, library and bathrooms for the first class passengers. At the launch of Schomberg’s maiden voyage, her master Captain ‘Bully’ Forbes, drunkenly predicted that he would make the journey between Liverpool and Melbourne in 60 days. Schomberg departed Liverpool on 6 October 1855 with 430 passengers and 3000 tons cargo including iron rails and equipment intended the build the Geelong Railway and a bridge over the Yarra from Melbourne to Hawthorn. The winds were poor as Schomberg sailed across the equator, slowing her journey considerably. She was 78 days out of Liverpool when she ran aground on a sand-spit near Peterborough, Victoria, on 27 December; the sand spit and the currents were not marked on Forbes’s map. Overnight, the crew launched a lifeboat to find a safe place to land the ship’s passengers. The scouting party returned to Schomberg and advised Forbes that it was best to wait until morning because the rough seas could easily overturn the small lifeboats. The ship’s Chief Officer spotted SS Queen at dawn and signalled the steamer. The master of the SS Queen approached the stranded vessel and all of Schomberg’s passengers were able to disembark safely. The Black Ball Line’s Melbourne agent sent a steamer to retrieve the passengers’ baggage from the Schomberg. Other steamers helped unload her cargo until the weather changed and prevented the salvage teams from accessing the ship. Local merchants Manifold & Bostock bought the wreck and cargo, but did not attempt to salvage the cargo still on board the ship. They eventually sold it on to a Melbourne businessman and two seafarers. After two of the men drowned when they tried to reach Schomberg, salvage efforts were abandoned.32 In 1975, divers from Flagstaff Hill, including Peter Ronald, found an ornate communion set at the wreck. The set comprised a jug, two chalices, a plate and a lid. The lid did not fit any of the other objects and in 1978 a piece of the lid broke off, revealing a glint of gold. As museum staff carefully examined the lid and removed marine growth, they found a diamond ring, which is currently on display in the Great Circle Gallery.33 Flagstaff Hill also holds ship fittings and equipment, personal effects, a lithograph, tickets and photograph from the Schomberg. Most of the artefacts were salvaged from the wreck by Peter Ronald, former director of Flagstaff Hill. The Schomberg, which is on the Victorian Heritage Register (VHR S612), has great historical significance as a rare example of a large, fast clipper ship on the England to Australia run, carrying emigrants at the time of the Victorian gold rush. She represents the technical advances made to break sailing records between Europe and Australia. Flagstaff Hill’s collection of artefacts from the Schomberg is significant for its association with the shipwreck, The collection is primarily significant because of the relationship between the objects, as together they have a high potential to interpret the story of the Schomberg. It is archaeologically significant as the remains of an international passenger Ship. It is historically significant for representing aspects of Victoria’s shipping history and for its association with the shipwreck and the ship, which was designed to be fastest and most luxurious of its day Photograph of the sailing ship Schomberg, mounted in a wood frame behind glass with a white matt Figures can be seen on deck of the ship."Schomberg 1854-1855"warrnambool, flagstaff-hill, flagstaff-hill-maritime-museum, maritime-museum, shipwreck-coast, flagstaff-hill-maritime-village, schomberg, shipwrecked-artefact, clipper ship, black ball line, 1855 shipwreck, aberdeen clipper ship, captain forbes, peterborough shipwreck, ss queen, photograph -
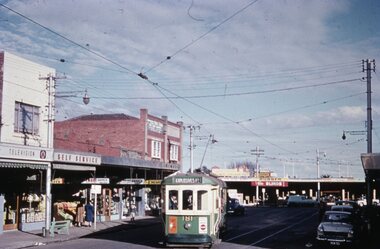
 Ballarat Tramway Museum
Photograph - Black & White Photograph/s, Victorian Railways, c1940
Yields information about the lower end of Sturt St from the Grenville St intersection show a mid 1940's view - shows types of vehicles, shops and streetscape.Black and white photograph of Sturt St. in the mid 1940's looking from the top of a building in Grenville St. towards the West. Has a number of parked vehicles in kerbs, two people riding horses, a Vacuum Oil Co. truck in the bottom right hand corner and an SEC tram travelling west, just past the City Loop points. Colour photocopy, laminated, of this photograph on display 4/2000 at 02-02-06. Colour postcard of same photograph see Reg Item 2981 and another print see Reg Item 4284. Copy 2 - added 30/7/2007, ex Alan Bradley collection of photographs, to depot 5/2007. State Library of Victoria has negative, VR Collection, Series 2716, Photo Number 842961. See also Reg Item 8329 for a better print. Which shows more detail.trams, tramways, ballarat, sturt st., vr photos, tram 20 -
Marysville & District Historical Society
Book (Item) - Tourist Guide, Jos. Pickersgill, The Victorian Railways Tourist's Guide, 1883
... . victorian railways victoria jos pickersgill sands & mcdougall ...A section of a Victorian Railways Tourist's Guide to various destinations within Victoria including Fernshaw and Marysville.A Victorian Railways Tourist's Guide to various destinations within Victoria including Fernshaw and Marysville.victorian railways, victoria, jos pickersgill, sands & mcdougall limited, fernshawe, fernshaw, marysville, keppel's australian hotel, maurice john keppel, melbourne, echuca, digger's rest, sunbury -
 Wodonga & District Historical Society Inc
Certificate - Australian Railways Union, Victorian Branch, Past Officers Certificate, Wodonga Sub-Branch, 1926
The Wodonga line and train station opened in November 1873 when the section of the line from Wangaratta was completed. The expansion of the railways to the northeast of Victoria occurred after the Victorian Government took over the railways in 1867 and the trains serviced large towns such as Seymour, Wangaratta and Wodonga, as well as smaller towns along the way. The north- east train line to Wodonga remained a significant factor in the development of Wodonga as a rural city in the 20th century. The Past Officers Certificate has local significance as it was presented to Wodonga resident, Lachlan McEachern, who was President of the Wodonga Sub-Branch of the Victorian Branch of the Australian Railways Union, and there are other items that belonged to Mr Eachern in the collection of the Wodonga Historical Society. It also has wider significance as an example of a Past Officers certificate dated to the 1920s, as other examples in the collection of Museums Victoria are later and are dated to the 1930s, 1940s and 1950s. Dark brown wooden frame with a lighter brown wood and gold inner border on a Past Officers Certificate from the Victorian Branch of the Australian Railways Union, presented to L. McEachern in 1926, in recognition of services rendered as President of the Wodonga Sub-Branch. The certificate is a colour lithograph with black and white photolithograph images and a red embossed seal. The inscription on the certificate is surrounded by two Corinthian columns and a background illustration of a signal gantry at Flinders St Station. The signatures of the State President and State Secretary are faded. At the bottom of the certificate, there are black and white images of a suburban electric passenger train, "Unity Hall" which is the building where the Australian Railway Union offices were located and a steam train."AUSTRALIAN RAILWAYS UNION" "A.R.U" "AUSTRALIAN RAILWAYS / UNION / VICTORIAN BRANCH" "Presented to / L.McEachern / In Recognition / of Services Rendered / As President / of the Wodonga Sub-Branch /Year 1926" "State President / State Secretary"australian railways union, a.r.u., a.r. u. victorian branch, wodonga sub-branch, victorian railways, v.r., past officers certificate, flinders st station, railway unions, trade unions -
 Wodonga & District Historical Society Inc
Tool - Hand forged iron alloy wedge belonging to railway carpenter Lachlan McEachern, c. late 1800s - early 1900s
The hand forged iron alloy wedge belonged to the railways carpenter, Lachlan McEachern, who became the President of the Wodonga Sub-Branch of the Victorian branch of the Australian Railways Union. He was presented with a framed Past Officers Certificate by the Australian Railways Union in recognition of services rendered in 1926. The certificate is also in the collection of the Wodonga Historical Society. The Wodonga train station opened in November 1873 when the section of the train line from Wangaratta to Wodonga was completed. The expansion of the railways to the northeast of Victoria occurred after the Victorian Government took over the railways in 1867 and the trains serviced large towns such as Seymour, Wangaratta and Wodonga, as well as smaller towns along the way. The hand forged iron alloy wedge has local and state significance due to its use by a Victorian Railways carpenter, Lachlan McEachern, in Wodonga. The local significance is also strong due to the prominence of the McEachern family in the Albury-Wodonga area.Hand forged iron wedge with a cracked flange/rim at the top, red-brown rust and some dirt on the surface.hand forged wedge, hand made tools, victorian railways, v.r., railways carpenter, wodonga, lachlan mceachern, iron alloy tools, mceachern family -
 Wodonga & District Historical Society Inc
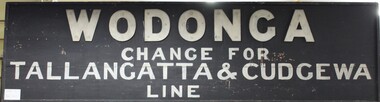
Sign - Wodonga Railway Station Sign, c. 1880s to 1920s
The Wodonga train line opened in November 1873 when the section of the train line from Wangaratta to Wodonga was completed. A goods shed was built at this time in 1873 and a permanent train station was completed in 1874. The expansion of the railways to the northeast of Victoria occurred after the Victorian Government took over the railways in 1867 and the trains serviced large towns such as Seymour, Wangaratta and Wodonga, as well as smaller towns along the way. The Tallangatta and Cudgewa train lines from Wodonga were built in stages from the 1880s to the 1920s in what is considered to be some of the most challenging landscape for railways. The Cudgewa line was opened in 1921, so the Wodonga train station sign dates from this period.The Wodonga train station sign has local and state significance due to its use in Wodonga in the late 19th and early 20th centuries, as part of the expansion of the Victorian Railways in the northeast of the state.Old painted wooden sign from the Wodonga train station with the directions for changing to the Tallangatta and Cudgewa train line in light coloured paint on a black painted background."WODONGA / CHANGE FOR / TALLANGATTA & CUDGEWA / LINE" wodonga railway station, wodonga train station, tallangatta train line, cudgewa train line, railway signs, victorian railways signs -
 Wodonga & District Historical Society Inc
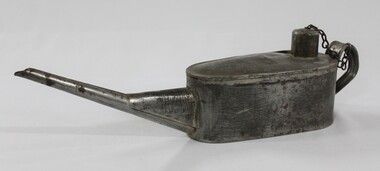
Functional object - Victorian Railways Oil Can/Feeder
The Victorian Railways oil can/feeder was used to oil various parts of engines of trains as part of the maintenance of trains. This would have been carried out by employees in the 'Rolling Stock Branch' of Victorian Railways, which included the maintenance and operation of locomotives and rolling stock. It was donated by a resident of Wodonga, and the Wodonga train line and train station opened in November 1873 when the section of the line from Wangaratta to Wodonga was completed. The expansion of Victorian Railways to the northeast of Victoria occurred after the Victorian Government took over the railways in 1867 and the trains serviced large towns such as Seymour, Wangaratta and Wodonga, as well as smaller towns along the way.The oil can/feeder has local significance as it was donated by a resident of Wodonga, as well as state significance as an example of the equipment used by the Victorain Railways.Grey metal Victorian Railways oil can/feeder used to oil various parts of train engines, with a long spout, handle and a chain attached to the lid."V↑R" on the proper left side.oil can, oil feeder, vintage oil cans, vintage oil feeders, victorian