Showing 3524 items matching " tram 3"
-
 Ballarat Tramway Museum
Photograph - Colour Photograph/s - set of 2, 5/03/1971 12:00:00 AM
Yields information the Victoria St terminus and the appearance of the Gardens in March 1971.Set of two colour prints: .1 - No. 33 at Victoria St terminus, 5/3/1971 .2 - view of the Botanic gardens with the statute of Wallace and the old hot house in the background. Date 5/3/71. Many colour garden beds in the photograph. Printed on Kodak paper.On the rear of the photograph is a stamp with date, place and subject details.trams, tramways, victoria st, gardens, botanical gardens, tram 33 -
 Ballarat Tramway Museum
Photograph - Colour Print/s - set of 10, Earl Ewers, 25/09/2005 12:00:00 AM
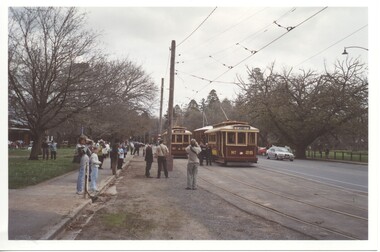
Yields information about the centenary celebrations of electric trams in Ballarat in 2005 and some of the people involved.Set of 10 colour prints with a white border of the celebrations for the centenary of electric trams in Ballarat - 25/9/2005. .1 - Scene at the loop with 17, 26 and 28. .2 - Horse tram at the loop with Lyall Drayton standing by the horses. .3 - ditto with onlookers. .4 - Sam Boon on Tram 17 .5 - Horse tram at the loop with Lyall Drayton standing by the horses. .6 - Horse tram and another in the loop .7 - No. 17 at Depot Junction with Darren Hutchesson alongside .8 - No. 17 in Wendouree Parade. .9 - No. 17 at Fairyland .10 - Horse tram at the loop with Lyall Drayton standing by the horses. Printed on Kodak Royal Paper. Earl Ewers photograph.trams, tramways, horse tram, centenary, wendouree parade, btm, tram 26, tram 27, tram 1, tram 17 -
 Ballarat Tramway Museum
Photograph - Colour Print/s - set of 5, Earl Ewers, 25/09/2005 12:00:00 AM
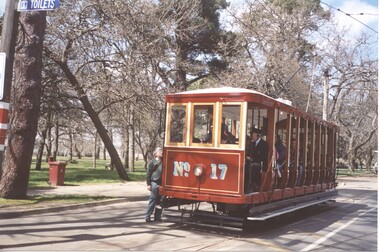
Yields information about the centenary celebrations of electric trams in Ballarat in 2005 and some of the people involved.Set of 5 colour prints of Bendigo No. 17 in Wendouree Parade and St Aidans Drive during the celebrations for the centenary of electric trams in Ballarat - 25/9/2005. .1 - Depot Junction .2 - at St Aidans Drive - with Greg Rogers .3 - at St Aidans Drive .4 - at St Aidans Drive with Graeme Cleak and Darren Hutchesson .5 - ditto Printed on Kodak Royal Paper. Earl Ewers photograph. trams, tramways, bendigo, centenary, wendouree parade, btm, tram 17 -
 Ballarat Tramway Museum
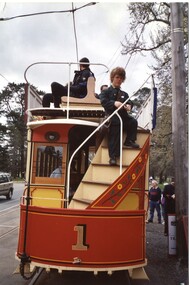
Photograph - Colour Print/s - set of 6, Earl Ewers, 25/09/2005 12:00:00 AM
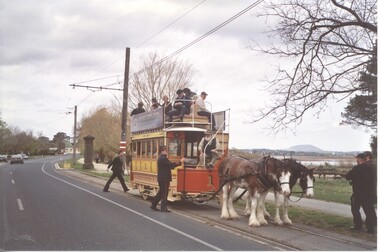
Yields information about the centenary celebrations of electric trams in Ballarat in 2005 and some of the people involved.Set of 6 colour prints of Ballarat Horse Tram No. 1,Bendigo 17 in Wendouree Parade during the celebrations for the centenary of electric trams in Ballarat - 25/9/2005. .1 - No. 1 at St Aidans Drive .2 - 17 and 1 at Loop .3 - at St Aidans Drive with Lake Wendouree in background. .4 - at St Aidans Drive .5 - ditto .6 - ditto Printed on Kodak Royal Paper. Earl Ewers photograph. trams, tramways, bendigo, centenary, wendouree parade, btm, tram 17, tram 1 -
 Ballarat Tramway Museum
Photograph - Colour Print/s - set of 15, Earl Ewers, 25/09/2005 12:00:00 AM
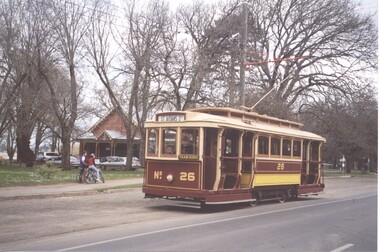
Yields information about the centenary celebrations of electric trams in Ballarat in 2005 and some of the people involved.Set of 15 colour prints of Ballarat Horse Tram No. 1 and Bendigo 17 in Wendouree Parade and St Aidans Drive during the celebrations for the centenary of electric trams in Ballarat - 25/9/2005. .1 - No. 26 at the loop .2 - No. 1 at the loop .3 - 26 and 1 at loop .4 - 1, ? and 17 at loop with lots of people .5 - 1 leaving the loop .6 - 1, 17 and 28 at loop .7 - ditto .8 - 28 and 1 at loop - Roger Salen and Austin Brehaut .9 - 1 arriving at the loop from Depot Junction .10 - 1 at loop - side on view .11 - 1 at loop - Alan Bradley and friends. .12 - 1 at loop .13 - ditto .14 - 17 and 28 at loop .15 - 1 at loop - Alan Bradley and friends. Printed on Kodak Royal Paper. Earl Ewers photograph. trams, tramways, bendigo, centenary, wendouree parade, btm, tram 17, tram 1, tram 26, tram 28 -
 Ballarat Tramway Museum
Photograph - Colour Print/s - set of 7, Earl Ewers, 25/09/2005 12:00:00 AM
Yields information about the centenary celebrations of electric trams in Ballarat in 2005 and some of the people involved.Set of 7 colour prints of some of the people involved during the celebrations for the centenary of electric trams in Ballarat - 25/9/2005. .1 - Neil Lardner .2 - Neil Lardner, Lyle Drayton .3 - Alan Bradley .4 - Alan Bradley .5 - Frank Puls and Simon Green .6 - Darren Hutchesson and Carolyn Dean .7 - Earl Ewers Printed on Kodak Royal Paper. Earl Ewers photograph. trams, tramways, bendigo, centenary, wendouree parade, btm, tram 17, tram 1 -
 Ballarat Tramway Museum
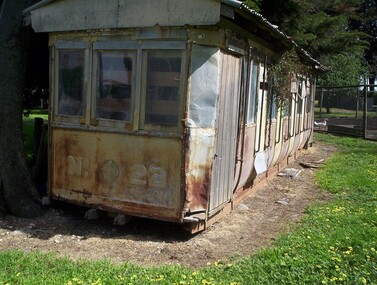
Photograph - Colour Print/s - set of 6, Paul Mong, 2/02/2009 12:00:00 AM
Yields information about the condition of Ballarat ESCo tram No. 22 prior to acquisition by the Museum in 2009.Stt of 6 digital image prints - printed on a colour laser printer of Ballarat No. 22 prior to recovery from Sebastopol. Photos taken by Paul Mong 2/2/2009. See email in worksheet file for source information. .1 - 3/4 front on view .2 - side on view .3 - Interior roof view .4 - end view of number .5 - view of the side of the tram that was against the fence. .6 - another side view. See email date 2/2/2009trams, tramways, btm, sebastopol type, recovery, acquisitions, tram 22 -
 Ballarat Tramway Museum
Photograph - Black & White Photograph/s, Wal Jack, 7/03/1954 12:00:00 AM
Black and White print contained within the Wal Jack Bendigo and Geelong Album, see Reg Item 5003 for more details. Photo of No. 21 in Mitchell St, near the Railway Station, 7-3-1954. Photo by Wal Jack. Printed on Ilford paper. See image i2 for rear of photograph. See image i3 for hi res scan of negative On the rear in blue ink "SEC Bendigo No 21 in Mitchell St near Rly Stn Sunday morning 7-3-54" with Wal Jack copyright stamp in the top right hand corner and the number "T67PC" written in.trams, tramways, bendigo, mitchell st, tram 21 -
 Ballarat Tramway Museum
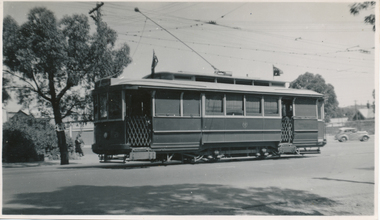
Photograph - Bendigo tram 22 decorated for Queens visit, Wal Jack, 7/03/1954
Photograph of No. 22 decorated for the Queen's visit (Royal visit) at the depot 7-3-1954. Photos by Wal Jack. Shows the decorations applied to the tram. The first has a depot worker standing in the drivers doorway. Single copy from the Ken Magor collection also held. Printed on Ilford paper. See Reg Item 7878 for a photo of the same tram on the depot access track. See image i2 for rear of photograph. See image i3 for hi res scan of negative Yields information about Bendigo tram 22 decorated for the 1954 visit of Queen Elizabeth IIBlack and White prints contained within the Wal Jack Bendigo and Geelong Album, see Reg Item 5003 for more details.On the rear in blue ink "SEC Bendigo No 22 decorated for Queen's visit, outside depot 7-3-54" with Wal Jack copyright stamp in the top right hand corner and the number "T74PC" written in.trams, tramways, bendigo, royal visit, decorated trams, depot, tram 22 -
 Ballarat Tramway Museum
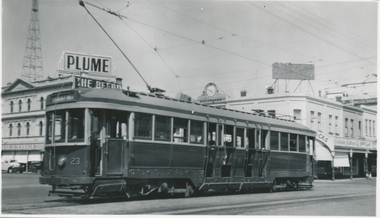
Photograph, Wal Jack, Bendigo No. 23 at Charing Cross, 3/01/1954
Photo of No. 23 at Charing Cross with the destination of Quarry Hill, photo by Wal Jack 3-1-1954. Has the Beehive in the background, a Plume petrol sign and the watchmaker's clock in the background. Printed on Ilford paper. Two prints held. See image i2 for rear of photograph. See image i3 for hi res scan of negative Yields information about Bendigo tram 23 in 1954 and Charing Cross.Black and White print contained within the Wal Jack Bendigo and Geelong Album, see Reg Item 5003 for more details. On the rear in blue ink "SEC Bendigo No 23 bogie to Quarry Hill at Fountain (Charing Cross) Bendigo 3-1-54" with Wal Jack copyright stamp in the top right hand corner and the number "T59PC" written in.trams, tramways, bendigo, charing cross, tram 23 -
 Ballarat Tramway Museum
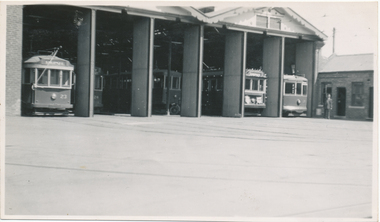
Photograph - Black & White Photograph/s, Wal Jack, 7/03/1954 12:00:00 AM
Black and White print contained within the Wal Jack Bendigo and Geelong Album, see Reg Item 5003 for more details. Photo of the front of the Bendigo depot, 7-3-1954, by Wal Jack, with bogie trams 23 and 24, "new" scrubber, No. 22 decorated, 28 Birney. Printed on Ilford paper. See image i2 for rear of photograph. See image i3 for hi res scan of negative On the rear in blue ink "SEC Bendigo Nos 23 24)bogies, new scrubber, No. 22 decorated, 28 Birney at depot 7-3-54" with Wal Jack copyright stamp in the top right hand corner and the number "T68PC" written in.trams, tramways, bendigo, depot, tram 24, tram 23, tram 22, tram 28, scrubber -
 Ballarat Tramway Museum
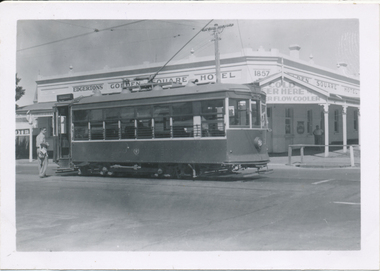
Photograph - Black & White Photograph/s, Wal Jack, 3/01/1954 12:00:00 AM
Black and White print contained within the Wal Jack Bendigo and Geelong Album, see Reg Item 5003 for more details. Photo of Bendigo Birney No. 30 at Golden Square Terminus, 3/1/1954. Has Edgerton's Golden Square Hotel in the background with date of 1857 on building corner and "Cold Beer Here and "?..er flow cooler" on the front verandah of the hotel. Note the railing around the drainage channel. i1 - scan of print in the album i2 - rear of image i3 - scan of negative at 3200dpi added 6/6/2020. On the rear in blue ink "SEC Bendigo Birney No. 30 at Golden Square terminus 3rd Jan '54" with Wal Jack copyright stamp in the top right hand corner and the number "T215" written in.trams, tramways, bendigo, golden square, birney, tram 30 -
 Ballarat Tramway Museum
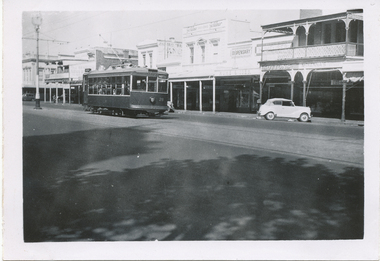
Photograph - Black & White Photograph/s, Wal Jack, 3/01/1954 12:00:00 AM
Black and White print contained within the Wal Jack Bendigo and Geelong Album, see Reg Item 5003 for more details. Photo of Bendigo Birney No.28 in High St Bendigo, 3-1-1954, Photo Wal Jack. Has in the background the City Club Hotel, Desmond's Radio Parts and a Ice cream shop and Marshalls Fruit Shop Printed on Ilford Paper. See image i2 for rear of photograph. See image i3 for hi res scan of negative On the rear in black ink "SEC Bendigo Birney 28 to Golden Square, High St Bendigo, 3-1-54", in the top left hand corner, the Wal Jack copyright stamp but with no number written in.trams, tramways, bendigo, high st, birney, tram 28 -
 Ballarat Tramway Museum
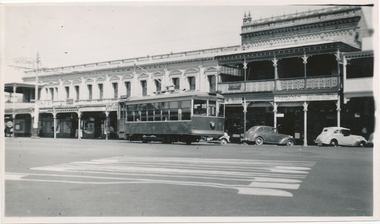
Photograph - Black & White Photograph/s, Wal Jack, 3/01/1954 12:00:00 AM
Black and White print contained within the Wal Jack Bendigo and Geelong Album, see Reg Item 5003 for more details. Photo of Bendigo Birney No. 28 in Pall Mall opposite near Post Office, Photo by Wal Jack, 3-1-54. In the background are shops for: Suttons Furniture, McKenna's, Hume & Iser Dispensary, and Gestetner Sales and Service. On the rear in blue ink "SEC Bendigo Birney No. 28 Birney ex North opposite Post Office 3-1-54" with Wal Jack copyright stamp in the top right hand corner and the number "T214" written in.trams, tramways, bendigo, pall mall, birney, tram 28 -
 Ballarat Tramway Museum
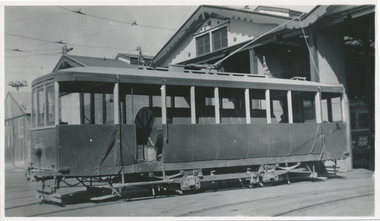
Photograph - Bendigo new scrubber outside the depot, Wal Jack, 7/03/1954
Photo of Bendigo of the then new scrubber outside the depot, 7-3-1954, Wal notes say converted from No. 17 Summer car. Photo by Wal Jack. Printed on Ilford paper. The Bendigo Trust rebuilt the tram back to its cross bench form during the 1970s. See image i2 for rear of photograph. See image i3 for hi res scan of negative See image i4 for hi res scan of negative of a second almost identical photograph.Yields information about the Bendigo scrubber converted from a cross bench tram.Black and White print contained within the Wal Jack Bendigo and Geelong Album, see Reg Item 5003 for more details.On the rear in blue ink "SEC Bendigo "New" water scrubber converted from No. 17 Summer car Bendigo Depot 7-3-54" with Wal Jack copyright stamp in the top right hand corner and the number "T70PC" written in.trams, tramways, bendigo, depot, scrubber tram, scrubber -
 Ballarat Tramway Museum
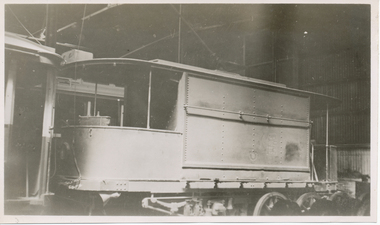
Photograph - Black & White Photograph/s, Wal Jack, 7/03/1954 12:00:00 AM
Black and White print contained within the Wal Jack Bendigo and Geelong Album, see Reg Item 5003 for more details. Photo of the first or old Bendigo Water tram or scrubber inside the depot, 7-3-1954, Photo by Wal Jack. Wal's album notes say that the vehicle is "now out of use". See Reg Item 7880 for another photograph from the other side. See image i2 for rear of photograph. See image i3 for hi res scan of negative On the rear in blue ink "SEC old "Brush" scrubber inside depot 7-3-54" with Wal Jack copyright stamp in the top right hand corner and the number "T73PC" written in.trams, tramways, bendigo, depot, scrubber tram, sprinkler tram, scrubber, sprinkler -
 Ballarat Tramway Museum
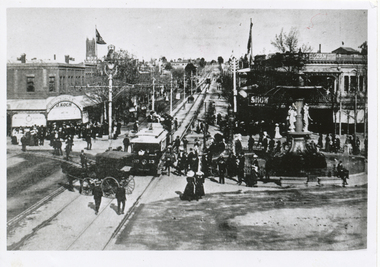
Photograph - Black & White Photograph/s, The Bendigonian, Sep. 2005
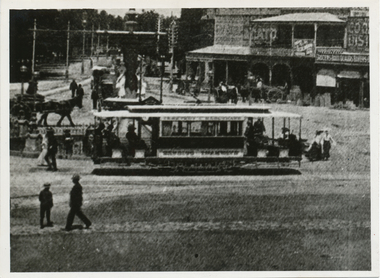
Black and White copy print contained within the Wal Jack Bendigo and Geelong Album, see Reg Item 5003 for more details. Photo of looking east along Mitchell St towards the Railway Station with tram No. 13 and a double deck trailer - has the centre poles along Mitchell St. in the photograph. In the background is a J. Koch and the Bendigo Supply Stores. Has fountain in photograph. Copied by Keith Kings from The Bendigonian 19/9/1905. On rear in ink " SA782, Bendigo, No. 13 - 3 window saloon Charing Cross. Note:- Crossover in Mitchell St.". Copied ex "The Bendigonian 19/9/1905."trams, tramways, bendigo, charing cross, horse trams, mitchell st -
 Ballarat Tramway Museum
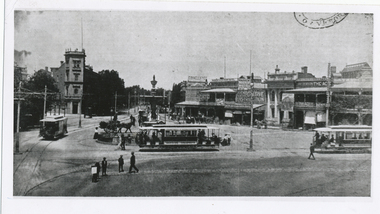
Photograph - Black & White Photograph/s, The Bendigonian, Jan. 2005
Black and White copy print contained within the Wal Jack Bendigo and Geelong Album, see Reg Item 5003 for more details. Photo of Charring cross looking from Pall Mall towards High St and the south west corner buildings in the photograph. Features three ESCo trams, 2 x two window and 1 x 3 window at the location. In the background are the buildings on the south west corner of Charing Cross, featuring an advertisement for The Age, Cooperative Distribution centre, Warrens View Point Hotel, Hamptons Newsagency and Connelly & Co. Copied by Keith Kings from The Bendigonian 3/1/1905. On rear in ink " SA776 Tramcars at Charing Cross, Note" 3 window saloon" Copied ex "The Bendigonian 3/1/1905."trams, tramways, bendigo, charing cross, esco -
 Ballarat Tramway Museum
Photograph - Black & White Photograph/s, The Bendigonian, Jan. 2005
Black and White copy print contained within the Wal Jack Bendigo and Geelong Album, see Reg Item 5003 for more details. Photo of Charring cross looking from Pall Mall towards High St and the south west corner buildings in the photograph. Features a three window ESCo. tramcar In the background are the buildings on the south west corner of Charing Cross, featuring an advertisement for The Age, Cooperative Distribution centre, Warrens View Point Hotel, Hamptons Newsagency and Connelly & Co. Copied by Keith Kings from The Bendigonian 3/1/1905. On rear in ink " SA776 Bendigo A 3 window saloon at Charring Cross" Copied ex "The Bendigonian 3/1/1905."trams, tramways, bendigo, charing cross, esco -
 Ballarat Tramway Museum
Photograph - Black & White Photograph/s, Wal Jack, 3/03/1940 12:00:00 AM
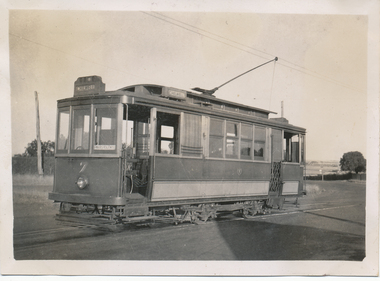
Black and White print contained within the Wal Jack Bendigo and Geelong Album, see Reg Item 5003 for more details. Photo of Geelong No. 7 at the East terminus. The tram has the destination of Chilwell. In the background are paddocks. Photo by Wal Jack 3/3/1940. Printed on Kodak paper. i1 - scan of print in the album i2 - rear of image i3 - scan of negative at 3200dpi added 6/6/2020. On rear in ink "T140 Geelong Tramways No. 7 Brush Saloon, East terminus 3-3-40. W Jack photo"trams, tramways, geelong, east, tram 7 -
 Ballarat Tramway Museum
Photograph - Black & White Photograph/s, Keith Kings, 31/07/1955 12:00:00 AM
Black and White print contained within the Wal Jack Bendigo and Geelong Album, see Reg Item 5003 for more details. Photo of Geelong No. 5 painted with zebra stripes at Belmont 31/7/1955. Photo by Keith Kings. On rear in ink - in top right hand corner, the Keith Kings copyright stamp with number P(b)(3) written in. "Geelong No. 5 "Zebra" painted ends, but without canopy. On car thus. 31/7/55".trams, tramways, geelong, belmont, tram 5 -
 Ballarat Tramway Museum
Photograph - Black & White Photograph/s, Wal Jack, 26/03/1939 12:00:00 AM
Black and White print contained within the Wal Jack Bendigo and Geelong Album, see Reg Item 5003 for more details. Photo of Geelong No. 15 at the Wharf terminus, Moorabool St, 26-3-1939. Photo by Wal Jack. Tram has the destination of Newtown. In the background are the Australian Steamships Pty Ltd Office and Sailor's Rest building. Printed on Ilford paper. i1 - scan of print in the album i2 - rear of image i3 - scan of negative at 3200dpi added 6/6/2020. On rear in ink "SEC Geelong No. 15 Birney at Moorabool St Wharf terminus. 26-3-1939." Has the Wal Jack copyright stamp in the top right hand corner with the number "T264" written in.trams, tramways, geelong, moorabool st, wharf, tram 15 -
 Ballarat Tramway Museum
Photograph - Black & White Photograph/s, Wal Jack, 3/01/1945 12:00:00 AM
Black and White print contained within the Wal Jack Bendigo and Geelong Album, see Reg Item 5003 for more details. Photo of No. 17 from the Railway Station turning out of Railway Terrace into Mercer St. 3-1-1945. Printed on Ilford Paper. Tram has the destination of West. i1 - scan of print in the album i2 - rear of image i3 - scan of negative at 3200dpi added 30/6/2020.Has the rear in ink "SEC Geelong No. 17 from the Railway Station turning out of Railway Terrace into Mercer St. 3rd January 1945". Has the Wal Jack copyright stamp on the rear with the number T319 written in.trams, tramways, geelong, mercer st, railway station, tram 17 -
 Ballarat Tramway Museum
Photograph - Black & White Photograph/s, Leon Marshall Wood, 29/03/1948 12:00:00 AM
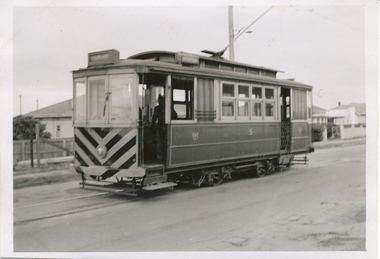
Black and White print contained within the Wal Jack Bendigo and Geelong Album, see Reg Item 5003 for more details. Photo of No. 24 in Aberdeen St, 29-3-1948. Wal's album notes that the tram is in the new colour (all green) scheme. Printed on Velox Paper. Tram has the destination of East. Note the "Pay as you enter" sign. Has on the rear in ink "Aberdeen St, Geelong 29-3-48" and the L. M. Wood copyright stamp.trams, tramways, geelong, aberdeen st, east, tram 24 -
 Ballarat Tramway Museum
Photograph - Black & White Photograph/s, Wal Jack, c1940
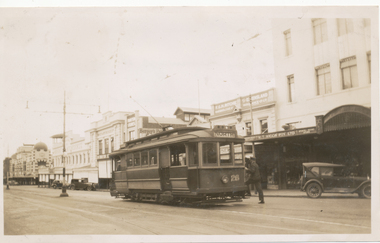
Black and White print contained within the Wal Jack Bendigo and Geelong Album, see Reg Item 5003 for more details. Photo of 26 in Moorabool St, Geelong. Tram has the destination of North. Printed on Kodak Velox paper. No date given, but c1940. In the background is building for W. T. Wiggs Pty Ltd sports store, F. G. H Ritchie Queensland Insurance and Berger's Paints On rear in ink "Geelong Tramways No. 26, Ex M&MTB made into 1 man car, 3 in service 24, 25, 26"trams, tramways, geelong, moorabool st, tram 26 -
 Ballarat Tramway Museum
Photograph - Black & White Photograph/s, Wal Jack, 3/01/1945 12:00:00 AM
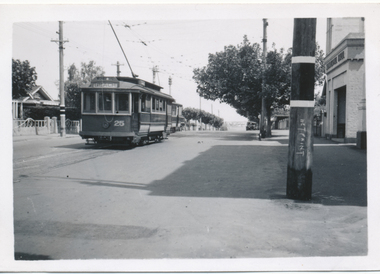
Black and White print contained within the Wal Jack Bendigo and Geelong Album, see Reg Item 5003 for more details. Photo of No. 25 and 1 at the junction between the Newtown and East lines, in Pakington St. Photo by Wal Jack 3/1/1945. City of Newtown and Chilwell offices on the right hand side. i1 - scan of print in the album i2 - rear of image i3 - scan of negative at 3200dpi added 29/6/2020. Has the rear in ink "SEC Geelong No. 25 from Beach to Newtown, No. 1 from East to Chilwell (straight down hill) Newtown Junc. Pakington St 3-1-45". Has the Wal Jack copyright stamp on the rear with the number T326 written in.trams, tramways, geelong, pakington st, newtown, east, tram 25, tram 1 -
 Ballarat Tramway Museum
Photograph - Black & White Photograph/s, 29/03/1948 12:00:00 AM
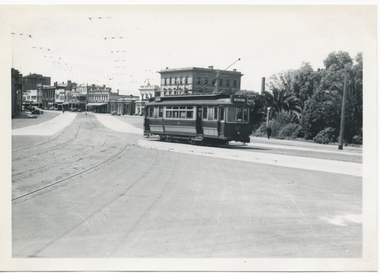
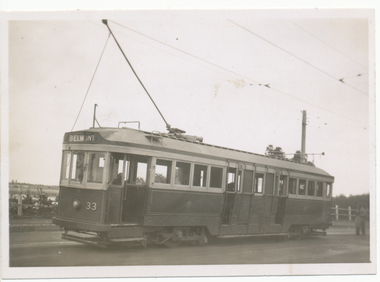
Black and White print contained within the Wal Jack Bendigo and Geelong Album, see Reg Item 5003 for more details. Photo of Geelong No. 33 on the Barwon Bridge, with the destination of Belmont. Photo by Leon Marshall Wood, 29-3-1948. Printed on Kodak Velox paper. On rear in ink "Geelong 29.3.48, Barwon Bridge". Has the L. M Wood copyright stamp on rear.trams, tramways, geelong, belmont, tram 33 -
 Ballarat Tramway Museum
Photograph - Black & White Photograph/s, c1950
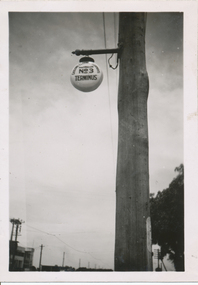
Black and White print contained within the Wal Jack Bendigo and Geelong Album, see Reg Item 5003 for more details. Photo of an illuminated street sign, lamp, at the North Geelong terminus. Photographer not known, c 1950. Sign has the words "Geelong Electric Tramways / Destination? / No. 3 Terminus"On the rear in ink "Illuminated terminal sign"trams, tramways, geelong, signs, north -
 Ballarat Tramway Museum
Photograph - Black & White Photograph/s, Leon Marshal Wood, 29/03/1948 12:00:00 AM
Black and White print contained within the Wal Jack Bendigo and Geelong Album, see Reg Item 5003 for more details. Photograph of the Geelong Scrubber, sprinkler or water tram at the depot, Photo by Leon Marshal Wood, 29-3-1948, photo printed on Kodak Velox Paper.On rear in ink "Geelong 29-4-48" and the Leon Marshal Wood copyright stamp.trams, tramways, geelong, depot, scrubber tram, sprinkler tram, scrubber, water tram, sprinkler -
 Ballarat Tramway Museum
Photograph - Black & White Photograph/s - set of 6, Keith Kings, 8/01/1956 12:00:00 AM
... standing in front of the tramcar. .3 - No. 6 - last tram at North..., Sun 8/1/56 - Q(x)(7) .3 - Geelong - 6 - last tram at North... - last tram at West at terminus, Sun 8/1/56 - Q(x)(7) .3 ...Black and White print contained within the Wal Jack Bendigo and Geelong Album, see Reg Item 5003 for more details. Set of six black and white photographs from Keith Kings of the staged closures of the Geelong tramways. Note some of these photographs are very similar to those of Geoff Grant - See Reg Item 485 and 476i7. .1 - No. 18 last tram to East, leaving city - 8/1/1956 - KSK Photo Q(x)(6) .2 - No. 7, last tram at West at terminus - 8/1/1956 - KSK Photo Q(x)(7) - has a group of people standing in front of the tramcar. .3 - No. 6 - last tram at North terminus, with a very large group of people in front of tram. Tram has the destination of North. 4/3/1956 - KSK Photo T(b)(6). .4 - No. 18 - last tram at Newtown terminus, with a very large group of people in front of tram. Tram has the destination of Newtown. 22/1/1956 - KSK Photo R(y)(3). .5 - No. 19, last tram to Eastern Park, at terminus on second last trip, with conductor on front step. 22/1/56, KSK Photo R(y)(2). Tram has the destination of Eastern Park. .6 - No. 1 - last regular tram from Beach to Chilwell, leaving Beach terminus - KSK Photo Q(x)(5).On the rear in ink and with the Keith Kings Copyright stamp: .1 - Geelong - 18 last tam to East leaving city, Sun 8/1/56 - Q(x)(6) .2 - Geelong - 7 - last tram at West at terminus, Sun 8/1/56 - Q(x)(7) .3 - Geelong - 6 - last tram at North terminus, Sun 4/3/56 - T(b)(6) .4 - Geelong - 18 - last tram at Newtown terminus, Sun 22/1/56 - R(y)(3) .5 - Geelong - 19 - last tram to Eastern Park, at terminus on second last trip - Sun 22/1/56 - R(y)(2) .6 - 1 - last regular tram from Beach to Chilwell, leaving Beach terminus, Sun 8/1/56 - Q(x)(5)trams, tramways, geelong, closure, east, north, chilwell, beach, newtown, eastern park, last tram, tram 18, tram 7, tram 6, tram 19, tram 1