Showing 2902 items matching " garden city"
-
 Ballarat Tramway Museum
Photograph - B&W print of donated negative, Ron E. Fluck, 1968
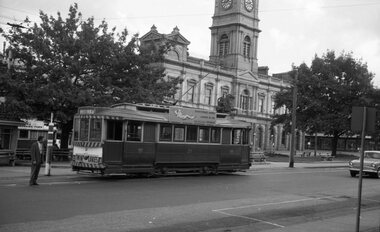
Black and white print of a donated negative. Print made 8/1998. Photo of SEC tram No. 21 at the City Terminus during 1968. Has Town Hall in background. Tram has destination of Lydiard St. North. Advertisement for Twin Lakes on front dash and SEC Roof Ad ("Everything is under control in my all electric kitchen"_ Negative rescanned 9-5-2020 and image updated.tramways, trams, sturt st, town hall, ballarat, 21, tram 21 -
 Ballarat Tramway Museum
Document - Calendar, Topmill Pty Ltd, "Australian Trams 1999 Calendar", 1998
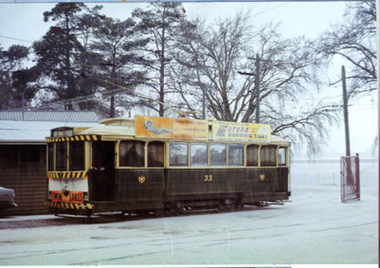
24 Page full colour calendar featuring Australian Trams, published by Top mill Pty Ltd. Cover (1299i5) features Sydney trams outside Central station in Eddy Ave. Other cities represented - Brisbane, Sydney, Adelaide, Perth, Fremantle, Bendigo, Ballarat, Sydney light rail, Hobart and Melbourne. Photos by Hugh Ballment, Dale Budd, Robert Merchant, Arthur Perry and the Sydney Tramway Museum. Priced at $9.95, and has "Parkholme Newsagency and Toys" sticker over bar code section, giving the same price. Distributed by Gordon and Gotch. Ballarat trams - 1299i1 - 33 at depot during hail storm on 20/8/1971 and 1299i2 - BTM trams 14 and 26 at Carlton St. during BTM operations 1970's or early 1980's. Used for month of June. Bendigo trams - 1299i3 - No. 4 at Eaglehawk terminus - 1/2/1971 and 1299i4 - trams 28, 2, 23 and two single truckers at Charing Cross 1970. Used for month of May.tramways, trams, australian trams, ballarat, bendigo, museums -
 Ballarat Tramway Museum
Photograph - Black & White Photograph/s, Sutcliffe Pty Ltd, 1926
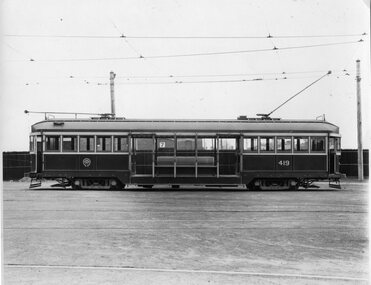
Black and white photograph of W1 419 photographed side on at South Melbourne Depot - 1926c. Photographed by Sutcliffe Pty Ltd. Assumed photograph taken soon after the tram was built in 1926. Has "Sutcliffe Pty. Ltd. Photographers Cromwell buildings 366a Bourke St. Melbourne" stamp in purple on back of photo. See Destination City, 4th Edition.On rear in pencil "W1 we have 30 of these. No more will be constructed." "M&MTB" and "41".trams, tramways, mmtb, w1 class, tram 419 -
 Ballarat Tramway Museum
Photograph - Black & White Photograph/s, Sutcliffe Pty Ltd, c1929
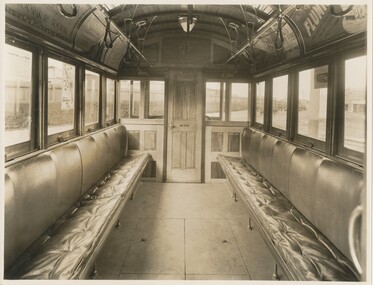
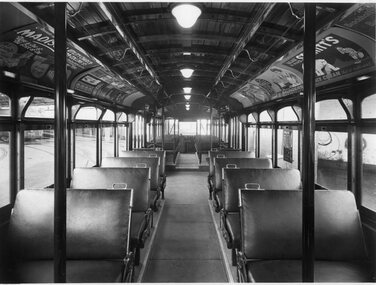
Black and white photograph of the interior a W2 end saloon showing the longitudinal seats upholstered in leather. Photo taken at Preston Workshops, shows interior fit out at the time of construction, with central strap hangers (leather), light fittings. Tram would appear to have been service for some time as it is fitted with advertisements and M&MTB posters. Destination City, 4th Edition page 42 notes that W2 329, 331, 332, 335 were fitted with leather seating in 1929. Keith Kings identified that the tram is 329 in a photo held by the Melbourne Tram Museum. Taken by Sutcliffe Pty Ltd. Photographers. Has "Sutcliffe Pty. Ltd. Photographers Cromwell buildings 366a Bourke St. Melbourne" stamp in purple on back of photo.On rear in pencil "Interior W2 upholstered in leather", "M&MTB" and "40".trams, tramways, mmtb, w2 class, upholstery, interiors, tram 329 -
 Ballarat Tramway Museum
Photograph - Black & White Photograph/s, Sutcliffe Pty Ltd, c1928
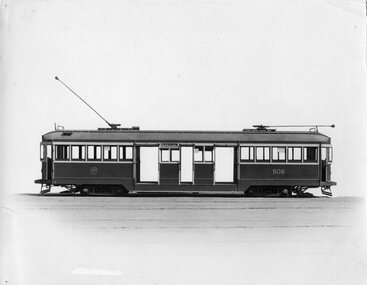
Black and white photograph of the side on exterior of W2 506 c1928 (Built by James Moore 1928) Would appear to have been service for as it is fitted with notices in the windows. Taken by Sutcliffe Pty Ltd. Photographers. Background has been faded or painted out. Tram has doors and windshields to driver's cabins. Has "Sutcliffe Pty. Ltd. Photographers Cromwell buildings 366a Bourke St. Melbourne" stamp in purple on back of photo. Destination City, 4th EditionOn rear in pencil "W2 Melbourne", "M&MTB" and "39".trams, tramways, mmtb, w2 class, tram 506 -
 Ballarat Tramway Museum
Photograph - Black & White Photograph/s, Sutcliffe Pty Ltd, 1939
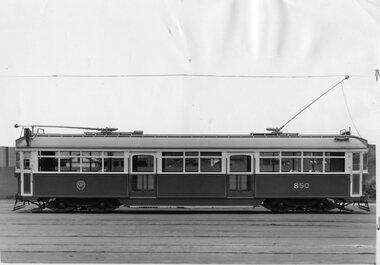
Black and white photograph of MMTB SW6 850 probably soon after n. Side on photograph of tram. Destination City gives build date 1939 and notes that car was built with a tail light/s, which is visible at the right end of the tram. Has cropping marks in ink on right side of photograph. On rear is a type note (glued on sheet of paper) specifications of the tramcar and car dimensions. Destination City 5th edition gives a view of the tram - 3/4 front on showing the tail light arrangement - p41. Also on rear is "Sutcliffe Pty Ltd, Commercial Photographers 94 Elizabeth St. Melbourne, Cent 1500" stamp in light blue ink. and date stamp of print - "12 Jan 1946". See Destination City, 4th Edition and 5th edition.On rear in ink is notations "57", and measurement "4 9/16" with cropping mark.trams, tramways, mmtb, sw6 class, tram 850 -
 Ballarat Tramway Museum
Photograph - Y1 class tram interior, Sutcliffe Pty Ltd, early 1930's
Black and white photograph of the interior a Y1 class tram car, photographed at Camberwell Depot. Shows arrangements of seats, lights with covers and roof ads. A number of roof ads and window posters in the tram - of tram in service. Part of tram 550 in background. On rear is Sutcliffe stamp, and Gordon and Gotch stamp with date July 10. Has "Sutcliffe Pty. Ltd. Photographers Cromwell buildings 366a Bourke St. Melbourne" stamp in purple on back of photo. Destination City, 4th Edition and 5th edition.Yields information about the interior of a Y1 class tramcar.Black and white photograph with details on rear.On rear in pencil is "Return to F. Shennen" with arrow pointing to Gordon and Gotch stamp. "Interior Y1". The Sutcliffe stamp has two pencil crosses through it.trams, tramways, mmtb, y1 class, interiors -
 Ballarat Tramway Museum
Photograph - Black & White Photograph/s, HSN, 20/11/1932 12:00:00 AM
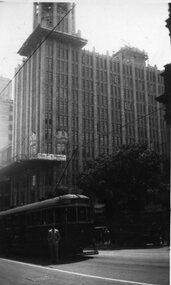
Black and white photograph of a westbound W2 in Collins St. Melbourne at the intersection with Swanston St with the Manchester Unity building in the background and parts of the Melbourne Town Hall alongside. The Manchester Unity building is under construction with the towers being completed. Tram showing destination of "CITY" and has a person standing alongside - see inscriptions.In pencil on the rear - "The escalator building / Ken standing in front of the tram / HSN / 20/11/32"trams, tramways, collins st, swanston st, manchester unity, melbourne -
 Ballarat Tramway Museum
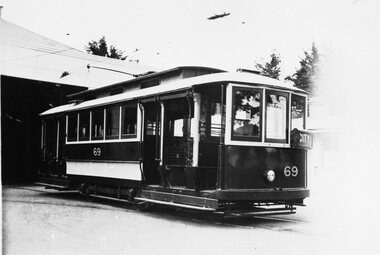
Photograph - B&W print of donated negative, State Electricity Commission of Victoria (SECV), c1938
Yields information ex Adelaide A class trams that were rebuilt by the SEC mid 1930's for service in Ballarat in as received condition ex AdelaideBlack and white photo print from a collected negative of ex Adelaide No. 69, later to become Ballarat No. 23, probably photographed soon after delivery in the depot yard, with the depot in the background. Car has the Adelaide type destination box, showing 'CITY'. Hi Res scan of neg added 16/5/2020.tramways, trams, adelaide, ballarat depot, conversion, tram 69, tram 23 -
 Ballarat Tramway Museum
Photograph - B&W print of donated negative and Digital Image of decorated tram 23, State Electricity Commission of Victoria (SECV), 1938
Ballarat No. 23 was decorated with waxed paper flowers for the centenary of settlement in the Ballarat district in 1938. Tram has female students on board, with a conductor alighting. Shows track brakes on the tramcar. A floral tram. See also Reg Items 1021, 1362 and 3813 for other photographs of this tram, in particular 3813 which is a colour rendition of this photograph. See page 70 & 71 of "The Golden City and its Tramways" for these photographs and others in use and notes.Yields information about Ballarat 's 23, ex Adelaide No. 69 when decorated for the 1938 state celebrations, school children on the tram and conductorsBlack and white photo prints from a collected negative. tramways, trams, centenary, decorated trams, special trams, floral tram, tram 23, tram 69 -
 Ballarat Tramway Museum
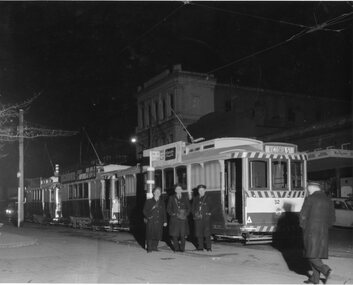
Photograph - Black & White Photograph/s, R.G. Vanselow, 30/08/1968 12:00:00 AM
Black and white photograph of SEC No. 32 and two other single truckers at the City Centre in Sturt St, on the north side. Photographed by R.G. Vanselow at 11.05pm on 30/8/1968. The three crew members (drivers) are standing by the tram stop pole while an Inspector walks towards them. Photo has the SEC building in the background. Tram 32 has a Wilkinson Sword razor blade roof ad. The 2nd tram has a roof ad for Myers Pixietown. Tram 32 showing destination of "Victoria St." Colour photocopy, laminated, of this photograph on display 5/2000 at 02-02-06 1380 Copy 2 - made by enlarging photo to an approx. A4 print by colour photocopying and laminated for display purposes. Made July 2000 for the Trams at Night exhibition in the depot. Made by W.Doubleday. Has four Velcro dots on rear. Overall size 210H x 272W. Stored in same box at rear of large photos area in an A4 plastic folder.On rear in pencil "Approx. 11.05pm, Fri 30 August 1968 / City Centre, Sturt St, / Ballarat" and in bottom right hand corner, in ink "With Compliments / R.G." and stamped in black ink "Vanselow".trams, tramways, city centre, sturt st, night photo, tram 32 -
 Ballarat Tramway Museum
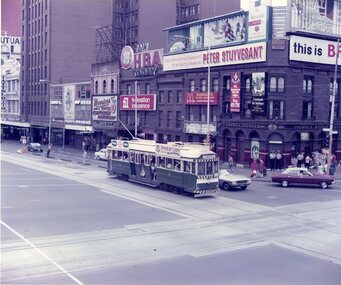
Photograph - Colour Photocopy/photocopies, John Phillips, 28/01/1980 12:00:00 AM
Yields information about the operation of a Ballarat (ex Melbourne) tram in Melbourne during an Australia Day celebrations by the BTPS and the city skyline at the time.Colour photograph of BTM Ballarat Tram No. 40 at the corner of Swanston St and Flinders St. Melbourne on 28 Jan. 1980. Tram fitted with Pioneer Settlement and Peters Ice Cream Roof Ads, showing Sebastopol destination. Taken during the Australia Day celebrations. Young & Jackson Hotel in the background with many advertisements. Photo taken from the Princes Bridge Station Plaza. Taken by John Phillips. Second copy added 9/11/2005 to display box D2. See also Reg Item 4131 and 4132 for other photos of the day - Wellington Parade. See 1979-1980 Annual Reportaustralia day, melbourne, btps, tram 40 -
 Ballarat Tramway Museum
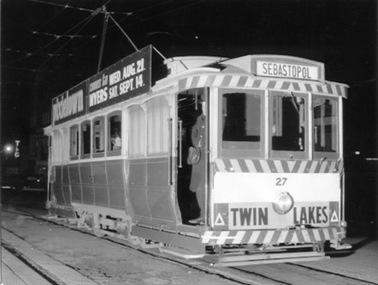
Photograph - Black & White Photograph/s, R.G. Vanselow, 30/08/1968 12:00:00 AM
Black and white photograph of SEC No. 27 with destination of Sebastopol waiting at the City terminus on Friday 30 August 1968. Has driver standing in doorway, looking very cold and one passenger in saloon looking at photographer. Tram has a "Twin Lakes" advertisement on the drivers cab panel and "Pixietown" and "comes to Myers Wed. August 21 - Sat. Sept. 14" roof advertisements. Illuminated T&G sign in the background. Copy 1 - Colour photocopy, laminated, of this photograph on display 5/2000 at 02-02-06 Copy 2 - made by enlarging photo to an approx. A4 print by colour photocopying and laminated for display purposes. Made July 2000 for the Trams at Night exhibition in the depot. Made by W.Doubleday. Has four Velcro dots on rear. Overall size 210H x 275W. Stored in same box at rear of large photos area in an A4 plastic folder.On rear in pencil "Approx. 11.05pm, Fri 30 August 1968 / City Centre, Sturt St, / Ballarat" and in bottom right hand corner, in ink "With Compliments / R.G." and stamped in black ink "Vanselow".trams, tramways, city centre, sturt st, night photo, tram 27 -
 Ballarat Tramway Museum
Photograph - Black & White Photograph/s, Peter Bruce, Digital image - "City Loop and Bridge St", 1971
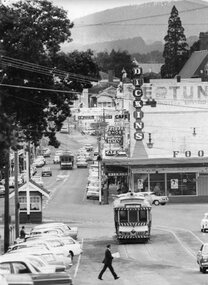
Yields information about the buildings and trams in view from Lydiard St looking east along Bridge St.Black and white photograph of SEC No. 31 and two other single truckers in the City Loop at the bottom end of Sturt St. near Grenville St and another single trucker in Bridge St. heading west, just after leaving the junction with Main and Victoria Sts. Has the Grenville St. tramway shelter. Telephoto lens used from about the intersection with Lydiard St. looking east. Has "Dickins" store and other shops in the background. Tram 31 shows the destination of City and has a Twin Lakes sign as well. Photograph by Peter Bruce, 1971. Digital image added 7/7/10. Peter Bruce title "City Loop and Bridge St"trams, tramways, sturt st, city loop, bridge st, dickins, tram 31 -
 Ballarat Tramway Museum
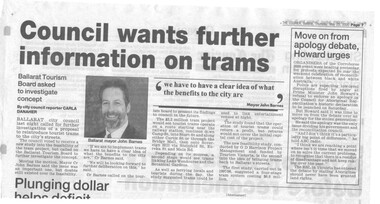
Newspaper, The Courier Ballarat, "Council wants further information on trams", 25/05/200
Newspaper cutting from The Courier Ballarat, Thursday May 25, 2000 about the consideration by the Ballarat City Council of the Tourism Board's report into the proposal to reintroduce tourist trams to the city streets. See also Reg. item 1433 for previous days cutting. Quotes Ballarat Mayor, John Barnes. Has a photo of the Mayor. Written by the city council reporter, Carla Danaher. Notes the Harrison Report. (See Reg. Item 1436) trams, tramways, ballarat revival, city of ballarat, harrison report -
 Ballarat Tramway Museum
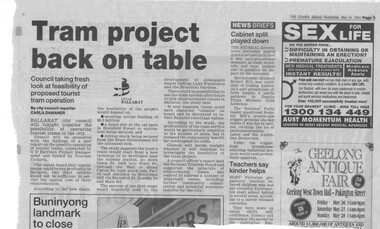
Newspaper, The Courier Ballarat, "Tram project back on the table", 24/05/200
Newspaper cutting from The Courier Ballarat, Wednesday May 24, 2000 about the consideration by the Ballarat City Council of the Tourism Board's report into the proposal to reintroduce tourist trams to the city streets that night. See also Reg. item 1432 for previous days cutting about the outcome. Gives details from the Harrison report. Written by the city council reporter, Carla Danaher. Notes the Harrison Report. (See Reg. Item 1436) trams, tramways, ballarat revival, city of ballarat, harrison report -
 Ballarat Tramway Museum
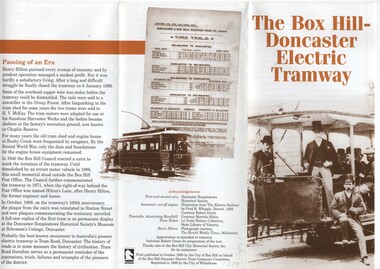
Pamphlet, City of Whitehorse, "The Box Hill - Doncaster Tram", 1998
Two colour pamphlet describing the history of the Australia's first electric tram service - Box Hill to Doncaster in 1889. Pamphlet folded into 6, with 9 photos and copy of timetable. Includes notes on sources, brochure preparation and edition details. Printed on white paper, with a reddish brown colour for headings and sepia toned photo backgrounds. On rear noted as reprint in 1998 of a 1989 brochure. Two copies held.trams, tramways, box hill, city of box hill, doncaster -
 Ballarat Tramway Museum
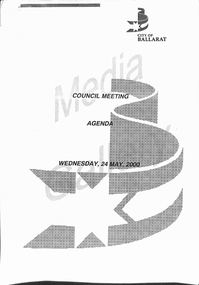
Document - Report, City of Ballaarat, "Ballarat City Tram Study", May. 2000
Twenty Six sheet document pertaining to the reinstatement of trams to Ballarat, presented to the Ballarat City Council on Wed. 24 May 2000. Details are: Sheets 1 to 3 - Cover and contents sheets for the Council Meeting of 24/5/2000 containing the Agenda, Ballarat City logo on white A4 paper. Sheet 4 - pages 37 and 38 of the Agenda, Officers report on the study work carried out, noting the Ballarat Tourism Board work, giving a summary, background, issues, options, financial implications, attachments and recommendation. On a white sheet of A4 paper. Sheets 5 - 26 - on green A4 paper - document titled "Ballarat Tourist Tram Study", final report dated August 1999, though not received by the Ballarat Tourism Board until March 2000. Written by G.D. Harrison Project Management Pty Ltd. Report looks at the marketing aspects, planning, infrastructure, staffing, ticketing and financial analysis, map of suggested route and comparative operations elsewhere.trams, tramways, ballarat city tramway, ballarat revival, harrison report, city of ballarat -
 Ballarat Tramway Museum
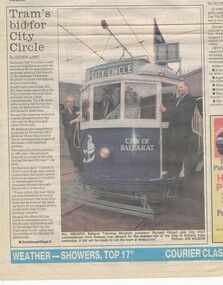
Newspaper, The Courier Ballarat, "Trams bid for City Circle", 5/12/1995 12:00:00 AM
Front page of The Courier, Ballarat, Tuesday December 5, 1995 featuring the launch of the BTM's W4 671 in the City of Ballarat's colours. Article by Andrew Laing. Features a colour photo of Richard Gilbert and Vern Robson leaning from the tram, with Len Millar inside. Photo by Ian Wilson. Notes comments by Peter Hiscock for the reinstatement of trams in Ballarat, and comments by the Chief Commissioner, Vern Robson. Article continues on the base of page 2.trams, tramways, city of ballarat, 671, ballarat city tramway, ceremonies -
 Ballarat Tramway Museum
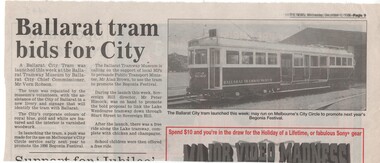
Newspaper, The Courier Ballarat, "Ballarat tram bids for City", 6/12/1995 12:00:00 AM
Article from page 9 of The News, Ballarat, Wednesday December 6, 1995 featuring the launch of the BTM's W4 671 in the City of Ballarat's colours. Features a black and white photo of 671 on the depot fan Notes comments by Peter Hiscock for the reinstatement of trams in Ballarat and comments by the Chief Commissioner, Vern Robson and the launch of the tram itself.trams, tramways, city of ballarat, 671, ballarat city tramway, ceremonies -
 Ballarat Tramway Museum
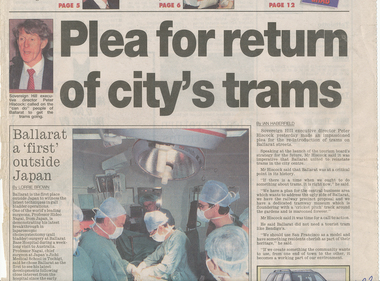
Newspaper, The Courier Ballarat, "Pleas for return of city's trams", 8/12/1995 12:00:00 AM
Front page of The Courier, Ballarat, Tuesday December 8, 1995 featuring the plea by Peter Hiscock, executive director of Sovereign Hill for the return of trams to Ballarat streets. Article by Ian Haberfield. Features a photo of Peter and on page 2, black and white photo of 671 in Wendouree Parade. Article continues on page 2. Notes that a submission had been sent to the Federal Government for a feasibility study and that Federal Regional Development Minister Brian Howe who is responsible for the Better Cities program will be in Ballarat the following day.On page 1, in blue ink "&p2"trams, tramways, 671, ballarat city tramway, ballarat revival -
 Ballarat Tramway Museum
Newspaper, The Courier Ballarat, "Pleas for return of city's trams", 9/12/1995 12:00:00 AM
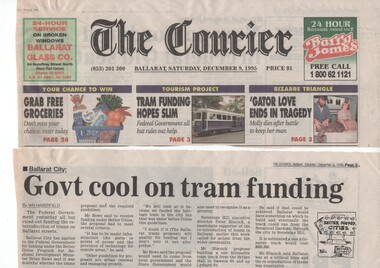
1447.1 Top Part of front page of The Courier, Ballarat, Tuesday December 9, 1995. 1447.2 - top part of page 3 of the same date noting that it was unlikely the Ballarat would receive government funding under the Better Cities program for reintroduction of trams on Ballarat streets. Notes comments by the Federal Minister, Mr. Howe and Peter Hiscock. On page 1 is a small colour photo of 671 used as pointer to page 3 and on page 3, a cartoon by Burns about the Better cities program.trams, tramways, 671, ballarat city tramway, ballarat revival -
 Ballarat Tramway Museum
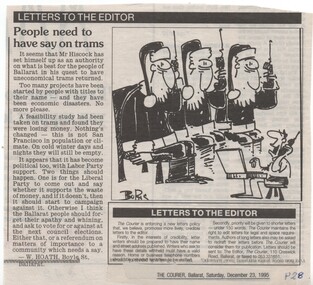
Newspaper, The Courier Ballarat, "People need to have say on trams", 23/12/1995 12:00:00 AM
Letter to the Editor of The Courier Ballarat of 23/12/1995, titled "People need to have say on trams", written by W. Hoath, Boyle St. Ballarat. Notes that people should have a say on whether trams are returned and that they will be uneconomical. Has the paper and date details taped to the bottom right hand corner area of the cutting."p28" in blue ink in the bottom right hand corner.trams, tramways, letter to the editor, ballarat city tramway, ballarat revival -
 Ballarat Tramway Museum
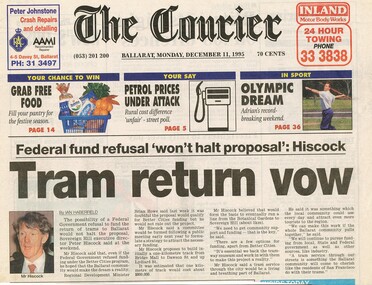
Newspaper, The Courier Ballarat, "Tram Return Vow", "Federal fund refusal 'won't halt proposal': Hiscock", 11/12/1995 12:00:00 AM
Front page of The Courier, Ballarat, Tuesday December 11, 1995 featuring the comment by Peter Hiscock director of Sovereign Hill , that federal refusal to fund the project would not halt the proposal. Article by Ian Haberfield. Features a photo of Peter Hiscock. Comments about costs, benefits of the project, and that the trams will be cherished by the community.trams, tramways, peter hiscock, ballarat city tramway, ballarat revival -
 Ballarat Tramway Museum
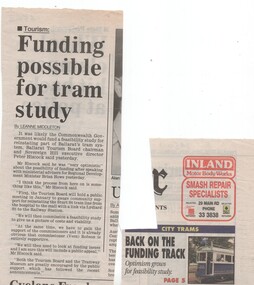
Newspaper, The Courier Ballarat, "Funding possible for tram study", 12/12/1995 12:00:00 AM
1450.1 Top right hand corner part of front page of The Courier, Ballarat, Tuesday December 12, 1995 used as a pointer to an article on page 5, with a small colour photo of 671 1450.2 - Item from page 5, written by Leanne Middleton, noting that Mr. Peter Hiscock, Ballarat Tourism Board Chairman was 'very optimistic' about the possibility of funding for a feasibility study on the return of trams to Ballarat. Notes that is was possible that funding was likely after speaking to the Federal Minister, Mr. Howe. Item has Newspaper name and page details taped to back of cutting. trams, tramways, 671, ballarat city tramway, ballarat revival -
 Ballarat Tramway Museum
Newspaper, The Courier Ballarat, "Ballarat trams back on track", 12/12/1995 12:00:00 AM
Cartoon by Burns of The Courier Ballarat of 12/12/1995, titled "Ballarat trams back on track" in the Letters to the Editor section. On the back of the cutting, taped on is the paper title, date and page number.trams, tramways, cartoons, ballarat city tramway, ballarat revival -
 Ballarat Tramway Museum
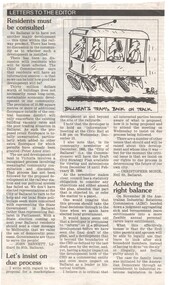
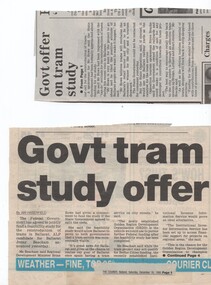
Newspaper, The Courier Ballarat, "Govt tram study offer", 16/12/1995 12:00:00 AM
1452.1 Bottom part of the front page of The Courier, Ballarat, Saturday December 16, 1995 featuring an announcement by Jenny Beacham, ALP candidate for Ballarat (Federal) the previous day that the Federal Government has agreed to jointly fund a feasibility study for the reintroduction of trams in Ballarat. Article by Ian Haberfield. Has the newspaper name, date and page number taped to the bottom portion of the cutting. 1452.2 - Part of page 4 of the same newspaper, with a continuation of the story from page 1. Reports on comments from Brian Howe, Federal Minister and State Opposition tourism spokesman, Steve Bracks. Has the newspaper name, date and page number taped to the bottom portion of the cutting. trams, tramways, funding, feasibility study, ballarat city tramway, ballarat revival -
 Ballarat Tramway Museum
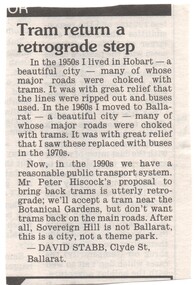
Newspaper, The Courier Ballarat, "Tram return a retrograde step", 16/12/1995 12:00:00 AM
Letter to the Editor that appeared in The Courier, Saturday 16/12/1995 written by David Stabb, Clyde St. Ballarat, titled "Tram return a retrograde step". Notes that he lived in Hobart in the 1950's "choked with trams", also Ballarat in the 1960's also "choked with trams". Comments on Ballarat's reasonable public transport system and the Peter Hiscock's proposal is retrograde. On the rear of the cutting is the name of the paper, date and page number, taped on.trams, tramways, letter to the editor, hobart, ballarat city tramway, ballarat revival -
 Ballarat Tramway Museum
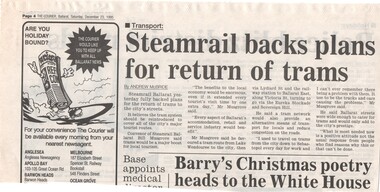
Newspaper, The Courier Ballarat, "Steamrail backs plans for return of trams", 23/12/1995 12:00:00 AM
Article from page 4 of The Courier, Saturday 23/12/1995 written by Andrew McBride that Steamrail Ballarat backing the plans for the return of trams to Ballarat. Quotes Bill Musgrove, the convenor of Steamrail Ballarat, and that trams were not the problem, cars and trucks were.trams, tramways, steamrail, ballarat city tramway, ballarat revival -
 Ballarat Tramway Museum
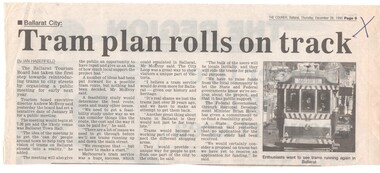
Newspaper, The Courier Ballarat, "Tram Plan rolls on track", 28/12/1995 12:00:00 AM
Article from page 9 of The Courier, Thursday 28/12/1995 written by Ian Haberfield that a tentative date had been set for Jan. 23, 1996 for a public meeting to discuss the return of trams to Ballarat. Quotes Tourism Board Executive Director Andrew McEvoy. Includes a picture of tram 40, with destination of Sebastopol."X" in blue ink in top right hand cornertrams, tramways, public meeting, ballarat city tramway, ballarat revival