Showing 2000 items
matching goldfield hotels
-
 Ballarat Tramway Museum
Slide - 35mm slide/s - set of 2, Eldon Hogan?, late 1950's
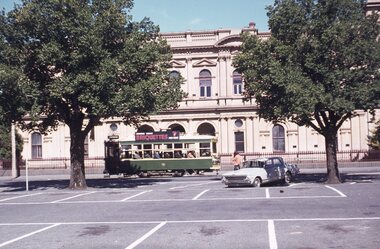
Set of two Agfacolor cardboard mounted slides - have handwritten captions and two numbers - no date, pre dash canopy stripes and additional lights, late 1950's? Scanned on the Canon scanner at the depot 15/12/1971 at the time of the installation of the scanner. .1 - Bendigo 13, outbound in Pall Mall with the Shamrock Hotel in the background. .2 - Bendigo 2, in bound from Eaglehawk in a very rural situation, unsealed road sides, with the Destination of Quarry Hill..1 - "Tram No. 13 in Pall Mall Bendigo / 24)" in red ink. .2 - "Tram No. 2 approaching Bendigo / 25)" in red ink.tramways, trams, bendigo, eaglehawk, pall mall, tram 13, tram 2 -
 Ballarat Tramway Museum
Slide - 35mm slide/s - set of 3, Eldon Hogan, early 1960's
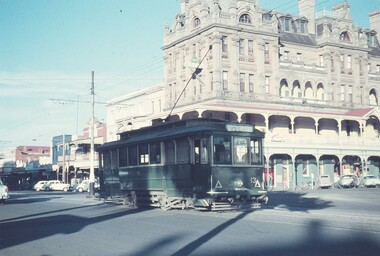
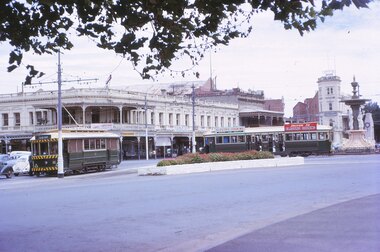
Set of three Kodak cardboard mounted slides - have handwritten captions and slide numbers - no date, post dash canopy lights but with the largely green front - early 1960's. From the Eldon Hogan collection. Scanned on the Canon scanner at the depot 15/12/1971 at the time of the installation of the scanner. .1 - No. 16 and a bogie car at Charing Cross, early 1960's with the City Club Hotel in the background. .2 - No. 18 at Charing Cross with the destination of Quarry Hill and with the City Club Hotel in the background .3 - No. 25 at the Eaglehawk terminus with two crewmen standing in front of the tram. Tram has the destination of Eaglehawk. The Town Hall in the background has a money raising thermometer for the Olympic Swimming Pool fund..1 - "Trams at Bendigo" .2 - "Trams at Fountain at Bendigo" .3 - "Tram at Eaglehawk" all in penciltramways, trams, bendigo, eaglehawk, charing cross, tram 16, tram 18, tram 25 -
 Ballarat Tramway Museum
Slide - 35mm slide/s - set of 11, Eldon Hogan, mid 1960's to early 1970's
Set of 11 Agfa Plastic mounted slides - from the Eldon Hogan collection - possibly on an ARE Bendigo tours late 1960's or early 1970's with No. 18 Scanned on the Canon scanner at the depot 15/12/1971 at the time of the installation of the scanner. .1 - No 18 at Golden Square terminus with Billy Rodda's Golden Square Hotel in the background. .2 - ditto and the Victoria Bitter fence alongside the hotel. .3 - ditto and another single trucker. .4 - No. 18 at the Fire Station Loop, Golden Square line, with destination of Railway Station. .5 - No. 18 passing the Central Deborah mine, Violet St. Tram has a Briquette advertisement on the roof - the flaming briquettes. .6 - Another bogie tram at ditto. .7 - No. 18 and No. 6 crossing McCrae St loop near the depot junction? .8 - ditto .9 - No. 18 and a single trucker at the North Bendigo terminus. .10 - ditto .11 - with the single trucker leaving.tramways, trams, bendigo, golden square, central deborah, north bendigo, mccrae st, tram 18, tram 6 -
 Ballarat Tramway Museum
Slide - 35mm slide/s - set of 11, Eldon Hogan, mid 1960's to early 1970's
Set of 11 Agfa Plastic mounted slides - from the Eldon Hogan collection - featuring an ARE tour with Nos. 21, 29 and 25 to Bendigo, mid 1960's. Scanned on the Canon scanner at the depot 15/12/1971 at the time of the installation of the scanner. .1 - No. 29 passing the Institute of Technology building, McCrae St. .2 - ditto .3 - Nos. 21 and 29 Lake Weeroona .4 - Nos. 29, 21 and 25 at the Golden Square Terminus with the Golden Square Hotel, Victoria Bitter fence in the background. .5 - ditto with a service car? .6 - ditto .7 - No. 21 with the Central Deborah mine poppet head in the background, Violet St. .8 - ditto with 21 and 29 .9 - ditto with 29 .10 - ditto with 21 and 29 .11 - 21, 29 and 25? at depot junction. Trams have SEC roof advertisements. tramways, trams, bendigo, lake weeroona, golden square, central deborah, tram 21, tram 29, tram 25 -
 Ballarat Tramway Museum
Photograph - Black & White Photograph/s, Ron Hann, Jan. 1963
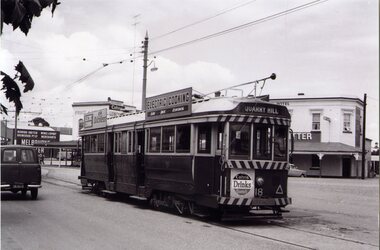
Yields information about the interior of Bendigo tram depot, is storage area and two Birney trams.Black and white print on laser print paper - of Bendigo 18 at the Eaglehawk terminus 1/1963. Photo by Ron Hann. Tram has a Cohn's Drink advertisement on the front dash panel, two SEC roof advertisements and the destination of Quarry Hill. In the background are a hotel and a liquor store, both advertising Melbourne Bitter. Printed on Fujifilm, Fujicolor Crystal Archive for Frontier"Has label "Reference 6/214/26 Photo by Ron Hann" and another label "Eaglehawk Bendigo 01.63"trams, tramways, eaglehawk, hotels, tram 18 -
 Ballarat Tramway Museum
Photograph - Digital image, Late 1950's
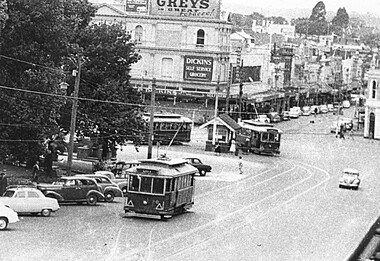
Yields information the appearance and details about the Grenville St intersection in the background in particular the shops on the corner in the late 1950's.Digital scan from the Ben Parle collection of SEC trams tram 30 in the loop and two other single truckers at the Grenville St stop. Photo 1950's or early 1960 prior to introduction of dash canopy lighting. Note the SE Dickins store on the north side, with the hotel on south side. Dickins later moved to the south side. Morsheads sign in photo as well as Grey's cigarettes. Photo received with the Ben Parle slides 09/2004. trams, tramways, grenville st, sturt st, bridge st, city loop, tram 30 -
 Ballarat Tramway Museum
Photograph - Black & White Photograph/s, Intersection of Sturt & Lydiard Sts Ballarat, c1907
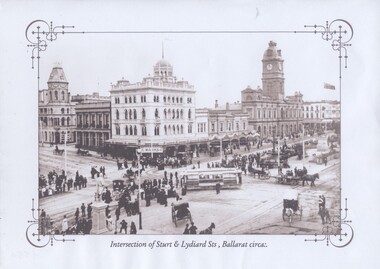
Titled "Intersection of Sturt and Lydiard Streets, Ballarat circa:." shows an ESCO tram, without windows turning from Sturt St into Lydiard St North with many people lining the streets prior to a parade. Has a number of horse drawn vehicles in photo taken from the Post Office or Summerscales Office. In photo are Craigs Hotel, National Mutual Life building and the Town Hall. See item 8247 for a colour postcard of this image. Yields information about Sturt and Lydiard St during an event.Black and white historic photograph downloaded from a picture resource website within a decorative frame and printed with an inkjet printer. trams, tramways, sturt st, lydiard st, town hall, esco -
 Ballarat Tramway Museum
Photograph - Black & White Photograph/s, c1907
Yields information about Sturt and Armstrong Streets with a toast rack tram and Snows Buildings on the left.Black and white historic photograph downloaded from a picture resource website within a decorative frame. Printed with an inkjet printer. Titled "Looking down Lydiard Street North Ballarat, circa:" shows a view looking north along the street from outside the Mining Exchange. Shows the centre poles in the street, the Federal Hotel, Cobb & Co building, blue stone gutters, gutter crossings and telephone wires. Original photo from a postcard - not currently (June 2010) in Museum's collection.trams, tramways, lydiard st north, horse drawn vehicle -
 Ballarat Tramway Museum
Photograph - Black & White Photograph/s, c1927
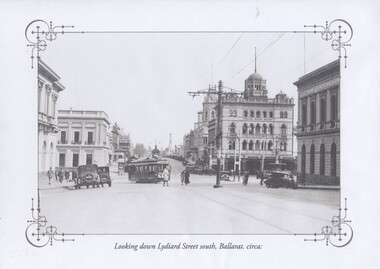
Yields information about Sturt and the streetscape with a horse tram outside St Andrews Kirk with two small boys playing.Black and white historic photograph downloaded from a picture resource website within a decorative frame. Printed with an inkjet printer. Titled "Looking down Lydiard Street south, Ballarat. circa:" shows an ESCo tram turning from Lydiard St north into Sturt St with many parked motor vehicles and pedestrians. Has the Post Office, Craigs Hotel, Commonwealth Bank, National Mutual Building and the Bank of Australasia in the photograph. One centre pole in the photograph. Photo c1927 Original photo from a postcard?trams, tramways, lydiard st north, poles, post office, esco, tram 20 -
 Ballarat Tramway Museum
Photograph - Digital image, Aug. 1968
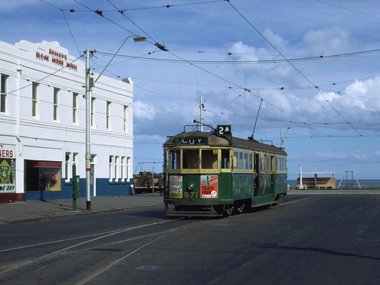
Yields information about one of the Museum's tram when it was Melbourne and the South Melbourne Beach terminus in 1968.Digital Image of MMTW W4 671 (now a BTM Tram) at the South Melbourne Beach terminus, August 1968. Photo Dick Jones via Carolyn Cleak 28/6/2010 (Trams Down Under email dated 28/6/2010). Reilly's Bleak House Hotel in the background. Note the Bundy Clock. Tram has the destination of City and showing route number 2A. This is a later photo of South Melbourne Beach terminus, with yet another view of a W4, this time 671 in August 1968. Must have been getting toward the end of the W4's by that time. The hotel verandah had gone by this time and the bundy clock had been moved. Use photo only with Dick Joni's OK.trams, tramways, south melbourne beach, mmtb, w class trams, tram 671 -
 Ballarat Tramway Museum
Photograph - Digital image, 1970s
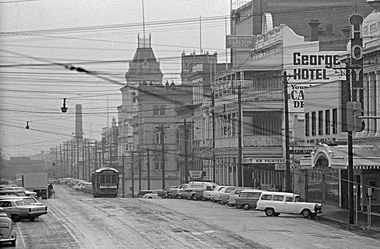
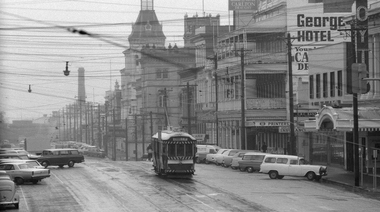
Yields information about the Lydiard St Nth landscape looking south.Digital image of a bogie tram travelling north in Lydiard St North between Sturt and Mair Sts, with many parked cars. Has the George Hotel, the CBC Bank, Hoyts Regent, and other buildings in the view. Photo taken by Peter Bruce 1970's and 1971, prior to the closure of the Ballarat tramway system. Peter's Title of image: "Gloomy Lydiard St"trams, tramways, lydiard st nth -
 Ballarat Tramway Museum
Photograph - Digital image, 1970s
Yields information about the Sebastopol tram terminus.Digital image of No. 38 at the Sebastopol terminus, with the Royal Mail Hotel in the background. Shows the stop arrangements. Hotel has Melbourne Bitter and Fosters Lager signs. The tram has the destination of Lydiard St North and a SEC "Everything is fine in my electric kitchen" roof advertisement. Photo taken by Peter Bruce 1970's and 1971, prior to the closure of the Ballarat tramway system. Peter's Title of image: "No 38 at Royal Mail Sebastopol"trams, tramways, sebastopol, hotels, tram 38 -
 Ballarat Tramway Museum
Photograph - Digital image Set of 2, 1970s
Yields information about the Lydiard St and Sturt St intersection and some of the signs that were in place at the time.Digital image, black and white, two photos of No. 12 southbound in Lydiard St North, before turning into Sturt St. Note Craigs Royal Hotel street lamp, the fire alarm box, fire plug post and the warning sign behind the Stop sign Photo taken by Peter Bruce 1970's and 1971, prior to the closure of the Ballarat tramway system. Peter's Title of image: "No. 12 and gas lamp" and "No. 12 Lydiard St Sturt 1"trams, tramways, lydiard st nth, craig s hotel, signs, tram 12 -
 Ballarat Tramway Museum
Photograph - Digital image, 1970s
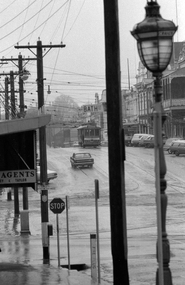
Yields information about Sturt St between Grenville St and Lydiard St and the south side of the street.Digital image, black and white, of No. 13 climbing the hill between Grenville St and Lydiard St, past the City Loop with Cooks Private Hotel in the background. Photo taken by Peter Bruce 1970's and 1971, prior to the closure of the Ballarat tramway system. Peter's Title of image: "No. 13 up the hill"trams, tramways, sturt st, grenville st, city loop, tram 14 -
 Ballarat Tramway Museum
Photograph - Digital image Set of 2, Peter Bruce, Lydiard St North, 1970s
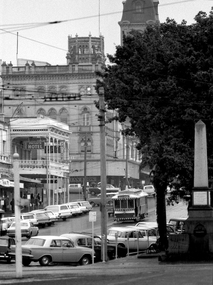
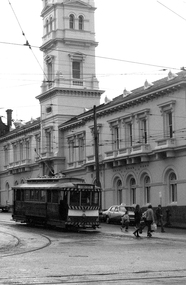
Yields information about the Sturt St and Lydiard St intersection.Digital image, black and white, two images of No. 32 in Lydiard St North. .1 - adjacent to the post office, about to turn into Sturt St, enroute for Sebastopol. .2 - further up Lydiard St North, taken from outside Craigs Royal Hotel (see also Reg Item 4594 for a similar photo) Photo taken by Peter Bruce 1970's and 1971, prior to the closure of the Ballarat tramway system. Peter's Title of image: "No. 32 Lydiard St Nth".trams, tramways, lydiard st, craig s hotel, post office, tram 32 -
 Ballarat Tramway Museum
Photograph - Digital image, 1970s
Yields information about Lydiard St between Mair and Sturt Streets.Digital image, black and white, of No. 38 travelling north in Lydiard St North between Sturt and Mair Sts, with many parked cars. Has the George Hotel, the CBC Bank, Hoyts Regent, and other buildings in the view. See also Reg Item 4580 for a later photograph, probably 38 too. Photo taken by Peter Bruce 1970's and 1971, prior to the closure of the Ballarat tramway system. Peter's Title of image: "No. 38 Lydiard St near Mair St."trams, tramways, lydiard st, tram 38 -
 Ballarat Tramway Museum
Photograph - Digital image, Peter Bruce, "No. 41 Mair St", 1970s
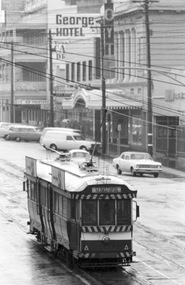
Yields information about Lydiard St between Mair and Sturt St.Digital image, black and white, of No. 41 southbound in Lydiard St after crossing Mair St with the George Hotel and Hoyts theatre in the background. The tram has the destination of Sebastopol. Photo taken by Peter Bruce 1970's and 1971, prior to the closure of the Ballarat tramway system. Peter's Title of image: "No. 41 Mair St"trams, tramways, mair st, lydiard st nth, tram 41 -
 Ballarat Tramway Museum
Photograph - Black & White Photograph/s, Wal Jack, 7/10/1939 12:00:00 AM
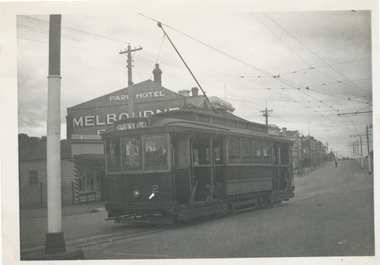
Black and White print contained within the Wal Jack Bendigo and Geelong Album, see Reg Item 5003 for more details. Photo of No. 2 at the Eaglehawk terminus, 7-10-1939, High St, with the Park Hotel in the background. Photo by Wal Jack. Tram has the destination of Quarry Hill. Printed on Ilford paper. i1 - scan of print in the album i2 - rear of image i3 - scan of negative at 3200dpi added 7/6/2020. On the rear in blue ink "SEC Bendigo No 2 (ex MMTB 115 M class) in High St Eaglehawk (terminus) 7th Oct. 1939." with Wal Jack copyright stamp in the top right hand corner and the number "T194" written in.trams, tramways, bendigo, high st, eaglehawk, tram 2 -
 Ballarat Tramway Museum
Photograph - Black & White Photograph/s, Keith Kings, 29/12/1947 12:00:00 AM
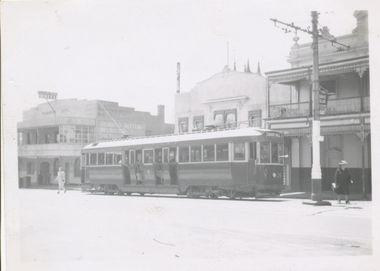
Black and White print contained within the Wal Jack Bendigo and Geelong Album, see Reg Item 5003 for more details. Photograph of No. 26 in Mitchell St Bendigo, outbound to Quarry Hill with the Terminus Hotel in the background. Wal's album notes date the photo as 29-12-1947. Photo by Leon Marshall Wood. In ink on rear "SEC of Victoria, Bendigo, Bogie drop centre car No.26 acquired from M&MTB 1947, ex MMTB "C" class, owned originally by Hawthorn Tramways Trust". In pencil, different hand writing "ex 135" and in bottom left hand corner, Leon Marshall Wood photo number "SEC 22" written in.trams, tramways, bendigo, bogie trams, quarry hill, mitchell st, tram 26 -
 Ballarat Tramway Museum
Photograph - Black & White Photograph/s, Wal Jack, 3/01/1954 12:00:00 AM
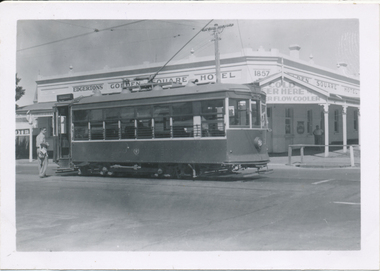
Black and White print contained within the Wal Jack Bendigo and Geelong Album, see Reg Item 5003 for more details. Photo of Bendigo Birney No. 30 at Golden Square Terminus, 3/1/1954. Has Edgerton's Golden Square Hotel in the background with date of 1857 on building corner and "Cold Beer Here and "?..er flow cooler" on the front verandah of the hotel. Note the railing around the drainage channel. i1 - scan of print in the album i2 - rear of image i3 - scan of negative at 3200dpi added 6/6/2020. On the rear in blue ink "SEC Bendigo Birney No. 30 at Golden Square terminus 3rd Jan '54" with Wal Jack copyright stamp in the top right hand corner and the number "T215" written in.trams, tramways, bendigo, golden square, birney, tram 30 -
 Ballarat Tramway Museum
Photograph - Black & White Photograph/s, Wal Jack, 3/01/1954 12:00:00 AM
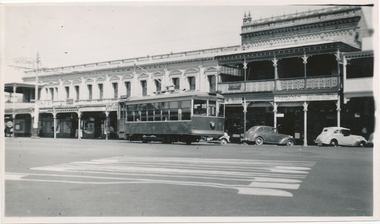
Black and White print contained within the Wal Jack Bendigo and Geelong Album, see Reg Item 5003 for more details. Photo of Bendigo Birney No.28 in High St Bendigo, 3-1-1954, Photo Wal Jack. Has in the background the City Club Hotel, Desmond's Radio Parts and a Ice cream shop and Marshalls Fruit Shop Printed on Ilford Paper. See image i2 for rear of photograph. See image i3 for hi res scan of negative On the rear in black ink "SEC Bendigo Birney 28 to Golden Square, High St Bendigo, 3-1-54", in the top left hand corner, the Wal Jack copyright stamp but with no number written in.trams, tramways, bendigo, high st, birney, tram 28 -
 Ballarat Tramway Museum
Photograph - Black & White Photograph/s, 25/09/1961 12:00:00 AM
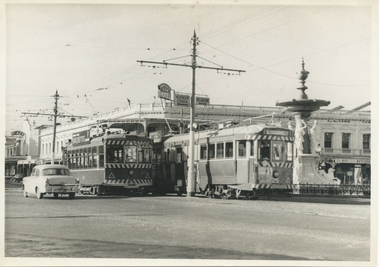
Black and White print contained within the Wal Jack Bendigo and Geelong Album, see Reg Item 5003 for more details. Photo of Birney No. 28 and Bogie tram No. 25 Bendigo, at Charing Cross with the fountain in the background along with the City Club Hotel). No. 28 has the destination of Special and a SEC roof advertisement for Briquettes, No. 25 Eaglehawk? and has a white disk showing a tram following. Note the direction signs on the pole between the tram for Heathcote and Echuca and Melbourne. Photo by Jim Seletto, 25/9/1961. On rear in ink "No. 28 Birney, No. 25 Bogie", Jim Seletto stamp, with date stamp of "25 Sep 1951" and "Bendigo" in red ink.trams, tramways, bendigo, charing cross, birney, tram 25, tram 28 -
 Ballarat Tramway Museum
Photograph - Black & White Photograph/s, The Bendigonian, Jan. 2005
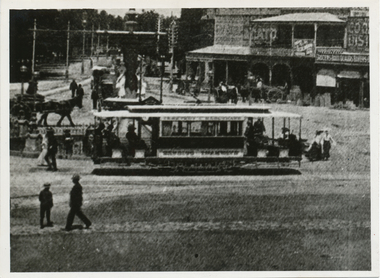
Black and White copy print contained within the Wal Jack Bendigo and Geelong Album, see Reg Item 5003 for more details. Photo of Charring cross looking from Pall Mall towards High St and the south west corner buildings in the photograph. Features a three window ESCo. tramcar In the background are the buildings on the south west corner of Charing Cross, featuring an advertisement for The Age, Cooperative Distribution centre, Warrens View Point Hotel, Hamptons Newsagency and Connelly & Co. Copied by Keith Kings from The Bendigonian 3/1/1905. On rear in ink " SA776 Bendigo A 3 window saloon at Charring Cross" Copied ex "The Bendigonian 3/1/1905."trams, tramways, bendigo, charing cross, esco -
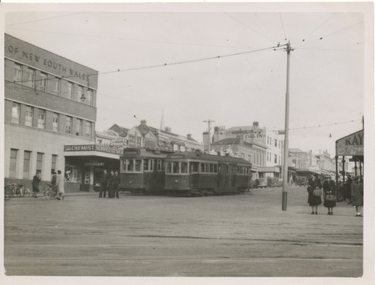 Ballarat Tramway Museum
Photograph - Black & White Photograph/s, Wal Jack, May. 1949
Black and White print contained within the Wal Jack Bendigo and Geelong Album, see Reg Item 5003 for more details. Photo of Car No. 32 and single trucker 22, Moorabool St. No. 32 has the destination of North, No. 22 Belmont. In the background is the Bank of New South Wales, Geelong Nursery Nook, McGills, Hotel Cullen. Photo May 1949. No details on photographer though there is an initial on the photograph. i1 - scan of print in the album i2 - rear of image i3 - scan of negative at 3200dpi added 27/6/2020.On rear in pencil "Geelong May 1949, 32 and 22 new and old, 8 wheeler and 4 wheeler, North & Belmont, Coming and Going / Moorabool St / Ryrie St in the foreground."trams, tramways, geelong, ryrie st, moorabool st, bogie trams, tram 32, tram 22 -
 Ballarat Tramway Museum
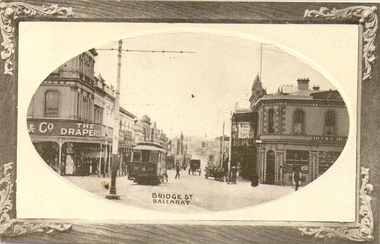
Photograph - Digital image, c1912
Yields information about the streetscape of Bridge St at Grenville St c1912.Digital image of a Postcard held by David Critchley of Ballarat ESCo No. 17 at the Grenville St terminus, west end of Bridge St. The tram has not been fitted with windscreens. Trolley pole is set up for the tram to come into Sturt St. In the background are the Bucks Head Hotel and Cowdell Tonner and Ellis drapers/ Provided by David Critchley - not to be reproduced without discussions with David. trams, tramways, esco, sturt st, bridge st, grenville st, tram 17 -
 Ballarat Tramway Museum
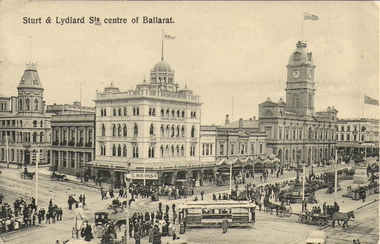
Photograph - Digital image, J. Summerscales and Ballarat, Sturt & Lydiard Sts centre of Ballarat, c1908
Photograph - looking from Summerscales offices onto the intersection of Sturt and Lydiard St during an event, with a parked ESCo tram and crowds or onlookers on either side of the south side of Sturt St. Has a detailed image of the tram. C1909. In the background are Craigs Hotel, C. Marks & Co, National Mutual building, Snows and the Town Hall. A number of horse drawn vehicles are in the photograph. Also A. E. Casley Chemists and Beath Schiess & Co, though this seems to be almost printed into the photograph - above the chemist shop. See item 8247 for a colour image of the same postcard published by SEM Co. Yields information about the streetscape of Sturt St and Lydiard Streets c1908Digital image of a postcard by A. H Summerscalestrams, tramways, sturt st, esco, events, lydiard st -
 Bendigo Historical Society Inc.
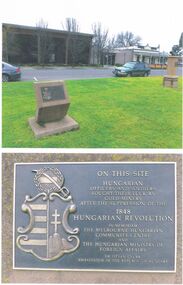
Photograph - HUNGARIAN MEMORIAL
Four pages of coloured photographs of the unveilling of the Hungarian Memorial. Two photos on each page. Page 1 has a man leaning on the memorial and being photographed with a crowd looking on. The second photo shows the crowd and the Memorial before the unveilling. The Australian and Hungarian flags in the background. Across the street is the Foundry Arms Hotel and Safeway Supermarket. Written on the back is: 2 November 2002 Photographed by James Lerk, (written on the back of the four pages). Bendigo Advertiser Photographer Bill Hawkings posing the Hungarian Ambassador. Page 2 shows a litle girl in national dress laying some flowers at the base of the Memorial and a little boy looking on. The second photo is the unveilling. Page 3 shows the plaque on the left and on the right is the Memorial and standing behind it are 6 men, Rod Fyffe is on the left. The two flags behind them. Page 4 shows some children, 2 in national dress, the flowers at the base of the memorial and the men and flags behind them. The second photo is a close up of the side of the Memorial and children in national dress, the flowers and some of the crowd. The inscription reads: On this site Hungarian Officers and Soldiers sought their luck as gold miners after the suppression of the 1848 Hungarian Revolution. In Memoriam. The Melbourne Hungarian Community Centre and the Hungarian Ministry of Foreign Affairs. Dr Istvan Gyurk Ambassador of the Republic of Hungary. Beside the inscription is an emblem. Included is a page from the Memorials Australia website.hungarian memorial, james lerk, bendigo advertiser, bill hawkings -
 Bendigo Historical Society Inc.
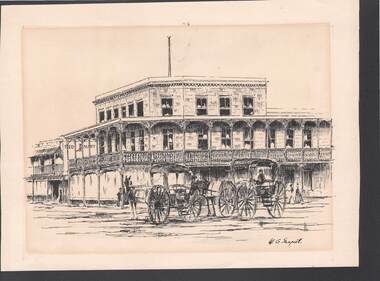
Artwork,other - SHAMROCK HOTEL BY W G SHAPCOT
... Inc. History House 11 Mackenzie Street Bendigo goldfields ...Ink sketch on cream card of an earlier Shamrock Hotel by W. G. Shapcot. Sketch shows the building and the Red Mart building next door. It has three stories and there are two horse drawn vehicles in front of it and some people on the footpath. Signed by W. G. Shapcot.artwork, shamrock hotel, w g shapcot, derek ? augwin -
 Bendigo Historical Society Inc.
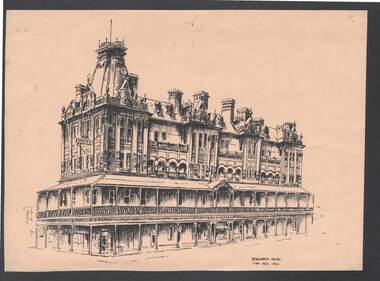
Artwork,other - SHAMROCK HOTEL BY JAN NEIL 1972
... Inc. History House 11 Mackenzie Street Bendigo goldfields ...Black ink sketch on buff coloured card, titled Shamrock Hotel. Written on the front is Shamrock Hotel Jan Neil 1972. It is a detailed drawing of the Hotel, with no other buildings in it. It is an ornate building of four stories. Written in pencil on the back is: Received 12.9.2002 GB. Derek? Augwin 2/29 Glebe Ave Cheltenham.artwork, shamrock hotel, jan neil -
 Bendigo Historical Society Inc.
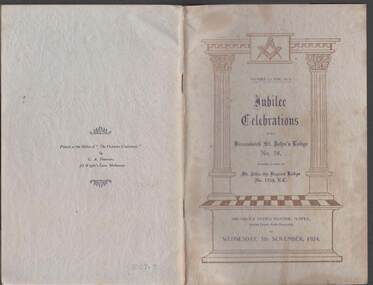
Book - BOOK: JUBILEE CELEBRATIONS, 5th November, 1924
Light blue/grey book titled Jubilee Celebrations of the Brunswick St. John's Lodge No. 78 formerly known as St. John the Baptist Lodge No 1518. Celebrations were on Wednesday, 5th November, 1924. The book is a short history of the Brunswick St. John's Lodge, No. 78. Some photos in the book are: Cornish Arms Hotel, Wor Bro William Dods, Wor Bro P F Donald, Wor Bro John Bedford, Wor Bro F G Manchester, Rt Wor Bro F G Manchester, Wor Bro E L Hayden, Wor Bro O R Snowball, Wor Bro Robert Bugg, Wor Bro D H Hogan, Very Wor Bro F W Seekamp, Wor Bro Edward Saunders, Wor Bro F W Murphy, Wor Bro Robert Yorke and the Brunswick United Masonic Temple, Printed at the Office of 'The Victorian Craftsman' by g. A. Sharman, 23 Wright's Lane, Melbourne. Hand written on the first page 'With Compliments W Jones P.J.G.D. 5/11/24.Printed at the Office of 'The Victorian Craftsman,' by G.A. Sharman, 23 Wright's Lane, Melbourne.event, social, jubilee celebration, masonic society events (various) - jubilee celebrations of the brunswick st. john's lodge no. 78 1924, st john the baptist lodge no 1518, brunswick united masonic temple, wor bro w jones, cornish arms hotel, wor bro william dods, wor bro p f donald, wor bro john bedford, wor bro f g manchester, rt wor bro f g manchester, wor bro e l hayden, wor bro o r snowball, wor bro robert bugg, wor bro d h hogan, very wor bro f w seekamp, wor bro edward saunders, wor bro f w murphy, wor bro robert yorke, brunswick united masonic temple