Showing 31770 items
matching south
-
 Eltham District Historical Society Inc
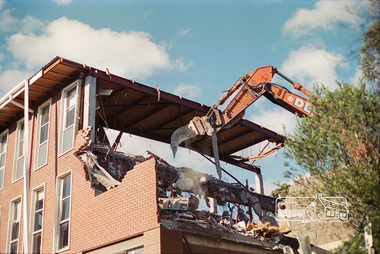
Negative - Photograph, Harry Gilham, South wing from Library drive (bluestone wall): Demolition of Eltham Shire Offices, 895 Main Road, Eltham, Aug. 1996
The Shire Offices opened in 1965 and were extended in 1971. The final Eltham Shire Council meeting was held in December 1994 before the forced amalgamations of municipal councils by the Kennett Government. The State-Government-appointed Commissioners (1994-1996) took the decision in July 1996 to demolish the Eltham Shire Offices. The demolition works started within 24 hours of the decision being made.Roll of 35mm colour negative film, 5 of 6 strips Associated printKodak Gold 100-5eltham shire office, demolition -
 Eltham District Historical Society Inc
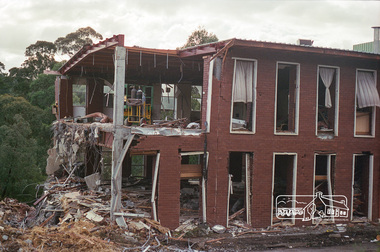
Negative - Photograph, Harry Gilham, Demolition of Eltham Shire Offices (South Wing), 895 Main Road, Eltham, Aug. 1996
The Shire Offices opened in 1965 and were extended in 1971. The final Eltham Shire Council meeting was held in December 1994 before the forced amalgamations of municipal councils by the Kennett Government. The State-Government-appointed Commissioners (1994-1996) took the decision in July 1996 to demolish the Eltham Shire Offices. The demolition works started within 24 hours of the decision being made.Roll of 35mm colour negative film, 5 of 6 strips Associated printKodak Gold 100-5eltham shire office, demolition -
 Eltham District Historical Society Inc
Negative - Photograph, Harry Gilham, Demolition of Eltham Shire Offices (South Wing viewed from Main Road), 895 Main Road, Eltham, Aug. 1996
The Shire Offices opened in 1965 and were extended in 1971. The final Eltham Shire Council meeting was held in December 1994 before the forced amalgamations of municipal councils by the Kennett Government. The State-Government-appointed Commissioners (1994-1996) took the decision in July 1996 to demolish the Eltham Shire Offices. The demolition works started within 24 hours of the decision being made.Roll of 35mm colour negative film, 5 of 6 strips Associated printKodak Gold 100-5eltham shire office, demolition -
 Eltham District Historical Society Inc
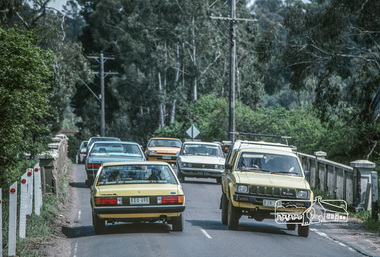
Photograph, Fred Mitchell, Looking west across Main Road Bridge over the Diamond Creek, Eltham South, 1983, 1983
Digital copy of colour photographfred mitchell collection, 1983, main road bridge, eltham south -
 Eltham District Historical Society Inc
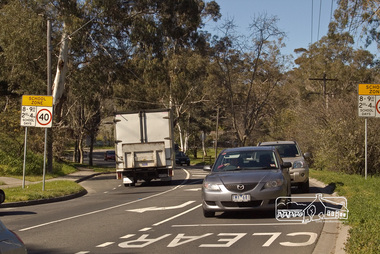
Photograph, Fred Mitchell, Looking south along Main Road from the intersection with Dalton Street (left), 5 September 2007, 05/09/2007
Digital copy of colour photographfred mitchell collection, 2007 -
 Eltham District Historical Society Inc
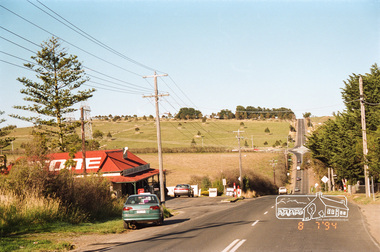
Photograph, Looking south towards the Kangaroo Ground Store, Eltham-Yarra Glen Road, Kangaroo Ground, 8 July 1994, 08/07/1994
Roll of 35mm colour negative film, 4 stripsFuji 100kangaroo ground, eltham-yarra glen road, kangaroo ground store -
 Eltham District Historical Society Inc
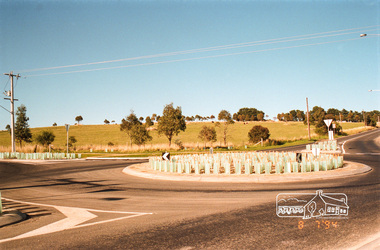
Photograph, Looking south-east at the intersection of Eltham-Yarra Glen Road and Kangaroo Ground-Warrandyte Road, Kangaroo Ground, 8 July 1994, 08/07/1994
Roll of 35mm colour negative film, 4 stripsFuji 100kangaroo ground, eltham-yarra glen road, kangaroo ground-warrandyte road -
 Flagstaff Hill Maritime Museum and Village
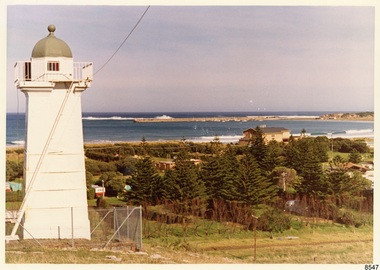
Photograph - Historical, Flagstaff Hill, John Lindsay, View of the Bay from the south boundary of the Ports and Harbours land, 1970s
The photograph shows the view of the shore and Lady Bay with the Breakwater and Middle Island all visible. It was taken to show that the Flagstaff Hill area was unlikely to have any further development between it and the Bay, with the view of development of the Flagstaff Hill Maritime Museum and Village. This photograph, a print, is one of a set of five that show the site of Flagstaff Hill. The photographer was John Lindsay, Founding Director of Flagstaff Hill Maritime Museum and Village, with the words "Photo J Lindsay" on the back. It was taken in the early 1970s during the initial stages of the development of Flagstaff Hill as a Museum and Maritime Village. The photographs belonged to the donor's grandparents, who lived in the Warrnambool district of Allansford/Naringal. The photograph is a record of the site and surrounds of Flagstaff Hill Maritime Museum and Village before its development and opening in 1975. It shows the Surfside Holiday Park, Surf Lifesaving Club, and the Breakwater. The photograph is significant for recording the location and condition of the Lower Lighthouse on the Hill.Coloured photograph, glassy print, one of a set of five. Flagstaff Hill's Lower Lighthouse is in the foreground above the Surfside Holiday Park. To the right of centre is the Surf Lifesaving Club. In the background is Lady Bay and the Breakwater and Middle Island, with the Southern Ocean the other side. The photograph's paper has the printer's watermark and a pencilled inscription on the back. The early 1970s scene was photographed by John Lindsay, Warrnambool.Label on the back: "VIEW OF THE BAY FROM the southern boundary of the Ports and Harbours land. No development below this area is likely to obstruct the view, due to the steep grade down to the Southern boundary of Flagstaff Hill property." Handwritten in pencil: "Photo J Lindsay"flagstaff hill, flagstaff hill maritime museum and village, warrnambool, maritime museum, maritime village, great ocean road, shipwreck coast, 1970s, photograph, surfside holiday park, lady bay, flagstaff hill site, john lindsay, lower lighthouse, lower light, surf lifesaving club, breakwater, middle island, ports and harbours -
 Federation University Historical Collection
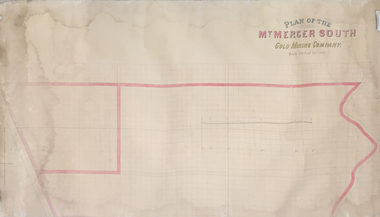
Plan, Plan of the Mount Mercer South Gold Mining Company
This plan is associated with former Ballarat School of Mines Student Richard Squire (1875-1876). Gift of the Squire FamilyPaper on linen. Handcoloured. Scale of 150 feet to one inch.mount mercer, gold mining, gold, mining -
 Federation University Historical Collection
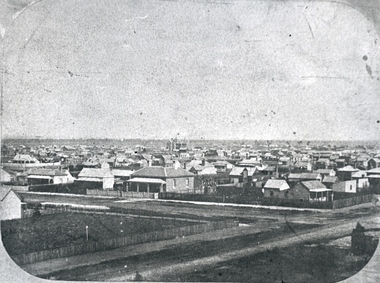
Photograph, Solomon and Bardwell, Ballarat From the Western Fire Brigade Tower Looking South
Black and white photograph of Ballarat taken from the Ballarat West Fire Brigade on the corner of Sturt Street and Raglan Street. ballarat, ballarat west fire brigade, solomon and bardwell -
 Federation University Historical Collection
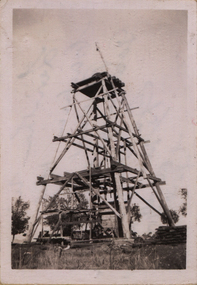
Photograph - Photograph - Black and White, Leviathan Quartz Ballarat South Cambrian Mine
Eight photographs relating to the Leviathan Mine, Ballaratleviathan, poppet head, kibble, jack scott, mining, robertson, pitfield, cambrian hill, donald mather, leviathan quartz mine ballarat south, cambrian mine -
 Federation University Historical Collection
Plans, Plans of the Ballarat School of Mines, Lydiard Street South, Ballarat, 1953
.3) Ballarat School of Mines plan for water supply installation to prefabricated classrooms associated with the Ballarat Girls' Techncial School, April 1953 .4) Ballarat School of Mines plans for three prefabricated classrooms to be used as the Ballarat Girls' Techncial School, Hickman Street, Ballarat by Percy E. Everett, 16 December 1952. Earthworks undertaken by T.G. James. .5) Ballarat Sewerage Authority Plan of Drainage Prefabricated Class Rooms Ballarat School of Mines by Chief Architect Percy E. Everett, 13 April 1953. The plan shows basket ball court and shelter, classrooms, contours, excavations and girls toilet associated with the Ballarat Girls' Techncial School, Hickman Street, Ballarat. ballarat junior girls' technical school, ballarat girls' technical school, ballarat school of mines, hickman street, white flat, t.g. james -
 Federation University Historical Collection
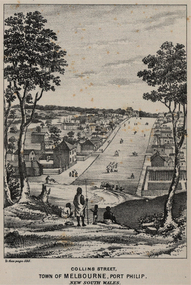
Image - black and white, Collins Street. Town of Melbourne, Port Philip. New South Wales
collins street, melbourne, aborigines, aboriginal -
 Federation University Historical Collection
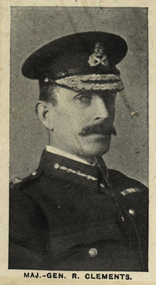
Photograph (black & White), Major-General R. Clements - South Africa
Major General R.A.P. Clements was the commander of the British brigade in the Battle of Nooitgedacht, 1900. This battle was against the Boer commandos led by Generals Koos de la Rey and Christiaan Beyers during the Second Boer War. The British were defeated and suffered many losses. Clements and the remnant of his brigade rode off towards Pretoria.Thanks to his quick response to the crisis, Clements was able to save his brigade from complete annihilation.Individual image from photographed poster of tobacco and cigarette cards.r a p clements, battle of nooitgedacht, boer, second boer war, british, pretoria, koos de la rey, christiaan beyers -
 Federation University Historical Collection
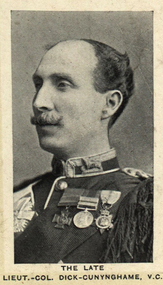
Photograph (black & White), Lieutenant-Colonel Dick-Cunynghame, V.C. - South Africa
Lieutenant-Colonel Dick-Cunyinhame V.C.Individual image from photographed poster of tobacco and cigarette cards.victoria cross, south africa, dick-cunynghame, lieutenant-colonel, highland regiment, scotland -
 Federation University Historical Collection
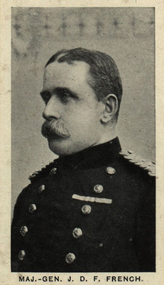
Photograph (black & White), Major-General John Denton Pinkstone French, 1st Earl of Ypres - South Africa
French was born in Kent in 1852. He had a brief service in the Royal Navy before becoming a cavalry officer. He distinguished himself on the Gordon Relief Expedition and was rapidly promoted. French became a national hero during the Second Boer War. He won the Battle of Elandslaagte near Ladysmith, escaping on the last train as the siege began. He commanded the Cavalry Division, winning the Battle of Klip Drift during the march to relieve Kimberley. In Cape Colony he conducted Counter-insurgency operations. Attained the rank of Field Marshall. Awards he received: Knight of the Order of St Patrick, Knight Grand Cross of the Order of the Bath, Member of the Order of Merit, Knight Grand Cross of the Royal Victorian Order, Knight Commander of the Order of St Michael and St George. French died in Kent in !925, aged 72. Individual image from photographed poster of tobacco and cigarette cards.1st earl of ypres, john french, second boer war, gordon relief expedition, cavalry, battle of klip drift, battle of elandslaagte, cape colony, counter insurgency operations, field marshall, knight of the order of st patrick, knight grand cross of the order of the bath, order of merit, knight grand cross of the royal victorian order, knight commander of the order of st michael and st george -
 Federation University Historical Collection
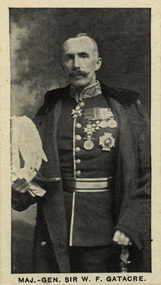
Photograph (black & White), Major-General Sir William Forbes Gatacre - South Africa
Individual image from photographed poster of tobacco and cigarette cards. -
 Federation University Historical Collection
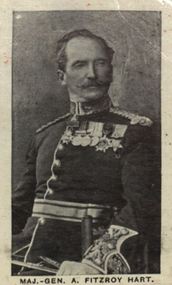
Photograph (black & White), Major-General A. Fitzroy Hart - South Africa
Hart had a long and varied experience, always emerging from action with distinction for courage and skill. Served in the Ashanti War (1873), Zulu War (1879), the Boer War of 1881 and the Egyptian War of 1882. In 1899 he was fighting in Natal and at Colenso. During the final and successful advance of the British on Ladysmith in 1900, "Hart's Brigade" successfully drove the Boers from Colenso.Individual image from photographed poster of tobacco and cigarette cards.major general fitzroy hart, ashanti war, zulu war, egyptian war, natal, colenso, ladysmith, boer war, hart's brigade -
 Federation University Historical Collection
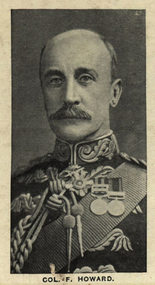
Photograph (black & White), Colonel F. Howard - South Africa
Individual image from photographed poster of tobacco and cigarette cards. -
 Federation University Historical Collection
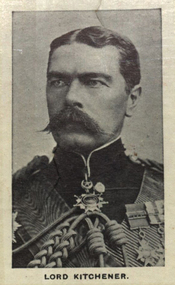
Photograph (black & White), Horatio Herbert Kitchener, 1st Earl Kitchener - South Africa
For his achievements in the Battle of Omdurman and Sudan in 1898, Kitchener was made Lord Kitchener of Khartoum, becoming an Earl - qualifying peer of mid-rank. Kitchener was a senior British Army officer and colonial administrator who won notoriety for his campaigns, most especially his scorched earth policy against the Boers and his establishment of concentration camps during the Second Boer War. Awards he received include: Knight of the Order of the Garter; Knight of the Order of St Patrick; Knight Grand Cross of the Order of the Bath; Member of the Order of Merit; Knight Grand Commander of the Order of the Star of India; Knight Grand Cross of the Order of St Michael and St George; Knight Grand Commander of the Order of the Indian Empire. Individual imagae take from photographed poster of tobacco and cigarette cards.battle of omdurman, sudan, kitchener, earl, scorched earth policy, boers, concentration camps, colonial administrator, knight of the order of st patrick, knight of the order of the garter, knight grand cross of the order of st michael and st george, knight grand cross of the order of the bath, member of the order of merit, knight grand commander of the order of the star of india, knight grand commander of the order of the indian empire -
 Federation University Historical Collection
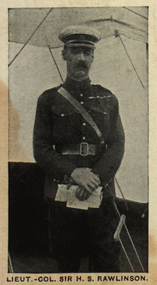
Photograph (black & White), Lieutenant-Colonel Sir Henry Seymour Rawlinson, 1st Baron Rawlinson - South Africa
Rawlinson served with distinction in a field command in the Second Boer War from 1899 to 1902. He was in Western Transvaal during early 1902 and led a column taking part in the Battle of Rooiwai, the last battle of the war. Following the end of hostilities he returned to England. Rawlinson, for his commands and the battles and wars he was engaged in during his career was awarded many times. Knight Grand Cross of the Royal Victorian Order, 1917; Knight Commander of the Order of St Michael and St George, 1918; Knight Grand Cross of the Order of the Bath, 1919; Baron Rawlinson, of Trent in the County of Dorset, 1919. Grand Officer of the Legion of Honour of France, 1916; Order of Danilo, 1st Class of the Kingdom of Montenegro, 1916; Obilitch Medal in Gold of the Kingdom of Montenegro, 1917; Order of St George, 4th Class of the Empire of Russia, 1917; Grand Officer of the Order of Leopold of Belgium, 1917; Croix de Guerre of Belgium, 1918; Croix de Guerre of France, 1919; American Army Distinguished Service Medal, 1919; Knight Grand Commander of the Order of the Star of India, 1924. Individual image from photographed poster of tobacco and cigarette cards.rawlinson, second boer war, western transvaal, battle of rooiwai, 1st baron of trent, dorset, knight grand cross of the royal victorian order, knight commander of the order of st michael and st george, knight grand cross of the order of the bath, grand officer of the legion of honour france, order of danilo 1st class of the kingdom of montenegro, obilitch medal in gold of the kingdom of montenegro, order fo st george 4th class of theempire of russia, grand officer of the order of leopold of belgium, croix de guerra of belgium, croix de guerra of france, american army distinguished service medal, knight grand commander of the order of the star of india -
 Federation University Historical Collection
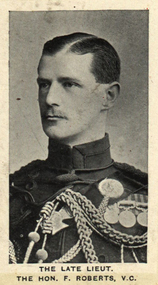
Photograph (black & White), Lieutenant, The Honourable Frederick Hugh Sherston Roberts - South Africa
Frederick Roberts was the son of Field Marshall Frederick Roberts, 1st Earl Roberts. At the age of 27 he went with the King's Rifles to the Second Boer War. During battle he, with two officers tried to assist and save guns when the detachments serving the guns had all become casualties or been driven away. While doing this Roberts fell badly wounded and 2 days later died. Commander-in-Chief Redvers Buller recommended Roberts for the Victoria Cross. Confirmation of the award made after his death. Roberts and his father were one of only three father son pairs to win the Victoria Cross. His father's was in 1858.Individual image from photographed poster of tobacco and cigarette cards.frederick roberts, field marshall roberts, king's rifles, second boer war, redvers buller, south africa -
 Federation University Historical Collection
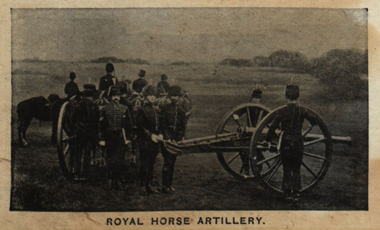
Photograph (black & White), Royal Horse Artillery - South Africa
Individual image from photographed poster of tobacco and cigarette cards.royal horse artillery, south africa, boer war, tranpsort -
 Federation University Historical Collection
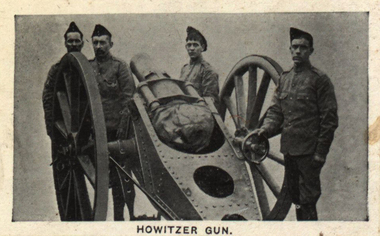
Photograph (black & White), BL5-inch Howitzer Gun - South Africa
During the Second Boer War Major D Hall states that the Liddite shells often failed to detonate; the gun was too heavy to be used as a field howitzer, and for siege use its range was too short and shell too light. However, it achieved some success in Natal when able to get close enough to bombard Boers in trenches.Individual image taken from photographed poster of tobacco and cigarette cards.second boer war, major hall, liddite shell -
 Federation University Historical Collection
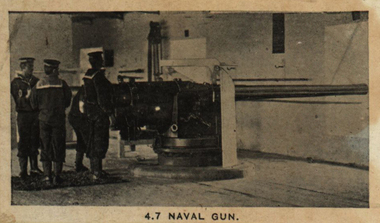
Photograph - Black & white photograph, 4.7 Naval Gun - South Africa, c1901
British forces in the Second Boer war were initially outgunned by the long range Boer artillery. Captain Percy Scott of HMS Terrible first improvised timber static siege mountings for two 4-7 guns from the Cape Town coastal defences, to counter the Boers' "Long Tom" gun during the Siege of Ladysmith in 1899-1900. Captain Scott then improvised a travelling carriage for 4-7 inch guns removed from their static coastal or ship mountings to provide the army with a heavy field gun. These improvised carriages lacked recoil buffers and hence in action drag shoes and attachment of the carriage by cable to a strong point in front ofthe gun were necessary to control the recoil. They're manned by Royal Navy crews and required up to 32 oxen to moveIndividual image from photographed poster of tobacco and cigarette cards.second boer war, boer artillery, 4-7 guns, captain percy scott, hms terrible, cape town, "long tom", siege of ladysmith -
 Federation University Historical Collection
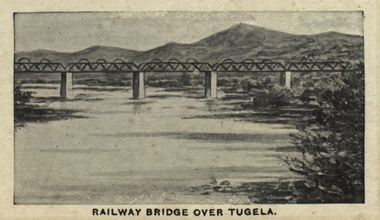
Photograph (black & White), Railway Bridge over Tugela - South Africa
Several bridges were built across the Tugela River by the British in their attempts to relieve Ladysmith. In December the British under Methuen were blocked from advancing on Ladysmith by the Boers. The Battle of Tugela Heights consisted of a series of military actions lasting from 14 February through to 27 February 1900 in which General Sir Redvers Buller's British army forced Louis Botha's Boer army to lift the Siege of Ladysmith during the Second Boer War.Individual image from photographed poster of tobacco and cigarette cardstugela river, ladysmith, lord methuen, boers, battle of tugela heights, general sir redvers buller, louis botha, siege of ladysmith, second boer war -
 Federation University Historical Collection
Book, C.E. Bristow, Government Printer, Northern Territory of South Australia Government Geologist's Reports on Recent Mineral Discoveries, 1908
Foolscap government geologist's Report including information on:- Pine Creek District; Brock's Creek, Anson Bay, Northern Territory Boring Operations Images Include: 'Mob of Blacks ad Tamarind Tree near Cliff Head, Anson Bay; Diamond Drill Boring Camp, near Cliff Head, Anson Bay, Wannomi Swamp; Daly River Crossing; Battery and Chinese Miners, Driffield Sketch Plan of the Mount Davis Copper FIeld, Sketch Plan Shewing POsition of Mineral Localities and Claims Near Wolfram Camp, Sketch PLan of the Pin Creek District Shewing Metalliferous Localities. h.y.l. brown, mining, boring, aborigines, aboriginal, chinese, south australia -
 Federation University Historical Collection
Map, South East Australia, not dated
Printed colour maptasmania, new south wales, victoria -
Federation University Historical Collection
Book, D.J. Walmsley, Change and Adjustment in Northern New South Wales, 1990, 1990
Robert H.T. Smith was Chancellor of University of Ballarat (later Federation University Australia).Soft white covered book. robert h.t. smith, georgraphy, new south wales -
 Federation University Historical Collection
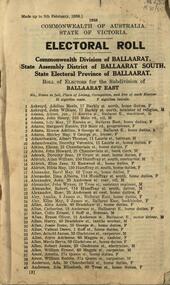
Booklet, W.M. Housten, Governent Printer, Commonwealth Division of Ballaarat. State Assembly District of Ballarat South. State Electrical Province of Ballaarat. Role of Electors for the Subdivision of Ballarat East, 1958, 1958
Ballarat East Electoral Rollelectoral roll, ballarat east, w.m. housten