Showing 1944 items
matching victoria bridge
-
 Lakes Entrance Regional Historical Society (operating as Lakes Entrance History Centre & Museum)
Photograph, 1926
Black and white photograph of drilling rig Government number 2 Bore at North Eastern side of North Arm bridge with Rigby Island and Hummocks, Lake and Princes Highway in background Lakes Entrance Victorialighthouses -
Lakes Entrance Regional Historical Society (operating as Lakes Entrance History Centre & Museum)
Photograph, 1926
... bridge Lakes Entrance Victoria... taken along North Arm near bridge Lakes Entrance Victoria ...Also two other black and white photographs taken in North Arm 04999.2 at big bight, 04999.3 taken at Mississippi Creek quarry showing transferring rock to trucks on way to be loaded onto barge. 7 x 11.5 cm. Also an enlarged version of same photograph 10 x 15 cm 04999.3Black and white photograph taken along North Arm near bridge Lakes Entrance Victoriajetties -
Lakes Entrance Regional Historical Society (operating as Lakes Entrance History Centre & Museum)
Photograph, H D Bulmer, 1910c
Sepia toned photograph showing heavily timbered steep banks on each side of calm water, distant view of timber tramway bridge which appears to be intact Lake Bunga Victoriaocean, vegetation, coast -
Lakes Entrance Regional Historical Society (operating as Lakes Entrance History Centre & Museum)
Photograph, Marie Fish, 1990c
Colour photograph taken from Western shore looking upstream showing heavily timbered banks Lake Bunga Victoriabridges, forest, historic site, waterways -
 Lakes Entrance Regional Historical Society (operating as Lakes Entrance History Centre & Museum)
Photograph, Lakes Post Newspaper, 2012
Colour photograph of Shirley Hancock holding the Lakes Entrance Bridge Clubs Perpetual Trophy flanked by Barrie Martin and Dawn Wallace winners of the Hancock Perpetual Trophy 2012. Lakes Entrance Victoriaboats and boating, tourism -
 Mt Dandenong & District Historical Society Inc.
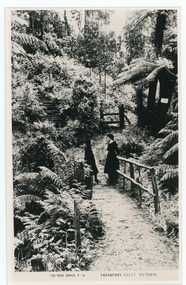
Photograph, Sassafras Gully, Victoria, c1920
The tourist track running alongside the creek from Sassafras Mechanics’ Hall to Emerald. In the early 1900s the track started at Rostrevor Guest House.Black and white copy of Rose Series Post card P. 74 showing two young women standing on a footbridge at Sassafras Gully. A set of steep steps can be seen above them.rose series, track, footbridge, bridge, sassafras -
 Mt Dandenong & District Historical Society Inc.
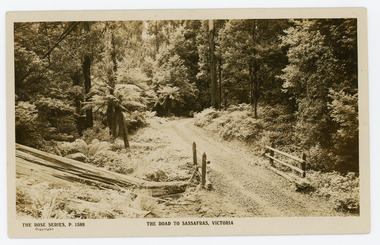
Photograph, The Road to Sassafras. Victoria
Rose Series postcard # P. 1588 showing a view of the road to Sassafras pre WW1.Sepia Coloured Rose Series post card P.1588 showing a stretch of unmade road passing over a simple bridge on the road to sassafras.On Front: THE ROSE SERIES, P. 1588 THE ROAD TO SASSAFRAS, VICTORIArose series, postcard, sassafras, road -
 Tramways/East Melbourne RSL Sub Branch - RSL Victoria Listing id: 27511
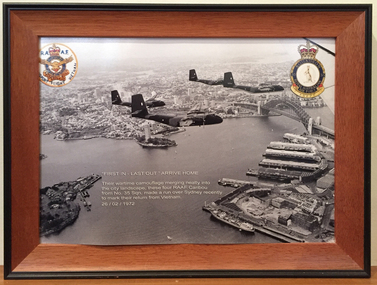
Photograph, First In - Last Out
Framed photograph showing four RAAF Caribou planes on their return to Australia. Image shows the four planes mid flight over Sydney Harbour Bridge. 'FIRST IN - LAST OUT- ARRIVE HOME' Their wartime camouflage merging neatly into the city landscape. These four RAAF Caribou from No. 35 Sqn. made a run over Sydney Recently to mark their return from Vietnam. vietnam, sydney, caribou, raaf, plane, vietnam war, 35 squadron -
Tramways/East Melbourne RSL Sub Branch - RSL Victoria Listing id: 27511
Book, Octopus, Great War Stories (Colditz Story, Bridge over River Kwai, Battle of the River Plate, Dambusters), 1978
isbn: 0 7064 0926 4 -
 Melbourne Legacy
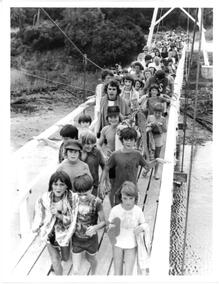
Photograph - Junior legatee outing, Somers Camp 1979, 01/1979
A photo of a large group of children crossing a bridge enroute to the beach. It came from an envelope with other camp photos. The Legacy envelope was marked "P6 Junior Legatee Camps and Hols" in red pen, and dated Jan 1977 in pencil. The contents will be items 00418 to 00425. Melbourne Legacy provides camps for junior legatees. The camps gave the children an opportunity of a summer beach holiday with other Legacy children. It started with outings to the property of Legacy founder, Legatee Stan Savige, who had a place in Balnarring. close to the beach. Permanent camp buildings were built in 1930. In 1930 Lord Somers (Governor of Victoria) also started a camp at a nearby property and the area was renamed Somers. Legacy Somers Camps continued intermittently at Stan's property until it was decided in 1951 to make other arrangements for holidays. A record of Junior Legatee camps.Black and white photo of children crossing a bridge at the beach.Handwritten on back "Jan 1979" in blue pen. Stamped "The property of Melbourne Legacy" in purple ink. Stamped "Copyright The Herald and Weekly Times" in blue ink. junior legatee outing, bridges, beach, somers camp -
 Whittlesea Historical Society Inc.
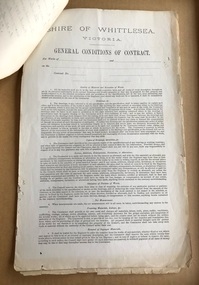
Document - Contract, Contract No.7, Shire of Whittlesea, Victoria. Plenty Main Road, 10 Dec 1888
Specifications for supplying 300 Cubic Yards of Metal on the side of the Main Plenty Road, between Yan Yean Road and the Plenty River Bridge, Whittlesea.3 sheets of paper held together with a brass split pin, includes General Conditions of ContractContract signed by William Henry Lockwood, Engineer, with Bryan McSweeney. Dated 10 December 1888.contract, william lockwood, main plenty road, whittlesea, yan yean road, bryan mcsweeney -
Ballarat Tramway Museum
Poster, State Electricity Commission of Victoria (SECV), "Now its cheaper to travel by tram!", Jun. 1963
Yield information and demonstrates the SEC's marketing of the City Section Fare in Ballarat.Poster - printed onto paper and cut to a size to be pasted or adhered to an interior tramcar advert titled "Now its cheaper to travel by tram!", advertising fares from Dawson St to the station or to the East End of Bridge St. Follows the introduction of the City Section Fares to the Railway Station. Based on Schedule of Fares and Charges Reg Item 1731 for June 1963.trams, tramways, posters, fares, advertisements, tickets -
 Ballarat Tramway Museum
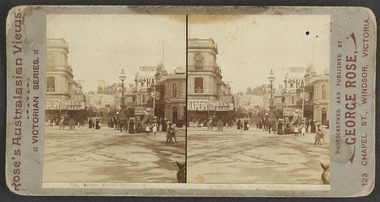
Photograph - Digital image, Rose Stereograph Co, c1895?
Yields information about the appearance of the intersection of Grenville and Bridge St following the introduction of the horse trams and the terminal arrangements.Digital image from the State Library of Victoria website image No. H92.291/24, a Rose series stereo photograph showing a horse tram just after off loading at the Grenville St terminus. Shows the view along Bridge St with the Nicholl and Allan store, Bucks Head hotel, Reed Chemist and C. Morris Hatter sign. C1895? Has a number of people in the view. The horses are being "run around the tram". Tram has the destination of "Convent", could be No. 6 or 5. See image btm7019i2.pdf for the SLV link - correct as of 31-12-17. See image i3 for a more detailed photograph.trams, tramways, bridge st, grenville st, sturt st, horse trams, stereo photograph, tram 5 of 6? -
 Ballarat Tramway Museum
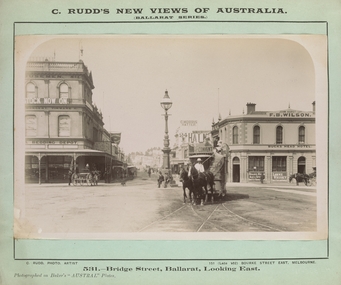
Photograph - Digital image, Charles Rudd, c1890?
Yields information about the appearance of the intersection of Grenville and Bridge St following the introduction of the horse trams and the terminal arrangements.Digital image from the State Library of Victoria website image No. H39358/11, showing a horse tram departing the Grenville St terminus. Shows the view along Bridge St with the Nicholl and Allan store, Bucks Head hotel, and C. Morris Hatter sign. C1890? Tram has the destination of "Convent", with a number of people on the upper deck. See image btm7019i2.pdf for the SLV link - correct as of 31-12-17. See image i3 for a more detailed photograph.trams, tramways, bridge st, grenville st, sturt st, horse trams -
 Ballarat Tramway Museum
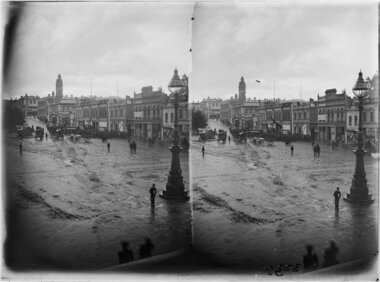
Photograph - Digital image, John Henry Harvey, c1900
Yields information about the appearance of the intersection of Grenville and Bridge St following the introduction of the horse trams and the terminal arrangements.Digital image from the State Library of Victoria website image No. H86.76/17, a series stereo photograph showing the horse tram track from the Bucks Head Hotel at Grenville and Sturt Streets. Shows the muddy nature of the intersection. Has the buildings on the north side of Sturt St in the view. Photograph by John Henry Harvey, c1900. trams, tramways, bridge st, grenville st, sturt st, horse trams, stereo photograph -
 Ballarat Tramway Museum
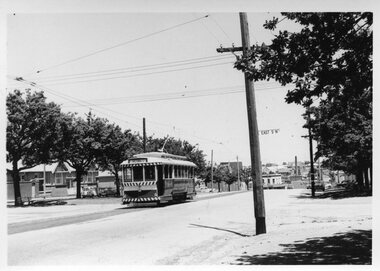
Photograph - Black and White - tram 17 Victoria St and East St, A T Miles, 30/1/1968
Black and White - tram 17 (Victoria St) at the intersection with East St, looking west. Shows the curve in Victoria St, just before the descent to Bridge St, Taken by A T Miles 30/1/1968.Yields information about the Victoria St route.Photograph - black and white print with notes on rear. Printed on Ilford paper.A T Miles stamp and location and date notes.tramways, trams, tram 17, victoria st, east st -
 Ballarat Tramway Museum
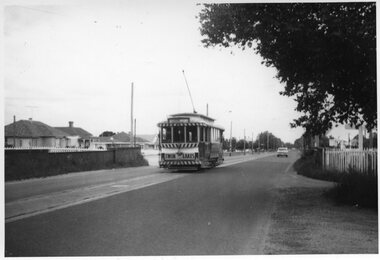
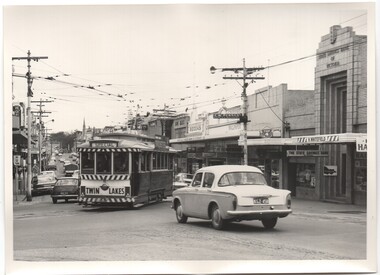
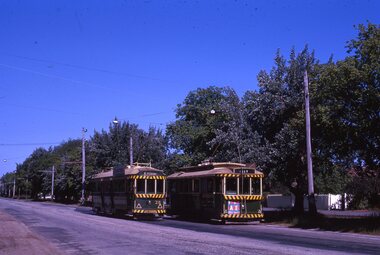
Photograph - Black and White - tram 11 Victoria St, A T Miles, 26/11/1969
... in Victoria St crossing over the Eureka line bridge - former Buninyong ...Black and White - tram 11 in Victoria St crossing over the Eureka line bridge - former Buninyong railway line. Taken by A T Miles 26/11/1969. The tram has a Twin Lakes advert on the front. The destination has been changed for the return trip to the Gardens via Sturt St West.Yields information about services to Victoria St.Photograph - black and white print with notes on rear. A T Miles stamp and location and date notes.tramways, trams, tram 11, victoria st, eureka line, bridge, buninyong -
 Ballarat Tramway Museum
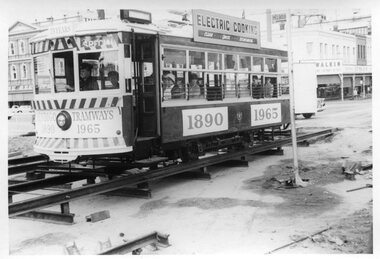
Photograph, Tramway Museum Society of Victoria (TMSV), Bendigo Birney 28 - bridgework, 1965
Photo shows Bendigo 28 decorated for the 75th anniversary of Bendigo trams (1890 to 1965) crossing temporary track at Charing Cross during the reconstruction of the Bendigo Creek bridge during early 1965 - see Electric Traction Vol. 20, No. 6, June 1965. The front cover has a photo by H R Clark of the decorated car. The photo shows the method of supporting the rails during the work prior to completion of concreting. Yields inforamation about bridge reconstruction in Bendigo and their 75th anniversary.Black and white photograph printTMSV Shop stamptrams, tramways, bendigo, birney, tram 28, bridgeworks, charing cross, 75th anniversary -
 Ballarat Tramway Museum
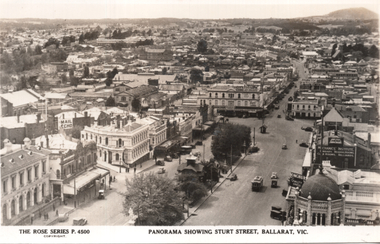
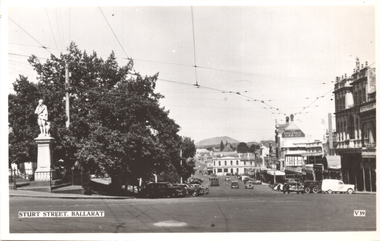
Postcard, Rose Stereograph Co, "Panorama showing Sturt Street, Ballarat Vic.", 1940s
The photo is a Panorama showing Sturt Street, taken from the Town Hall, looking north east with Mount Warrenheip and Black Hill in the view. Shows the buildings east of Lydiard St, including Bridge St, Camp St and part of Victoria St. One tram is westbound, about to cross Lydiard St. Rose Series P4500. Has signs for the "Mail Echo", Plume petrol, ANA, the Mechanics Institute, and Longhurs Bread. On the rear Wal Jack has written extensive notes for Ken Magor noting the streets in the view and the Ballarat East loco depot and Goods shed. Wal has dated the photo 1940 to 1944, though the trams do not have white bumper bars that featured from 1941 to 1945.Yields information about Ballarat during the 1940sPostcard black and white, divided back, with a handwritten note on rear.See image 2 for details of the handwritten note by Wal Jack on the rear. tramways, trams, bridge st, sturt st, ballarat east, rose postcards -
 Ballarat Tramway Museum
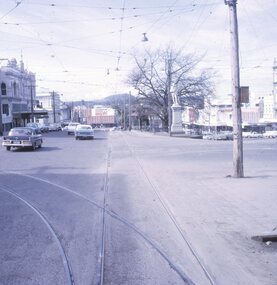
Postcard, Valentine & Sons Publishing Co, "Sturt Street, Ballarat", c1950
... St from Lydiard St, looking east showing narrow Bridge St... narrow Bridge St and Victoria St hill. Mt Warrenheip 4 miles away ...The photo shows the view of the south side of Sturt Street from Lydiad St, looking east. The Robbie Burns statue is on the left of the card, along with the Mechanics Institute, The Ballarat Gas Co, Buckshead Hotel. There is one tram parked in the parking loop. On the rear, Wal Jack in a note to Ken Magor has written: "4 wheeler (No. 30 or 33?) in parking loop. Lower Sturt St from Lydiard St, looking east showing narrow Bridge St and Victoria St hill. Mt Warrenheip 4 miles away." Has a sketch of the tram tracks as well. C1950Yields information about Ballarat during the late 1940s or early 1950s.Postcard black and white, undivided back, with a handwritten note on rear. Card No. V39.See image 2 for details of the handwritten note by Wal Jack on the rear. tramways, trams, sturt st, valentine -
 Ballarat Tramway Museum
Slide - 27 mm sq slide/s - set of 8 - tram tracks - Victoria St, Lilian Butler, Aug. 1971
... the streetscapes of Ballarat on the Gardens to Victoria St route ...Yields information about the streetscapes of Ballarat on the Gardens to Victoria St route and in particular buildings and people that crewed the trams.Set of eight Colour 27 x 27 mm slide in a Kodachrome cardboard mount. .1 - view of the Sturt and Lydiard St intersection from the front of the tram car with the Robbie Burns statue in the view and the Big W store. .2 - ditto at the corner of Sturt and Grenville St with the tramway shelter and the Dickins store. .3 - setting the signals for the Bridge St route. .4 - View looking east along Bridge St with Big W store and Faull's shoe shop. .5 - At intersection with Main Road, looking up the hill towards Victoria St. On the right is the advert for Viscount Ambassador Caravans. .6 - Looking along Victoria St, towards the East at E St, with the biscuit factory on the left. .7 - tram shelter at Queen St. .8 - View of the terminus looking east, showing the median strip Slide mount date August 1971. Photo from the collection of Lilian Butler.ballarat, tramways, trams, sturt st, grenville st, shelters, bridge st, signals, victoria st -
 Ballarat Tramway Museum
Negative - Set of 3, Campbell Duncan, 10/08/1971 12:00:00 AM
... of trams in the Main of No. 31 approaching the junction with Bridge... approaching the junction with Bridge St and Victoria St. The tram has ...Yields information about tram operations and the street views at Stones Corner.Set of 3 photographs taken on 10/8/1971 by Campbell Duncan of trams in the Main of No. 31 approaching the junction with Bridge St and Victoria St. The tram has the destination of Gardens via Drummond North and a Twin Lakes sign. In the background are the Avery Scales store, Wearwell and Stones Corner. Shows the overhead arrangements at this location.trams, tramways, main road, stones corner, tram 31 -
 Ballarat Tramway Museum
Photograph - Black & White Photograph/s set of 2, Charles Craig, 1950s
... tramways Bridge St Main Road Victoria St tram 28 Set of two black ...Yields information about the traffic and appearance of Bridge St during the 1950's.Set of two black and white photographs of trams in Bridge St at the intersection with Main Road and Victoria St .1 - tram at the intersection with Stones Corner and other shops in the background. Includes the Caltex services station, the Listers for Service clock and direction sign, with many people leaving the tram and walking along Victoria St. Has the Gear Chemist, Ricksha Paint and other shops in the view. .2 - No. 28 - for Gardens via Sturt St West and the intersection. Photo possibly early 1950's. Both photos by Charles Craig trams, tramways, bridge st, main road, victoria st, tram 28 -
 Ballarat Tramway Museum
Photograph - Black & White Photograph/s, Charles Craig, 1971
Yields information about Stones Corner, associated building and its use by trams in the period before the closure of the SEC system. Black and White photograph of tram of No. 11 at Stones Corner turning from Bridge St into Main Road. Tram showing Special, has a Twin Lakes sign and a Briquettes roof advert. In the background is H. Whitefield, the State Savings Bank of Victoria, a directional sign for C. W. Pennant wall paper Rodda and the ANZ bank? Photo by Charles Craig - during 1971. trams, tramways, bridge st, stones corner, main road, tram 11 -
 Ballarat Tramway Museum
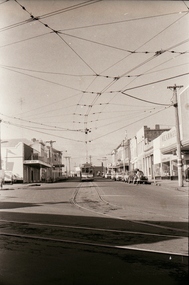
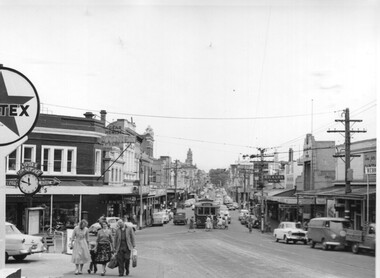
Photograph - Digital image, W. J. Llewelyn, c1971
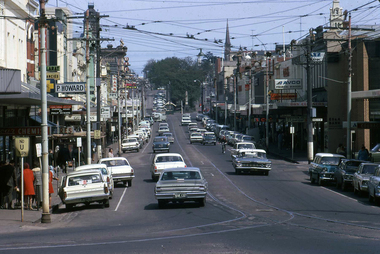
... tramways Bridge St Victoria St Stones Corner Royal Visit Grenville ...Yields information about the Royal Visit to Ballarat and the appearance of Bridge St during 1956 and just prior to the closure of the tramway.Set of three colour digital images taken of the Bridge St Ballarat by W. J. Llewelyn. .1 - Looking west along Bridge St from the Service Station, shows the various buildings, tram track, tram shelter and overhead. Appears to be c1971. .2 - Look east from Grenville St, 1954 with the Royal Visit decorations in the placed. Has the Dickins Self Service Grocery shop, Bucks Head Hotel and a sign for Morsheads store. Tram tracks and overhead apparent along with two trams in the far distance. .3 - Looking west along Sturt St from Bridge and Grenville St - shows the buildings in the background, tramway overhead, general congestion, letter box, tram stop shelter. A tram is parked in the loop. Has a Davies Bread advert on the Mechanics Institute building, also Thomas Jewellers, T& G and the Odeon Theatre sign.trams, tramways, bridge st, victoria st, stones corner, royal visit, grenville st, shelters, sturt st -
 Ballarat Tramway Museum
Photograph - Digital image, W. J. Llewelyn, 1939
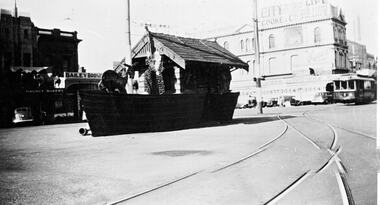
Digital image of the Grenville St tram shelter decorated for the Victorian Centenary celebrations in Ballarat 1938 - the shelter has been decorated to look like a boat. Has tram 18 or 19 entering Bridge St. In the background is Bailey Bros butcher, Magnet bakery, advert for city Life Mutual and Cooke & Co. finance on the Nicholl & Allan building, Grenville St., Bridge St Photo by Jane Holmes, from the Museum of Victoria website - see related documents. Note the scanning error in the trackwork.trams, tramways, centenary, ballarat, shelters, grenville st, tram 18, tram 19 -
 Ballarat Tramway Museum
Slide - 35mm slide/s, Robert Thomson, 21/04/1962 12:00:00 AM
Yields information about Ballarat's trams during 1964 and the Victoria St terminus and an AETA Convention tour.Kodachrome cardboard mount, colour slide of trams 18 and 37 at the Victoria St terminus, during the AETA Convention tour of 21-4-1962. Tram, 18 has adverts for The Age, Lancashire's store at 94-98 Bridge St and a Whites Florist and No. 37 and SEC Electric Cooking advert and the AETA tour sign."AETA Convention 21-4-62" in ink.tramways, trams, victoria st, aeta, aeta tour, tram 18, tram 37 -
 Ballarat Tramway Museum
Newspaper, The Courier Ballarat, "On the trams", 19/09/1992 12:00:00 AM
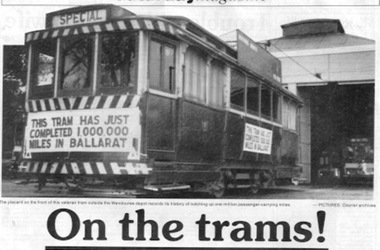
... in Ballarat" and one of tram 31, east bound in Bridge St. bound... in Bridge St. bound for Victoria St. dropping off a passenger ...Newspaper cutting from The Courier, Ballarat, Saturday 19/9/1992, page 27, written by Seaton Ashton about the history of trams in Ballarat on the 20th anniversary of their closure. Notes horse trams, ESCo, opening of lines, tram car builders, their rehabilitation in the 1930's, the involvement of the BTPS, trams 1 and 12. Has two photos, one of tram 27 sitting outside the SEC depot carrying the "This tram has just completed 1,000,000 miles in Ballarat" and one of tram 31, east bound in Bridge St. bound for Victoria St. dropping off a passenger at a stop. Both picture from the Courier Archives. Item in the Courier's "Saturday Magazine". Occupies a full page of the newspaper. 2nd copy added 11/8/2001 - folded.trams, tramways, ballarat, esco, btps, horse trams, sec -
 Ballarat Tramway Museum
Slide - 35mm slide/s - set of 7, Noel Simons, 22/11/1962 12:00:00 AM
Set of 7 Kodachrome transparencies taken on 22/11/1962. 1161.1 - trams 38 and 20 in Sturt St. West at the Russell St. loop. No. 20 has possibly terminated and is showing "CITY" while 38 is showing "Mt Pleasant" Both trams fitted with dash canopy lighting, but no large white stripe. 20 has a Twin Lakes sign. 1161.2 - tram 33 just before Gardens Loop in Wendouree Parade, with destination of "Victoria St." Has a Twin Lakes sign. 1161.3 - tram 39 at corner of Lydiard St. North and Sturt St. with Post Office in background. 1161.4 - tram 40 turning from Sturt St into Lydiard St. North with Post Office in background and showing destination of Lydiard St. North. A blue Holden with red stripes for the Radio Cabs co. is in the foreground, along with pedestrians. 1161.5 - tram 41 in Sturt St. at the City terminus, showing destination of Mt Pleasant with Post Office and ANZ Bank buildings in background. Numerous people waiting on the seats at the tram stop. 1161.6 - tram 13 in Sturt St. near Doveton St. showing destination of Bell St. Many cars and pedestrians on the south side of Sturt St. Note the Austin motor car by the tram showing a stop signal. Tram 13 has a Twin Lakes sign. 1161.7 - trams 13, 26, and 39 in the City Loop near Bridge St. Has Morseheads and Grenville St. tram shelter in the background.1161.1 - "38 and 20 crossing in Sturt St. Ballarat near Russell Street" - in blue and black ink. The "Russell St" is a later addition, over white out. 1161.2 - "33 near Botanic Gardens terminus, Wendouree Parade, Ballarat" 1161.3 - "No. 39 in Lydiard St. Ballarat at Cnr. of Sturt St." 1161.4 - "No. 40 entering Lydiard St. from Sturt St. Ballarat" 1161.5 - "No. 41 in Sturt St. Ballarat at cnr of Lydiard St." 1161.6 - "No. 13 in Sturt St. Ballarat, at Cnr. of Doveton St." 1161.7 - "Nos. 13, 26, and 39 in Sturt St. Ballarat near Bridge St." All have date stamp of "22 Nov. 1962" in purple ink. All black ink unless otherwise noted.tramways, trams, ballarat, sturt st. west, wendouree parade, lydiard st., city loop, taxis, radio cabs, tram 13, tram 20, tram 26, tram 33, tram 38, tram 39, tram 40, tram 41 -
 Ballarat Tramway Museum
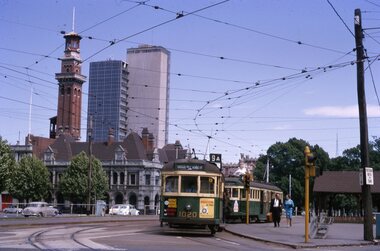
Slide - 35mm slide/s - set of 11, Noel Simons, 23/10/1965 12:00:00 AM
Set of 11 Kodachrome transparencies taken on 23/10/1965 in Melbourne. 1178.1 - W7 1020 (on route 9A, Northcote via St Georges Road) with a W2 536 (Deepdene) behind at the corner of Victoria Parade and Brunswick St. East Melbourne or Fitzroy. Has Eastern Hill fire station and ICI building in background. 1020 has front dash panel ads for Queens Bridge Motors and Bridgestone tyres. 1178.2 - W5 759 (route 19, North Coburg) and W5 807 in Elizabeth St. Melbourne at the intersection of Bourke St. with the State Savings Bank building in the background. 759 has side ads, one of which is for CASTROL. 1178.3 -SW6 903 crossing Brunswick St. in Victoria Parade, Fitzroy bound for Deepdene, route 45. Photo taken after tram has passed photographer. 1178.4 - W7 1019 (route 96, East Brunswick Blyth St.) and W7 1010 (route 88 East Preston) in Nicholson St at intersection with Victoria Parade. A Herald newspaper truck is alongside 1019. 1178.5 - W7 1040 (route 96, East Brunswick Blyth St.) in Nicholson St at intersection with Albert St. Has Princess Theatre in the background. (High res scan added 26/10/2008 - copy to FOHTD) .1178.6 - W6 974 (route 89 East Preston Bell St.) in Bourke St. about to turn into Spring St. Has buildings on the south side of Bourke St in background, including Southern Cross Hotel. Note trees in tubs and red phone box by Windsor Hotel. 1178.7 - as for same location as 1178.6 - SW6 967 (route 96) and W6 971 (inbound - route 90 - City Spencer St.) 967 has Lucas ad on front dash. 1178.8 - W7 1013 (route 88 East Preston) photographed from W6 991 in Bourke St at corner of Russell St. Has Normans corner store, Treadways and Foys in background. 1178.9 - W2 553 (route 1 East Coburg) at the corner of Elizabeth St and Bourke St. Has the Leviathan, Roger David and Ezywalkin shops in the background. 1178.10 - W6 991 (route 88) and W7 (route 96) in Bourke St. at corner with Elizabeth St. Photo taken from the GPO steps. 991 has ads for BIC pens and CASTROL. In background are the State Savings Bank, Halls Books and McEwans shops. 1178.11 - Line up of north bound trams (3 +) lead by W2 449and southbound in Elizabeth St at corner of Collins St. Has Flinders St. station building in the background. Hi -res image of .10 added 22-12-2018All have date stamp of "23 Oct 1965" in purple ink. All black ink unless otherwise noted. 1178.1 - "W7 1020 turning into Brunswick St. from Victoria parade, East Melbourne (followed by W2 536) 1178.2 - "W5 799 and 807 in Elizabeth St. Melbourne at cnr. of Bourke St." 1178.3 - "SW6 903 entering reserved track in Victoria Parade, East Melbourne" 1178.4 - "W7 1019 and 1010 in Nicholson St. East Melbourne at Victoria Pde intersection" 1178.5 - "W7 1040 Melbourne's last tram (to date) in Nicholson St. at Albert St. intersection." 1178.6 - "W6 974 in Bourke St. Melbourne, about to turn into Spring St." 1178.7 - "W6 971 entering Bourke St. from Spring St. Melbourne, passes SW6 967 outward bound for East Brunswick" 1178.8 - "W7 1013 (seen from W6 991) in Bourke St. Melbourne crossing Russell St." 1178. 9 -"W2 553 in Elizabeth St. Melbourne at cnr of Bourke St." 1178.10 - "W6 991 and W7 1005 in Bourke St. Melbourne at cnr of Elizabeth St." 1178.11 - "W2 449 leads a line of Peak hour cars along Elizabeth St. Melbourne (at Collins St. corner)"tramways, trams, melbourne, victoria parade, nicholson st., brunswick st., bourke st, elizabeth st, tram 1020, tram 536, tram 799, tram 807, tram 903, tram 1019, tram 1010, tram 1040, tram 974, tram 967, tram 971, tram 1013, tram 553, tram 991, tram 1005, tram 449