Showing 2413 items
matching street parade
-
 Ballarat Tramway Museum
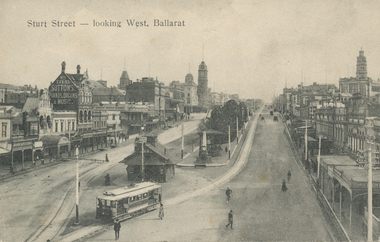
Postcard, ESCo tram at the east end of Sturt St
B&W postcard of an ESCo tram at the east end of Sturt St. Ballarat, with the Grenville St. shelter in the background. Shows buildings along both sides of Sturt St. Has a few pedestrians in the photo and some horse drawn vehicles in the background. Tram in style with destination box/lights at back of drivers canopy. Has title "Sturt Street - looking West, Ballarat" in top left hand corner. On rear "H.J. Summerscales, next Post Office, Ballarat - Printed in Germany" on left hand edge vertically. Post card dated 29/12/10 (1910), from E.H. Colson? at 49 Webster St. wishing the recipient a happy new year. Recipient - Mr. A. Steer, Glen Eira Rd. Elsternwick. Has a Ballarat Post office and stamp and Victorian 1d stamp (red). As well in pencil, a price "$15". See also scanned image file and prints from negative at Reg. Item 833. Image cropping is slightly different at the bottom to that of Reg. Item 833. Used in postcard display 2017-2018trams, tramways, esco, sturt st, postcards -
 Ballarat Tramway Museum
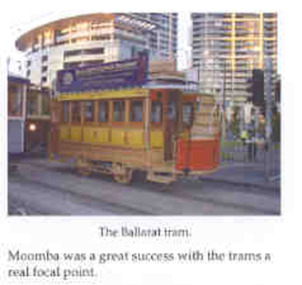
Memorabilia - Event Materials, Arts Project Vic, Melbourne Moomba Trams on Parade, 1/04/2002 12:00:00 AM
Set of papers collected for the archives relevant to the visit of BTM Horse Tram No. 1 for the 2002, Melbourne Moomba trams on Parade. .1 - "Call Sheet" - four A4 sheets, giving details of the participant, times, assembly area, parking, contact and notes. Also sheet listing trams in Parade (black and white), Assembly information, and a plan of the tram assembly area showing the location of the various display trams. .2 - Colour A4 sheet of the trams on parade in order of appearance and details of the street party that followed. .3 - Photocopy of a letter from the organisers (Arts Projects Australia) thanking the BTM for participating. .4 - Copy of National Express Group company newsletter for Week 11, 15/3/2002, titled "Weekly Update" with a photograph of the horse tram in the parade with the South Melbourne skyline in the background. See pdf file for full copy.trams, tramways, moomba, trams on parade, melbourne, btm -
 Ballarat Tramway Museum
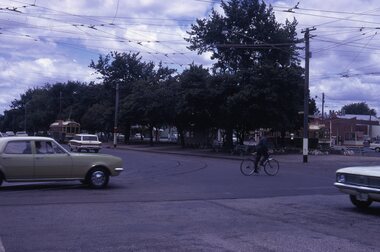
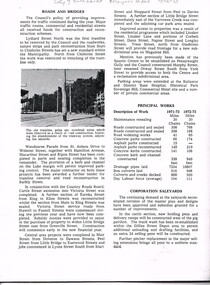
Slide - 35mm slide/s, Peter Moses, Jan. 1966
Photo of a bogie tram east bound in Sturt St. after leaving Hospital corner (corner of Sturt and Drummond Streets). Has curve from Drummond North into Sturt St. in the foreground. Note scanning error in the image. Kodak cardboard mount slide, taken by Peter Moses January 1966.On back of slide in blue ink in the bottom right hand corner "P. Moses".tramways, trams, hospital corner, sturt st. -
 Ballarat Tramway Museum
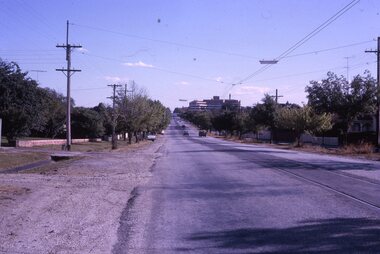
Slide - 35mm slide/s, Peter Moses, Jan. 1966
Photo of Drummond Street North, looking south from Macarthur St. Shows the nature of the street construction at the time. Has the hospitals in the background. Kodak cardboard mount slide, taken by Peter Moses January 1966.On back of slide in blue ink "Jan. 1966 / 125 f11" and bottom right hand corner "P. Moses".tramways, trams, drummond st nth -
 Ballarat Tramway Museum
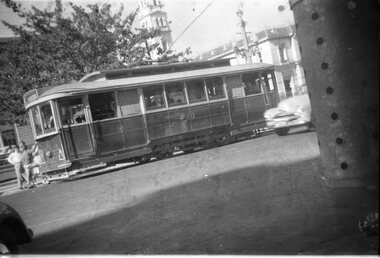
Slide - 35mm slide/s, Peter Moses, Aug. 1971
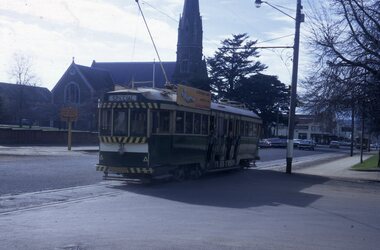
Photo of SEC Ballarat Tram No. 37 east bound at Lyons St. on a charter with the St. Andrews Kirk (church) in the background, on the corners of Sturt, Dawson and Lyons Streets. Photo taken after the tram has passed the photographer. Tram has "Everything's under control in my all electric kitchen" SEC roof advertisement panel. Kodak cardboard mount slide, taken by Peter Moses August 1971.On back of slide in red ink "N37 / Child ? new? Special Tram, Sturt St." and in top right hand corner in black ink "P. Moses".tramways, trams, lyons st, sturt st, st andrews kirk, tram 37 -
 Ballarat Tramway Museum
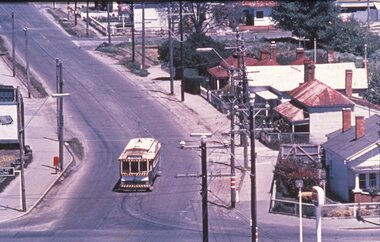
Slide - 35mm slide/s, Peter Moses, 21/08/1971 12:00:00 AM
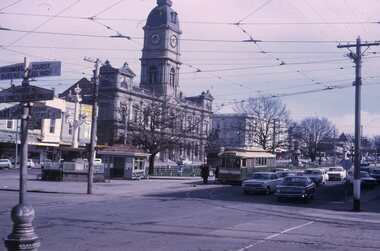
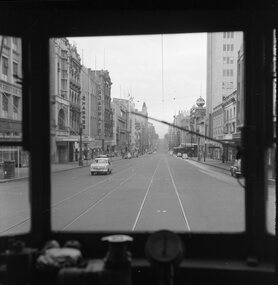
Photo of SEC Ballarat No. 13 at the City terminus, east bound in Sturt St. Tram has destination of Mt Pleasant. Town Hall in background. Note sign in left corner of photograph, giving directions to the Art Gallery and the Tourist Bureau and "Danger Cross Streets and Right Angles". Kodak cardboard mount slide, taken by Peter Moses 21 August 1971.On the rear of the slide in black ink "Ballarat / Sturt St. terminus" and "P. Moses" in the bottom right hand corner.tramways, trams, sturt st, lydiard st, signs, tram 13 -
 Ballarat Tramway Museum
Slide - 35mm slide/s, Peter Moses, Jan. 1969
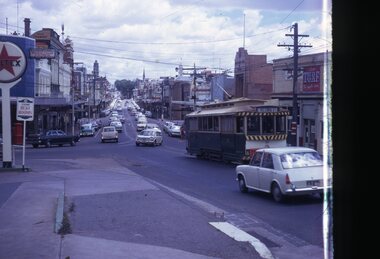
Photo of SEC Ballarat No. 40 west bound in Bridge St. Tram has two car numbers on the front, the destination roll with black background with white lettering. Later replaced with black letters on white background. Has Morseheads shop on the left hand side, Coles store and Christmas decorations in the street. The driver of the car in front of the tram is giving a hand signal - STOP! White cardboard mount slide, taken by Peter Moses assumed Jan. 1966.On the rear of the slides in black ink "Ballarat Tram, end of Main St." and "P. Moses" in the bottom left hand corner in black ink.tramways, trams, bridge st, morseheads, tram 40 -
 Ballarat Tramway Museum
Slide - 35mm slide/s, Peter Moses, Jan. 1969
Photo of SEC Ballarat No. 33 east bound at junction of Main St. and Victoria Streets, bound for Victoria St. Tram has destination of Victoria St., a Twin Lakes sign. Companies in image are Turf advertisement and Caltex. Photo taken looking along Bridge St. Slide has been at the start or the end of the roll, and has been hand mounted in a cardboard mount by the photographer. White cardboard mount slide, taken by Peter Moses assumed Jan. 1969.On the rear of the slides in black ink "Ballarat tram turn off to Victoria St." and "P. Moses" in the bottom left hand corner in black ink.tramways, trams, bridge st, main st, victoria st., tram 33 -
 Ballarat Tramway Museum
Slide - 35mm slide/s - set of 2, Peter Moses, Jan. 1969
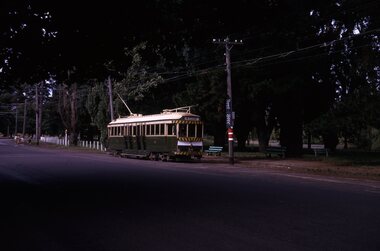
Set of two photos of SEC Ballarat No. 34 in Wendouree Parade at Gardens Loop. Tram has destination of "Mt Pleasant". .1 - No. 34 at the loop, waiting to depart. Note the signs on the poles and the seats at the stop. .2 - No. 34 has departed loop and running south along Wendouree Parade - note the many parked cars and trees in the street. Kodak cardboard mount slide, taken by Peter Moses assumed Jan. 1969, dated only "Jan", but date lines up with Bendigo slides and type of numbering. Could be 1970. See also Reg Item 3261 for photo used as Membership card for 2004 - 2005.On the rear of the slides in black ink "P. Moses" along bottom left or right hand corner in black ink.tramways, trams, wendouree parade, gardens loop, tram 34 -
 Ballarat Tramway Museum
Photograph - Black & White Photograph/s, Dave Macartney, 4/08/1968 12:00:00 AM
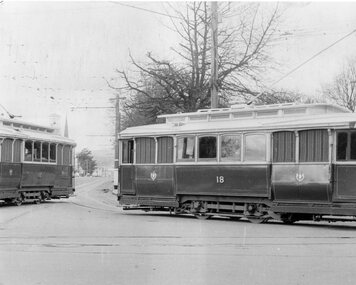
Black and white photograph of SEC Nos 12 and 18 meeting at the corner of Drummond Street and Sturt St. Taken by Dave Macartney 4/8/1968. Both trams inbound. No. 12 turning from Drummond St. Nth, showing "Depot via Drummond Nth" and No. 18 ex Sebastopol line. Both trams have the blinds drawn. Printed on Agfa paper. See also Reg Item 1412 for another print of this scene, but differently framed. tramways, trams, hospital corner, sturt st, junction, tram 18, tram 12 -
 Ballarat Tramway Museum
Slide - 35mm slide/s, Wal Jack, 17/06/1962 12:00:00 AM
Bendigo, Birney No. 28 turning into Mitchell St from Pall Mall, heading for Quarry Hill. Photo taken after tram has passed, looks along Mitchell Street towards railway station, with centre of the road poles. Not well in focus. Tram has Briquettes roof ad.'SEC Bendigo, Birney No. 28 in Mitchell St. 17-6-62'tramways, trams, bendigo, mitchell st, tram 28 -
 Ballarat Tramway Museum
Photograph - Black & White Photograph, Horse trams at the Gardens, c1900
Photo of Horse trams No. 1 and 12 in the Gardens Area of Lake Wendouree. Photo shows both trams with many passengers, some sitting on the handrails and people standing in the street. Taken c1900? The modesty panel or the advertisement panel on the top of tram 1, has been changed in the photograph to blank out the advertisement and to draw in the handrails.Yields information about Ballarat 's horse trams No. 11 and another and its appearance in the gardens. The Modesty board has been modified to remove an advertisement.Black and white photograph with notes on rear. Has on rear, markings for use in a publication, location etc "Photo page 9 bottom Reduce to 5 1/2" x 3 1/2", in top right hand corner on three lines "4c", "1.13." and ".14." and in bottom right hand corner "KMcC" 3rd copy has "Neg 14,060, 1 and 12 at Ballarat" in ink on rear.trams, tramways, ballarat, horse trams, wendouree parade, gardens , tram 1, tram 12 -
 Ballarat Tramway Museum
Photograph - Black & White Photograph/s, Geoff Grant, 16/06/1955 12:00:00 AM
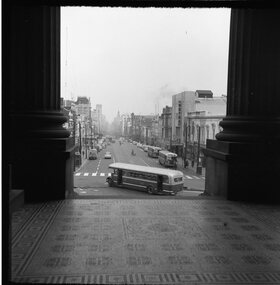
View of Bourke Street Melbourne from just inside pillars of Parliament House looking west on 16 June 1955, a few days before the trams took over. MMTB Bus 580 turning into Bourke St from Spring St. Negative scanned hi res and imaged updated 20/5/2020.On rear in typed on paper "Buses inn Bourke St. A shot taken a few days before the trams took over. Taken from Parliament House steps 16 June 1955." & "Geoff Grant etc." stamp in btm rh corner.trams, tramways, melbourne, bourke st -
 Ballarat Tramway Museum
Photograph - Black & White Photograph/s, Geoff Grant, 25/06/1955 12:00:00 AM
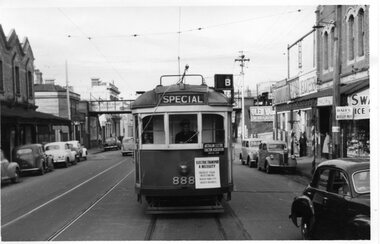
Black & white photo of M&MTB tram No. 888 from rear cab of 877 while on AETA tour of 25/6/1955 in Victoria Street, North Richmond, just to the west of the North Richmond Station, Victoria Street railway bridge. Numerous parked cars of the era in the street, and shops on both sides of street. Tram 888 has destination of "SPECIAL", carrying AETA auxiliary board and a board on front dash of tram that says "ELECTRIC TRANSPORT A NECESSITY , PROTECTS YOUR INVESTMEST, BUILDS YOUR CITY, CREATES BUSINESS"On typed paper on rear, "Shot out of the Rear cabin of 877 showing 888 tailing us on AETA Bourke St. tour. June 25 1955" and "Geoff Grant" stamp in btm rh cnr.trams, tramways, victoria st, bourke st, aeta, north richmond , tram 888 -
 Ballarat Tramway Museum
Photograph - Black & White Photograph/s, Geoff Grant, 19/06/1955 12:00:00 AM
Black & white photo out of rear cabin of M&MTB tram No. 988, running "bang road" or wrong line in Bourke St. on Sunday, 19 June 1955 while testing overhead. Good view of Bourke St. buildings looking towards GPO. Some motor cars in the street. Negative No. 315 on file. Scanned image of negative btm497i1 shows a wider image than the print. Geoff Grant's notes on the envelope that contained the negative - says that this was the first tram to run on the Bourke St. route. Negative scanned at hi res 21/5/2020.On typed paper on rear "View out of the rear cabin of 988 as it came up Bourke St. on Sunday the 19 June 1955" and "Geoff Grant" stamp in btm rh corner.trams, tramways, melbourne, bourke st., commissioning , tram 988 -
 Ballarat Tramway Museum
Photograph - Black & White Photograph/s, Richards & Co Ballarat, 19/06/1955 12:00:00 AM
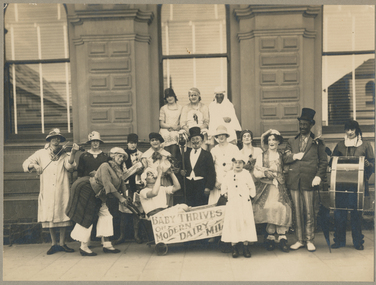
Black & white photograph of the Ballarat Tramways Social Club taken in front of a Grenville St. office (in 1997 was the "The Pancake Kitchen" building. No date. Group of 16 people, men, women and 1 child. HP James second from Right dressed with face blackened. Other people in fancy dress, includes a person in a pram "Baby Thrives on Modern Diary Milk" written on the side. Photograph mounted onto cardboard with a grey textured face and depressed for photo. Has "Richards & Co. Ballarat" printed on bottom rh corner. On rear in Pencil "Ballarat Tramways Social Club (street procession) H.James second from Right" On rear in top left hand corner, white circle with "3" in green ink.trams, tramways, ballarat, esco, personnel, social club -
 Ballarat Tramway Museum
Photograph - Colour Photograph/s, Jim Seletto, c1960
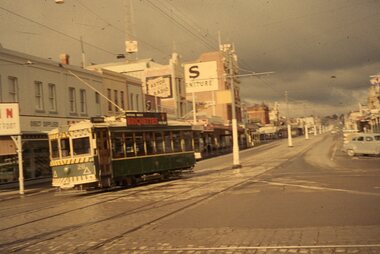
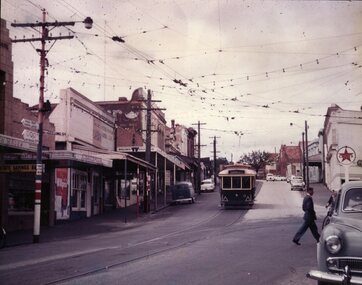
Colour Photograph of SEC tram No. 11, prior to fitting of dash Canopy lighting, c1960, at the intersection of Bridge and Main Streets. Tram No. 11 is arriving from Victoria St. and is about to cross the junction with the Mt. Pleasant line. Trams stops are visible on poles, as is the overhead arrangement, shops on both sides. Tram has large reflective triangles on cab front. Caltex service station sign on right side of photograph. On pole with tram stop sign is a sign with the Olympic rings, pointing way to Lake Wendouree.ballarat, bridge st, victoria st, olympics, tram 11 -
 Ballarat Tramway Museum
Photograph - Colour Photograph/s, Jim Seletto, c1958?
Colour photograph of SEC No. 39 outbound on Mt. Pleasant route, at Gladstone street. Photo taken after tram has past the photographer. Tram has destination "Gardens via Drummond Nth". In photo are a tram stop shelter of the type erected by the Museum at Gardens Loop, tram stop signs and a red truck. Tram has a roof ad board. Tram has large reflective triangles on cab fronts. Prior to 1960. Destination has been changed prior to arriving at terminus. Two extra copies of prints added May 2005.ballarat, mt pleasant, tram stops, shelters, tram 39 -
 Ballarat Tramway Museum
Photograph - Black & White Photograph/s - set of 2, The Courier Ballarat, 16/09/1970 12:00:00 AM
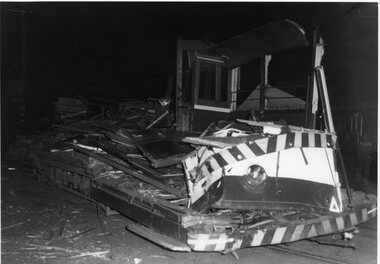
Yields information about the incidents/accidents that can occur on a street tramway system - collisions resulting in the rare virtual total demolition of a tram in Ballarat.Black and white photograph of SEC No. 20 after accident on 16/9/1970. See Kings, "Ballarat Tramways" p57 for further details. Taken in Victoria St. by Courier and published the following day. Tram has been almost completely demolished to the floor boards. Published the following day in The Courier. See also Reg. Item No. 1089 for better print of this photograph. See item 1088 for story in The Courier of 17/9/1970., 551.1 - Collected by Alan Bradley from the Ballarat Courier early 1980's. See Excel file "Record of Ballarat Courier Photos SEC era" (Archive Documents) for source of details. Wayne Kell, Pitman SEC 1968-1971 - advised 10/10/2020 that the driver did not work again. Normally two young ladies would travel together on that service and would sit on the right hand side of the car at the front. This night, only one travelled and she sat on the left hand side. See Reg Item 8125 for item. On rear "Copyright, The Ballarat Courier Proprietary Limited" in blue ink stamp.trams, tramways, ballarat, victoria st, accidents , tram 20 -
 Ballarat Tramway Museum
Photograph - Black & White Photograph/s, Peter Bruce, c1970
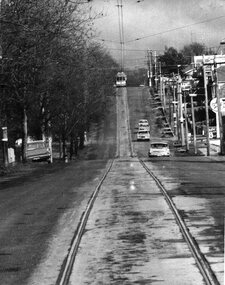
Black and white photograph of Barkly St. Mt Pleasant taken with a long telephoto lens. Single truck Tram on the top of a hill at terminus, with the photographer on or near the top of the`next hill in centre of track. Four cars travelling towards photographer. Sign of Caltex Service station on right side of photograph. with trees on left. Shows nature of street construction - deep gutters with "bridge" crossings. See also item No. 559, possibly tram No. 31. Would appear to be taken at about the same time, not parked Holden station wagon on left hand side of photo.trams, tramways, ballarat, barkly st, mt pleasant -
 Ballarat Tramway Museum
Photograph - Black & White Photograph/s - set of 2, Dave Macartney, 4/08/1968 12:00:00 AM
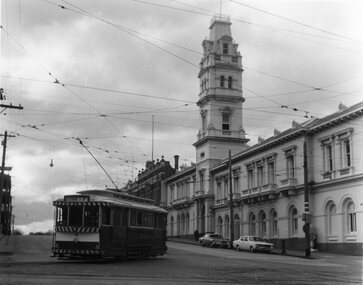
Yields information about intersection of Lydiard and Sturt Streets, in particular the post office building.Black and white photograph of SEC Ballarat tram No. 18 turning from Sturt St. into Lydiard St. with Post Office in background. Photo taken after tram has passed photographer. Tram has destination of "LYDIARD ST NTH". Taken 4/8/1968. Print a bit over exposed for the sky. 585.1 - a horizontal view of the same image. See also Reg Item 1014 for a different crop (vertical) view of the same photograph. Small copy of .1 added 10/10/2019. Image updated.trams, tramways, ballarat, lydiard st., post office , tram 18 -
 Ballarat Tramway Museum
Photograph - Colour Photocopy/photocopies, Alan Marine
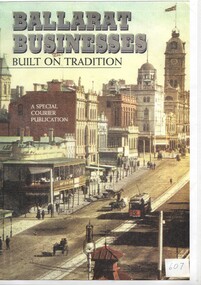
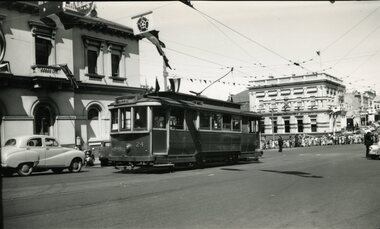
Colour photocopy of the front cover of a special Courier publication titled "Ballarat Business, Built a tradition", showing ESCo tram Westbound on Sturt Street, - photo taken from Grenville Street . Copy of a hand coloured photograph. Image added 5/12/16.ballarat, esco, sturt st -
 Ballarat Tramway Museum
Document - Photocopy, Neville Gower, "Mayor's Report 1958-1959", Jul. 1997
Photocopy of part of City of Ballarat's Mayor's Report for 1958 - 1959. Originals held in the Ballarat Library. Three pages covering trams, railways , electricity and business. A photo page of 8 photographs joined together of Ballarat. One photo includes a single truckers at Sturt and Lydiard Streets. Images added 19-12-2016.trams, tramways, city of ballaarat, trams, railways, civic history -
 Ballarat Tramway Museum
Document - Photocopy, Neville Gower, " Mayor's Report 1972-1973", Jul. 1997
Photocopy of part of City of Ballaarat's Mayor's Report for 1972- 1973. Originals held in the Ballarat Library. One page covering roads and bridges and reconstruction of streets following removal of trams. Includes photos of part of Wendouree parade at View Point. Image added 18-12-2016trams, tramways, city of ballaarat, trams, railways, civic history -
 Ballarat Tramway Museum
Slide - 35mm slide/s, Glen Mills, Nov. 1970
Agfa plastic mount (blue base, white cover) of a photograph of No. 21 or could be 27 taken from the Ballarat (Ballarat East) Fire Station tower. Photo taken Nov. 1970. Has the sign of the AMPOL service station in the foreground. Has destination of Special. Tram at the intersection of Main St and Barkly Street. One of a set of 20 slides made by the Association of Railway Enthusiast Provincial Tramways film strip. Reference Item 2560 details the ARE Film Strip and provide references to other slides. Photo Glen Mills Slide rescanned at 3200 dpi 25-10-2020, jpg replaced, tiff file retained. This file was scanned in 2003 and may show colour changes."BAS 69" in pencil.tramways, trams, mt pleasant, barkly st, main st, tram 21 or tram 27 -
 Ballarat Tramway Museum
Negative - Black and white print from negative, Travis Jeffrey, 12/12/1958 12:00:00 AM
Negative No. N374 and black and white print made by a laser printer (stored in folder) of Ballarat No. 20 at the City Terminus, intersection of Sturt and Lydiard Streets with the Ballarat Post Office in the background. Taken from the south side of the street - unusual view. Date 12/12/1958. hi res scan made and image updated 23/5/2020.Paper folder that contained the negative had "NR2A" in red ink, "BA1" in pencil, date stamp of "29 Dec 1958" on front, and date stamps "26 Sep 1962" on rear, top and bottom.trams, tramways, city terminus, sturt st, tram 20 -
 Ballarat Tramway Museum
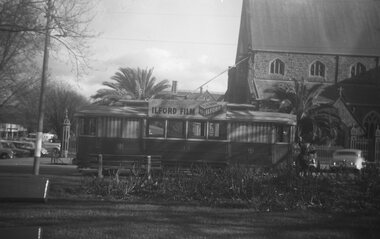
Negative - Black and white print from negative, Travis Jeffrey, 6/09/1960 12:00:00 AM
Negative No. N376 and black and white print made by a laser printer (stored in folder) of Ballarat No. 14 at the intersection of Sturt and Dawson Streets with St. Patricks Church in the background. Note Conductor has changed the trolley pole to enable the tram to use the Dawson St. crossover. Tram has an "Ilford Film" roof advertisement. Date of photo on folder - 5/9/1960. hi res scan made and image updated 23/5/2020.Paper folder that contained the negative had "NR38A" in red ink, "BA3" in pencil, date stamp of "5 Sep 1960" on front, and on rear date stamps "26 Sep 1962" and "6 Oct 1962".trams, tramways, dawson st, st patricks, sturt st, tram 14 -
 Ballarat Tramway Museum
Photograph - Black & White Photograph/s, Keith Kings, 8/03/1954 12:00:00 AM
Black and white photograph of Ballarat No. 24 in Lydiard St. North, terminating to the north of Sturt St outside the Post Office prior to shunting at the crossover during the 1954 Royal visit to Ballarat on 8/3/54. Tram appears to have destination of Grey St. Sebastopol. Post Office and Commonwealth Bank have been decorated for the occasion. A line up of people waiting on the other side of Sturt St near bank in photograph. Keith Kings photo No. I(y)2. Print has black edges (not fully masked). Note: Alan Bradley advised in his article "50 years ago", April 2004, that the date of the royal tour was 6/3/54. Check rear of photo. See "50 Years Ago" - Alan Bradley, Reg. Item No. 2709. Stamp in top right hand corner and handwritten number with "K.S. Kings No. I(y)2 Copyright reserved". (Stamped twice) In black ink "Ballarat / No. 24 shunting at crossover in Lydiard Street North, at Sturt St, on 8/3/54, Royal Visit day."tramways, trams, sturt st, royal visit, post office, lydiard st nth, tram 24 -
 Ballarat Tramway Museum
Document - Photocopy, The Courier Ballarat, "Support for Tram Plan", Aug. 2002
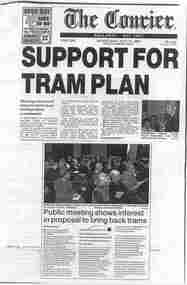
Photocopy of parts of pages 1 and 2 of the Courier, Ballarat, 31/7/2002, titled "Support for Tram Plan" written by Catherine Best. The item reports on the meeting held the previous day at the Town Hall to explain the details of the $20m proposal to return trams to the streets of Ballarat. Notes the Couriers web poll. Has photos of Ballarat Tourism Board chair Judy Verlin and of part of the crowd at the meeting. Full Image and 2nd copy of sheets added 14-1-2016 from donation of Kathy Stanley. Second copy - Has date and page number written in under headline in ink.trams, tramways, ballarat city tramway, public meeting, ballarat revival -
 Ballarat Tramway Museum
Newspaper, "Melbourne's First Tramcars", 11/03/1962 12:00:00 AM
Newspaper clipping contained within Reg. Item 2526, page 10, titled "Melbourne's First Tramcars" - noting that the Argus of 11/3/1962 reported that two of Mr. George Francis Train's patent tramcars had been landed in Melbourne with fittings for four more. Item said that promoters were negotiating with the City Council, but these fell through, as Council did not have the power to lease the streets for railway purposes. Has been cut out from a sheet and pasted into the book. Note Item Not formally Numbered.melbourne, tramcars, tramways