Showing 9879 items
matching tram museum
-
 Ballarat Tramway Museum
Slide - 35mm slide/s, Travis Jeffrey, c1962
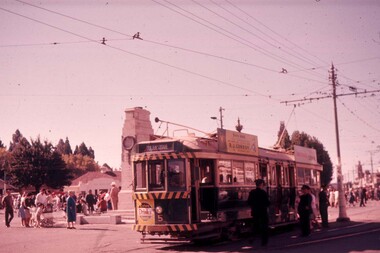
Agfa plastic mount (blue base, white cover) with a photo of Bendigo No. 5 at Charing Cross near the end of the double line with the Cenotaph in the background. Tram has the destination of Golden Square, a Cohns Drinks advertisement on the front panel and a R.J. Conroy roof advertisement. Three SEC Tramway personnel standing by the side of the tram. Many people standing in the background - Easter Fair or similar event. Photo taken c1962."BES 26" in penciltramways, trams, bendigo, charing cross, celebrations, tram 5 -
 Ballarat Tramway Museum
Slide - 35mm slide/s, Travis Jeffrey, c1962
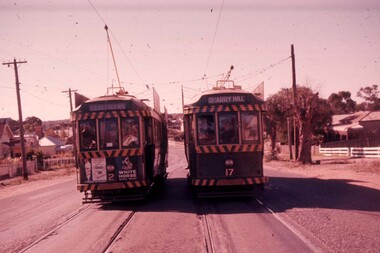
Agfa plastic mount (blue base, white cover) with a photo of Bendigo 2, with destination of Eaglehawk, crossing No. 17 at Jobs Gull loop on the Eaglehawk line. No. 17 has destination of Quarry Hill. Has a Streets Ice cream and Whitehorse Whisky advertisements on the rear panel. Photo taken c1962."BES 27" in penciltramways, trams, bendigo, eaglehawk, jobs gully, tram 2, tram 17 -
 Ballarat Tramway Museum
Slide - 35mm slide/s, Travis Jeffrey, c1962
Agfa plastic mount (blue base, white cover) with a photo of Bendigo 17, possibly at Manchester Loop, with destination of Eaglehawk. Tram fitted with Whitehorse Whiskey ad on front dash panel and two "Electric Cook" roof advertisements. Photo taken c1962."BES 28" in penciltramways, trams, bendigo, eaglehawk, manchester loop, tram 17 -
 Ballarat Tramway Museum
Slide - 35mm slide/s, Travis Jeffrey, c1962
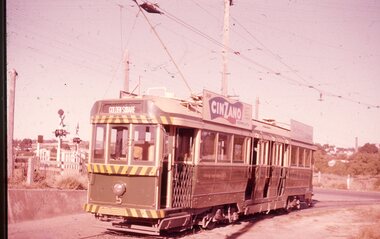
Agfa plastic mount (blue base, white cover) with a photo of Bendigo 5 at North Bendigo terminus. Tram has the destination of Golden Square. Photo has the level crossing in the background. Tram has a "Cinzano" and another roof advertisement. Photo taken c1962."BES 30" in penciltramways, trams, bendigo, north bendigo, tram 5 -
 Ballarat Tramway Museum
Slide - 35mm slide/s, Travis Jeffrey, c1962
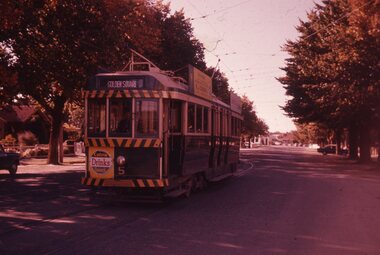
Agfa plastic mount (blue base, white cover) with a photo of Bendigo 5 passing through the Bridge St Loop. Tram has the destination of Golden Square, a Cohns Soft drink ad on the dash panel and a "R.J. Conroy" roof advertisement. Photo taken c1962."BES 31" in penciltramways, trams, bendigo, north bendigo, bridge st, tram 5 -
 Ballarat Tramway Museum
Slide - 35mm slide/s, Travis Jeffrey, late 1960's or early 1970's
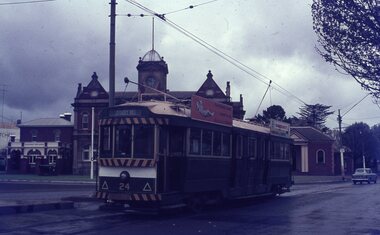
Agfa plastic mount (blue base, white cover) with a photo of Bendigo 24 at the Eaglehawk terminus, with the Eaglehawk Town Hall / Post Office in the background. Tram has the destination of Quarry Hill and roof advertisements for SEC "Everything's under control in my all electric kitchen" and one for Mamouney's Furniture Company. Photo taken late 1960's early 1970's."BES 32" in penciltramways, trams, bendigo, eaglehawk, tram 24 -
 Ballarat Tramway Museum
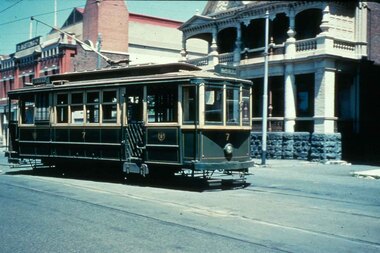
Slide - 35mm slide/s, Travis Jeffrey, late 1960's or early 1970's
Agfa plastic mount (blue base, white cover) with a photo of Bendigo 7 and the scrubber tram at Charing Cross. No. 7 has roof advertisements for SEC "Everything's under control in my all electric kitchen" and one for Electric Cooking. Photo taken late 1960's early 1970's."BES 33" in penciltramways, trams, bendigo, charing cross, scrubber tram, tram 7, scrubber -
 Ballarat Tramway Museum
Slide - 35mm slide/s, Travis Jeffrey, late 1960's or early 1970's
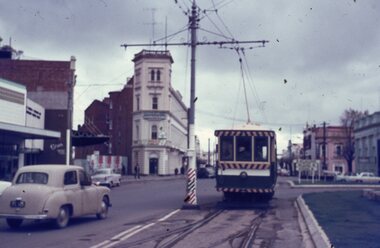
Agfa plastic mount (blue base, white cover) with a photo of Bendigo scrubber tram at the end of the double track in High St., heading out for Golden Square Photo taken late 1960's early 1970's. Photo has the City Family Hotel in the background."BES 34" in penciltramways, trams, bendigo, high st, scrubber tram, scrubber -
 Ballarat Tramway Museum
Slide - 35mm slide/s, Travis Jeffrey, late 1960's or early 1970's
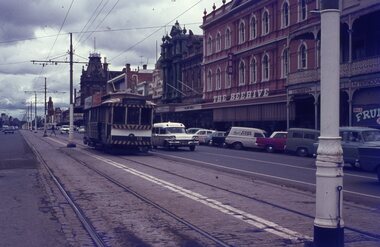
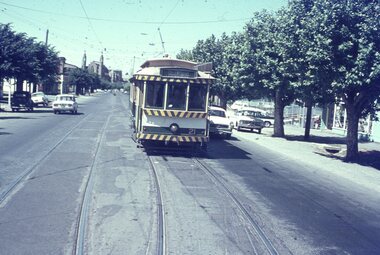
Agfa plastic mount (blue base, white cover) with a photo of Bendigo No. 19 in Pall Mall, nearing Charing Cross. Tram has the destination of Golden Square Photo taken late 1960's early 1970's. Photo has the Beehive, the Shamrock Hotel in the background. Radio station 3BO can be seen on the Beehive building. No. 19 has two SEC roof advertisements. Note the point bar on the pole on the right hand side of the photograph."BES 35" in penciltramways, trams, bendigo, pall mall, beehive building, tram 19 -
 Ballarat Tramway Museum
Slide - 35mm slide/s, Travis Jeffrey, late 1960's or early 1970's
Agfa plastic mount (blue base, white cover) with a photo of Bendigo No. 19 and the Scrubber tramcar at Golden Square terminus, with the terminus milk bar in the background. Photo taken late 1960's early 1970's. No. 19 has two SEC roof advertisements."BES 36" in penciltramways, trams, bendigo, golden square, scrubber tram, scrubber, tram 19 -
 Ballarat Tramway Museum
Slide - 35mm slide/s, Travis Jeffrey, late 1960's or early 1970's
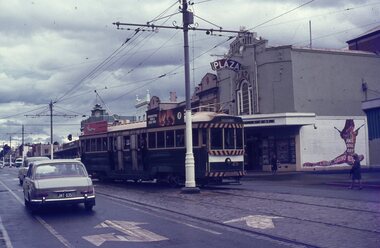
Agfa plastic mount (blue base, white cover) with a photo of Bendigo No. 25 using the crossover in Mitchell St outside the Plaza Theatre. Photo taken late 1960's early 1970's. No. 25 has the destination of Eaglehawk and two SEC roof advertisements, electric cooking and a briquettes ads. The film "James Bond Casino Royale" was being advertised on the side wall of the theatre."BES 37" in penciltramways, trams, bendigo, mitchell st, plaza theatre, tram 25 -
 Ballarat Tramway Museum
Slide - 35mm slide/s, Travis Jeffrey, late 1960's or early 1970's
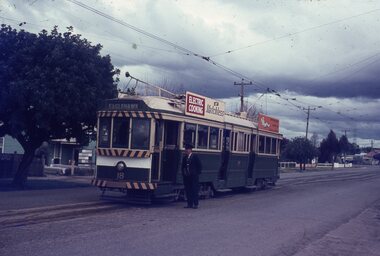
Agfa plastic mount (blue base, white cover) with a photo of Bendigo No. 18 at the Quarry Hill terminus, with the conductor standing by the front of the tramcar. Photo taken late 1960's early 1970's. No. 18 has the destination of Eaglehawk and two SEC roof advertisements, "Electric Cooking Matchless" and "Everything's fine in my all electric kitchen"."BES 38" in penciltramways, trams, bendigo, quarry hill, conductors, tram 18 -
 Ballarat Tramway Museum
Slide - 35mm slide/s, Travis Jeffrey, late 1960's or early 1970's
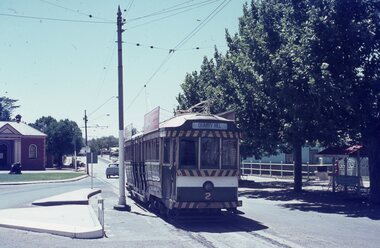
Agfa plastic mount (blue base, white cover) with a photo of Bendigo No. 2 at Eaglehawk terminus, looking along the terminal track. Photo has the traffic island arrangements, and shows the waiting shelter on the right hand side of the photo. Photo taken late 1960's early 1970's. No. 2 has the destination of Quarry Hill and two SEC roof advertisements on the tram."BES 39" in penciltramways, trams, bendigo, eaglehawk, tram 2 -
 Ballarat Tramway Museum
Slide - 35mm slide/s, Travis Jeffrey, late 1960's or early 1970's
Agfa plastic mount (blue base, white cover) with a photo of Bendigo No. 2 at Quarry Hill terminus. Photo taken late 1960's early 1970's. No. 2 has the destination of Eaglehawk and on the tram two SEC roof advertisements, "Electric Cooking Matchless" and "Everything's fine in my all electric kitchen"."BES 40" in penciltramways, trams, bendigo, quarry hill, tram 2 -
 Ballarat Tramway Museum
Slide - 35mm slide/s, Travis Jeffrey, late 1960's or early 1970's
Agfa plastic mount (blue base, white cover) with a photo of Bendigo No. 21 in the loop at Myrtle St, High St, bound for Golden Square. Photo taken late 1960's early 1970's from the window of another tram, either inbound or outbound, at the southern end of the loop. In the background is the Sacred Heart Cathedral ."BES 41" in penciltramways, trams, bendigo, quarry hill, tram 21 -
 Ballarat Tramway Museum
Slide - 35mm slide/s, Travis Jeffrey, late 1960's or early 1970's
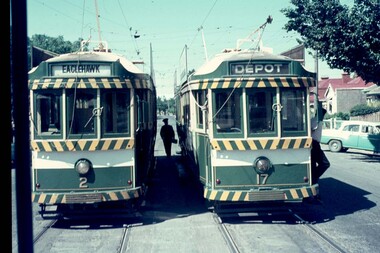
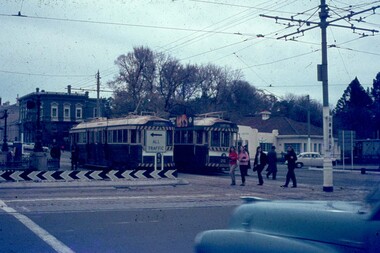
Agfa plastic mount (blue base, white cover) with a photo of Bendigo Nos. 2 and 17 at the area of Depot Junction, swapping crews. No. 2 showing Eaglehawk and No. 17, Depot. Note differences in the destination blinds or rolls, white on black, or the later form, black on white. Photo taken late 1960's early 1970's from the window of another tram."BES 42" in penciltramways, trams, bendigo, crews, depot junction, tram 2, tram 17 -
 Ballarat Tramway Museum
Slide - 35mm slide/s - set of 3, Travis Jeffrey, late 1960's or early 1970's
Series of three Agfa plastic mount (blue base, white cover) with a photo of Bendigo Nos. 2 running into the depot. Photo taken late 1960's early 1970's from the window of another tram. Reg Item 2652.2 and .3 show depot building and .2, has the scrubber in the background as well."BES 43", "45", "46" in pencil.tramways, trams, bendigo, crews, depot junction, tram 2, scrubber -
 Ballarat Tramway Museum
Slide - 35mm slide/s, Travis Jeffrey, late 1960's or early 1970's
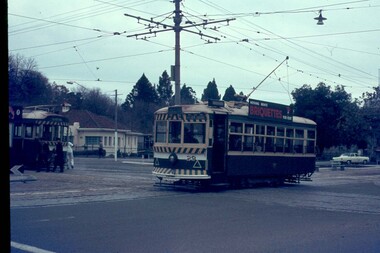
Agfa plastic mount (blue base, white cover) with a photo of Bendigo No 28 arriving at the Charing Cross stop, from Golden Square. Two SEC crewmen waiting at stop. Tram has a SEC Briquettes roof advertisement on the side of the tram. Photo taken late 1960's early 1970's from the window of another tram."BES 47" in pencil.tramways, trams, bendigo, charing cross, tram 28 -
 Ballarat Tramway Museum
Slide - 35mm slide/s, Travis Jeffrey, late 1960's or early 1970's
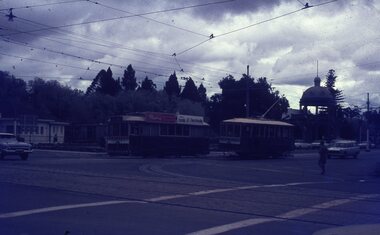
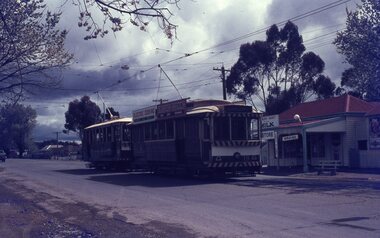
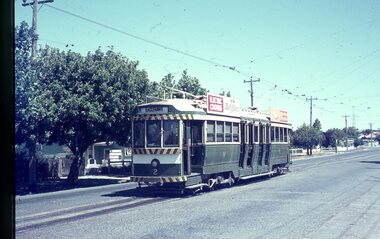
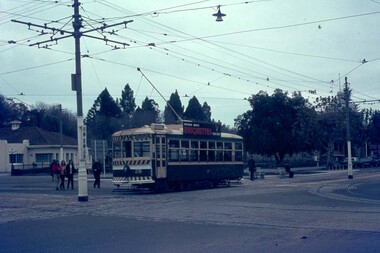
Agfa plastic mount (blue base, white cover) with a photo of Bendigo Nos. 3 and 26 at Charing Cross. The trams are bound for Eaglehawk, Quarry Hill respectively. Photo shows the traffic arrangements at Charing Cross prior to closure. Photo taken late 1960's early 1970's from the window of another tram. No. 3 has two roof advertisement racks which are empty, while No. 26 has a SEC briquettes roof advertisement."BES 48" in pencil.tramways, trams, bendigo, charing cross, tram 3, tram 26 -
 Ballarat Tramway Museum
Slide - 35mm slide/s - set of 3, Travis Jeffrey, late 1960's or early 1970's
Series of three Agfa plastic mount (blue base, white cover) of photos of Bendigo No. 29 on the Golden Square - North Bendigo route. Photo taken late 1960's early 1970's from the window of another tram. The tram has a SEC Briquettes roof advertisement fitted. 2655.1 - No. 29 leaving Charing Cross for Golden Square with 26 in the background. 2655.2 - No. 29 north bound in Pall Mall with Stonemasons Supermarket and the Stoneman's Shamrock Hotel in the background. 2655.3 - No. 29 leaving a Myrtle St loop, in High St?, with Hardies Fibrolite Pipes yard in the background."BES 49", "50", "51" in pencil.tramways, trams, bendigo, golden square, pall mall, charing cross, high st, tram 29 -
 Ballarat Tramway Museum
Leisure object - Jigsaw, Resort Puzzles Pty Ltd, c1988
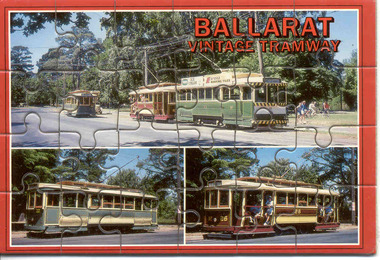
BTPS Postcard, featuring trams No. 26, 27 and 33 over three separate images Wendouree Parade (Reg. Item 1657) that has been manufactured or stamped into a 24 piece jigsaw by Resort Puzzles Pty Ltd. of Lithgow, c1990 Card after stamping has been mounted onto a sheet of brown cardboard then enveloped with a sheet of clear light weight plastic and onto the rear, a printed white sheet of paper has been glued or fixed onto it. The pre-printed sheet of paper acts as the rear of the postcard for mailing purposes, providing a stamp location, address and writing area. The printed details give information about the manufacturer, phone number and on the top left hand corner has the words "Greetings from Australia" and has been translated under that into oriental characters.trams, tramways, btps, jigsaw, postcard, wendouree parade -
 Ballarat Tramway Museum
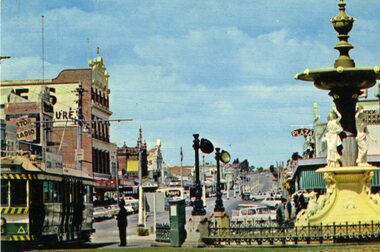
Postcard, Nu-color-vue or Nucolorvue Productions, Bendigo No. 3 at Charing Cross, late 1960's
Nu-colour-Vue series postcard No. BE 24 of Bendigo No. 3 at Charing Cross with Mitchell St in the background. Shows part of the tram, fountain and the buildings on either side of Mitchell St. Photo taken mid to late 1960's. Has advertisements on buildings for Astor Radio, Fountain Plaza and a Peters Ice cream van in the photograph. On rear of postcard are the details of the photo, manufacturer, copy right statement and location to place the stamp.trams, tramways, bendigo, charing cross, mitchell st -
 Ballarat Tramway Museum
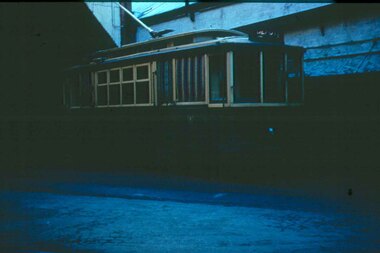
Slide - 35mm slide/s, c1955
Agfachrome Professional plastic mount (blue base, white cover) reproduction slide of a colour slide of a Geelong tram just outside the depot building structure - poor photograph. Tram in SEC livery, possibly photographed just before closure. tramways, trams, geelong, depot -
 Ballarat Tramway Museum
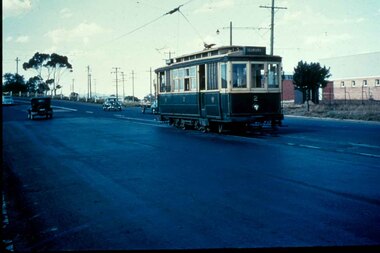
Slide - 35mm slide/s, c1955
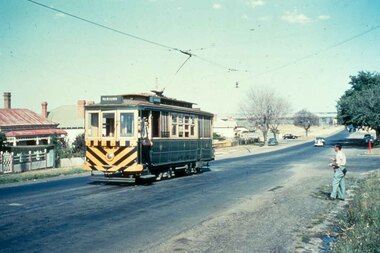
Agfachrome Professional plastic mount (blue base, white cover) reproduction slide of a colour slide of Geelong No. 2 at North terminus. Tram has the destination of Belmont. Photo taken mid 1950's. "G 3" and "1 -3" in pencil.tramways, trams, geelong, north, tram 2 -
 Ballarat Tramway Museum
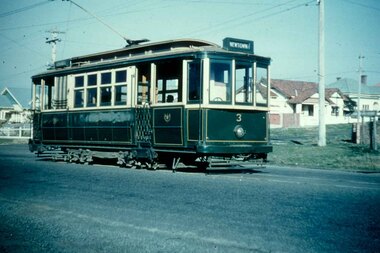
Slide - 35mm slide/s, c1955
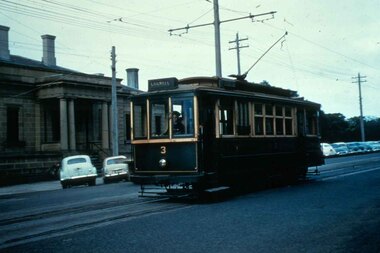
Agfachrome Professional plastic mount (blue base, white cover) reproduction slide of a colour slide of Geelong No. 3 at Eastern Park terminus. Tram has the destination of Newtown. Photo taken after December 1952. "G 4" and "1 -4" in pencil.tramways, trams, geelong, eastern park, tram 3 -
 Ballarat Tramway Museum
Slide - 35mm slide/s, c1955
Agfachrome Professional plastic mount (blue base, white cover) reproduction slide of a colour slide of Geelong No. 3 at Brougham St, near Moorabool St, with the Custom's House? in the background. Tram has the destination of Chilwell. Photo taken mid 1950's. "G 5" and "1 -5" in pencil.tramways, trams, geelong, brougham st, customs house, tram 3 -
 Ballarat Tramway Museum
Slide - 35mm slide/s, c1955
Agfachrome Professional plastic mount (blue base, white cover) reproduction slide of a colour slide of Geelong No. 4 at Eastern Park Terminus. Tram has the destination of Newtown. Photo taken after 1953. Photo has the driver/conductor in the doorway. "G 6" and "1 -6" in pencil.tramways, trams, geelong, eastern park, tram 4 -
 Ballarat Tramway Museum
Slide - 35mm slide/s, Keith Kings, 25/03/1956 12:00:00 AM
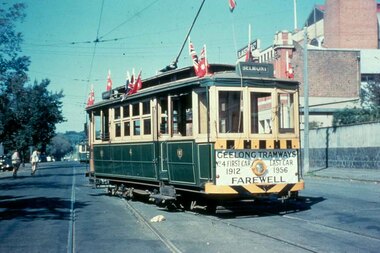
Yields information about the closure of Geelong tramway system - slide of Geelong No. 4 decorated for the last tram in Geelong.Agfachrome Professional plastic mount (blue base, white cover) reproduction slide of a colour slide of Geelong No. 4 decorated for the last day of service, outside the depot in Corio Tce. Tram has the destination of Belmont. Sign on the end of the tram, notes that the tram was the first car in 1912 and was to be the last car in 1956. Photo taken on 25/3/1956. See also Reg Item 4388 for a print of this photograph. See btm2667doc.pdf for a scan of a letter and the rear of the photograph identifying that Keith Kings took the photo. Photo added to collection - "G 7" and "1 -7" in pencil.tramways, trams, geelong, depot, last tram, corio tce, closure, tram 4 -
 Ballarat Tramway Museum
Slide - 35mm slide/s, c1955
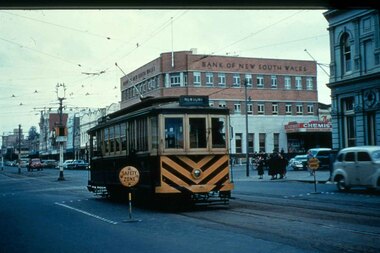
Agfachrome Professional plastic mount (blue base, white cover) reproduction slide of a colour slide of Geelong No. 5, at the corner of Moorabool and Ryrie St. Geelong. Has the Bank of New South Wales building in the background. Also a set of "Bar traffic lights" and signs indicating the safety zone at the tram stops on either side of the road are shown in the photo. The signs could be taken away from the stops when necessary. The tram has the destination of Newtown Photo taken after 1953. Dave O'Neil's notes that the tram has terminated in the city instead of through routing to Eastern Park and was about to reverse to run to Newtown - an unusual working. "G 8" and "1 -8" in pencil.tramways, trams, geelong, moorabool st, ryrie st, traffic lights, safety zones, tram 5 -
 Ballarat Tramway Museum
Slide - 35mm slide/s, mid 1950's
Agfachrome Professional plastic mount (blue base, white cover) reproduction slide of a colour slide of Geelong No. 7 outside the depot, turning onto the double track in Corio Tce. The tram has the destination of East. Photo taken mid 1950's. "G 9" and "1 -9" in pencil.tramways, trams, geelong, depot, corio st, tram 7