Showing 3192 items
matching world war one
-
 City of Moorabbin Historical Society (Operating the Box Cottage Museum)
Photograph, The Cheltenham Market Gardner's Picnic, The Gardner's Picnic pre 1914-18 War, pre 1914-18
The photograph is pre 1914-18. It is showing Cheltenham Market Gardeners having a picnic. The Market Gardeners gave Moorabbin it's first industry, which was to prove the most durable and resilient. The ladies and gentlemen are dressed in very fine clothes. All of the men are wearing suits with waistcoats and white shirts with neck ties. One man has a Boater hat , 4 have Bowler hats and 5 have Stetson hats. 5 men are standing and 4 men are kneeling or sitting with the ladies. The ladies are seated on the ground around a table runner on which items of food are seen. Most of the ladies are wearing white dresses, one lady has a dark coloured skirt with a white frilly blouse, and all have large wide brimmed fashionably decorated hats . They all seem to be dressed in their best clothes.The photograph depicts a group of men and women, 16 altogether, having a picnic pre World War 1 1914-1918 . They are surrounded by trees and bushes outside.Front of mount : R. McGeehan Photograph, Beechworth. Back of Mount Address Balaclava / C Whitehead / Gardeners Picnic / Pre World War 11914-18, moorabbin. picnic, market gardeners, early settlers, pioneers, moorabbin shire, cheltenham, fashion, dressmaking, bowler hats, boater hats, stetson hats, bonnets, chapeau, menswear, neckties, beechworth mcgeehan r, photographs, -
 City of Moorabbin Historical Society (Operating the Box Cottage Museum)
Newsletter, City of Moorabbin Historical Society Apr 2012, April 2012
The City of Moorabbin Historical Society was formed c 1960 by a group of Moorabbin area residents who were concerned that the history of the area should be preserved. A good response to a call for items related to the historical area of Moorabbin Shire brought donations of a wide variety of artefacts which are now preserved by the current members of CMHS at Box Cottage Museum . Helen Stanley, Secretary of CMHS, began producing a Newsletter for members in April 2007 to provide current information and well researched items of historical interestHelen Stanley has produced a bi-monthly Newsletter, 2007 - 2013, for the members of the City of Moorabbin Historical Society that contains well researched interesting historical items, notification of upcoming events, current advice from Royal Australian Historical Society , Museums Australia Victoria and activities of Local Historical Societies. The Newsletter is an important record of the activities of the CMHS. 5 x A4 paper printed on 1 side Issue 26 of the bi-monthly, City of Moorabbin Historical Society Newsletter produced by Society member and Secretary, Mrs Helen Stanley in April 2012. Notice for meeting April 29th , expected visit by Box family descendants 29th, reminder that subscriptions are due, and proposed Open Days June 16th and 17th to celebrate Moorabbin Roads Board 150th Anniversary. The Anvil was delivered from Heathcote on April 17th and it will enhance the Barn display. Helen recalls the story of Private Robert Mitchell, one of the 17 ‘Bentleigh Boys’ who died during World War 1, with 6 photocopied photographs CITY of MOORABBIN HISTORICAL SOCIETY / APRIL 2012 NEWSLETTERcity of moorabbin historical society, stanley helen, melbourne, moorabbin, brighton, cheltenham, ormond, bentleigh, market gardeners, pioneers, early settlers, the moorabbin roads board 1862, city of glen eira, city of kingston, moorabbin shire, parish of moorabbin, brighton east, south brighton, bent tommy, mair william, anvil, blacksmith, mitchell robert, mitchell charles, mitchell catherine, bicycle penny-farthing, bicycle races, smith frank, grocer, centre road bentleigh, foucaucourt france, somme france, world war 1 1914-1918, anzac, -
 City of Moorabbin Historical Society (Operating the Box Cottage Museum)
Medal - World War 1914-1918, Wartime medal, 1918
This medal is one of the type issued by the Victorian Education Department, EVD, and sold on behalf of the Australian Branch of the British Red Cross Society. The same medal was made in a variety of metals, including bronze, silvered bronze, (as with this one), silver and gold.Many Moorabbin Shire young men volunteered to serve in World War 1 and their families willingly gave financial support to Red Cross and similar aid agenciesA small silvered bronze medallion with a metal loop at the top.One side of the medallion has a flag embossed in the middle inscribed with the words, Gallipoli, France, Palestine. At the top of the medallion are the initials EVD. Around the lower edge is embossed ANZAC DAY 1918. On the reverse side fo the medallion is embossed an AIF soldiers bust, he is wearing his slouch hat. Around the edge of the medallion is embossed the words HONOR TO THE AIFarmy, badge, medallion, victorian education department, british red cross, australian red cross, world war 1918 gallipoli medal -
 City of Moorabbin Historical Society (Operating the Box Cottage Museum)
Uniform - World War 1 1914-1918, Hat Badge Rising Sun, c1914
Proudly worn by soldiers of the 1st and 2nd Australian Imperial Force in both World Wars, the 'Rising Sun' badge has become an integral part of the digger tradition. The distinctive shape of the badge, worn on the upturned side of a slouch hat, is commonly identified with the spirit of ANZAC formed at the Gallipoli landings 1915 There are seven patterns of the Rising Sun. 1902 - 1991. The Rising Sun has evolved over time and today Australian Army soldiers wear the seventh pattern Rising Sun. The Third Pattern Rising Sun Badge. May 1904 The third pattern Rising Sun badge carried a scroll inscribed with the words ‘Australian Commonwealth Military Forces’ and was worn throughout both World Wars. There were, however, a number of variations of the badge; a special version was struck for the coronation of King Edward VII in 1902 and there were badges of the Commonwealth Horse and the Australian Instructional Corps, each with its respective title on the scrolls. This pattern badge formed the template for all subsequent General Service badges. The most widely accepted version of the origin of this badge is the one that attributes the selection of its design, c1902, to a British Officer, Major General Sir Edward Hutton, the newly appointed Commander-in-Chief of the Australian Forces. Hutton had earlier received as a gift from Brigadier General Joseph Gordon, a military acquaintance of long standing, a ‘Trophy-of-Arms’ composed of mounted cut and thrust swords and triangular Martini-Henry bayonets that were arranged in a semi-circle around the Crown. To General Hutton, the shield was symbolic of the cooperation between the naval and military forces of the Empire. This Third Pattern Rising Sun Badge.- May 1904 - was worn on the Slouch hats of soldiers serving in the Australian Commonwealth Military Forces during World War 1 1914-1918World War1 1914-1918, soldier’s, rising sun hat badge, made of oxidised copperRising Sun with central Crown AUSTRALIAN COMMONWEALTH / MILITARY FORCES australian military uniforms, military insignia, badges, city of moorabbin, bentleigh, cheltenham, major general sir edward hutton, anzac, gallipoli, australian imperial forces, ww1 1914-1918 -
 City of Moorabbin Historical Society (Operating the Box Cottage Museum)
Photograph - Photograph, Exhibit at 1916 Easter Carnival, 1916 Easter Monday
The photograph was taken on Easter Monday 1916 at the Easter Carnival. It is showing one of the exhibits at the Australian Natives Association's Fruit and Vegetable Exhibit, at the Mentone Recreation Ground. The Easter Carnival was a fund-raising event to assist and repatriate wounded WW1 soldiers returning home. The photographer is unknown.Black and white photograph. The photograph is showing two men, a horse and a carriage. One of the men is holding on to the horses' harness and the other man in standing on a platform on the carriage holding the horses' reign. The horse is harnessed to the carriage containing various fruits and vegetables elaborately displayed. Much of the fruit and vegetables are seen in boxes along the carriage and others are hanging along the edge of the carriage. Some of the fruit and vegetable clearly able to be seen are pumpkin, parsnip, carrots, cabbage, cauliflower, turnip, grapes, various types of apples, oranges and lemons. There are also flowers meticulously arranged around the frame of the carriage and wheels. Front; A.N.A Exhibit / Easter Carnival - 1916 Back; Donated by / W.A.Follett / Heatherton ( written in ink ) Easter Monday CCarnival / at Mentone Recreation Ground / 1916 A.N.A ( written in pencil)easter carnival, 1916, photograph, australian natives association, fund-raising, world war i, ww1, mr w.a follett - heatherton, fruit, vegetable, mentone, mentone recreation ground -
 City of Moorabbin Historical Society (Operating the Box Cottage Museum)
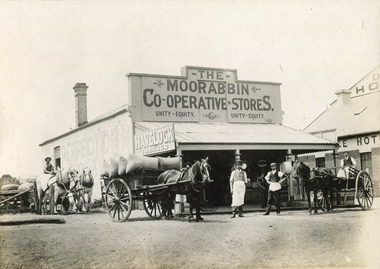
Photograph - Photograph, 1906 The Moorabbin Co-Operative Stores, 1906
1906: The Moorabbin Co-Operative Stores. Located on the Nepean Road, Cheltenham, (before 1st WW). . There are four men outside the Store and a 3 horse carriage. Two of the men are sitting on their carriages, one to the left and the other on the right of the photograph. The third horse and carriage is right beside the left of the store, carrying eight large sacks. Towards the side of the Moorabbin Stores there is a building located to right which is called The Exchange Hotel.1906: The Moorabbin Co-Operative Stores. Located on the Nepean Road, Cheltenham, (before 1st WW). The Leader Newspaper office occupied the site. The Exchange Hotel is to the right.Photograph is black and white. 1906: The Moorabbin Co-Operative Stores. Located on the Nepean Road, Cheltenham, (before 1st WW). The Leader Newspaper office occupied the site. The Exchange Hotel is to the right.Stamped on back :City of Moorabbin Historical Society Written on Front of mount : 1906moorabbin, stores, horses, men, ww1, world war 1, tobacco, nepean road, co-operative, cheltenham -
 The Beechworth Burke Museum
Photograph, 1944
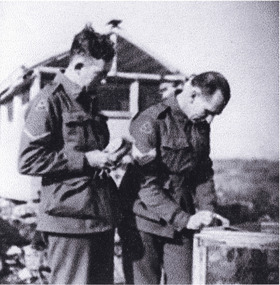
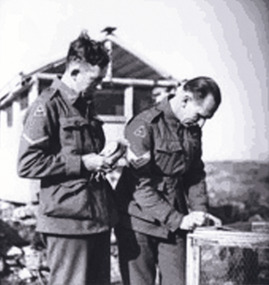
... Airforce that was active during World War Two. One of the tasked ...Taken in 1944 in Bonegilla, Victoria, this photograph depicts soldiers of the 1st Australian Corps Signals training battalion releasing carrier pigeons from a portable loft for their daily exercise.The 1st Australian Corps Signals was a branch of the Australian Imperial Airforce that was active during World War Two. One of the tasked carried out by 1st Australian Corps Signals was to send messages through the use of carrier pigeons. Carrier pigeons were most commonly used by the Allied Forces to send messages from the front line trenches or advancing units.Black and white square reproduced photograph on rectangular archival paperObverse: Negative Number: 066265/ thumbnail/ image 066265/ purchased from Australian War Memorial/ Bonegilla Victoria 1944*05-03 Carrier pigeons being released for their/ daily exercise from a portable loft of the 1st Signals training Battlion/ Reverse: 7993/military album, beechworth, burke museum, military, world war 2, ww2, australian army, bonegilla, pigeons -
 The Beechworth Burke Museum
Photograph, 1944
... Airforce that was active during World War Two. One of the tasked ...Taken in 1944 in Bonegilla, Victoria, this photograph depicts soldiers of the 1st Australian Corps Signals training battalion releasing carrier pigeons from a portable loft for their daily exercise.The 1st Australian Corps Signals was a branch of the Australian Imperial Airforce that was active during World War Two. One of the tasked carried out by 1st Australian Corps Signals was to send messages through the use of carrier pigeons. Carrier pigeons were most commonly used by the Allied Forces to send messages from the front line trenches or advancing units.Black and white square reproduced photograph on rectangular archival paperObverse: Bonegilla Victoria 1944 - 05 - 03 Carrier pigeons being released for their daily exercise/ from a portable loft of the 1st Signals training Battlion/ copied from the Australian War Memorial No 066265 Order No 2319835 Copyright/ permission for the collection of/ Robert O'Hara Burke Memorial Museum Beechworth/ Reverse: 7993.1military album, beechworth, burke museum, military, world war 2, ww2, australian army, bonegilla, pigeons -
 The Beechworth Burke Museum
Photograph, 03/05/1944
... that was active during World War Two. One of the tasked carried out by 1st ...Taken in 1944 in Bonegilla, Victoria by Captain E.C. Johnston, this photograph depicts soldiers of the 1st Australian Corps Signals training battalion releasing carrier pigeons from a portable loft for their daily exercise.The 1st Australian Corps Signals was a branch of the Australian Imperial Airforce that was active during World War Two. One of the tasked carried out by 1st Australian Corps Signals was to send messages through the use of carrier pigeons. Carrier pigeons were most commonly used by the Allied Forces to send messages from the front line trenches or advancing units. Edgar Charles Johnston (1896-1988) was an aviator and public servant. In WW1 he served with the Australian Imperial Force, and later joined the Royal Flying Corps. For his service in the Royal Flying Corps he was awarded the Distinguished Flying Cross, which assisted him in becoming the assistant director-general in 1939 of the Commonwealth Department of Aviation. During World War II he was heavily engaged in the department’s activities in support of the war effort.Black and white square reproduced photograph on rectangular archival paperObverse: Bonegilla Victoria 1944-05-03/ Carrier Pigeons being released for their daily exercise/ from a portable loft of the 1st Signals training Battalion/ Photograph made 3 May 1944, by E.C. Johnston/ copied from CD Image supplied from/ Australian War Memorial collection/ Copyright/ Use of this image for the/ Robert O'Hara Burke Memorial Museum, Beechworth/ enhanced to remove moir effect/ Reverse: 7993.2/military album, beechworth, burke museum, military, world war 2, ww2, australian army, bonegilla, pigeons, edgar charles johnston -
 The Beechworth Burke Museum
Photograph, 1941
... of the Australian Imperial Airforce that was active during World War Two ...Taken in Syria in 1941, this photograph depicts Sergeant Theodore Arthur Horton, dressed in his military uniform, writing down a message to be sent by carrier pigeon. Standing next to Sergeant Horton is an unknown soldier, dressed in his military uniform, holding a carrier pigeon. Both man are standing in front of a large pigeon loft.The 1st Australian Corps Signals was a branch of the Australian Imperial Airforce that was active during World War Two. One of the tasked carried out by 1st Australian Corps Signals was to send messages through the use of carrier pigeons. Carrier pigeons were most commonly used by the Allied Forces to send messages from the front line trenches or advancing units.Black and white square reproduced photograph on rectangular archival paperObverse: Negative Number: 022213/ purchased from Australian War Memorial/ thumbnail 022213/ Syria 1941-12 Sergeant T A Horton of 1st Australian Corps Signals/ writing a message to be sent by carrier pigeon/ Reverse: 7992/ military album, beechworth, burke museum, military, world war 2, ww2, australian army, sergeant horton, theodore arthur horton -
 The Beechworth Burke Museum
Photograph, 1941
... Airforce that was active during World War Two. One of the tasked ...Taken in Syria in 1941, this photograph depicts Sergeant Theodore Arthur Horton, dressed in his military uniform, writing down a message to be sent by carrier pigeon. Standing next to Sergeant Horton is an unknown soldier, dressed in his military uniform, holding a carrier pigeon. Both man are standing in front of a large pigeon loft. The 1st Australian Corps Signals was a branch of the Australian Imperial Airforce that was active during World War Two. One of the tasked carried out by 1st Australian Corps Signals was to send messages through the use of carrier pigeons. Carrier pigeons were most commonly used by the Allied Forces to send messages from the front line trenches or advancing units. Black and white square reproduced photograph on rectangular archival paperObverse: Syria 1941-12 Sergeant T A Horton of 1st Australian Corps Signals writing a message/ to be sent by carrier pigeon/ copied from the Australian War Memorial No 2319835 Copyright Neg No 022213/ permission for the collection of/ Robert O;Hara Burke Memorial Museum Beechworth/ Reverse: 7992.1/ archival paper/military album, beechworth, burke museum, military, world war 2, ww2, australian army, sergeant horton, theodore arthur horton -
 The Beechworth Burke Museum
Photograph, 1941
... of the Australian Imperial Airforce that was active during World War Two ...Taken in Syria in 1941, this photograph depicts Sergeant Theodore Arthur Horton, dressed in his military uniform, writing down a message to be sent by carrier pigeon. Standing next to Sergeant Horton is an unknown soldier, dressed in his military uniform, holding a carrier pigeon. Both man are standing in front of a large pigeon loft.The 1st Australian Corps Signals was a branch of the Australian Imperial Airforce that was active during World War Two. One of the tasked carried out by 1st Australian Corps Signals was to send messages through the use of carrier pigeons. Carrier pigeons were most commonly used by the Allied Forces to send messages from the front line trenches or advancing units.Black and white square reproduced photograph on rectangular archival paperObverse: Syria 1941-12/ Sergeant T A Horton of 1st Australian Corps Signals/ writing a message to be sent by carrier pigeon/ copied from CD Image supplied from/ Australian War Memorial collection/ Copyright/ Use of this image only for the/ Robert O'Hara Burke Memorial Museum, Beechworth/ enhanced to remove moir effect/ Reverse: 7992.3/ archival paper/military album, beechworth, burke museum, military, world war 2, ww2, australian army, sergeant horton, theodore arthur horton -
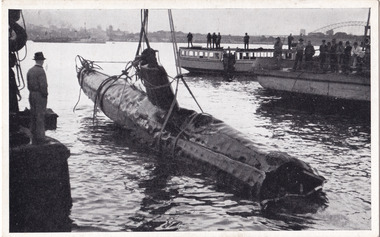
 The Beechworth Burke Museum
Postcard, 30/07/1942
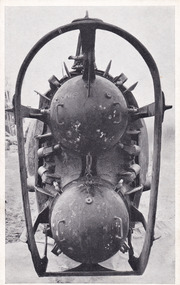
The postcard image depicts the torpedo tubes with caps in position of a Japanese midget submarine that was involed in the attack on Sydney Harbour on May 31st, 1942. On the 31st of May 1942, in the midst of World War Two, Sydney found itself under attack from three Japanese midget submarines that entered Sydney Harbour under the cover of night. The first submarine became trapped in anti-torpedo nets and the third submarine was sunk in Taylor Bay. The second submarine fired on the heavy cruiser the USS Chicago. One of the torpedoes exploded near the depot ship the HMAS Kuttabul, killing 21 sailors.Black and white rectangular postcard printed on cardReverse: 7525-1/ POST CARD/ 2/ This postcard is a/ souvenir of the Exhibition/ of Japanese Midget Sub-/ marines sunk in Sydney Har-/ bour on the night of Sunday,/ May 31st, 1942, the night/ that the first attack on/ Sydney by a foreign power/ took place and was/ frustrated./ caps of the/ torpeto tubes/ 30th JULY 1942/ SERIAL No. 2/ Torpedo tubes of Japanese midget submarine with/ caps in position/military album, beechworth, burke museum, ww2, world war two, wwii, maritime, sydney harbour, sydney, japanese, japan, submarine, torpedo -
 The Beechworth Burke Museum
Postcard, 30/07/1942
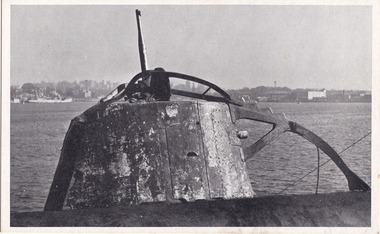
The postcard image depicts the conning tower of a Japanese midget submarine that was involed in the attack on Sydney Harbour on May 31st, 1942.On the 31st of May 1942, in the midst of World War Two, Sydney found itself under attack from three Japanese midget submarines that entered Sydney Harbour under the cover of night. The first submarine became trapped in anti-torpedo nets and the third submarine was sunk in Taylor Bay. The second submarine fired on the heavy cruiser the USS Chicago. One of the torpedoes exploded near the depot ship the HMAS Kuttabul, killing 21 sailors.Black and white rectangular postcard printed on cardReverse: 7525-2/ POST CARD/ 3/ This postcard is a/ souvenir of the Exhibition/ of Japanese Midget Sub-/ marines sunk in Sydney Har-/ bour on the night of Sunday,/ May 31st, 1942, the night/ that the first attack on/ Sydney by a foreign power/ took place and was/ frustrated./ 30th JULY 1942/ SERIAL No. 3/ Conning tower of Japanese midget submarine/ The Con. Tower/ military album, beechworth, burke museum, ww2, world war two, wwii, maritime, sydney harbour, sydney, japanese, japan, submarine -
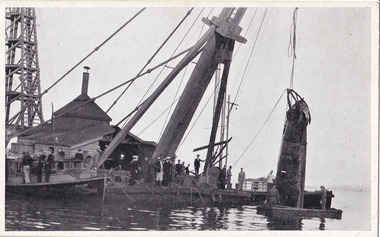
 The Beechworth Burke Museum
Postcard, 30/07/1942
The postcard image depicts a sunken Japanese midget submarine, that was involved in the attack on Sydney Harbour on May 31st, 1942, being raised from the waters of the Sydney Harbour by a winch system, as groups of onlookers stand upon the decks of surrounding boats.On the 31st of May 1942, in the midst of World War Two, Sydney found itself under attack from three Japanese midget submarines that entered Sydney Harbour under the cover of night. The first submarine became trapped in anti-torpedo nets and the third submarine was sunk in Taylor Bay. The second submarine fired on the heavy cruiser the USS Chicago. One of the torpedoes exploded near the depot ship the HMAS Kuttabul, killing 21 sailors.Black and white rectangular postcard printed on cardReverse: 7525-3/ POST CARD/ 4/ This postcard is a/ souvenir of the Exhibition/ of Japanese Midget Sub-/ marines sunk in Sydney Har-/ bour on the night of Sunday,/ May 31st, 1942, the night/ that the first attack on/ Sydney by a foreign power/ took place and was/ frustrated./ 30th JULY 1942/ SERIAL No. 4/ Raising the Japanese midget submarine/ The sub after/ being lifted out of/ the water, note/ the cause from depth/ charges./military album, beechworth, burke museum, ww2, world war two, wwii, maritime, sydney harbour, sydney, japanese, japan, submarine, torpedo -
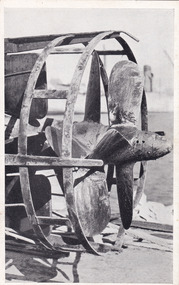 The Beechworth Burke Museum
Postcard, 30/07/1942
The postcard image depicts the propeller of a Japanese midget submarine that was involved in the attack on Sydney Harbour on May 31st, 1942.On the 31st of May 1942, in the midst of World War Two, Sydney found itself under attack from three Japanese midget submarines that entered Sydney Harbour under the cover of night. The first submarine became trapped in anti-torpedo nets and the third submarine was sunk in Taylor Bay. The second submarine fired on the heavy cruiser the USS Chicago. One of the torpedoes exploded near the depot ship the HMAS Kuttabul, killing 21 sailors.Black and white rectangular postcard printed on cardReverse: 7525-4/ POST CARD/ 1/ This postcard is a/ souvenir of the Exhibition/ of Japanese Midget Sub-/ marines sunk in Sydney Har-/ bour on the night of Sunday,/ May 31st, 1942, the night/ that the first attack on/ Sydney by a foreign power/ took place and was/ frustrated./ 30th JULY 1942/ SERIAL No. 1/ Propellers and rudders of Japanese midget/ submarine/ Propellor/ with protecting/ bands./military album, beechworth, burke museum, ww2, world war two, wwii, maritime, sydney harbour, sydney, japanese, japan, submarine -
 The Beechworth Burke Museum
Postcard, 30/07/1942
The postcard image depicts a salvage team winching a Japanese midget submarine that was involed in the attack on Sydney Harbour on May 31st, 1942, out of the waters of the Sydney Harbour. The winch and salvage team are situated in front of a dock shed on a pier.On the 31st of May 1942, in the midst of World War Two, Sydney found itself under attack from three Japanese midget submarines that entered Sydney Harbour under the cover of night. The first submarine became trapped in anti-torpedo nets and the third submarine was sunk in Taylor Bay. The second submarine fired on the heavy cruiser the USS Chicago. One of the torpedoes exploded near the depot ship the HMAS Kuttabul, killing 21 sailors.Black and white rectangular postcard printed on cardReverse: 7525-5/ POST CARD/ This postcard is a/ souvenir of the Exhibition/ of Japanese Midget Sub-/ marines sunk in Sydney Har-/ bour on the night of Sunday,/ May 31st, 1942, the night/ that the first attack on/ Sydney by a foreign power/ took place and was/ frustrated./ 30th JULY 1942/ SERIAL No. 6/ The salvage part at work on a Japanese midget/ submarine/ Bringing the sub/ to the surface/military album, beechworth, burke museum, ww2, world war two, wwii, maritime, sydney harbour, sydney, japanese, japan, submarine -
 The Beechworth Burke Museum
Photograph
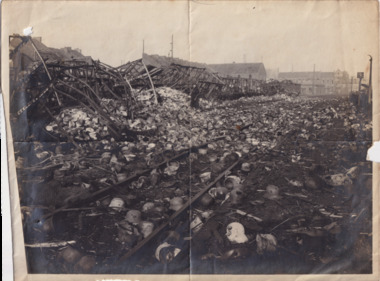
Taken some time between 1914-18 in France, the photograph depicts extensive wreckage of a railway train. There are collapsed buildings, debris, and helmets scattered all across the landscape. There is one unidentified soldier standing in the middle of the photograph. With research that is currently available, it can be inferred that the wreckage depicted in this photograph is from the tragic Saint-Michel-de-Maurienne derailment which occurred on December 12, 1917. The railway accident involved a troop train carrying almost 1,000 French soldiers on their way home for leave from the Italian Front in World War I. As the train descended into the Maurienne Valley, a sudden, uncontrollable acceleration caused a catastrophic crash and subsequent fire. 675 people died in the accident.The record is historically significant due to its connection to World War I. This conflict is integral to Australian culture as it was the single greatest loss of life and the greatest repatriation of casualties in the country's history. Australia’s involvement in the First World War began when the Australian government established the Australian Imperial Force (AIF) in August 1914. Immediately, men were recruited to serve the British Empire in the Middle East and on the Western Front. The record has strong research potential. This is due to the ongoing public and scholarly interest in war, history, and especially the ANZAC legend, which is commemorated annually on 25 April, known as ANZAC Day. Additionally, there is only limited information available about the Sant-Michel-de-Maurienne derailment. The record may be a useful springboard for further investigation into this accident and its history.Black and white rectangular photograph printed on matte photographic paper.Reverse: 6530 / Destruction of train carrying / German helmets (?) to (?) prior to / his retreat at Charleroi /military album, army, war, wwi, world war i, france, charleroi, train, military, wreckage, europe, belgium, saint-michel-de-maurienne, maurienne valley -
 The Beechworth Burke Museum
Photograph
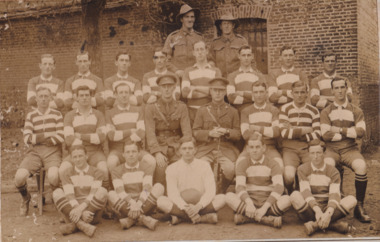
Taken some time between 1914-18, depicted is a large group of unidentified males. Four of them are dressed in Australian military uniforms. The remaining 19 men are dressed in striped uniforms. The male in the centre of the front row is cradling a football, suggesting that the group was part of a football or rugby league team. It is believed that the soldiers in this photograph were part of the Australian Imperial Force. This can be inferred by the chevron rank insignia visible on their uniforms. The placement of this insignia on the sleeve of the right arm suggests that this soldier was either a Warrant Officer or a Non-Commissioned Officer (NCO). Additionally, they are also wearing 'Rising Sun' collar badges on their coats. Australia, unlike most other Commonwealth countries, did not adopt metal regimental badges during the First World War. All units were issued with the Australian Army General Service Badge, better known as the 'Rising Sun’ badge. This insignia is almost always identified with the Australian Imperial Force. Sport has always been entwined with war. Both sport and war demand peak physical fitness, camaraderie, strategy, and allegiance to a team collaboratively working towards a common goal: to win. The connection between sport and war is especially strong in Australia since these two concepts form the basis of our national identity. The Australian War Memorial has a number of World War I recruitment posters linking war and sport in its collection. One of the posters produced in 1915 by the State Parliamentary Recruiting Committee in Victoria attempted to shame young men into enlisting by juxtaposing the image of an Australian soldier standing guard over his deceased mate with a photograph of a Victorian Football League match. Another poster, produced in 1917, features vignettes of different sports including cricket, bowling, boxing, kayaking and golf. Its slogan reads, "Join Together - Train Together - Embark Together - Fight Together: Enlist in the Sportman's 1000".The record is historically significant due to its connection to World War I. This conflict is integral to Australian culture as it was the single greatest loss of life and the greatest repatriation of casualties in the country's history. Australia’s involvement in the First World War began when the Australian government established the Australian Imperial Force (AIF) in August 1914. Immediately, men were recruited to serve the British Empire in the Middle East and on the Western Front. The record has strong research potential. This is due to the ongoing public and scholarly interest in war, history, and especially the ANZAC legend, which is commemorated annually on 25 April, known as ANZAC Day. Additionally, the record presents a unique opportunity to further explore the relationship between the arts, sport and war. This statement of significance has already established that war is integral to Australia's national identity - and sport is of equal importance. Specifically, the record begs to question how the peak physical fitness and camaraderie valued in team sports were creatively translated into military recruitment campaigns during World War I. Evidently, this record and its historic context demonstrates that there is potential here, and if further research is completed on this topic, it may provide insight into Australian military recruitment tactics used in the past and present, and into the future.Sepia rectangular photograph printed on matte photographic paper mounted on card.Reverse: 6529 / hyossest (?) / (?)1/11/1 /military album, army, military, war, wwi, world war i, sport, football, rugby, aif, australian imperial force -
 The Beechworth Burke Museum
Photograph
Taken during World War I from the forecastle of a navy ship, the photograph depicts an eruption of water and smoke as a result of an underwater submarine being bombed from above.The naval war of World War I was a conflict unlike any previous one with the exception of the brief Russo-Japanese War (1904-1905), with naval warfare in World War I being mainly between the German forces and the Great Britain forces. The naval war of World War I proved largely a disappointment to officials on both sides as it did not produce the decisive fleet actions envisioned in the pre-war years. Nevertheless, the war at sea was a crucial part of World War I overall. The German use of the submarine against commerce not only threatened the Allied war effort, but also drew the United States into the conflict. In addition, the British economic blockade of Germany afforded by the Royal Navy’s command of the sea inflicted great damage on the war effort of Germany. Finally, the naval war held great ramifications for the future since many practices employed in the First World War were those pursued in the Second World War.Black and white rectangular reproduced photograph on matte photographic paperReverse: 6527/ (Crown copyright notice from the Imperial War Museum)/ Naval 23/ 23/ A99/ burke museum, world war 1, world war i, ww1, wwi, submarine, submarine warfare, navy, naval vessels -
 The Beechworth Burke Museum
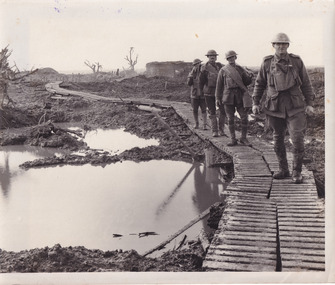
Photograph
Taken during World War I on the Western Front, this photograph depicts four soldiers dressed in full uniform and kit walking through muddy trenches on wooden duckboards.On the Western Front, the war was fought by soldiers in trenches. Trenches were long, narrow ditches dug into the ground where soldiers lived. They were very muddy, uncomfortable and the toilets overflowed. These conditions caused some soldiers to develop medical problems such as trench foot. There were many lines of German trenches on one side and many lines of Allied trenches on the other. In the middle was no man's land, which soldiers crossed to attack the other side. 'Duckboards' (or 'trench gratings') were first used at Ploegsteert Wood, Ypres in December 1914. They were used throughout the First World War being usually placed at the bottom of the trenches to cover the sump-pits, the drainage holes which were made at intervals along one side of the trench. This made it easier to pump out the pits when necessary. The raised edges of the boards in theory helped protect men's feet from accumulated water; walking along them (especially at night and in the wet) was something of an art as it was easy to lose one's footing and slip or trip on the fequently misaligned sections.Sepia rectangular reproduced photograph on matte photographic paperReverse: 6528/ (A copyright and reproduction notice from the Australian War Museum, printed in blue ink)/burke museum, military album, trench warfare, duckboards, soldiers, ww1, wwi, world war 1, world war i, western front -
 The Beechworth Burke Museum
Postcard, 1916
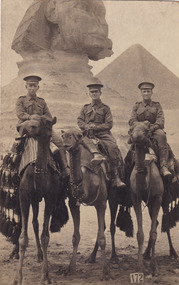
The photograph on the obverse side of the postcard was taken in Egypt on 4 March 1916, during World War I. Depicted are three unidentified Australian soldiers part of the Australian Imperial Force. They are dressed in military uniforms. Each of these men are seated atop a camel's back. All three camels are draped in - what are believed to be - traditional Egyptian textiles, including tassels, carpets and beads. In the background, we can see a triangular pyramid and the Great Sphinx of Giza. The Australian Imperial Force (AIF) were established by the Australian government in August 1914. This announcement marked the beginning of Australia's involvement in World War I. Immediately, men were recruited to serve the British Empire in the Middle East and on the Western Front. The first contingent of the AIF departed Australia by ship in November 1914. England was their destination. Although, their convoy was diverted to Egypt after the Australian High Commissioner in London, Sir George Reid, and the British military authorities unanimously agreed that the overcrowded military camps in England were unsuitable for so many men over winter. The AIF disembarked in Alexandria, Egypt on 3 December 1914, and the men moved to training camps near Cairo. It was in Egypt that the AIF and the New Zealand Expeditionary Force (NZEF) formed one united corps - the Australian and New Zealand Army Corps (ANZAC). This group of troops trained in the desert beneath the pyramids until March 1915.The record is historically significant due to its connection to World War I. This conflict is integral to Australian culture as it was the single greatest loss of life and the greatest repatriation of casualties in the country's history. On 25 April 1915, members of the Australian Imperial Force landed on Gallipoli in Turkey with troops from New Zealand, Britain, and France. This specific event holds very strong significance within Australian history. The record has strong research potential. This is due to the ongoing public and scholarly interest in war, history, and especially the ANZAC legend, which is commemorated annually on 25 April, known as ANZAC Day. The record's unique research potential is strengthened by its relationship to a historically significant site: the Egyptian pyramids. Since the postcard was produced in 1916, the record can be used as primary evidence for historians and conservationists studying these sites, or how these sites have evolved over time. The record may also be a useful resource for those interested in the history of Egyptian textiles. Furthermore, it may also provide insight into international relations between Egypt and Australia in the past and present.Sepia rectangular postcard printed on paper.Obverse: 172 / Reverse: 6536 / CARTE POSTALE / 4/3/16 / Rough riders under / the shadow of the / pyramids /military album, army, war, wwi, world war i, egypt, pyramid, great sphinx of giza, textiles, australian imperial force, aif, uniform -
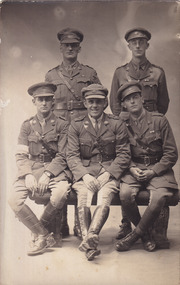
 The Beechworth Burke Museum
Postcard, 1918
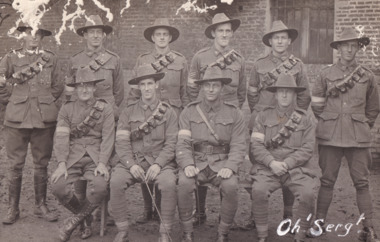
It is believed that the photograph on the obverse side of the postcard was taken in 1918. Depicted are ten Australian male soldiers. Their names are transcribed in pencil on the reverse side of the postcard. Each soldier is dressed in a formal military uniform. It is believed that these soldiers were part of The Australian Imperial Force during World War I. This can be inferred by the chevron rank insignia visible on the uniforms of nine of ten men. The placement of this insignia on the sleeves of their right arms suggests that they were either Warrant Officers or Non-Commissioned Officers (NCO). Specifically, the number of chevron stripes - here, nine men have three - are believed to signify a Corporal rank. The men pictured on this postcard are also wearing 'Rising Sun' collar badges on their coats. Australia, unlike most other Commonwealth countries, did not adopt metal regimental badges during the First World War. All units were issued with the Australian Army General Service Badge, better known as the 'Rising Sun’ badge. This insignia is almost always identified with the Australian Imperial Force. Another characteristic of the Australian Imperial Force uniform are the rectangular colour patches worn by all men on this postcard. In March 1915, a new scheme of unit identification was devised to replace the wearing of unit titles. This consisted of cloth colour patches on the upper arms of a soldier’s tunic. The black and white nature of the record means that we cannot establish which battalion these soldiers were part of. However, one of the handwritten signatures on the reverse side of the postcard reads "W.A. Griggs". This was the signature of Sergeant William Archibald Griggs. Further research shows that Griggs was part of the 5th Australian Division Signals Company. Therefore, it is believed these soldiers were part of the ANZAC Signal Companies. The main role of the Signal Companies during World War I was the laying and maintenance of telephone cables and switchboards, used to connect various units in their area. Furthermore, the man standing in the back row, third from the left side, has an Overseas Service chevron patch on his coat. In January 1918, the Australian Imperial Force approved the wearing of the overseas service chevrons which had been adopted by the British Army. These were embroidered or woven inverted chevrons worn above the cuff on the right arm. Due to a shortage of supply, some men had chevrons privately made. For each year of war service, a blue chevron was awarded, and those men who had embarked in 1914 received a red chevron to indicate that year’s service; however, the black and white nature of the postcard makes it difficult to determine what colours are on this man's patch.The record is historically significant due to its connection to World War I. This conflict is integral to Australian culture as it was the single greatest loss of life and the greatest repatriation of casualties in the country's history. Australia’s involvement in the First World War began when the Australian government established the Australian Imperial Force (AIF) in August 1914. Immediately, men were recruited to serve the British Empire in the Middle East and on the Western Front. The first significant Australian action of the war was the Australian Naval and Military Expeditionary Force’s (ANMEF) landing on Rabaul on 11 September 1914. The ANMEF took possession of German New Guinea at Toma on 17 September 1914 and of the neighbouring islands of the Bismarck Archipelago in October 1914. On 25 April 1915, members of the AIF landed on Gallipoli in Turkey with troops from New Zealand, Britain, and France. This specific event holds very strong significance within Australian history. The record has strong research potential. This is due to the ongoing public and scholarly interest in war, history, and especially the ANZAC legend, which is commemorated annually on 25 April, known as ANZAC Day.Black and white rectangular postcard printed on paper.Obverse: Oh 'Serg!' / Reverse: CARTE POSTALE / 6537 / Correspondance / Adresse / w.a. Grigg / J. Fain / Ruckling / R.J Farrar / (?) / Clarke / L (?) / GFFisher / R. M. Forrest / With Compliments / Sgt's Mess / November 1918 /military album, army, aif, uniform, military, wwi, world war i, rising sun badge, william archibald griggs, anzac, signal companies, postcard, patches, chevron -
 The Beechworth Burke Museum
Postcard
The photograph on the obverse side of the postcard was taken some time between 1914-1918. Depicted are five unidentified Australian soldiers. They are all dressed in military uniforms. It is believed that these soldiers were part of The Australian Imperial Force during World War I. This can be inferred by the 'Rising Sun' collar badges on their coats. Australia, unlike most other Commonwealth countries, did not adopt metal regimental badges during the First World War. All units were issued with the Australian Army General Service Badge, better known as the 'Rising Sun’ badge. This insignia is almost always identified with the Australian Imperial Force. Another characteristic of the Australian Imperial Force uniform are rectangular colour patches. One is visible on the soldier in the front row, first from the left on this postcard. In March 1915, a new scheme of unit identification was devised to replace the wearing of unit titles. This consisted of cloth colour patches on the right arms of a soldier’s tunic. The sepia nature of the record means that we cannot determine the colour, and therefore cannot establish which battalion this soldier was part of. Furthermore, the man seated in the middle of the front row has an Overseas Service chevron patch on his coat. In January 1918, the Australian Imperial Force approved the wearing of the overseas service chevrons which had been adopted by the British Army. These were embroidered or woven inverted chevrons worn above the cuff on the right arm. Due to a shortage of supply, some men had chevrons privately made. For each year of war service, a blue chevron was awarded, and those men who had embarked in 1914 received a red chevron to indicate that year’s service; however, the sepia nature of the postcard makes it difficult to determine what colours are on this man's patch.The record is historically significant due to its connection to World War I. This conflict is integral to Australian culture as it was the single greatest loss of life and the greatest repatriation of casualties in the country's history. Australia’s involvement in the First World War began when the Australian government established the Australian Imperial Force (AIF) in August 1914. Immediately, men were recruited to serve the British Empire in the Middle East and on the Western Front. The first significant Australian action of the war was the Australian Naval and Military Expeditionary Force’s (ANMEF) landing on Rabaul on 11 September 1914. The ANMEF took possession of German New Guinea at Toma on 17 September 1914 and of the neighbouring islands of the Bismarck Archipelago in October 1914. On 25 April 1915, members of the AIF landed on Gallipoli in Turkey with troops from New Zealand, Britain, and France. This specific event holds very strong significance within Australian history. The record has strong research potential. This is due to the ongoing public and scholarly interest in war, history, and especially the ANZAC legend, which is commemorated annually on 25 April, known as ANZAC Day.Sepia rectangular postcard printed on paper.Reverse: CARTE POSTALE / hyossest (?) / 6538 /military album, army, aif, australian imperial force, postcard, wwi, world war i, portrait, soldiers -
 The Beechworth Burke Museum
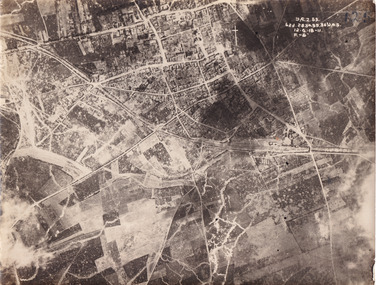
Photograph
... Imperial Force had one their greatest World War I victories ...Taken some time between 1914-18, the photograph depicts an aerial view of Villers-Bretonneux in France, a region which was part of the Western Front during World War I. The image mostly shows rural landscape. The Western Front was the main theatre of war during World War I. Following the outbreak of war in August 1914, the German Army opened the Western Front by invading Luxembourg and Belgium, then gaining military control of important industrial regions in France. The German advance was halted with the Battle of the Marne. Following the Race to the Sea, both the French-British and German armies dug in along a meandering line of fortified trenches, stretching from the North Sea to the Swiss frontier with France. The First Battle of Villers-Bretonneux occurred between 30 March - 5 April 1918. It took place during Operation Michael, part of the German Spring Offensive on the Western Front. The offensive began against the British Fifth Army and the Third Army on the Somme, and pushed back the British and French reinforcements on the north side of the Somme. The capture of Villers-Bretonneux, close to Amiens, a strategically important road and rail-junction, would have brought the Germans within artillery-range. In late March, troops from the Australian Imperial Force were brought south from Belgium as reinforcements to help shore up the line. In early April, the Germans launched an attack to capture Villers-Bretonneux. After a determined defence by British and Australian troops, the attackers were close to success until a counter-attack by the 9th Australian Infantry Brigade and British troops late in the afternoon of 4 April restored the situation and halted the German advance on Amiens. The Second Battle of Villers-Bretonneux occurred between 24 - 27 April 1918, during the German Spring Offensive to the east of Amiens. It is notable for being the first occasion on which tanks fought against each other. A counter-attack by two Australian brigades and a British brigade during the night of 24 April partly surrounded Villers-Bretonneux, and on 25 April, the town was recaptured. On 26 April, the role of the Moroccan division of the French army was crucial in pushing back German units. Australian, British and French troops nearly restored the original front line by 27 April.The record is historically significant due to its connection to World War I. This conflict is integral to Australian culture as it was the single greatest loss of life and the greatest repatriation of casualties in the country's history. Australia’s involvement in the First World War began when the Australian government established the Australian Imperial Force (AIF) in August 1914. Immediately, men were recruited to serve the British Empire in the Middle East and on the Western Front. Additionally, the record's significance is enhanced by its depiction of Villers-Bretonneux. The battles that occurred in this town during World War I are especially historically significant to Australia as this is where the Australian Imperial Force had one their greatest World War I victories. An Australian flag still flies over Villers-Bretonneux in the present. Furthermore, a plaque outside the Villers-Bretonneux Town Hall recounts the battles fought to save the town in 1918. Kangaroos feature over the entrance to the Town Hall, and the main street is named Rue de Melbourne. More officially, recognition of the significance of the battle in Villers-Bretonneux is found at the Australian National Memorial, which was built just outside the town. It commemorates all Australians who fought in France and Belgium and includes the names of 10,772 who died in France and have no known grave. Each year, a small ceremony is held at the memorial to mark the sacrifice made by the soldiers. Lastly, the record has strong research potential. This is due to the ongoing public and scholarly interest in war, history, and especially the ANZAC legend, which is commemorated annually on 25 April, known as ANZAC Day.Sepia rectangular photograph printed on matte photographic paper.Obverse: yAE.2.35. / 125 / 62d.2834.35.36.VA.5. / 12.G.18-11 / F.-(?)" /military album, wwi, world war i, villers-bretonneux, australian imperial force, aif, france, war, army, conflict, germany, 1918, battle -
 The Beechworth Burke Museum
Audio - Oral History, Jennifer Williams, Mrs Vanessa McDonald, 9 November 2000
Mrs. Vanessa McDonald was born in Beechworth in 1917. Christened, Agnes Bertha Collins, Vanessa changed her name in 1960. Mrs. McDonald's family's connection with gold mining in the district reach back to the first of Beechworth's gold rushes, when her great grandfather, a Dutchman who adopted the name Charles Collins, arrived in 1851-1852. Mrs. McDonald spent her childhood in the isolated hamlet of Stanley, in the area known as 'Little Scotland', where she recalls helping her mother to raise younger siblings, picking apples and walnuts on the family farm, and roaming the hills for wildflowers. As a young woman Mrs. McDonald attended religious and social gatherings in the local community. In 1940 she went to Melbourne to work as a mothercraft nurse during the Second World War. She met her husband at a Beechworth football match and was married at the Stanley Methodist Church in 1941. The gold diggings known as the 'Nine Mile' became the hamlet of Stanley, after the British Prime Minister, Lord Stanley, in 1858. By the late 1850s, Stanley boasted schools, an athenaeum, a church, a weekly newspaper and several hotels and other civic infrastructure to cater for a growing population. The area attracted large numbers of Chinese miners, whose presence was frequently resisted. Like other early Victorian mining settlements, Stanley was a hotbed of political and racial tensions during the gold rush. One side of the Nine Mile Creek was known as 'Little Scotland’, the other, 'Little Ireland'. A number of Christian denominations built congregations and churches in Stanley, including the Church of England, Methodist Church, the Catholic Church, and Presbyterian Church. Stanley became part of the United Shire of Beechworth in 1871. By 1880 timber was being cut and two sawmills were established by 1887. River-dredged gold mining consumed vast amounts of timber from the forests in the area, and in 1931 the first of several softwood plantations began. This oral history recording was part of a project conducted by Jennifer Williams in the year 2000 to capture the everyday life and struggles in Beechworth during the twentieth century. This project involved recording seventy oral histories on cassette tapes of local Beechworth residents which were then published in a book titled: 'Listen to what they say: voices of twentieth century Beechworth'. These cassette tapes were digitised in July 2021 with funds made available by the Friends of the Burke.Following the decline in the mining and associated industries during the early-mid-twentieth century, the Beechworth district experienced a period of general economic decline. On the east side of the Dingle Range, Mrs. McDonald's father, William Henry Collins, felled timber and the family were pioneer apple orchardists. The establishment of apple orchards in Stanley reflects changes to how land was used and contributes to our understanding of the historical development of rural communities following the gold rush. Mrs. McDonald's recollections are significant for understanding family and social life in a small rural town in years leading up to the Great Depression and prior to the Second World War. This oral history recording may be compared with other oral histories and items in the Burke Museum's collection. This oral history account is socially and historically significant as it is a part of a broader collection of interviews conducted by Jennifer Williams which were published in the book 'Listen to what they say: voices of twentieth-century Beechworth.' While the township of Beechworth is known for its history as a gold rush town, these accounts provide a unique insight into the day-to-day life of the town's residents during the 20th century, many of which will have now been lost if they had not been preserved.This is a digital copy of a recording that was originally captured on a cassette tape. The cassette tape is black with a horizontal white strip and is currently stored in a clear flat plastic rectangular container. It holds up 40 minutes of recordings on each side.Mrs Vanessa McDonald /listen to what they say, beechworth, oral history, burke museum, emigration, gold rush immigration, victorian gold rush, mining families, apple orchard, forestry, forest plantation, little scotland, stanley, twentieth century history, regional australia, rural australia, farming, harvest festival, great depression, dingle range, the nine mile, australian wildflowers, high country wildflowers, mothercraft nurse, rural and regional women, social history, collins, mrs. vanessa mcdonald, building community life, shaping cultural and creative life, fruit growers, family history, changes to land use in regional victoria -
 The Beechworth Burke Museum
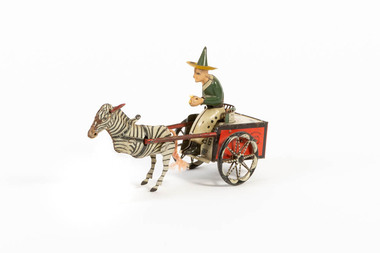
Domestic object - Toy Cart, c1920
... toy manufacturing prior to World War One. ) How ...The Lehmann toy company exported toys to the USA from 1895 to 1929 and specialized in mechanical, friction transportation and lithographed wind-up tinplate toys. Founded by Ernest Lehmann Co. in Brandenberg, Germany, 1881. In 1951 the fim re-established and is still making friction toys. Some of the most famous include: Autobus, the Dancing Sailor and Icarus. Lehmann distinguished itself early 20th-century by releasing small tin toys which were cheaper than the toys the competition made. End of the 19th century, beginning of th 20th, competitors were producing heavy, cast-iron toys. By the 1920s the Lehmann company had a staff over 800 people and made 80+ different toy designs.How it is significant? (...this item is one of last remaining examples of German toy manufacturing prior to World War One. ) How it is significance to local history? (....this item represents the importance of preserving local history and culture.) German, clockwork, red and white tinplate cart with green and white driver with green pointed hat, being pulled by zebra with red ears and cord tail. 1881/ Lehmann 'Zikra' Marke Pat./USA Appl. / For Jan 1907, Dec 1913 lehmann, toy, beechworth, burke museum, zebra, cart, germany -
 Montmorency/Eltham RSL Sub Branch
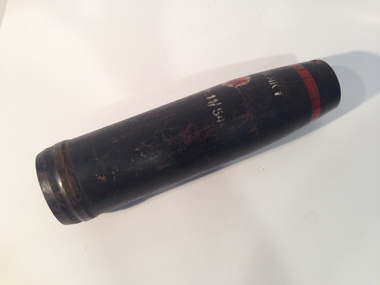
Artillery shell for 25 pounder Gun/Howitzer, 1954
The Ordnance QF 25-pounder was the major British field gun and howitzer during the Second World War. Many Commonwealth countries used them during WW2 and Australia produced the guns at General Motors Holden. They were renowned for their rapid rate of fire and when firing at maximum range (12,253m -13,400yds) one gun could have up to 5 shells in the air at once. In North Africa during WW2, they were sometimes called upon to act as anti-tank guns. A shortened and lightened version of the gun was made in Australia and used in jungle operations.Steel conical projectile25 PR MK 1 L35 ME 11/54 -
 Montmorency/Eltham RSL Sub Branch
Puttees, Short, 1944
Puttees were long established items of a soldiers kit. Although time consuming items to tie correctly, puttees were a very comfortable and practical method of ensuring that mud and loose debris would not enter the tops of ankle length boots. Short puttees were common during the second world war.A pair of dark khaki woven wool cloth bands that were wound around a soldier's ankle. Each puttee has cotton stitching across one end, with the other end stitched into a triangular shape. Attached to the triangular end is a long khaki woven cotton strap that was used to secure the puttee in place. Cotton stitching is across the end of the cotton strap.V307 1944 D (broad arrow) Dputtees, clothing -
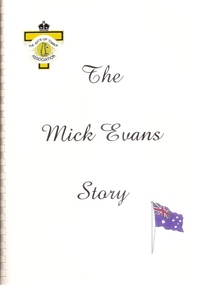 Greensborough Historical Society
Book, The Mick Evans Story, 1941_
Mick Evans (E.H.) Evans, VX10125, 9th Division, 2nd/1st Field Workshop. This story was transcribed from 9 x 90 minute audio tapes recorded by Mick Evans several years before his death. The book was completed in 2000 just before Mick's death.One man's story of life during World War II, in particular as a "Rat of Tobruk".Spiral bound book, 95 p., illus. (some col.). Clear plastic outer cover. Printed cover has title, Rats of Tobruk Association logo and Australian flag.Inside front cover: "From Betty, Shirley, June and Mary Evans"mick evans, june hall, tobruk, australian army, world war ii.