Showing 872 items matching " cooking"
-
 Whitehorse Historical Society Inc.
Booklet, That's A Good Idea
Handy Hints Reference Booklet titled That's A Good Idea with information regarding gardening, childcare, cooking, first aid and home economics.That's A Good Idea The Sun Book of Home Hintsbooks, reference -
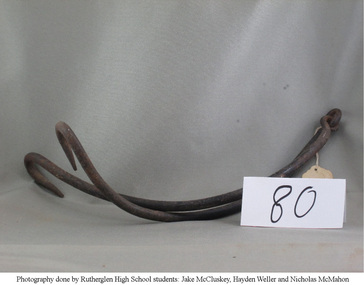 Rutherglen Historical Society
Handle / Jointed
Hung on a hook suspended from a bar in the chimney of an open fireplace2 armed handle, linked in the middle, used over open fires upon which to hank cooking utensils. Shaped in a semi-circlecooking utensils, fireplace tools -
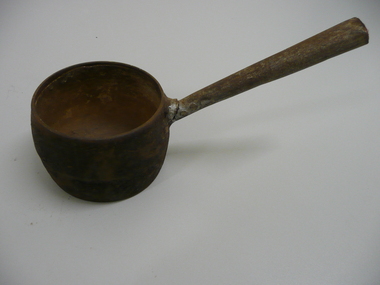 Bendigo Historical Society Inc.
Domestic Object - SMALL COOKING POT
Small 1 pint cast iron cooking pot with attached tin handle, marked on bottom with a star patent No1 1 pint.domestic equipment, food preparation, cooking pot -
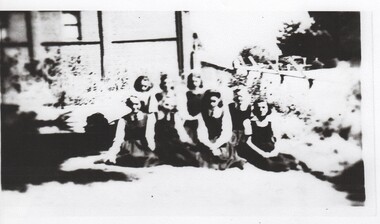 Rutherglen Historical Society
Photograph - Image, c1950
Black and white photocopy of a photograph of a group of school children in front of a building.On back of the photocopy: "This is my sister Phyllis Humphreys. It is taken on the lawn near the cooking centre - not a good photo - you may have a better one!"schools, rutherglen state school, school children, humphreys family, phillis humphreys -
 Bendigo Historical Society Inc.
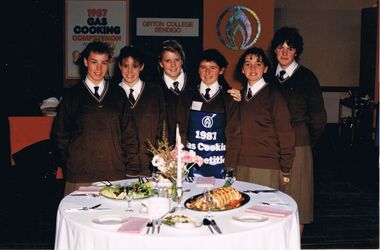
Photograph - CASTLEMAINE GAS COMPANY COLLECTION: PHOTO PEOPLE, 1987
1987 Cooking school's competition - Catholic College Wodonga team standing in front of table prepared with candles and food. Location Unknown. A15 on the back.Kodakevent, entertainment, school's cooking competition -
 National Vietnam Veterans Museum (NVVM)
Equipment - Equipment, Army, 1967
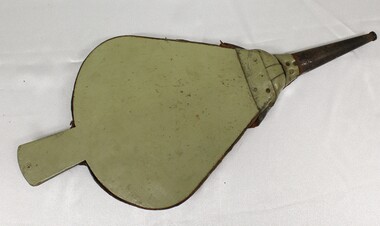
Steel upright field cooker with curved hinged lid and handles. comprised cabinet, cooking utensils and petrol operated burner. Catering for fifty personnel355051 8. US Armstrong Products Corp 1967field range m59 -
 Tatura Irrigation & Wartime Camps Museum
Exercise Book, Recipe Book, 1937
Book belonged to Mrs R. S. Thompson Moss Bank Tatura. Created from 1937 onwards.School exercise book. Contains cooking recipes. Front cover depicts King George V1 and Queen Elizabeth with the words "Coronation" exercise book.Coronation exercise bookrecipe book, mrs r s thompson -
 Bendigo Historical Society Inc.
Photograph - CASTLEMAINE GAS COMPANY COLLECTION: PHOTO PEOPLE, 1987
1987 Cooking school's competition - Girton College Bendigo team standing in front of table with flowers, candles and food. Location Unknown. A13 on the back.Kodakevent, entertainment, school's cooking competition -
 Ithacan Historical Society
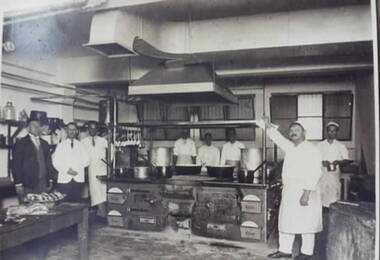
Photograph, Early restaurant kitchen
A black and white print taken from a photograph of restaurant staff standing in a commercial kitchen a where there a number of pots open a large cooking range.unknown, kitchen, restaurant, cafe -
 Flagstaff Hill Maritime Museum and Village
Domestic object - Bowl
The Process of Making Pottery Decorating, Firing, Glazing, Making, Technical There is a rhythm and flow to clay. It can’t be done all at once! Even the making process! It can take weeks to get everything done, especially if you can only work on your pottery once a week! Even though we have three hour classes, it’s often just not enough time! Here is an overview of some of the processes so you have a bit more grasp on some of the technical stuff! Step One – Design There are SO many ideas out there for making stuff in clay! From delicate porcelain jewellery, through to heavy sculptural work and everything in between. Deciding your direction is sometimes not that easy – when you first start, try everything, you will naturally gravitate to the style that you enjoy! The options and variations are endless and can get a wee bit overwhelming too! Check in with me before you start to ensure your ideas will work, what order you might do things, how you could achieve the look you are seeking and any other technical data required! Step Two – Making Clay is thixotropic. This means that as you work with it, the clay first gets sloppier and wetter, before is begins to dry in the atmosphere. For most things, you simply can’t do all parts of the project at once. An example of work order might look like: Get last weeks work out from the shelves Prepare clay for today’s work – roll your clay, prepare balls for throwing, make the first stage of a pinch pot) Clean up last week’s work and put it on the shelf for bisque firing Check that you have any glazing to do – and do enough of it that you will have time to finish your main project Do the next step of your next project – there might be a further step that can’t be complete immediately, in that case, wrap your work well and put onto the shelves. Letting your work rest for a while can really help keep your work clean and professional looking. Many things require bagging under plastic to keep it ready for work the next week – put your name on the outside of the bag so you can find your work easily. We have stickers and markers. Consider how you want to decorate your work – coloured slip can be applied at a fairly wet stage (remembering that it will make your work even wetter!). Trying to apply slip to dry clay won’t work! If you want to do sgraffito – you will need to keep the work leather hard (a state of dryness where you can still work the clay with a little effort and a little water and care). Step Three – Drying Most of the time your work can go into the rack uncovered to let it dry out for the following week. If you want to continue forming or shaping you will need to double bag your work – put your work on a suitable sized bat and put the bat in a bag so the base of the bag is under the bat, then put another bag over the top of the work and tuck the top of the bag under the bat. If you want to trim (or turn) your thrown work the following week, it should also be double bagged. If your work is large, delicate, or of uneven thicknesses, you should lightly cover your work for drying. When considering the drying process, bare in mind the weather, humidity and wind! The hotter and dryer, the faster things dry and work can dry unevenly in the shelves – this can lead to cracking – another time to lightly cover your work for drying. Step Four – Trimming and Cleaning Up Your work is dry! It is called greenware now and it is at it’s most fragile! Handle everything with two hands. I often refer to soft hands – keep everything gentle and with your fingers spread as much as possible. Try to not pick up things like plates too much, and always with both hands! Before your work can be bisque fired it should be “cleaned up”. You work won’t go into the kiln if it has sharp edges – when glazed, sharp edges turn into razor blades! Use a piece of fly wire to rub the work all over – this will scratch a little so be light handed. Use a knife or metal kidney to scrape any areas that require a bit more dynamic treatment than the fly wire offers! Finally, a very light wipe over with a slightly damp sponge can help soften and soothe all of your edges and dags! Trimming thrown work: If you are planning to trim (or turn) your thrown work (and you should be), make sure you bag it well – your work should be leather hard to almost dry for easiest trimming. Use this step to finish the work completely – use a metal kidney to polish the surface, or a slightly damp sponge to give a freshly thrown look. Wipe the sponge around the rim after trimming, and check the inside of the pot for dags! Trimming slip cast work: Usually I will trim the rims of your work on the wheel the following day to make that stage easier, however you will still need to check your work for lumps and bumps. Last but not least – check that your name is still clearly on the bottom of your work. Step Five – Bisque Firing When the work is completely dry it can go into the bisque kiln. The bisque kiln is fired to 1000°C. This process burns off the water in the clay as well as some of the chemically bound water. The structure of the clay is not altered that much at this temperature. Inside the bisque kiln, the work is stacked a little, small bowl inside a larger bowl and onto a heavy plate. Smaller items like decorations or drink coasters might get stacked several high. Consideration is paid to the weight of the stack and shape of the work. A bisque kiln can fire about one and a half times the amount of work that the glaze kiln can fire. The firing takes about 10 hours to complete the cycle and about two days to cool down. Once it has been emptied the work is placed in the glaze room ready for you to decorate! Step Six – Glazing Decorating your work with colour can be a lot of fun – and time consuming! There are three main options for surface treatment at this stage: Oxide Washes Underglazes Glazes Washes and underglazes do not “glaze” the work – It will still need a layer of glaze to fully seal the clay (washes don’t need glaze on surfaces not designed for food or liquid as they can gloss up a little on their own). Underglazes are stable colourants that turn out pretty much how they look in the jar. They can be mixed with each other to form other colours and can be used like water colours to paint onto your work. Mostly they should have a clear glaze on top to seal them. Oxides are a different species – the pink oxide (cobalt) wash turns out bright blue for instance. They don’t always need a glaze on top, and some glazes can change the colour of the wash! The glazes need no other “glaze” on top! Be careful of unknown glaze interactions – you can put any combination of glaze in a bowl or on a plate, but only a single glaze on the outside of any vertical surface! Glazes are a chemical reaction under heat. We don’t know the exact chemicals in the Mayco glazes we use. I can guess by the way they interact with each other, however, on the whole, you need to test every idea you have, and not run the test on a vertical surface! Simply put, glaze is a layer of glass like substance that bonds with the clay underneath. Clay is made of silica, alumina and water. Glaze is made of mostly silica. Silica has a melting point of 1700°C and we fire to 1240°C. The silica requires a “flux” to help it melt at the lower temperature. Fluxes can be all sorts of chemicals – a common one is calcium – calcium has a melting point of 2500°C, however, together they both melt at a much lower temperature! Colourants are metal oxides like cobalt (blue), chrome (green through black), copper (green, blue, even red!), manganese (black, purple and pink) iron (red brown), etc. Different chemicals in the glaze can have dramatic effects. for example, barium carbonate (which we don’t use) turns manganese bright pink! Other elements can turn manganese dioxide brown, blue, purple and reddish brown. Manganese dioxide is a flux in and of itself as well. So, glazes that get their black and purple colours, often interact with other glazes and RUN! Our mirror black is a good example – it mixes really well with many glazes because it fluxes them – causes them to melt faster. It will also bring out many beautiful colours in the glazes because it’s black colouring most definitely comes from manganese dioxide! Glaze chemistry is a whole subject on it’s own! We use commercial Mayco glazes on purpose – for their huge range of colour possibilities, stability, cool interactions, artistic freedom with the ability to easily brush the glazes on and ease of use. We currently have almost 50 glazes on hand! A major project is to test the interactions of all glazes with each other. That is 2,500 test tiles!!!! I’m going to make the wall behind the wheels the feature wall of pretty colours! Step Seven – Glaze (Gloss or sometimes called “Glost”) Firing Most of the time this is the final stage of making your creation (but not always!) The glaze kiln goes to 1240°C. This is called cone 6, or midrange. It is the low end of stoneware temperatures. Stoneware clays and glazes are typically fired at cone 8 – 10, that is 1260 – 1290°C. The energy requirement to go from 1240°C to 1280°C is almost a 30% more! Our clay is formulated to vitrify (mature, turn “glass-like”) at 1240°, as are our glazes. A glaze kiln take around 12 hours to reach temperature and two to three days to cool down. Sometimes a third firing process is required – this is for decoration that is added to work after the glaze firing. For example – adding precious metals and lustres. this firing temperature is usually around 600 – 800°C depending upon the techniques being used. There are many students interested in gold and silver trims – we will be doing this third type of firing soon! After firing your work will be in the student finished work shelves. Remember to pay for it before you head out the door! There is a small extra charge for using porcelain clay (it’s more than twice the price of regular clay), and for any third firing process! Once your work has been fired it can not turn back into clay for millennia – so don’t fire it if you don’t like it! Put it in the bucket for recycling. https://firebirdstudios.com.au/the-process-of-making-pottery/ This bowl is an example of kitchenware used in the 19th century and still in use today.Bowl white ceramic plain that has two sets of edging around lip. Inside bowl has plaster designed to look like cooking mixture.flagstaff hill, warrnambool, shipwrecked-coast, flagstaff-hill, flagstaff-hill-maritime-museum, maritime-museum, shipwreck-coast, flagstaff-hill-maritime-village, kitchen equipment, ceramic -
 Buninyong Visitor Information Centre
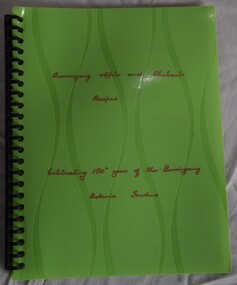
Book - Recipe Book, Judith Lewis, Buninyong Apple and Rhubarb Recipes, 2011
This collection of recipes and historical notes was compiled by Judith Lewis to mark the 100th Anniversary of the Buninyong Botanic Gardens in 2011.Written in honour of the 100th Anniversary of the Buninyong Botanical Gardens.Green coloured plastic cover with spiral binding. Contains plastic sleeves with A4 pages. Includes a number of recipes and a history of Stewart's Seedling Cooking Apples. buninyong botanical gardens, apples, orchards, gardening, recipes -
 Lakes Entrance Historical Society
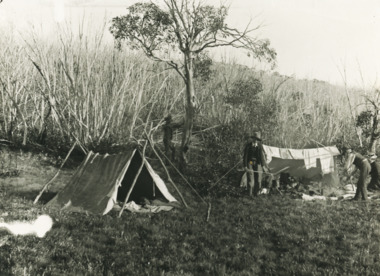
Photograph - Photographers Campsite, 1903 c
Man at fire looks like Nicholas Caire Photographer. Woman Mrs Caire who often travelled with him. Young man possibly H D Bulmer who travelled with Caire and learned photography. Other man helped lug the gearBlack and white photograph showing three men and a woman at a basic campsite of tarpaulin tent washing line and open air cooking in East Gippsland Victoriacamping, photographers -
 Bendigo Military Museum
Photograph - PHOTOGRAPH VIETNAM, FRAMED, 1968
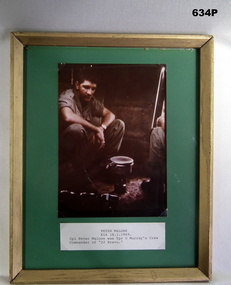
Peter Anthony Malone No 215983, Vietnam 18.12.67 to 18.1.69 when he was Killed in Action. He was Crew Commander of "22 Bravo" 3 Cav Regt. Photo supplied by Geoff Murray No 3411521, Vietnam 3 Cav Regt 27.11.67 to 22.10.68, Survey Corp 15.10.69, 15.10.70. Geoff served in Malonne's crew. Refer 638P.Colour photo, Vietnam showing Peter Malone sitting inside an APC cooking, with label at bottom. Photo is on green paper background in gold coloured wooden frame.photographs, vietnam, 3 cav, commander -
 Bendigo Historical Society Inc.
Photograph - CASTLEMAINE GAS COMPANY COLLECTION: PHOTO PEOPLE, 1988
7 photos of the 1988 Gas Cooking Competition for Schools. Schools represented: Creek Street Christian College - Kangaroo Flat Technical School and Christian Community School.Kodakevent, exhibition, gas cooking competition -
 Bendigo Historical Society Inc.
Photograph - CASTLEMAINE GAS COMPANY COLLECTION: PHOTO HALL, 1987
1987 Cooking school's competition - A view of the hall where the competition was held the various team are sitting and the tables ready to be judged in the middle Location Unknown. A18 on the back.Kodakevent, entertainment, school's cooking competition -
 Tatura Irrigation & Wartime Camps Museum
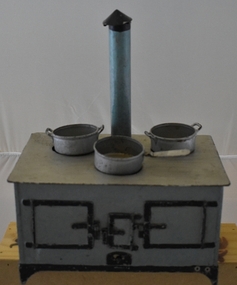
Toy - stove, 1940's
Made by internee and used by Helga Weid (niece of Karl Kaztenbach) Blue painted steel model of a cooking oven used as a childs toy. Has two doors to two ovens either side of a smaller door on the fire box.3 holes on top of stove representing hot platestatura, toys, dolls, furniture, toy stove, weid -
Running Rabbits Military Museum operated by the Upwey Belgrave RSL Sub Branch
Hexamine Stove
Cooking rations in field.Hexamine Stoveequipment, vietnam, army -
 Flagstaff Hill Maritime Museum and Village
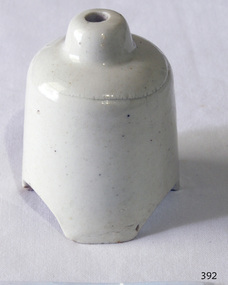
Ceramic - Pie Funnel, 20th Century
Pies with top crusts need to be vented, to allow steam to escape. Funnel-style steam vents have been placed in the centre of fruit and meat pies during cooking since Victorian times. Pie funnels were used to prevent pie filling from boiling up and leaking through the crust by allowing steam to escape from inside the pie. They also supported the pastry crust in the centre of the pie, so that it did not sag in the middle, and are occasionally known as 'crust holders'. Older ovens had more problems with uniform heating, and the pie funnel prevented boil-over in pie cooking. The traditional inverted funnels, with arches on the bottom for steam to enter, were followed by ceramic birds; and from the 1940s they have been produced in a multitude of designs. Creigiau Pottery of South Wales produced a 'Welsh Pie Dragon' in copper lustreware. This trend has been particularly noticeable in recent times, due to their increasing popularity as gifts and collectors' items rather than simply utilitarian kitchen tools. Adapted from Wikipedia: https://en.wikipedia.org/wiki/Pie_birdThis item shows how a simple object can provide a significant improvement of the final product.Pie Funnel, ceramic white glaze with scalloped edges.Noneflagstaff hill, warrnambool, shipwrecked-coast, flagstaff-hill, flagstaff-hill-maritime-museum, maritime-museum, shipwreck-coast, flagstaff-hill-maritime-village, pie funnel, ceramics, cooking -
 Bendigo Military Museum
Photograph - PHOTOGRAPH VIETNAM, FRAMED, 1967-68
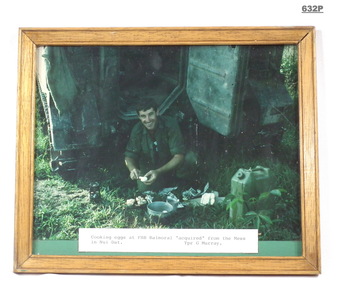
Geoff Murray No 3411521, Vietnam 3 Cav Regt 27.11.67 to 22.10.68, Survey Corp 15.10.69 to 15.10.70. Refer 638P.Colour photo showing G Murray cooking eggs at the rear of his APC in Vietnam. A label at the bottom details where in Vietnam it was taken. Frame is brown stained wood.vietnam, 3 cav, survey corp -
 Bendigo Historical Society Inc.
Photograph - CASTLEMAINE GAS COMPANY COLLECTION: PHOTO PEOPLE, 1987
1987 Cooking school's competition - A view of the hall where the competition was held the various team are sitting, $ people (possibly the judges are standing in front. Location Unknown. A21 on the back.Kodakevent, entertainment, school's cooking competition -
 Wangaratta High School
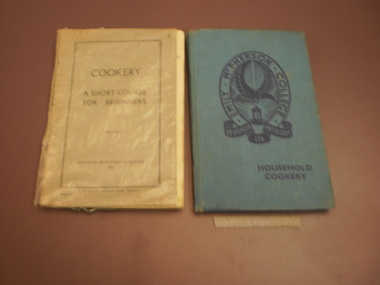
Cookery Textbooks, 1942
Two paperback 1942 Cooking textbooks: Cookery: A short course for beginners, grey with a plastic cover Emily McPherson College Household cookery, blue with dark blue ink. -
 Bendigo Military Museum
Accessory - RATION PACK, USA, US DEFENCE FORCE, c1981
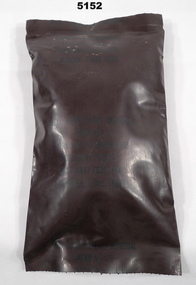
Developed in 1981 onwards.This is a sealed plastic container. Inside is some sort of ration. It is heat sealed both ends. Colour is brown with black printing on one side.In black ink, hardly visible, is "Pork Patty dehydrated". "Accessory pack D - Meal, ready to eat, Individual." Other items hard to read, menu and cooking instructions.us defence force, food pouch -
 Wodonga & District Historical Society Inc
Functional object - Small wooden bellows, Late 19th to early 20th century
The fireplace was the main heating source for small houses before 1900, so a bellows to coax a flame from a dying fire was important. They would also be used to keep the fire going in a woodfire oven for cooking. In later cooking ranges, domestic water supply was also heated through the cooking range so bellows helped to maintaing a supply of hot water.An item of local and social signifance throughout Australia, bellows were usedin homes to coax a domestic fire into flame for heating and cooking purposes. It was probably used in late 19th to early 20th century homes.A small set of wooden and canvas bellows with metal tip commonly used in households in the 19th and early 20th centuries.bellows, domestic tools -
 Bendigo Military Museum
Equipment - PETROL STOVE, Rogers Tool and Die Co Inc, 1951
.1) Stove, cooking Gasoline, one burner, Model M-1950. .2) Spanner for above stove. .3) Tool for above stove. .4) Cardboard carton for above stove.domestic items-cooking, military equipment - army -
 Bendigo Historical Society Inc.
Photograph - CASTLEMAINE GAS COMPANY COLLECTION: PHOTO TABLE, 1987
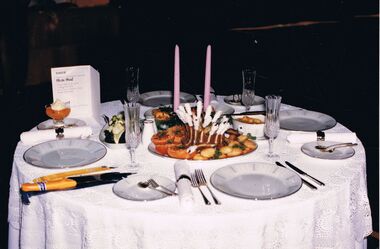
1987 Cooking school's competition - Table set for 4, 3 plates of food in the middle, 2 candles and a menu. Location not described but possibly Catholic College Wodonga. . A7 on the back.Kodakevent, entertainment, school's cooking competition -
 National Vietnam Veterans Museum (NVVM)
Equipment - Oven
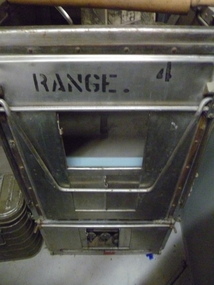
Steel upright cooker with flat bi-fold hinged lid, handles. Comprising cabinet, cooking utensils (egg slide, ladle, rolling pin), petrol operated burner belowRange 4range cooker, cooker -
 Lakes Entrance Historical Society
Photograph - Lions Club, Lakes Post Newspaper, 1996
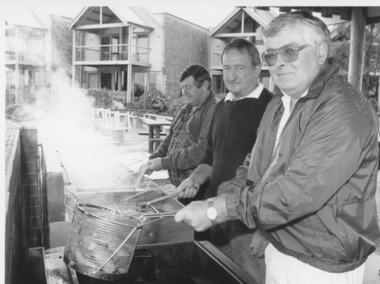
Black and white photograph showing Lions Club members Alan Sandy Laurie Appleby and Geoff McConville, cooking on foreshore at Lions Club Fish Tasting event. Metung Victorialions club, volunteering, festival -
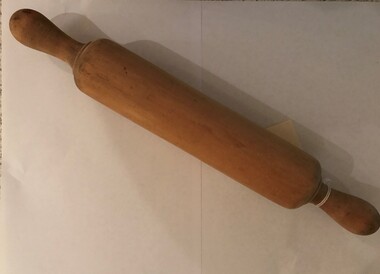 Greensborough Historical Society
Domestic object - Rolling Pin, Wooden rolling pin, 1940s
Commonly used for rolling dough in cookingTurned wooden rolling pinrolling pin, baking utensils, woodcraft -
Blacksmith's Cottage and Forge
Boiler pot with lid, clark and co, early 1900's
Cooking pot used on wood stoveThis is a domestic cooking pot used for food preparation.oval shaped boiler with a handle and lid, cast ironClark and co. 2 1/2gallonsdomestic, kitchen, pot, boiler, cast iron -
Phillip Island and District Historical Society Inc.
Book, Presbyterian Women's Missionary Union of Victoria, P.W.M.U. cookery book of Victoria, 1918
Gracie M. Hocking. In remembrance of Wickliffe Oct 1919'cooking