Showing 315 items
matching eaglehawk museum
-
 Ballarat Tramway Museum
Photograph - Black & White Photograph/s, George Bishop, Dec. 1971
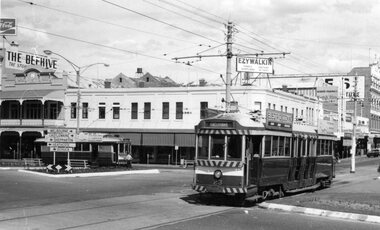
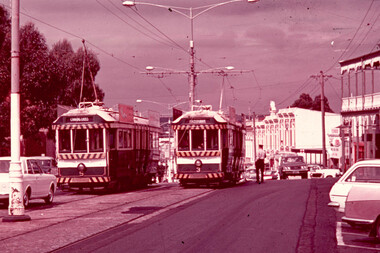
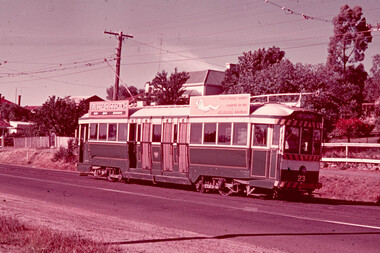
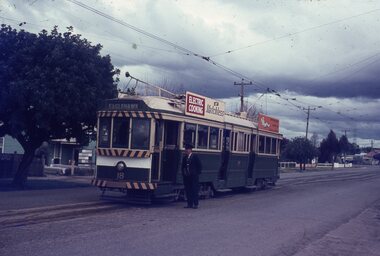
Black and white photographs of Bendigo No. 23 and 19 at Charing Cross 12/1971. No. 23 has destination of Eaglehawk. The Beehive and Ezywalkin buildings in the background. No. 19 in the distance. Both trams have SEC Electric Cooking Roof Advertisements. Photos by George Bishop. .On the back of the photo in ink "SEC trams No. 19 and 23 (Bendigo System) at Charing Cross. / G. Bishop photo."tramways, trams, bendigo, charing cross, pall mall, tram 19, tram 23 -
 Ballarat Tramway Museum
Photograph - Black & White Photograph/s - set of 2, George Bishop, Dec. 1971
Two Black and White photograph of a in-bound bogie tram No. 3, 12/1971 descending Mitchell St Bendigo, just after the start of the double track near the railway station. Photo has Glendon House on the left hand side. Photo by George Bishop. Tram has the destination "Eaglehawk"On the back of the photos in ink "Outside Glendon House Bendigo / G. Bishop photo" and in pencil on 3609.2 "No. 3 near Rly Station Bendigo, Dec 1971, Destination Eaglehawk: and "George Bishop Photo"tramways, trams, bendigo, mitchell st, railway station, tram 3 -
 Ballarat Tramway Museum
Photograph - Black & White Photograph/s, George Sodbonov, Nov. 1957
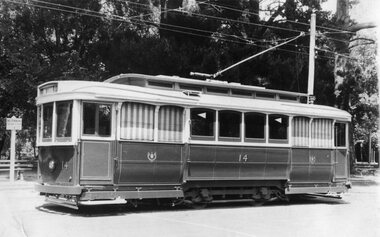
Yields information about the appearance of one of Ballarat's trams, now operated by the BTM in 1957, and used in a publication that featured all three of the SEC tramways.Black and white photograph of Ballarat No. 14 at Gardens Loop, Wendouree Parade, 11/57. with the blinds drawn. Photo used in Jack Richardson's publication, Destination Eaglehawk, page 11. Photo by George Sodbonov.On rear in ink are two numbers "9263#", 5632", printer direction marks, "Increase to 31ems" and in bottom left hand corner "Photo George Sodbonov 11/57"tramways, trams, gardens loop, wendouree parade, tram 14 -
 Ballarat Tramway Museum
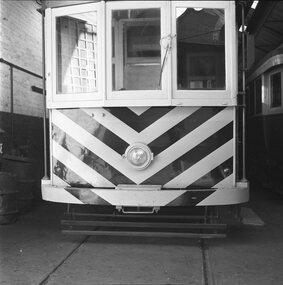
Photograph - B&W print of donated negative - set of 2, John Webster, 1955
Yields information about Geelong Depot and tramcar No. 5 and its repainting with zebra stripes in 1955Two Black and white digital print from scan of a donated negative showing Geelong No. 5 in the depot after it was repainted with strips. Also fitted with mirrors. Shows the coupling arrangements. Photo by John Webster, 1955. See page 44 of Destination Eaglehawk for details. Black and White prints made from scan of negative. Original Negative stored with Negatives. Negative scanned at hi res 2/6/2020 and image updated.On left hand side of the negatives in ink is "EI 9" and "EI 10"tramways, trams, geelong, tramcars, tram 5 -
 Ballarat Tramway Museum
Photograph - Black & White Photograph/s, Ron Hann, Jan. 1963
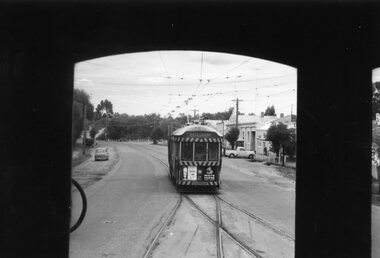
Yields information about the California Gully or Thorpe St Loop from the front of an in-bound tramcar and the tramcar it is crossing at the loop.Black and white print on heavy matt photographic paper of the Bendigo 2, crossing another bogie tram at the California Gully or Thorpe St Loop, c1963. Taken from the window of the inbound tramcar. No. 2 has the destination of Eaglehawk, a front dash panel advertisements for Whitehorse Whiskey and another for ice-cream? 2nd copy - laser print - with date etc on rear - added 22/2/2010, copy from Ron Hann. Printed on Fujifilm, Fujicolour Crystal Archive for Frontier".On rear in pencil "Eaglehawk line 1963" 2nd copy has label "Reference 6/214/27" Photo by Ron Hann" and another label "Eaglehawk Route Bendigo 01.63" tramways, trams, bendigo, eaglehawk, california gully, tram 2 -
 Ballarat Tramway Museum
Photograph - Black & White Photograph/s, Herald Sun, 16/04/1972 12:00:00 AM
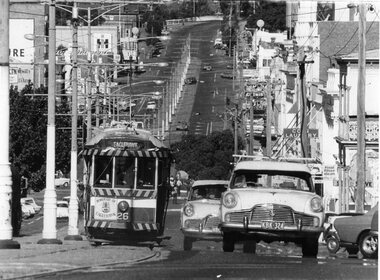
Yields information the operation of Bendigo trams in View St Bendigo, on the Eaglehawk route, and the delivery of the tram to Eaglehawk following closure.Black and White photograph of Bendigo No. 26 climbing View St, Bendigo with the destination of Eaglehawk and a "Borough of Eaglehawk sign" on the front dash panel. Photo taken with a large telephoto lens to show up the hill. Has Mitchell St in the background and a number of cars in the foreground. Photo taken on the last day of operation - used in Keith Dunstan's "A Place in the Sun" 17/4/1972. Herald Sun newspaper photograph. Printed on Agfa paper. For a copy of the newspaper article see Reg. Item 2229. See A Place in the Sun 17/4/1972.On rear in ink "ED15/215" and "17/4/72" in ink and a "Herald Sun Newspaper copyright" stamp - very faint green ink.tramways, trams, bendigo, eaglehawk, closure, view st, tram 26 -
 Ballarat Tramway Museum
Slide - 35mm slide/s, Max Michell, Apr. 1972
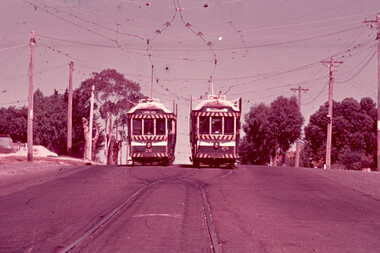
White cardboard mount, 35mm slide, from the Association of Railway Enthusiast's film strip titled "Provincial Tramway Film Strip" of Bendigo trams Nos. 3 and 5 in View St., near Rowan St. No. 3 has destination of Eaglehawk, while No. 5, inbound has destination of Charing Cross. An SEC Employee is standing by the rear of No. 3 The film strip notes (Reg. Item 2560), provided the following caption details: "Bogie cars 3 & 5 (running out of course due to an earlier failure) meet on the double track at the Bendigo end of the "EAGLEHAWK" Line - Apr. '72 (Max Michell)" See image btm2592p.tif for high level scan of image. Stamped on base of slide "11802" and written in ink on top edge "No 3 & 5 Eaglehawk line Bendigo"tramways, trams, are, film strip, view st, bendigo, tram 3, tram 5 -
 Ballarat Tramway Museum
Slide - 35mm slide/s, Graham Evans, Apr. 1972
White cardboard mount, 35mm slide, from the Association of Railway Enthusiast's film strip titled "Provincial Tramway Film Strip" of a Bogie car at Long Gully Loop, in the far distance, with a Hotel and the ESSO service station in between. Has Fosters Lager and Carlton signs on hotel. Note sign on the closet pole - "No standing between Notices". The film strip notes (Reg. Item 2560), provided the following caption details: "Meandering roadway and centre road track were a feature of the long "EAGLEHAWK" line. Here an inbound car negotiates the Long Gully Loop. - April '72 (Graham Evans)" See image btm2593p.tif for high level scan of image. Stamped on base of slide "11803" and written in ink on top edge "Eaglehawk line"tramways, trams, are, film strip, long gully, eaglehawk -
 Ballarat Tramway Museum
Slide - 35mm slide/s, Dave Macartney, Dec. 1968
White cardboard mount, 35mm slide, from the Association of Railway Enthusiast's film strip titled "Provincial Tramway Film Strip" of a Bendigo No. 23 passing through Needle Loop, enroute to Eaglehawk. Tram has two SEC Roof advertisements "Electric Cooking" and "Everything's under control in my all electric kitchen" The film strip notes (Reg. Item 2560), provided the following caption details: "Bogie car 23 - freshly painted - negotiates Needles loop on the way to "EAGLEHAWK". - Dec 68 (Dave Macartney)" See image btm2594p.tif for high level scan of image. Stamped on base of slide "11804" and written in ink on top edge "No. 23 Needles Loop Eaglehawk line"tramways, trams, are, film strip, needle loop, eaglehawk, tram 23 -
 Ballarat Tramway Museum
Slide - 35mm slide/s, Graham Evans, Apr. 1972
White cardboard mount, 35mm slide, from the Association of Railway Enthusiast's film strip titled "Provincial Tramway Film Strip" of a Bendigo Nos. 26 (Quarry Hill) and 25 (Eaglehawk) at Jobs Gully Loop. The film strip notes (Reg. Item 2560), provided the following caption details: "Bogie cars 26 & 25 meet at Jobs Gully loop about a mile from the terminus. Apr ' 72 (Graham Evans)" See image btm2595p.tif for high level scan of image. Stamped on base of slide "11805" and written in ink on top edge "26 & 25 Jobs Gully Eaglehawk"tramways, trams, are, film strip, jobs gully, eaglehawk, tram 26, tram 25 -
 Ballarat Tramway Museum
Slide - 35mm slide/s, Graham Evans, Apr. 1972
White cardboard mount, 35mm slide, from the Association of Railway Enthusiast's film strip titled "Provincial Tramway Film Strip" of a Bendigo No. 26 descending the Bendigo end of the bridge over the railway near Eaglehawk near Jobs Gully loop. Tram has the destination of Quarry Hill and has four roof advertisements. The film strip notes (Reg. Item 2560), provided the following caption details: "Bogie cars 26 drops down the Bendigo side of the bridge over the Eaglehawk railway, on the long journey to "QUARRY HILL". - Apr ' 72 (Graham Evans)" See image btm2596p.tif for high level scan of image. Stamped on base of slide "11806" and written in ink on top edge "26 Eaglehawk"tramways, trams, are, film strip, jobs gully, eaglehawk, railway bridge, tram 26 -
 Ballarat Tramway Museum
Slide - 35mm slide/s, Harry Jackson, Dec. 1971
White cardboard mount, 35mm slide, from the Association of Railway Enthusiast's film strip titled "Provincial Tramway Film Strip" of a Bendigo No. 3 standing at the Eaglehawk terminus with the Town Hall in the background. Tram reflected in shop windows and shows some of the verandas of High St. Eaglehawk. The film strip notes (Reg. Item 2560), provided the following caption details: "Bogie car No. 3 stands at "EAGLEHAWK" in the hot midday sun. = Dec. '71 (Harry Jackson) See image btm2597p.tif for high level scan of image. Stamped on base of slide "11807" and written in ink on top edge "No. 3 Eaglehawk"tramways, trams, are, film strip, high st, eaglehawk, tram 3 -
 Ballarat Tramway Museum
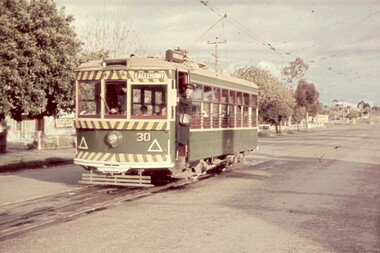
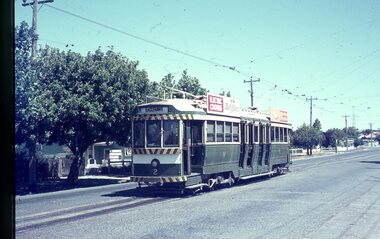
Slide - 35mm slide/s, Travis Jeffrey, c1961
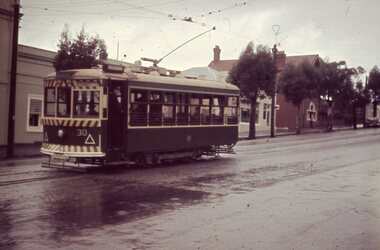
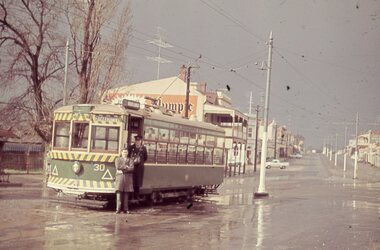
Agfa plastic mount (blue base, white cover) with a photo of Bendigo No. 30 in Mitchell St, just before start of the double track section, c1962. Photo taken during a rainy day. Tram has destination of Eaglehawk. Note SEC crewman standing by door and the passengers looking towards the gutter at the railway station stop. Apparently picking up passengers ex the train on a Sunday. See Other Information regarding a possible date of the slide."BES 1" in penciltramways, trams, bendigo, mitchell st, tram 30 -
 Ballarat Tramway Museum
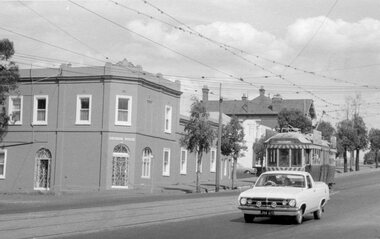
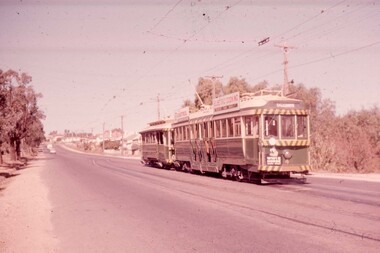
Slide - 35mm slide/s, Travis Jeffrey, c1962
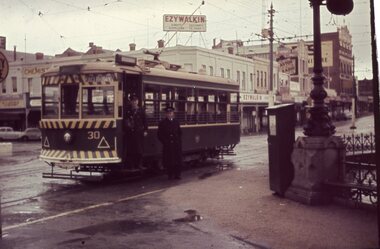
Agfa plastic mount (blue base, white cover) with a photo of Bendigo No. 30 at Charing Cross, in View St., c1962. Photo follows on from Reg Item No. 2612. Photo taken during a rainy day. Tram has destination of Eaglehawk. Note SEC crewman and Inspector standing by door. Has the Ezywalkin building in the background and a billboard advertisement for Astor Radio."BES 2" in penciltramways, trams, bendigo, charing cross, eaglehawk, tram 30 -
 Ballarat Tramway Museum
Slide - 35mm slide/s, Travis Jeffrey, c1962
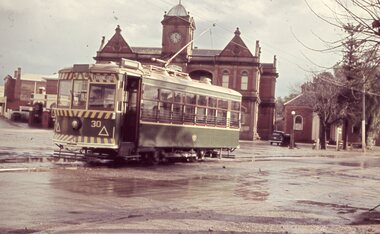
Agfa plastic mount (blue base, white cover) with a photo of Bendigo No. 30 at Eaglehawk terminus, High St. Eaglehawk, c1962. Photo follows on from Reg Item No. 2612. Photo taken during a rainy day. Tram has destination of Eaglehawk. Note SEC crewman and another person standing by door. Has Olympic Tyres ad on a building in the background."BES 3" in penciltramways, trams, bendigo, high st, eaglehawk, tram 30 -
 Ballarat Tramway Museum
Slide - 35mm slide/s, Travis Jeffrey, c1962
Agfa plastic mount (blue base, white cover) with a photo of Bendigo No. 30 at Eaglehawk terminus, High St. Eaglehawk, c1962 with the Eaglehawk Town Hall in the background. Photo follows on from Reg Item No. 2611 to 2613. Photo taken during a rainy day. Tram has destination of Eaglehawk. Tram has the destination of Charing Cross."BES 4" in penciltramways, trams, bendigo, high st, eaglehawk, tram 30 -
 Ballarat Tramway Museum
Slide - 35mm slide/s, Travis Jeffrey, c1962
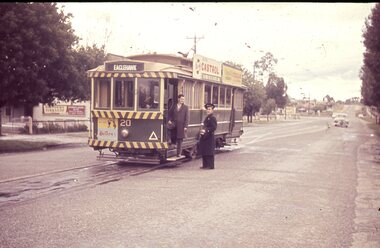
Agfa plastic mount (blue base, white cover) with a photo of Bendigo 20 at the Quarry Hill terminus. Tram has the destination of Eaglehawk and has a Castrol Oil, and another company roof advertisements, with Huttons Ham advertisement on the dash panel. Conductor and another person (enthusiast) outside the tram, driver changing ends on the inside. In the background is the premises for "Northern Terrazzo"."BES 15" in penciltramways, trams, bendigo, quarry hill, tram 20 -
 Ballarat Tramway Museum
Slide - 35mm slide/s, Travis Jeffrey, c1962
Agfa plastic mount (blue base, white cover) with a photo of Bendigo 30 at the Quarry Hill terminus. Tram has the destination of Eaglehawk . Conductor standing in the doorway for the photographer. In the background is the premises for "Northern Terrazzo"."BES 16" in penciltramways, trams, bendigo, quarry hill, tram 30 -
 Ballarat Tramway Museum
Slide - 35mm slide/s, Travis Jeffrey, c1962
Agfa plastic mount (blue base, white cover) with a photo of Bendigo 30 at Pinder's Loop, Carpenter St. Quarry Hill. Tram has the destination of Eaglehawk ."BES 17" in penciltramways, trams, bendigo, quarry hill, pinders loop, tram 30 -
 Ballarat Tramway Museum
Slide - 35mm slide/s, Travis Jeffrey, c1962
Agfa plastic mount (blue base, white cover) with a photo of Bendigo No. 4 and a single trucker, possibly No. 16 at Manchester Loop. Taken c1962, spring or early summer. No. 4 has a Whitehorse Whiskey advertisement and a tram following indicator on the front dash panel, a Castrol and a SEC Electric Cooking roof advertisements and destination of Eaglehawk."BES 19" in penciltramways, trams, bendigo, eaglehawk, manchester loop, tram 4 -
 Ballarat Tramway Museum
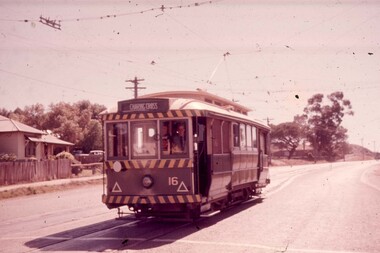
Slide - 35mm slide/s, Travis Jeffrey, c1962
Agfa plastic mount (blue base, white cover) with a photo of Bendigo No. 16 Manchester Loop, near Jackson St. Taken c1962, spring or early summer. No. 16 has a tram following indicator on the front dash panel and destination of Charing Cross. Note wall behind tram remains in situ 8/2004."BES 20" in penciltramways, trams, bendigo, eaglehawk, tram 16 -
 Ballarat Tramway Museum
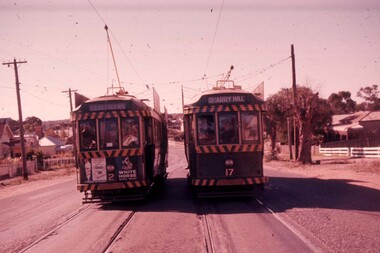
Slide - 35mm slide/s, Travis Jeffrey, c1962
Agfa plastic mount (blue base, white cover) with a photo of Bendigo 2, with destination of Eaglehawk, crossing No. 17 at Jobs Gull loop on the Eaglehawk line. No. 17 has destination of Quarry Hill. Has a Streets Ice cream and Whitehorse Whisky advertisements on the rear panel. Photo taken c1962."BES 27" in penciltramways, trams, bendigo, eaglehawk, jobs gully, tram 2, tram 17 -
 Ballarat Tramway Museum
Slide - 35mm slide/s, Travis Jeffrey, c1962
Agfa plastic mount (blue base, white cover) with a photo of Bendigo 17, possibly at Manchester Loop, with destination of Eaglehawk. Tram fitted with Whitehorse Whiskey ad on front dash panel and two "Electric Cook" roof advertisements. Photo taken c1962."BES 28" in penciltramways, trams, bendigo, eaglehawk, manchester loop, tram 17 -
 Ballarat Tramway Museum
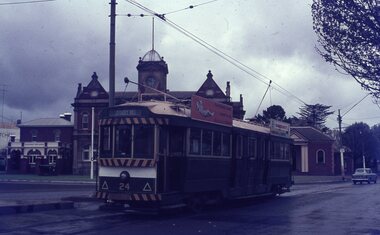
Slide - 35mm slide/s, Travis Jeffrey, late 1960's or early 1970's
Agfa plastic mount (blue base, white cover) with a photo of Bendigo 24 at the Eaglehawk terminus, with the Eaglehawk Town Hall / Post Office in the background. Tram has the destination of Quarry Hill and roof advertisements for SEC "Everything's under control in my all electric kitchen" and one for Mamouney's Furniture Company. Photo taken late 1960's early 1970's."BES 32" in penciltramways, trams, bendigo, eaglehawk, tram 24 -
 Ballarat Tramway Museum
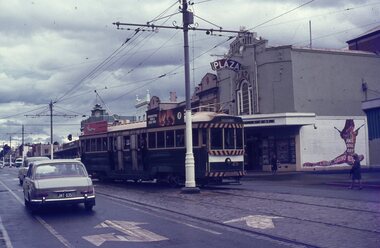
Slide - 35mm slide/s, Travis Jeffrey, late 1960's or early 1970's
Agfa plastic mount (blue base, white cover) with a photo of Bendigo No. 25 using the crossover in Mitchell St outside the Plaza Theatre. Photo taken late 1960's early 1970's. No. 25 has the destination of Eaglehawk and two SEC roof advertisements, electric cooking and a briquettes ads. The film "James Bond Casino Royale" was being advertised on the side wall of the theatre."BES 37" in penciltramways, trams, bendigo, mitchell st, plaza theatre, tram 25 -
 Ballarat Tramway Museum
Slide - 35mm slide/s, Travis Jeffrey, late 1960's or early 1970's
Agfa plastic mount (blue base, white cover) with a photo of Bendigo No. 18 at the Quarry Hill terminus, with the conductor standing by the front of the tramcar. Photo taken late 1960's early 1970's. No. 18 has the destination of Eaglehawk and two SEC roof advertisements, "Electric Cooking Matchless" and "Everything's fine in my all electric kitchen"."BES 38" in penciltramways, trams, bendigo, quarry hill, conductors, tram 18 -
 Ballarat Tramway Museum
Slide - 35mm slide/s, Travis Jeffrey, late 1960's or early 1970's
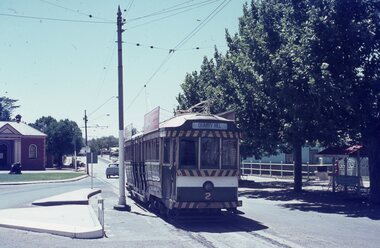
Agfa plastic mount (blue base, white cover) with a photo of Bendigo No. 2 at Eaglehawk terminus, looking along the terminal track. Photo has the traffic island arrangements, and shows the waiting shelter on the right hand side of the photo. Photo taken late 1960's early 1970's. No. 2 has the destination of Quarry Hill and two SEC roof advertisements on the tram."BES 39" in penciltramways, trams, bendigo, eaglehawk, tram 2 -
 Ballarat Tramway Museum
Slide - 35mm slide/s, Travis Jeffrey, late 1960's or early 1970's
Agfa plastic mount (blue base, white cover) with a photo of Bendigo No. 2 at Quarry Hill terminus. Photo taken late 1960's early 1970's. No. 2 has the destination of Eaglehawk and on the tram two SEC roof advertisements, "Electric Cooking Matchless" and "Everything's fine in my all electric kitchen"."BES 40" in penciltramways, trams, bendigo, quarry hill, tram 2 -
 Ballarat Tramway Museum
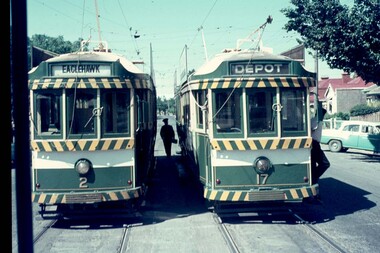
Slide - 35mm slide/s, Travis Jeffrey, late 1960's or early 1970's
Agfa plastic mount (blue base, white cover) with a photo of Bendigo Nos. 2 and 17 at the area of Depot Junction, swapping crews. No. 2 showing Eaglehawk and No. 17, Depot. Note differences in the destination blinds or rolls, white on black, or the later form, black on white. Photo taken late 1960's early 1970's from the window of another tram."BES 42" in penciltramways, trams, bendigo, crews, depot junction, tram 2, tram 17 -
 Ballarat Tramway Museum
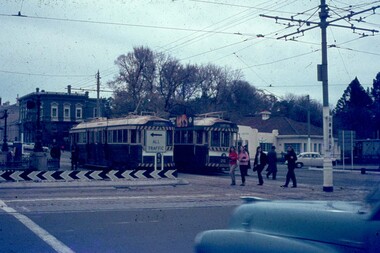
Slide - 35mm slide/s, Travis Jeffrey, late 1960's or early 1970's
Agfa plastic mount (blue base, white cover) with a photo of Bendigo Nos. 3 and 26 at Charing Cross. The trams are bound for Eaglehawk, Quarry Hill respectively. Photo shows the traffic arrangements at Charing Cross prior to closure. Photo taken late 1960's early 1970's from the window of another tram. No. 3 has two roof advertisement racks which are empty, while No. 26 has a SEC briquettes roof advertisement."BES 48" in pencil.tramways, trams, bendigo, charing cross, tram 3, tram 26