Showing 705 items
matching jeffrey
-
 Ballarat Tramway Museum
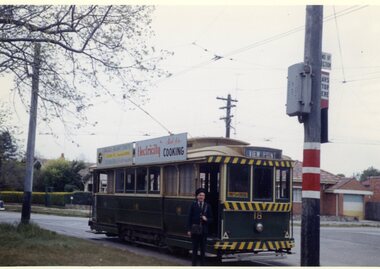
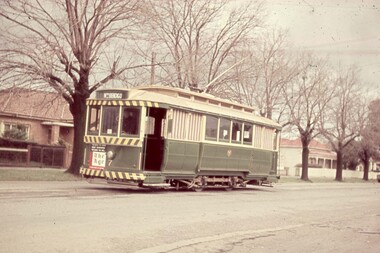
Photograph - Colour Photograph/s, Travis Jeffrey, 6/11/1962 12:00:00 AM
Colour photograph of Ballarat No. 18 at the View Point terminus in Wendouree Parade. Photograph has the conductor (and driver?) standing by the front of the tram, after the pole has been turned. Destination sign yet to be changed from View Point. Photo shows the tram stop arrangements with painted pole, "End of Section", "Cars Stop Here" sign, timetable sign and on the back of the pole a Section insulator connection box. Tram has two roof advertisements, SEC "Electric Cooking" and the Whites Florist Sturt St. shop advertisement and a "Pay as you Enter" sign. In the background is the Macarthur St. tram line. Photo dated 6/11/1962. On Kodacolor paper."60Ed" in blue ink, date stamp 6 Nov 1962" in red ink.view point, wendouree parade, tram stops, tram 18 -
 Ballarat Tramway Museum
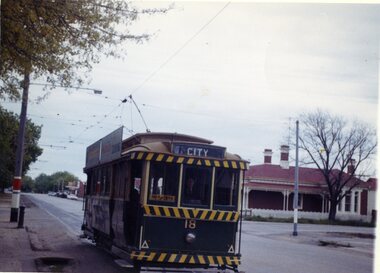
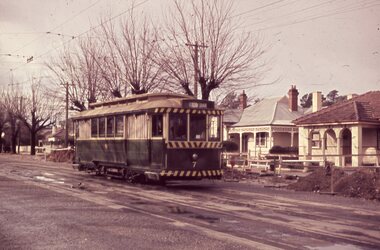
Photograph - Colour Photograph/s, Travis Jeffrey, 6/11/1962 12:00:00 AM
Colour photograph of Ballarat No. 18 at the Junction between the View Point tram line and Sturt St. at Ripon St. North. Tram has destination of City and "Pay as you enter sign" by the front door. Tram has two roof advertisements, SEC "Electric Cooking" and Whites Florist Sturt St. shop advertisement. In the background is the Ripon St. tram line. Photo dated 6/11/1962. On Kodacolor paper."66Ed" in blue ink, date stamp 6 Nov 1962" in red ink.view point, sturt st, ripon st, tram 18 -
 Ballarat Tramway Museum
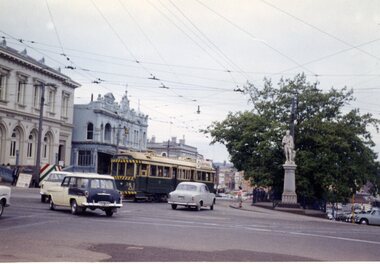
Photograph - Colour Photograph/s, Travis Jeffrey, 6/11/1962 12:00:00 AM
Colour photograph of Ballarat No. 38 completing the turn from Lydiard St. North into Sturt St. (north side) with the Post Office in the background. See also Reg. Item 2401. Tram has a Castrol roof advertisement at the leading end. Robbie Burns statue in background. Photo dated 6/11/1962. On Kodacolor paper."69Ed" in blue ink, date stamp 6 Nov 1962" in red ink.sturt st, castrol, post office, tram 38 -
 Ballarat Tramway Museum
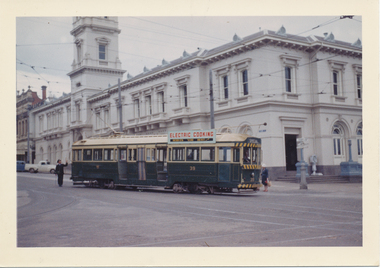
Photograph - Colour Photograph/s, Travis Jeffrey, 6/11/1962 12:00:00 AM
Colour photograph of Ballarat No. 39 starting the turn from Lydiard St. North into Sturt St. (north side) with the Post Office in the background. See also Reg. Item 2400. Tram has a SEC Electric Cooking roof advertisement at the leading end and destination of "Special". Appears that an Inspector is holding a point bar and holding the trolley rope prior to the wheel passing through the overhead pan or frog. Photo dated 6/11/1962. On Kodacolor paper."70Ed" in blue ink, date stamp 6 Nov 1962" in red ink.sturt st, sec, post office, lydiard st north, tram 39 -
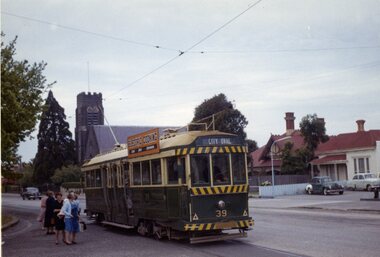 Ballarat Tramway Museum
Photograph - Colour Photograph/s, Travis Jeffrey, 6/11/1962 12:00:00 AM
Colour photograph of Ballarat No. 39 after dropping passengers at the intersection of Sturt St and Pleasant St. with St. Peters?? church in the background. (check back onto Reg. Item 532) Tram has the destination of City Oval and a SEC Electric Cooking roof advertisement.. Photo dated 6/11/1962. On Kodacolor paper."74Ed" in blue ink, date stamp 6 Nov 1962" in red ink.sturt st, pleasant st, city oval, tram 39 -
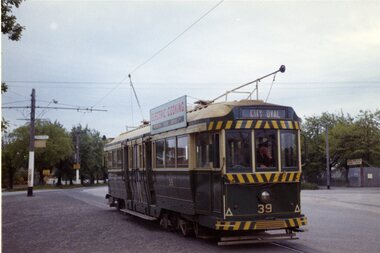 Ballarat Tramway Museum
Photograph - Colour Photograph/s, Travis Jeffrey, 6/11/1962 12:00:00 AM
Colour photograph of Ballarat No. 39 entering Sturt St from Sturt St. West after crossing Pleasant St. - start of double track. City Oval gates in the background. Tram has the destination of City Oval and a SEC Electric Cooking roof advertisement. Photo dated 6/11/1962. On Kodacolor paper."75Ed" in blue ink, date stamp 6 Nov 1962" in red ink.sturt st, pleasant st, city oval, tram 39 -
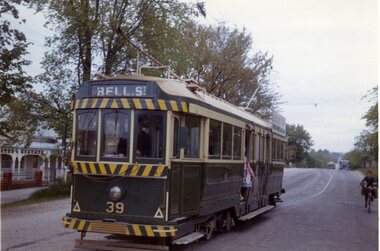 Ballarat Tramway Museum
Photograph - Colour Photograph/s, Travis Jeffrey, 6/11/1962 12:00:00 AM
Colour photograph of Ballarat No. 39 leaving Gregory St. loop in Lydiard St. Nth. (House to the left of the photo is No. 803). Tram has the destination of Bell St and a SEC Electric Cooking roof advertisement. Photo dated 6/11/1962. Note outbound tram in distance, and paper or delivery boy on bike on right hand side of the photograph. On Kodacolor paper."76Ed" in blue ink, date stamp 6 Nov 1962" in red ink.gregory st., lydiard st., tram 39 -
 Ballarat Tramway Museum
Photograph - Colour Photograph/s, Travis Jeffrey, 6/11/1962 12:00:00 AM
Colour photograph of Ballarat No. 39 crossing No. 35 at Bell St. loop, Skipton St. The house to the right of the 39 is No. 710 Skipton St. Tram 35 has the destination of Sebastopol and No. 39, Gregory St. Photo dated 6/11/1962. On Kodacolor paper."79Ed" in blue ink, date stamp 6 Nov 1962" in red ink.bell st, skipton st., tram 39, tram 35 -
 Ballarat Tramway Museum
Photograph - Colour Photograph/s, Travis Jeffrey, 6/11/1962 12:00:00 AM
Colour photograph of Ballarat No. 39? in Sturt St between Lydiard St. North and Camp St. Photo taken from the Post Office steps. Has the Robbie Burns Statue and the Titanic bandstand in the view along with many cars and cyclists. Tram number is obscured, but thought to be 39 based on previous photos. Tram has "Electric Cooking" roof advertisement. Tram has the destination of Gregory St. Photo dated 6/11/1962. On Kodacolor paper."81Ed" in blue ink, date stamp 6 Nov 1962" in red ink.sturt st, robert burns, statues, tram 39 -
 Ballarat Tramway Museum
Ephemera, Travis Jeffrey, Ballarat tram timetables, 1960's
Notebook, with three sections of 16 pages each, two pink, one blue, stapled individually onto a yellow coloured card cover and then covered with a printed black and gold patterned sheet to cover the staples. Shown in a tabular form are the timetables for each of the Ballarat and Bendigo routes in the 1960's, for Mondays to Fridays, Saturdays and Sundays. Gives the run number, times at various points, special workings, terminals, short workings. The tables for Sundays in Bendigo has been prepared but not filled in. In the blue section has various notes on Ballarat weekday runs, timetables. Image 1 - cover, 2 - inside front cover and timetable for Lydiard St - Sebastopol, 3 - Stones Corner - View Point, Sebastopol - Depot and Eaglehawk to Quarry Hill, 4 - blue pages run details. On inside back cover in ink, addresses, calculations and street names.trams, tramways, ballarat, bendigo, rosters, employees, shifts, timetables -
 Ballarat Tramway Museum
Slide - 35mm slide/s, Travis Jeffrey, c1960
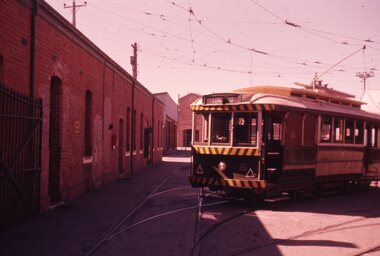
Plastic mount (black base, white cover) of a Bendigo 16 leaving or being shunted around the Depot, early 1960's. Tram has the destination of Long Gully. Has the offices of the Bendigo depot in the foreground.tramways, trams, bendigo, depot, tram 16 -
 Ballarat Tramway Museum
Slide - 35mm slide/s, Travis Jeffrey, 8/01/1956 12:00:00 AM
Cardboard, Kodachrome slide, white with red band around slide on non viewing side of Geelong No. 18 at East Terminus. Photo shows a crewman boarding the front end of the tram. Possibly taken on the last day of the Chilwell - East West line, 8/1/1956. See Reg. Item 476.5 for a similar photograph taken by Geoff Grant and 2675 for another copy of the slide. Photographer unknown.tramways, trams, geelong, east, tram 18 -
 Ballarat Tramway Museum
Slide - 35mm slide/s, Travis Jeffrey, c1961
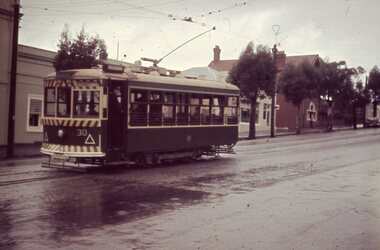
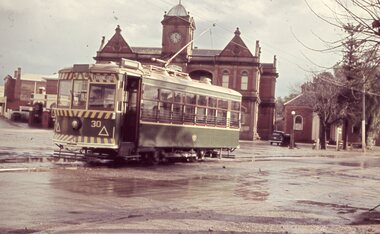
Agfa plastic mount (blue base, white cover) with a photo of Bendigo No. 30 in Mitchell St, just before start of the double track section, c1962. Photo taken during a rainy day. Tram has destination of Eaglehawk. Note SEC crewman standing by door and the passengers looking towards the gutter at the railway station stop. Apparently picking up passengers ex the train on a Sunday. See Other Information regarding a possible date of the slide."BES 1" in penciltramways, trams, bendigo, mitchell st, tram 30 -
 Ballarat Tramway Museum
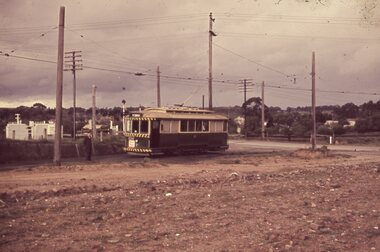
Slide - 35mm slide/s, Travis Jeffrey, c1962
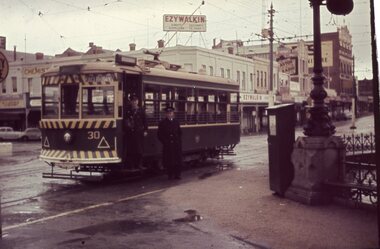
Agfa plastic mount (blue base, white cover) with a photo of Bendigo No. 30 at Charing Cross, in View St., c1962. Photo follows on from Reg Item No. 2612. Photo taken during a rainy day. Tram has destination of Eaglehawk. Note SEC crewman and Inspector standing by door. Has the Ezywalkin building in the background and a billboard advertisement for Astor Radio."BES 2" in penciltramways, trams, bendigo, charing cross, eaglehawk, tram 30 -
 Ballarat Tramway Museum
Slide - 35mm slide/s, Travis Jeffrey, c1962
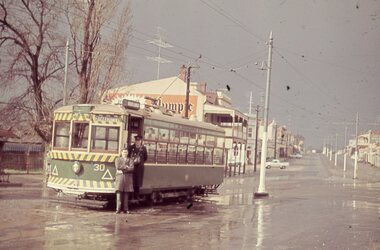
Agfa plastic mount (blue base, white cover) with a photo of Bendigo No. 30 at Eaglehawk terminus, High St. Eaglehawk, c1962. Photo follows on from Reg Item No. 2612. Photo taken during a rainy day. Tram has destination of Eaglehawk. Note SEC crewman and another person standing by door. Has Olympic Tyres ad on a building in the background."BES 3" in penciltramways, trams, bendigo, high st, eaglehawk, tram 30 -
 Ballarat Tramway Museum
Slide - 35mm slide/s, Travis Jeffrey, c1962
Agfa plastic mount (blue base, white cover) with a photo of Bendigo No. 30 at Eaglehawk terminus, High St. Eaglehawk, c1962 with the Eaglehawk Town Hall in the background. Photo follows on from Reg Item No. 2611 to 2613. Photo taken during a rainy day. Tram has destination of Eaglehawk. Tram has the destination of Charing Cross."BES 4" in penciltramways, trams, bendigo, high st, eaglehawk, tram 30 -
 Ballarat Tramway Museum
Slide - 35mm slide/s, Travis Jeffrey, c1962
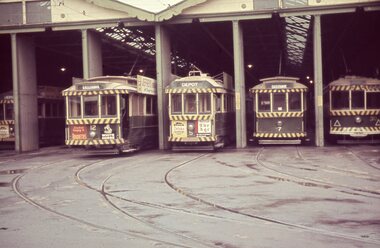
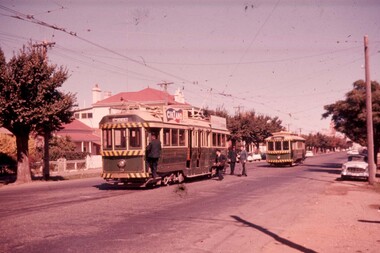
Agfa plastic mount (blue base, white cover) with a photo of four trams standing at the front of Bendigo tram depot. Trams 12, 5, 7 and 30 are featured. Possibly taken on the same day as Reg. item 2611 to 2614, ground in front of depot partly wet and No. 30 showing depot, possibly having run into the depot. Advertisements on the trams feature SEC Briquettes, Whitehorse Whiskey, Cohns Soft Drinks and The Age newspaper. No. 12 has a "Jefferies" road advertisement."BES 5" in penciltramways, trams, bendigo, depot, tram 30, tram 7, tram 5, tram 12 -
 Ballarat Tramway Museum
Slide - 35mm slide/s, Travis Jeffrey, c1962
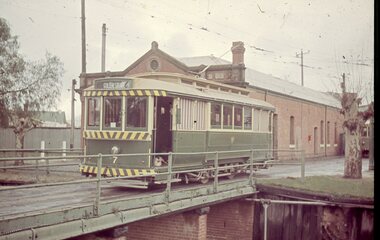
Agfa plastic mount (blue base, white cover) with a photo of Bendigo 7, crossing the bridge outside the Bendigo Tram Depot. Possibly taken on the same day as Reg. item 2611 to 2615. Tram has the destination of Golden Square. Photo taken c1962."BES 6" in penciltramways, trams, bendigo, depot, tram 7 -
 Ballarat Tramway Museum
Slide - 35mm slide/s, Travis Jeffrey, c1962
Agfa plastic mount (blue base, white cover) with a photo of Bendigo 7, in McCrae St, near Arnold St. at the end of the double line track. Note the "End of Section" sign on the pole. Tram has the destination of North Bendigo. Photo taken c1962. Tram has a "The Age" sign on the front cab panel."BES 7" in penciltramways, trams, bendigo, mccrae st, signs, tram 7 -
 Ballarat Tramway Museum
Slide - 35mm slide/s, Travis Jeffrey, c1962
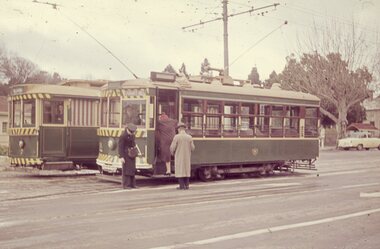
Agfa plastic mount (blue base, white cover) with a photo of Bendigo 7 and possibly No. 29 in Pall Mall Bendigo, with passengers boarding the Birney tram car and the conductor observing them. The Bendigo has the destination of Quarry Hill and No. 7, North Bendigo. Photo taken c1962."BES 8" in penciltramways, trams, bendigo, charing cross, pall mall, tram 7, tram 29 -
 Ballarat Tramway Museum
Slide - 35mm slide/s, Travis Jeffrey, c1962
Agfa plastic mount (blue base, white cover) with a photo of Bendigo 7, en route to North Bendigo, McCrae St, about to turn into Nolan St. loop. Tram has the destination of North Bendigo. Photo taken c1962. Tram has a "The Age" sign on the front cab panel. Tram is thought to be outside 260 McCrae St. (8/2004 noted house in background with similar entry at this location."BES 9" in penciltramways, trams, bendigo, north bendigo, mccrae st, tram 7 -
 Ballarat Tramway Museum
Slide - 35mm slide/s, Travis Jeffrey, c1962
Agfa plastic mount (blue base, white cover) with a photo of Bendigo 7,at North Bendigo terminus with the railway level crossing in the background. Tram has the destination of North Bendigo. Photo taken c1962. Tram has a "The Age" sign on the front cab panel."BES 10" in penciltramways, trams, bendigo, north bendigo, tram 7 -
 Ballarat Tramway Museum
Slide - 35mm slide/s, Travis Jeffrey, c1962
Agfa plastic mount (blue base, white cover) with a photo of Bendigo 7, at the north end of the Bridge St. Loop. Photo taken c1962. Note the road works in the background with the kerosene warning lamps and wooden protection barriers. House opposite tram is 122 Bridge St., which is part of a butchers shop (noted during 8/2004 visit)"BES 11" in penciltramways, trams, bendigo, north bendigo, mccrae st, road works, tram 7 -
 Ballarat Tramway Museum
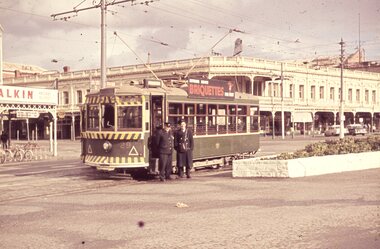
Slide - 35mm slide/s, Travis Jeffrey, c1962
Agfa plastic mount (blue base, white cover) with a photo of Bendigo 29 at Charing Cross, with another single truck car behind it (possibly No. 7). Has two SEC crewman (Driver and Conductor) standing at the front of the tram. In the background is the Ezywalkin Shoe Store and the City Club Hotel in the background. Tram has the destination of North Bendigo and has a SEC Briquettes roof advertisement."BES 12" in penciltramways, trams, bendigo, north bendigo, charing cross, city club hotel, tram 29 -
 Ballarat Tramway Museum
Slide - 35mm slide/s, Travis Jeffrey, c1962
Agfa plastic mount (blue base, white cover) with a photo of Bendigo 29 turning from McCrae St into Nolan St, with Lake Weeroona in the background. Tram has the destination of North Bendigo and has a SEC Briquettes roof advertisement. Note the "Cohns" drink advertisement on the milk bar on the corner."BES 13" in penciltramways, trams, bendigo, north bendigo, nolan st, mccrae st, tram 29 -
 Ballarat Tramway Museum
Slide - 35mm slide/s, Travis Jeffrey, c1962
Agfa plastic mount (blue base, white cover) with a photo of Bendigo 29 at the North Bendigo terminus. Photo taken from the level crossing, looking across to the new housing estate, then under construction. Tram has the destination of Golden Square and has a SEC Briquettes roof advertisement."BES 14" in penciltramways, trams, bendigo, north bendigo, tram 29 -
 Ballarat Tramway Museum
Slide - 35mm slide/s, Travis Jeffrey, c1962
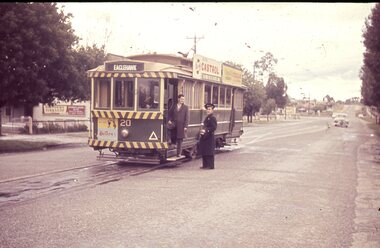
Agfa plastic mount (blue base, white cover) with a photo of Bendigo 20 at the Quarry Hill terminus. Tram has the destination of Eaglehawk and has a Castrol Oil, and another company roof advertisements, with Huttons Ham advertisement on the dash panel. Conductor and another person (enthusiast) outside the tram, driver changing ends on the inside. In the background is the premises for "Northern Terrazzo"."BES 15" in penciltramways, trams, bendigo, quarry hill, tram 20 -
 Ballarat Tramway Museum
Slide - 35mm slide/s, Travis Jeffrey, c1962
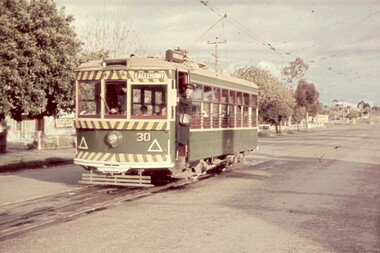
Agfa plastic mount (blue base, white cover) with a photo of Bendigo 30 at the Quarry Hill terminus. Tram has the destination of Eaglehawk . Conductor standing in the doorway for the photographer. In the background is the premises for "Northern Terrazzo"."BES 16" in penciltramways, trams, bendigo, quarry hill, tram 30 -
 Ballarat Tramway Museum
Slide - 35mm slide/s, Travis Jeffrey, c1962
Agfa plastic mount (blue base, white cover) with a photo of Bendigo 30 at Pinder's Loop, Carpenter St. Quarry Hill. Tram has the destination of Eaglehawk ."BES 17" in penciltramways, trams, bendigo, quarry hill, pinders loop, tram 30 -
 Ballarat Tramway Museum
Slide - 35mm slide/s, Travis Jeffrey, c1962
Agfa plastic mount (blue base, white cover) with a photo of Bendigo 5 and No. 20 in McCrae St, Bendigo at the junction with Arnold St, or the junction for the depot. Appears to be changing crews, has driver board, conductor about to board, with two others at the rear of the tram, one in a SEC uniform. Taken c1962, spring or early summer. No. 5 has a Cinzano roof advertisement and destination of North Bendigo."BES 18" in penciltramways, trams, bendigo, mccrae st, depot junction, crews, tram 5, tram 20