Showing 767 items matching "colonial australia"
-
 Flagstaff Hill Maritime Museum and Village
Instrument - Surgical Kit, early 1900's
This scalpel kit contains two handles and a keeper-bar within a protective stainless steel cylinder with a screw on cap. This kit was donated to Flagstaff Hill Maritime Museum by the family of Doctor William Roy Angus, Surgeon and Oculist. It is part of the “W.R. Angus Collection” that includes historical medical equipment, surgical instruments and material once belonging to Dr Edward Ryan and Dr Thomas Francis Ryan, (both of Nhill, Victoria) as well as Dr Angus’ own belongings. The Collection’s history spans the medical practices of the two Doctors Ryan, from 1885-1926 plus that of Dr Angus, up until 1969. ABOUT THE “W.R.ANGUS COLLECTION” Doctor William Roy Angus M.B., B.S., Adel., 1923, F.R.C.S. Edin.,1928 (also known as Dr Roy Angus) was born in Murrumbeena, Victoria in 1901 and lived until 1970. He qualified as a doctor in 1923 at University of Adelaide, was Resident Medical Officer at the Royal Adelaide Hospital in 1924 and for a period was house surgeon to Sir (then Mr.) Henry Simpson Newland. Dr Angus was briefly an Assistant to Dr Riddell of Kapunda, then commenced private practice at Curramulka, Yorke Peninsula, SA, where he was physician, surgeon and chemist. In 1926, he was appointed as new Medical Assistant to Dr Thomas Francis Ryan (T.F. Ryan, or Tom), in Nhill, Victoria, where his experiences included radiology and pharmacy. In 1927 he was Acting House Surgeon in Dr Tom Ryan’s absence. Dr Angus had become engaged to Gladys Forsyth and they decided he would take time to further his studies overseas in the UK in 1927. He studied at London University College Hospital and at Edinburgh Royal Infirmary and in 1928, was awarded FRCS (Fellow from the Royal College of Surgeons), Edinburgh. He worked his passage back to Australia as a Ship’s Surgeon on the on the Australian Commonwealth Line’s T.S.S. Largs Bay. Dr Angus married Gladys in 1929, in Ballarat. (They went on to have one son (Graham 1932, born in SA) and two daughters (Helen (died 12/07/1996) and Berenice (Berry), both born at Mira, Nhill ) Dr Angus was a ‘flying doctor’ for the A.I.M. (Australian Inland Ministry) Aerial Medical Service in 1928 . The organisation began in South Australia through the Presbyterian Church in that year, with its first station being in the remote town of Oodnadatta, where Dr Angus was stationed. He was locum tenens there on North-South Railway at 21 Mile Camp. He took up this ‘flying doctor’ position in response to a call from Dr John Flynn; the organisation was later known as the Flying Doctor Service, then the Royal Flying Doctor Service. A lot of his work during this time involved dental surgery also. Between 1928-1932 he was surgeon at the Curramulka Hospital, Yorke Peninsula, South Australia. In 1933 Dr Angus returned to Nhill where he’d previously worked as Medical Assistant and purchased a share of the Nelson Street practice and Mira hospital from Dr Les Middleton one of the Middleton Brothers, the current owners of what was once Dr Tom Ryan’s practice. Dr L Middleton was House Surgeon to the Nhill Hospital 1926-1933, when he resigned. [Dr Tom Ryan’s practice had originally belonged to his older brother Dr Edward Ryan, who came to Nhill in 1885. Dr Edward saw patients at his rooms, firstly in Victoria Street and in 1886 in Nelson Street, until 1901. The Nelson Street practice also had a 2 bed ward, called Mira Private Hospital ). Dr Edward Ryan was House Surgeon at the Nhill Hospital 1884-1902 . He also had occasions where he successfully performed veterinary surgery for the local farmers too. Dr Tom Ryan then purchased the practice from his brother in 1901. Both Dr Edward and Dr Tom Ryan work as surgeons included eye surgery. Dr Tom Ryan performed many of his operations in the Mira private hospital on his premises. He too was House Surgeon at the Nhill Hospital 1902-1926. Dr Tom Ryan had one of the only two pieces of radiology equipment in Victoria during his practicing years – The Royal Melbourne Hospital had the other one. Over the years Dr Tom Ryan gradually set up what was effectively a training school for country general-practitioner-surgeons. Each patient was carefully examined, including using the X-ray machine, and any surgery was discussed and planned with Dr Ryan’s assistants several days in advance. Dr Angus gained experience in using the X-ray machine there during his time as assistant to Dr Ryan. Dr Tom Ryan moved from Nhill in 1926. He became a Fellow of the Royal Australasian College of Surgeons in 1927, soon after its formation, a rare accolade for a doctor outside any of the major cities. He remained a bachelor and died suddenly on 7th Dec 1955, aged 91, at his home in Ararat. Scholarships and prizes are still awarded to medical students in the honour of Dr T.F. Ryan and his father, Dr Michael Ryan, and brother, John Patrick Ryan. ] When Dr Angus bought into the Nelson Street premises in Nhill he was also appointed as the Nhill Hospital’s Honorary House Surgeon 1933-1938. His practitioner’s plate from his Nhill surgery states “HOURS Daily, except Tuesdays, Fridays and Saturday afternoons, 9-10am, 2-4pm, 7-8pm. Sundays by appointment”. This plate is now mounted on the doorway to the Port Medical Office at Flagstaff Hill Maritime Village, Warrnambool. Dr Edward Ryan and Dr Tom Ryan had an extensive collection of historical medical equipment and materials spanning 1884-1926 and when Dr Angus took up practice in their old premises he obtained this collection, a large part of which is now on display at the Port Medical Office at Flagstaff Hill Maritime Village in Warrnambool. During his time in Nhill Dr Angus was involved in the merging of the Mira Hospital and Nhill Public Hospital into one public hospital and the property titles passed on to Nhill Hospital in 1939. In 1939 Dr Angus and his family moved to Warrnambool where he purchased “Birchwood,” the 1852 home and medical practice of Dr John Hunter Henderson, at 214 Koroit Street. (This property was sold in1965 to the State Government and is now the site of the Warrnambool Police Station. ). The Angus family was able to afford gardeners, cooks and maids; their home was a popular place for visiting dignitaries to stay whilst visiting Warrnambool. Dr Angus had his own silk worm farm at home in a Mulberry tree. His young daughter used his centrifuge for spinning the silk. Dr Angus was appointed on a part-time basis as Port Medical Officer (Health Officer) in Warrnambool and held this position until the 1940’s when the government no longer required the service of a Port Medical Officer in Warrnambool; he was thus Warrnambool’s last serving Port Medical Officer. (The duties of a Port Medical Officer were outlined by the Colonial Secretary on 21st June, 1839 under the terms of the Quarantine Act. Masters of immigrant ships arriving in port reported incidents of diseases, illness and death and the Port Medical Officer made a decision on whether the ship required Quarantine and for how long, in this way preventing contagious illness from spreading from new immigrants to the residents already in the colony.) Dr Angus was a member of the Australian Medical Association, for 35 years and surgeon at the Warrnambool Base Hospital 1939-1942, He served as a Surgeon Captain during WWII1942-45, in Ballarat, Victoria, and in Bonegilla, N.S.W., completing his service just before the end of the war due to suffering from a heart attack. During his convalescence he carved an intricate and ‘most artistic’ chess set from the material that dentures were made from. He then studied ophthalmology at the Royal Melbourne Eye and Ear Hospital and created cosmetically superior artificial eyes by pioneering using the intrascleral cartilage. Angus received accolades from the Ophthalmological Society of Australasia for this work. He returned to Warrnambool to commence practice as an ophthalmologist, pioneering in artificial eye improvements. He was Honorary Consultant Ophthalmologist to Warrnambool Base Hospital for 31 years. He made monthly visits to Portland as a visiting surgeon, to perform eye surgery. He represented the Victorian South-West subdivision of the Australian Medical Association as its secretary between 1949 and 1956 and as chairman from 1956 to 1958. In 1968 Dr Angus was elected member of Spain’s Barraquer Institute of Barcelona after his research work in Intrasclearal cartilage grafting, becoming one of the few Australian ophthalmologists to receive this honour, and in the following year presented his final paper on Living Intrasclearal Cartilage Implants at the Inaugural Meeting of the Australian College of Ophthalmologists in Melbourne In his personal life Dr Angus was a Presbyterian and treated Sunday as a Sabbath, a day of rest. He would visit 3 or 4 country patients on a Sunday, taking his children along ‘for the ride’ and to visit with him. Sunday evenings he would play the pianola and sing Scottish songs to his family. One of Dr Angus’ patients was Margaret MacKenzie, author of a book on local shipwrecks that she’d seen as an eye witness from the late 1880’s in Peterborough, Victoria. In the early 1950’s Dr Angus, painted a picture of a shipwreck for the cover jacket of Margaret’s book, Shipwrecks and More Shipwrecks. She was blind in later life and her daughter wrote the actual book for her. Dr Angus and his wife Gladys were very involved in Warrnambool’s society with a strong interest in civic affairs. Their interests included organisations such as Red Cross, Rostrum, Warrnambool and District Historical Society (founding members), Wine and Food Society, Steering Committee for Tertiary Education in Warrnambool, Local National Trust, Good Neighbour Council, Housing Commission Advisory Board, United Services Institute, Legion of Ex-Servicemen, Olympic Pool Committee, Food for Britain Organisation, Warrnambool Hospital, Anti-Cancer Council, Boys’ Club, Charitable Council, National Fitness Council and Air Raid Precautions Group. He was also a member of the Steam Preservation Society and derived much pleasure from a steam traction engine on his farm. He had an interest in people and the community He and his wife Gladys were both involved in the creation of Flagstaff Hill, including the layout of the gardens. After his death (28th March 1970) his family requested his practitioner’s plate, medical instruments and some personal belongings be displayed in the Port Medical Office surgery at Flagstaff Hill Maritime Village, and be called the “W. R. Angus Collection”. The W.R. Angus Collection is significant for still being located at the site it is connected with, Doctor Angus being the last Port Medical Officer in Warrnambool. The collection of medical instruments and other equipment is culturally significant, being an historical example of medicine from late 19th to mid-20th century. Dr Angus assisted Dr Tom Ryan, a pioneer in the use of X-rays and in ocular surgery. Scalpel kit containing two (2) scalpel handles; part of the W.R. Angus Collection. Container is a stainless steel barrel with screw on cap. Inside are 2 scalpel handles stored one on each side of a fitted steel bar. All components have an inscription. The cylinder and one scalpel are made in England, the other scalpel is made in USA.Inscriptions; base of cylinder;"25" lid of cylinder: "4 / BRITISH MADE / 3", one scalpel; "BARD-PARKER", "BP" a trade mark, "4", “SURGICAL MFG. COY. LTD" and "MADE IN U.S.A.". The other scalpel has 'MADE IN ENGLAND", "PARAGON" and "3". The metal bar has "3" on one side and "4" on the otherwarrnambool, flagstaff hill maritime museum, shipwreck coast, great ocean road, dr w r angus, dr ryan, surgical instrument, t.s.s. largs bay, warrnambool base hospital, nhill base hospital, mira hospital, flying doctor, medical treatment, scalpel kit, bard-parker, paragon -
 Flagstaff Hill Maritime Museum and Village
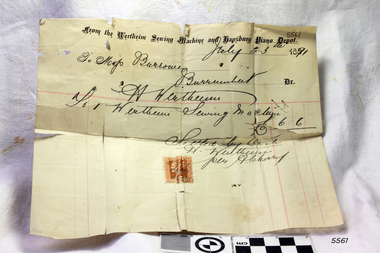
Document - Receipt, Joseph Wertheim, Wertheim Sewing Machine and Hapsburg Piano Depot, 23-07-1891
... Melbourne to Colonial Australia. The receipt also gives a fixed date ...This receipt was donated with our collection's Wertheim sewing machine accessory box. The box contains twelve accessories, the instruction book and the receipt for the purchase of a Wertheim sewing machine. The receipt was written on July 23rd 1891 by the Wertheim distributor in Melbourne, Hugo Wertheim. His business was the Wertheim Sewing Machine and Hapsburg Piano Depot, trading at 173 Williams Street, Melbourne. The purchaser was Mrs Burrowes from Burrumbeet, Victoria, a district northwest of Ballarat. She paid £6-6 (six pounds and six shillings) in cash. The receipt was signed by H. Wertheim and the other signatory looks like John A. Cherry. Hugo Wertheim (1854-1919) was an agent for his father’s cousin Joseph Wertheim, a well-established sewing machine manufacturer in Germany. He was born in Lispenhausen, Germany, and migrated to Melbourne in October 1875, where he opened a merchandising business at 39 Flinders Lane East. He returned to Germany in 1885 to marry Joseph Wertheim's daughter Sophie Emilie. The couple came back to Melbourne, and Hugo quickly established a substantial business selling sewing machines, bicycles, pianos and other mechanical devices, under brands such as Wertheim, Electra, Planet, Griffin and Hapsburg. He exhibited at agricultural shows and in 1901 at the Pan American Exposition, Buffalo, United States of America. One of his staff was O. C. Beale, who later set up his own piano business in New South Wales. Hugo continued to own 25 per cent of one of Beale's companies, which became Wertheim's Queensland business. In 1908 Hugo Wertheim opened a piano factory in Richmond, Melbourne, aiming to produce 2000 pianos and player pianos a year, predominantly using Australian materials. In laying the foundation stone, Prime Minister Alfred Deakin observed that “few men with such opportunities for a life of ease would have embarked on such an enterprise” Hugo died of chronic hepatitis in 1919 at his home in South Yarra. His eldest son, Herbert Joseph (1886-1972), continued the business. The piano factory closed in 1935, becoming a Heinz food processing plant and in 1955, GTV Channel 9 studios and offices. The Wertheim Sewing Machine Company – Joseph Wertheim (1804–1899) founded the company in 1868 in Frankfurt, Germany. At this time Joseph was the Frankfurt city delegate for the Democratic Party. At its height, the Wertheim factory employed approximately 650 workers. The company used a trademark of a dwarf holding a hammer which is known to have been used until at least 1925, however in 1909 a Star of David was also registered. In 1870 a Wertheim subsidiary was formed in Barcelona, Spain. The business imported and sold complete machines, including the English Jones machine. Locals began calling the sewing machines “las rapidas”, and the business became known as “las casa de las rapidas”. In 1915 production began of a totally manufactured Spanish Wertheim machine. Wertheim in Germany continued manufacturing machines until 1932 when the Wertheim family fled to Spain. Despite converting to Christianity from Judaism, they feared the political unrest in Germany during that time. Wertheim Spain became Rapida SA and was then the sole manufacturer of the Wertheim machines. The factory was managed by Karl Wertheim under the alias Carlos Vallin.The receipt is significant for its connection with Victoria's northwestern district, the Melbourne distributor Hugo Wertheim, and the well-known German manufacturer of the early domestic sewing machines, Joseph Wertheim. The stamp with Queen Victoria's profile also connects the receipt to the Victorian era and connects Melbourne to Colonial Australia. The receipt also gives a fixed date to the machine accessories and instruction book in our Collection, connecting them all to domestic life in the Victorian era.Receipt on cream paper, rectangular, with red horizontal and vertical lines. Printed letterhead and heading text. Handwritten details of the seller, owner, the item purchased, method of payment, and cost. Signed by two signatories. A one-penny stamp is attached. Sold by Wertheim Sewing Machines and Hapsburg Pianos,.dated 23rd July 1891 for £6 6/- from Mrs Burrowes, Burrumbeet, Victoria, for the purchase of a Wertheim sewing machine.Printed "From the Wertheim Sewing Machine and Hapsburg Piano Depot" Handwritten "Mrs Burrowes, Burrumbeet" "July 23rd 1891" "Wertheim Sewing Machine" "£6 6" "Settled by Cash" Signatures "H. Wertheim" and (Looks Like) "John A Cherry" Ont the stamp, [image of Queen Victoria's profile] and "VICTORIA" "ONE PENNY" flagstaff hill, flagstaff hill maritime museum and village, warrnambool, maritime museum, maritime village, great ocean road, shipwreck coast, wertheim, sewing machine, victorian era, sewing machine accessories, sewing machine instructions, wertheim sewing machine and hapsburg piano depot, 23-7-1891, £6 6/-, mrs burrowes, burrumbeet, h. wertheim, wertheim sewing machines, domestic machines, dress making, home industry, fashion, receipt, queen victoria stamp, one-penny stamp -
 Flagstaff Hill Maritime Museum and Village
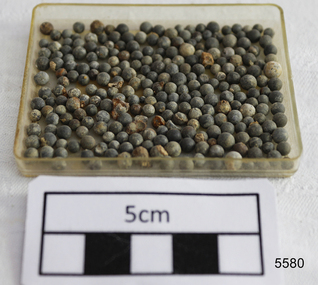
Lead shot, Before 1878
The objects comprise a quantity of small calibre lead shot raised from the LOCH ARD shipwreck site by Flagstaff Hill divers in 1976. The Maritime Village’s collection has companion pieces. The three masted, iron hulled, LOCH ARD was wrecked against the tall limestone cliffs of Mutton Bird Island in the early hours of the first of June 1878. Included in her diverse and valuable cargo were 22 tons of lead shot, packed in cloth bags and wooden casks. Bulk quantities of lead shot, uniformly round balls of dull grey metal ranging from 2mm “birdshot” to 8mm “buckshot”, were routinely exported to the Australian colonies. Shot was used mostly as projectiles fired from smooth bored guns to bring down moving targets such as wild ducks and small game. It was also useful as ballast, when a dense, “pourable” weight was required to fill cavities or establish volume within a measuring container. The production of consistently round spheres of lead shot required the pouring of molten metal through a sieve and then a long drop through the atmosphere to a water filled basin for final cooling and collection. This “shot tower” process was first patented by William Watts of Bristol in 1782. His calculation of a 150 feet fall was not only to form evenly spherical droplets through surface tension, but also to provide partial cooling and solidification to each shot before they hit the water below. The value of his innovation was the minimising of indentation and shape distortion, avoiding the expense of re-smelting and re-moulding the lead. Lead shot was already being produced in Australia at the time the LOCH ARD loaded her cargo and left Gravesend on the second of March 1878. James Moir constructed a 157 feet circular stone shot tower near Hobart in 1870, with a peak annual production of 100 tons of lead shot sold in 28 pound linen bags. However colonial demand exceeded this source of local supply. The continued strength of the market for lead shot in the Colony of Victoria prompted substantial investment in additional productive capacity in Melbourne in the next decade. In 1882 Richard Hodgson erected the 160 feet round chimney-shaped Clifton Hill shot tower on Alexandra Parade (VHR H0709) and in 1889 Walter Coop built the 160 feet square tower-shaped Melbourne Central shot tower on La Trobe Street (VHR H0067). At its peak, the Coop Tower produced 6 tons of lead shot per week, or 312 tons per annum. HISTORY OF THE LOCH ARD The LOCH ARD belonged to the famous Loch Line which sailed many ships from England to Australia. Built in Glasgow by Barclay, Curdle and Co. in 1873, the LOCH ARD was a three-masted square rigged iron sailing ship. The ship measured 262ft 7" (79.87m) in length, 38ft (11.58m) in width, 23ft (7m) in depth and had a gross tonnage of 1693 tons. The LOCH ARD's main mast measured a massive 150ft (45.7m) in height. LOCH ARD made three trips to Australia and one trip to Calcutta before its final voyage. LOCH ARD left England on March 2, 1878, under the command of Captain Gibbs, a newly married, 29 year old. She was bound for Melbourne with a crew of 37, plus 17 passengers and a load of cargo. The general cargo reflected the affluence of Melbourne at the time. On board were straw hats, umbrella, perfumes, clay pipes, pianos, clocks, confectionary, linen and candles, as well as a heavier load of railway irons, cement, lead and copper. There were items included that intended for display in the Melbourne International Exhibition in 1880. The voyage to Port Phillip was long but uneventful. At 3am on June 1, 1878, Captain Gibbs was expecting to see land and the passengers were becoming excited as they prepared to view their new homeland in the early morning. But LOCH ARD was running into a fog which greatly reduced visibility. Captain Gibbs was becoming anxious as there was no sign of land or the Cape Otway lighthouse. At 4am the fog lifted. A man aloft announced that he could see breakers. The sheer cliffs of Victoria's west coast came into view, and Captain Gibbs realised that the ship was much closer to them than expected. He ordered as much sail to be set as time would permit and then attempted to steer the vessel out to sea. On coming head on into the wind, the ship lost momentum, the sails fell limp and LOCH ARD's bow swung back. Gibbs then ordered the anchors to be released in an attempt to hold its position. The anchors sank some 50 fathoms - but did not hold. By this time LOCH ARD was among the breakers and the tall cliffs of Mutton Bird Island rose behind the ship. Just half a mile from the coast, the ship's bow was suddenly pulled around by the anchor. The captain tried to tack out to sea, but the ship struck a reef at the base of Mutton Bird Island, near Port Campbell. Waves broke over the ship and the top deck was loosened from the hull. The masts and rigging came crashing down knocking passengers and crew overboard. When a lifeboat was finally launched, it crashed into the side of LOCH ARD and capsized. Tom Pearce, who had launched the boat, managed to cling to its overturned hull and shelter beneath it. He drifted out to sea and then on the flood tide came into what is now known as LOCH ARD Gorge. He swam to shore, bruised and dazed, and found a cave in which to shelter. Some of the crew stayed below deck to shelter from the falling rigging but drowned when the ship slipped off the reef into deeper water. Eva Carmichael had raced onto deck to find out what was happening only to be confronted by towering cliffs looming above the stricken ship. In all the chaos, Captain Gibbs grabbed Eva and said, "If you are saved Eva, let my dear wife know that I died like a sailor". That was the last Eva Carmichael saw of the captain. She was swept off the ship by a huge wave. Eva saw Tom Pearce on a small rocky beach and yelled to attract his attention. He dived in and swam to the exhausted woman and dragged her to shore. He took her to the cave and broke open case of brandy which had washed up on the beach. He opened a bottle to revive the unconscious woman. A few hours later Tom scaled a cliff in search of help. He followed hoof prints and came by chance upon two men from nearby Glenample Station three and a half miles away. In a state of exhaustion, he told the men of the tragedy. Tom returned to the gorge while the two men rode back to the station to get help. By the time they reached LOCH ARD Gorge, it was cold and dark. The two shipwreck survivors were taken to Glenample Station to recover. Eva stayed at the station for six weeks before returning to Ireland, this time by steamship. In Melbourne, Tom Pearce received a hero's welcome. He was presented with the first gold medal of the Royal Humane Society of Victoria and a £1000 cheque from the Victorian Government. Concerts were performed to honour the young man's bravery and to raise money for those who lost family in the LOCH ARD disaster. Of the 54 crew members and passengers on board, only two survived: the apprentice, Tom Pearce and the young woman passenger, Eva Carmichael, who lost all of her family in the tragedy. Ten days after the LOCH ARD tragedy, salvage rights to the wreck were sold at auction for £2,120. Cargo valued at £3,000 was salvaged and placed on the beach, but most washed back into the sea when another storm developed. The wreck of LOCH ARD still lies at the base of Mutton Bird Island. Much of the cargo has now been salvaged and some was washed up into what is now known as LOCH ARD Gorge. Cargo and artefacts have also been illegally salvaged over many years before protective legislation was introduced. One of the most unlikely pieces of cargo to have survived the shipwreck was a Minton porcelain peacock - one of only nine in the world. The peacock was destined for the Melbourne International Exhibition in 1880. It had been well packed, which gave it adequate protection during the violent storm. Today, the Minton peacock can be seen at the Flagstaff Hill Maritime Museum in Warrnambool. From Australia's most dramatic shipwreck it has now become Australia's most valuable shipwreck artefact and is one of very few 'objects' on the Victorian State Heritage Register. The shipwreck of the LOCH ARD is of State significance – Victorian Heritage Register S417 Flagstaff Hill’s collection of artefacts from LOCH ARD is significant for being one of the largest collections of artefacts from this shipwreck in Victoria. It is significant for its association with the shipwreck, which is on the Victorian Heritage Register (VHR S417). The collection is significant because of the relationship between the objects, as together they have a high potential to interpret the story of the LOCH ARD. The LOCH ARD collection is archaeologically significant as the remains of a large international passenger and cargo ship. The LOCH ARD collection is historically significant for representing aspects of Victoria’s shipping history and its potential to interpret sub-theme 1.5 of Victoria’s Framework of Historical Themes (living with natural processes). The collection is also historically significant for its association with the LOCH ARD, which was one of the worst and best known shipwrecks in Victoria’s history. A quantity of lead shot pellets retrieved from the wreck of the LOCH ARD. There are 242 loose 2mm pieces and 17 loose 4mm pieces. They are in good condition, with some shape distortion and sedimentary concretion, and shot tower made.flagstaff hill, warrnambool, shipwrecked coast, flagstaff hill maritime museum, maritime museum, shipwreck coast, flagstaff hill maritime village, great ocean road, loch line, loch ard, captain gibbs, eva carmichael, tom pearce, glenample station, mutton bird island, loch ard gorge, lead shot, colonial industry, melbourne shot towers, victorian metallurgy, colonial imports -
 Flagstaff Hill Maritime Museum and Village
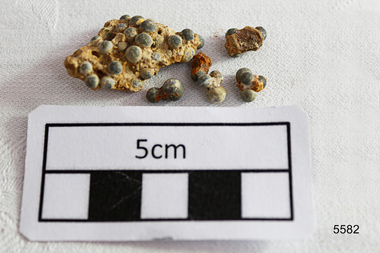
Weapon - Ammunition, Before 1878
The objects are a small sample of small gauge lead shot raised by Flagstaff Hill divers from the LOCH ARD shipwreck site in 1976. Companion pieces are in the Maritime Village collection. The three masted, iron hulled, LOCH ARD was wrecked against the tall limestone cliffs of Mutton Bird Island in the early hours of the first of June 1878. Included in her diverse and valuable cargo were 22 tons of lead shot, packed in cloth bags and wooden casks. Bulk quantities of lead shot, uniformly round balls of dull grey metal ranging from 2mm “birdshot” to 8mm “buckshot”, were routinely exported to the Australian colonies. Shot was used mostly as projectiles fired from smooth bored guns to bring down moving targets such as wild ducks and small game. It was also useful as ballast, when a dense, “pourable” weight was required to fill cavities or establish volume within a measuring container. The production of consistently round spheres of lead shot required the pouring of molten metal through a sieve and then a long drop through the atmosphere to a water filled basin for final cooling and collection. This “shot tower” process was first patented by William Watts of Bristol in 1782. His calculation of a 150 feet fall was not only to form evenly spherical droplets through surface tension, but also to provide partial cooling and solidification to each shot before they hit the water below. The value of his innovation was the minimising of indentation and shape distortion, avoiding the expense of re-smelting and re-moulding the lead. Lead shot was already being produced in Australia at the time the LOCH ARD loaded her cargo and left Gravesend on the second of March 1878. James Moir constructed a 157 feet circular stone shot tower near Hobart in 1870, with a peak annual production of 100 tons of lead shot sold in 28 pound linen bags. However colonial demand exceeded this source of local supply. The continued strength of the market for lead shot in the Colony of Victoria prompted substantial investment in additional productive capacity in Melbourne in the next decade. In 1882 Richard Hodgson erected the 160 feet round chimney-shaped Clifton Hill shot tower on Alexandra Parade (VHR H0709) and in 1889 Walter Coop built the 160 feet square tower-shaped Melbourne Central shot tower on La Trobe Street (VHR H0067). At its peak, the Coop Tower produced 6 tons of lead shot per week, or 312 tons per annum. The shipwreck of the LOCH ARD is of State significance – Victorian Heritage Register S417 Flagstaff Hill’s collection of artefacts from LOCH ARD is significant for being one of the largest collections of artefacts from this shipwreck in Victoria. It is significant for its association with the shipwreck, which is on the Victorian Heritage Register (VHR S417). The collection is significant because of the relationship between the objects, as together they have a high potential to interpret the story of the LOCH ARD. The LOCH ARD collection is archaeologically significant as the remains of a large international passenger and cargo ship. The LOCH ARD collection is historically significant for representing aspects of Victoria’s shipping history and its potential to interpret sub-theme 1.5 of Victoria’s Framework of Historical Themes (living with natural processes). The collection is also historically significant for its association with the LOCH ARD, which was one of the worst and best known shipwrecks in Victoria’s history. A quantity of 2mm and 4mm lead shot ammunition retrieved from the LOCH ARD shipwreck site. They are concreted together by sediment. There are (6) small pieces with some single shot and a larger conglomerate of cemented shot. flagstaff hill, warrnambool, shipwrecked coast, flagstaff hill maritime museum, maritime museum, shipwreck coast, flagstaff hill maritime village, great ocean road, loch line, loch ard, captain gibbs, eva carmichael, tom pearce, glenample station, mutton bird island, loch ard gorge, lead shot, colonial industry, melbourne shot towers, victorian metallurgy, colonial imports -
 Flagstaff Hill Maritime Museum and Village
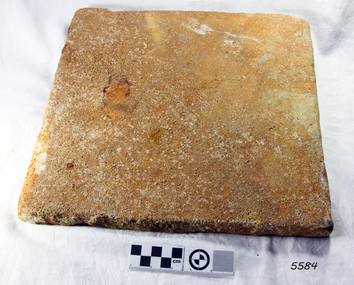
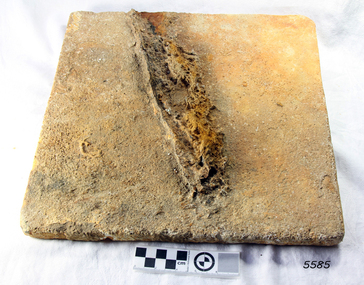
Marble Tile, circa 1878
The artefact is a white marble tile raised from the wreck of the LOCH ARD (1878). The cargo manifest of the sunken vessel has the entry “Marble £400”. This is placed directly following the entry “Glass (604 cases)”. This conjunction suggests the marble tile was originally part of a consignment intended for use in a ‘high end’ residential or public building project in the gold and wool rich Colony of Victoria. Traditionally, white or cream marble was imported into Britain from the Mediterranean region of Europe, where beds of sedimentary limestone (calcium and magnesium carbonate) had been buried over a long geological period of time. Deep in the earth’s crust, it had been subjected to immense pressures and high temperatures, sufficient to completely re-crystallise the original deposits. Marble beds began as layers of sediment at the bottom of ancient tropical seas, forming from the skeletal remains of calcareous fossils, shell, and coral fragments. The metamorphic process of prolonged compression and heating recrystallised this skeletal material, destroying all signs of the original sedimentary fabric. The resulting ‘true’ marbles of, for example, White Carrara (Tuscany, Italy), Verdi (green) Antico (Thessaly, Greece), and Rouge (red) Languadoc (Carcassone, France), were highly prized in classical decoration (sculpture and friezes) and architecture (temples and arches). Marble was found in nineteenth century Australia, but in small, uneconomic deposits, not suitable for commercial quarrying. The comparative expense of imported marble restricted its use in colonial buildings to carved fireplaces and mantel pieces, or outdoor ornaments such as fountains, statuary and grave stones. If Carrara marble floor tiles were used, they were used sparingly, as an arresting feature in entrance halls for instance. However, most prominent private and public construction used timber flooring, waxed or ‘japanned’, with carpet runners and rugs (for example the Austin’s Barwon Park Mansion, 1871), or laid tessellated and ceramic tiles of baked clay infused with colour (for example the Chirnside’s Werribee Park Mansion, 1878). HISTORY OF THE LOCH ARD The LOCH ARD belonged to the famous Loch Line which sailed many ships from England to Australia. Built in Glasgow by Barclay, Curdle and Co. in 1873, the LOCH ARD was a three-masted square rigged iron sailing ship. The ship measured 262ft 7" (79.87m) in length, 38ft (11.58m) in width, 23ft (7m) in depth and had a gross tonnage of 1693 tons. The LOCH ARD's main mast measured a massive 150ft (45.7m) in height. LOCH ARD made three trips to Australia and one trip to Calcutta before its final voyage. LOCH ARD left England on March 2, 1878, under the command of Captain Gibbs, a newly married, 29 year old. She was bound for Melbourne with a crew of 37, plus 17 passengers and a load of cargo. The general cargo reflected the affluence of Melbourne at the time. On board were straw hats, umbrella, perfumes, clay pipes, pianos, clocks, confectionary, linen and candles, as well as a heavier load of railway irons, cement, lead and copper. There were items included that intended for display in the Melbourne International Exhibition in 1880. The voyage to Port Phillip was long but uneventful. At 3am on June 1, 1878, Captain Gibbs was expecting to see land and the passengers were becoming excited as they prepared to view their new homeland in the early morning. But LOCH ARD was running into a fog which greatly reduced visibility. Captain Gibbs was becoming anxious as there was no sign of land or the Cape Otway lighthouse. At 4am the fog lifted. A man aloft announced that he could see breakers. The sheer cliffs of Victoria's west coast came into view, and Captain Gibbs realised that the ship was much closer to them than expected. He ordered as much sail to be set as time would permit and then attempted to steer the vessel out to sea. On coming head on into the wind, the ship lost momentum, the sails fell limp and LOCH ARD's bow swung back. Gibbs then ordered the anchors to be released in an attempt to hold its position. The anchors sank some 50 fathoms - but did not hold. By this time LOCH ARD was among the breakers and the tall cliffs of Mutton Bird Island rose behind the ship. Just half a mile from the coast, the ship's bow was suddenly pulled around by the anchor. The captain tried to tack out to sea, but the ship struck a reef at the base of Mutton Bird Island, near Port Campbell. Waves broke over the ship and the top deck was loosened from the hull. The masts and rigging came crashing down knocking passengers and crew overboard. When a lifeboat was finally launched, it crashed into the side of LOCH ARD and capsized. Tom Pearce, who had launched the boat, managed to cling to its overturned hull and shelter beneath it. He drifted out to sea and then on the flood tide came into what is now known as LOCH ARD Gorge. He swam to shore, bruised and dazed, and found a cave in which to shelter. Some of the crew stayed below deck to shelter from the falling rigging but drowned when the ship slipped off the reef into deeper water. Eva Carmichael had raced onto deck to find out what was happening only to be confronted by towering cliffs looming above the stricken ship. In all the chaos, Captain Gibbs grabbed Eva and said, "If you are saved Eva, let my dear wife know that I died like a sailor". That was the last Eva Carmichael saw of the captain. She was swept off the ship by a huge wave. Eva saw Tom Pearce on a small rocky beach and yelled to attract his attention. He dived in and swam to the exhausted woman and dragged her to shore. He took her to the cave and broke open case of brandy which had washed up on the beach. He opened a bottle to revive the unconscious woman. A few hours later Tom scaled a cliff in search of help. He followed hoof prints and came by chance upon two men from nearby Glenample Station three and a half miles away. In a state of exhaustion, he told the men of the tragedy. Tom returned to the gorge while the two men rode back to the station to get help. By the time they reached LOCH ARD Gorge, it was cold and dark. The two shipwreck survivors were taken to Glenample Station to recover. Eva stayed at the station for six weeks before returning to Ireland, this time by steamship. In Melbourne, Tom Pearce received a hero's welcome. He was presented with the first gold medal of the Royal Humane Society of Victoria and a £1000 cheque from the Victorian Government. Concerts were performed to honour the young man's bravery and to raise money for those who lost family in the LOCH ARD disaster. Of the 54 crew members and passengers on board, only two survived: the apprentice, Tom Pearce and the young woman passenger, Eva Carmichael, who lost all of her family in the tragedy. Ten days after the LOCH ARD tragedy, salvage rights to the wreck were sold at auction for £2,120. Cargo valued at £3,000 was salvaged and placed on the beach, but most washed back into the sea when another storm developed. The wreck of LOCH ARD still lies at the base of Mutton Bird Island. Much of the cargo has now been salvaged and some was washed up into what is now known as LOCH ARD Gorge. Cargo and artefacts have also been illegally salvaged over many years before protective legislation was introduced. One of the most unlikely pieces of cargo to have survived the shipwreck was a Minton porcelain peacock - one of only nine in the world. The peacock was destined for the Melbourne International Exhibition in 1880. It had been well packed, which gave it adequate protection during the violent storm. Today, the Minton peacock can be seen at the Flagstaff Hill Maritime Museum in Warrnambool. From Australia's most dramatic shipwreck it has now become Australia's most valuable shipwreck artefact and is one of very few 'objects' on the Victorian State Heritage Register. The wreck of the LOCH ARD is of State significance — Victorian Heritage Register S417 Flagstaff Hill’s collection of artefacts from LOCH ARD is significant for being one of the largest collections of artefacts from this shipwreck in Victoria. It is significant for its association with the shipwreck, which is on the Victorian Heritage Register (VHR S417). The collection is significant because of the relationship between the objects, as together they have a high potential to interpret the story of the LOCH ARD. The LOCH ARD collection is archaeologically significant as the remains of a large international passenger and cargo ship. The LOCH ARD collection is historically significant for representing aspects of Victoria’s shipping history and its potential to interpret sub-theme 1.5 of Victoria’s Framework of Historical Themes (living with natural processes). The collection is also historically significant for its association with the LOCH ARD, which was one of the worst and best known shipwrecks in Victoria’s history. A square marble tile retrieved from the wreck of the LOCH ARD. Most of its surface is covered by a thin layer of limestone and marine growth encrustation that is stained rust-red. The tile is ‘rough-worked’, cut to shape and size, but not smoothed or polished. There is a companion tile in similar condition in the Flagstaff Hill collection. From visual observation of the original surface (at low magnification) the tile appears to be of white Carrara-type marble.flagstaff hill, warrnambool, shipwrecked coast, flagstaff hill maritime museum, maritime museum, shipwreck coast, flagstaff hill maritime village, great ocean road, loch line, loch ard, captain gibbs, eva carmichael, tom pearce, glenample station, mutton bird island, loch ard gorge, white marble, marble tile, carrara marble, imported marble, colonial architecture, victorian building materials -
 Flagstaff Hill Maritime Museum and Village
Marble Tile, circa 1878
The artefact is a white marble tile raised from the wreck of the LOCH ARD (1878). The cargo manifest of the sunken vessel has the entry “Marble £400”. This is placed directly following the entry “Glass (604 cases)”. This conjunction suggests the marble tile was originally part of a consignment intended for use in a ‘high end’ residential or public building project in the gold and wool rich Colony of Victoria. Traditionally, white or cream marble was imported into Britain from the Mediterranean region of Europe, where beds of sedimentary limestone (calcium and magnesium carbonate) had been buried over a long geological period of time. Deep in the earth’s crust, it had been subjected to immense pressures and high temperatures, sufficient to completely re-crystallise the original deposits. Marble beds began as layers of sediment at the bottom of ancient tropical seas, forming from the skeletal remains of calcareous fossils, shell, and coral fragments. The metamorphic process of prolonged compression and heating recrystallised this skeletal material, destroying all signs of the original sedimentary fabric. The resulting ‘true’ marbles of, for example, White Carrara (Tuscany, Italy), Verdi (green) Antico (Thessaly, Greece), and Rouge (red) Languadoc (Carcassone, France), were highly prized in classical decoration (sculpture and friezes) and architecture (temples and arches). Marble was found in nineteenth century Australia, but in small, uneconomic deposits, not suitable for commercial quarrying. The comparative expense of imported marble restricted its use in colonial buildings to carved fireplaces and mantel pieces, or outdoor ornaments such as fountains, statuary and grave stones. If Carrara marble floor tiles were used, they were used sparingly, as an arresting feature in entrance halls for instance. However, most prominent private and public construction used timber flooring, waxed or ‘jappaned’, with carpet runners and rugs (for example the Austin’s Barwon Park Mansion, 1871), or laid tessellated and ceramic tiles of baked clay infused with colour (for example the Chirnside’s Werribee Park Mansion, 1878). HISTORY OF THE LOCH ARD The LOCH ARD belonged to the famous Loch Line which sailed many ships from England to Australia. Built in Glasgow by Barclay, Curdle and Co. in 1873, the LOCH ARD was a three-masted square rigged iron sailing ship. The ship measured 262ft 7" (79.87m) in length, 38ft (11.58m) in width, 23ft (7m) in depth and had a gross tonnage of 1693 tons. The LOCH ARD's main mast measured a massive 150ft (45.7m) in height. LOCH ARD made three trips to Australia and one trip to Calcutta before its final voyage. LOCH ARD left England on March 2, 1878, under the command of Captain Gibbs, a newly married, 29 year old. She was bound for Melbourne with a crew of 37, plus 17 passengers and a load of cargo. The general cargo reflected the affluence of Melbourne at the time. On board were straw hats, umbrella, perfumes, clay pipes, pianos, clocks, confectionary, linen and candles, as well as a heavier load of railway irons, cement, lead and copper. There were items included that intended for display in the Melbourne International Exhibition in 1880. The voyage to Port Phillip was long but uneventful. At 3am on June 1, 1878, Captain Gibbs was expecting to see land and the passengers were becoming excited as they prepared to view their new homeland in the early morning. But LOCH ARD was running into a fog which greatly reduced visibility. Captain Gibbs was becoming anxious as there was no sign of land or the Cape Otway lighthouse. At 4am the fog lifted. A man aloft announced that he could see breakers. The sheer cliffs of Victoria's west coast came into view, and Captain Gibbs realised that the ship was much closer to them than expected. He ordered as much sail to be set as time would permit and then attempted to steer the vessel out to sea. On coming head on into the wind, the ship lost momentum, the sails fell limp and LOCH ARD's bow swung back. Gibbs then ordered the anchors to be released in an attempt to hold its position. The anchors sank some 50 fathoms - but did not hold. By this time LOCH ARD was among the breakers and the tall cliffs of Mutton Bird Island rose behind the ship. Just half a mile from the coast, the ship's bow was suddenly pulled around by the anchor. The captain tried to tack out to sea, but the ship struck a reef at the base of Mutton Bird Island, near Port Campbell. Waves broke over the ship and the top deck was loosened from the hull. The masts and rigging came crashing down knocking passengers and crew overboard. When a lifeboat was finally launched, it crashed into the side of LOCH ARD and capsized. Tom Pearce, who had launched the boat, managed to cling to its overturned hull and shelter beneath it. He drifted out to sea and then on the flood tide came into what is now known as LOCH ARD Gorge. He swam to shore, bruised and dazed, and found a cave in which to shelter. Some of the crew stayed below deck to shelter from the falling rigging but drowned when the ship slipped off the reef into deeper water. Eva Carmichael had raced onto deck to find out what was happening only to be confronted by towering cliffs looming above the stricken ship. In all the chaos, Captain Gibbs grabbed Eva and said, "If you are saved Eva, let my dear wife know that I died like a sailor". That was the last Eva Carmichael saw of the captain. She was swept off the ship by a huge wave. Eva saw Tom Pearce on a small rocky beach and yelled to attract his attention. He dived in and swam to the exhausted woman and dragged her to shore. He took her to the cave and broke open case of brandy which had washed up on the beach. He opened a bottle to revive the unconscious woman. A few hours later Tom scaled a cliff in search of help. He followed hoof prints and came by chance upon two men from nearby Glenample Station three and a half miles away. In a state of exhaustion, he told the men of the tragedy. Tom returned to the gorge while the two men rode back to the station to get help. By the time they reached LOCH ARD Gorge, it was cold and dark. The two shipwreck survivors were taken to Glenample Station to recover. Eva stayed at the station for six weeks before returning to Ireland, this time by steamship. In Melbourne, Tom Pearce received a hero's welcome. He was presented with the first gold medal of the Royal Humane Society of Victoria and a £1000 cheque from the Victorian Government. Concerts were performed to honour the young man's bravery and to raise money for those who lost family in the LOCH ARD disaster. Of the 54 crew members and passengers on board, only two survived: the apprentice, Tom Pearce and the young woman passenger, Eva Carmichael, who lost all of her family in the tragedy. Ten days after the LOCH ARD tragedy, salvage rights to the wreck were sold at auction for £2,120. Cargo valued at £3,000 was salvaged and placed on the beach, but most washed back into the sea when another storm developed. The wreck of LOCH ARD still lies at the base of Mutton Bird Island. Much of the cargo has now been salvaged and some was washed up into what is now known as LOCH ARD Gorge. Cargo and artefacts have also been illegally salvaged over many years before protective legislation was introduced. One of the most unlikely pieces of cargo to have survived the shipwreck was a Minton porcelain peacock - one of only nine in the world. The peacock was destined for the Melbourne International Exhibition in 1880. It had been well packed, which gave it adequate protection during the violent storm. Today, the Minton peacock can be seen at the Flagstaff Hill Maritime Museum in Warrnambool. From Australia's most dramatic shipwreck it has now become Australia's most valuable shipwreck artefact and is one of very few 'objects' on the Victorian State Heritage Register. HISTORY OF THE LOCH ARD The LOCH ARD belonged to the famous Loch Line which sailed many ships from England to Australia. Built in Glasgow by Barclay, Curdle and Co. in 1873, the LOCH ARD was a three-masted square rigged iron sailing ship. The ship measured 262ft 7" (79.87m) in length, 38ft (11.58m) in width, 23ft (7m) in depth and had a gross tonnage of 1693 tons. The LOCH ARD's main mast measured a massive 150ft (45.7m) in height. LOCH ARD made three trips to Australia and one trip to Calcutta before its final voyage. LOCH ARD left England on March 2, 1878, under the command of Captain Gibbs, a newly married, 29 year old. She was bound for Melbourne with a crew of 37, plus 17 passengers and a load of cargo. The general cargo reflected the affluence of Melbourne at the time. On board were straw hats, umbrella, perfumes, clay pipes, pianos, clocks, confectionary, linen and candles, as well as a heavier load of railway irons, cement, lead and copper. There were items included that intended for display in the Melbourne International Exhibition in 1880. The voyage to Port Phillip was long but uneventful. At 3am on June 1, 1878, Captain Gibbs was expecting to see land and the passengers were becoming excited as they prepared to view their new homeland in the early morning. But LOCH ARD was running into a fog which greatly reduced visibility. Captain Gibbs was becoming anxious as there was no sign of land or the Cape Otway lighthouse. At 4am the fog lifted. A man aloft announced that he could see breakers. The sheer cliffs of Victoria's west coast came into view, and Captain Gibbs realised that the ship was much closer to them than expected. He ordered as much sail to be set as time would permit and then attempted to steer the vessel out to sea. On coming head on into the wind, the ship lost momentum, the sails fell limp and LOCH ARD's bow swung back. Gibbs then ordered the anchors to be released in an attempt to hold its position. The anchors sank some 50 fathoms - but did not hold. By this time LOCH ARD was among the breakers and the tall cliffs of Mutton Bird Island rose behind the ship. Just half a mile from the coast, the ship's bow was suddenly pulled around by the anchor. The captain tried to tack out to sea, but the ship struck a reef at the base of Mutton Bird Island, near Port Campbell. Waves broke over the ship and the top deck was loosened from the hull. The masts and rigging came crashing down knocking passengers and crew overboard. When a lifeboat was finally launched, it crashed into the side of LOCH ARD and capsized. Tom Pearce, who had launched the boat, managed to cling to its overturned hull and shelter beneath it. He drifted out to sea and then on the flood tide came into what is now known as LOCH ARD Gorge. He swam to shore, bruised and dazed, and found a cave in which to shelter. Some of the crew stayed below deck to shelter from the falling rigging but drowned when the ship slipped off the reef into deeper water. Eva Carmichael had raced onto deck to find out what was happening only to be confronted by towering cliffs looming above the stricken ship. In all the chaos, Captain Gibbs grabbed Eva and said, "If you are saved Eva, let my dear wife know that I died like a sailor". That was the last Eva Carmichael saw of the captain. She was swept off the ship by a huge wave. Eva saw Tom Pearce on a small rocky beach and yelled to attract his attention. He dived in and swam to the exhausted woman and dragged her to shore. He took her to the cave and broke open case of brandy which had washed up on the beach. He opened a bottle to revive the unconscious woman. A few hours later Tom scaled a cliff in search of help. He followed hoof prints and came by chance upon two men from nearby Glenample Station three and a half miles away. In a state of exhaustion, he told the men of the tragedy. Tom returned to the gorge while the two men rode back to the station to get help. By the time they reached LOCH ARD Gorge, it was cold and dark. The two shipwreck survivors were taken to Glenample Station to recover. Eva stayed at the station for six weeks before returning to Ireland, this time by steamship. In Melbourne, Tom Pearce received a hero's welcome. He was presented with the first gold medal of the Royal Humane Society of Victoria and a £1000 cheque from the Victorian Government. Concerts were performed to honour the young man's bravery and to raise money for those who lost family in the LOCH ARD disaster. Of the 54 crew members and passengers on board, only two survived: the apprentice, Tom Pearce and the young woman passenger, Eva Carmichael, who lost all of her family in the tragedy. Ten days after the LOCH ARD tragedy, salvage rights to the wreck were sold at auction for £2,120. Cargo valued at £3,000 was salvaged and placed on the beach, but most washed back into the sea when another storm developed. The wreck of LOCH ARD still lies at the base of Mutton Bird Island. Much of the cargo has now been salvaged and some was washed up into what is now known as LOCH ARD Gorge. Cargo and artefacts have also been illegally salvaged over many years before protective legislation was introduced. One of the most unlikely pieces of cargo to have survived the shipwreck was a Minton porcelain peacock - one of only nine in the world. The peacock was destined for the Melbourne International Exhibition in 1880. It had been well packed, which gave it adequate protection during the violent storm. Today, the Minton peacock can be seen at the Flagstaff Hill Maritime Museum in Warrnambool. From Australia's most dramatic shipwreck it has now become Australia's most valuable shipwreck artefact and is one of very few 'objects' on the Victorian State Heritage Register. The wreck of the LOCH ARD is of State significance — Victorian Heritage Register S417 Flagstaff Hill’s collection of artefacts from LOCH ARD is significant for being one of the largest collections of artefacts from this shipwreck in Victoria. It is significant for its association with the shipwreck, which is on the Victorian Heritage Register (VHR S417). The collection is significant because of the relationship between the objects, as together they have a high potential to interpret the story of the LOCH ARD. The LOCH ARD collection is archaeologically significant as the remains of a large international passenger and cargo ship. The LOCH ARD collection is historically significant for representing aspects of Victoria’s shipping history and its potential to interpret sub-theme 1.5 of Victoria’s Framework of Historical Themes (living with natural processes). The collection is also historically significant for its association with the LOCH ARD, which was one of the worst and best known shipwrecks in Victoria’s history. A square marble tile retrieved from the wreck of the LOCH ARD. Most of its surface is covered by a thin layer of limestone and marine growth encrustation that is stained rust-red. There is a piece of corroded iron encrusted at an oblique angle on the tile’s rear face. The tile is ‘rough-worked’, cut to shape and size, but not smoothed or polished. There is a companion tile in similar condition in the Flagstaff Hill collection. From visual observation of the original surface (at low magnification) the tile appears to be of white Carrara-type marble.flagstaff hill, warrnambool, shipwrecked coast, flagstaff hill maritime museum, maritime museum, shipwreck coast, flagstaff hill maritime village, great ocean road, loch line, loch ard, captain gibbs, eva carmichael, tom pearce, glenample station, mutton bird island, loch ard gorge, white marble, marble tile, carrara marble, colonial architecture, victorian building materials -
 Bendigo Military Museum
Administrative record - Geodetic Survey and Topographical Mapping in Australia - Report by BP Lambert 1968, 1968
Australia is governed by a Federal Government and by six State Governments. National coordination of their respective geodetic survey and topographic mapping activities is effected on the advice of a National Mapping Council. Twenty years ago, at least 95% of Australia was poorly mapped and what maps existed were in need of revision. only a small area of the continent was covered by horizontal geodetic control and there was no scheme for a national levelling survey. Over the intervening period there has been an urgent and increasing demand for topographic maps varying from large scale contoured maps in support of specific engineering projects to rapid reconnaissance maps required for mineral prospecting in remote areas. Superimposed on this has been a defence requirement, specifically for military training areas, and generally for maps of the whole country. During the period much progress has been made. This paper reports on the progress from early colonial days through to the present time and finally hazards a prediction of future trends.Photocopy of 18-page typed report including diagrams, stapled top left-hand corner. Geodetic Survey and Topographic Mapping a Report by BP Lambert Director of National Mapping, Department of National Development, Canberra, Australia, 1968.royal australian survey corps, rasvy, fortuna, army survey regiment, army svy regt, asr, national mapping -
 Warrnambool and District Historical Society Inc.
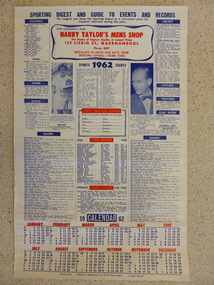
Calendar, Harry Taylor 1962, 1961
This calendar was issued to customers of Harry Taylors Mens Shopin Warrnambool in 1962. Harry Taylor came to Warrnambool in 1932 and opened a menswear shop in Liebig Street. By 1962 Harry’s sons were running two shops at 132 and 136 Liebig Street. In the 1980s the shop at 132 Liebig Street was known as Taylors Colonial. Today this shop is still operated by members of the Taylor family under the name of Surfodesy. Members of the Taylor family been associated with men’s wear and sports wear shops in Warrnambool, for over 80 years and so any historical item connected with the shops is of some importance. The production for customers of a yearly calendar by businesses was, and still is, a feature of our social history.This is a 1962 calendar printed in blue and red on white paper. It has been produced for Harry Taylor’s Men’s Shop in Warrnambool and features two photographs, one of Margaret Smith, the tennis player and one of the Duke of Edinburgh. There is much typed material showing dates etc of prominent sports activities in Australia in 1962. A calendar for 1962 is at the bottom of the page.warrnambool, calendar -
 Warrnambool and District Historical Society Inc.
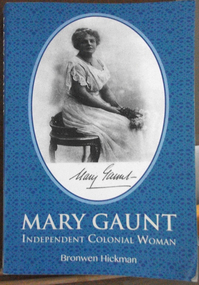
Book, Bronwen Hickman, Mary Gaunt: independent colonial woman, 2014
Biography of novelist and travel writer, Mary Gaunt (1862-1942)This is a soft cover book of 304 pages. It has a blue cover with a black and white photograph of Mary Gaunt in an oval shape on the front cover. There is white lettering on the front cover and black lettering in an oval shape on the back cover. The book has an introduction, 35 chapters, acknowledgements, endnotes, a list of publications and an index. It has several illustrations, sketches, maps and black and white and colour photographs,non-fictionBiography of novelist and travel writer, Mary Gaunt (1862-1942)mary gaunt, australian literature, history of warrnambool -
 Warrnambool and District Historical Society Inc.
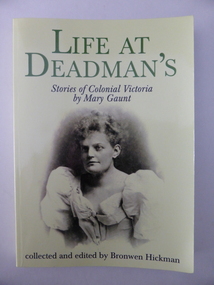
Book, Life of deadmann - Colonial Vic. Mary Gaunt, 2001
This collection of short stories by Mary Gaunt has been edited and published by Bronwen Hickman. Mary Gaunt (1861-1942) was a writer of novels, travel books, short stories and other articles. She was known internationally for her writings in the late 19th century and early 20th century. Born in Chiltern, Victoria, she was the first woman to study at Melbourne University, travelled extensively in West Africa and China in areas rarely visited by white women and published 26 books. From 1894 to 1900 Mary Gaunt lived in Warrnambool where her husband, Hubert Lindsay Miller, was a local doctor. Some of her writings were produced while she was in Warrnambool and some have local content. This book, although a modern reprint, is important as the only collection of the short stories of the internationally-known author, Mary Gaunt that we have in our collection. Mary Gaunt not only lived and wrote in Warrnambool for some years but also used local places, people and events in her writings. One of the stories in ‘Life at Deadman’s’ (‘The Humbling of Sergeant Mahone’) is based on the events in the late 19th century when whisky was being made illegallyin the Nirranda district. Mary Gaunt apparently had met the real main character in this saga. This is a soft cover book of 178 pages. The cover is yellow with an image in sepia tones of Mary Gaunt. The lettering on the front cover and on the spine is green and black. The back cover contains critical comments on Mary Gaunt’s work and information on the editor. The book has a map, an introduction, a list of the sources of the stories, twelve short stories, a list of works by Mary Gaunt and a note on the author by the editor. ‘With Good Wishes Bronwen Hickman’ mary gaunt, dr h.l.miller, whiskey stills in the warrnambool district (19th century), history of warrnambool, australian women writers -
 Kiewa Valley Historical Society
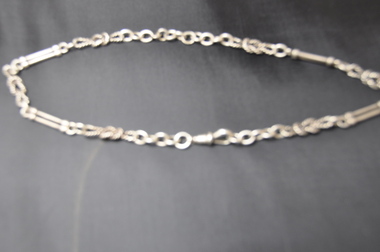
Necklace Silver Lover's Knot, circa late 1800's
This "lovers" necklace is made from Sterling Silver and was imported into "the Colony" before the Australian Federation was enacted. This was a time when very close "bondage" between Australia and England was shown by the amount of "quality" products that were purchased, and the motto "Best of British" was truly still entwined in all aspects of rural live, from "British" mores and values "inherited from the "colonial days". It was only after World War II (when Britain could not help to defend Australia from the Japanese) that these long held mores were, through generations and generations, that the USA and Asian markets and goods replaced the "old" ties.This ladies silver necklace is very significant to the Kiewa Valley because it demonstrates the "rural" mores and values at a time(1800's to mid 1900's) when the "gap" between city and rural mores was very pronounced. That gap was maintain only through the degree of "isolation" (communication and physical interactions) between the two major types of "communities" and the evolving mores which each of them were going through. The social structure was just as pronounced in rural areas as it was in the cities. Fine jewelry was a "sparkling" affirmation of status and "wealth". The rural sectors had very wealthy sectors before the World Wars, when "Australia" was riding "on the sheep's back", but the increased mineral wealth exports and "big" industry of the cities started to forge ahead.This necklace is made from sterling silver and has four double bar and six lover's knots coupled to a silver chain. There is one silver double bar missing and may have been removed to reduce the length of the necklace. Sterling silver Hallmarks and Makers marks are stamped on the links and the clasp. The meaning of the horizontal twin bars have not yet been interpreted .Hall marks "PWC" and "AA"necklace, jewellery, sterling silver, lovers knot -
 Warrnambool and District Historical Society Inc.
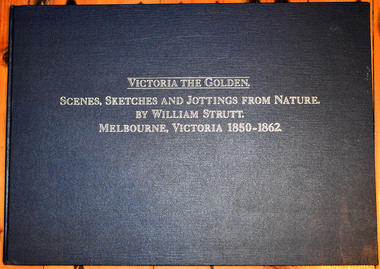
Book, William Strutt et al, Victoria The Golden - Scenes, Sketches and Jottings from Nature, 1980
Reproduction of an early Victorian artist's workThis is a book of 85 pages. It has a blue cover with gold lettering on the front cover and the spine. It contains printed text, reproductions of artistic works - sketches, lithographs and jottings. non-fictionReproduction of an early Victorian artist's workvictorian colonial art, william strutt -
 Warrnambool and District Historical Society Inc.
Book - Encyclopaedia of Australasia, David Blair, Cyclopaedia of Australasia, 1881
... as Australasia (Australia, New Zealand and nearby islands) from the early ...Dictionary of facts, places and people of British Colonies in the Southern OceanThis is a book of 794 pages. It has a brown cover with gold printing on the front and the spine. The front cover is completely detached. The pages contain printed text. non-fictionDictionary of facts, places and people of British Colonies in the Southern Ocean british colonial history, australian history, warrnambool history -
 Eltham District Historical Society Inc
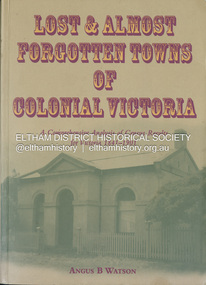
Book, Angus B. Watson, Lost & almost forgotten towns of colonial Victoria : a comprehensive analysis of census results for Victoria, 1841-1901, 2003
Lists all towns and villages with entries in the Victorian censuses between 1841 and 1901. It includes in excess of 1400 entries with the latitude and longitude for each town, numbers males and females in the town, and the number of occupied dwellings (where available). For many of these settlements the only visible trace of them today is in the census results collected by the fledgling governments of Colonial Victoria. It is a comprehensive reference and a fascinating insight into the movements of early populations of new Australians.cities and towns victoria, history 19th century, statistics, ghost towns - victoria, geographical names victoria, victoria census -
Glen Eira Historical Society
Article - Sargood Family
This file contains six articles on the Sargood family. Two photocopied pages from BURKE’S COLONIAL GENTRY vol. 1, 1891, on the Frederick Thomas Sargood family lineage, pages 129 and 130. Article on Frederick Thomas Sargood on education, business ventures, the volunteer forces, and his ministerial position and marital status, taken from VICTORIA AND ITS METROPOLIS vol. 2, 1888, page 501. Nine handwritten pages of Frederick James Sargood family tree, primarily taken from Sargood Family Bible, Melbourne University archives, undated. One typed and one carbon copy of written notes on Sargood family in Australia up to family member Edith Marian. Hand written notes taken from Caulfield Rate Books 1858 to 1892, on Frederick Thomas Sargood, also St Kilda rate books 1867 to 1874. Hand written details of unknown relationships to F. G. Sargood and listing of Sargoods from phone book, date unknown.sargood frederick thomas, sargood marian australia rolfe, sargood frederick george, sargood percy rolfe, sargood alfred herbert, sargood harry morton, sargood willie ernest, sargood clara wordsworth, sargood edith marian, sargood emma winnifred, sargood gulielma bertha, sargood charlotte rippon tomlin, sargood julia charlotte, sargood frederick james, warehouses, defence forces, parliamentary representatives, st mary’s church, allen william, hotham street, caulfield, glen eira road, sandham street, ripponlea, housenames, mansions, willow street, gardeners, coachmen, à beckett t. t., alma road -
 Glen Eira Historical Society
Book - Reformed Presbyterian Church
Book giving history of Reformed Presbyterian Church In Canada, Australia (Geelong and McKinnon Congregations). Some photographs (black & white) of McKinnon church in book. Title: A Brief History of Colonial Mission Work in Canada and Australia by Rev. Hugh Wright for the Reformed Presbyterian Church of Ireland.wright hugh rev., manses halls, mcewan alastair, mckinnon road, bentleigh east, halket a., the reformed presbyterian church, hannah e, park s, mckinnon mcewan mrs., malcolm street, halket d. m., mcewan william reid rev., mcconaghy j., halket j., sabbath school -
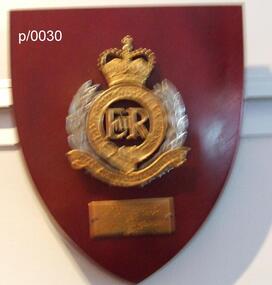 Waverley RSL Sub Branch
Plaque Royal Australian Engineers, Royal Australian Engineers
The Royal Australian Engineers (RAE) is a corps of the Australian Army (although the word corps does not appear in their name or on their badge). The RAE is ranked fourth in seniority of the corps of the Australian Army, behind the Staff Cadets, Armoured and Artillery Corps. The Corps was formed by the amalgamation of the various colonial engineer corps of the States and territories of Australia in 1902[2] and since then has served in various conflicts including World War I, World War II and the Vietnam War. The Corps has also served on numerous peacekeeping operations and is currently involved in the Australian contribution to the war in Afghanistan. The RAE provides combat engineering, construction and other technical support to the Australian Defence Force. One of the main roles of the Corps is to provide mobility and counter mobility capabilities to the Australian Army and its allies. This means enhancing the ability of friendly forces to move while denying movement to enemy forces. In order to provide these capabilities, engineers are required to conduct many tasks including penetrating minefields, locating and disarming booby traps, purifying water and building roads and bridges. The Corps also performs the majority of the Australian Army's demolition tasks and is trained to fight as infantry if needed. http://en.wikipedia.org/wiki/Royal_Australian_EngineersWooden Plaque 15cm x 13cmRoyal Australian Engineers -
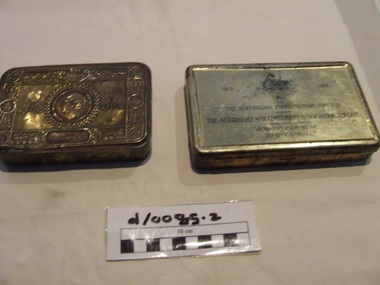 Waverley RSL Sub Branch
Gift tobacco tins
Gift to troops in France 1914-15. Decorative brass tin sent by Princess Mary to members of the British, Colonial and Indian Armed Forces for Christmas 1914. Over 426,000 of these tins were distributed to those serving on Christmas Day 1914. The tins were filled with various items including tobacco, confectionary, spices, pencils, a Christmas card and a picture of the princess. http://museumvictoria.com.au/collections/items/1329146/tin-princess-mary-s-christmas-gift-19142Gift to the troops tobacco tins Christmas 1914 Brass hinged lidded tin New Year 1915 Brass hinged lidded tin containing tobacco in "plugs"Christmas 1914 Imperium Brittanicum France Russia (embossed) Australian coat of arms To the Australian Expeditionary Forces From the Australian Contingent Association Happy New Year 1915 christmas gift, tobacco, princess mary -
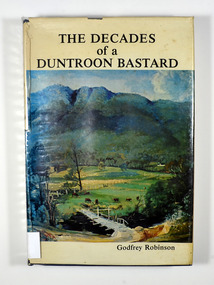 Marysville & District Historical Society
Book, The Decades of a Duntroon Bastard, 1980
A biography of Godfrey Robinson of his time serving in the Australian, British and Indian Armies; of his time in the British Raj, the Burma war and colonial Africa and of his time as a farmer in Taggery, VictoriaHardback. Front cover is of a painting of a farm at the base of the Cathedral Range in Victoria. Back cover has a black and white photograph of the author and a blurb on the book.This is copy No. 118/142 of the prepublication issue. Signature of the author Stamp of the Marysville & District / Historical Society Inc / P.O. Box 22 / Marysville 3779duntroon, australian army, british army, indian army, british raj, burma war, colonial africa, taggerty -
 Marysville & District Historical Society
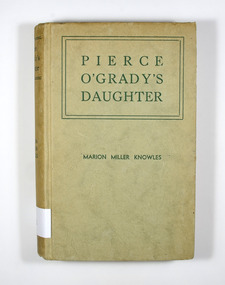
Book, Marion Miller Knowles, Pierce O'Grady's Daughter, 1928
... children's story set in colonial times. short stories australian ...An Australian children's story set in colonial times.Buff color cover with the title and the author's name in dark green lettering on the spine and front cover.fictionAn Australian children's story set in colonial times.short stories, australian -
 Marysville & District Historical Society
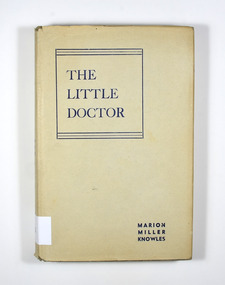
Book, The Little Doctor
... children's story set in colonial times. short stories australian ...An Australian children's story set in colonial times.Dust cover is buff in color and the title and author's name is in navy blue lettering on the front cover and spine.fictionAn Australian children's story set in colonial times.short stories, australian -
 Marysville & District Historical Society
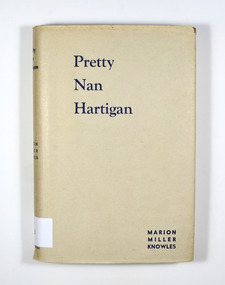
Book, Marion Miller Knowles, Pretty Nan Hartigan, 1928
... children's story set in colonial times. short stories australian ...An Australian children's story set in colonial times.Dust cover is a buff color with the title and author's name in navy blue lettering on the front cover and spine.fictionAn Australian children's story set in colonial times.short stories, australian -
 Marysville & District Historical Society
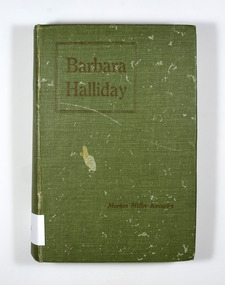
Book, Marion Miller Knowles, Barbara Halliday-A story of the hill country of Victoria, 1896
... country of Victoria set in colonial times. short stories ...A story of the hill country of Victoria set in colonial times.Cover is olive green with the title and author's name in gold lettering on the front cover and spine.fictionA story of the hill country of Victoria set in colonial times.short stories, australian, victoria -
 Marysville & District Historical Society
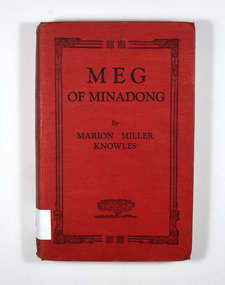
Book, Marion Miller Knowles, Meg of Minadong, 1926
An Australian children's story set in colonial times.Red cover. Title and author are in black lettering on front cover and spine of book.fictionAn Australian children's story set in colonial times.minagong, marion miller knowles, australia, fiction -
 Lara RSL Sub Branch
Photograph, Set 4 photographs. and others for Torquay Light Horse camp, 1940
These images capture for all time Light Horsemen travelling through Geelong on their way to camp at Torquay for the last Group meeting in Australia . information following - details obtained from .........https://torquayhistory.com/light-horse-brigade/ On Australia Day, 1997, Sir John Young unveiled this plaque on Point Danger, Torquay. Torquay history, Light Horse Training Camp, WW2 Plaque at Pt. Danger Note----- (See images to view plaque) The plaque identifies a significant event in Torquay’s history and the sentiments of ‘change’ for the Light Horse Brigade – from horses to machines. In 1940 the four Light Horse Regiments (4th, 8th, 13th and 20th), some 5000 Light Horse and 2000 horses camped and trained at Torquay. Three other regiments, formerly mounted on horses, were also at Torquay ‘mounted’ on privately owned trucks and cars. Division troops included Artillery, Engineers, Signals, Field Ambulance and other branches of the Army necessary to enable a Division to function. It wasn’t just the sheer numbers of men coming to this little town that made the event significant, it was also the fact that the men of the Light Horse were dramatic, almost glamorous figures and it is easy to see their exploits as some splendid adventure. Horses have played a special role in the story of Australia. They were the only means of transport across this huge country, so it was necessary for everyone to have the ability to ride a horse. When war broke out in 1899 between Britain and the Boers of South Africa (“Boer” was Dutch for “farmer”) Australia sent troops to fight. At first Britain was wary of using untried, unprofessional colonial cavalrymen but soon saw that the slouch-hatted Australian “bushmen” were a match for the fast-moving and unconventional mounted commandos of the Boers. The Australians proved themselves to be expert rough-riding horsemen and good shots. Bush life had hardened them to go for long periods with little food and water. They also showed remarkable ability to find their way in a strange country and use its features for cover, in both attack and defence. By 1914, when Australia joined the war against Germany, there were 23 Light Horse regiments of militia volunteers. Many men from these units joined the Light Horse regiments of the Australian Imperial Force (AIF). Men were given remounts (if not using their own horses) – army horses bought by Commonwealth purchasing officers from graziers and breeders. These were called “walers” because they were a New South Wales stockhorse type – strong, great-hearted animals with the strains of the thoroughbred and semi-draught to give them speed, strength and stamina. On 1st November, 1914, Australia’s First Infantry Division and the first four Light Horse regiments sailed for England in a fleet of transport ships. The first of the Light Horse arrived at Gallipoli in May without their horses. Back with their horses after Gallipoli, they were formidable combatants across the Sinai and Palestine. Some British commanders observed that the light horseman moved with a “lazy, slouching gait, like that of a sleepy tiger” but described how the promise of battle “changes that careless gait, into a live athletic swing that takes him over the ground much quicker than other troops”. They had Light Horse, Torquay, training campdeveloped a reputation as formidable infantrymen. The Turks called them “the White Ghurkas” – a reference to their deadly skill with the bayonet. The Arabs called them “The Kings of the Feathers”. The plume had originally been a battle honour of the Queensland Mounted Infantry for their work in the shearer’s strike of 1891. During WW1 it was adopted by almost all the Light Horse Regiments. It was the proud badge of the light horseman. The most famous of their battles was the attack on Beersheba- the charge of the 4th Light Horse Brigade. Mounted infantrymen and their superb walers had carried out one of the most successful cavalry charges in history – against what seemed impossible odds. They surprised the Turks by charging cavalry-style, when they would normally have ridden close to an objective then dismounted to fight. The fall of Beersheba swung the battle tide against the Turks in Palestine; and changed the history of the Middle East. While 19 men from the Surf Coast Shire served with the 4th Light Horse over the course of WW1, only four were involved in the charge of Beersheba- John GAYLARD, Philip QUINN.(Winchelsea); Wallace FINDLAY (Anglesea); Harry TRIGG (Bambra). After the war, Light Horse units played a key role in the Australian Government’s compulsory military training programme. The Citizen Military Forces (C.M.F.) thrived on the glamour of the wartime Light Horse tradition, ignoring the possibility that motor vehicles would soon replace the horses. When training was no longer compulsory, the C.M.F. regiments declined and horses became more of a luxury during the 1930s depression years of poverty and unemployment. Some regiments were motorised. Then, in 1939, Australia joined Britain in another world war. Training was increased for the militia at both home bases and regional training camps. The camp at Torquay in 1940, commanded by Major General Rankin, was at Divisional strength. By the end of the camp some felt that the Division was ready for active service. Gradually, over the next four years, the Australian Light Horse units were mounted on wheels and tracks and the horses were retired. Six men enlisted at the Torquay camp and another 57 men and women enlisted at Torquay for service in WW2. Those who served in the Militia provided valuable Officers and NCOs and men for the armed services during the war. Each infantry division of the 2nd AIF had a Light Horse regiment attached to it. But the day of the Australian mounted soldier hadn’t quite passed. During World War II, Australia’s 6th Cavalry Regiment formed a mounted unit they called “The Kelly Gang” which did valuable scouting work. In New Guinea, a mounted Light Horse Troop did patrol duty and helped carry supplies. Some fully equipped walers were flown into Borneo for reconnaissance in rugged mountain country. But by the end of the war, in 1945, the horse had disappeared from the Australian Army. References: Australian Light Horse Association www.lighthorse.org.au National Australia Archives Australian War Memorial Surf Coast Shire WW1 memorials www.togethertheyserved.com The Light horse- a Cavalry under Canvas Light Horse, Training Camp, Torquay, WW2 Late in 1939 it was decided to set up a Lighthorse training camp in Torquay to train both men and horses for the battles of the Second World War. Horses, men and equipment came on special trains from all over Victoria and NSW, and as you would expect horseman came from areas such as Omeo and Sale, the Wimmera and the Western District. They arrived at the Geelong racecourse for watering in the Barwon River and then were ridden across the ford at the breakwater and began their 11 mile trek to Torquay. Light Horse, Training Camp, Torquay, WW2 Tent city By the end of January 1940 the camp at Torquay accommodated some 5000 men and 2500 horses of the Second Cavalry Division. The rows of horses, tents and huts near Blackgate Road were quite a sight. While the cavalrymen engaged in exercises on the land and on the beaches, many of the troops took over the Torquay School for special training of men and officers. Mr Bob Pettit local farmer and Councillor for the Barrabool Shire, wrote about the Light horse in the Surf Coast Community News in 1985 saying “They used to travel about the district riding four abreast in one long convoy. To my annoyance they went through my property and shut all the gates behind them. I had certain gates open to let stock in to the water holes and it would take me three -quarters of an hour to follow the horsemen up and put all the gates right again” he continued “the men from the Light Horse were here when the fire went through in March 1940. He recalled an incident when early one morning, as some one blew the bugle, a soldier putting a white sheet on the line frightened the horses. They panicked and ran off in all directions. Six went over the cliff near Bird Rock, five were never found, and the rest were gathered up after nearly a fortnight in the bush around Addiscott and Anglesea" Light Horse, Training Camp, Torquay, WW2, Geelong Parade Geelong parade The training camp culminated in a parade through the streets of Geelong on March 12th 1940. The salute was given at the Town Hall and the troops continued on a route to the You Yang’s for a training exercise. Note-----(see media section for photograph) The Camp was abandoned in mid 1940 as it was deemed unsuitable for training during winter and the cost of a permanent camp could not be justified if it could not be used all year. Historic.......Rare,,,Interpretive.Sepia photographs.set of four ....post card size ....Horses &LighthorsemenNo 1, Lighthorsemen Regiment Geelong 1940......No 2 Light Horse at Breakwater Geelong 1938 to 1940....No 3 Light Horse at Breakwater Geelong 1938 to 1940.....No 4 Light Horse crossing Breakwater camped at Geelong Showgrounds. These markings are on reverse of photographs.light horsemengeelong 1940., world war 2 -
 Lara RSL Sub Branch
Money, Japanese Goverment One Shilling, 1942
The Japanese government-issued Oceanian Pound was one of several issues of Japanese invasion money used during World War II. Consisting of only four denominations, the Oceanian Pound was the shortest set (i.e., total number of denominations) issued. Geographically, the region of Oceania comprises numerous islands across the vast South and Central Pacific which includes the islands of New Zealand.[1] Certain descriptions may or may not include Australia.[2] Oceania has also been defined by island groupings: Melanesia, Micronesia, and Polynesia.[1][3] However, from a numismatic perspective (i.e., the issuance of Japanese invasion money), Oceania consisted of the occupied territories of Guam, Gilbert and Ellice Islands, Caroline Islands, Marianas Islands, Solomon Islands, Palau, and the now defunct Territory of New Guinea.[4] [5] Although officially called "Oceania" the region was considered a financial and currency union under Japanese colonial dominion that included several political jurisdictions rather than a single polity.A blue coloured paper note with picture of fruit and an island beach on the front.On the front reads "Japanese Government One Shilling" and on the reverse the number 1. On the front in red are the letters "OC".money, paper, currency, japanese, wwii, japan, oceania, shilling, one, occupation, japanese government, blue -
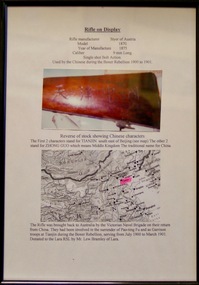 Lara RSL Sub Branch
Framed Photograph and Rifle, Rifle - Styer. Made in Austria in 1875, 1875
The Boxer Rebellion, Boxer Uprising or Yihetuan Movement was a violent anti-foreign, anti-colonial and anti-Christian uprising that took place in China between 1899 and 1901, toward the end of the Qing dynasty.The Rifle was brought back to Australia by the Victorian Naval Brigade on their return from China. They had been involved in the surrender of Pao-ting Fu and as Garrison troops at Tianjin during the boxer Rebellion, serving from July 1900 to March 1901. Rifle - Styer. Made in Austria in 1875. Glass covered Rectangular Framed Photo and Map with a brief description.rifle,gun,styer rifle, boxer rebellion,lara r.s.l. -
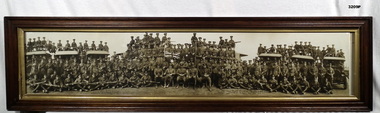 Bendigo Military Museum
Photograph - PHOTOGRAPH, FRAMED
Black & white photo in brown wooden frame with gold inner edge & glass front, white backing with wire hanging strap. Photo of 300th Co Army Service Corps (late 9th Australian Company). All personnel in full uniform with vehicles in background, Australian flag in centre.Bottom of photo: “300th Army Service Corps (late 9th Australian ASC). DSCM Mobilized for European War. June 1915”photography-photographs, frame accessories, 300th, passchendaele barracks trust -
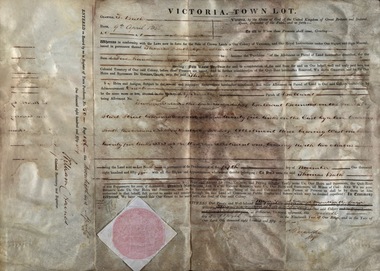 Federation University Historical Collection
Document, Grant, by Purchase, Ballarat, Victoria, 1856, 1856
Thomas Bath of Ballarat became the purchaser of a parcel of land for the sum of Five Hundred Pounds. The land was in the County of Grant, Parish of Ballarat. Record of Register of Town Purchase, No. 50, Page 156 on 20 April 1856 and signed by William C Haines.Thick cream paper, badly stained. Hanad written Official seal Dated 9 April 1856 Signed: E Macarthur - Major General Edward Macarthur Signed: William C Haines - Colonial Secretarythomas bath, county of grant, parish of ballarat, william c haines, colonial secretary, edward macarthur -
Federation University Historical Collection
Document, Colonial Mutual Fire Insurance Co Policy, c1907
Four page policy filled out by Frederick Martellballarat school of mines, insurance, colonial mutural fire co insurance, frederick martell