Showing 331 items
matching william bottoms
-
 Rutherglen Historical Society
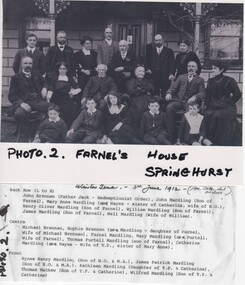
Photograph - Image, Farnel's House Springhurst - Winter Time, 3/06/1912
Farnell Mardling is believed to have been a Councillor and Mayor of Rutherglen Borough, and was on the committee that was responsible for the building of the Common School in 1872. Persons identified in the photograph are: Back row (left to right): John Brennan (Father Jack - Redemptionist Order), John Mardling (Son of Farnel), Mary Anne Mardling (nee Hayes - sister of Catherine, wife of H.O.), Henry Oliver Mardling (Son of Farnel), William Mardling (Son of Farnel), James Mardling (Son of Farnel), Nell Mardling (Wife of William). Centre Row: Michael Brennan, Sophie Brennan (nee Mardling - daughter of Farnel, Wife of Michael Brennan), Farnel Mardling, Mary Mardling (nee Purtell, Wife of Farnel), Thomas Purtell Mardling (son of Farnel), Catherine Mardling (nee Hayes - Wife of T.P., sister of Mary Anne. Front row: Hynes Henry Mardling (Son of H.O. & M.A.), James Patrick Mardling (Son of H.O. & M.A.), Kathleen Mardling (Daughter of T.P. & Catherine), Thomas Mathew Mardling (Son of T.P. & Catherine, Wilfred Mardling (Son of T.P. & Catherine).Black and white photograph of a large family group, posing in front of a veranda with iron lace. Caption of separate piece of paper identifies the people in the photograph.Written at bottom of photo: "Photo. 2. Farnel's House, Springhurst" Written on the left of the caption: "Photo.2." At top of caption paper: "Winter time. 3rd June 1912" mardling family, brennan family, purtell family, john brennan, redemptionist order, john mardling, mary anne madling, henry oliver mardling, william mardling, james mardling, nell mardling, michael brennan, sophie brennan, farnel mardling, mary mardling, thomas purtell mardling, catherine mardling, hynes henry mardling, james patrick mardling, kathleen mardling, wilfred mardling, thomas mathew mardling, farnell mardling -
 Rutherglen Historical Society
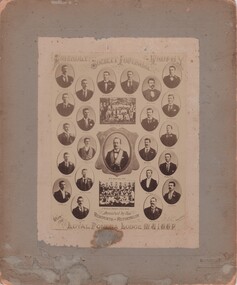
Photograph - Image, Hugen and Bennet, Friendly Society Football Trophy, c1900
Individual portraits are captioned with names - Left to Right from top: R. Roberts, J.B. Collins, W.R. Harry, A. Martin, H. Gilmour, J. Pitcher, J. Ashton, N. Evans, G. Evans, L. Jackson, T. Wilkinson, F.H. Greenwade - Secretary, W.H. Houston - N.G., W.Rees - P.E. Secretary, F. Garnham, F. Hiskins, A. Trevellian, A. Deas, G. Ashton, D. McAliece, O. Devers, H. Devers - Captain, E. Evans. Black and white photograph, mounted on cardboard, of Friendly Society Football Trophy, showing a central oval portrait of a man in Friendly Society regalia, with a rectangular photograph of a football team, above and below. The three central photographs are surrounded by 22 individual oval portraits of the players.Photographs of football teams are captioned: "M.U.I.O.O.F." and "St Patrick's Branch H.A.C.B.S." At bottom of the group of photos is: "Donated by the Residents of Rutherglen" and "Won by Loyal Pomona Lodge M.U.I.O.O.F." At bottom right corner of photo: "Hugen & Bennett, Photo, Rutherglen" Embossed at bottom right of mount: "Chiltern and Rutherglen" Written on back of mount: "My Father, William Richard Harry. Member of M.U.I.O.O.F. for over 50 years"football teams, australian rules football, afl, loyal pomona lodge, muioof, st patricks branch, hacbs, hibernian australian catholic benefit society, r. roberts, j.b. collins, w.r. harry, a. martin, h. gilmour, j. pitcher, j. ashton, n. evans, g. evans, l. jackson, t. wilkinson, f.h. greenwade - secretary, w.h. houston - n.g., w.rees - p.e. secretary, f. garnham, f. hiskins, a. trevellian, a. deas, g. ashton, d. mcaliece, o. devers, h. devers - captain, e. evans., william richard harry, r roberts, j b collins, a martin, h gilmour, j pitcher, j ashton, n evans, g evans, l jackson, t wilkinson, f h greenwade, w h houston, w rees, f garnham, f hiskins, a trevellian, a deas, g ashton, d mcaliece, o devers, h devers, e evans -
 Whitehorse Historical Society Inc.
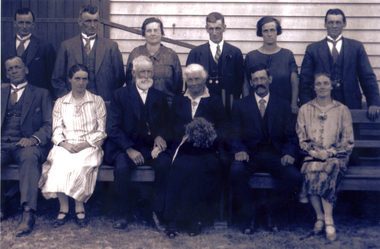
Photograph, Tainton family c1920
Joseph Tainton was born in Gloucestershire about 1850. He emigrated to Australia at the age of 2 years in 1853 aboard the 'British Queen' with his father James Tainton (aged 39) , mother Ann (Drew, aged 34), and brother William 4 years. Joseph married Mary Jane Course in 1877Photograph of Joseph and Mary Jane Tainton's family on the occasion of their 50th Wedding Anniversary. c1920 Top:- Herbert, William, Ida (James), Harold, Lucy (Lowen), Percival. Bottom:- James, Emily (Finger), Joseph, Mary Jane, Joseph Charles, Maude (Finger)tainton, joseph, mary jane (nee course) -
 Hume City Civic Collection
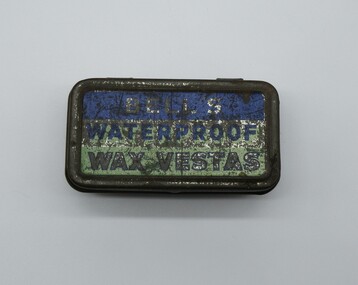
Container - Tin, BELL'S/WATERPROOF/WAX VESTAS
This tin contained waterproof wax vestas, a short match with a wax shaft. On the bottom of the tin there is a rough surface which was struck to light the match.A small brown with dark blue and aqua stripes on the front of a rectangular tin. Three lines of print on the front hinged lid.BELL'S/WATERPROOF/WAX VESTAShouston, william, houston, joan, george evans collection, commercial packaging -
 Tatura Irrigation & Wartime Camps Museum
Clothing - Christening Robe, 1856
The Christening robe was word by Charles William Wilson, the first white child born at Whroo. He was the first born to Mary Primrose Wilson and William Wilson. He died in 1901 aged 45 years and is interred at Tatura cemetary. His monument is erected in front of the Tatura Court House.Cotton and broderie Anglaise white robe. Gathered at the bodice with pin tucking across bottom of robe. Ties at neckline and bodice.christening robe, charles william wilson, mary primrose wilson, william wilson, whroo, tatura court house, tatura cemetery -
 Brimbank City Council
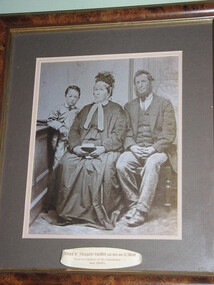
Black and White Photograph, Richard and Margaret Griffith and thier son William
An early 1800s B&W photographPlaque at front bottom centre of frame. -
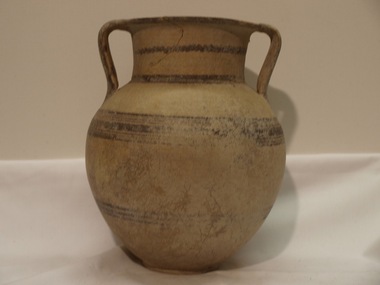
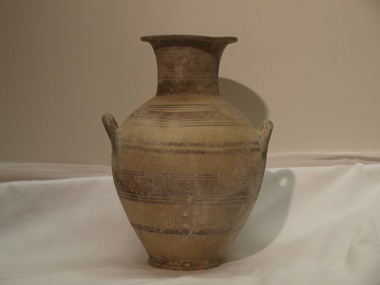 Hellenic Museum
Neck Amphora, 1050 - 600 BCE
Cypriot Bichrome Ware from Cypro-Geometric/Cypro-Archaic PeriodTwo black bands on interior, the rim with three sets of line, the neck shoulder and body with broad red band between sets of three narrow bands, neck with black band at top and bottom, the painted horizontal twin loop handles with two horizontal back wavy lines between, a broad red band between horizontal lines on lower body, single band below, foot painted. cypriot -
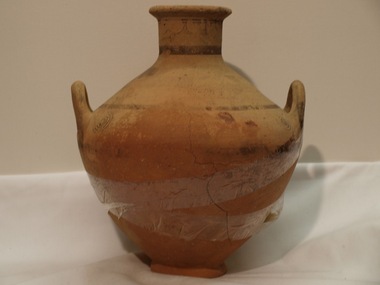
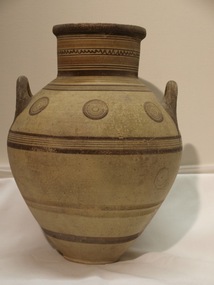 Hellenic Museum
Neck Amphora, 1050 - 600 BCE
Cypriot Bichrome Ware from Cypro-Geometric/Cypro-Archaic PeriodThe rim painted black, a horizontal line around the interior, the neck centred with wavy line between horizontal lines, two red bands, black band at bottom, shoulder with two red horizontal lines above set of black lines within two bands, the painted horizontal twin loop handles with frieze of three concentric circles on each side, over set of horizontal lines with bands, lower body with two horizontal red lines, single black band below. cypriot -
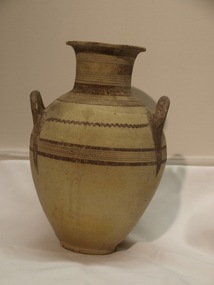 Hellenic Museum
Neck Amphora, 1050 - 600 BCE
Cypriot Bichrome Ware from Cypro-Geometric/Cypro-Archaic PeriodThe painted interior with a set of black horizontal lines, the rim with sets of trapezoids within lines, the outer rim painted, the neck with black band at top and bottom centred with red band between sets of horizontal black lines, another set of narrow bands on shoulder, the painted twin horizontal loop handles with horizontal wavy line between on each side, over a set of lines between bands. cypriot -
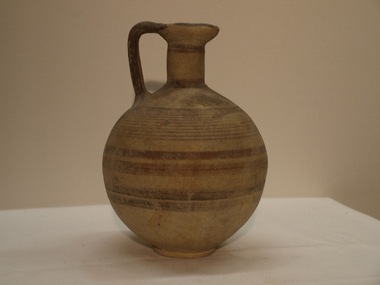 Hellenic Museum
Trefoil-Lipped Jug, 1050 - 600 BCE
Cypriot Bichrome Ware from Cypro-Geometric/Cypro-Archaic PeriodThe lip and double strap handle painted back, the narrow column neck with two bands at top and one at bottom, the shoulder with frieze of concentric circles, over set of lines, two red and two black bands below. cypriot -
 Hellenic Museum
Hydria (Water Jar), 750 - 600 BCE
Cypriot White Painted Ware from the Cypro-Archaic PeriodThe rim is painted black, one encircling horizontal band on interior, the top and bottom of neck with black bands, the strap and painted twin horizontal loop handles over an encircling band, the shoulder with two concentric circles, another flanking the loop handles, the strap handle painted with vertical stroke continuing to body and flanked by another on each side. cypriot -
 Hellenic Museum
Hydria (Water Jar), 750 - 600 BCE
Cypriot White Painted Ware from the Cypro-Archaic PeriodThe rim painted black, the top of the neck with two encircling lines, a band at the bottom, the strap handle with vertical stroke to shoulder, flanked by vertical strokes, two angled strokes below, the shoulder with two pairs of concentric circles on each side and a set of horizontal lines below. cypriot -
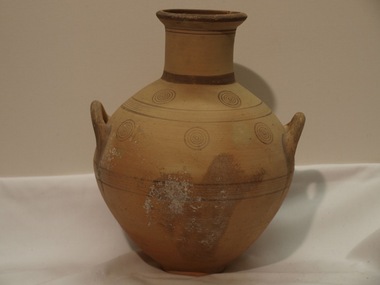
 Hellenic Museum
Neck Amphora, 750 - 600 BCE
Cypriot White Painted Ware from the Cypro-Archaic PeriodThe interior has a painted black band, the rim with sets of strokes between lines, continuing on twin strap handles, the neck with wavy line, two bands at bottom, the body with two sets of encircling lines and broad band between, set of three narrow bands on lower body. cypriot -
 Melbourne Legacy
Book, The Torch
The book speaks about the beginnings of Legacy and the activities that Legacy engaged in up to the time of printing. There are several photographs of visiting dignitaries at various Legacy activities acknowledging the work of Legacy and the beneficiaries of the work of Legacy.Significant in that the work of Legacy, as the photographs show, is recognized by H.M. Queen Elizabeth II, and other serving and retired members of the armed forces of Great Britain. Hardback cover, colour burgundy, 234 pages in black type on white pages interspersed with various photographs of Legacy activities and H.M. Queen Elizabeth II, Lord Louis Mountbatten, H.E. Sir William Slim, Field Marshall Bernard Montgomery and Frank Partridge V.C. First published 1957. Reprinted 1970. Publisher Angus & Robertson. Author M.H. Ellis. Printed and bound by Halstead Press, SydneyFront cover, Legacy logo embossed in gold. Spine, The Torch, Ellis (the author) at the bottom of the spine Legacy: all embossed in gold.history, activities, objectives -
 Ballarat Tramway Museum
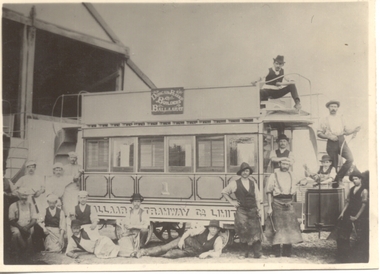
Photograph - Black & White Photograph/s, Horse Tram No. 1 completion, 1887
Photographed outside the Wendouree Parade depot, late 1887, with 16 workmen standing or lying around the tramcar. Builders Photo. Tram is lettered "BALLAARAT TRAMWAY CO LIMITED". A sign on the advertising board says "Duncan & Fraser, Builders, Ballaarat". The men around the tram are dressed in trade clothes, with aprons, including carpenters, painters and blacksmiths. For image history etc see notes. See also Reg Items 1654 and 3042 for different prints of the same photo. Yields information about the construction, final assembly, of the original horse tram at the Ballarat depot 1887, shows the workmen who were involved.B&W photo (copy print) of Ballarat Horse Tram No. 1. Multiple copies held.765.3 - In the top left-hand corner "19", "No. 1 i n 1887", a red border sticker of printing instructions. Centrally on photo "(1) Ballarat Tramways (horse) Car No. 1 after assembly at the Ballarat depot. 1887". In the bottom right-hand corner a "William F Scott" address label. 765.4 - see image i4 for the rear of Wal Jack's photo notes and i8.trams, tramways, ballaarat tramway company, horse trams, depot, duncan & fraser , tram 1 -
 Ballarat Tramway Museum
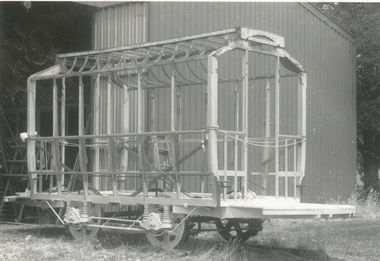
Photograph - B&W Photograph, Dave Macartney, Apr. 1989
Black and white photograph of Horse Tram No. 1, photographed at the rear of the depot about April? 1989. Saloon body framing, complete but no sides etc. Photographed used in the Trolley Wire article on the reconstruction of Horse Tram No. 1. Two copies held -On rear, taped on with red ink correction is the Trolley Wire caption "Reconstruction underway: about a third of the original body framing was reused in the tram. All the corner posts and the underframe are new. DAVE MACARTNEY" and a sticker with black in "Reduce to 5 1/2" x 3 3/4". Copy 2 - In top left hand corner "3 Ballarat Return to:" and in bottom right hand corner, on a sticker "William F Scott / P.O. Box 2550 / Cheltenham VIC 3192, Australia / (03) 9584 3679" High Res image added 20-8-2016.tramways, trams, horse tram no. 1, btps, tramcars, reconstruction, tram 1 -
 Ballarat Tramway Museum
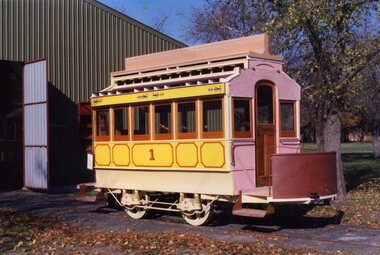
Photograph - Colour Photograph/s, Carolyn Dean, 24/03/1991 12:00:00 AM
Colour photo of horse tram No. 1 on the rear extension of No. 5 at depot, with the first stairway completed taken from Gilles St. looking back at the depot building. See also Reg. item 740 for photo taken at the same time. Tram body has seat on top deck and detail painting is underway. Photo by Carolyn Dean, 24/3/1991.On rear in blue ink "161.5 24-3-91 / Carolyn Dean photo" and in black ink "(4) Ballarat / Return to" and in bottom left hand corner on a sticker "William F Scott / P.O. Box 2550 / Cheltenham Vic 3192 Australia / (03) 9584 3679". horse tram no. 1, btps, tramcars, reconstruction, tram 1 -
 Ballarat Tramway Museum
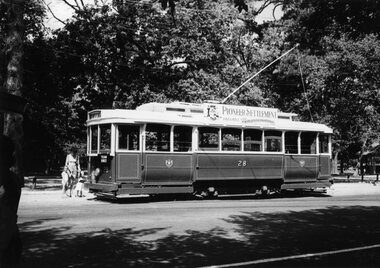
Photograph - Black & White Photograph/s, William. F. Scott, c1990
Black and White Photograph of Ballarat No. 28 in BTM Service, Wendouree Parade, picking up passengers, north bound at Depot Junction. Taken by William F. Scott. Taken c1990. Fitted with Pioneer Settlement sign. On Agfa paper.On rear in bottom left hand corner on a label - stamped "William F. Scott" in black ink and "T19 31A" written in black ink.trams, tramways, btm, 28, passengers, wendouree parade, tram 28 -
 Ballarat Tramway Museum
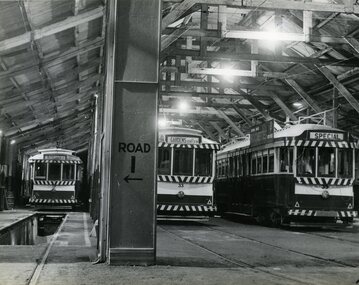
Photograph - Black & White Photograph/s, Jim Seletto, 1960's
Yields information about the interior of the Ballarat tram depot and the various arrangements.Black and white photograph of SEC trams Nos 13, 33 and 35 inside the depot at night during 197 0. Tram 13 on No. 1 road, showing "Depot via Drummond Nth", 33 on 2 road showing "Gardens via Sturt St. W" and No. 35 on 3 road, showing "Special". Tram 35 has a SEC briquettes advertisement. Shows the depot structure. Photograph by Jim Seletto. Shows how "Road 1" was marked on the building along with arrow. Copy 1 - Colour photocopy, laminated, of this photograph on display 5/2000 at 02-02-06 Copy 2 - made by enlarging photo to an approx. A4 print by colour photocopying and laminated for display purposes. Made July 2000 for the Trams at Night exhibition in the depot. Made by W.Doubleday. Has four Velcro dots on rear. Overall size 208H x 274W. Stored in same box at rear of large photos area in an A4 plastic folder. Copy 3 - added 13/4/2009.In black ink "Ballarat Depot (Night) 1970" and in a purple ink stamp Photograph by J. Seletto". Also "DJM" on back of print in pencil. along with pencil notes "Photo (23) and Reduce to 7 1/8 x 5 1/8" Copy 3 - in top left hand corner "38)", in centre in ink "Photo by Jim Seletto, early 1960's" and in bottom right hand corner "James Seletto and William Scott" address label.trams, tramways, depot, night photo, tram 13, tram 33, tram 35 -
 Ballarat Tramway Museum
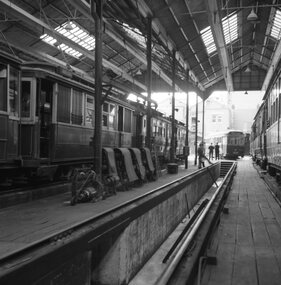
Negative - Set of 2, Geoff Grant, 2/04/1955 12:00:00 AM
Yields information about the interior appearance of the Geelong depot.Negative No. 263 and colour print made by colour laser printer (stored in folder ) of the general view of the car barn from the inside by Geoff Grant on 2/4/1955 while on an Australian Electric Traction Association tour. AETA special tram in background. 1545.1 - black and white image, made by Bill Scott on AGFA Prestige Digital paper, correct way around. Image on 1545 is reversed. Added 17/7/2009 Original negative scanned at hi res 18/5/2020 and image updated. 1545.1 - in ink "38)" in top left hand corner. Along bottom "Geelong depot Car 39 in background 2.4.1955 on a AETA tour Geoffrey Grant pic" and "William Scott" address label.trams, tramways, geelong, aeta, depot -
 Ballarat Tramway Museum
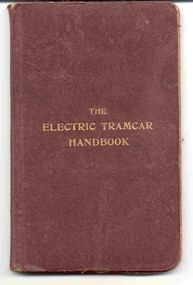
Book, W.A. Agnew, "The Electric Tramcar Handbook", 1920
Book titled "The Electric Tramcar Handbook written by W.A. Agnew. Book has dark red cloth covers, gold block titled on front only, with tipped in end papers, title page, contents pages, three introductory pages by author, 127 pages of text, five index pages and six folded sheets interspersed in book with wiring or controller diagrams. Book finished with red tinted edging. Book published by The Electrical Review Limited, London in 1920, 8th edition. On inside end paper, has ESCo Ballarat office stamp with date 30/9/1924, a glued in white sheet of paper with handwritten notation "To be returned to Mr. P. Bath Motorman No. 51, City Office 9.1.63" and on bottom left hand corner a "Tait Book Co. 90 William St. Melbourne" label that has also been glued in. Primary contents chapters include: The Electric Circuit Electric Tramways Electric Tramcars Controllers Brakes On the Road Faults and Breakdowns. See above for inside end paper.trams, tramways, tramcars, tramways, technical books, handbooks -
 Ballarat Tramway Museum
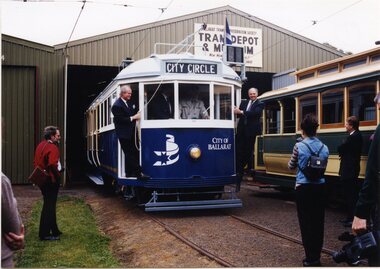
Photograph - Colour Photograph/s and Letter/s, William. F. Scott, 4/12/1995 12:00:00 AM
... On rear in pencil (inside circle) '1' and sticker in bottom...' and sticker in bottom corner 'William F. Scott/ 4.12.95, 16'. Colour ...Colour photograph of launch of 'City of Ballarat' Tram No. 671 on 4.12.95 at depot of Ballarat Tramway Museum. Photo taken just after formal launch with Richard Gilbert (left) and Vern Robson (right) on tramcar. Photo taken on No. 3 road with tram 27 on No. 2 road. Photograph is glued to a piece of paper with item No. 469 as well, and a letter from W.Scott to Dave Macartney of 23.1.1995 with caption details. Letter has Bill's letterhead - see related documents. If required can be separated from backing paperOn rear in pencil (inside circle) '1' and sticker in bottom corner 'William F. Scott/ 4.12.95, 16'.btm, 671, city of ballarat, launch, tram 671, tram 27 -
 Ballarat Tramway Museum
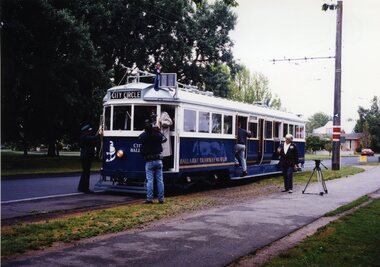
Photograph - Colour Photograph/s and Letter/s, William. F. Scott, 4/12/1995 12:00:00 AM
... On rear in pencil (inside circle) '2' and sticker in bottom... in bottom corner 'William F. Scott/ 4.12.95, 19'. Colour photograph ...Colour photograph of 'City of Ballarat' tram No 671 at St Aidans Drive, following its launch on 4.12.95. TV reporter taking video of front of tram. Carolyn Dean walking by tram. Travis Jeffrey tying trolley rope. Tram has destination of City Circle. Houses and park in background. Photograph is glued to a piece of paper with item No. 469 as well, and a letter from W.Scott to Dave Macartney of 23.1.295 with caption details. Letter has Bill's letterhead - see related documents. If required can be separated from backing paperOn rear in pencil (inside circle) '2' and sticker in bottom corner 'William F. Scott/ 4.12.95, 19'.btm, 671, city of ballarat, launch, tram 671 -
 Ballarat Tramway Museum
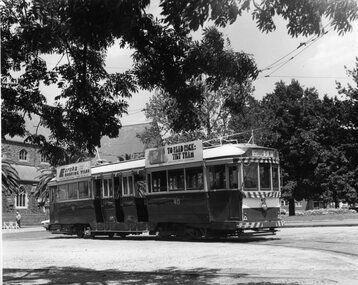
Photograph - Black & White Photograph/s, Chris Wurr, Jan. 1971
Yields information about one of Ballarat's bogie trams at Dawson St and in particular one of the roof advertisements that were well written to catch attention.Black and White photograph of No. 40 using the crossover at Dawson St. The tram has the destination of Lydiard St Nth and has a Eureka Roof Tiles and Bliss Bombs (To read pack: Tilt Tram") roof advertisement. 2nd copy added 13/4/2009, ex Bill Scott Donation.Stamped on rear in black ink "Donated to BTPS by and Photo By" / "Chris Wurr 12 Truscott Street, Ararat 3377 (053) 52 3403. Copy 2 - Stamped on rear "Photo by Chris Wurr 12 Truscott Street, Ararat 3377 (053) 52 3403", a "William F Scott" address label in the bottom right hand corner and in ink "Ballarat Trmys (SEC) / No. 40 negotiates the Dawson St shunt to head back to Lydiard St North/ Jan 1971" and "purchased 5.93"tramways, trams, sturt st, dawson st, bliss bombs, tram 42 -
 Ballarat Tramway Museum
Photograph - Black & White Photograph/s and Black and White photograph/s - mounted, John Phillips, 1968
... Bridge St" and in bottom right hand corner "William Scott..." and in bottom right hand corner "William Scott" and address label. Black ...Yields information about the use of the trams in Bridge St - the major shopping strip at the time in Ballarat, shows the nature of the strip, the passengers (all ladies) and the motor cars in use at the time.Black and white print of No. 28, picking up four lady passengers at the junction in Bridge St, Stones Corner. Tram has the destination of Victoria St. Photo taken late 1960's, early 1970's. In the photo are the Bank of NSW buildings, Gear Chemist and Hotel on the Corner of Peel and Bridge Sts. Print and photo by John Phillips. Second copy added 13/4/2009 - see history .1 - Black and White photograph mounted on heavy cardboard backing, used for display purposes. On rear of second print - "Copyright John Phillips 1968 Bridge St" and in bottom right hand corner "William Scott" and address label.tramways, trams, bridge st, stones corner, passengers, tram 28 -
 Ballarat Tramway Museum
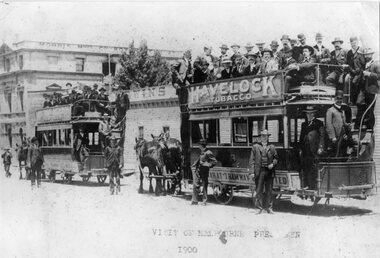
Photograph - Black & White Photograph/s - set of 2, 1900
Yields information about the nature of a visit to Ballarat by Melbourne pressmen and the buildings in the background at the time. Also shows the dress of the visitors at the time. Various sources - ex photo held by the Ballarat Historical Society. Also shows the condition of the trams at the time.Black and white print of a photograph of two crowded horse trams in Lydiard St North. Ballarat, titled "Visit of Melbourne Pressmen 1900". Has Morris Manufacturing Company building in the background. Both horse trams, No.9 nearest to camera, have "Havelock" Tobacco roof advertisements. Behind the trams is Irwin's Provincial Hotel, when it was a timber structure. Print made from a copy negative held in the Ballarat Historical Society collection???? 2nd copy added 8/11/2005 from BTM collection of photos in mess room. 2785.1 - as above, but photographed from an album - shows the full length of horse tram No. 9 and has number TR4 in bottom right hand corner. 2785.2 - as above but cropped on sides - cropped out rear of horse tram 9. 2785.1 & .2 added 12/7/2009, ex William F Scott. See Email from Max Harris 12/8/042785.1 - top on rear in ink - "Ballarat Visit of Press men , 1900 Sydney Harvey photo". 2785.2 - in ink on rear "18a)", "Visit from Melbourne Press 1900, opposite Ballarat Railway Station". In bottom right hand corner "Sydney Harvey" and "William F Scott" address label.tramways, trams, horse trams, melbourne pressmen, ballarat, tram 9 -
 Ballarat Tramway Museum
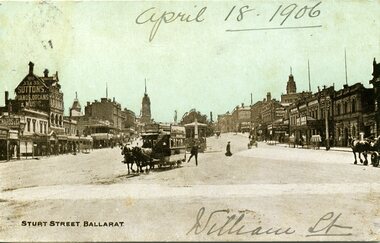
Postcard, E.W. Cole Arcade, Ballarat Horse tram arriving at the Grenville St. terminus, c1900
Demonstrates aspects of working of Ballarat tramways, with a passenger stepping off a moving horse tram at Grenville St. Has a strong association with the sender and receiver, giving family/friends movements. Hand painted card.Printed black and white postcard with hand painted light blue sky background of Ballarat Horse tram arriving at the Grenville St. terminus, at the bottom end of Sturt St terminus with a person stepping off the tramcar. Has buildings on both sides of Sturt St. in photograph, and one other horse drawn vehicle. Also Suttons and Richards & Co. buildings in photo. See Reg. Item 1539 for photographic image of the postcard and 2762, and 3298. Titled "Sturt Street, Ballarat" in bottom left hand corner". On rear of postcard, printed is the words "Post Card", areas for "This space may be used for correspondence" and "The Address to be written here" and in stamp area in a square "Penny Stamp here". On the left hand side of the card "Cole's Sunny Australia 96 Views", E.W. Cole Book Arcade Melbourne, Sydney and Adelaide. See also Reg Item 2762 for another postcard using the same photograph and Reg Item 3298 for another version with some writing on the card.On front of card in black ink "April 18 1906" and "William St" On rear stamped "Melbourne, 17.4.06", 1d stamp and addressed to Mrs. Keast, Cumberland, Waymouth St Adelaide. and a message about family members/friends travelling. On top edge stamp "E.G.Butland"trams, tramways, sturt st, postcards, horse tram, grenville st, tram 35 -
 Ballarat Tramway Museum
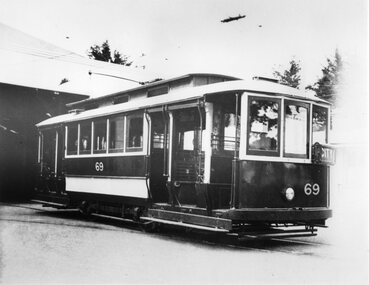
Photograph - Black & White Photograph/s, State Electricity Commission of Victoria (SECV), Feb. 1937
Yields information about the condition of a tramcar received from Adelaide prior to conversion and repainting by the SEC to a Ballarat tram. Shows the layout of the tram.Black and white photo print , ex Adelaide No. 69, (renumbered Ballarat 23) following receipt from Adelaide 2/1937 and prior to repainting in the SEC colour scheme. Photographed in the depot yard with the depot buildings in the background. Tram has destination of 'CITY'. Has William Scot address label in bottom right hand corner and "Ballarat Ex Adelaide 69 became Ballarat 23" and in top left hand corner "30) SEC Alan Bradley"tramways, trams, adelaide, ballarat depot, rehabilitation, tram 69, tram 23 -
 Ballarat Tramway Museum
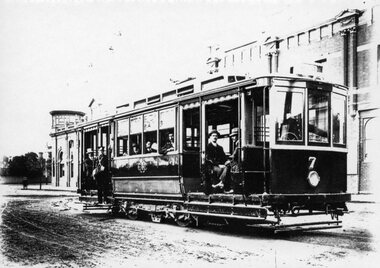
Photograph - Black & White Photograph/s, 1912
... and in bottom right hand corner "William F. Scott" address label... Society" in Bill Scot's handwriting and in bottom right hand ...Yields information about the form and style of the early Geelong trams.Black and white photograph, printed onto card (inkjet printer?) of Geelong No. 7, at the depot, then Corio Terrace, now Brougham Street Geelong 1912. Has a number of men on board the tram - depot workers for the photograph? Shows as built details of the tramcar. Two copies held. Dave O'Neil advised 20/7/2009 - test tram prior to formal opening.Copy 1 on rear "Emerging from Depot 1912", "W.F. Scott Collection", "Geelong Historical Society" in Bill Scot's handwriting and in bottom right hand corner "William F. Scott" address label. and "14" in top left hand corner. Copy 2 - "Geelong Hist Soc / William F Scott Collection / Car outside the depot in Corio Tce (now called Brougham Street)"tramways, trams, geelong, depot, brougham st, tram 7 -
 Ballarat Tramway Museum
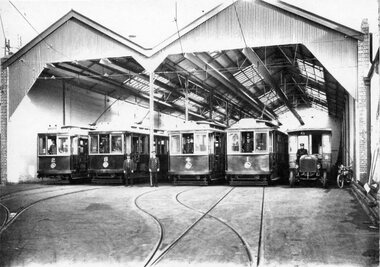
Photograph - Black & White Photograph/s, 1915
... handwriting and in bottom right hand corner "William F. Scott" address... there until 1922" in Bill Scot's handwriting and in bottom right hand ...Yields information about the form and style of the early Geelong trams and in particular one of the cross bench trams.Black and white photograph, printed onto card (inkjet printer?) of the front of the Geelong depot soon after the opening of the tramway, four roads - 1915. Has trams 2, 8, 4 and 1 on front of the track and alongside is a small motor bus and a motorcycles. Each tram has a person vehicle in the front. Shows depot arrangements. Two copies held. Dave O'Neil advised 20/7/2009 - agree with date.Copy 1 - " Depot view about 1915 - Geelong Hist Soc / W F S Collection." Copy 2 on rear "Depot view about 1915. Note bus in right road. Buses were housed there until 1922" in Bill Scot's handwriting and in bottom right hand corner "William F. Scott" address label. and "20" in top left hand corner. Also "Geelong Trys" "C1915" and "W.F. Scott Collection." trams, tramways, geelong, depot, buses, tram 1, tram 2, tram 8, tram 4