Showing 3554 items matching " tram 3"
-
 Melbourne Tram Museum
Pamphlet, Rail Tram & Bus Union (RTBU), "Union Rules and Conditions", c2005
Pamphlet - 3 fold DL sheet printed "Union Rules and Conditions", published by the RTBU c2005, titled "Union Rules and Conditions". Has an advertisement for the Credit Union and its Visa Card on the outside. Printed on the inside of the sheet are 44 rules and conditions for the Tram and Bus Division. Has the address and contact details for the Union.trams, tramways, rtbu, unions, employment, rules -
 Melbourne Tram Museum
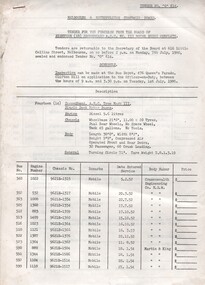
Document - Tender Document, Melbourne & Metropolitan Tramways Board (MMTB), "Tender for the Purchase from the Board of Eighteen Second-hand AEC Mk III Motor Buses Complete", Jun. 1980
.1 - Tender document - Tender "O" 614 - 3 foolscap duplicated sheets (were stapled in the top left hand corner) - titled "Tender for the Purchase from the Board of Eighteen Second-hand AEC Mk III Motor Buses Complete", giving details of the bus numbers, engines, chassis, date entered service, body maker and general description. Third sheets gives MMTB's "Conditions of Tendering for the Purchased of Material from the Board." Tenders closed 7-7-1980. .2 - ditto - "O" 615 - titled "Tender for the Purchase from the Board of five (5) Second-hand AEC MK IV Motor Buses Complete", as above, with tenders closing 7-7-1980.trams, tramways, mmtb, buses, tenders, sales items -
 Melbourne Tram Museum
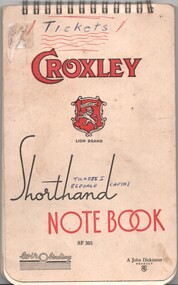
Document - Notebook, John Dickson, Barry George, "Tickets", 1960's?
Notebook - wire bound - Croxley - shorthand notebook - SF305, a John Dickson Product, mark in ink on the top "Tickets" and "Tickets B George (AETA). About 50 pages. Each page has been cut with diagonal cuts to hold MMTB size paper tickets. Most tickets have been removed, but a pencil mark notes what was their when prepared. Has written heading on top of sheet "Melbourne - Out of Date" Includes description of ticket, revenue tin or container or outfit number and prefix. Includes 10d, 9d, 1/-, ticket machines 7d and 1/3 Melbourne as is now: = 3d, 6d, 6d City Section, 10d, 1/6,. Has pages for Sydney, Hobart, Bendigo, VR Melbourne, Perth, Brisbane Sydney 3d, 6d, 9d, 1/-, 1/6, 1/9/ 1/10, 2/- Melbourne - 3d, 4d, 7d, 9d, 1/2, 10d, 5d, 6d.trams, tramways, tickets, mmtb, aeta -
 Melbourne Tram Museum
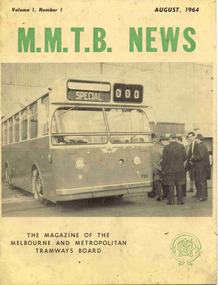
Magazine, K. V. Newmann, MMTB Public Relations Officer, "MMTB News", 1964
Four issues of "MMTB News" - The Magazine of the Melbourne and Metropolitan Tramways Board. Two copies of each issue. 1721.1 - Vol. 1, No. 1 - 16 pages, August 1964, with Bus No. 701 on the front cover. Has articles on; New Buses, Traffic Noise and Trams, Preston Workshops. Cover an cream colour gloss paper, rest of magazine - white gloss paper. 1721.2 - Vol. 1, No. 2 - 16 pages, September 1964, with a photo of a "resilient crossing" on the front cover. Has articles on; MMTB Band, Les Organ - 40 years of service, Tramways Benefit Society, Safety, tram poles, Preston workshops. Cover an cream colour gloss paper, rest of magazine - white gloss paper. Has an obituary for Ron Willingham a member of the band and notes Mr C. Cohen as President and P. Cohen his son is the Secretary. See image i5. 1721.3 - Vol. 1, No. 3 - 16 pages, October 1964, with a photo of part of the training room at Hawthorn depot on the front cover. Has articles on; equipment testing, memories of the cable days, sporting news. Cover an cream colour gloss paper, rest of magazine - white gloss paper. Advised the Clarence Inman constructed the bench mainly in workshop. See image 1721i6 for a handwritten note provided by his son, Kevin Inman. 1721.4 - Vol. 1, No. 4 - 20 pages, November - December 1964, with a colour photo of the new Supervisory control room at Carlton on the front cover. Has articles on; chairman's message, tramway band, Carlton Control - Supervisory Centre, safe electrical working, Christmas celebrations, the old power control centre, a obituary for H. H. Bell, Remembrance day. Printed on gloss white paper.2178.1 has "B706" written in ink on the top of the magazine.trams, tramways, mmtb, carlton control, preston workshops, hawthorn depot, tramway band -
 Melbourne Tram Museum
Magazine, Melbourne & Metropolitan Tramways Board (MMTB), MMTB News, 1967
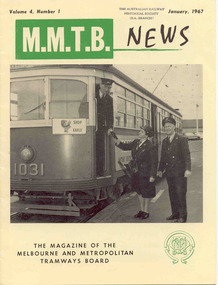
Eight issues of "MMTB News" - The Magazine of the Melbourne and Metropolitan Tramways Board. Two copies of each issue held. All issues printed with an cream colour paper cover with the rest of the magazine white glass paper. 1724.1 - Vol. 4, No. 1 - 16 pages, January 1967, with a photo of the W7 1031 prior to running out of Preston Depot with its crew and depot starter, photo of opening of Glenferrie Rd Malvern, "Like to Drive a Tram?" - Hawthorn driver training school with photos, intake of new conductors, Stores - The Board's Housekeeper - Mr. D. Tatam, extension of the East Preston route, Children's Christmas party, trackwork and duplication of East Coburg to Bell St, laying of a cable tram cable. 2721.2 - Vol. 4, No. 2 - 16 pages, February 1967, with a photo of North Fitzroy bus crews prior to running out, "Sixty years of Essendon Tramways", R. Risson's speech to the ANA on 26/1, Annual report highlights, Tramways band, retirement of Max Jones. Photo of Mr. Risson scanned - see i9 1724.3 - Vol. 4, No. 3 - 16 pages, March 1967, with a photo of a model of the proposed St. Kilda junction arrangements, "Trams and Buses - they keep them rolling", St. Kilda Junction scheme, Overhead crews, Conductresses Uniforms, new conductors, sports and social club news. 1724.4 - Vol. 4, No. 4 - 16 pages, April 1967, with a photo of the reconstruction of Camberwell Road, "Melbourne Needs Trams", Tramways Band, Long Service awards, retirement of Roy Allen, Jack Moffatt World wide TV broadcast from South Melbourne depot, sports and social club news. 2721.5 - Vol. 4, No. 5 - 16 pages, May 1967, with a photo of bus maintenance work at North Fitzroy, Tram track maintenance procedures, retirement of Arthur Battye, death or Harold Wallace, sports and social club news. 1724.6 - Vol. 4, No. 6 - 16 pages, June 1967 with a photo of the World TV broadcast, "Our World" that featured South Melbourne Depot, tram track maintenance procedures, TMSV Visit to Rubicon with bus 570, staggered working hours, first MMTB built tramcars (T166), TMSV all night tour, retirement of Bill Trickey, sports and social club news. 1724.7 - Vol. 4, No. 7 - 16 pages, July - August 1967 with a photo of visiting US Sailors on a tramcar, changes to tramways routes (Norm Cross), retirement of Val Marchesi, Tom Addison, J. J. McKenzie, Gordon Mitchell, sports and social club news. 1724.8 - Vol. 4, No. 8 - 16 pages, September - October 1967 with a photo of Ray Harvey working on a RC2 Controller, tram charter by Bob Wilson, Essendon reunion, sports and social club news. Two copies of issue 4 held. Second copy added 31/8/2004. Two copies of issue 6 held. Second copy added 26/09/2006.trams, tramways, mmtb, hawthorn, essendon, tramways band, st kilda rd, trackwork, tmsv, tv broadcasts, tramcars -
 Melbourne Tram Museum
Document, Marilynn Fahey, "A few Memories of "W" class tram by Marilynn Fahey", 2015
Two page article or manuscript titled "A few Memories of "W" class tram by Marilynn Fahey". Article used in a City of Port Phillip book during the 2015 Seniors Festival and in an exhibition during 2016. Describes the writers view of the demise of W class trams in Chapel St, the tramcars themselves, their ambiance, that one went to Denmark, conductors, use, operations, operation of the trams on route 78. The Museum provided a number of photographs to the City - see emails with Anne Scambary for use in a digital story exhibition. Item as a word document provided by Anne as the basis of the photo request. The first date for the Speaking stories: Digital histories 2016 is at the St Kilda Town Hall Foyer, 10 October - 17 October, 8.30AM- 5PM. Kind regards Anne Scambary Art & Heritage Programs , Vibrant & Creative City T: 9209 6416 , W: www.portphillip.vic.gov.au Private Bag 3, St Kilda, VIC 3182trams, tramways, route 78, w class, articles, stories, chapel st, conductors -
 Melbourne Tram Museum
Drawing, Melbourne & Metropolitan Tramways Board (MMTB), "Brunswick Depot", c1937
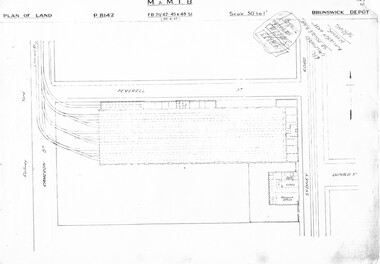
Set of three photocopied plans or drawings on A3 sheet of Brunswick Depot - dated 30-6-1937 .1 - P8142 - Plan showing depot block and building plan .2 - P8144 - Detail plan of depot .3 - P8146 - Plan of Mess Room above depot offices / basement.trams, tramways, drawings, depots, property, brunswick depot -
 Melbourne Tram Museum
Drawing, Melbourne & Metropolitan Tramways Board (MMTB), "Camberwell Depot", Original drawings - c1937, 1985
Set of three photocopied plans or drawings on A3 sheet of Camberwell Depot - c1937 .1 - P? - Plan showing depot block and building plan with adjacent private houses and properties .2 - P8410 - Detail plan of depot - part missing on the left hand side. .3 - P8411 - Plan of Mess Rooms and offices.trams, tramways, drawings, depots, property, camberwell depot -
 Melbourne Tram Museum
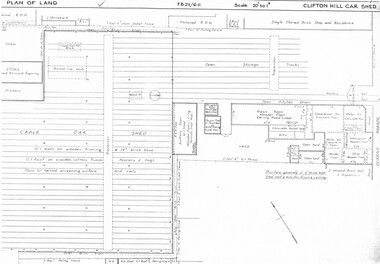
Drawing, Melbourne & Metropolitan Tramways Board (MMTB), "Clifton Hill car shed", c1937
Set of six photocopied plans or drawings on A3 sheet of Clifton Hill car shed - 3/1937 Some of the sheets overlap with each other. .1 - P? - Plan showing depot block, building plan and track plans .2 - P7689 - Plan of Land - dated 6-3-1937 .3 - P7690 - same as sheet one, but shows date and drawing number .4 - P? - part of shed with notes hand written on it - changes made to buildings - notes condensers and gas storage - possibly for the gas producer buses. .5 - part of plan with hand written notes .6 - dittotrams, tramways, drawings, depots, property, clifton hill cable tram depot, cable trams, world war 2, buses -
 Melbourne Tram Museum
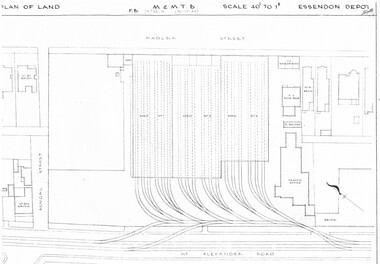
Drawing, Melbourne & Metropolitan Tramways Board (MMTB), "Essendon Depot", c1937
Set of three photocopied plans or drawings on A3 sheet of Essendon Depot - c1937 to 1944 .1 - P? - Plan showing depot block and building plan with adjacent private houses and properties - dated 30-12-1944 .2 - P8008 - Plan showing depot block and building plan with adjacent private houses and properties - dated 27-4-1937 .3 - P8089 - Detail plan of depot and offices, dated 27-4-1937 - prior to new offices being built.trams, tramways, drawings, depots, property, essendon depot -
 Melbourne Tram Museum
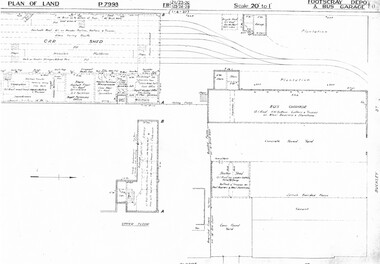
Drawing, Melbourne & Metropolitan Tramways Board (MMTB), "Footscray Depot and bus garage", c1937
Set of three photocopied plans or drawings on A3 sheet of "Footscray Depot and bus garage" c 1937 .1 - P7993 - Plan of land showing car shed, bus garage and offices dated 1-4-1937 - shows substation location. .2 - P? - Plan of land showing buildings and surrounding properties - dated 1-4-1937 .3 - P79821 - ditto but a wider area - dated 1-4-1937 - shows substation location.trams, tramways, drawings, depots, property, footscray depot, substation -
 Melbourne Tram Museum
Drawing, Melbourne & Metropolitan Tramways Board (MMTB), "Glenhuntly Depot", c1937
Set of three photocopied plans or drawings on A3 sheet of "Glenhuntly Depot" - c 1938 .1 - P8334 - Plan of land showing details of offices and tennis court - 2-6-1938 .2 - P8335 - Plan of land showing car depot layout and associated buildings - 2-6-1938 - shows substation location. .3 - P8333 - Plan of land showing MMTB land and surrounding properties. - 2-6-1938trams, tramways, drawings, depots, property, glenhuntly tram depot, substation -
 Melbourne Tram Museum
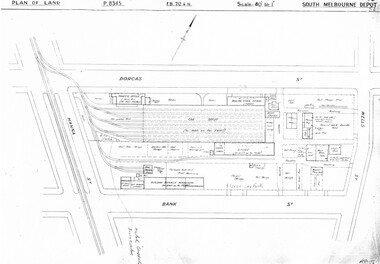
Drawing, Melbourne & Metropolitan Tramways Board (MMTB), "South Melbourne Depot", c1937
Set of five photocopied plans or drawings on A3 sheet of "South Melbourne Depot" - c 1937 .1 - P8345 - Plan of land showing MMTB land and surrounding properties. .2 - P8346 - Plan of land showing detail of offices .3 - P8347 - Plan showing detail of tram shed and adjacent buildings .4 - P8348 - Plan showing detail of buildings along the side of the block. .5 - P8349 - Plan showing details of the per way yard and associated facilities.trams, tramways, drawings, depots, property, south melbourne depot -
 Melbourne Tram Museum
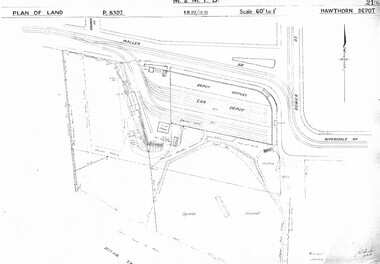
Drawing, Melbourne & Metropolitan Tramways Board (MMTB), "Hawthorn Depot", c1937
Set of three photocopied plans or drawings on A3 sheet of "Hawthorn Depot" - c 1938 .1 - P8392 - Plan of land showing Depot, surrounding land and streets - 2 copies held .2 - P8393 - Plan showing detail layout of depot, buildings and fences - 2 copies held .3 - P8394 - Plan showing detail of offices and basement Drawings 2 and 3 show substation location.trams, tramways, drawings, depots, property, hawthorn depot, substation -
 Melbourne Tram Museum
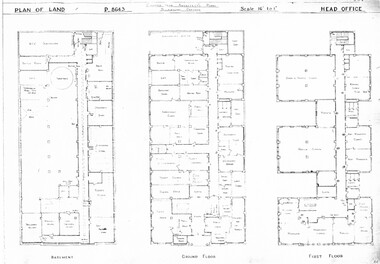
Drawing, Melbourne & Metropolitan Tramways Board (MMTB), "Head Office", c1938
Set of three photocopied plans or drawings on A3 sheet of "Head Office" - c1937 .1 - P8643 - Plan showing Basement, Ground Floor and First Floor - shows MCC substation location in basement. .2 - P8644 - Plan showing Second, Third and fourth floors .3 - P8394 - Plan showing firth floor and roof, with lift rooms.trams, tramways, drawings, depots, property, head office, mmtb, substation -
 Melbourne Tram Museum
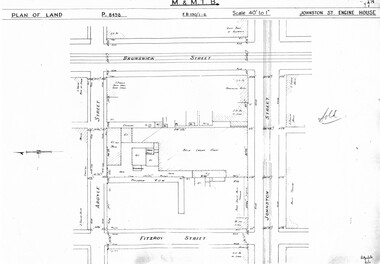
Drawing, Melbourne & Metropolitan Tramways Board (MMTB), "Johnston St Engine House", "Northcote Engine House", "Richmond Engine House", c1938
Set of four photocopied plans or drawings on A3 sheet of the "Johnston St Engine House", "Northcote Engine House" and "Richmond Engine House", c2/1938. .1 - Sheet 1 - P8498 - Plan showing land and surrounding streets for the "Johnston St Engine House" .1 - Sheet 2 - P8499 - Plan showing the layout of the engine house. Has a note sheets 1 and 2 that it has been sold .2 - P8506 -Plan showing land and surrounding streets for the "Northcote Engine House" - 2 copies held. .3 - P8607 - Plan showing Richmond Engine House and adjacent streets with sub-station next doortrams, tramways, drawings, depots, property, cable trams, winding houses, johnston st, northcote, richmond, hoddle st, bridge rd -
 Melbourne Tram Museum
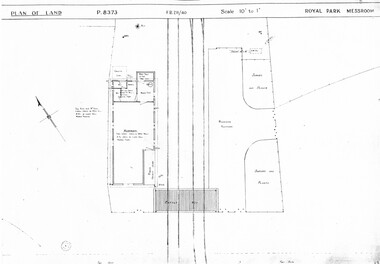
Drawing, Melbourne & Metropolitan Tramways Board (MMTB), "Royal Park Messroom", "Swanston St shunt", "Signal Box, St Kilda Junction", c1938
Set of three photocopied plans or drawings on A3 sheet of the "Royal Park Messroom" .1 - P8373 - Royal Park Messroom - corner Flemington Road and Abbotsford St - Route 55, shows passenger platform and fencing. .2 - P8447 - Swanston St shunt - signal box - shows detail of the building at the junction of Swanston St and Victoria Streets. .3 - P8484 - "Signal Box, St Kilda Junction" - show location of the signal box, adjacent streets and details of the building itself.trams, tramways, drawings, depots, property, route 55, royal park, signal box, victoria st, swanston st, st kilda junction, wellington st -
 Melbourne Tram Museum
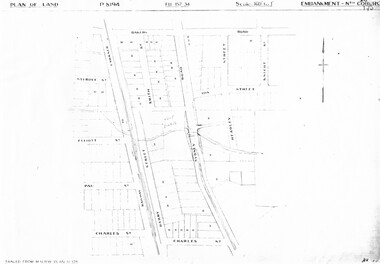
Drawing, Melbourne & Metropolitan Tramways Board (MMTB), "Substations", c1938
Set of 7 photocopied plans or drawings on A3 sheet of various MMTB properties for the following locations. .1 - P8194 - Embankment North Coburg - 18-5-1938 .2 - P8055 - Park Northcote - 28-10-1937 - showing a park at the corner of St Georges Road and Merri Parade Northcote .3 - P8403 - Property at 27 Scotchmer St, North Fitzroy - c1938 .4 - P8177 - Fitzroy Stables, Victoria St and Fitzroy St - 19-11-1938 .5 - P8092 - Cottage in Royal Park - 29-6-1939 .6 - P?? - Land at the corner of Gertrude and Smith St Fitzroy - undated .7 - P8302 - Plan of buildings at the corner of Gertrude and Smith St Fitzroy, c1938.trams, tramways, drawings, depots, property, north coburg, fitzroy, stables, royal park, gertrude st, smith st -
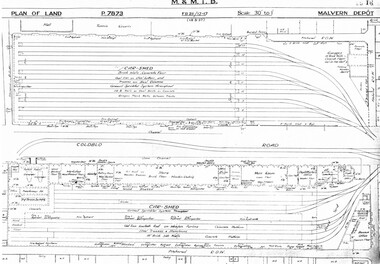 Melbourne Tram Museum
Drawing, Melbourne & Metropolitan Tramways Board (MMTB), "Malvern Depot", c1938
Set of three photocopied plans or drawings on A3 sheets of "Malvern Depot" - 15-3-1937 .1 - P7873 - Plan showing details of car sheds .2 - P7894 - Plan of Land showing overall site plan .3 - P8342 - showing details of buildings, including offices, Club Rooms in Stanhope St, No. 28 Stanhope St and sub-station.trams, tramways, drawings, depots, property, substation, malvern depot -
 Melbourne Tram Museum
Drawing, Melbourne & Metropolitan Tramways Board (MMTB), "Wattle Park", c1938
Set of four photocopied plans or drawings on A3 sheets of "Wattle Park" .1 - P8504 - Curator's Lodge, Wattle Park - 1939 .2 - P8503 - Wattle Park Chalet - 20/2/1939 .3 - P8574 - Office and Sheds - 29/6/1939 .4 - P8505 - Golf House - 20/2/1939trams, tramways, drawings, depots, property, wattle park -
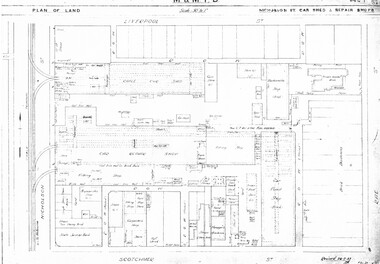 Melbourne Tram Museum
Drawing, Melbourne & Metropolitan Tramways Board (MMTB), "Central Bus Garage", "Nicholson St car shed and repair shops", c1938
Set of four photocopied plans or drawings on A3 sheets of the "Central Bus Garage" and the "Nicholson St car shed and repair shops" .1 - Plan showing block and details of the cable car facilities, repair shops and car paint shop - drawing dated 28-7-1933. .2 - Plan of the block showing the various properties and buildings - shows bus garage location. .3 - South part of drawing No. 1019 - showing the various properties, title details, purchased costs and dates - includes the hospital at Rae St - see Reg Item 1738.2 for details. Dated 8/1940. .4 - North part of the above drawing.trams, tramways, drawings, depots, property, cable trams, nicholson st, central bus garage, buses -
 Melbourne Tram Museum
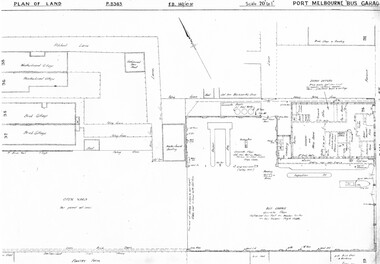
Drawing, Melbourne & Metropolitan Tramways Board (MMTB), "Port Melbourne Bus Garage", c1938
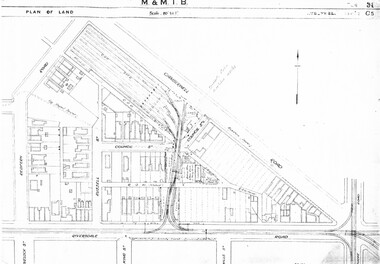
Set of five photocopied plans or drawings on A3 sheets of the "Port Melbourne Bus Garage" .1 - P8383 - Plan showing building layouts and adjacent land - including a Poultry Farm - dated 1938 .2 - P8416 - Plan showing parts of the adjoining properties including houses. .3 - Unnumbered - more modern architects drawing showing details of offices - c1944? - two sheets. .4 - unnumbered - drawing showing layout of repair shed, pits, offices and mess room facing Bay St. Copy of the map from Melway Street Directory No. 1 from Kevin Staines 24-2-2018 - added 9-3-2018. See image i6trams, tramways, drawings, depots, property, port melbourne, buses, maps -
 Melbourne Tram Museum
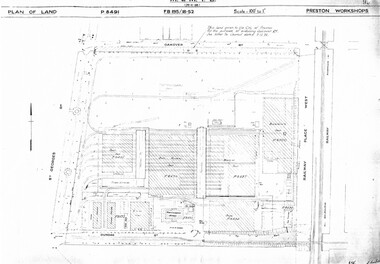
Drawing, Melbourne & Metropolitan Tramways Board (MMTB), "Preston Workshops", c1938
Set of nine photocopied plans or drawings on A3 sheets of the "Preston Workshops" - c1939 .1 - P8491 - Plan of land showing layout and associated drawings including Reservoir railway line - 19-4-1939. .2 - P8492 - Plan of Timber stacks and Hall - 3-2-1939 .3 - P8493 - Plan of Offices and location of sub-station - 13-12-1938 .4 - P8494 - Plan of Store including Oil store - c1939. .5 - P8495 - Plan of Paint Shop and relationship to timber stack - 1-3-1939 .6 - P8496 - Plan of Car building and Repairs shop - 6-12-1938 .7 - P8497 - Plan of machine shop - 10-12-1938 .8 - P8500 - Plan of Blacksmiths shop - 1-12-1938 .9 - P8590 - Plan of Substation - 1-12-1938trams, tramways, drawings, depots, property, preston workshops, workshops, substation -
 Melbourne Tram Museum
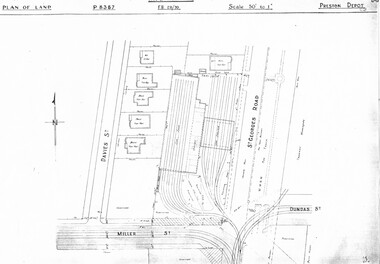
Drawing, Melbourne & Metropolitan Tramways Board (MMTB), "Preston Depot", c1938
Set of three photocopied plans or drawings on A3 sheets of the "Preston Depot" - c1938, later to become Thornbury Depot .1 - P8387 - Plan of Preston depot including adjacent properties, St Georges Road and entry into Preston Workshops - 6-4-1938. .2 - unnumbered - Plan of depot, St Georges Road, Yan Yean Pipe track, Millers St - dated 12-10-1939. .3 - P8388 - detail plan of depot, offices and open car shelter - c1938.trams, tramways, drawings, depots, property, preston depot, thornbury depot -
 Melbourne Tram Museum
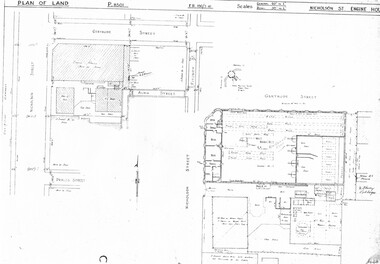
Drawing, Melbourne & Metropolitan Tramways Board (MMTB), "Nicholson St Engine House", c1938
Photocopied plans or drawings on A3 sheets of the "Nicholson St Engine House" at corner of Gertrude and Nicholson St, Fitzroy. P8501 - plan showing the location, adjacent properties and details of the Engine House - dated 3-2-1938.trams, tramways, drawings, depots, property, cable trams, engine houses, nicholson st, gertrude st -
 Melbourne Tram Museum
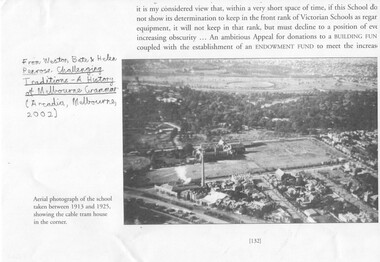
Document - Photocopies, Weston Bate and others, "Challenging Traditions - A History of Melbourne Grammar', 2016
Set of three photocopies of photographs from "Challenging Traditions - A History of Melbourne Grammar (Arcdia, Melbourne 2002) showing the cable tram winding house on the corner of St Kilda Road and Bromby St in 1919 and after redevelopment c1930. .1 - looking north with steam coming from the winding house. .2 - looking south east with winding house and surround buildings .3 - after closure and redevelopment of the site, looking north east. .4 - photo of the intersection of Victoria Parade and Gisborne St showing the cable tram track, cable trams, MFB and Eye and Ear Hospital. Shows the track layout partly. A photograph from a book "Melbourne from the Air"trams, tramways, st kilda rd, cable trams, victoria parade, brunswick st, winding houses, fitzroy -
 Melbourne Tram Museum
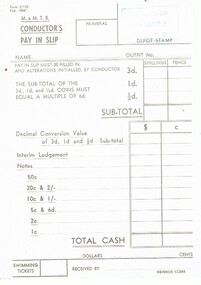
Document - Form/s, Melbourne & Metropolitan Tramways Board (MMTB), "M&MTB Conductor's Pay in slip", Feb. 1966
Printed form on off white paper titled "M&MTB Conductor's Pay in slip", form number 3/135, dated February 1966, at the time of the conversion of the Australian currency to the decimal system. Enabled the conductors to record what amount they paid into the revenue office, with space for table number, name, out fit number, amounts, number of swimming tickets and signature of revenue clerk. See Reg Item 1460 for a 1988 and 809 for March 1972 examples. Has the Malvern Depot stamp in the top right hand corner - 11 Jan 1969trams, tramways, mmtb, conductors, forms, pay in forms, decimal conversion, decimal currency -
 Melbourne Tram Museum
Document - Folder with papers, The Met, "Opening of the St Kilda Light Rail Project", "Moving Victoria", "What Melbourne's been waiting for arrives this Friday", Nov. 1987
Folder issued for the opening of the St Kilda Light Rail 20-21 November 1987, comprising six items. .1 - Folder - folded green card with the "Metropolitan Transit" logo in the bottom left hand corner .2 - Pamphlet - Light Rail Transit Link - same as Reg Item 457 .3 - News Release or Press Release - two A4 pages titled "Light Rail: Transport for the next Century" - Quotes the Minister Tom Roper, has details on the B class trams. .4 - Opening ticket - see also Reg Item 602 .5 - "Moving Victoria" - 40 page book - card covers, colour printed centre stapled with table of contents setting out the Victorian Government forward look and Transport Budget for 1987 - 1988 - for the various transport departments. .6 - Pamphlet - two fold black and white on gloss paper - titled "What Melbourne's been waiting for arrives this Friday" - published by the Met about the opening of the St Kilda line and free rides.trams, tramways, tickets, st kilda, conversion, light rail, opening, b class, minister for transport -
 Melbourne Tram Museum
Document - Folder, Myki, c2012
.1 Blue - white inside, printed plastic folder with colour print of Flinders St Street station on the front for holding a Myki touch card and contact details for Myki on the rear with Myki logos. 2nd copy added 4-4-2017 .2 - RFID Card - Myki Seniors Card - No. 3 08425 0258 6484 2 - green white, with a various logos, myki contact details, embedded RFID chiptrams, tramways, myki, tickets, rfid cards -
 Melbourne Tram Museum
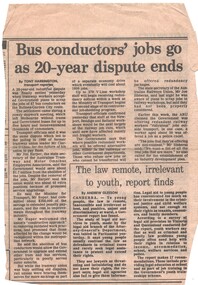
Newspaper, "Bus conductors' jobs to go as 20-year dispute ends", c1986
Newspaper Clipping - from an unknown paper, titled "Bus conductors' jobs to go as 20-year dispute ends" - about the agreement with the ATMOEA about the removal of bus conductors on the Bulleen - Garden City bus route. Quotes Mr. Tom Roper ( Minister) and Jim Harper (union secretary). Also notes railway disputes. c1986 (Tom Roper Minister for Transport 1985 - 1987) - http://www.parliament.vic.gov.au/re-member/details/1408-thomas-william-roper (accessed 3-11-2016). Item written by Tony Harringtontrams, tramways, buses, garden city, buses, conductors, unions, disputes