Showing 4127 items
matching tram 2
-
 Ballarat Tramway Museum
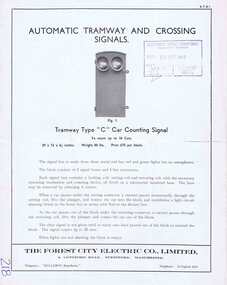
Pamphlet, The Forest City Electric Co. Limited England, "Automatic Tramway and Crossing Signals", c1948
Yields information about the types of tramway signals available for use on tramways systems. The type BY was used by the SEC in Ballarat and Bendigo.Four page Pamphlet or Brochure Forest City ATS1, printed brochure with illustrations "Automatic Tramway and Crossing Signals" – four types noted. Four types: 1. Tramway type "C: Car counting signal, up to 10 cars 2. Tramway type "BY" - non car counting signals 3. Level crossing signal operated by approaching cars 4. Turning Warning signals with notes on rear page of the set up for automatic control signals for rail crossings on roads, docks etc. Date stamped by SEC 20/9/1949 on front cover.Has “218” in biro in bottom left hand corner.trams, tramways, forest city signals, level crossings, signals -
 Ballarat Tramway Museum
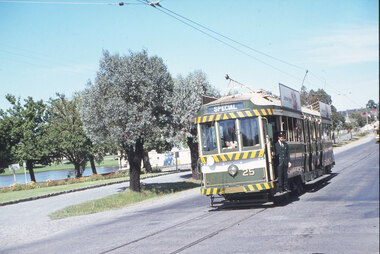
Slide - 35mm slide/s - set of 20, Eldon Hogan, 22/05/1971 12:00:00 AM
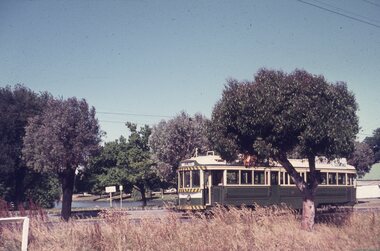
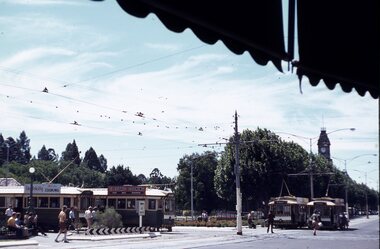
Set of 20 35mm Agfa colour blue and white plastic mount slide - featuring photos taken during an Association of Railway Enthusiasts Tour by Eldon Hogan. Folder had the date "22/5/1971" on it. Scanned on the Canon scanner at the depot 15/12/2005 at the time of the installation of the scanner. .1 - No. 25 in Nolan St with Lake Weeroona in the background. .2 - Three Birneys at the Depot junction, 30 and 29 with Conoles Hotel, McCrae St in the background. .3 - No. 5 in front of the Shamrock Hotel, Pall Mall .4 - No. 29 in front of the Shamrock Hotel with Stonemasons sign in the background. .5 - No. 18 ditto .6 - No. 30 and another Birney at the Quarry Hill terminus .7 - No. 24 southbound High St at the Violet St intersection with a "Mine Open" sign in the foreground and the Cathedral in the background. .8 - No. 19 at the Golden Square terminus, with the Golden Square Hotel in the background. .9 - No. 29 - side on view, North Bendigo line? Thunder St? .10 - No. 30 crossing the railway overbridge, inbound from Eaglehawk with a number of photographers in the foreground. .11 - No. 29? ditto .12 - No. 5 outbound - side on view, Thunder St, North Bendigo line? .13 - No. 29 and 30 at the intersection of High St and Brazier St with Church or School hall in the background. .14 - ditto .15 - ditto .16 - No. 25 and the two Birneys at the Eaglehawk terminus. .17 - No. 29 and two other trams at ditto .18 - No. 30 and 19 adjacent to the Lake View Hotel, McCrae St .19 - No. 5 and 25 crossing on the Eaglehawk Line, Ironbark? .20 - No. 29 at Quarry Hilltramways, trams, bendigo, lake weeroona, pall mall, golden square, eaglehawk, quarry hill, tram 25, tram 30, tram 29, tram 5, tram 18, tram 19, tram 24, tram 25 -
 Ballarat Tramway Museum
Slide - 35mm slide/s - set of 5, Eldon Hogan, 1/78 or late 1977
Set of five Kodak cardboard mounted slides - featuring photos taken during a visit to Bendigo Tour by Eldon Hogan. Slides have slide number (10 to 14) and date "Jan 78" stamped onto them. Scanned on the Canon scanner at the depot 15/12/1971 at the time of the installation of the scanner. .1 - No. 17 Nolan St .2 - No. 25 with Myer Roof Advertisement and No. 28 at Depot. .3 - No. 25 at Central Deborah Mine terminus .4 - No. 17 at North Bendigo terminus .5 - No. 17, Pall Mall at City terminus with the Beehive Building in the background.tramways, trams, bendigo, bendigo trust, nolan st, depot, central deborah, north bendigo, pall mall, tram 17, tram 25, tram 28 -
 Ballarat Tramway Museum
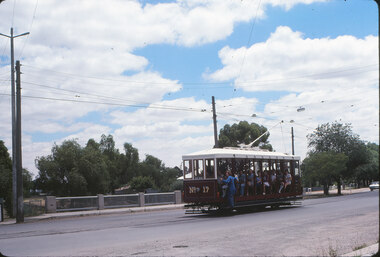
Slide - 35mm slide/s - set of 7, Eldon Hogan, Aug. 1964
Set of seven Kodak cardboard mounted slides - featuring photos taken during a visit to Bendigo by Eldon Hogan. Slides have slide number (26 to 32) and date "Aug 64" stamped onto them. Possibly a Xavier College Cadets tour - Eldon was involved with them at the time, given slide No. 27. Scanned on the Canon scanner at the depot 15/12/1971 at the time of the installation of the scanner. .1 - No 11 and a bogie car at the Railway Station .2 - ditto - note uniformed person boarding (Xavier College Cadet?) .3 - No. 11 at Charing Cross, showing "special" .4 - No. 11 bound for Eaglehawk at a Crossing loop .5 - No. 20 in bound for Quarry Hill - at the above crossing loop? .6 - No. 11 crossing the Eaglehawk / Swan Hill railway line at the overbridge. .7 - No. 11, High St Eaglehawk.tramways, trams, bendigo, railway station, eaglehawk, charing cross, birney, tram 11, tram 20 -
 Ballarat Tramway Museum
Slide - 35mm slide/s - set of 11, Eldon Hogan, mid 1960's to early 1970's
Set of 11 Agfa Plastic mounted slides - from the Eldon Hogan collection - possibly on an ARE Bendigo tours late 1960's or early 1970's with No. 18 Scanned on the Canon scanner at the depot 15/12/1971 at the time of the installation of the scanner. .1 - No 18 at Golden Square terminus with Billy Rodda's Golden Square Hotel in the background. .2 - ditto and the Victoria Bitter fence alongside the hotel. .3 - ditto and another single trucker. .4 - No. 18 at the Fire Station Loop, Golden Square line, with destination of Railway Station. .5 - No. 18 passing the Central Deborah mine, Violet St. Tram has a Briquette advertisement on the roof - the flaming briquettes. .6 - Another bogie tram at ditto. .7 - No. 18 and No. 6 crossing McCrae St loop near the depot junction? .8 - ditto .9 - No. 18 and a single trucker at the North Bendigo terminus. .10 - ditto .11 - with the single trucker leaving.tramways, trams, bendigo, golden square, central deborah, north bendigo, mccrae st, tram 18, tram 6 -
 Ballarat Tramway Museum
Slide - 35mm slide/s - set of 11, Eldon Hogan, mid 1960's to early 1970's
Set of 11 Agfa Plastic mounted slides - from the Eldon Hogan collection - possibly on an ARE Bendigo tours - mid 1960's (black destination rolls) and late 1960's or early 1970's. Scanned on the Canon scanner at the depot 15/12/1971 at the time of the installation of the scanner. .1 - No 18 with Lake Weeroona in the background - possibly at the same time as the tour with No. 18, though showing destination of Charing Cross. .2 - ditto .3 - No. 25 and two following trams on a special tour, note the white disc - Quarry Hill line? .4 - No. 29 on the Eaglehawk line at the Mt. Korong Road and the Calder Highway, with the Ampol Service station in the background. .5 - No. 29 passing Lake Weeroona with Destination of Nth Bendigo - has a Briquettes Roof Advertisement., .6 - No. 26 ditto - with two SEC Roof Advertisements. .7 - No. 24 leaving Charing Cross for Golden Square with The Beehive building, Ezywalkin, Coca Cola and the Fountain Shopping Centre in the background. .8 - No. 29 and a bogie tram at the Golden Square terminus with Golden Square Hotel and Victoria Bitter fence in the background. No. 29 has a SEC Briquettes roof advertisement. .9 - No. 29, with the Cathedral in background. Tram has a SEC Briquettes roof advertisement and destination of Golden Square. .10 - side view of a bogie tram on the Eaglehawk line? Tram has a Electric cooking roof advertisement. Photo has been over exposed. .11 - Single trucker, Violet St with the Central Deborah mine head in the background. Tram has two SEC Electric Cooking roof advertisements. tramways, trams, bendigo, lake weeroona, eaglehawk, golden square, charing cross, central deborah, tram 18, tram 25, tram 29, tram 24 -
 Ballarat Tramway Museum
Slide - 35mm slide/s - set of 10, Eldon Hogan, mid 1960's to early 1970's
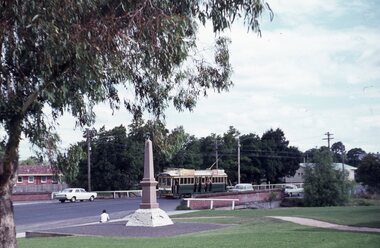
Set of 10 Agfa Plastic mounted slides - from the Eldon Hogan collection - possibly on an ARE Bendigo tours - mid 1960's (black destination rolls) and late 1960's or early 1970's. Scanned on the Canon scanner at the depot 15/12/1971 at the time of the installation of the scanner. .1 - No. 24 in bound along High St Bendigo with the discovery of gold monument in the foreground, Golden Sq route. .2 - ditto .3 - No. 26 outbound at the above location. .4 - No. 24 at the corner of Short St and High St, with the Technical college building? in the background. .5 - No. 26 at ditto, outbound for Golden Square. .6 - No. 24, High St Bendigo, with the Cathedral in the background. Tram has two Johnnie Walker Whiskey roof advertisements. .7 - Three trams, Pall Mall, Charing Cross, with the Beehive building in the background. Trams have SEC roof advertisement. .8 - ditto with Coca Cola ad on the Beehive building, turning around. .9 - No. 29 and a bogie tram at the Golden Square terminus with Billy Rodda's Golden Square Hotel in the background. Just past the tram is a large truck carrying boxes. .10 - Nos, 18, a bogie tram, 21 and 29 at the Quarry Hill terminus. tramways, trams, bendigo, tram 18, tram 24, tram 26, tram 21, tram 29 -
 Ballarat Tramway Museum
Slide - 35mm slide/s - set of 11, Eldon Hogan, mid 1960's to early 1970's
Set of 11 Agfa Plastic mounted slides - from the Eldon Hogan collection - possibly on an ARE Bendigo tours - mid 1960's (black destination rolls) and late 1960's or early 1970's. Scanned on the Canon scanner at the depot 15/12/1971 at the time of the installation of the scanner. .1 - front of depot -26, 19, 24, 29 and 28 amongst those present. .2 - ditto .3 - 24 departing depot .4 - 26 at Eaglehawk .5 - No. 5 turning from Pall Mall into Mitchell St with town hall in background. .6 - No. 5 using crossover in Mitchell St - with Maples, CBA Bank, Astor, Homecrafts, Roger David shops or signs in the background. .7 - ditto .8 - bogie car at Charing Cross with the Fountain Plaza shopping centre in the background. .9 - Charing Cross, with the fountain in the foreground, The Beehive and three trams in the view. .10 - No. 24 outbound, Golden Square line crossing the bridge over the creek, adjacent to the discovery of Gold Monument. .11 - ditto. tramways, trams, bendigo, eaglehawk, depot, charing cross, golden square, tram 26, tram 19, tram 24, tram 29, tram 28, tram 26, tram 5 -
 Ballarat Tramway Museum
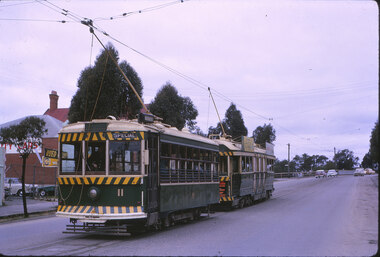
Slide - 35mm slide/s - set of 11, Eldon Hogan, mid 1960's to early 1970's
Set of 11 Agfa Plastic mounted slides - from the Eldon Hogan collection - featuring an ARE tour with Nos. 21, 29 and 25 to Bendigo, mid 1960's. Scanned on the Canon scanner at the depot 15/12/1971 at the time of the installation of the scanner. .1 - No. 29 passing the Institute of Technology building, McCrae St. .2 - ditto .3 - Nos. 21 and 29 Lake Weeroona .4 - Nos. 29, 21 and 25 at the Golden Square Terminus with the Golden Square Hotel, Victoria Bitter fence in the background. .5 - ditto with a service car? .6 - ditto .7 - No. 21 with the Central Deborah mine poppet head in the background, Violet St. .8 - ditto with 21 and 29 .9 - ditto with 29 .10 - ditto with 21 and 29 .11 - 21, 29 and 25? at depot junction. Trams have SEC roof advertisements. tramways, trams, bendigo, lake weeroona, golden square, central deborah, tram 21, tram 29, tram 25 -
 Ballarat Tramway Museum
Slide - 35mm slide/s - set of 11, Eldon Hogan, mid 1960's to early 1970's
Set of 11 Agfa Plastic mounted slides - from the Eldon Hogan collection - featuring an ARE tour with Nos. 21, 29 and 25 to Bendigo, mid 1960's. Scanned on the Canon scanner at the depot 15/12/1971 at the time of the installation of the scanner. .1 - four trams at Charing Cross - includes 19 and 25. .2 - 21 and 25 at the depot junction. .3 - 21 and 29 Quarry Hill route? .4 - 29 ditto .5 - 24 at Golden Square terminus - photo taken from the city side - note all the little shops and buildings on the left hand side of the photograph. .6 - 29, 21 and 25 at Eaglehawk .7 - 29 - side on view - Eaglehawk line? .8 - ditto with 21 .9 - 29 - North Bendigo line? - side on view .10 - 29 and 21 - vacant paddocks - Eaglehawk line .11 - 29 crossing the railway overbridge, Eaglehawk line, in bound. Trams have SEC roof advertisements. tramways, trams, bendigo, eaglehawk, charing cross, golden square, tram 21, tram 29, tram 25, tram 19 -
 Ballarat Tramway Museum
Photograph - Digital image set of 2, 1950 or earlier
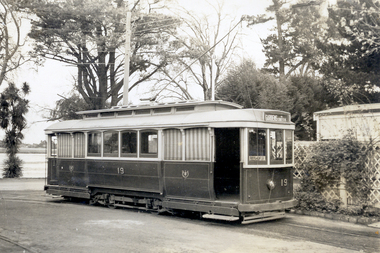
Yields information about SEC Ballarat tram No. 19 - one of a series of official photographs early 1950 or earlier and the appearance of the tram.Digital Image of SEC Ballarat No. 19 in the 1950 or earlier in the depot yard with the toilet block in the background. SEC Official photograph. See Reg Item 4568 for the CD. 4525.1 - Digital image of the same photograph from the Wal Jack album - images of front and rear of photograph - rear image has no details.trams, tramways, secv, ballarat, depot, tram 19 -
 Ballarat Tramway Museum
Photograph - Digital image Set of 2, c1956
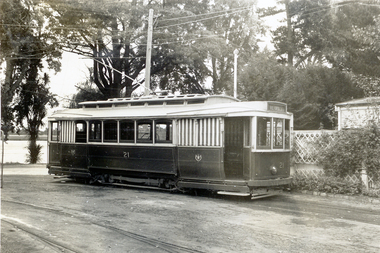
Yields information about SEC Ballarat tram No. 21 - one of a series of official photographs early 1950 or earlier and the appearance of the tram.Digital Image of SEC Ballarat No. 21 in the 1950 or earlier in the depot yard with the toilet block in the background. SEC Official photograph. See Reg Item 4568 for the CD. 4526.1 - - same photograph from the Wal jack Album - see i2 and i3 for front and rear details.trams, tramways, secv, ballarat, depot, tram 21 -
 Ballarat Tramway Museum
Photograph - Digital image Set of 2, 1950 or earlier
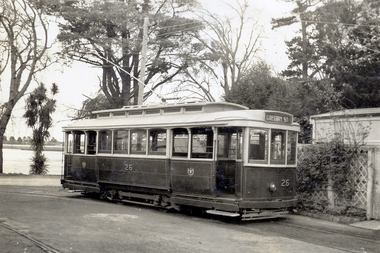
Yields information about SEC Ballarat tram No. 26 - one of a series of official photographs early 1950 or earlier and the appearance of the tram.Digital Image of SEC Ballarat No. 26 in the 1950 or earlier in the depot yard with the toilet block in the background. SEC Official photograph. See Reg Item 4568 for the CD. 4529.1 - Digital image of the same photograph from the Wal Jack album - images of front and rear of photograph - rear image has no details.trams, tramways, secv, ballarat, depot, tram 26 -
 Ballarat Tramway Museum
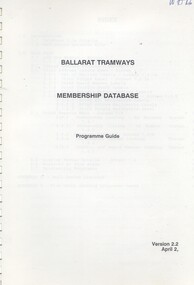
Manual, Howard Stoney and Warren Doubleday, "Ballarat Tramways Membership Database - Programme Guide", 1990
Forty page document, with clear plastic front cover, light blue card as rear cover and bound with a plastic comb binder titled "Ballarat Tramways Membership Database - Programme Guide" Version 2.2, dated April 2, 1990. Used at the time to manage the BTPS's Membership database and print labels and reports. Written dBase III+ for use on IBM computers running MS DOS Gives file details, details of the various reports, mail centre codes, and the various sub-programme codes. Has hand written notes noting changes. Programme use until the data base transferred to MS Works/Excel and then managed by Peter Winspur, c1993? various notestrams, tramways, btps, members, manual -
 Ballarat Tramway Museum
Album - Photo Album, c1970
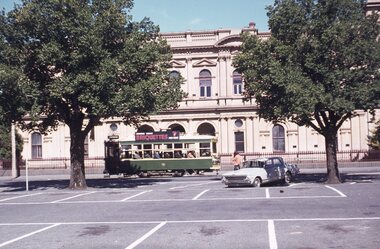
... St. .2 - taken from tram ascending Bakery St hill... and a single trucker inbound in Sturt St. .2 - taken from tram ...Set of 16 photos of Ballarat tram system taken 1970c on a tour by an unknown Qld based person.Photo album containing 16 colour prints. Photo album has heavy card covers, covered in black textured plastic containing 12 clear plastic photo sleeves held with a white comb binder. Photos of Ballarat prior to closure, c1970. Photographer unknown. Donated by Peter Hyde of Brisbane Tramway Museum to BTM 3/2/2010, from a deceased estate. Photos apparently taken on a tram tour. .1 - No. 42 and a single trucker inbound in Sturt St. .2 - taken from tram ascending Bakery St hill in Victoria St. .3 - End of No. 42, with the destination "Haddon St via Drummond Nth" .4 - No. 11 and 42 in Lydiard St Nth, near the railway station. No. 11 showing special. .5 - photo of three people on the tour. .6 - Trams reversing at the Victoria St terminus .7 - ditto .8 - 11, 42 and 12? in Lydiard St North by railway station. .9 - Three trams at Sebastopol terminus. .10 - View in Albert St Sebastopol looking north along the track on the side of the road. .11 - View of the tram crossing in Albert St. .12 - 27 and 42 crossing Albert St Sebastopol. .13 - View of Albert St from the tram, north of the crossing looking at the reserved track 14. - Lydiard St North looking south .15 - 42 at the railway level crossing. .16 - View south of the railway level crossing, three trams, with passengers alighting.trams, tramways, ballarat, albert st, sebastopol, victoria st, sturt st, lydiard st nth, railway crossing -
 Ballarat Tramway Museum
Photograph - Digital image, Late 1950's
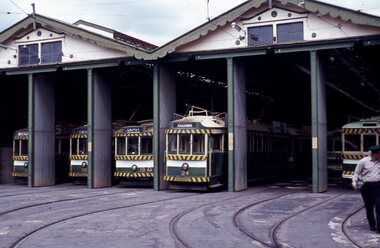
Yields information the appearance and details about the depot and trams 20 and 36 in the late 1950's.Digital scan from the Ben Parle collection of SEC No. 36 on No. 2 road at the depot and No. 20 on 0 road at the depot. Photo 1950's or early 1960 prior to introduction of dash canopy lighting. Has the houses either side of the street in view. Photo received with the Ben Parle slides 09/2004. trams, tramways, depot, tram 20, tram 36 -
 Ballarat Tramway Museum
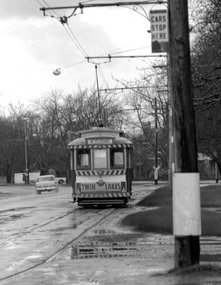
Photograph - Digital image Set of 2, Peter Bruce, No. 11 "Wendouree Parade", 1970s
Yields information about Wendouree Parade and the Hamilton Ave area and Sturt St West..Digital image, black and white, of No. 11, with a Twin Lakes sign running a Mt Pleasant service. .1 - In Sturt St west between Hamilton Ave and Russell St loop. .2 - In Wendouree Parade about to turn into Hamilton Ave. Note the Tram timetable on the pole on the right hand side of the photograph. Photo taken by Peter Bruce 1970's and 1971, prior to the closure of the Ballarat tramway system. Peter's Title of images: No. 11 "Wendouree Parade"trams, tramways, wendouree parade, sturt st west, mt pleasant, timetables, hamilton ave, tram 11 -
 Ballarat Tramway Museum
Photograph - Digital image Set of 2, 1970s
Yields information about the Lydiard St and Sturt St intersection and some of the signs that were in place at the time.Digital image, black and white, two photos of No. 12 southbound in Lydiard St North, before turning into Sturt St. Note Craigs Royal Hotel street lamp, the fire alarm box, fire plug post and the warning sign behind the Stop sign Photo taken by Peter Bruce 1970's and 1971, prior to the closure of the Ballarat tramway system. Peter's Title of image: "No. 12 and gas lamp" and "No. 12 Lydiard St Sturt 1"trams, tramways, lydiard st nth, craig s hotel, signs, tram 12 -
 Ballarat Tramway Museum
Photograph - Digital image Set of 2, 1970s
Yields information about Sturt St and the intersection with Grenville St.Digital image, black and white, two images of No. 21 at the base of the Sturt St hill before crossing Grenville St, going to Victoria St. Roof advert appears in other photos, but very hard to work out. Photo taken by Peter Bruce 1970's and 1971, prior to the closure of the Ballarat tramway system. Peter's Title of image: "No. 21 bottom Sturt St" and "No. 21 Sturt and Grenville".trams, tramways, sturt st, grenville st, tram 21 -
 Ballarat Tramway Museum
Photograph - Digital image Set of 2, Peter Bruce, "No.30 Bridge and Main", 1970s
Yields information about Bridge St Ballarat and its associated shopping strip.Digital image, black and white, two images, of No. 30 in Bridge St. 4605.1 - at Stones Corner, enroute to Mt Pleasant with Rodda's, Gill & O'Keffe, C.W. Pennan, ANZ Bank and other shops in the background. Note the signal lamps on the right hand side of the photo above the tram stop sign and how the overhead was arranged at this junction. 4605.2 - at Grenville St end, with Faulls Shoes, Suttons HMV and other shops in the background. Photo taken by Peter Bruce 1970's and 1971, prior to the closure of the Ballarat tramway system. Peter's Title of image: "No.30 Bridge and Main" and "No. 30 Bridge St up end".trams, tramways, bridge st, mt pleasant, tram 30 -
 Ballarat Tramway Museum
Photograph - Digital image Set of 2, Peter Bruce, Lydiard St North, 1970s
Yields information about the Sturt St and Lydiard St intersection.Digital image, black and white, two images of No. 32 in Lydiard St North. .1 - adjacent to the post office, about to turn into Sturt St, enroute for Sebastopol. .2 - further up Lydiard St North, taken from outside Craigs Royal Hotel (see also Reg Item 4594 for a similar photo) Photo taken by Peter Bruce 1970's and 1971, prior to the closure of the Ballarat tramway system. Peter's Title of image: "No. 32 Lydiard St Nth".trams, tramways, lydiard st, craig s hotel, post office, tram 32 -
 Ballarat Tramway Museum
Photograph - Digital image Set of 2, Peter Bruce, "No. 34 and schoolgirls", 1970s
Yields information about the Hospital Corner, Drummond and Sturt St intersection area.Digital image, black and white, of No. 34 at Drummond and Sturt intersection, in bound with two school girls walking across the street. The first image is a cropped version of the same photograph. Photo taken by Peter Bruce 1970's and 1971, prior to the closure of the Ballarat tramway system. Peter's Title of image: "No. 34 and schoolgirls"trams, tramways, sturt st, hospital corner, tram 34 -
 Ballarat Tramway Museum
Photograph - Digital image Set of 3, Peter Bruce, 1970s
Yields information about the highway crossing Albert St Sebastopol from both sides.Digital image, black and white, set of three images of No. 41 crossing Albert St Sebastopol. .1 - No. 41 southbound, before crossing Albert St. .2 - ditto, after crossing Albert St .3 - No. 41 on return, north bound. Note the pole with directions for Mt Clean, Sebastopol Gun Club. Photo taken by Peter Bruce 1970's and 1971, prior to the closure of the Ballarat tramway system. Peter's Title of image: "No. 41 at the Highway"trams, tramways, albert st, sebastopol, tram 41 -
 Ballarat Tramway Museum
Photograph - Digital image Set of 2, Peter Bruce, "Up the Street", 1970s
Yields information about Sturt St and the City loop.Digital image, black and white, two images, of two single truck trams parked in the City Loop Sturt St, looking up the hill towards the Town Hall. Photo taken by Peter Bruce 1970's and 1971, prior to the closure of the Ballarat tramway system. Peter's Title of image: "Up the Street"trams, tramways, city loop, sturt st -
 Ballarat Tramway Museum
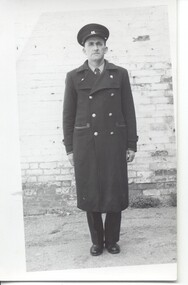
Photograph - Black & White Photograph/s - set of 5, State Electricity Commission of Victoria (SECV), late 1950's?
Has a strong association with the early days of the BTPS in preparing to move the tramcars from the depot and working at the former SEC depot itself in dismantling 0 road..Set of five black and white photographs, showing a SEC employee modelling different type of uniforms, c1950/1960. .1 - Winter uniform with Great Coat on - cap badge No. 44 .2 - Summery uniform - no jacket, long sleeve shirt and tie - cap badge No. 44 .3 - Inspectors summer uniform - no jacket .4 - as for .3 .5 - Inspectors winter uniform with Great Coat and cap. See also Reg Item 3907 for a mounted set of these photographs. See also Reg item 1368 for a set of photographs of later uniforms.trams, tramways, secv, uniforms, crews, inspectors -
 Ballarat Tramway Museum
Document - Instruction, State Electricity Commission of Victoria (SECV), Set of four instructions, Niov. 1965
Significant in being an assembled set of instructions that were used by tram crews for reference by management.Set of four SEC staff instructions stapled together for reference by managers. Stapled along the top edge with staples. Comprise: “Forest City” Signals – 5 pages – with handwritten notes on page 5, regarding “Shortening of signal section” dated 20 Jan 1965. – see Reg Item 3456 Tramcar Emergency Braking – 25/1/1965 – 2 pages – Reg Item 3457 Question and Answer paper – Brake Equipment Descriptions, etc. – 4 pages – Reg items 272, 3457, Special Order to Motorman (49/1) – 2 pages – 25/1/1965 – Reg item 3459 and 5371 for an undated issue. See the various Registered items for more details and 5370 for an undated version of the Tramcar Emergency Braking. Page 5 of the first document has hand written notes about “Shortening of signal section” Top sheet has a number of initials of people who have read/sighted the document - dated 8/11/1965 and 11/12/1965.trams, tramways, sec, instructions, braking, emergency, forest city signals -
 Ballarat Tramway Museum
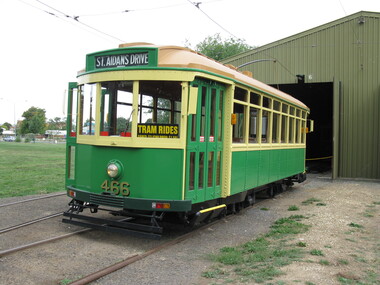
Photograph - Digital image set of 6, "466 last day in service", 27/03/2010 12:00:00 AM
Four digital images and two movie images on the last day of operation of tram 466 prior to return to Bendigo. Taken by Austin Brehaut. .1 - 466 at the depot prior to running out. .2 - 466 at Carlton St .3 - 466 at St Aidans Drive with Len Millar at the controls .4 - Looking through the rear view mirror at the inside of the tram. .5 - Movie image of 466 turning at Depot Junction onto the access track. .6 - Movie image of 466 running in onto 6 road at the depot. For movie images see directory c:/dbtext/AV images/Reg Item 4641-5 and 4641-6 trams, tramways, last day, btm, wendouree parade, depot, depot junction, tram 466 -
 Ballarat Tramway Museum
Photograph - Digital image Set of 3, 28/03/2010 12:00:00 AM
Yields information about the last day of Dave O'Neil as a driver and Ryan Vanderzweep as a conductor.Three digital images of Dave O'Neil's last day as a driver and Ryan Vanderzweep first day as a conductor. Taken by Austin Brehaut. .1 - Dave O'Neil on the footstep of No. 14 .2 - Dave O'Neil and Ryan Vanderzweep .3 - Ryan's first day. trams, tramways, last day, btm, wendouree parade, tram 14 -
 Ballarat Tramway Museum
Photograph - Compact Diskette with photographs, Austin Brehaut, Begonia Weekend 2010
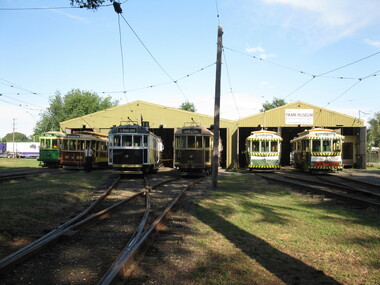
Yields information about the 2010 Begonia Festival, the trams during the Parade and has a strong association with some of the volunteers.CD compact diskette in a paper envelope, containing a set of 14 images of the Begonia Weekend 2010, taken by Austin Brehaut. .1 - Trams on the depot fan on the morning of 6/3 .2 - 671 and 28 at Carlton St - 8/3 .3 - Begonia Festival parade spectators inside 661 - 8/3 .4 - ditto .5 - 671 and people for the Parade 8/3 .6 - The Parade about to happen - 661 and 671 at the loop - 8/3 .7 - 661 and people for the Parade 8/3 ,8 - Peter Winspur views the coming parade 8/3 .9 - Viewing the parade - 8/3 .10 - Peter Bruce viewing .11 - Bill Kingsley viewing .12 - Graeme Cleak using 671 to view the Begonia Festival 8/3 .13 - 661 and 671 laid up at the loop - 8/3 .14 - 27 being prepared for a repaint and repairs.On CD "Begonia Weekend 2010 / A. Brehaut" and on paper case "Peter Winspur"begonia festival, depot, wendouree parade -
 Ballarat Tramway Museum
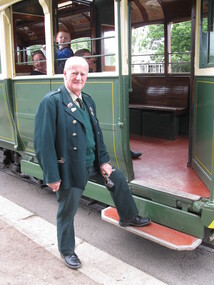
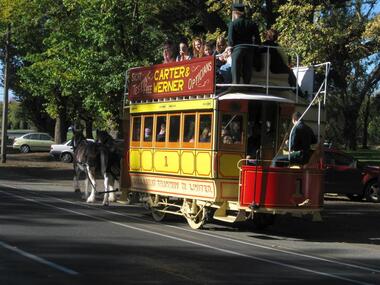
Photograph - Digital image set of 12, Peter Winspur, Museum horse tram operating, 8 & 9 May 2010
Yields information about the operation of the horse tram by the BTM during the Ballarat Heritage Weekend 2010.Set of 12 digital images taken on Saturday 8 or Sunday 9 May 2010 of the horse tram operating between Gardens Loop and St Aidans Drive by Peter Winspur, for the City of Ballarat 2010 Heritage Weekend. .1 - tram heading north from the loop area. .2 - view at the stop where the tram was turned around with people swapping around. .3 - admiring the horses. .4 - ditto .5 - ditto .6 - queuing for the tram - Len Millar by the sign. .7 - tram ride sign .8 - travelling towards St Aidans Drive. .9 - ditto .10 - ditto - returning from St Aidans Drive, Len Millar and Lyle Drayton .11 - scene at the loop with people swapping trams. .12 - ditto and No. 28trams, tramways, horse tram, btm, wendouree parade, tram 1, tram 28