Showing 878 items
matching bogies
-
 Bendigo Historical Society Inc.
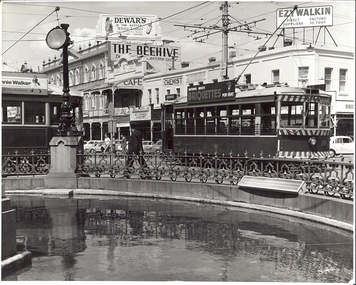
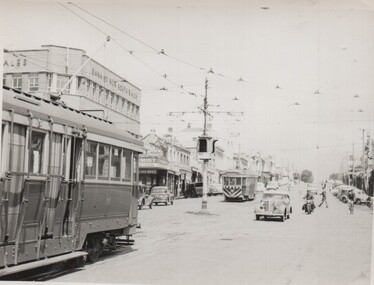
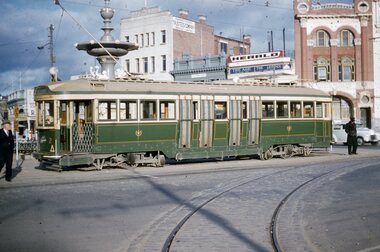
Photograph - BASIL MILLER COLLECTION: TRAMS PASS THE FOUNTAIN
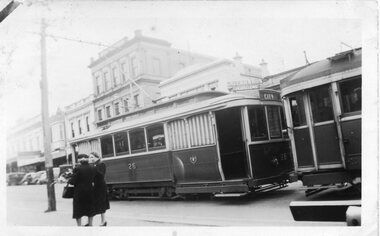
Black and white photograph 'Birney Car' Number 28, and 'Bogie' tram. Alexandra Fountain in foreground, 'The Beehive', Café, W.M.I Jones Chemist, Ezywalkin shoe shop in background.Inscription on reverse: Stamped in blue ink, 'Photo by A. Doney Bendigo'.person, individual, basil miller -
 Melbourne Tram Museum
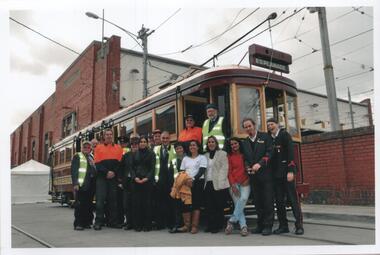
Photograph - Colour Print, May. 2010
Colour print of the Bendigo tramways team and others who brought the former PMTT bogie tram No. 44 to Melbourne for the Prahran and Malvern Tramway Centenary arranged by Ron Scholten, standing on the left hand side of the group. 5/2010.trams, tramways, pmtt, centenary, tram 144 -
 Ballarat Tramway Museum
Photograph - Digital image Set of 10, Tony Smith, 1971
Yields information about Ballarat Tramways and trams prior to the closure of the tramway system.Set of 10 digital images of Ballarat trams prior to closure, scanned from original slides by Tony Smith, 1971 prior to closure of the system. .1 - 35 and 43 crossing at Urquhart St, Drummond St Sth. 35 outbound to Sebastopol, 43 to Lydiard St Nth. .2 - 35 in Lydiard St North, about to turn into Sturt St, with the Commonwealth Bank and National Mutual, Craig's Hotel in the background. Note the tram stop signs on the pole nearest to the Post Office. Tram has destination of Sebastopol. .3 - 39 and 41 at Grey St Loop, on a wet day. 39 showing Lydiard St Nth, 41 Special. .4 - two bogie trams (35?) and 41? Albert St, south of Grey St Loop. .5 - two bogies trams (41 and 35?) and a single trucker at the Sebastopol terminus. 41 showing Special. .6 - two bogies trams (41, 35?) and single trucker at the Grey St Loop, waiting for another bogie tram to arrive. Has a "Bounds" running alongside the tram. On a wet muddy day. .7 - two single truckers crossing at Gregory St loop, Lydiard St. Nth. - photo out of focus. .8 - 35 and single trucker crossing at ditto. .9 - 39 and another bogie tram waiting for two other trams to meet at Gregory St. loop. .10 - two single truckers crossing at the King St loop, Victoria St - out of focus and over exposed.trams, tramways, urquhart st, drummond st sth, lydiard st nth, sturt st, albert st, sebastopol, grey st loop, gregory st, king st, tram 35, tram 43, tram 39, tram 41 -
 Ballarat Tramway Museum
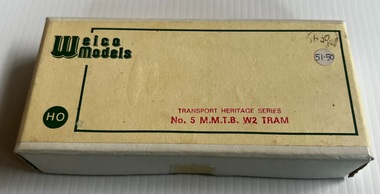
Model - Model Melbourne W2 tram, Weico Models, 1983
Model of a Melbourne W2 class tramcar by Weico Models produced for the model enthusiast to assemble. Has detailed instructions on undertaking the work. Though not motorised, could be fitted with an electric operable bogie. Instructions dated 1983. Has a price label of $51.50 on box.Demonstrates an model kit that could be assembled by the purchaser.Model of Melbourne Melbourne tram W2 class tram by Weico Models, comprising cardboard box, cast metal parts and instructions. HO Scalemodels, tramcars, w2 class, weico models -
 Melbourne Tram Museum
Document, Electric Railway Journal, "Melbourne adopts three-door car as standard", 1925
Article provides the operating background to the new type of bogie car then being built for the MMTB. Gives the design basis of the tram and has a side elevation of the tram. This type was known as the "W class" tramcar. Refers to the Electrical Engineer (item 6922) as the source of the drawingYields information about the Melbourne W class tram in 1925.Photocopy of an article titled "Melbourne adopts three-door car as standard" from the Electric Railway Journal of the USA, Vol 67, No. 10, page 402. tramways, tramcars, mmtb, melbourne, w class, design of new trams -
 Melbourne Tram Museum
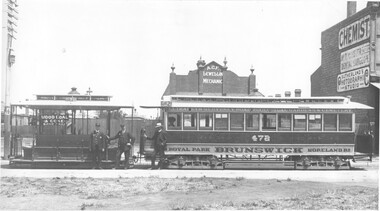
Photograph - Cable car set - Brunswick, c1910
Black and white photograph of a cable tram set (bogie trailer 472) with gripman and conductor near the Brunswick terminus in Sydney Road. For full details of the image and the story behind it, see page 10 of Bellcord No. 53, March 2022 - see reference for the link.Yields information about a bogie cable tram set and its location.Black and white print block mounted onto thick card.tramways, tramcars, cable trams, crews, gripmen, conductors, sydney road, brunswick, tram 472 -
 Melbourne Tram Museum
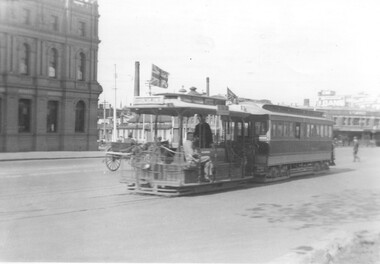
Photograph, Bogie Cable tram - Elizabeth and Victoria Sts, 1920s
The photograph shows a cable tram (Brunswick) with a bogie trailer, north bound in Elizabeth St having just crossed over Victoria St. The tram is flying two red ensigns. In the background is a horse drawn gig, and the Independent Order of Oddfellows (IOOF) building.Yields information about the intersection of Victoria and Elizabeth Sts and the Brunswick cable tram services, 1920s.Photograph, black and white, plain backtrams, tramways, cable tram, elizabeth st, victoria st, bogie cable trailers -
 Melbourne Tram Museum
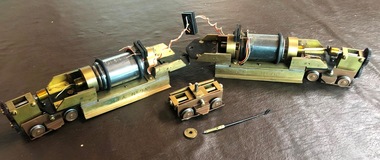
Functional object - Model tram, Preston Workshops, wheel set for an articulated tram made by The Met, c1984
Model tram wheel set for an articulated tram made by The Met for their model tram at the Royal Show Melbourne c1985. Two sets of heavy duty electric motor, geared to two sets of four wheel bogies and one unmotorised bogie with a centre pins, washer and split pin that secured the articulated section of the tram. Each set number on side "MTA No. 9A with motor section given "10" and 7B" Made from brass, steel, plastic - purpose made. Placed with two sections of O gauge track - each 340mm long.trams, tramways, models, b class, the met, royal show -
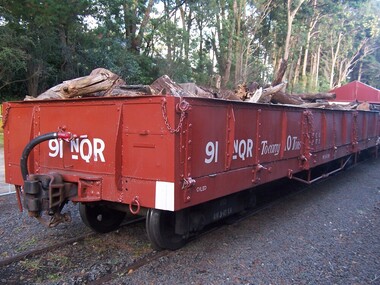 Puffing Billy Railway
91 NQR - Open Medium Truck with drop ends, 15/ 2/1907
The NQRs were the standard Medium open goods wagon. Generally the sides and ends were removable thus providing a totally flat truck. Three long drop-down doors formed the sides thus allowing easy loading and unloading. 218 of these goods vehicles were built between 1898 and 1914 ? numbered 1 - 218. Originally, these wagons carried the code letter R as they were built with sides and ends. They later had the R removed. Unlike the Broad Gauge, VR's 2 ft 6 in (762 mm) narrow gauge network never had four-wheeled wagons (aside from a handful of trolleys). Because of this, a single design of open wagon emerged and this was the only type of wagon ever used on these lines. This was the NQR class, a wagon with the same length and loading capacity as a Broad Gauge four-wheeled open wagon to make transferring freight between the gauges easier. The wagons, numbered 1 through 218, were built between 1898 and 1914. The wagons used the same underframe as most other non-locomotives on the VR Narrow Gauge. Letters and numbers were originally painted only on the end bulkheads and doors, both of which could be removed as traffic dictated, and this made wagon identification difficult until the decals were transferred to the underframes of each wagon In the 1910s some NQRs were provided with removable wood and steel frameworks with canvas roof canopies and side curtains, and internal seating to supplement the rest of the passenger stock during busy holiday periods. Puffing Billy has re-created these for emergency capacity. Five more NQRs, numbered 219-223, were built between 1990 and 1992 initially for passenger use so were fitted with the removable frames In the 1960s the Puffing Billy Railway added grids in the floor of some to enable them to be used to drop ballast on the track where needed. Vehicle Length 25 feet 2 inches ( 7671 mm) Coupled Length 27 feet 4 inches (8330 mm) Width 6 feet 3 inches (1905 mm) Weight 5 tons Capacity 11 tons Built 1898 - 1915 (1992) Number Built 218 (223) In use 14 To be restored 6 91 NQR - Open Medium Truck VR Service History 15/ 2/1907 NWS Built new Vehicle Length 25 feet 2 inches ( 7671 mm) Coupled Length 27 feet 4 inches (8330 mm) Width 6 feet 3 inches (1905 mm) Weight 5 tons Capacity 11 tons Built 1898 - 1915 (1992) Number Built 218 (223) In use 14 To be restored 6 *NQR 91.VA - 15/ 2/1907 NWS Built new - / /1926 - To NQ 91.VA - Puffing Billy Service History or Notes April 2016 - New Bogie has been assembled and awaits testing under 91NQR May 2016 - New Bogie has been assembled and awaits testing under 91NQR July 2016 - New Bogie has been assembled and awaits testing under 91NQR Aug 2016 - New Bogie has been assembled and awaits testing under 91NQR Sept 2016 - New Bogie has been assembled and awaits testing under 91NQR Oct 2016 - New Bogie has been assembled and awaits testing under 91NQR Nov 2016 - New Fox bogie Under 91NQR - Flats Link to Heritage / Period Photos PBR Workshop Blog Report Friday, May 20, 2016 Bogie in Brief - on NQR 91 http://puffingbillyworkshops.blogspot.com.au/2016/05/bogie-in-brief.htmlHistoric - Victorian Railways - Narrow Gauge Rolling Stock - NQR Open Medium Truck with drop ends91 NQR narrow gauge Open Medium Truck with drop ends made of Steel and metal91 NQRpuffing billy, pbr, rolling stock , 91 nqr, narrow gauge rolling stock, nqr wagon, victorian railways, 91 nqr -
 Ballarat Tramway Museum
Photograph - Black & White Photograph/s, Charles Craig, mid 1950's
Photograph of the intersection of Ryrie and Moorabool Streets Geelong looking south along Moorabool St, showing the bar type traffic lights and two bogie trams in Ryrie St, one with safety or hazard stripes. Has the Bank of NSW in the view. trams, tramways, geelong, ryrie st, moorabool st, traffic lights -
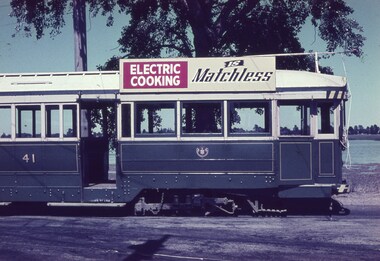 Ballarat Tramway Museum
Slide - 35mm slide/s, Keith Caldwell, 12/03/1962 12:00:00 AM
Yields information about the appearance of a bogie tram and detail of an SEC sign.Agfa colour slide, white cardboard mount, photo by Keith Caldwell on 12/3/1962 of: the front section (in this case) of No. 41 opposite the depot in Wendouree Parade. Shows the 22E bogie, the SEC roof advert "Electric Cooking is Matchless".In ink "Ballarat 12.3.62"tramways, trams, lake wendouree, wendouree parade, 22e trucks, tram 41 -
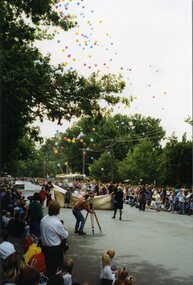 Ballarat Tramway Museum
Photograph - Colour Photograph/s, William. F. Scott, 1/03/1994 12:00:00 AM
Colour photograph of the Begonia Festival Parade, March 1994 showing two trams, bogie and single trucker, parked in the Wendouree Parade Gardens loop. Photo shows balloons being released. Taken by William F. Scott - on AGFA paper.In pencil on rear "Begonia Festival '94 / William. F. Scott"begonia festival, wendouree parade, gardens loop -
 Ballarat Tramway Museum
Photograph - Colour Photograph/s, c1971
Demonstrates aspects of the Ballarat Tramways operations at this intersection - Hospital Corner - unusual photograph angle - early morning photo - not a lot taken at this time, but of lower photographic quality.Colour photograph of a bogie tram in Drummond St south about to cross Sturt St - c1971, taken from the median strip early in the morning. Has the Southern Cross Hotel on the left hand side of the photograph and the liquor store in the background.sturt st, drummond st -
 Ballarat Tramway Museum
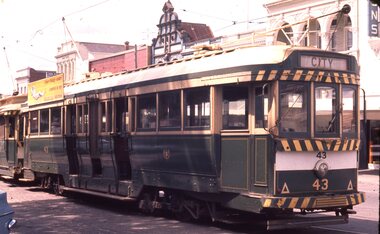
Slide - 35mm slide/s, Chas Bevan, 1971
Yields information about the storage of tramcars in the City Loop during a week day.Colour slide - 35mm - of Ballarat bogie tram No. 43 parked in the City Loop with buildings of Sturt St south side in the background. Tram has the destination of City and an SEC roof advert "Everything's fine in my all electric kitchen""Ballarat trams 1971"tramways, trams, sturt st, city loop, tram 43 -
 Ballarat Tramway Museum
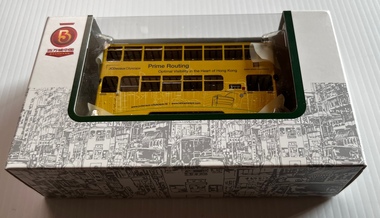
Model - Model Hong Kong double decker 45, Bachmann Models, c1990
Model of a Hong Kong double deck tram, No. 45 made by Bachmann models, China. Painted in an overall advertising scheme for Prime Routing for JCDecaux advertising.Demonstrates of a model of Hong Kong double decker tram.Model of Hong Kong double decker tram in cardboard box, clear plastic packaging, instruction sheets made fitted with a motorised bogie, trolley pole. Model shows seats and stairways on upper deck. HO Scale. Model is operable.models, tramcars, hong kong, bachmann models -
 Ballarat Tramway Museum
Photograph - Black and White - 26 at City in Sturt Street late 1940s to 1950s
Photograph shows Ballarat tram 26 parked behind a bogie car at the City terminus, in Sturt St at Lydiard St. Alongside there are two ladies talking to each other one holding a sheaf of flowers. In the background is the SEC City Office and Alan Bros Jewellers.Yields information about tram operations post the second world war.Black and White Photograph - 26 at City in Sturt Street 1950s. Original and Copy Print.ballarat, sturt st, city terminus, tram 26, trams, tramcars, tramways -
 Ballarat Tramway Museum
Photograph - Tram 35 Lydiard St Nth crossing, late 1950s
The photograph shows SEC Ballarat tram No. 35 northbound in Lydiard St loop, crossing another bogie tram, probably at the Seymour St Loop. The tram is fitted with tail lights and large reflective triangles, indicating a date between 1956 and 1960. Photographer unknown.Yields information about tram 35 crossing another bogie, probably at the Seymour St loop - late 1950s.Black and white print on plain papertramcars, tram 35, lydiard st nth -
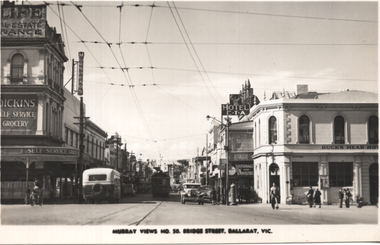 Ballarat Tramway Museum
Postcard, Murray Views, "Murray Views No. 50 Bridge Street Ballarat Vic", 1948
Photo shows the view looking east along Bridge St from Grenville St. Bogie tram 35 is in the shadows. A bus is entering Bridge St, In the view are Dickins Self service grocery, Morseheads store, CTA Hotel, and the Bucks Head Hotel. On the rear, Wal Jack to Ken Magor of Newcastle has written "No. 35 bogie to Victoria St, 1948. Bridge St from Sturt and Grenville Sts. Note two green lights on the span pole under neon sign which guards the Bridge St (bottom light) and Victoria St single track. Mt Pleasant light is on opposite side pole. No. 35 is standing at the old city terminus up to 1937."Yields information about Bridge St Ballarat and its various buildings.Postcard black and white, divided back, with a handwritten note on rear.See image 2 for details of the handwritten note by Wal Jack on the rear. tramways, trams, bridge st, tram 35, buses, dickins, bucks head hotel -
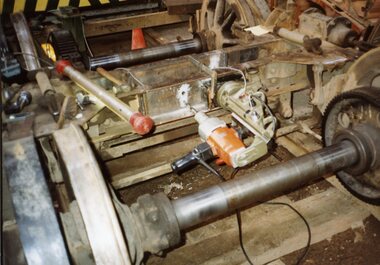 Ballarat Tramway Museum
Photograph - Colour Photograph/s - set of 3, Warren Doubleday, Aug. 1990
... Bogies ...Has a strong association with a BTM/BTPS volunteer - mid 1980's and the work to repair the main bolster on tram 661.Set of three colour prints showing the repairs to No. 661 bolster following extensive cracking in the bolster. Taken August/Sept. 1990 (661's book would show actual dates). Reported in the September 1991 issue of Fares Please! Printed on Kodak paper. .1 - Showing the drill in position to drill the 2nd of four holes. .2 - Drilling the second hole - Warren Doubleday .3 - Work complete with the bracket in position. See September 1990 Fares Please!repairs, volunteers, btps, bogies, tram 661 -
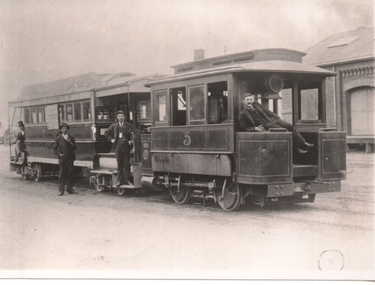 Ballarat Tramway Museum
Photograph - Bendigo Steam tram 5 and bogie trailer, 1894
Copy print of Bendigo steam tram and bogie trailer at the railway station, 1894. Has Baldwin Motor No. 5 with trailer No. 4, crew members around the tram motor and trailer with a man wearing a top hat on the rear platform. Railway station goods shed in the background.Yields information about Bendigo steam tram 5 and their operations.Black and White copy print contained within the Wal Jack Bendigo and Geelong Album, see Reg Item 5003 for more details.On rear in ink " Bendigo No. 5 Motor, No. 4 car, at Railway 1894, Motor No. 5 built by Baldwin B/No 12244 of 1891." Has Wal Jack copyright stamp in bottom right hand corner and No. T169 written in.trams, tramways, bendigo, steam trams, railway station, trailers, tram 5, tram 4 -
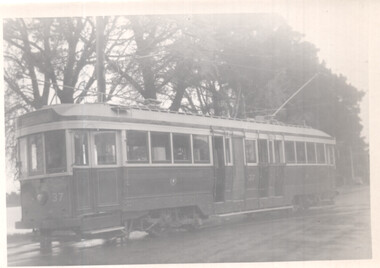 Ballarat Tramway Museum
Photograph - Ballarat 37 leaving the depot, Bob Lilburn, c1953
Photo shows Ballarat bogie tram 37 leaving the tram depot in Wendouree Parade. The tram itself was renumbered in Sept 1952 (Reg Item 5533) and scrapped in 1955 following a major accident in April 1954 - see Reg item 5315. Date 1952 to 1954.Yields information about bogie tram 37 c1953Black and White photograph of - Ballarat 37 leaving the depot.Has in ink on rear " R Lilburn"ballarat, tramways, trams, tram 37, depot -
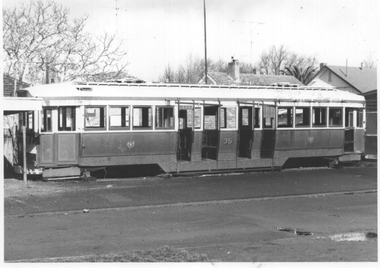 Ballarat Tramway Museum
Photograph - set of 2 - Tram 35 Ballarat College, late 1971
The photographs show SEC Ballarat tram No. 35 "parked" at the Junior School of Ballarat College after the closure of the Ballarat SEC-operated system. Item 3929 gives a disposal date of 5-10-1971. The bogies had been removed at the time of transportation. Photographer unknown. Yields information about tram 35 after its disposal in 1971.Set of two black and white prints, plain back.tramcars, tram 35, disposal, sale of trams, ballarat college -
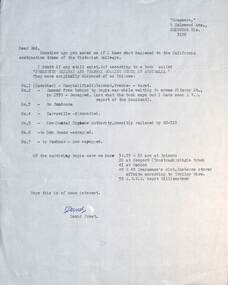 Melbourne Tram Museum
Letter - Disposal of VR Trams, David Frost, c1990
Letter written by David Frost to Rod Atkins, detailing the disposal of some of the Victorian Railways Trams - c1990. Includes the four wheel (2nd batch) and surviving bogie trams at the time. Refers to a book - "Preserved railway and tramway rolling stock in Australia" - Peter Charrett, 1977. Yields information about the disposal of VR trams.Letter - typed on quarto paper undatedtramcars, victorian railways, preserved trams, sale of trams, scrapped, scrapped trams, david frost -
 Melbourne Tram Museum
Photograph - SW5 852 derailed Glenferrie and Coldblo Roads, mid to late 1980s
SW5 852 derailed Glenferrie and Coldblo Roads, at the entry to Malvern depot. The rear bogie has derailed, tram possibly running into the depot. Date unknown. Tram has a King Gee work clothing advertisement and is The Met colour scheme - possibly mid to late 1980s Shows a tram derailed at the entry to Malvern Depot.Colour print on Kodak paper.sw5 class, tramcars, the met, glenferrie road, derailments, coldblo road, malvern depot -
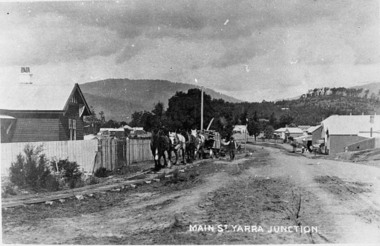 Upper Yarra Museum
Negative Photographic Reproduction, Main St Yarra Junction
03039 PC Main street Yarra Junction. Team of horses pulling sawn timber on log bogies along the wooden Gilderoy tramline. Upper Yarra Shire 1888-1988 Centenary collection. Black & white Negative, scanned at 600 dpimain st yarra junction station masters house gilderoy tramway -
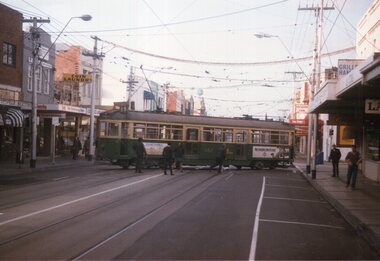
 Ballarat Tramway Museum
Slide - 35mm slide/s, Wal Jack, 3/09/1958 12:00:00 AM
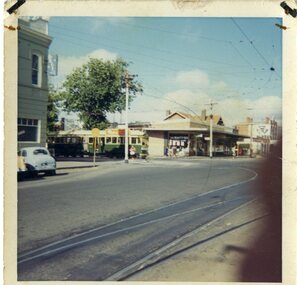
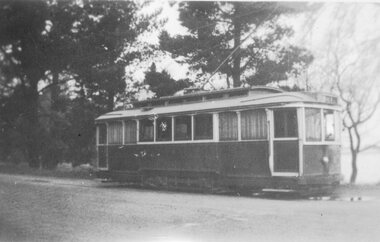
Bendigo, bogie tram No. 2 standing alongside the fountain before proceeding to Eaglehawk. Tram fitted with small reflective triangles on front panels, all blinds drawn and gate closed. Has fountain in background and shops on the west side of Charing cross.'7 55 am Wed 3 Sept. 1958, Tram No. 2 at Fountain, Bendigo'tramways, trams, bendigo, tram 2 -
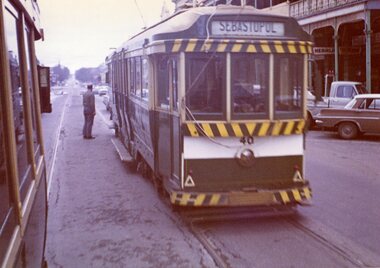 Ballarat Tramway Museum
Photograph - Colour Photograph/s, Travis Jeffrey, 14/08/1971 12:00:00 AM
Colour photograph of Ballarat No. 40 southbound in Lydiard St. North, between Mair and Sturt St. photographed from a northbound bogie tram. Tram 40 has destination of Sebastopol. Photo on Agfa Paper and taken on Friday 14 August 1971.Stamps with faded green ink: "Photo by Chris Jeffrey / Number" with number "104PC/07" in blue ink and date stamp "Friday 14 August 1971" also in faded green ink.lydiard st nth., tram 40 -
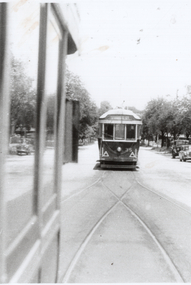
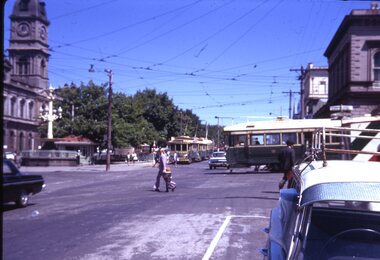 Ballarat Tramway Museum
Slide - 35mm slide/s, Carolyn Dean, 3/11/1970 12:00:00 AM
Shows how the trams crossed Sturt St from Lydiard St Nth.Kodak slides, white cardboard Taken 3.11.1970 by Carolyn Dean. A bogie tram in Lydiard St Nth crosses Sturt St, with three trams standing at the City Terminus. Not well focused poor depth of field. Has Town Hall in background. ."3-11-70" in ink on slide.tramways, trams, ballarat, sturt st -
 Ballarat Tramway Museum
Photograph - Black & White Photograph/s, Wal Jack, Jul. 1946
Yields information about the appearance of one of Ballarat's single truck trams, soon after it was repainted to the more uniform green colour scheme in 1946.Black and white photograph of the Ballarat Bogie tram No. 16, in the new colour scheme, (that is without a cream rocker panel), Lake Wendouree, July 1946. Photo by Wal Jack. Image rescanned from copy neg and updated 1/6/2020.On rear in pencil, "Ballarat No. 16 (New colours) Lake Wendouree July 1946.tramways, trams, wendouree parade, livery, colour schemes, tram 16 -
 Ballarat Tramway Museum
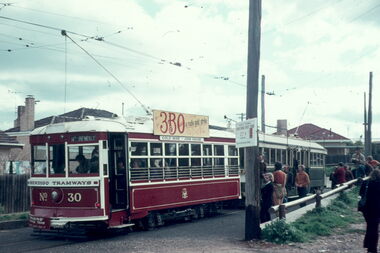
Slide - 35mm slide/s, Eldon Hogan, mid 1970's
Colour slide of Birney tram No. 30 at the North Bendigo Terminus in Bendigo Trust colours, mid 1970's and a SEC Bogie tram behind. Possibly on an ARE tour. Photographer Eldon Hogan, AGFA Slide, blue plastic with white plastic on reverse.tramways, trams, sper, bendigo, birney, north bendigo, tram 30