Showing 8982 items matching " meals-on-wheels"
-
 City of Moorabbin Historical Society (Operating the Box Cottage Museum)
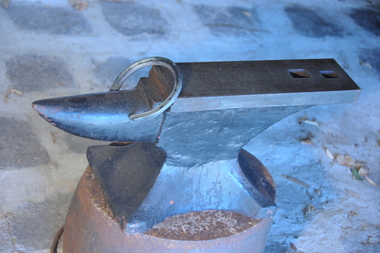
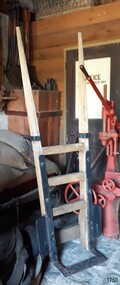
Tool - Blacksmith Anvil
... This anvil is typical of the type used by Blacksmiths in Moorabbin Shire c1850 - 20thC Blacksmith were needed to make machinery, tools, farm and household equipment, wheels and wagons, horseshoes and saddle irons....Solid steel single horn shaped block used by a Blacksmith to make tools, horseshoes, kitchenware, farm equipment, wagon wheels...City of Moorabbin Historical Society (Operating the Box Cottage Museum) Joyce Park Jasper Road Ormond melbourne This anvil is typical of the type used by Blacksmiths in Moorabbin Shire c1850 - 20thC Blacksmith were needed to make machinery, tools, farm and household equipment, wheels and wagons, horseshoes and saddle irons. ...This anvil is typical of the type used by Blacksmiths in Moorabbin Shire c1850 - 20thC Blacksmith were needed to make machinery, tools, farm and household equipment, wheels and wagons, horseshoes and saddle irons.This anvil is an example of the type used by blacksmiths in Moorabbin Shire 1840- 20thC as early settlers developed the land. built homes, shops and schoolsSolid steel single horn shaped block used by a Blacksmith to make tools, horseshoes, kitchenware, farm equipment, wagon wheelsmarket gardeners, early settlers, moorabbin shire, dendy special survey 1841, bentleigh, moorabbin, cheltenham, tools, anvils, steel, horses, wagons, washing pots, cooking pots, blacksmiths, county of bourke -
 Ballarat Tramway Museum
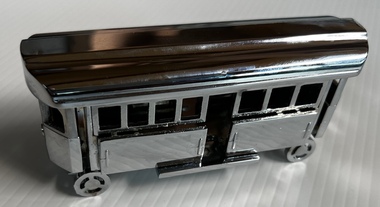
Model - model tramcar - Representational of a Melbourne W2
... The motorman’s cabin is realistic, but the body with its centre doorway does not look like any known tram designs. The wheels and their arrangement at the very ends of the tram are not realistic at all. ...Nickel plated steel model with operable wheels at either end. Two copies held....The motorman’s cabin is realistic, but the body with its centre doorway does not look like any known tram designs. The wheels and their arrangement at the very ends of the tram are not realistic at all. ...This is a small commercially made tram model. Its design appears to be very loosely based on a Melbourne W Class tram design. The motorman’s cabin is realistic, but the body with its centre doorway does not look like any known tram designs. The wheels and their arrangement at the very ends of the tram are not realistic at all. No details of the maker, or where or when the model was made. Demonstrates making tramcar models for decorative purposesNickel plated steel model with operable wheels at either end. Two copies held.models, trams, tramcars -
 Kiewa Valley Historical Society
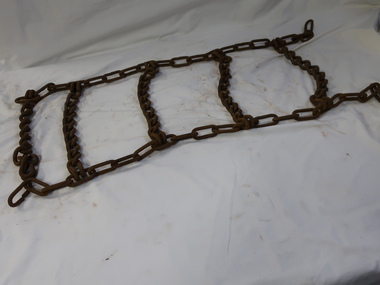
Chains - Large vehicles
... They were fitted onto the driving wheels for extra grip....Used to fit on the driving wheels of large vehicles eg. bus, tractor, snow vehicle....Used to fit on the driving wheels of large vehicles eg. bus, tractor, snow vehicle. ...Chains were used to prevent vehicles from slipping on the terrain. They were fitted onto the driving wheels for extra grip.Used on large vehicles during the construction of the Kiewa Hydro Electric Scheme when the terrain was slippery eg. mud, snowIron chains connected to form rectangles with extended links at each end with clips. Used to fit on the driving wheels of large vehicles eg. bus, tractor, snow vehicle.heavy vehicles, construction vehicles, snow chains -
 Whitehorse Historical Society Inc.
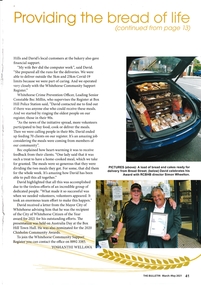
Article - The Burwood Bulletin, The Burwood Bulletin, Proving the Bread of Life, 2021
... David Winter and a group of 130 volunteers operated a Meals on Wheels program that fed over 220 people, 9800 meals twice a week during the Covid-19 lockdown. ...Citizen of the Year Winter David City of Whitehorse Meals on Wheels Awards Covid-19 David Winter and the Meals on Wheels program during Covid-19 lockdown Item id code marked on the cover page 3 pages (cover, pp 13, 41) from The (Burwood) Bulletin. ...David Winter and the Meals on Wheels program during Covid-19 lockdown3 pages (cover, pp 13, 41) from The (Burwood) Bulletin. One side of the respective pages is jagged.non-fictionDavid Winter and the Meals on Wheels program during Covid-19 lockdowncitizen of the year, winter david, city of whitehorse, meals on wheels, awards, covid-19 -
 Port Melbourne Historical & Preservation Society
Book - Peter's All Round Year, 1970 ... 50 Years On, 2020
... The book covers the career of South Melbourne Football Club Captain and 1970 Brownlow Medal winner, Peter Lawrence Anthony "Wheels" BEDFORD....White covered book with a collection of articles and information on the AFL South Melbourne Football Club Captain and 1970 Brownlow Medal winner, Peter Lawrence Anthony "Wheels" BEDFORD....Best wishes Peter Bedford. 11 1970 White covered book with a collection of articles and information on the AFL South Melbourne Football Club Captain and 1970 Brownlow Medal winner, Peter Lawrence Anthony "Wheels" BEDFORD. Book Peter's All Round Year, 1970 ... 50 Years On ...The book covers the career of South Melbourne Football Club Captain and 1970 Brownlow Medal winner, Peter Lawrence Anthony "Wheels" BEDFORD.White covered book with a collection of articles and information on the AFL South Melbourne Football Club Captain and 1970 Brownlow Medal winner, Peter Lawrence Anthony "Wheels" BEDFORD.Dean Jones & Nick. Best wishes Peter Bedford. 11 1970sport - australian rules football, peter lawrence anthony bedford, 50th anniversary -
 8th/13th Victorian Mounted Rifles Regimental Collection
Photograph
... Crews ate meals from ration packs on exercise. The 8th/13th Victorian Mounted Rifles was raised as a regiment of the Royal Australian Armoured Corps on 1 May 1948 with Headquarters in Melbourne and squadrons in Sale, Benalla/Wangaratta and Albury. ...Two black and white photographs of 8/13 Victorian Mounted Rifles crewmen enjoying a meal on exercise at Puckapunyal, c.1964....Two black and white photographs of 8/13 Victorian Mounted Rifles crewmen enjoying a meal on exercise at Puckapunyal, c.1964. Photograph ...Crews ate meals from ration packs on exercise. The 8th/13th Victorian Mounted Rifles was raised as a regiment of the Royal Australian Armoured Corps on 1 May 1948 with Headquarters in Melbourne and squadrons in Sale, Benalla/Wangaratta and Albury. In 1955 Regimental Headquarters moved to Wangaratta and a second squadron was located at Albury. The Sale squadron transferred to 4th/19th Prince of Wales’s Light Horse. In 1977 8/13 VMR Regiment was reduced to an independent squadron A Squadron 8th/13th Victorian Mounted Rifles and in 1991 was linked with 4th/19th Prince of Wales’s Light Horse forming the VMR Squadron of that regiment.Two black and white photographs of 8/13 Victorian Mounted Rifles crewmen enjoying a meal on exercise at Puckapunyal, c.1964." John Doyle, Lou Madjeric, Bill Cameron, Peter McClosky, Bill Vincent." -
 Marysville & District Historical Society
Ephemera (item) - Menu, Unknown
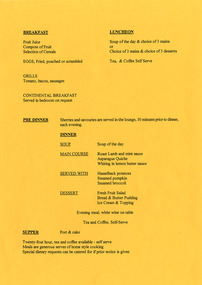
... The menu shows options for breakfast, luncheon, pre-dinner, dinner and supper meals....The menu shows options for breakfast, luncheon, pre-dinner, dinner and supper meals....The menu shows options for breakfast, luncheon, pre-dinner, dinner and supper meals. Ephemera Menu ...A menu from Mary-Lyn Guest House in Marysville. Mary-Lyn was a part of the Mary Chain of guest houses built by Eric Dowdle during the Depression years. The menu shows options for breakfast, luncheon, pre-dinner, dinner and supper meals.A menu from Mary-Lyn Guest House in Marysville.marysville, victoria, australia, mary chain guest houses, mary-lyn guest house, eric dowdle, mary-lyn '50 & over' holiday resort, mary-lyn the fifty and over holiday resort, menu -
 Melbourne Tram Museum
Photograph - Preston Workshops - wheel lathe and trolley wheels - set of 2, 1950s
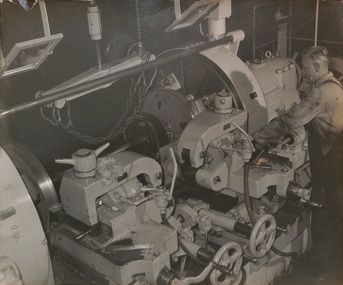
... ...wheels...Underfloor lathes are now used as well. 2 - Machining trolley wheels on a turret lathe, from a cast brass piece....In pencil: "2 - Turning tramcar tyre profiles on Niles wheel lathe, machine shop, Preston Wshops" "7 - turning tramcar trolley wheels on turret lathe, machine shop, Preston Workshops"...Photograph Preston Workshops - wheel lathe and trolley wheels - set of 2 ...The photos shows two different lathes at Preston Workshops 1 - Niles wheel lathe for turning the flanges on a wheel to the correct profile - this was a large machine. Underfloor lathes are now used as well. 2 - Machining trolley wheels on a turret lathe, from a cast brass piece.Yields information about two of the MMTB machines in the machine shop at Preston.Set of two black and white photographs with notes on the rear.In pencil: "2 - Turning tramcar tyre profiles on Niles wheel lathe, machine shop, Preston Wshops" "7 - turning tramcar trolley wheels on turret lathe, machine shop, Preston Workshops"tramways, machines, lathes, preston workshops, wheels, trolley wheels, wheel lathe -
Lara RSL Sub Branch
Service Gear, Dehydrated Meal
... Dehydrated Meal...2 x Dehydrated Meals...Lara RSL Sub Branch McClelland Ave Lara 2 x Dehydrated Meals Dehydrated Meal Service Gear ...2 x Dehydrated Meals -
 Melbourne Tram Museum
Document - Report, Melbourne & Metropolitan Tramways Board (MMTB), "Notes on Rolling Stock Maintenance Practice", late 1930's?
... "Notes on Rolling Stock Maintenance Practice"...Gives details of the shifts, cleaning, motor inspections, grinding, the use of a single truck breakdown tram, grinding of wheels at depots, annual mileages, defect rate, use of roller bearings on armatures, painting of trams, gear shield grease and varnishing or lacquering of seats and interiors,...Gives details of the shifts, cleaning, motor inspections, grinding, the use of a single truck breakdown tram, grinding of wheels at depots, annual mileages, defect rate, use of roller bearings on armatures, painting of trams, gear shield grease and varnishing or lacquering of seats and interiors, "Notes on Rolling Stock Maintenance Practice" Document Report Melbourne & Metropolitan Tramways Board (MMTB) ...Memorandum, typed foolscap, 4 sheets, titled "Notes on Rolling Stock Maintenance Practice", undated, late 1930's? looking at MMTB Workshop and depot maintenance practices, for tramcars. Gives details of the shifts, cleaning, motor inspections, grinding, the use of a single truck breakdown tram, grinding of wheels at depots, annual mileages, defect rate, use of roller bearings on armatures, painting of trams, gear shield grease and varnishing or lacquering of seats and interiors,trams, tramways, tramcar components, brakes, depots, workshops, maintenance, motors, rolling stock, bearings, paint -
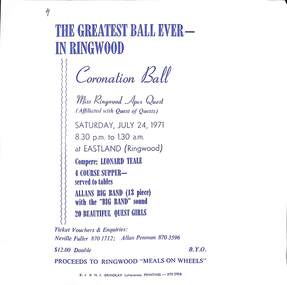 Ringwood and District Historical Society
Pamphlet, Miss Ringwood Apex Quest Coronation Ball
... Proceeds to Ringwood "Meals on Wheels"...Proceeds to Ringwood "Meals on Wheels" White stiff paper with blue printing (2 copies) Miss Ringwood Apex Quest Coronation Ball Pamphlet ...White stiff paper with blue printing (2 copies)The greatest ball ever- In Ringwood. Saturday July 24, 1971, 8.30 pm to 1.30 am at Eastland. Compere- Leonard Teale - Allans Big Band (13 Piece). 20 Beautiful Quest Girls. $12.00 double. Proceeds to Ringwood "Meals on Wheels" -
 Sunshine and District Historical Society Incorporated
Administrative record - City of Sunshine - Commissioner Mr Alexander Alex George Gillon Collection 1976 - 1982 - Minutes of the ordinary meeting of council held on 29th June 1977, City of Sunshine, 29th June 1977
... Victorian Family and Community Services Programme Bikeway Seminar Sunshine North Technical School proposed use and agreement Maidstone Elderly Citizens Club And Meals on Wheels Lease if Navigational Beacon site in Robinson Road Deer Park Council Officers Reports...City of Sunshine Alexander "Alex" George Gillon Navigational Beacon Robinsons Road Deer Park Maidstone Elderly Citizens Club Sunshine West High School Lachlan Road Sunshine West Ardeer South Primary School Victorian Family and Community Services Programme Bikeway Seminar Sunshine North Technical School proposed use and agreement Maidstone Elderly Citizens Club And Meals on Wheels Lease if Navigational Beacon site in Robinson Road Deer Park Council Officers Reports Foolscap sized document. ...Victorian Family and Community Services Programme Bikeway Seminar Sunshine North Technical School proposed use and agreement Maidstone Elderly Citizens Club And Meals on Wheels Lease if Navigational Beacon site in Robinson Road Deer Park Council Officers Reports city of sunshine, alexander "alex" george gillon, navigational beacon, robinsons road, deer park, maidstone elderly citizens club, sunshine west high school, lachlan road, sunshine west, ardeer south primary school -
 Sunshine and District Historical Society Incorporated
Administrative record - City of Sunshine - Commissioner Mr Alexander Alex George Gillon Collection 1976 - 1982 - Notice of ordinary meeting of the council of the City of Sunshine to be held on 29th June 1977, City of Sunshine, 22nd June 1977
... Victorian Family and Community Services Programme Bikeway Seminar Sunshine North Technical School proposed use and agreement Maidstone Elderly Citizens Club And Meals on Wheels Lease if Navigational Beacon site in Robinson Road Deer Park Council Officer's reports...City of Sunshine Alexander "Alex" George Gillon Sunshine North Technical School Northumberland Road Sunshine North Maidstone Elderly Citizens Club Navigational Beacon Robinsons Road Deer Park Victorian Family and Community Services Programme Bikeway Seminar Sunshine North Technical School proposed use and agreement Maidstone Elderly Citizens Club And Meals on Wheels Lease if Navigational Beacon site in Robinson Road Deer Park Council Officer's reports Foolscap sized document. ...Victorian Family and Community Services Programme Bikeway Seminar Sunshine North Technical School proposed use and agreement Maidstone Elderly Citizens Club And Meals on Wheels Lease if Navigational Beacon site in Robinson Road Deer Park Council Officer's reports city of sunshine, alexander "alex" george gillon, sunshine north technical school, northumberland road, sunshine north, maidstone elderly citizens club, navigational beacon, robinsons road, deer park -
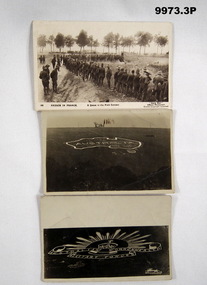 Bendigo Military Museum
Postcard - PHOTOGRAPHIC POSTCARDS WW1
... Other photo is of NZ Troops lined up in France for meals. Photo taken by Daily Mail as Official War Photo....Black and white photo of troops lined up in France for meals. Postcard format on back. 2P. Photo of image of map of Australia and the word "Australia" inside on a plain in the UK, most likely Salisbury. 3P. ...Other photo is of NZ Troops lined up in France for meals. Photo taken by Daily Mail as Official War Photo. ...Two postcard signs likely taken on Salisbury Plains in UK. Other photo is of NZ Troops lined up in France for meals. Photo taken by Daily Mail as Official War Photo.1P. Black and white photo of troops lined up in France for meals. Postcard format on back. 2P. Photo of image of map of Australia and the word "Australia" inside on a plain in the UK, most likely Salisbury. 3P. Photo of large scale image of the Australian Rising Sun Emblem laid out on a plain. Assumed to be Salisbury Plain.No writing on postcards.selby collection, photographic postcards -
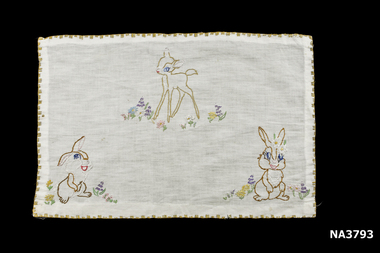 Whitehorse Historical Society Inc.
Textile - Child's Tray Cloth, circa 1948
... Meal Mat by Semco No 1...Whitehorse Historical Society Inc. 2-10 Deep Creek Road Mitcham melbourne Embroidered by donor (Richardson Pat) at Primary School in Grade 6 in 1948 handcrafts embroidery domestic items infants Meal Mat by Semco No 1 A rectangular tray cloth embroidered with a Faun and two Rabbits, Flowers and edged with yellow thread. ...Embroidered by donor (Richardson Pat) at Primary School in Grade 6 in 1948A rectangular tray cloth embroidered with a Faun and two Rabbits, Flowers and edged with yellow thread.Meal Mat by Semco No 1handcrafts, embroidery, domestic items, infants -
 Bendigo Historical Society Inc.
Photograph - SANDHURST BOYS CENTRE COLLECTION: MEAL TIME
... Meal distribution at Sandhurst Boys Centre....Photograph SANDHURST BOYS CENTRE COLLECTION: MEAL TIME ...Meal distribution at Sandhurst Boys Centre. -
![Plan, Improvements on the Camp Reserve Ballarat, 1870, 26/4/1870 (exact); Traced by Henry [Mornes?], district surveyor, on the above date](/media/collectors/4f729f6797f83e0308601707/items/4f72a4fa97f83e0308602508/item-media/59b79d3921ea680200c6b8a7/item-fit-380x285.jpg?cb=6) Federation University Historical Collection
Federation University Historical CollectionPlan, Improvements on the Camp Reserve Ballarat, 1870, 26/4/1870 (exact); Traced by Henry [Mornes?], district surveyor, on the above date
... Improvements on the Camp Reserve Ballarat, 1870..., district surveyor, on the above date ...The Ballarat Camp housed the Goldfields administrators. It was from this site that the troopers left on the morning of 3 December 1854 to attack the Eureka Stockade. Much of the area shown in on the west side of Camp Street is now used by the Federation University Arts Academy.Hand-drawn plan on white linen showing the camp reserve in what is now known Ballarat's Camp Street. The plan shows allotments in an area bounded by Mair, Sturt and Lydiard Streets. The plan has colours indicating wooden buildings, stone buildings, brick buildings, Wood & zinc buildings, and wood & brick buildings.ballarat, camp street, horace walker, henry mornes, goldfields architecture, reserve for public, buildings, goldfields administration, eureka stockade -
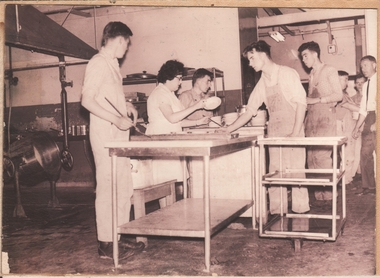
 Eltham District Historical Society Inc
Document - Series Listing, Fraser Faithfull et al, Series 27: Shire President's Volunteers Afternoon Tea, 1991 , 14 colour negatives, 2000
... Series consists of 14 colour negatives taken on the occasion of an afternoon tea held to thank volunteers who have assisted with services such as Meals on Wheels and Home Help. The afternoon tea is usually held at Eltham Community Centre....Eltham District Historical Society Inc 728 Main Rd Eltham melbourne Series consists of 14 colour negatives taken on the occasion of an afternoon tea held to thank volunteers who have assisted with services such as Meals on Wheels and Home Help. The afternoon tea is usually held at Eltham Community Centre. shire of eltham archives series listing A4 printout Series 27: Shire President's Volunteers Afternoon Tea, 1991 , 14 colour negatives Document Series Listing Fraser Faithfull Chris Marks ...Series consists of 14 colour negatives taken on the occasion of an afternoon tea held to thank volunteers who have assisted with services such as Meals on Wheels and Home Help. The afternoon tea is usually held at Eltham Community Centre.shire of eltham archives, series listing -
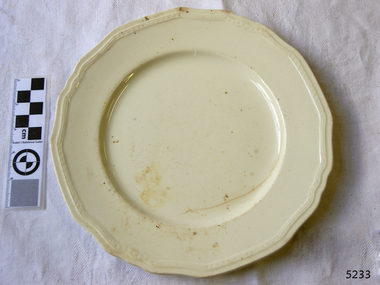
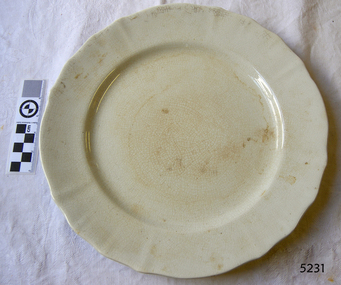 Flagstaff Hill Maritime Museum and Village
Domestic object - Plate
... I’m going to make the wall behind the wheels the feature wall of pretty colours! ...Stoke-on-Trent, Staffordshire, UK...I’m going to make the wall behind the wheels the feature wall of pretty colours! ...The Process of Making Pottery Decorating, Firing, Glazing, Making, Technical There is a rhythm and flow to clay. It can’t be done all at once! Even the making process! It can take weeks to get everything done, especially if you can only work on your pottery once a week! Even though we have three hour classes, it’s often just not enough time! Here is an overview of some of the processes so you have a bit more grasp on some of the technical stuff! Step One – Design There are SO many ideas out there for making stuff in clay! From delicate porcelain jewellery, through to heavy sculptural work and everything in between. Deciding your direction is sometimes not that easy – when you first start, try everything, you will naturally gravitate to the style that you enjoy! The options and variations are endless and can get a wee bit overwhelming too! Check in with me before you start to ensure your ideas will work, what order you might do things, how you could achieve the look you are seeking and any other technical data required! Step Two – Making Clay is thixotropic. This means that as you work with it, the clay first gets sloppier and wetter, before is begins to dry in the atmosphere. For most things, you simply can’t do all parts of the project at once. An example of work order might look like: Get last weeks work out from the shelves Prepare clay for today’s work – roll your clay, prepare balls for throwing, make the first stage of a pinch pot) Clean up last week’s work and put it on the shelf for bisque firing Check that you have any glazing to do – and do enough of it that you will have time to finish your main project Do the next step of your next project – there might be a further step that can’t be complete immediately, in that case, wrap your work well and put onto the shelves. Letting your work rest for a while can really help keep your work clean and professional looking. Many things require bagging under plastic to keep it ready for work the next week – put your name on the outside of the bag so you can find your work easily. We have stickers and markers. Consider how you want to decorate your work – coloured slip can be applied at a fairly wet stage (remembering that it will make your work even wetter!). Trying to apply slip to dry clay won’t work! If you want to do sgraffito – you will need to keep the work leather hard (a state of dryness where you can still work the clay with a little effort and a little water and care). Step Three – Drying Most of the time your work can go into the rack uncovered to let it dry out for the following week. If you want to continue forming or shaping you will need to double bag your work – put your work on a suitable sized bat and put the bat in a bag so the base of the bag is under the bat, then put another bag over the top of the work and tuck the top of the bag under the bat. If you want to trim (or turn) your thrown work the following week, it should also be double bagged. If your work is large, delicate, or of uneven thicknesses, you should lightly cover your work for drying. When considering the drying process, bare in mind the weather, humidity and wind! The hotter and dryer, the faster things dry and work can dry unevenly in the shelves – this can lead to cracking – another time to lightly cover your work for drying. Step Four – Trimming and Cleaning Up Your work is dry! It is called greenware now and it is at it’s most fragile! Handle everything with two hands. I often refer to soft hands – keep everything gentle and with your fingers spread as much as possible. Try to not pick up things like plates too much, and always with both hands! Before your work can be bisque fired it should be “cleaned up”. You work won’t go into the kiln if it has sharp edges – when glazed, sharp edges turn into razor blades! Use a piece of fly wire to rub the work all over – this will scratch a little so be light handed. Use a knife or metal kidney to scrape any areas that require a bit more dynamic treatment than the fly wire offers! Finally, a very light wipe over with a slightly damp sponge can help soften and soothe all of your edges and dags! Trimming thrown work: If you are planning to trim (or turn) your thrown work (and you should be), make sure you bag it well – your work should be leather hard to almost dry for easiest trimming. Use this step to finish the work completely – use a metal kidney to polish the surface, or a slightly damp sponge to give a freshly thrown look. Wipe the sponge around the rim after trimming, and check the inside of the pot for dags! Trimming slip cast work: Usually I will trim the rims of your work on the wheel the following day to make that stage easier, however you will still need to check your work for lumps and bumps. Last but not least – check that your name is still clearly on the bottom of your work. Step Five – Bisque Firing When the work is completely dry it can go into the bisque kiln. The bisque kiln is fired to 1000°C. This process burns off the water in the clay as well as some of the chemically bound water. The structure of the clay is not altered that much at this temperature. Inside the bisque kiln, the work is stacked a little, small bowl inside a larger bowl and onto a heavy plate. Smaller items like decorations or drink coasters might get stacked several high. Consideration is paid to the weight of the stack and shape of the work. A bisque kiln can fire about one and a half times the amount of work that the glaze kiln can fire. The firing takes about 10 hours to complete the cycle and about two days to cool down. Once it has been emptied the work is placed in the glaze room ready for you to decorate! Step Six – Glazing Decorating your work with colour can be a lot of fun – and time consuming! There are three main options for surface treatment at this stage: Oxide Washes Underglazes Glazes Washes and underglazes do not “glaze” the work – It will still need a layer of glaze to fully seal the clay (washes don’t need glaze on surfaces not designed for food or liquid as they can gloss up a little on their own). Underglazes are stable colourants that turn out pretty much how they look in the jar. They can be mixed with each other to form other colours and can be used like water colours to paint onto your work. Mostly they should have a clear glaze on top to seal them. Oxides are a different species – the pink oxide (cobalt) wash turns out bright blue for instance. They don’t always need a glaze on top, and some glazes can change the colour of the wash! The glazes need no other “glaze” on top! Be careful of unknown glaze interactions – you can put any combination of glaze in a bowl or on a plate, but only a single glaze on the outside of any vertical surface! Glazes are a chemical reaction under heat. We don’t know the exact chemicals in the Mayco glazes we use. I can guess by the way they interact with each other, however, on the whole, you need to test every idea you have, and not run the test on a vertical surface! Simply put, glaze is a layer of glass like substance that bonds with the clay underneath. Clay is made of silica, alumina and water. Glaze is made of mostly silica. Silica has a melting point of 1700°C and we fire to 1240°C. The silica requires a “flux” to help it melt at the lower temperature. Fluxes can be all sorts of chemicals – a common one is calcium – calcium has a melting point of 2500°C, however, together they both melt at a much lower temperature! Colourants are metal oxides like cobalt (blue), chrome (green through black), copper (green, blue, even red!), manganese (black, purple and pink) iron (red brown), etc. Different chemicals in the glaze can have dramatic effects. for example, barium carbonate (which we don’t use) turns manganese bright pink! Other elements can turn manganese dioxide brown, blue, purple and reddish brown. Manganese dioxide is a flux in and of itself as well. So, glazes that get their black and purple colours, often interact with other glazes and RUN! Our mirror black is a good example – it mixes really well with many glazes because it fluxes them – causes them to melt faster. It will also bring out many beautiful colours in the glazes because it’s black colouring most definitely comes from manganese dioxide! Glaze chemistry is a whole subject on it’s own! We use commercial Mayco glazes on purpose – for their huge range of colour possibilities, stability, cool interactions, artistic freedom with the ability to easily brush the glazes on and ease of use. We currently have almost 50 glazes on hand! A major project is to test the interactions of all glazes with each other. That is 2,500 test tiles!!!! I’m going to make the wall behind the wheels the feature wall of pretty colours! Step Seven – Glaze (Gloss or sometimes called “Glost”) Firing Most of the time this is the final stage of making your creation (but not always!) The glaze kiln goes to 1240°C. This is called cone 6, or midrange. It is the low end of stoneware temperatures. Stoneware clays and glazes are typically fired at cone 8 – 10, that is 1260 – 1290°C. The energy requirement to go from 1240°C to 1280°C is almost a 30% more! Our clay is formulated to vitrify (mature, turn “glass-like”) at 1240°, as are our glazes. A glaze kiln take around 12 hours to reach temperature and two to three days to cool down. Sometimes a third firing process is required – this is for decoration that is added to work after the glaze firing. For example – adding precious metals and lustres. this firing temperature is usually around 600 – 800°C depending upon the techniques being used. There are many students interested in gold and silver trims – we will be doing this third type of firing soon! After firing your work will be in the student finished work shelves. Remember to pay for it before you head out the door! There is a small extra charge for using porcelain clay (it’s more than twice the price of regular clay), and for any third firing process! Once your work has been fired it can not turn back into clay for millennia – so don’t fire it if you don’t like it! Put it in the bucket for recycling. https://firebirdstudios.com.au/the-process-of-making-pottery/Ceramics have evolved over thousands of years.White earthenware dinner plate. Crazing evident all over.Backstamped ‘Made in England S LTD’flagstaff hill, warrnambool, shipwrecked-coast, flagstaff-hill, flagstaff-hill-maritime-museum, maritime-museum, shipwreck-coast, flagstaff-hill-maritime-village, ceramics, tableware -
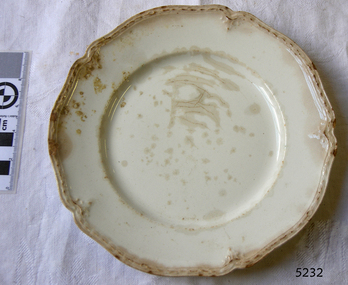 Flagstaff Hill Maritime Museum and Village
Domestic object - Plate, Johnson Bros
... I’m going to make the wall behind the wheels the feature wall of pretty colours! ...Stoke-on-Trent, Staffordshire, UK...I’m going to make the wall behind the wheels the feature wall of pretty colours! ...The Process of Making Pottery Decorating, Firing, Glazing, Making, Technical There is a rhythm and flow to clay. It can’t be done all at once! Even the making process! It can take weeks to get everything done, especially if you can only work on your pottery once a week! Even though we have three hour classes, it’s often just not enough time! Here is an overview of some of the processes so you have a bit more grasp on some of the technical stuff! Step One – Design There are SO many ideas out there for making stuff in clay! From delicate porcelain jewellery, through to heavy sculptural work and everything in between. Deciding your direction is sometimes not that easy – when you first start, try everything, you will naturally gravitate to the style that you enjoy! The options and variations are endless and can get a wee bit overwhelming too! Check in with me before you start to ensure your ideas will work, what order you might do things, how you could achieve the look you are seeking and any other technical data required! Step Two – Making Clay is thixotropic. This means that as you work with it, the clay first gets sloppier and wetter, before is begins to dry in the atmosphere. For most things, you simply can’t do all parts of the project at once. An example of work order might look like: Get last weeks work out from the shelves Prepare clay for today’s work – roll your clay, prepare balls for throwing, make the first stage of a pinch pot) Clean up last week’s work and put it on the shelf for bisque firing Check that you have any glazing to do – and do enough of it that you will have time to finish your main project Do the next step of your next project – there might be a further step that can’t be complete immediately, in that case, wrap your work well and put onto the shelves. Letting your work rest for a while can really help keep your work clean and professional looking. Many things require bagging under plastic to keep it ready for work the next week – put your name on the outside of the bag so you can find your work easily. We have stickers and markers. Consider how you want to decorate your work – coloured slip can be applied at a fairly wet stage (remembering that it will make your work even wetter!). Trying to apply slip to dry clay won’t work! If you want to do sgraffito – you will need to keep the work leather hard (a state of dryness where you can still work the clay with a little effort and a little water and care). Step Three – Drying Most of the time your work can go into the rack uncovered to let it dry out for the following week. If you want to continue forming or shaping you will need to double bag your work – put your work on a suitable sized bat and put the bat in a bag so the base of the bag is under the bat, then put another bag over the top of the work and tuck the top of the bag under the bat. If you want to trim (or turn) your thrown work the following week, it should also be double bagged. If your work is large, delicate, or of uneven thicknesses, you should lightly cover your work for drying. When considering the drying process, bare in mind the weather, humidity and wind! The hotter and dryer, the faster things dry and work can dry unevenly in the shelves – this can lead to cracking – another time to lightly cover your work for drying. Step Four – Trimming and Cleaning Up Your work is dry! It is called greenware now and it is at it’s most fragile! Handle everything with two hands. I often refer to soft hands – keep everything gentle and with your fingers spread as much as possible. Try to not pick up things like plates too much, and always with both hands! Before your work can be bisque fired it should be “cleaned up”. You work won’t go into the kiln if it has sharp edges – when glazed, sharp edges turn into razor blades! Use a piece of fly wire to rub the work all over – this will scratch a little so be light handed. Use a knife or metal kidney to scrape any areas that require a bit more dynamic treatment than the fly wire offers! Finally, a very light wipe over with a slightly damp sponge can help soften and soothe all of your edges and dags! Trimming thrown work: If you are planning to trim (or turn) your thrown work (and you should be), make sure you bag it well – your work should be leather hard to almost dry for easiest trimming. Use this step to finish the work completely – use a metal kidney to polish the surface, or a slightly damp sponge to give a freshly thrown look. Wipe the sponge around the rim after trimming, and check the inside of the pot for dags! Trimming slip cast work: Usually I will trim the rims of your work on the wheel the following day to make that stage easier, however you will still need to check your work for lumps and bumps. Last but not least – check that your name is still clearly on the bottom of your work. Step Five – Bisque Firing When the work is completely dry it can go into the bisque kiln. The bisque kiln is fired to 1000°C. This process burns off the water in the clay as well as some of the chemically bound water. The structure of the clay is not altered that much at this temperature. Inside the bisque kiln, the work is stacked a little, small bowl inside a larger bowl and onto a heavy plate. Smaller items like decorations or drink coasters might get stacked several high. Consideration is paid to the weight of the stack and shape of the work. A bisque kiln can fire about one and a half times the amount of work that the glaze kiln can fire. The firing takes about 10 hours to complete the cycle and about two days to cool down. Once it has been emptied the work is placed in the glaze room ready for you to decorate! Step Six – Glazing Decorating your work with colour can be a lot of fun – and time consuming! There are three main options for surface treatment at this stage: Oxide Washes Underglazes Glazes Washes and underglazes do not “glaze” the work – It will still need a layer of glaze to fully seal the clay (washes don’t need glaze on surfaces not designed for food or liquid as they can gloss up a little on their own). Underglazes are stable colourants that turn out pretty much how they look in the jar. They can be mixed with each other to form other colours and can be used like water colours to paint onto your work. Mostly they should have a clear glaze on top to seal them. Oxides are a different species – the pink oxide (cobalt) wash turns out bright blue for instance. They don’t always need a glaze on top, and some glazes can change the colour of the wash! The glazes need no other “glaze” on top! Be careful of unknown glaze interactions – you can put any combination of glaze in a bowl or on a plate, but only a single glaze on the outside of any vertical surface! Glazes are a chemical reaction under heat. We don’t know the exact chemicals in the Mayco glazes we use. I can guess by the way they interact with each other, however, on the whole, you need to test every idea you have, and not run the test on a vertical surface! Simply put, glaze is a layer of glass like substance that bonds with the clay underneath. Clay is made of silica, alumina and water. Glaze is made of mostly silica. Silica has a melting point of 1700°C and we fire to 1240°C. The silica requires a “flux” to help it melt at the lower temperature. Fluxes can be all sorts of chemicals – a common one is calcium – calcium has a melting point of 2500°C, however, together they both melt at a much lower temperature! Colourants are metal oxides like cobalt (blue), chrome (green through black), copper (green, blue, even red!), manganese (black, purple and pink) iron (red brown), etc. Different chemicals in the glaze can have dramatic effects. for example, barium carbonate (which we don’t use) turns manganese bright pink! Other elements can turn manganese dioxide brown, blue, purple and reddish brown. Manganese dioxide is a flux in and of itself as well. So, glazes that get their black and purple colours, often interact with other glazes and RUN! Our mirror black is a good example – it mixes really well with many glazes because it fluxes them – causes them to melt faster. It will also bring out many beautiful colours in the glazes because it’s black colouring most definitely comes from manganese dioxide! Glaze chemistry is a whole subject on it’s own! We use commercial Mayco glazes on purpose – for their huge range of colour possibilities, stability, cool interactions, artistic freedom with the ability to easily brush the glazes on and ease of use. We currently have almost 50 glazes on hand! A major project is to test the interactions of all glazes with each other. That is 2,500 test tiles!!!! I’m going to make the wall behind the wheels the feature wall of pretty colours! Step Seven – Glaze (Gloss or sometimes called “Glost”) Firing Most of the time this is the final stage of making your creation (but not always!) The glaze kiln goes to 1240°C. This is called cone 6, or midrange. It is the low end of stoneware temperatures. Stoneware clays and glazes are typically fired at cone 8 – 10, that is 1260 – 1290°C. The energy requirement to go from 1240°C to 1280°C is almost a 30% more! Our clay is formulated to vitrify (mature, turn “glass-like”) at 1240°, as are our glazes. A glaze kiln take around 12 hours to reach temperature and two to three days to cool down. Sometimes a third firing process is required – this is for decoration that is added to work after the glaze firing. For example – adding precious metals and lustres. this firing temperature is usually around 600 – 800°C depending upon the techniques being used. There are many students interested in gold and silver trims – we will be doing this third type of firing soon! After firing your work will be in the student finished work shelves. Remember to pay for it before you head out the door! There is a small extra charge for using porcelain clay (it’s more than twice the price of regular clay), and for any third firing process! Once your work has been fired it can not turn back into clay for millennia – so don’t fire it if you don’t like it! Put it in the bucket for recycling. https://firebirdstudios.com.au/the-process-of-making-pottery/Ceramics have evolved over thousands of years.A white earthenware side plate with a gadroon edge. Has water marks and chips on front.‘Johnson Bros England Reg No 15587’flagstaff hill, warrnambool, shipwrecked-coast, flagstaff-hill, flagstaff-hill-maritime-museum, maritime-museum, shipwreck-coast, flagstaff-hill-maritime-village, johnson bros, ceramics, tableware -
 Flagstaff Hill Maritime Museum and Village
Domestic object - Plate, Alfred Meakin
... I’m going to make the wall behind the wheels the feature wall of pretty colours! ...Stoke-on-Trent, Staffordshire, UK...I’m going to make the wall behind the wheels the feature wall of pretty colours! ...The Process of Making Pottery Decorating, Firing, Glazing, Making, Technical There is a rhythm and flow to clay. It can’t be done all at once! Even the making process! It can take weeks to get everything done, especially if you can only work on your pottery once a week! Even though we have three hour classes, it’s often just not enough time! Here is an overview of some of the processes so you have a bit more grasp on some of the technical stuff! Step One – Design There are SO many ideas out there for making stuff in clay! From delicate porcelain jewellery, through to heavy sculptural work and everything in between. Deciding your direction is sometimes not that easy – when you first start, try everything, you will naturally gravitate to the style that you enjoy! The options and variations are endless and can get a wee bit overwhelming too! Check in with me before you start to ensure your ideas will work, what order you might do things, how you could achieve the look you are seeking and any other technical data required! Step Two – Making Clay is thixotropic. This means that as you work with it, the clay first gets sloppier and wetter, before is begins to dry in the atmosphere. For most things, you simply can’t do all parts of the project at once. An example of work order might look like: Get last weeks work out from the shelves Prepare clay for today’s work – roll your clay, prepare balls for throwing, make the first stage of a pinch pot) Clean up last week’s work and put it on the shelf for bisque firing Check that you have any glazing to do – and do enough of it that you will have time to finish your main project Do the next step of your next project – there might be a further step that can’t be complete immediately, in that case, wrap your work well and put onto the shelves. Letting your work rest for a while can really help keep your work clean and professional looking. Many things require bagging under plastic to keep it ready for work the next week – put your name on the outside of the bag so you can find your work easily. We have stickers and markers. Consider how you want to decorate your work – coloured slip can be applied at a fairly wet stage (remembering that it will make your work even wetter!). Trying to apply slip to dry clay won’t work! If you want to do sgraffito – you will need to keep the work leather hard (a state of dryness where you can still work the clay with a little effort and a little water and care). Step Three – Drying Most of the time your work can go into the rack uncovered to let it dry out for the following week. If you want to continue forming or shaping you will need to double bag your work – put your work on a suitable sized bat and put the bat in a bag so the base of the bag is under the bat, then put another bag over the top of the work and tuck the top of the bag under the bat. If you want to trim (or turn) your thrown work the following week, it should also be double bagged. If your work is large, delicate, or of uneven thicknesses, you should lightly cover your work for drying. When considering the drying process, bare in mind the weather, humidity and wind! The hotter and dryer, the faster things dry and work can dry unevenly in the shelves – this can lead to cracking – another time to lightly cover your work for drying. Step Four – Trimming and Cleaning Up Your work is dry! It is called greenware now and it is at it’s most fragile! Handle everything with two hands. I often refer to soft hands – keep everything gentle and with your fingers spread as much as possible. Try to not pick up things like plates too much, and always with both hands! Before your work can be bisque fired it should be “cleaned up”. You work won’t go into the kiln if it has sharp edges – when glazed, sharp edges turn into razor blades! Use a piece of fly wire to rub the work all over – this will scratch a little so be light handed. Use a knife or metal kidney to scrape any areas that require a bit more dynamic treatment than the fly wire offers! Finally, a very light wipe over with a slightly damp sponge can help soften and soothe all of your edges and dags! Trimming thrown work: If you are planning to trim (or turn) your thrown work (and you should be), make sure you bag it well – your work should be leather hard to almost dry for easiest trimming. Use this step to finish the work completely – use a metal kidney to polish the surface, or a slightly damp sponge to give a freshly thrown look. Wipe the sponge around the rim after trimming, and check the inside of the pot for dags! Trimming slip cast work: Usually I will trim the rims of your work on the wheel the following day to make that stage easier, however you will still need to check your work for lumps and bumps. Last but not least – check that your name is still clearly on the bottom of your work. Step Five – Bisque Firing When the work is completely dry it can go into the bisque kiln. The bisque kiln is fired to 1000°C. This process burns off the water in the clay as well as some of the chemically bound water. The structure of the clay is not altered that much at this temperature. Inside the bisque kiln, the work is stacked a little, small bowl inside a larger bowl and onto a heavy plate. Smaller items like decorations or drink coasters might get stacked several high. Consideration is paid to the weight of the stack and shape of the work. A bisque kiln can fire about one and a half times the amount of work that the glaze kiln can fire. The firing takes about 10 hours to complete the cycle and about two days to cool down. Once it has been emptied the work is placed in the glaze room ready for you to decorate! Step Six – Glazing Decorating your work with colour can be a lot of fun – and time consuming! There are three main options for surface treatment at this stage: Oxide Washes Underglazes Glazes Washes and underglazes do not “glaze” the work – It will still need a layer of glaze to fully seal the clay (washes don’t need glaze on surfaces not designed for food or liquid as they can gloss up a little on their own). Underglazes are stable colourants that turn out pretty much how they look in the jar. They can be mixed with each other to form other colours and can be used like water colours to paint onto your work. Mostly they should have a clear glaze on top to seal them. Oxides are a different species – the pink oxide (cobalt) wash turns out bright blue for instance. They don’t always need a glaze on top, and some glazes can change the colour of the wash! The glazes need no other “glaze” on top! Be careful of unknown glaze interactions – you can put any combination of glaze in a bowl or on a plate, but only a single glaze on the outside of any vertical surface! Glazes are a chemical reaction under heat. We don’t know the exact chemicals in the Mayco glazes we use. I can guess by the way they interact with each other, however, on the whole, you need to test every idea you have, and not run the test on a vertical surface! Simply put, glaze is a layer of glass like substance that bonds with the clay underneath. Clay is made of silica, alumina and water. Glaze is made of mostly silica. Silica has a melting point of 1700°C and we fire to 1240°C. The silica requires a “flux” to help it melt at the lower temperature. Fluxes can be all sorts of chemicals – a common one is calcium – calcium has a melting point of 2500°C, however, together they both melt at a much lower temperature! Colourants are metal oxides like cobalt (blue), chrome (green through black), copper (green, blue, even red!), manganese (black, purple and pink) iron (red brown), etc. Different chemicals in the glaze can have dramatic effects. for example, barium carbonate (which we don’t use) turns manganese bright pink! Other elements can turn manganese dioxide brown, blue, purple and reddish brown. Manganese dioxide is a flux in and of itself as well. So, glazes that get their black and purple colours, often interact with other glazes and RUN! Our mirror black is a good example – it mixes really well with many glazes because it fluxes them – causes them to melt faster. It will also bring out many beautiful colours in the glazes because it’s black colouring most definitely comes from manganese dioxide! Glaze chemistry is a whole subject on it’s own! We use commercial Mayco glazes on purpose – for their huge range of colour possibilities, stability, cool interactions, artistic freedom with the ability to easily brush the glazes on and ease of use. We currently have almost 50 glazes on hand! A major project is to test the interactions of all glazes with each other. That is 2,500 test tiles!!!! I’m going to make the wall behind the wheels the feature wall of pretty colours! Step Seven – Glaze (Gloss or sometimes called “Glost”) Firing Most of the time this is the final stage of making your creation (but not always!) The glaze kiln goes to 1240°C. This is called cone 6, or midrange. It is the low end of stoneware temperatures. Stoneware clays and glazes are typically fired at cone 8 – 10, that is 1260 – 1290°C. The energy requirement to go from 1240°C to 1280°C is almost a 30% more! Our clay is formulated to vitrify (mature, turn “glass-like”) at 1240°, as are our glazes. A glaze kiln take around 12 hours to reach temperature and two to three days to cool down. Sometimes a third firing process is required – this is for decoration that is added to work after the glaze firing. For example – adding precious metals and lustres. this firing temperature is usually around 600 – 800°C depending upon the techniques being used. There are many students interested in gold and silver trims – we will be doing this third type of firing soon! After firing your work will be in the student finished work shelves. Remember to pay for it before you head out the door! There is a small extra charge for using porcelain clay (it’s more than twice the price of regular clay), and for any third firing process! Once your work has been fired it can not turn back into clay for millennia – so don’t fire it if you don’t like it! Put it in the bucket for recycling. https://firebirdstudios.com.au/the-process-of-making-pottery/Ceramics have evolved over thousands of years.Earthenware dessert plate, cream colour. Made by Alfred Meakin, England. Backstamped ‘Alfred Meakin England’. flagstaff hill, warrnambool, shipwrecked-coast, flagstaff-hill, flagstaff-hill-maritime-museum, maritime-museum, shipwreck-coast, flagstaff-hill-maritime-village, alfred meakin, ceramics, earthenware, kitchenware -
 Flagstaff Hill Maritime Museum and Village
Domestic object - Bowl, J & G Meakin, Late 19th or early 20th Century
... I’m going to make the wall behind the wheels the feature wall of pretty colours! ...Hanley, Stoke-on-Trent, Staffordshire, England...I’m going to make the wall behind the wheels the feature wall of pretty colours! ...The Process of Making Pottery Decorating, Firing, Glazing, Making, Technical There is a rhythm and flow to clay. It can’t be done all at once! Even the making process! It can take weeks to get everything done, especially if you can only work on your pottery once a week! Even though we have three hour classes, it’s often just not enough time! Here is an overview of some of the processes so you have a bit more grasp on some of the technical stuff! Step One – Design There are SO many ideas out there for making stuff in clay! From delicate porcelain jewellery, through to heavy sculptural work and everything in between. Deciding your direction is sometimes not that easy – when you first start, try everything, you will naturally gravitate to the style that you enjoy! The options and variations are endless and can get a wee bit overwhelming too! Check in with me before you start to ensure your ideas will work, what order you might do things, how you could achieve the look you are seeking and any other technical data required! Step Two – Making Clay is thixotropic. This means that as you work with it, the clay first gets sloppier and wetter, before is begins to dry in the atmosphere. For most things, you simply can’t do all parts of the project at once. An example of work order might look like: Get last weeks work out from the shelves Prepare clay for today’s work – roll your clay, prepare balls for throwing, make the first stage of a pinch pot) Clean up last week’s work and put it on the shelf for bisque firing Check that you have any glazing to do – and do enough of it that you will have time to finish your main project Do the next step of your next project – there might be a further step that can’t be complete immediately, in that case, wrap your work well and put onto the shelves. Letting your work rest for a while can really help keep your work clean and professional looking. Many things require bagging under plastic to keep it ready for work the next week – put your name on the outside of the bag so you can find your work easily. We have stickers and markers. Consider how you want to decorate your work – coloured slip can be applied at a fairly wet stage (remembering that it will make your work even wetter!). Trying to apply slip to dry clay won’t work! If you want to do sgraffito – you will need to keep the work leather hard (a state of dryness where you can still work the clay with a little effort and a little water and care). Step Three – Drying Most of the time your work can go into the rack uncovered to let it dry out for the following week. If you want to continue forming or shaping you will need to double bag your work – put your work on a suitable sized bat and put the bat in a bag so the base of the bag is under the bat, then put another bag over the top of the work and tuck the top of the bag under the bat. If you want to trim (or turn) your thrown work the following week, it should also be double bagged. If your work is large, delicate, or of uneven thicknesses, you should lightly cover your work for drying. When considering the drying process, bare in mind the weather, humidity and wind! The hotter and dryer, the faster things dry and work can dry unevenly in the shelves – this can lead to cracking – another time to lightly cover your work for drying. Step Four – Trimming and Cleaning Up Your work is dry! It is called greenware now and it is at it’s most fragile! Handle everything with two hands. I often refer to soft hands – keep everything gentle and with your fingers spread as much as possible. Try to not pick up things like plates too much, and always with both hands! Before your work can be bisque fired it should be “cleaned up”. You work won’t go into the kiln if it has sharp edges – when glazed, sharp edges turn into razor blades! Use a piece of fly wire to rub the work all over – this will scratch a little so be light handed. Use a knife or metal kidney to scrape any areas that require a bit more dynamic treatment than the fly wire offers! Finally, a very light wipe over with a slightly damp sponge can help soften and soothe all of your edges and dags! Trimming thrown work: If you are planning to trim (or turn) your thrown work (and you should be), make sure you bag it well – your work should be leather hard to almost dry for easiest trimming. Use this step to finish the work completely – use a metal kidney to polish the surface, or a slightly damp sponge to give a freshly thrown look. Wipe the sponge around the rim after trimming, and check the inside of the pot for dags! Trimming slip cast work: Usually I will trim the rims of your work on the wheel the following day to make that stage easier, however you will still need to check your work for lumps and bumps. Last but not least – check that your name is still clearly on the bottom of your work. Step Five – Bisque Firing When the work is completely dry it can go into the bisque kiln. The bisque kiln is fired to 1000°C. This process burns off the water in the clay as well as some of the chemically bound water. The structure of the clay is not altered that much at this temperature. Inside the bisque kiln, the work is stacked a little, small bowl inside a larger bowl and onto a heavy plate. Smaller items like decorations or drink coasters might get stacked several high. Consideration is paid to the weight of the stack and shape of the work. A bisque kiln can fire about one and a half times the amount of work that the glaze kiln can fire. The firing takes about 10 hours to complete the cycle and about two days to cool down. Once it has been emptied the work is placed in the glaze room ready for you to decorate! Step Six – Glazing Decorating your work with colour can be a lot of fun – and time consuming! There are three main options for surface treatment at this stage: Oxide Washes Underglazes Glazes Washes and underglazes do not “glaze” the work – It will still need a layer of glaze to fully seal the clay (washes don’t need glaze on surfaces not designed for food or liquid as they can gloss up a little on their own). Underglazes are stable colourants that turn out pretty much how they look in the jar. They can be mixed with each other to form other colours and can be used like water colours to paint onto your work. Mostly they should have a clear glaze on top to seal them. Oxides are a different species – the pink oxide (cobalt) wash turns out bright blue for instance. They don’t always need a glaze on top, and some glazes can change the colour of the wash! The glazes need no other “glaze” on top! Be careful of unknown glaze interactions – you can put any combination of glaze in a bowl or on a plate, but only a single glaze on the outside of any vertical surface! Glazes are a chemical reaction under heat. We don’t know the exact chemicals in the Mayco glazes we use. I can guess by the way they interact with each other, however, on the whole, you need to test every idea you have, and not run the test on a vertical surface! Simply put, glaze is a layer of glass like substance that bonds with the clay underneath. Clay is made of silica, alumina and water. Glaze is made of mostly silica. Silica has a melting point of 1700°C and we fire to 1240°C. The silica requires a “flux” to help it melt at the lower temperature. Fluxes can be all sorts of chemicals – a common one is calcium – calcium has a melting point of 2500°C, however, together they both melt at a much lower temperature! Colourants are metal oxides like cobalt (blue), chrome (green through black), copper (green, blue, even red!), manganese (black, purple and pink) iron (red brown), etc. Different chemicals in the glaze can have dramatic effects. for example, barium carbonate (which we don’t use) turns manganese bright pink! Other elements can turn manganese dioxide brown, blue, purple and reddish brown. Manganese dioxide is a flux in and of itself as well. So, glazes that get their black and purple colours, often interact with other glazes and RUN! Our mirror black is a good example – it mixes really well with many glazes because it fluxes them – causes them to melt faster. It will also bring out many beautiful colours in the glazes because it’s black colouring most definitely comes from manganese dioxide! Glaze chemistry is a whole subject on it’s own! We use commercial Mayco glazes on purpose – for their huge range of colour possibilities, stability, cool interactions, artistic freedom with the ability to easily brush the glazes on and ease of use. We currently have almost 50 glazes on hand! A major project is to test the interactions of all glazes with each other. That is 2,500 test tiles!!!! I’m going to make the wall behind the wheels the feature wall of pretty colours! Step Seven – Glaze (Gloss or sometimes called “Glost”) Firing Most of the time this is the final stage of making your creation (but not always!) The glaze kiln goes to 1240°C. This is called cone 6, or midrange. It is the low end of stoneware temperatures. Stoneware clays and glazes are typically fired at cone 8 – 10, that is 1260 – 1290°C. The energy requirement to go from 1240°C to 1280°C is almost a 30% more! Our clay is formulated to vitrify (mature, turn “glass-like”) at 1240°, as are our glazes. A glaze kiln take around 12 hours to reach temperature and two to three days to cool down. Sometimes a third firing process is required – this is for decoration that is added to work after the glaze firing. For example – adding precious metals and lustres. this firing temperature is usually around 600 – 800°C depending upon the techniques being used. There are many students interested in gold and silver trims – we will be doing this third type of firing soon! After firing your work will be in the student finished work shelves. Remember to pay for it before you head out the door! There is a small extra charge for using porcelain clay (it’s more than twice the price of regular clay), and for any third firing process! Once your work has been fired it can not turn back into clay for millennia – so don’t fire it if you don’t like it! Put it in the bucket for recycling. https://firebirdstudios.com.au/the-process-of-making-pottery/This bowl was made by renowned pottery company J & G Meakin of England. The firm was established in the mid-1800's. The bowl is an example of kitchenware used in the 19th century and still in use today.Bowl; white ceramic, round and tapering inwards towards base. Made by J and G Meakin England.On base, 'Ironstone China Reg SOL 391413' with symbolflagstaff hill, flagstaff hill maritime museum and village, warrnambool, maritime museum, maritime village, great ocean road, shipwreck coast, mixing bowl, food preparation, j & g meakin, pottery, stoke-on-trent, kitchen equipment, ceramic -
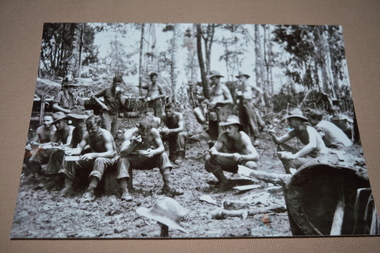 Wangaratta RSL Sub Branch
Photograph, c1945
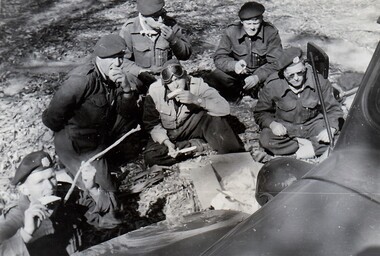
... AUSTRALIAN INFANTRY BATTALION EATING MEAL DURING A LULL IN THE BATTLE FOR SATTELBERG. ...Reproduced black and white photograph of large group of soldiers having a meal. Soldiers are seated in the foreground and five standing behind. ...AUSTRALIAN INFANTRY BATTALION EATING MEAL DURING A LULL IN THE BATTLE FOR SATTELBERG. ...SATTELBERG AREA, NEW GUINEA. 1943-11-15. TROOPS OF THE 2/24TH. AUSTRALIAN INFANTRY BATTALION EATING MEAL DURING A LULL IN THE BATTLE FOR SATTELBERG. THEY ARE: NX10044 ACTING SERGEANT Stewart COLDHAM. (1) VX68432 PRIVATE Harold ANQUETAL. (2) VX80603 PRIVATE Thomas. F. BRYCE. (3) VX41167 PRIVATE Samuel T. SHERLOCK. (4) VX28432 LANCE CORPORAL Kenneth G. NORRIS. (5) ACTING CORPORAL Ralph F. KENYON. (6) VX43055 SIGNALMAN Ernest W. HORNER. (7) NX33751 PRIVATE Arol. J. PEIRCY. (8) VX71588 SIGNALMAN Francis. J. KELLY. (9) VX26381 PRIVATE John BUNNETT. NX86910 SIGNALMAN Ronald E. AMERY. QX13958 SERGEANT James S. GREGORY. SX30255 PRIVATE Cyril MARSHALL VX29721 SIGNALMAN Martin W. REIDY.The 2/24th Battalion was an infantry battalion of the Australian Army, which served during World War II .A unit of all-volunteers, it was formed in July 1940 from primarily Victorian volunteers and was known as "Wangaratta's Own" because of the time the battalion spent in the town during its formative period prior to deployment overseas. It served in North Africa in 1941–1942 as part of the 26th Brigade, which was assigned to the 7th Division, before being reassigned to the 9th Division. In early 1943, the battalion returned to Australia and later took part in campaigns against the Japanese in New Guinea in 1943–1944 and Borneo in 1945, before being disbanded in 1946. The 2/24th suffered the highest number of casualties of any 2nd AIF infantry battalion. The Unit was granted the Freedom of the City by the Rural City of Wangaratta in 1990 and one of the first, if not the first, to receive this type of honourReproduced black and white photograph of large group of soldiers having a meal. Soldiers are seated in the foreground and five standing behind. Nearly all have shirts removed.2/24th battalion, new guinea, ww2 -
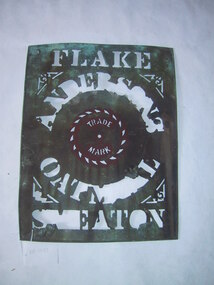 Parks Victoria - Andersons Mill
Sign - Stencil
... "FLAKE / ANDERSON'S / OAT MEAL / SMEATON"..."FLAKE / ANDERSON'S / OAT MEAL / SMEATON" Rectangular copper stencil plate, ribbed edging; Anderson's Mill trademark (circular saw) in centre; some lettering is difficult to read due to corrosion / breaking of this section; some green surface corrosion; red paint around central trademark saw and lettering. ...This stencil was used on bags and possibly other packaging containing grain processed and packed at Anderson's Mill. The stencil would have indicated the destination of, or origin of the grain.Rectangular copper stencil plate, ribbed edging; Anderson's Mill trademark (circular saw) in centre; some lettering is difficult to read due to corrosion / breaking of this section; some green surface corrosion; red paint around central trademark saw and lettering."FLAKE / ANDERSON'S / OAT MEAL / SMEATON" -
Yarrawonga and Mulwala Pioneer Museum
Furphy Water Cart B, Furphys, Approx 1930
... Horse drawn, spoked steel wheels. Wheels also made by Furphy...Yarrawonga and Mulwala Pioneer Museum 151 Melbourne St, Mulwala Horse drawn, spoked steel wheels. Wheels also made by Furphy Furphy Water Cart B Furphys ...Horse drawn, spoked steel wheels. Wheels also made by Furphy -
 Ballarat Tramway Museum
Document - Table Cards (Sheets), State Electricity Commission of Victoria (SECV), SEC Ballarat trams on the Sebastopol - Lydiard St. Nth, Aug. 1971
... SEC Ballarat trams on the Sebastopol - Lydiard St. Nth...Each run details where the driver/conductor would sign on, time, the trips, meal breaks, finish time and the total time of the shift. ...Each run details where the driver/conductor would sign on, time, the trips, meal breaks, finish time and the total time of the shift. ...Set of 5 sheets, photocopied on heat sensitive paper, demi-quarto (double quarto) size graph paper sheets giving the Saturday tables or runs for the SEC Ballarat trams on the Sebastopol - Lydiard St. Nth service following the closure of the Victoria St. - Gardens via Drummond St Nth and Mt Pleasant - Gardens via Sturt St. West services. Gives details of 14 tables or runs, numbered from 2 Run to 33 Run. Each sheet headed "Saturday". Each run details where the driver/conductor would sign on, time, the trips, meal breaks, finish time and the total time of the shift. Stored with these sheets are a photocopies of each sheet reduced to A4 size and full size copies made on A3 paper.trams, tramways, timetables, sec, ballarat, crews -
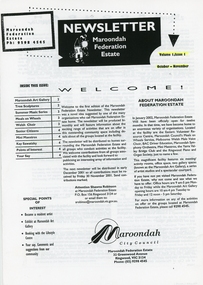 Ringwood and District Historical Society
Pamphlet - Newsletter, Maroondah Federation Estate, Maroondah Federation Estate Newsletter Vol 1. Issue 1. 2001, 2001
... Maroondah Federation Estate opened in January 2001 to house some of Maroondah's organisations such as Eastern Volunteers Resource centre, Council's Meals on wheels Service. Consists of meeting rooms, 2 Gallery spaces and office space. ...Ringwood and District Historical Society 125A Warrandyte Road Ringwood North melbourne Maroondah Federation Estate opened in January 2001 to house some of Maroondah's organisations such as Eastern Volunteers Resource centre, Council's Meals on wheels Service. Consists of meeting rooms, 2 Gallery spaces and office space. ...Maroondah Federation Estate opened in January 2001 to house some of Maroondah's organisations such as Eastern Volunteers Resource centre, Council's Meals on wheels Service. Consists of meeting rooms, 2 Gallery spaces and office space. It was originally Ringwood Primary School.4 pages A4 size printed bifold the first newsletter of the Maroondah Federation Estate -
 Flagstaff Hill Maritime Museum and Village
Equipment - Hand Trolley
... It uses the principles of wheels and leverage, like a wheelbarrow, and can easily be wheeled from one place to another. ...Hand trolley: an L-shaped hand-operated trolley with handles and supporting legs at one end, wheels at the other, and a ledge or platform to hold the load. ...It uses the principles of wheels and leverage, like a wheelbarrow, and can easily be wheeled from one place to another. ...A hand trolley can be loaded with heavy and bulky objects such as luggage, and stacks of boxes such as produce, cargo and equipment. It uses the principles of wheels and leverage, like a wheelbarrow, and can easily be wheeled from one place to another. Hand trolleys are still used by farmers, railway workers, shipping companies, porters, airports, hospitals, warehouses, logistical firms, furniture removalists, factory labourers and even in private homes when heavy loads need to be moved. Hand trolleys were first used in the 18th century in industries where children were used to move heavy loads. By using a hand trolley, the young labourers could move the piles of objects with the same efficiency as the adult workers. The design of the hand trolley is an example of equipment used since the 18th century to move heavy loads at the docks and shipyards. It is associated with the maritime industries of shipping, transportation, travel and trade as well as the colonial primary production sectors of farming, markets and produce. The design represents an early step in the evolution of the simple hand trolley. More recently, as well as the continued use of this simple style of trolley, the design has been improved to include specialised trolleys that fold, climb stairs, move pianos and even easily turn corners on their spinning, pivoting wheels. Hand trolley: an L-shaped hand-operated trolley with handles and supporting legs at one end, wheels at the other, and a ledge or platform to hold the load. This hand trolley has orange wooden slats and handles, two metal wheels, and a black metal frame with curved corners on its rectangular side flanges.flagstaff hill, warrnambool, shipwreck coast, maritime museum, flagstaff hill maritime museum and village, vintage, antique, hand trolley, hand card, hand truck, rolling cart, luggage trolley, station trolley, dolly, stack truck, sack truck, trundler, box cart, sack barrow, bag barrow, two-wheeler, leverage, material handling equipment, marine technology, cargo handling, docks, shipping trade -
 Trafalgar Holden Museum
Award
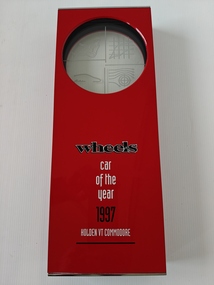
... wheels car of the year 1997 holden VT commodore...Trafalgar Holden Museum 74 Waterloo Rd Trafalgar gippsland Award Trophy wheels car of the year 1997 holden VT commodore red painted steel award with chrome plate on top and bottom and glass etched see through window Award ...red painted steel award with chrome plate on top and bottom and glass etched see through windowwheels car of the year 1997 holden VT commodoreaward, trophy -
 Tatura Irrigation & Wartime Camps Museum
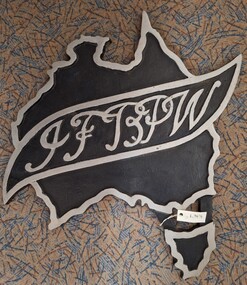
Plaque, I F B P W, This logo was used by all Australian B.P.W. clubs
... Tatura club formed during the 1980's. "Meals and Wheels" - holiday workshops for children and District Nursing service just three of our major projects. ...I F B P W International Federation of Business and Professional Women Meals and wheels district nursing Tatura Service clubs I.F.B.P.W. painted in silver, across "Australia". ...Tatura club formed during the 1980's. "Meals and Wheels" - holiday workshops for children and District Nursing service just three of our major projects. Not actually a "service club" but B.P.W. joined in many local activities to help promote our town.Metal logo, taken from "Welcome to Tatura" sign, showing visitors the service clubs in our town. Made in the shape of Australia - black metal with silver outline of Australia, with silver capitals of organization.I.F.B.P.W. painted in silver, across "Australia". "International Federation of Business and Professional Women". i f b p w, international federation of business and professional women, meals and wheels, district nursing, tatura service clubs