Showing 933 items
matching tram 26
-
 Ballarat Tramway Museum
Negative, Wal Jack, late 1940's?
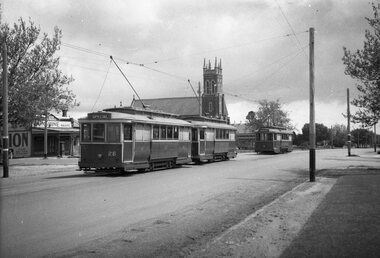
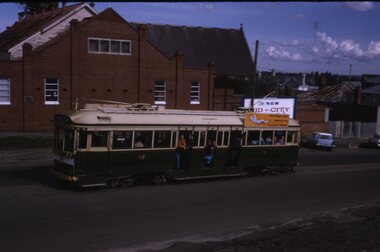
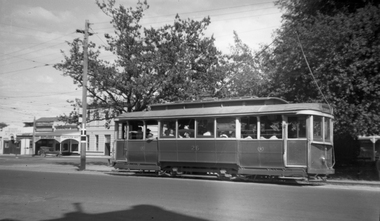
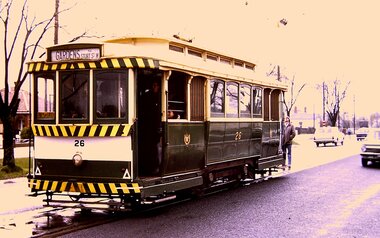
... tram 26 tram 20? tram 28.... Trams tramways Victoria St King St tram 26 tram 20? tram 28 ...Yields information about the Victoria St line and the use of King St loop and special trams.Negative and Digital image of the Wal Jack Ballarat Negative file of No. 26 west bound (showing Special) nearing the King St Loop in Victoria St. In front of the tram is No. 20? and No. 28 (Special) in the loop. Has the St Alipius church in background and a general store advertising Sunshine biscuits, operated by Stan ?owsell. Has a letter box under the verandah. See Reg Item 7633 - likely to have been taken at the same time.trams, tramways, victoria st, king st, tram 26 tram 20? tram 28 -
 Ballarat Tramway Museum
Slide - 27 mm sq slide/s, Andrew Howlett, Nos. 34 and 26 crossing at the Parked St loop in Sturt St west loop, Mar. 1969
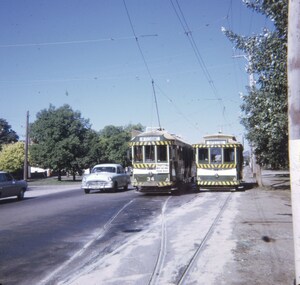
... tram 26... West Parker St Loop tram 26 tram 34 Has in red ink "Sturt St ...Yields information about the Sturt St West Parker St Loop.Colour slide, Kodak white cardboard mount, developed March 1969 of Nos. 34 and 26 crossing at the Parked St loop in Sturt St west loop. No. 34 is heading for Mt Pleasant and has a Trotting at Bray Raceway auxiliary board and No. 26 running a Special. Shows how's the motor vehicle traffic had to veer out past trams. One of a series of tour photos - see Reg item 7667, 7668, 7683 and 7701.Has in red ink "Sturt St Loop"ballarat, tramways, trams, sturt st west, parker st loop, tram 26, tram 34 -
 Ballarat Tramway Museum
Slide - 27 mm sq slide/s, Andrew Howlett, Trams crossing at Barrett Ave or Depot Loop, Feb 1969?
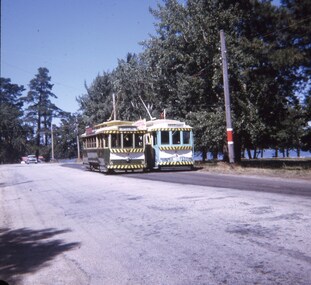
... tram 26... Ave tram 26 tram 21 Colour slide, Kodak white cardboard mount ...Yields information about Wendouree Parade at the depot loop and the Begonia Festival tram of 1969 and a special tram service.Colour slide, Kodak white cardboard mount, developed Mar 1969 of No. 26 eastbound crossing Begonia Festival Showboat tram No. 21 at the Barrett Ave or Depot Loop. No. 26 is running a Special. One of a series of tour photos - see Reg item 7667, 7668, 7683 and 7701.ballarat, tramways, trams, wendouree parade, decorated trams, begonia festival, depot loop, barrett ave, tram 26, tram 21 -
 Ballarat Tramway Museum
Photograph - Digital image Set of 16, Warren Doubleday, 5/10/1975 12:00:00 AM
... tram 26... Wendouree Parade Depot Gardens Loop tram 14 tram 26 tram 27 tram 40 ...Set of 16 digital images of BTPS Operations on 5-10-1975 during the time of the SPER (Sydney Tramway Museum) visit to Ballarat. .1 - 14 and 27 on the depot fan .2 - 27 and 14 on the access track about to cross Wendouree Parade .3 - ditto with 40 in Wendouree Parade .4 - 26 swinging the pole in Wendouree Parade .5 - three single truckers in the Loop .6 - ditto .7 - 14 in the loop .8 - 40 near depot junction .9 - 27 running into the loop. 10 - All four cars in or nearing the loop 11 - ditto 12 - 26 side on view 13 - 26 Gardens North 14 - 14 Gardens North 15 - 14 and 26 descending from Carlton St 16 - 26 dittotrams, tramways, btps, sper, wendouree parade, depot, gardens loop, tram 14, tram 26, tram 27, tram 40 -
 Ballarat Tramway Museum
Photograph - Digital image Set of 8, Warren Doubleday, 7/09/1975 12:00:00 AM
... tram 26... Parade Depot Gardens Loop Depot Junction tram 26 tram 27 tram 40 ...Set of 8 digital images of BTPS Operations on 7-9-1975 of BTPS activities. .1 - 27 on the 3 road extensions or service pit .2 - 27 and 28 on the depot fan - Gavin Young and Graham Jordan .3 - 26 on depot fan .4 - 28 with a side saloon panel removed and 38 behind .5 - 40 and 26 on the depot fan .6 - 27 at depot junction .7 - 40 on the access track .8 - 40 on the depot fan.trams, tramways, btps, wendouree parade, depot, gardens loop, depot junction, tram 26, tram 27, tram 40, tram 28 -
 Ballarat Tramway Museum
Newspaper, Tourist Trams preserve colourful local history - Ballarat - 1975
... tram 26... Society trams tramways ballarat btps opening tram 26 tram 27 BTPS ....1 - Newspaper clipping from The Sun or The Courier (all ?) 10/12/1974 and 3/2/1975, reporting on the planned and then the reopening of the BTPS. Not sure which newspaper and actual date. Has one photograph of No. 26 outside the depot. .2 - Newspaper from The Courier, titled "Just like the old days", Monday Feb. 3, 1975, following the formal re-opening for the BTPS. Has four trams in the photo with Bill Stephen MLA and Dudley Erwin MP standing alongside. Tram 27 is leading. .3 - Second copy of "Tourist Trams preserve colourful local history", adherred to a single sheet of faintly lined foolscap paper, dated 3/2/1975 Has a strong association with a Melbourne tram driver who assembled the scrap book and series of photos of Ballarat trams at the time of closure and the re-opening of the tram museum by the Ballarat Tramway Preservation SocietySet of newspaper cuttings contained with Reg item 5988, a Stamford Kiwi School Scrap Book - card covers, 23 sheets, spiral bound, titled "Ballarat", prepared by Ellen Butland of Auckland following the closure of the SEC Ballarat Tramway system.trams, tramways, ballarat, btps, opening, tram 26, tram 27, btps depot -
 Ballarat Tramway Museum
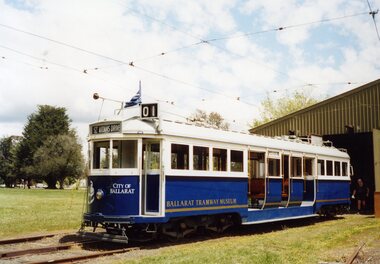
Slide - Set of 3 - BTPS Special Trams, David Verrier, 9-4-1993
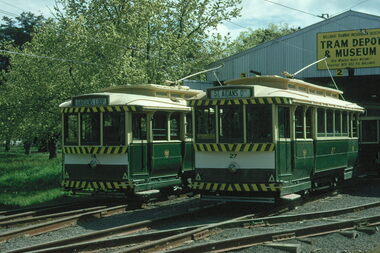
... tram 26... 26 tram 27 tram 671 tram 33 Set of 3 Kodak colour slide ...Set of three colour slides showing special tram operations at Ballarat and trams at the depot. The second depot photo shows tram 671 being repainted.Demonstrates Special trams provided by the BTPS to visitors and trams at the depot.Set of 3 Kodak colour slide - white plastic mountballarat, btps, specials, tram 38, tram 661, carlton st, tram 26, tram 27, tram 671, tram 33 -
 Ballarat Tramway Museum
Slide - 35mm slide/s, Keith Kings, 20/04/1962 12:00:00 AM
... tram 26... Eaglehawk tram 26 tram 18 tram 29 tram 11 tram 5 Stamped ...Bendigo trams 26,18,29,11, & 5 at Eaglehawk terminus on a special tour for the ARHS Vic. Div on day of Bendigo Centenarian tour, on 20/4/1962. Trams have arrived at terminus and many passengers around, taking photos etc. Trams fitted with safety stripes etc. Leading tram showing 'SPECIAL'. Photo by Keith Kings.Stamped on 'K.S.Kings etc' and in blue ink 'K(k)(381) 1/250, f5.6, 20/4/62, ARHS, trams 26,18,29,11 & 5 as specials at Eaglehawk terminus during Bendigo Centenarian trip.'tramways, trams, bendigo, eaglehawk, tram 26, tram 18, tram 29, tram 11, tram 5 -
 Ballarat Tramway Museum
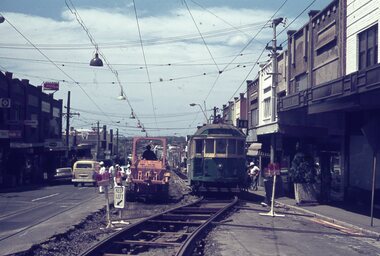
Slide - Set of 7, Warren Doubleday, Ballarat - last Saturday of full operations, 21/8/1971
... tram 26... - Ballarat 26 Wendouree Parade Olympic monument with the tram ...Photos taken on the last Saturday of full operations by the SECV in Ballarat prior to the first closure of the Victoria St line on 22/8/1971. 1 - Tram 42 climbing Victoria St with a sign for the site of the "New Mid - City Motel" behind. 2 - Tram 13 in Victoria St from the Anglican church tower with Black Hill in the background. 3 - Barkly and Main St from the Anglican church tower with an outbound tram the Ampol Service station in the view. 4 - Tram 39 in Wendouree Parade near depot with swans in the background. 5 - Ballarat 26 Wendouree Parade Olympic monument with the tram crossing from the side of the road into the middle of the road for Hamilton Ave. 6 - Trams 21 and 27 crossing at the Skipton St loop. 7 - Tram 27 and others on the ARHS tour at Sebastopol with the conductor unhooking the trolley pole rope before turning the pole. Yields information about the last full Saturday of SEC Tramway operations in Ballarat and has a strong association with the archivist. Set of 7 Kodachrome colour slides - cardboard mountsHave the photographer's slide numbers written on them.trams, tramways, closure, tram 26, tram 27, tram 13, tram 17, wendouree parade, victoria st, barkly st, tram 39, olympics, sebastopol, skipton st loop, tram 42, tram 21 -
 Ballarat Tramway Museum
Photograph - View of Wendouree Parade north end, c1977
... tram 26... trams BTPS tram 26 tram 28 St Aidans Drive Wendouree Parade ...Photograph from the window of a tram (possibly No. 28) looking along the BTPS track from St Aidans Drive with another tramcar in the distance. Shows the roadside nature of gardens area at the time - long grass and before the construction of a gutter and paths. Possibly taken at the same time as item 9642.Yields information about Wendouree Parade near St Aidans Drive.Black and white print on Kodak paper.tramcars, trams, btps, tram 26, tram 28, st aidans drive, wendouree parade -
 Ballarat Tramway Museum
Photograph - Black & White Photograph/s - set of 8, Bob Lilburn, late 1950's to early 1960
... tram 26... Charing Cross Arnold St tram 26 tram 18 tram 5 tram 8 tram 18 tram ...Set of eight Black and White photograph of Bendigo trams late 1950's to 1960 prior to the installation of dash canopy lighting. .1 - No. 26 at Quarry Hill with the crew standing either side of the tram - grey album remnants on the rear .2 -18 at Eaglehawk, showing Depot as the destination .3 - 5 in Arnold Street, 4/1960, showing Special. Note the white bumpers. .4 - 18 at Quarry Hill .5 - 14 at Quarry Hill - has remnants of album mounting on the rear and "Ex 86 PMTT" in pencil - not in Bob's hand writing. Has crews standing by the front of the tram. .6 - 10 at Charing cross, with a large "Plume" sign in the background with The Beehive building, chemist and cafe. .7 - 30 at Bendigo Depot .8 - 10 at Charing Cross, with the destination of Quarry Hill. Photograph from the Bob Lilburn Collection. Inscription in Bob's handwriting.On rear in ink are details of the location and tram number and some dates.trams, tramways, bendigo, quarry hill, crews, eaglehawk, birney, charing cross, arnold st, tram 26, tram 18, tram 5, tram 8, tram 18, tram 14, tram 10, tram 30 -
 Ballarat Tramway Museum
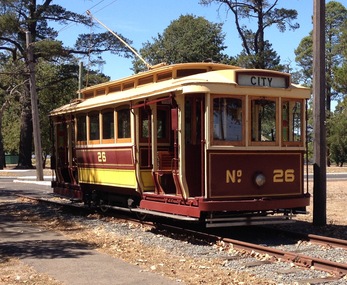
Photograph - Colour Print/s - set of 7, Carolyn Cleak, 15/01/2012 12:00:00 AM
... tram 26... St St Aidans Drive tram 33 tram 1 tram 26 tram 8 tram 671 ...Yields information about the BTM Tram fleet and operations in Jan. 2012.Set of seven colour photographs taken by Carolyn or Graeme Cleak on 15/1/2012 of the depot and No. 33 in Wendouree Parade. .1 - Horse Tram with Peter Winspur walking alongside .2 - No. 8 on No. 5 road with tower truck in background .3 - No. 661 on No. 4 road .4 - No. 26 on No. 5 road .5 - No. 671 on No. 3 road .6 - No. 33 at Carlton St terminus .7 - No. 33 at St Aidans Driver terminus. Printed on Fujichrome Crystal Archive paper.On rear of each photograph is date "15.1.12" and who the photo taken by in ink.trams, tramways, btm, depot, wendouree parade, carlton st, st aidans drive, tram 33, tram 1, tram 26, tram 8, tram 671, tram 661 -
 Ballarat Tramway Museum
Photograph - Digital image Set of 11, Floyd Bromley, BTM Tram Showcase day, 30/9/2018, 30/09/2018
... tram 26... Trams tramways BTM Depot Events tram 40 tram 28 tram 26 tram 27 ...Yields information about BTM Tram Showcase day, 30/9/2018Set of 11 digital images of tram operations at the depot during the BTM Tram Showcase day, 30/9/2018 (Oct. 2018 Fares Please!) by Floyd Bromley. .1 - 26, 28 and 40 .2 - depot interior with 28 and 40 .3 - 671 and No. 1 .4 - 27 on the fan.. 5 - 27 with Neville Britton and Carl Mahoney .6 - 33 and 27 .7 - 27 .8 - 33 and 13 .9 - 33, 13 and 28 on the fan .10 - 33 running out - P. Bruce taking a photo. .11 - 28 - side on view with Dave Macartney inside. Note: The white discs was a trial to indicate that a tram is following. This was an SEC practice in Bendigo. It was not subsequently adopted.trams, tramways, btm, depot, events, tram 40, tram 28, tram 26, tram 27, tram 13, tram 671, tram 1, tram 33 -
 Ballarat Tramway Museum
Photograph - Colour Photograph/s - set of 17, Earl Ewers, 20/10/2001 12:00:00 AM
... tram 26...St Aidans Drive BTM AGM BTM Depot tram 33 tram 26 tram 45 ...Set of 17 colour photographs taken by BTM member, Earl Ewers of the Annual General Meeting 28/10/2001. On Kodak paper. 1961.1 - tram 671 on BTM depot fan. .2 - 33 and 26 on depot fan .3 - ditto .4 - Members on board 671 .5 - trams 33, 45 and 671 at St Aidans Drive .6 - ditto .7 - ditto .8 - ditto .9 - AGM in progress; Len Millar, Warren Doubleday, Stephen Butler, Frank Hanrahan and Richard Gilbert .10 - Warren Doubleday, Robert Paroissien, Peter Winspur, Richard Gilbert and Bill Kingsley .11 - ditto .12 - ditto with Len Millar .13 - 33 at St Aidans Drive .14 - ditto .15 - 45 and 26 on depot fan .16 - ditto .17 - 33, 45 and 671 at St. Aidansst aidans drive, btm, agm, btm depot, tram 33, tram 26, tram 45, tram 671 -
 Ballarat Tramway Museum
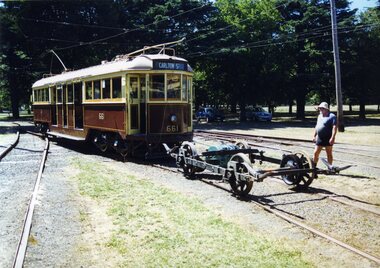
Photograph - Colour Photograph/s, Warren Doubleday and Stephen Butler and Alan Snowball, 20/02/2000 12:00:00 AM
... tram 26...21E trucks Motors 28 BTM tram 26 tram 661 Set of 14 colour ...Set of 14 colour photographs of the installation of the No. 2 end motor into No. 28's 21E truck on 20/2/2000 and its subsequent checking on Wendouree Parade. 1321.1 - Pushing truck with only No. 1 motor installed onto No. 5 road - Alan Snowball watching. 1321.2 - Motor on crane, with motor suspension bearings lying by rail. 1321.3 - Motor in position - still on crane 1321.4 - Bear caps being fitted - Warren Doubleday fitting cap 1321.5 - Lunch 1321.6 - Bearing caps in position, with split pins and cables joined and insulated with heat shrink 1321.7 - Gear end of motor frame showing previous welding repairs for cracked gear case support arm. 1321.8 - Dipstick tubes being fitted to oil boxes. 1321.9 - Packing motor suspension bearing boxes 1321.10 - St Aidans Drive - truck towed by 661 and service car 26. 1321.11 - ditto 1321.12 - ditto with out 26 - Alastair Reither and Simon Jenkins looking on. 1321.13 - truck with 661 at St Aidans Drive 1321.14 - placing truck under No. 28.21e trucks, motors, 28, btm, tram 26, tram 661 -
 Melbourne Tram Museum
Album - Photo Album, Michael Schrader, "Tram Pix ex Slides", 1960's
... tram 26... 181 tram 178 tram 6 tram 358 tram 35 tram 30 tram 12 tram 26 ...Manilla file folder, Railways of Australia Committee with a blue tape on the left hand side, preprinted file containing six sets of photograph sleeves with a sheet of white paper between, marked "Tram Pix ex Slides". Clipped into the folder with brass foldback clips. Sheet 1 front: MMTB Christmas Tram - 16W - Swanston St - 1963 T181 at Footscray Depot c1960 Brisbane Dreadnought 178 Sheet 1 rear VR 6 on an AETA Tour Brighton line Brisbane 358 and baby dreadnought and a group of 4 people Ballarat 35 and three other trams in City Loop - pre 1960 Sheet 2 front Ballarat 30 in bound in Albert St Sebastopol pre 1960 Bendigo 12 leaving depot, pre 1960 Bendigo 26 at Eaglehawk pre 1960 Sheet 2 rear Bendigo 29 pre 1960 Bendigo 28 with a group of enthusiasts standing in front - mid to late 1960's Sydney - coupled set of crossbench cars at a beach terminus Sheet 3 front Sydney - with Mark Foys in background Sydney - 2057 Sydney - trams being scrapped c1960 Sheet 3 rear Sydney - trams being burnt VR 30 at St Kilda Station Sheet 4 front VR36 and 6 on the Brighton line VR53 at St Kilda Station Sheet 4 rear VR 51 at Sandringham VR 51 on Sandringham Black Rock line VR 50 at Black Rock terminus Sheet 5 - not used Sheet 6 - front - photograph of a steam tram locomotive???trams, tramways, swanston st, myer, christmas trams, footscray depot, brisbane, st kilda brighton, ballarat, bendigo, sydney, scrapped trams, st kilda railway station, sandringham, black rock, tram 16w, tram 181, tram 178, tram 6, tram 358, tram 35, tram 30, tram 12, tram 26, tram 29, tram 28, tram 2057, tram 30, tram 36, tram 53, tram 51, tram 50 -
 Melbourne Tram Museum
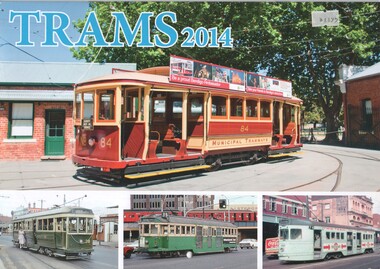
Ephemera - Calendar, Topmill Pty Ltd, "Trams - 2014", 2013
... tram 26... tram 361 tram 26 tram 20 tram 277 tram 1930 tram 992 tram 863 ...Wall Calendar - heavy card covers, 12 gloss art pages inside, titled "Trams - 2014" containing full colour photographs of Bendigo, Ballarat, Melbourne, Adelaide, Geelong, Sydney, Brisbane, and Transporting Art Melbourne trams. Has a punched hole along the top edge to enable wall use. Provides dates for holidays, school holidays and Pension payment days and phases of the moon. Produced by Topmill Pty Ltd and distributed by Gordon & Gotch Pty Ltd. Photos by A. W. Perry, Maurice Kelly and Ken Smith,trams, tramways, ballarat, geelong, sydney, brisbane, brisbane, transporting art, tram 84, tram 38, tram 605, tram 469, tram 214, tram 367, tram 361, tram 26, tram 20, tram 277, tram 1930, tram 992, tram 863, tram 336, tram 30, tram 11, tram 1451 -
 Melbourne Tram Museum
Album - Photo Album, Transit Australia Publishing, "TAP - Part A - Pre MMTB or W class – sheets A1 to A29", 1950's to 1990's
... tram 26... tram 9 tram 26 tram 31 tram 36 tram 47 tram 44 tram 60 tram 83 ...Photo Album - titled "TAP - Part A - Pre MMTB or W class – sheets A1 to A29 ", from Transit Australia Publishing. Photos used in the Destination City and other publications series. For a detailed list of photographs see htd4600i.pdf. For individual photo images see: \dbtext\hawthtramcoll\photo collections\htd4600-TAP-PartA, images TAP1 to TAP65. TAP01_Malvern Depot-assembling-trams.jpg TAP02_M1_Union Rd. Ascot Vale.jpg TAP03_Myer-Santa-tram_WilliamSt_MMTB.jpg TAP03_Myer-Santa-tram_William St_MMTB-obverse.jpg TAP04_8_Preston WS_Norm Cross.jpg TAP05_22-5_High St-Prahran_1910_CRC Field.jpg TAP06_31-36_High St-Armadale Rose Postcard.jpg TAP07_36_Dandenong Rd_c1917_Duckett Collection.jpg TAP08_Glenferrie Rd. Rose Postcard.jpg TAP09_52_Glenferrie Rd. Rose Postcard.jpg TAP10_53_Glenhuntly Rd_13Nov1913_Duckett Collection.jpg TAP11_93_Balwyn.jpg TAP12_163_Barkly St.jpg TAP13_177_Footscray_25Sep1953_W John Webster.jpg TAP14_177_Radiax Truck_Footscray_25Sep1953_W John Webster.jpg TAP15_181_Footscray_25Sep1953_WJ ohn Webster.jpg TAP16_185_Newmarket.jpg TAP17_197_SouthMelb_RJNowell.jpg TAP18_202_WilliamSt-late1920s.jpg TAP19_204_WilliamSt-late1920s.jpg TAP20_205_BowCollector.jpg TAP21_206_Preston_Mar1948_JackRichardson.jpg TAP22_ZooHorseTRam_TMSV-Postcard.jpg TAP22_ZooHorseTRam_TMSV-Postcard-obverse.jpg TAP23_16_Bendigo.jpg TAP24_456-others_Preston_Jul1947_JackStranger.jpg TAP25_180_WilliamstownRd.jpg TAP26_U_RacecourseRd.jpg TAP27_BoxHill-saloon.jpg TAP28_NMET-9-trailer_MtAlexanderRd.jpg TAP29_16_NicholsonSt-Coburgt_MMTB.jpg TAP30_26_CamberwellDepot_MMTB.jpg TAP32_47_MalvernDepot_MMTB.jpg TAP33_44-18_Bendigo.jpg TAP34_50_.jpg TAP35_60_KewDepot_MMTB.jpg TAP36_83_MalvernDepot_MMTB.jpg TAP37_275-6-93_Preston_RayPearson.jpg TAP38_99_KewDepot_Jan1937_RayPearson.jpg TAP39-122_McCraeSt_NormCross.jpg TAP40_137_HawthornDepot_MMTB.jpg TAP41_138_BourkeSt_20Oct1991_RayMarsh.jpg TAP42_140_PointOrmond.jpg TAP43_141_MalvernDepot_WJohnWebster.jpg TAP44_150_PointOrmond.jpg TAP45B_159_SwanstonSt_KSKings_14Mar1948.jpg TAP45C_159_SwanstonSt_KSKings_14Mar1948.jpg TAP46_171_SouthMelbourneDepot_MMTB.jpg TAP47_174_StGeorgesRd_JohnBeckett_1949.jpg TAP48_177_FootscrayDepot.jpg TAP49_177_FootscrayDepot_WJohnWebster.jpg TAP50_178_PointOrmond.jpg TAP51_178_ElsternwickRS_WJohnWebster.jpg TAP52A_179_LeedsSt-Footscray.jpg TAP52A_179_LeedsSt-Footscray_LCrow.jpg TAP52B_179_LeedsSt-Footscray_LCrow.jpg TAP53_187_SouthMelbourneDepot_MMTB.jpg TAP54_190_CamberwellDepot_GeoffGrant_7May1955.jpg TAP55_191_ElizabethSt-terminus_JohnBeckett.jpg TAP56_192_StKildaSA.jpg TAP57_200_MillerSt.jpg TAP58_205_LygonSt-into-BrunswickRd.jpg TAP59_208_EssendonDepot_MMTB.jpg TAP60_V214_MillerSt_1978_MMTB.jpg TAP61_15_EssendonDepot_MMTB.jpg TAP62_PrinceofWales-decoration_1920.jpg TAP63_EssendonDepot-PowerHouse.jpg TAP64_DoncasterTram_IllustratedAustrlianNews_9Nov1889.jpg TAP65_180_BourkeSt-at-SpencerSt.jpg Transit Australia Photos - Pre W class - sheets A1 to A29 -trams, tramways, transit australia, destination city, tramcars, depots, pmtt, htt, mbctt, nmetl, doncaster, bendigo, tram 1, tram 13, tram 9, 16, tram 8, tram 22, tram 5, tram 31, tram 36, tram 50, tram 63, tram 53, tram 93, tram 163, tram 177, tram 181, tram 185, tram 197, tram 202, tram 204, tram 205, tram 206, tram 84, tram 456, tram 180, tram 9, tram 26, tram 31, tram 36, tram 47, tram 44, tram 60, tram 83, tram 275, tram 93, tram 99, tram 122, tram 137, tram 138, tram 140, tram 141, tram 150, tram 159, tram 171, tram 174, tram 177, tram 178, tram 179, tram 187, tram 190, tram 191, tram 200, tram 205, tram 214, tram 15, tram 180 -
 Melbourne Tram Museum
Album - Photo Album, Transit Australia Publishing, "TAP - Part E - VR Trams – Sheets E1 to E24 ", 1950's to 1990's
... tram 26... tram 7 tram 17 tram 23 tram 26 tram 40 tram 43 tram 46 tram 51 ...Photo Album - titled "TAP - Part E - VR Trams – Sheets E1 to E24 ", from Transit Australia Publishing. Photos used in the Destination City and other publications series. For a detailed list of photographs see htd4604i.pdf. For individual photo images see: \dbtext\hawthtramcoll\photo collections\TAP-Part D, images TAP269 to TAP315. TAP269_1-scrubber-OrmondRd_c1943_LeonMarcshallWood.jpg (Bob Lilburn notes in a letter to Keith Kings, photo dated 10/1942 - see 4064.1 in the same folder) TAP270_7_BrightonBeach_1954_HughBallment.jpg TAP271_17_ex-Sydney_LeonMarshallWoodCollection.jpg TAP272_23_ElwoodDepotTurntable.jpg TAP273_26_SandringhamDepot_LGPooleColln.jpg TAP274_40_BrightonBeach_1954_HughBallment.jpg TAP275_43_Sandringham_1943_LeonMarshallWood.jpg TAP276_43_ElwoodDepot_HughBallment.jpg TAP277_48_BlackRock_1954_HughBallment.jpg TAP278_51_ElwoodDepot_25Jan1957_LeonMarshallWood.jpg TAP279_ElwoodDepot_1918.jpg TAP280_6-ElwoodDepot.jpg TAP281_8-9trailer_LeonMarshallWoodCollection.jpg TAP282_3_ElwoodDepot_HughBallment.jpg TAP283_6_ElwoodDepot.jpg TAP284_6_ElwoodDepot_RayPearsonColln.jpg TAP285_trailer_ElwoodDepot_PTC.jpg TAP286_23_Sandringham_RayPearson.jpg TAP287_28-32_ElwoodDepot_PTC.jpg TAP288_32_StKilda_HughBallment.jpg TAP289_34_OrrmondRd_TMSV.jpg TAP291_37_ElwoodDepot_LindsayCrowe.jpg TAP292_36-39_VautierSt_JimSeletto.jpg TAP292_36-52_ElwoodDepot_1959_JimSeletto.jpg TAP293_40-33_ElwoodDepot_HughBallment.jpg TAP294_41_StKildaStation_1959_JimSeletto.jpg TAP295_43_StKildaStation_HughBallment.jpg TAP296_48_BlackRock_1954_HughBallment.jpg TAP297_51_Sandringham_LindsayCrowe.jpg TAP298_51_leaving-Sandringham_HughBallment.jpg TAP299_51_Sandringham_RayPearson.jpg TAP300_50_Sandringham_1955_GeoffGrant.jpg TAP301_LuxuryCar_Elwood_VictorianRailways.jpg TAP302_52_leaving-StKilda_HughBallment.jpg TAP303_53_ElwoodDepot_HughBallment.jpg TAP304_53-40_StKilda_NoelReed_19Jan1954.jpg TAP305_54_ElwoodDepot_NoelReed.jpg TAP306_Esplanade_MiddleBrighton_TMSV.jpg TAP307_BrightonBeach_TMSV.jpg TAP308_SandringhamStation_TMSV.jpg TAP309_34_ElwoodDepot_JimSeletto.jpg TAP310_34_Yarrambat_JimSeletto.jpg TAP312_34_Elwood_VictorianRailways.jpg TAP313_43_StKildaStation_HughBallment.jpg TAP314_43-894_StKildaStation.jpg TAP315_53_VautierSt_JimSeletto.jpgtrams, tramways, transit australia, destination city, tramcars, depots, vr, victorian railways, st kilda brighton, sandringham, tram 1, tram 7, tram 17, tram 23, tram 26, tram 40, tram 43, tram 46, tram 51, tram 6, tram 3, tram 13, tram 23, tram 28, tram 32, tram 34, tram 36, tram 39, tram 37, tram 52, tram 40, tram 43, tram 41, tram 48, tram 51, tram 50, tram 53, tram 4, tram 54, tram 42 -
 Melbourne Tram Museum
Album - Robert Thomson Slide Collection - box 16
... tram 26... trackworks route 48 tram 504 tram 7 East Burwood tram 26 tram 255 ...Photo - see pdf file for further information. Number Date Brief Description Box 16 RT372 23-1-1980 W2 271, High St Kew reconstruction trackwork – route 48 RT373 23-1-1980 W2 504 Burwood Road RT374 23-1-1980 Z7 East Burwood terminus RT375 23-1-1980 Z26 Burwood Highway, route 75 RT376 23-1-1980 W2 255 North Balwyn terminus, route 48 RT377 24-1-1980 W5 at North Coburg terminus – route 19 RT378 24-1-1980 Z37 (route 19) and a W route 20 at North Coburg terminus RT379 24-1-1980 W2 378? Park St St Kilda terminus, route 12 RT380 24-1-1980 Z121 route 88 at Bourke St terminus with Spencer St station in background RT381 25-1-1980 Z1 118 and another Z81? At East Preston terminus – both route 88 RT382 26-1-1980 SW5 812 route 67 at Carnegie terminus RT383 28-1-1980 MMTB Austerity bus No. 301 RT384 26-1-1980 SW5 818? And SW6 965 at Carnegie Glen Huntly Road at start of the single line Truganini Road – note the single track signs. Both route 67. RT385 26-1-1980 W2 504 at East Malvern Darling Road – route 3 RT386 26-1-1980 SW5 787 route 52, Mathews Ave. RT387 26-1-1980 SW5 684? Airport West terminus, route 52, RT388 26-1-1980 High St Kew track reconstruction, W6 986, route 48 RT389 26-1-1980 SW6 965 route 67, Glen Huntly Road level crossing RT390 27-1-1980 SW6 962 Collins St route 42 Spencer St terminus RT391 27-1-1980 Z3 121, route 88 Bourke St Mal with parked cars. RT392 27-1-1980 Z3 188? Bourke St route 96 RT393 27-1-1980 3MP tram Camberwell Route 72 at Gardiner level crossing RT394 28-1-1980 MMTB Bus 370, Leyland OPS1 on display RT395 28-1-1980 MAN Bus 103, on display showing Doncaster Depot Demonstrates the work of Robert Thomson in photography, collection and/or production of slidesAssembled album in a black presentation folder of 24 colour slides, collected or produced by Robert Thomson. A list of all photographs with details has been compiled. All rights reserved for all photos., melbourne, tramways, trams, tram 271, high st kew, trackworks, route 48, tram 504, tram 7, east burwood, tram 26, tram 255, north coburg, route 19, tram 37, park st st kilda, tram 121, bourke st, spencer st, tram 118, east preston, route 88, route 12, route 67, carnegie, tram 812, tram 67, buses, tram 965, truganini road, route 3, route 52, tram 787, tram 986, level crossings, glen huntly rd, matthews ave, tram 962, collins st, route 42, tram 188, route 72, gardiner -
 Melbourne Tram Museum
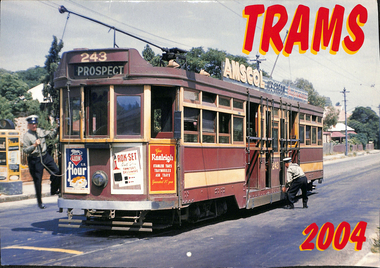
Ephemera - Calendar, Topmill Pty Ltd, "Trams - 2004", 2015
... tram 26... Rockhampton Fremantle tram 26 tram 294 tram 302 tram 7 tram 3018 Wall ...Wall Calendar - heavy card covers, 16 gloss art pages inside, titled "Trams - 2004" containing full colour photographs of Adelaide, Melbourne, Rockhampton, Ballarat, Bendigo, Melbourne, Fremantle, Sydney, Brisbane, Has a punched hole along the top edge to enable wall use. Provides dates for holidays, school holidays and Pension payment days and phases of the moon. Produced by Topmill Pty Ltd and distributed by Gordon & Gotch Pty Ltd. Photos by Arthur Perry, Les Horsburgh, Lawrie Hort, Archer Park, Ken Smith, Lenord Stewart,trams, tramways, ballarat, bendigo, adelaide, sydney, brisbane, rockhampton, fremantle, tram 26, tram 294, tram 302, tram 7, tram 3018 -
 Melbourne Tram Museum
Pamphlet, Gray Eisdell Matthews Pty Ltd, "Public Auction", Oct. 2005
... tram 26... tram 26 tram 27 tram 73 tram 110 tram 46 tram 77 tram 17 tram ...Pamphlet - Auction notice by Gray Eisdell Matthews Pty Ltd, titled "Public Auction" giving details of the auction of 12 Z1 class trams on 30/10/2005 at Preston Workshops under instructions from National Express (Swanston Trams) Receivers appointed. Three A4 pages stapled in top left hand corner. Lists the trams and has hand written notes as to the tram itself and the price received. Z's 26, 27, 73, 110, 46, 77, 17, 49, 80, 54, 91 and 85.Along top edge in ink "Copy messrs Budd & Wilson - Can keep, Oct. 2005"trams, tramways, z class, auctions, swanston trams, preston workshops, tram 26, tram 27, tram 73, tram 110, tram 46, tram 77, tram 17, tram 49, tram 80, tram 54, tram 91, tram 85 -
 Ballarat Tramway Museum
Negative - Ballarat No. 26 east bound in Sturt St at Drummond St, Wal Jack, 14-3-1953
... tram 26... Corner tram 26 Negative and Digital images of the Wal Jack ...From the print - see item 8993, - dated 14-3-1953Yields information about trams at Hospital corner.Negative and Digital images of the Wal Jack Ballarat Negative file of Ballarat No. 26 eastbound in Sturt St at Drummond St. Has a pole showing the tram stop and section signs. In the background is the Southern Cross Hotel. trams, tramways, sturt st, drummond st, hospital corner, tram 26 -
 Ballarat Tramway Museum
Photograph - Digital image Set of 2, W. J. Llewelyn, 8/03/2016 12:00:00 AM
... tram 26... track Depot Junction Wendouree Parade tram 26 Digital image ...Digital image of two photos of No. 26 on the BTM Access track with Wendouree Parade in the background. Photographed by Chris Phillips 8/3/2016.trams, tramways, btm, access track, depot junction, wendouree parade, tram 26 -
 Ballarat Tramway Museum
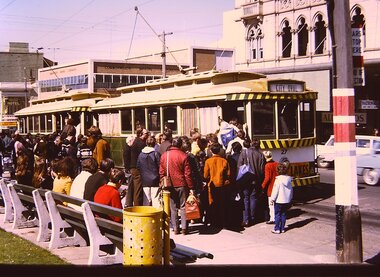
Photograph - Digital image Set of 2, Chris Phillips, c1970
... tram 26... 43 tram 26 Set of two digital images of trams at the City ...Yields information about the City terminus on the south side of Sturt St and the passenger traffic prior to closure of the system. Shows many people boarding the tram.Set of two digital images of trams at the City terminus on the south side of Sturt St, c1970. and corner with Lydiard St. .1 - No. 27 and another single trucker loading large crowds of passengers at the tram stop. No. 27 has the destination of City Oval. In the background is the Commonwealth Bank building. The tram has a Twin Lakes sign. .2 - Four trams at the same stop, from rear - 12, 43, 26 and ?. No. 12 has the destination of Sebastopol and has a Twin Lakes sign. Has the Town Hall in the background and the ESCo pillar cabinet on the corner.trams, tramways, sturt st, city oval, city, lydiard st, electrical switching, electrical equipment, esco, tram 27, tram 12, tram 43, tram 26 -
 Ballarat Tramway Museum
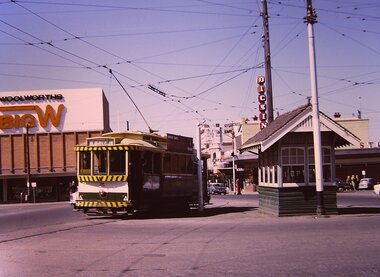
Photograph - Digital image, Chris Phillips, c1970
... tram 26... Bridge St tram 26 Digital image of No. 26 at the corner of Sturt ...Yields information about the intersection of Sturt and Grenville St prior to closure of the SEC operated system.Digital image of No. 26 at the corner of Sturt and Grenville St. Tram about to cross Grenville St into Bridge St, has destination of Mt. Pleasant. In the background is the Woolworths Big W store and the Dickins Supermarket. Also in the view is a letter box and the tramway shelter. Photo c1970.trams, tramways, grenville st, sturt st, shelters, bridge st, tram 26 -
 Ballarat Tramway Museum
Photograph - Digital image, Chris Phillips, c1970
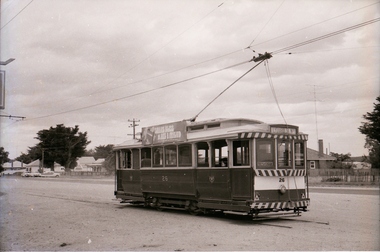
... tram 26... the tram operations in Victoria St. Trams tramways Victoria St tram ...Yields information about the tram operations in Victoria St.Digital image of No. 26 in Victoria St, near the King St loop on a wet day. Tram has the destination of Gardens via Sturt St West. Person standing behind the tramcar looking up - the trolley pole may have be dewired.trams, tramways, victoria st, tram 26 -
 Ballarat Tramway Museum
Photograph - Digital image, Chris Phillips, Mar.1987
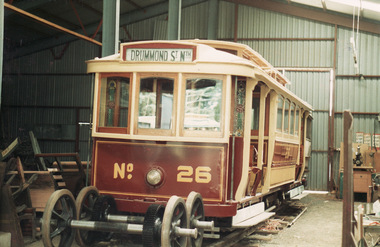
... tram 26... tram 26 Digital image of BTPS No. 26 at the back of No. 5 road ...Digital image of BTPS No. 26 at the back of No. 5 road at the depot March 1987.trams, tramways, btps, depot, tram 26 -
 Ballarat Tramway Museum
Slide - 27 mm sq slide/s - set of 20 - BTPS Official opening, Lilian Butler, 1/02/1975
... tram 26... tram 27 tram 26 Set of 20 Kodachrome of the Official Opening ...Yields information about the Official opening of the BTPS operation in Wendouree Parade in 1974 and has a strong association with those involved.Set of 20 Kodachrome of the Official Opening day of the BTPS Wendouree Parade tramway. .1 - BTPS Depot and associated trackwork with two people sitting on the door step. .2 - 40 and three single truckers lined up for the opening ceremony .3 - ditto .4 - Opening ceremony with speeches etc, the band (The Ballarat Memorial Soldiers Band) .5 - ditto .6 - ditto .7 - ditto .8 - ditto .9 - Bill Jessup holding the opening banner just after being broken - Clyde Croft in the cabin of the tram. .10 - close up of the front of 40 .11 - trams in Wendouree Parade] .12 - ditto .13 - 14 passing another tram at the loop .14 - 40 ditto .15 - Some enthusiasts hiding under the trees. .16 - turning the pole .17 - Gavin Young and Graham Jordan standing on front of 26 .18 - ditto .19 - putting the pole on the overhead .20 - Former driver? standing at the No. 2 end of 40. Photos from the collection of Lilian Butler. ballarat, tramways, trams, btps, wendouree parade, opening day, tram 40, tram 14, tram 27, tram 26 -
 Ballarat Tramway Museum
Negative - Set of 3, Campbell Duncan, 28/12/1970 12:00:00 AM
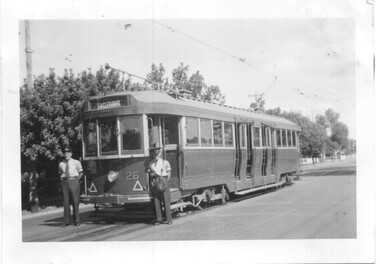
... tram 26... Sebastopol Drivers tram 26 Set of three photographs of No. 26 ...Yields information about the terminus at Sebastopol and signage.Set of three photographs of No. 26 at the Sebastopol terminus - 28/12/1970 .1 - 26 at the terminus, looking north. Has a Bliss Bombs roof advert - "Share bliss - make a friend". Tram has the destination of Lydiard St North. .2 - Tram timetable sign at the terminus, with a "Cars stop here" sign and the Fosters sign in the background. .3 - No. 26 at the terminus with the driver turning the pole.trams, tramways, albert st, signs, sebastopol, drivers, tram 26