Showing 829 items
matching slide sets
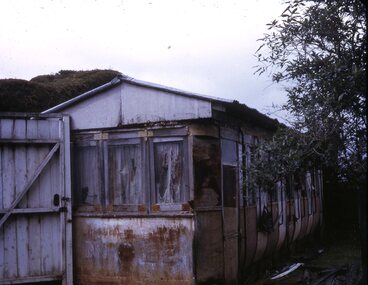
-
 City of Ballarat Libraries
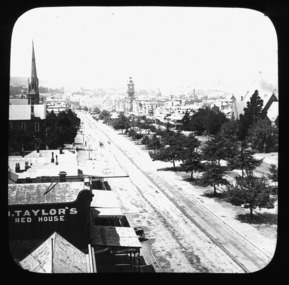
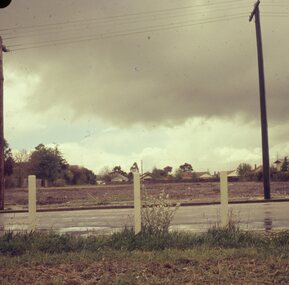
Glass Slide, Sturt St looking east from City Fire Brigade tower
Tram tracks can be clearly seen in this image. Horse trams were introduced late in 1887, the line up Sturt St to the Lake and Gardens being built first. Note these tracks do not have any electricity above them - electric trams did not appear until 1905. St Andrews Kirk steeple was erected in 1884.Previously unknown image of Ballarat. The set and its subjects indicate these images were produced to promote Ballarat and were perhaps aimed at tourists.An image repeating von Guerard's famous drawing from the City Fire Brigade tower, looking east along Sturt St to Mt Warrenheip. -
 City of Ballarat Libraries
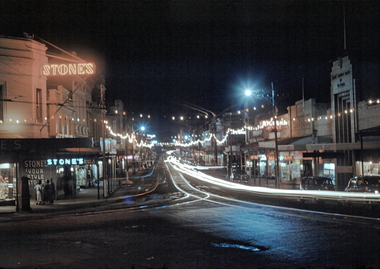
35mm Slide, Bridge Street Ballarat circa late 1950s
A night exposure of Bridge Street looking west. The tram tracks are clear, one set going straight ahead up Victoria St hill, the other set turning along Main Road. Stone's at Stones Corner was a select ladies dress shop for many years. Mrs Bon Strange and her husband Bert were well known Ballarat residents. When Mrs Strange died some years ago, her extensive slide collection was sorted through and those relevant to Ballarat were gifted to the Ballarat Library. bridge street -
 Numurkah & District Historical Society
Slides / Photos / Brush/comb sets / Telescopic view photo set / Tie pin
... Telescopic View photo set (1911) Slides / Photos / Brush/comb sets ...All of these items were donated by Jock Adams (He was on the Ulupna Island Committee and hence some of the donated photosPhotos - Morgan's Beach, Coonanga Homestead, Barmah Hotel, Ulupna Island Slides - Moira Forest shrubs etc 2 x Brush comb sets Sword/Dagger Tie Pin King George V Coronation Stereo Telescopic View photo set (1911)jock adams, tie-pin, photos, brush-comb set, telescopic view photos, slides -
 Ballarat Tramway Museum
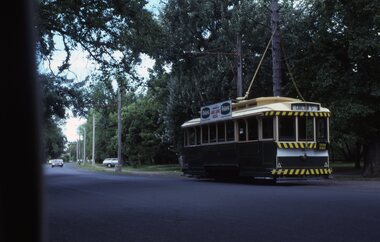
Slide - 35mm slide/s - set of 5, Frank Londey, colour slides by Frank Londey of operations at the BTPS depot and in Wendouree Parade, Apr. 1985
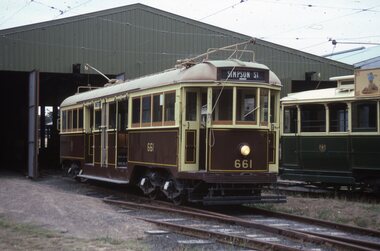
... 35mm slide/s - set of 5... Drive tram 661 tram 33 tram 18 tram 27 tram 40 Set of five 35mm ...Demonstrates Museum Operations.Set of five 35mm Kodachrome cardboard mount - colour slides by Frank Londey of operations at the BTPS depot and in Wendouree Parade April 1985 (date on the slide) Perhaps during a organised tour. .1 - W3 661 on No. 6 road .2 - trams 33 and 18 on the depot fan .3 - 27 and 40 at St Aidans Drive .4 - 27 and 661 at Gardens Loop .5 - 661 in Wendouree Parade at the Ferry stop tramways, trams, btps, btm, depot, wendouree parade, st aidans drive, tram 661, tram 33, tram 18, tram 27, tram 40 -
 Ballarat Tramway Museum
Slide - 35mm slide/s - set of 3, Frank Londey, Apr. 1985
... 35mm slide/s - set of 3... in the depot Slide 35mm slide/s - set of 3 Frank Londey ...Set of three 35mm Kodachrome cardboard mount - colour slides by Frank Londey of operations at the BTPS depot and in Wendouree Parade January 1986 or could be 1985 (date on the slide) Perhaps during an organised tour .1 - 14 Northbound in Wendouree Parade approaching Fairy land. .2 - 27 at the depot with 671 behind .3 - 671 in the depot tramways, trams, btps, btm, depot, wendouree parade, tram 14, tram 671, tram 27 -
 Ballarat Tramway Museum
Slide - 35mm slide/s - set of 3, Les Fordham, Aug. 1967
... 35mm slide/s - set of 3... Depot Loop Barrett Ave Tram Stops Signals tram 30 tram 32 Set ...Yields information about tram operations in Wendouree Parade during August 1967.Set of 3 Kodachrome white cardboard mount 35mm slides - dated August 1967 taken by Les Fordham. .1 - trams 32 (Victoria St) and 30 ( (Gardens Via Drummond North) crossing at the depot loop or Barrett Ave loop in Wendouree Parade. .2 - tram in the loop, about to leave - blurry can't read the number. .3 - tram 30 entering the loop, the red signal light is illuminated. The tram stop pole appears to be recently painted.tramways, trams, depot loop, barrett ave, tram stops, signals, tram 30, tram 32 -
 Ballarat Tramway Museum
Slide - 35mm slide/s - set of 2, Les Fordham, Aug. 1967
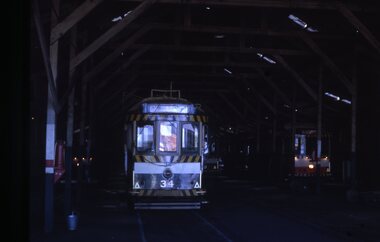
... 35mm slide/s - set of 2... 31, 34, 43 and ? Slide 35mm slide/s - set of 2 Les Fordham ...Yields information about the tram depot during August 1967.Set of 2 Kodachrome white cardboard mount 35mm slides - dated August 1967 taken by Les Fordham. .1 - No. 34 in the depot building with two other trams in the view as well (43?) .2 - View of the depot building with trams 31, 34, 43 and ?tramways, trams, depot, sec depot, tram 34, tram 31, tram 43 -
 Ballarat Tramway Museum
Slide - 35mm slide/s - set of 3, Les Fordham, Aug. 1967
... 35mm slide/s - set of 3... tram at the tram stop. Slide 35mm slide/s - set of 3 Les ...Set of 3 Kodachrome white cardboard mount 35mm slides - dated August 1967 taken by Les Fordham. .1 - St Andrew Kirk or church .2 - Town Hall, with a tram just in the view showing Sturt St West .3 - ditto with bogie tram at the tram stop.tramways, trams, town hall, sturt st, st andrews kirk -
 Ballarat Tramway Museum
Slide - 35mm slide/s - set of 2, Les Fordham, Aug. 1967
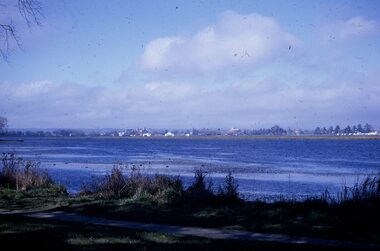
... 35mm slide/s - set of 2... Set of 2 Kodachrome white cardboard mount 35mm slides - dated ...Set of 2 Kodachrome white cardboard mount 35mm slides - dated August 1967 taken by Les Fordham of views across Lake Wendouree.tramways, trams, lake wendouree -
 Ballarat Tramway Museum
Photograph - Digital image Set of 3, Chris Phillips, 30/05/1971 12:00:00 AM
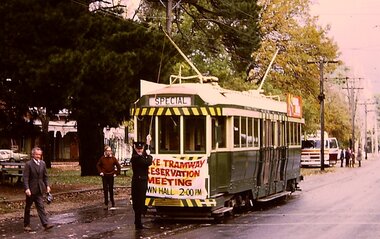
Yields information about the special tram and the people involved at the time of the formation of the BTPS prior to closure of the SEC operated system.Set of three digital images of tram 36 advertising the Lake Tramway Preservation Meeting at the Town Hall 31/5/1971 by Chris Phillips. .1 - tram at Gardens loop with the motorman L Bird pulling the pole down - similar photo to that of The Age Newspaper, see Reg Item 2487. .2 - tram turning from Sturt St into Lydiard St North with the Post Office and the Mining Exchange buildings in the background. .3 - tram at the City stop, south side of Sturt St with the Town Hall and Myers in the background. Also has the tram stop signs in the photograph. See also Reg Item 1064 for the newspaper clipping, 2487 for a print of The Age photograph. See 7033i4 for notes on the tram and who made the banner - thought to be Tom Clark. Imagebtm7033i2bw - black and white version of the slide use in the Long Gallery imagebtm7033i2co - colour hi res scan.trams, tramways, lake wendouree, charters, museum establishment, btps, sturt st, gardens, lydiard st north -
 Ballarat Tramway Museum
Photograph - Digital Image, Peter Knife, BTM Tram 18 Depot Junction, 19/4/2014
Set of three colour images of BTM tram 18 running in at the end of an operating day. The first image shows the driver at the rear of the tramcar and the next two of the tram crossing Wendouree Parade into the depot. This location was rebuilt during November and December 2014 and the road moved to the west for bicycle safety. Photo by Peter Knife 19/4/2014.Yields information about Ballarat Tramway Museum operations in Wendouree Parade and tram 18Set of three Digital images of colour slides.tramways, tramcars, btm, wendouree parade., depot junction, tram 18 -
 Ballarat Tramway Museum
Slide - 35mm slide/s - set of 4, Dave Simpson, late 1960's early 1970's
... 35mm slide/s - set of 4...Set of four 35mm slides - two Hanimex light blue grey... Trams tram 39 tram 26 tram 33 Set of four 35mm slides - two ...Yields information about Lydiard St North near the Railway Station and its use by trams running special tours.Set of four 35mm slides - two Hanimex light blue grey plastic mounts and two Anscochrome white plastic mounts of trams in Lydiard St North. .1 - No. 39 and 26 waiting at the station stop. No. 26 is showing "Special". .2 - ditto with photographers in the background. No. 26 is entering the double track, indicating that the trams are returning to the depot. .3 - No. 33 arriving at the end of the double track with a passenger leaving the tram, with St Paul's Technical College in the background. .4 - ditto Have the St Paul's Technical College, S.F Motors Pty Ltd and Union Fidelity Trustee Company in the background.tramways, trams, lydiard st north, special trams, tram 39, tram 26, tram 33 -
 Ballarat Tramway Museum
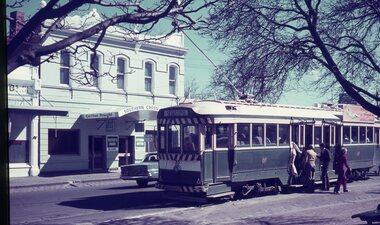
Slide - 35mm slide/s - set of 3, Dave Simpson, trams in Sturt St near Hospital Corner, late 1960's early 1970's
... 35mm slide/s - set of 3...Set of three 35mm slides - AGFA dark blue / white plastic... Hospital Corner Slide 35mm slide/s - set of 3 Dave Simpson ....1 -No. 35, outbound to Sebastopol with the Southern Cross Hotel in the background. Has signs for Fosters Larger, Carlton Draught and Victoria Bitter. Has a number of passengers boarding the tram. .2 - at Hospital corner with the signal system control box for the Forest City signals in the foreground on a pole. Has marking for Sebastopol, Sturt St West and Drummond St North? written on the box. Above this is a sign advising passengers that trams depart this point for The Gardens, View Point and Sebastopol. In the background is J. A. Malpass Hairdresser shop. See item 8900 for the actual switch. .3 - No. 35 turning into Drummond St south with the bottle shop on the south east corner in the background.Yields information about Hospital corner and the switch for the Forest City signalling system controls.Set of three 35mm slides - AGFA dark blue / white plastic mounts of trams in Sturt St near Hospital Corner. tramways, trams, sturt st, hotels, hospital corner, forest city signals, signs, tram 35 -
 Ballarat Tramway Museum
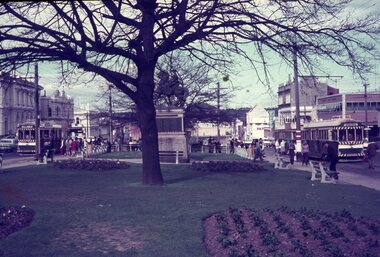
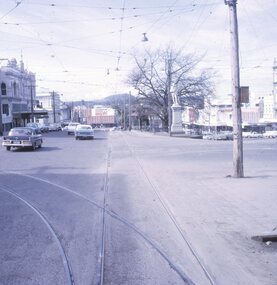
Slide - 35mm slide/s - set of 3, Dave Simpson, trams at the intersection of Sturt and Lydiard St - City terminus, late 1960's early 1970's
... 35mm slide/s - set of 3...Set of three 35mm slides - AGFA dark blue / white plastic... tram 14 Set of three 35mm slides - AGFA dark blue / white ...Yields information about the intersection of Sturt and Lydiard Sts tramway centre and Boer War monument.Set of three 35mm slides - AGFA dark blue / white plastic mounts of trams at the intersection of Sturt and Lydiard St - City terminus. 1 - view from the central median on the west side of Lydiard St, looking East with the Commonwealth Bank, Post Office, with many passengers at the location. The Boer War monument /statue is in the centre part of the photograph. 2 - No. 14 about to turn into Lydiard St North/ The short tram stop and End of Section sign are adjacent to the tram. 3 - Tram waiting at the north side tram stop - has a Twin Lakes and Cinzano sign. Has the ANZ bank and the SEC offices in the background.tramways, trams, sturt st, city, lydiard st, passengers, signs, tram 14 -
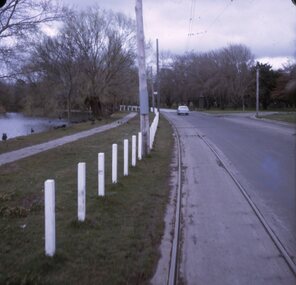
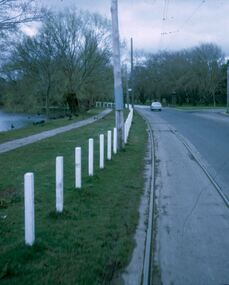
 Ballarat Tramway Museum
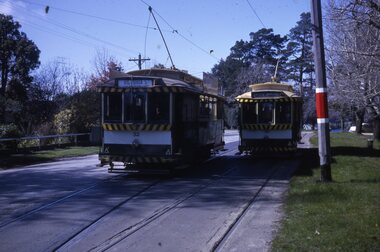
Slide - 27 mm sq slide/s - set of 9 - tram tracks - Gardens to the City, Lilian Butler, Aug. 1971
... 27 mm sq slide/s - set of 9 - tram tracks - Gardens to... Stops Carlton St Loop Set of nine Colour 27 x 27 mm slide ...Yields information about the streetscapes of Ballarat on the Gardens to Victoria St route and in particular buildings and people that crewed the trams.Set of nine Colour 27 x 27 mm slide in a Kodachrome cardboard mount of a series of photographs taken from Wendouree Parade in the Gardens to the City tramway - taken from the front or rear window of the tram. .1 - Carlton St loop looking north .2 - Wendouree Parade, north of the Windmill Drive north intersection - has a tram stop pole. .3 - Sturt St - in bound just past Pleasant St - has passengers waiting at the tram stop. .4 - at Ascot St. .5 - at Drummond St with Shell garage in the view and a track worker. .6 - at Talbot St? with track workers repairing the road surface. .7 - at Dawson St showing the tram stop and End of Section signs. .8 - nearing the intersection with Armstrong St. .9 - nearing Lydiard St. Slide mount date cannot be read - possibly August 1971. Photo from the collection of Lilian Butler.ballarat, tramways, trams, wendouree parade, sturt st, drummond st, trackwork, tram stops, carlton st loop -
 Ballarat Tramway Museum
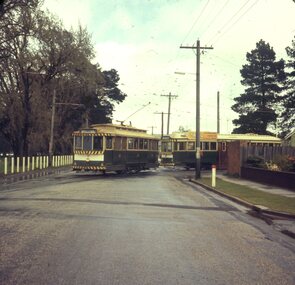
Slide - 27 mm sq slide/s set of 6, Lilian Butler, Tram No. 38 at the Victoria St terminus, Aug. 1971
... 27 mm sq slide/s set of 6... Corner tram 30 Set of six Colour 27 x 27 mm slide in a Kodachrome ...Yields information about the streetscapes of Ballarat on the Gardens to Victoria St route and in particular buildings and people that crewed the trams.Set of six Colour 27 x 27 mm slide in a Kodachrome cardboard mount. .1 - Tram No. 38 at the Victoria St terminus, with the destination of Gardens via Sturt St West. Note the red traffic cone in the overhead by the trolley wheel positioning location device. .2 - crew of No. 30 by the tram - R. Knight (57) and Conductor W. Nancarrow (8) .3 - No. 30 at Gardens Loop .4 - as for .2 - see Also Reg item 6455. .5 - view from tram at intersection of Wendouree Parade and MacArthur St, View Point. .6 - view of trackwork at intersection of Drummond and Sturt Streets with the Southern Cross Hotel in the background. Slide mount date August 1971. Photo from the collection of Lilian Butler.ballarat, tramways, trams, victoria st, crews, gardens loop, view point, hospital corner, tram 30 -
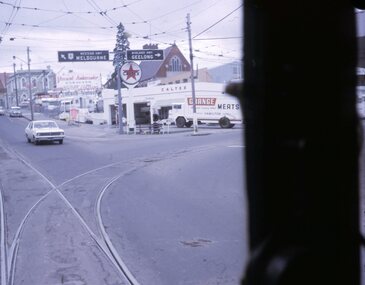
 Ballarat Tramway Museum
Slide - 27 mm sq slide/s - set of 8 - tram tracks - Victoria St, Lilian Butler, Aug. 1971
... 27 mm sq slide/s - set of 8 - tram tracks - Victoria St... Victoria St Set of eight Colour 27 x 27 mm slide in a Kodachrome ...Yields information about the streetscapes of Ballarat on the Gardens to Victoria St route and in particular buildings and people that crewed the trams.Set of eight Colour 27 x 27 mm slide in a Kodachrome cardboard mount. .1 - view of the Sturt and Lydiard St intersection from the front of the tram car with the Robbie Burns statue in the view and the Big W store. .2 - ditto at the corner of Sturt and Grenville St with the tramway shelter and the Dickins store. .3 - setting the signals for the Bridge St route. .4 - View looking east along Bridge St with Big W store and Faull's shoe shop. .5 - At intersection with Main Road, looking up the hill towards Victoria St. On the right is the advert for Viscount Ambassador Caravans. .6 - Looking along Victoria St, towards the East at E St, with the biscuit factory on the left. .7 - tram shelter at Queen St. .8 - View of the terminus looking east, showing the median strip Slide mount date August 1971. Photo from the collection of Lilian Butler.ballarat, tramways, trams, sturt st, grenville st, shelters, bridge st, signals, victoria st -
 Ballarat Tramway Museum
Slide - 27 mm sq slide/s - set of 9 - Victoria St and crews, Lilian Butler, Aug. 1971
... 27 mm sq slide/s - set of 9 - Victoria St and crews... of Lilian Butler. Slide 27 mm sq slide/s - set of 9 - Victoria St ...Yields information about the streetscapes of Ballarat on the Gardens to Victoria St route and in particular buildings and people that crewed the trams.Set of nine Colour 27 x 27 mm slide in a Kodachrome cardboard mount. .1 - R. Williams (Motorman) and Danny Powell (badge 30) standing in front of a tram at Victoria St. The tram has the destination of Gardens via Sturt St West. .2 - view of No. 113 Victoria St - now Ardenlee B&B. .3 - Sunshine Biscuit Factory .4 - Mack's Hotel .5 - Stones Corner - intersection of Victoria and Mt Pleasant routes .6 - Crossing Grenville St .7 - No. 30 at the City terminus, Lydiard St with Racey's and the SEC office in the background. .8 - as for .5, but looking east with the Caltex service station in the background. .9 - No. 30 at the Victoria St terminus. Slide mount date August 1971. Photo from the collection of Lilian Butler.ballarat, tramways, trams, victoria st, bridge st, stones corner, tram 30 -
 Ballarat Tramway Museum
Slide - 27 mm sq slide/s - set of 11, Lilian Butler, Wendouree Parade and Sturt St West, Sep. 1971
... 27 mm sq slide/s - set of 11... Set of eleven Colour 27 x 27 mm slide in a Kodachrome ...Yields information about the streetscapes of Ballarat depot to Pleasant St route and in particular buildings and people that crewed the trams.Set of eleven Colour 27 x 27 mm slide in a Kodachrome cardboard mount. .1 - Wendouree Parade looking west towards St Aidans Drive - the gate pillars can be seen. .2 - ditto looking west - Fairyland .3 - ditto looking towards Gardens Loop .4 - No. 41 at Gardens Loop, with destination of Gardens via Drummond North .5 - ditto showing Mt Pleasant .6 - ditto, just past the now BTM Depot Junction. .7 - Carlton St - showing the gates .8 - Looking towards Hamilton Ave from within Carlton St loop with the signal showing red. .9 - Turning from Hamilton Ave into Sturt St West. .10 - Sturt St west looking east with the Loreto convent walls on the left hand side. .11 - Sturt St - Pleasant St intersection - showing road surface, a tram coming towards the intersection and buildings on either side. Slide mount date September 1971. Photo from the collection of Lilian Butler.ballarat, tramways, trams, wendouree parade, st aidans drive, gardens loop, depot junction, carlton st, carlton st loop, signals, sturt st west, pleasant st, tram 41 -
 Ballarat Tramway Museum
Slide - 27 mm sq slide/s - set of 7, Lilian Butler, Mt Pleasant line, Sep. 1971
... 27 mm sq slide/s - set of 7... Trolley Poles tram 41 Set of seven Colour 27 x 27 mm slide ...Yields information about the streetscapes of Stones Corner to Mt Pleasant route and in particular buildings and people that crewed the trams.Set of seven Colour 27 x 27 mm slide in a Kodachrome cardboard mount. .1 - Tram turning onto the Mt Pleasant line at Stones Corner - Bridge St, Main Road .2 - Main Road looking south with Inland Body Works building on the left and Ampol Service Station .3 - Mt Pleasant terminus with the butcher shop on the left and the diary on the right - shows the terminating tram track .4 - Conductor changing pole. .5 - Putting pole on the overhead .6 - Conductor (D O'Leary - No. 38) standing in front of tram and Motorman or driver (N. Hall - No. 43) .7 - ditto with number visible. See Reg item 3425 for crew lists. Slide mount date September 1971. Photo from the collection of Lilian Butler.ballarat, tramways, trams, stones corner, main road, mt pleasant, crews, drivers, conductors, trolley poles, tram 41 -
 Ballarat Tramway Museum
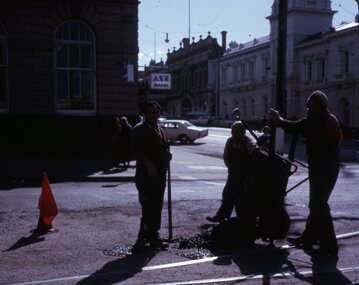
Slide - 27 mm sq slide/s - set of 2 - track workers, Lilian Butler, August or September 1971
... 27 mm sq slide/s - set of 2 - track workers... Set of two Colour 27 x 27 mm slides in a Kodachrome cardboard ...Yields information about SEC road workers repairing the bitumen or road surface in Ballarat.Set of two Colour 27 x 27 mm slides in a Kodachrome cardboard mount: .1 - Group of three SEC road repairer or track workers repairing the road surface the intersection of Sturt and Lydiard St with new asphalt mix. shows the red flag on the right - Sept. 1971 .2 - Group of three SEC road repairers, laying asphalt in Wendouree Parade, with the Road Roller and the concrete tram shelter at Forest St. in the background. - August 1971 Photo from the collection of Lilian Butler.ballarat, tramways, trams, trackwork, road works, sturt st, lydiard st north, wendouree parade, road roller, jelbart, shelters, forest st -
 Ballarat Tramway Museum
Slide - 27 mm sq slide/s - set of 4 - shelters, Lilian Butler, August or September 1971
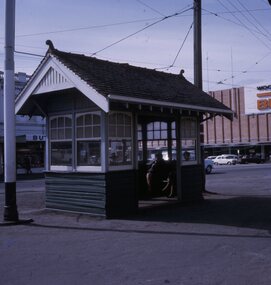
... 27 mm sq slide/s - set of 4 - shelters... St Set of four Colour 27 x 27 mm slide in a Kodachrome ...Yields information about some of the individual street tramways shelters at tram stops and their appearance.Set of four Colour 27 x 27 mm slide in a Kodachrome cardboard mount. .1 - Grenville St with two ladies sitting inside, has the Big W store in the background. .2 - Concrete shelter with curved roof - Wendouree Parade near - has the photographer's purse and umbrella on the seat. This shelter was located at Forest St. From discussions with Dave Macartney and Alastair Reither 11/9/2016, it was there in the 1990 hail storms as they sheltered under it, but disappeared soon after - the construction of the roundabout would have absorbed its location. .3 - timber based shelter with flat roof - Wendouree Parade near Dowling St. This shelter remains in position in 9/2016. See Reg Item 6551 for a digital image. .4 - Shelter at Tramway Centre, City, Sturt St and Lydiard Sts, looking towards the Town Hall Slide mount date August or September 1971. Photo from the collection of Lilian Butler.ballarat, tramways, trams, shelters, grenville st, wendouree parade, sturt st, lydiard st, city, tramway centre, forest st, dowling st -
 Ballarat Tramway Museum
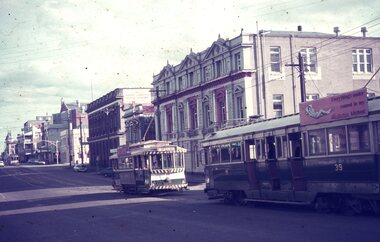
Slide - 27 mm sq slide/s - set of 6, Lilian Butler, City area - Sturt St, August or September 1971
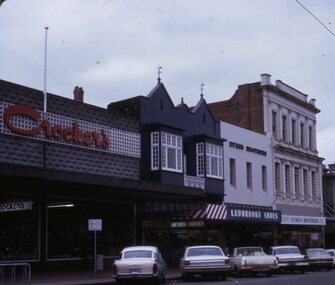
... 27 mm sq slide/s - set of 6... Loop Grenville St tram 21 Set of six Colour 27 x 27 mm slide ...Yields information about the streetscapes of the Sturt St - Grenville St and City Loop.Set of six Colour 27 x 27 mm slide in a Kodachrome cardboard mount. .1 - Sturt St with the Crockers, Hairdresser, Ludbrook's shoes and Eyres Brothers shops in the view. .2 - Photo of a passenger boarding a tram and a young lady leaving the tram on the north side of the City stop with the SEC building in the background. .3 - Sturt St west side looking west up Lydiard St with Coles & Gerrard, Mechanics Institute, Unicorn Hotel and other buildings - taken from the west end of the City loop. .4 - Two trams parked in city loop and one bogie tram crossing Grenville St with the Big W and Dickins Stores in the background. .5 - Tram 21 parked in the City Loop. .6 - Sturt St - city stop with seats shown, passengers waiting, tram stop sign, looking west with the Town Hall on the left hand side and Myers in the background. Slide mount date August or September 1971. Photo from the collection of Lilian Butler.ballarat, tramways, trams, sturt st, tram stops, city, shoppers, passengers, city loop, grenville st, tram 21 -
 Ballarat Tramway Museum
Slide - 27 mm sq slide/s - set of 3, Lilian Butler, ESCo 22 in the yard at south Sebastopol, Oct. 1971
... 27 mm sq slide/s - set of 3... tram 22 Set of three Colour 27 x 27 mm slides in Kodachrome ...Yields information about the appearance of ex ESCo No. 22 at a private property near Sebastopol in 1971.Set of three Colour 27 x 27 mm slides in Kodachrome cardboard mounts of ESCo 22 in the yard at south Sebastopol October 1971. Photo from the collection of Lilian Butler.ballarat, tramways, trams, esco, sale of trams, sebastopol, tram 22 -
 Ballarat Tramway Museum
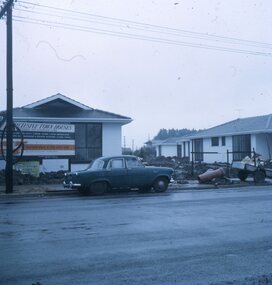
Slide - 27 mm sq slide/s - set of 2, Lilian Butler, construction of new town houses on the former SEC Depot site in Wendouree Parade, Jun. 1973
... 27 mm sq slide/s - set of 2... "old tram sheds" at the top of the slide. Set of two Colour 27 ...Yields information about the appearance of the units being constructed on the former depot site with an association of the parties involved.Set of two Colour 27 x 27 mm slides in Kodachrome cardboard mounts of the construction of new town houses on the former SEC Depot site in Wendouree Parade - one over exposed. The first one has the board for the construction of the homes by Prestige Homes and the agents name - B.E. Hayden & Co. Pty Ltd. Slide mount dated June 1973. Photo from the collection of Lilian Butler.Both slides have in pencil "old tram sheds" at the top of the slide.ballarat, tramways, trams, depot, sec depot, wendouree parade, construction -
 Ballarat Tramway Museum
Slide - 27 mm sq slide/s - set of 4, Lilian Butler, SEC Wendouree Parade depot site, Jul. 1973
... 27 mm sq slide/s - set of 4... Set of four Colour 27 x 27 mm slides in plain white cardboard ...Yields information about some of the SEC Wendouree Parade depot after it had been demolished.Set of four Colour 27 x 27 mm slides in plain white cardboard mounts of four views of the SEC Wendouree Parade depot site with the buildings demolished and the site cleared. The second slide shows the Trackwork still in position in the roadway and the last the view from Gregory St. Slide not dated - building demolition works commenced July 1972. Photo from the collection of Lilian Butler.ballarat, tramways, trams, sec depot, demolition, depot, wendouree parade -
 Ballarat Tramway Museum
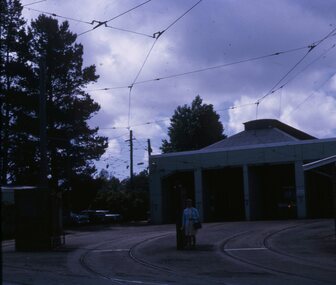
Slide - 27 mm sq slide/s - set of 7, Lilian Butler, tramcars at the depot at or just after the time of closure, Sep. 1971
... 27 mm sq slide/s - set of 7... Set of seven Colour 27 x 27 mm slides in Kodachrome white ...Yields information about the SEC Wendouree Parade depot and the activities at the depot after closure.Set of seven Colour 27 x 27 mm slides in Kodachrome white cardboard mounts of activities and tramcars at the depot at or just after the time of closure. .1 - view of the depot, under exposed or a lady, possibly Lil Butler standing in front of the gates of the depot with some tramcars in the shed. .2 - view with 1 road doors closed of the scrubber tram on "0" road, derailment marks, and the tennis court lighting. .3 - partial view of a tram (bogie) just clear of one the depot doors. .4 - internal view of the depot - no lights - very underexposed - but shows the gloom! .5 - photo showing door step of a bogie tram. .6 - ditto with the lifeguard reset rod lifted - shows damage to the front panel of the tram. .7 - tram being readied for lifting or loading with E. Davis alongside - see Reg Item 6453 for a colour print as well. Negative of this filed with 6453. Slide mounts dated September 1971 Photo from the collection of Lilian Butler.ballarat, tramways, trams, sec depot, depot, wendouree parade, closure, tramcars, lifeguard, loading trams, scrubber, tram 37 -
 Ballarat Tramway Museum
Slide - 27 mm sq slide/s - set of 2, Lilian Butler, No. 30 towing a bogie tram with the trolley poles and lifeguards removed, Sep. 1971
... 27 mm sq slide/s - set of 2... and lifeguards removed Slide 27 mm sq slide/s - set of 2 Lilian Butler ...Yields information about the SEC Wendouree Parade depot and the activities at the depot after closure.Set of two Colour 27 x 27 mm slides in Fuji film, processed by Hanimex white cardboard mounts. .1 - view of the SEC depot front with three and four roads doors, shows the sign and the small personnel door open. .2 - No. 30 towing a bogie tram with the trolley poles and lifeguards removed (possibly No. 37 but looks more like an ex HTT car) onto Wendouree Parade to be loaded. Photo from the collection of Lilian Butler.ballarat, tramways, trams, sec depot, depot, wendouree parade, closure, tramcars, loading trams, scrubber, tram 37 -
 Ballarat Tramway Museum
Slide - 27 mm sq slide/s, Lilian Butler, Sep. 1971
Yields information about the SEC Wendouree Parade depot and the activities at the depot after closure.Set of six Colour 27 x 27 mm slide in Agfachrome blue and white plastic mounts. .1 - view of a single trucker with a Twin Lakes sign inside the depot on No. 2 road, number obscured. .2 - view from inside the tram depot with No. 12 outside with the lake in the background. .3 - No. 34 entering the depot being driven by a depot worker in white overalls. .4 - B. Peart standing on the foot step of the Ballarat Scrubber tram at the Ballarat depot - see Reg Item 6447 for a colour print. .5 - Front of the depot from the Lake side - with all gates closed and the long grass alongside the lake. .6 - Bogie tram entering the depot with the depot gates in the foreground - could be 34 - see .3 Photo from the collection of Lilian Butler.ballarat, tramways, trams, depot, sec depot, scrubber tram, tram 12, scrubber, tram 34 -
 Ballarat Tramway Museum
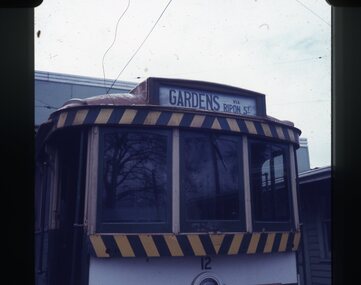
Slide - 27 mm sq slide/s - destination roll, Lilian Butler, Sep. 1971
Yields information about the destination rolls and the locations shown on a roll on a Ballarat Tram.Set of 22 Colour 27 x 27 mm slide in Agfachrome blue and white plastic mounts showing various destinations on tram No. 12 parked on the depot fan. .1 - Gardens via Ripon St .2 - Grey St Sebastl (Sebastopol) .3 - Sebastopol .4 - City .5 - Victoria St .6 - Gardens via Sturt St West .7 - Mt Pleasant .8 - Depot .9 - Bell St .10 - Haddon St via Drummond Nth .11 - Depot via Drummond Nth .12 - City Oval .13 - Special .14 - Gardens via Drummond Nth .15 - View Point .16 - Gregory St .17 - Drummond St Nth .18 - Rubicon St .19 - Depot via Ripon St .20 - Grey St Sebastopol .21 -Sturt St West .22 - Special (Depot - on tram 32 with an "Pay as you Enter" inside the depot building. Photo from the collection of Lilian Butler. ballarat, tramways, trams, depot, sec depot, destination indicators, destination roll, tram 12, tram 32