Showing 300 items matching "terminals"
-
 Melbourne Tram Museum
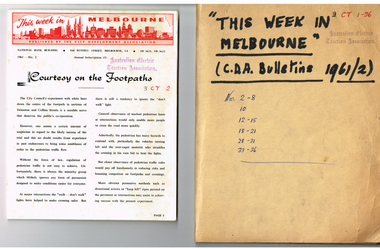
Magazine, City Development Association, "This week in Melbourne", 1961
Set of 24 magazines - each a folded foolscap sheet printed on semi gloss paper with a red printed heading, titled "This week in Melbourne", published by the City Development Association - 1961. Looks at issues that affect the Melbourne CBD, traffic, planning, MMBW, open space, population, parking, overseas practices, City of Melbourne, water supply, freight terminal. Published on a fortnightly basis. All contained loosely within a brown card folder with the title written on the front and issue numbers. 1961 issues are: 2-8, 10, 12-15, 18-21, 28-31, 33-36.Has AETA stamp on front cover with the letters "3CT with a running number alongside."trams, tramways, melbourne, city of melbourne, public transport, road transport, traffic control -
 Federation University Historical Collection
Instrument - Scientific Instument, Telegraph Relayer, c1870-1893
Probably acquired for use in Telegraphy courses run at the Ballarat SChool of Mines between 1875 and 1893. Telegraph relays amplified electrical signals in a telegraph line. Telegraph messages traveled as a series of electrical pulses through a wire from a transmitter to a receiver. Short pulses made a dot, slightly longer pulses a dash. The pulses faded in strength as they traveled through the wire, to the point where the incoming signal was too weak to directly operate a receiving sounder or register. A relay detected a weak signal and used a battery to strengthen the signal so that the receiver would operate. This relay was made by the firm of Charles T. and John N. Chester, two brothers who successfully partnered in New York City. Charles (1826-1880) founded the firm and provided the expert telegraphy knowledge while John (1820-1871) kept the books and managed the business operations.(http://americanhistory.si.edu/collections/search/object/nmah_706518, accessed 25/01/2018)Electromagnetic relay device used in telegraphy. The working parts mounted on a brass plate, attached to a wood base. Equipped with four terminal posts. Adjustable contactor mechanism. This electromagnetic Relay Device was used in Telegraphy at the Ballarat School of Mines. After a special meeting of the Ballarat SChool of Mines Council in 1874, a decision was made to offer instruction in Telegraphy, a subject not directly related to mining. Telegraphy was taught by W.P. Bechervaise, postmaster at Ballarat. On 07 October 1874 the Ballarat Courier correspondent reprted on Telegraphic training: "... these classes ... are a snare and a delusion, as there is scarcely the remotest chance of obtaining employment when the examination has been passed."scientific instrument, telegraph relayer, telegraphy relay device, telegraphy -
 Ballarat Tramway Museum
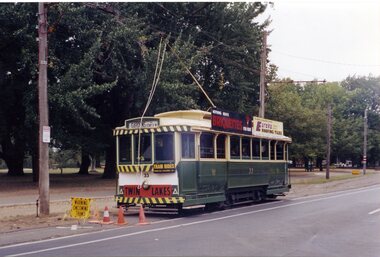
Slide - 35mm slide/s, Travis Jeffrey, 1961
Agfa plastic mount (blue base, white cover) of a photograph of No. 30, Wendouree Parade, View Point terminus. Tram is in the process of being fitted with dash canopy lights and tiger strips. Tram has destination of View Point, has a SF Motors Pty Ltd, roof advertisement and an advertisement for White Horse Whiskey on the front dash panel. Note terminal markings on road, timetable and section insulator box on pole. Photo taken early 1961. Slide rescanned at 3200 dpi 24-10-2020, jpg replaced, tiff file retained. This file was scanned in 2003 and may show colour changes. "BAS 20" in penciltramways, trams, view point, terminus, wendouree parade, tram 30 -
 Ballarat Tramway Museum
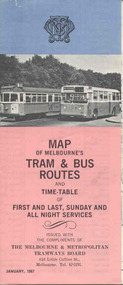
Map, Survey and Mapping for MMTB, "Map of Melbourne's Trams and Bus routes and all night services", Jan. 1967
Fold out sheet coloured map, 12 portions or folds, - title - "Map of Melbourne's Trams and Bus routes and all night services" map shows trams lines, route numbers, terminal points, bus routes, railway lines, blow up of city area with places of interest and key. On rear details, places of interest, suburb index, index to routes, first and last services, Sunday am services, all night bus services and locations of depots and head office. 2nd copy added 11-8-2006. Images of document - scanned to A3 size and overlapping added 30/10/13 On rear "out of date" stamp and 1 "cancelled" stamp - red ink.trams, tramways, melbourne, map, tram & bus services, all night services -
 Melbourne Tram Museum
Document - Research Notes, H. S. McComb, Domain Road, Park St, Toorak Road and Chapel St lines, c1930
Notes 6 pages, pinned together, giving details, opening dates, terminals, depot entries, sheave pits, curves, for the Domain Road, Park St, Toorak Road and Chapel St lines. Second set of notes 4 pages for the Port Melbourne and South Melbourne beach lines via City Road and Victoria St respectively. Single page sketches for both the Flemington Road via North Melbourne and Spencer St to North Melbourne lines - no dimensions or survey notes. Items 2064 to 2075 within box 72.3 in a brown folder marked "MT&O Co." red pencil on the front cover.trams, tramways, mto co, cable trams, drawings, reports, surveys, toorak rd, chapel st, south melbourne beach, port melbourne, city rd, victoria st, north melbourne, flemington rd -
 Ballarat Tramway Museum
Map, Ballarat Litho & Printing Co, "Electoral Map of Ballarat", 1920's?
Map showing the electoral boundaries of Ballarat - State? - possibly early 1920's. Has been marked up in blue pencil for electric and horse tram routes around Ballarat, along with names of terminals, depot, and other points of interest. Shows horse trams lines in Macarthur St and Armstrong St. Also has in pencil, approximate location of the railway to Buninyong. Map shows location of Showgrounds (old location), Hospital for epileptics, abattoirs, but does not show Ballarat North Railway Workshops. Title Block "Ballarat Litho & Ptg. Cos. / Electoral Map of / Ballarat / Scale 20 chains to One Inch" To be stored with minimal folding.trams, tramways, map, ballarat, horse trams -
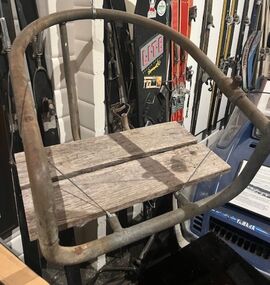 Falls Creek Historical Society
Equipment - Chair from Bob Hymans' Alpine Chairlift
Bob (Herman) Hymans (a former member of the Royal Netherlands Navy) was born in Bloemendaal, Holland on 30th September 1922. During World War II he fought against the Japanese in the Dutch East Indies (now Indonesia) and was imprisoned in Changi and on the Burma Railway. After gaining qualifications as a Ski Instructor, Bob arrived in Falls Creek in July 1950. Working as an Instructor and Supervisor at Bogong Lodge, Bob decided his future was in accommodation. He was successful in negotiating an indenture for land from the State Electricity Commission (SEC). It took Bob two years to build his Grand Coeur Chalet but, tragically, it was burned down in August 1961. Bob also built the first Chairlift in Australia. This was a single chairlift and the structure was built from wooden electricity poles. He was constantly full of new ideas and proposals for the village. Bob Hymans died on 7th July 2007. This Collection of documents and letters tells the story of Bob's endeavours to develop Falls Creek into the ski village it is today.This chair is significant because it is the last chair from the first chairlift ever constructed in Australia.This is the last known chair of the Alpine Chairlift built in 1957 and deconstructed in 1961. It was built by Bob Hymans from recycled SEC Poles. The chairlift had 40 chairs on the 390 metre trip to the top. It carried its first passengers on 21 July 1957. Available to all visitors, the lower end of the lift was about 90 metres above the Upper Kiewa Road and it ascended 120 vertical metres to the top terminal above the race-line. The forty chairs transported skiers continuously at a speed of 1.5 metres per second, the upward trip taking just over four minutes. Each chair has a safety bar above the rider's knees.bob hymans, australia's first chairlift, alpine chairlift -
 Kiewa Valley Historical Society
Ron White's Collection - 1920 - 2019
Ron White was born in 1920. He received a Diploma of Mechanical Engineering at Footscray Technical School in 1946. He started work as a laboratory assistant and after several promotions was appointed Senior Operator in 1948. In 1949, he was Engineer, Grade 1 (Hydro Areas). After further promotions he became Assistant Area Engineer, Rubicon at new Eildon Power Station and Area Engineer, Kiewa in commissioning Mt Beauty Terminal Station and West Kiewa Power Station.. By 1956, he was the Area Operations Engineer at Kiewa and four years later the Kiewa Electrical Superintendent (Operations and Maintenance) . In 1961, he was officially recognised as deputy for the General Superintendent, Kiewa. In 1966 he was appointed General Superintendent Kiewa and Kiewa became 'a branch of the Transmission Department'. In 1974, the Rubicon / Eildon Area was also under Ron's control. His title was "Principal Hydro Engineer, Hydro Division, Transmission Operations Department. He held this position until his retirement in 1985.Ron White was an important identity in his role as Principal Hydro Engineer from 1966 to 1985 after the completion of the Kiewa Hydro Electric Scheme. His long period of service involved him in the construction, operation and maintenance of the SECV's Hydro Electric Schemes and administration of related catchment areas. He had a close association with the local communities and care for the welfare of employees. He lived in Mt Beauty and was well respected in the community and beyond. He passed away on 30 September 2019, aged 99 years.A) History of Ron White's Working Life: including papers relating to "Promotion & Staff Appointment" B) Ron White's Retirement - 11th Jan. 1985: papers, cards, letters, photos, disc/plaque C) Ron White's Certificates: Diploma of Mechanical Engineering; First Aid; D) Ron White's Correspondence - miscellaneous E) Ron White's History of the 'Kiewa Scheme' from 1936- 1966. Written 1986 F) Ron White's Photo album Includes photos of him and the 2003 bushfires G) Miscellaneous Photos (not labelled) from Ron's photo album. Possibly relatives including nieces and nephews. H) Pewter Mug presented to Ron - Water Board I) Wall hanging presented to Ron - Scouts J) Ron White's Slide Ruler & Mathematical Instruments K) Collection of 7 books owned by Ron L) Starting Pistol Caps box M) Ice-cream serverF) One photo of Ron with 'Ken Connors'. One photo with 'l to r: Norm Middleton, Graham Napier, Ron White, Les Peart.' G) 2003 fires has a note re time, date and whereabouts of fires H) "Presented To / Ron White / In Appreciation For Service / To The / Kiewa Valley / Water Authority / And / Its predecessor Bodies / December 1994 I) Wall hanging: On emblem - "Lord Baden-Powell Society / The Scout Association of Australia". On Name Plate below - Ronald K. White 1989" J) mathematical Instruments have 'R. W' embossed in red on the corner of the cover M) 100 Straitline, Starting Pistol Caps N) National Ice-cream Server with stainless steel spring Size 20 ron white, hydro engineer, kiewa hydro electric scheme -
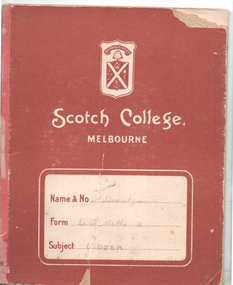 Melbourne Tram Museum
Book - Cable tram records - book 2 of 4, Alf Twentyman, c1940
Second of four documents compiled by Alf Twentyman about the history of Melbourne cable trams. The first seven pages list each cable car or trailer (1 to 601) and its depot, including some notes on their individual disposal. Page 15 lists additions to the fleet of cars - 1-7-1916 to 3-6-2024 including numbers and notes. Pages 16 to 37 provide cable and track diagrams and notes on St Kilda Junction, Collins and Market St, City Road & Clarendon St, Elizabeth St, Spring-Albert and Brunswick Sts, Swanston St, (Princes Bridge to Lonsdale St) and Lonsdale St to Russell St, Spencer St and Flinders St including the Bourke St terminus, Clifton Hill terminus, Nicholson and Gertrude, Spring and Nicholson, Lygon Elgin and Rathdowne Sts, various terminal arrangements and car shed access, Queensberry and Abbotsford, St Kilda Road, Chapel and Wellington, Ackland St and other notes on the last pages.Demonstrates the recording and drawing work of Alf Twentyman and his notes.Exercise book - printed for Scotch College, ruled in an accounting ledger format - 40 pages with red card covers.On cover in ink "A E Twentyman, Inter Maths B Ledger"tramways, cable trams, alf twentyman, history, track plans, records -
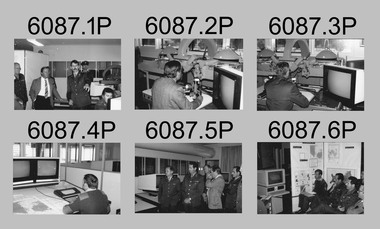
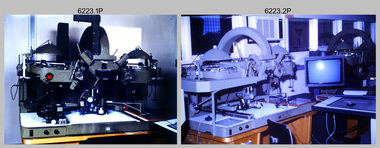 Bendigo Military Museum
Photograph - AUTOMAP 2 Production - Army Survey Regiment, Fortuna, Bendigo, c1986
This collection of 23 photos of map production on the AUTOMAP 2 computer-based system in Air Survey and Cartographic Squadrons, was most likely taken in 1986. The AUTOMAP 2 system was an upgrade to the AUTOMAP 1 system, comprising Intergraph graphic edit workstation terminals networked to VAX 750/785 main frame computers. Unlike AUTOMAP 1, operators could display digital topographic features on monitors for editing. Successful adaptation of this system meant RASvy was at the forefront of digital mapping/cartographic systems in Australia and overseas. The system comprised Input (Wild B8 Aviograph feature extraction) Raster Scanning (digitising from compilation sheets, Graphic Edit (cartographic completion) and Plot Verification Sub Systems. The system was operational from 1984 to its ‘Newheart’ upgrade in 1993. Throughout its life, the system was progressively refined with productivity gains, achieved from award winning technical development in-house by talented and innovative Army Survey Regiment personnel.This is a set of 23 photograph of AUTOMAP 2 production at the Army Survey Regiment at Fortuna, Bendigo, c1986. The photographs were on 35mm colour slides and were scanned at 96 dpi. Photos .5P and .6P are also printed on photographic and scanned at 300 dpi. They are part of the Army Survey Regiment’s Collection. .1) - Photo, colour, c1986, AUTOMAP 2 Production - Army Survey Regiment, Fortuna, Bendigo. c1986. .2) - Photo, colour, c1986, AUTOMAP 2 Wild B8 Aviograph stereoplotter. .3) - Photo, colour, c1986, AUTOMAP 2 Wild B8 Aviograph stereoplotter feature extraction, unidentified technician. .4) - Photo, colour, c1986, Wild B8 Aviograph stereoplotter feature extraction, LCPL Raelene (Munting) Brodie. .5) - Photo, colour, c1986, AUTOMAP 2 computer tape maintenance, SPR Steve Linane. .6) - Photo, colour, c1986, AUTOMAP 2 Graphic Edit Workstation, SPR Steve Linane. .7) to .8) - Photo, colour, c1986, AUTOMAP 2 Graphic Edit Workstation, unidentified technician. .9 to .10) - Photo, colour, c1986, AUTOMAP 2 Graphic Edit Workstation. .11) - Photo, colour, c1986, AUTOMAP 2 Graphic Edit Workstation feature coding and command menu. .12) - Photo, colour, c1986, AUTOMAP 2 high resolution computer monitor. .13) to .16) - Photo, colour, c1986, AUTOMAP 2 production output comparison to AUTOMAP 1. .17) to .18) - Photo, colour, c1986, AUTOMAP 2 computer system components. .19) - Photo, colour, c1986, AUTOMAP 2 Intergraph 7596 verification plotter. .20) - Photo, colour, c1986, AUTOMAP 2 Benson verification plotter, SPR Steve Coulson. .21) - Photo, colour, c1986, AUTOMAP 2 drainage, contour, roads and cultural digital data verification plot. .22) - Photo, colour, c1986, AUTOMAP 2 drainage, contour, roads and cultural digital data on computer monitor. .23) - Photo, colour, c1986, AUTOMAP 2 3D digital terrain model on computer monitor. .1P to .23P - Some of the equipment is annotated on the frame of the 35mm slides. .5P & .6P prints annotated incorrectly ‘Steve Lenane’. Correct spelling is - ‘Steve Linane’ royal australian survey corps, rasvy, army survey regiment, army svy regt, fortuna, asr, automap 2 -
 Bendigo Historical Society Inc.
Magazine - AILEEN AND JOHN ELLISON COLLECTION: AUSTRALIAN WOMEN'S WEEKLY JULY 19 1961
The Australian Women's Weekly from July 19, 1961. On the cover a picture of the P&O liner Canberra berthing at the new terminal at Circular Quay after her maiden voyage from Southampton. Content: Woollen handbag to make - The Jacky Kennedy story - Tropical fish - Home dressmaking - You have a right to be unhappy - At home - Cookery - Cookery course - Bedjacket to knit - Collectors corner - Prize recipes - Home plans - Gardening - Television - Films - Learning about husbands - That fickle feeling - Edge of the sea - The case of the duplicate daughters - Dress sense - Fashion frocks - Fashion patterns - it seems to me - Worth reporting - Your bookshelf - Letter box - Australian nature - Crosswords - Stars.books, magazines, women's magazine -
 Ballarat Tramway Museum
Photograph - Colour Photograph/s, Austin Brehaut, 15/03/2003 12:00:00 AM
Colour photograph of tram 33 terminating at the north end of Gardens Loop, Wendouree Parade, the first service tram to do so on Sat. 15 March 2003. The service was terminated at this point for some 6 weeks while Wendouree Parade was resurfaced and other track work done. Shows the temporary terminal arrangements, and the earth cable installed to protect the work site on the section insulator and earth stake alongside the pole. Tram 33 has the Eureka roofing tiles and SEC Briquettes roof advertisements and Twin Lakes sign on the drivers dash panel. The destination shown is Gardens via Sturt St. West. Photo taken by Austin Brehaut and printed on Kodak paper.In black ink on the rear of the photo "1st car to use short-working during track and road repairs 15.3.03 / APB"btm, road works, gardens loop, wendouree parade, tram 33 -
 Surrey Hills Historical Society Collection
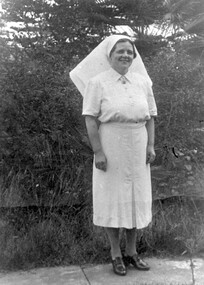
Photograph, Nurse - Alice Louise Jackson
Alice Louisa (Louise) Jackson was one of 12 children of George James Jackson and his wife Alice Eleanor (nee Taylor); both of whom were jewellers. One of her brothers, George Hall Jackson, served in WW1. The family lived at 'Handsworth', 7 Russell Street, Surrey Hills. Alice was born 25/9/1892 and died 25/8/1983. She was buried in Box Hill Cemetery - CE-*-2010. REF: Personal communication (email) Ruth Theodoridis, her niece, 30/5/2018: Alice trained at the Austin Hospital prior to WW2. She worked there after graduating and became the charge sister of the ward for terminally ill patients, many of whom were TB patients. After she retired from the Austin she nursed elderly and dying people in the Surrey Hills area. She had had a tricycle made especially for her as she could not ride a bicycle. She would always ride in the centre of the road in case the trike tipped over. She left her estate to the hospital. A black and white photograph of a lady standing in her nurses uniform, consisting of a skirt, blouse, and a veil on her head.louise jackson (miss), alice louisa jackson (miss), russell street, surrey hills, george james jackson (mr), alice eleanor jackson (mrs), alice eleanor taylor (miss), nurses, austin hospital, box hill cemetery -
 Surrey Hills Historical Society Collection
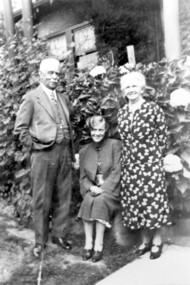
Photograph, Alice Eleanor Jackson
Alice Louisa (Louise) Jackson was one of 12 children of George James Jackson and his wife Alice Eleanor (nee Taylor); both of whom were jewellers. One of her brothers, George Hall Jackson, served in WW1. The family lived at 'Handsworth', 7 Russell Street, Surrey Hills. Alice was born 25/9/1892 and died 25/8/1983. She was buried in Box Hill Cemetery - CE-*-2010. REF: Personal communication (email) Ruth Theodoridis, her niece, 30/5/2018: Alice trained at the Austin Hospital prior to WW2. She worked there after graduating and became the charge sister of the ward for terminally ill patients, many of whom were TB patients. After she retired from the Austin she nursed elderly and dying people in the Surrey Hills area. She had had a tricycle made especially for her as she could not ride a bicycle. She would always ride in the centre of the road in case the trike tipped over. She left her estate to the hospital. A black and white photograph of a young lady, identified as Alice Eleanor Jackson, seated between an older couple in front of a house.jeweller, watchmaker, russell street, surrey hills, clothing and dress, nurse, george james jackson, mrs alice eleanor jackson, miss alice louisa jackson -
Glenelg Shire Council Cultural Collection
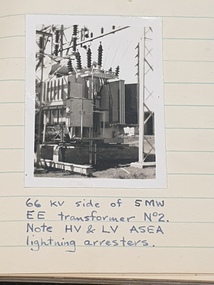
Photograph - Photograph - Sir Rohan Delacombe in Portland for opening of the grain terminal, 8th April 1965, 1965
Port of Portland Authority archivesFront: (no inscriptions) Back: B-2 (blue pen, upper left) 110-E/5 (pencil, upper right) TC Jarett/ +Sir Rohan Delacombe/ Grain Terminal/ opeining (blue pen, cursive script, centre) 12088 (Blue pen, centre right) 5/5 (red pen, centre) Thursday 8th April 1965 (pencil, lower centre) No 3 (underlined, pencil, lower left) Page 6 (red pen, lower left centre) D. (bloack felt tip pen, lower left corner)port of portland archives -
 Ballarat Tramway Museum
Ephemera, Travis Jeffrey, Ballarat tram timetables, 1960's
Notebook, with three sections of 16 pages each, two pink, one blue, stapled individually onto a yellow coloured card cover and then covered with a printed black and gold patterned sheet to cover the staples. Shown in a tabular form are the timetables for each of the Ballarat and Bendigo routes in the 1960's, for Mondays to Fridays, Saturdays and Sundays. Gives the run number, times at various points, special workings, terminals, short workings. The tables for Sundays in Bendigo has been prepared but not filled in. In the blue section has various notes on Ballarat weekday runs, timetables. Image 1 - cover, 2 - inside front cover and timetable for Lydiard St - Sebastopol, 3 - Stones Corner - View Point, Sebastopol - Depot and Eaglehawk to Quarry Hill, 4 - blue pages run details. On inside back cover in ink, addresses, calculations and street names.trams, tramways, ballarat, bendigo, rosters, employees, shifts, timetables -
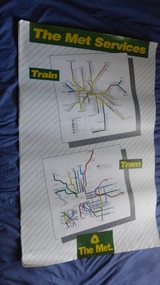 Melbourne Tram Museum
Poster, The Met, "The Met Services", mid 1990's
Poster - full colour on semi gloss paper titled "The Met Services" showing in a diagrammatic form the Melbourne tram and rail routes. For the tram section, (similar to Reg Item 509), shows major street names, route numbers, principal suburbs, terminal names, central area (pre Docklands, post light rail to St Kilda and Port Melbourne) and ticket zones. The rail map section shows the Neighbourhood ticket zones, the rail line via Altona (the direct route is not shown) and shows the St Kilda and Port Melbourne light rail lines. Has The Met logo and the Public Transport Corporation names on the bottom. Mid 1990's, Batman Ave still shown. See also Reg Items 696 and 696 for maps of the time.trams, tramways, melbourne, tramways, tram routes, railways, map, posters, tickets, neighbourhood tickets -
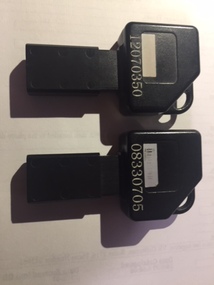 Melbourne Tram Museum
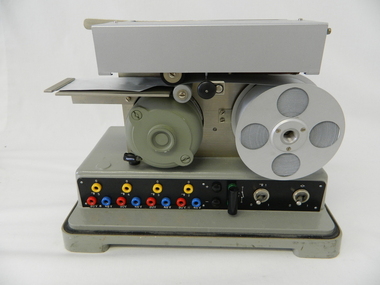
Functional object - Digital memory module, KDM, c1995
Digital Memory module, or Portable Memory Key, equivalent in type to a USB stick, black plastic with sliding mechanism to protect 8 copper contact strips with a digital memory area at one end. Stamped into the memory area part number "109 13858 512K KDM", indicating it had a memory storage of 512Kb. Above the number are the remains of a white bar-code label. Has as key type appearance. .1 - Numbered in white numerals "08330705" .2 - ditto "120703350" Advised by Adam Chandler 20-11-2017: They were used by tram and bus drivers. The PM (portable memory) key was issued to each driver. At the start of a shift, the driver would put it into a cream-coloured terminal at the sign-on point (starter's office in the depot) and transfer their shift information onto the key. Once the driver reached the vehicle, they put the key into the black-coloured terminal (tram driver's keypad - TDKP or bus driver's keypad) to upload the shift data to the vehicle. This was also the method used to transfer the 'blacklist' of periodical passes that had been stolen or misappropriated to each vehicle. IE if an annual Metcard had been stolen, once the holder reported it to Metcard they would blacklist the ticket number and this would be sent out to every depot and piece of equipment. From memory there were 100 slots in the blacklist. When a tram driver was finishing their shift (either being taken or running in) they would transfer all of the validations and ticket sale information to the PM key by inserting it a few minutes before the end of shift and downloading all of this data from the vehicle. They would then be required, on arriving back at the starter's office, to insert the key in the cream coloured terminal once more and copy all of the information across to the main system. Bus drivers also issued tickets from their BDKPs so the black PM key was also used for ensuring the accounting information was copied across to the main system. My memory might be faulty but I recall using them at railway stations with the Booking Office Machines (for starting and finishing shifts). No transfer of ticket issuance data however, as there was a computer equipment cabinet at each railway station with a DSL or cable link back to the OneLink central computers (in the revenue clearing house) I don't know what happened with the MTH cars on the Stony Point rail line but I could presume that there was a cabinet with a TDKP equivalent in it and a similar procedure for start and finish of shift.trams, tramways, ticket machines, metcard -
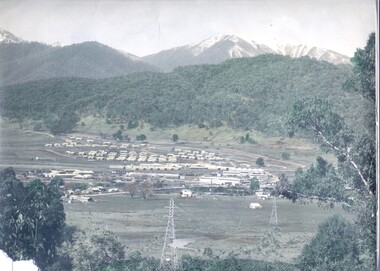 Kiewa Valley Historical Society
Set of 2 hand coloured photographs of early Mount Beauty, photographs of Mount Beauty, 1947/48
Construction of the town of Mount Beauty commenced in 1946 and continued until 1952. It was built to provide family accommodation for workers engaged in the construction of the hydro electric power scheme. As well as housing, there was an administration building, staff hostel, merchandising centre, workmen's camps, base stores and workshops and the Mount Beauty Terminal Station. The first house was occupied in November, 1946 by the then manager of the trading store, with a frontage onto Hollonds Street. The total number of houses erected was 488, 162 custom built and 326 prefabricated. The main workmen's camp can be seen just left of the centre of the photograph and accommodated 144 men at the time of the photograph. By 1950 it could accommodate 1200men. Photo No. 1 is taken in 1947/early 1948 as there is no evidence of the staff hostel under construction. This hostel was commenced in August/September 1948 and is clearly shown in photograph No. 2, dating this photo as 1948 as it is before the completion of the bypass road connecting to the main (high plains) road. This road was constructed in 1939 and in 1948 followed the route of Tawonga Crescent. This remained in use until the bypass construction was completed in early 1949 and does not appear to be finished in this photograph.. Both photographs are taken from the power line easement adjacent to the Bright road.Significant historical pictorial record of the development of a town from grazing land. The type of terrain that had to be surveyed and then to construct roads and other infrastructure, with very little machinery, is also of prime significance in the development of the Kiewa Hydro Electric Scheme.Two photographs, both hand painted to show colours, and both of Mount Beauty c 1947/48 not long after commencement of construction of homes and facilities for workers.Photo No.1 - on back of photo, left upper corner, faintly in pencil, SPIKE, underneath this is written T Pay,. Photo No. 2 - on back of photo, left upper corner, faintly in pencil, Jmount beauty, housing, accommodation -
 Bendigo Military Museum
Photograph - Technical Tour of the Army Survey Regiment, Fortuna, Bendigo, c1984
This collection of 10 photos was most likely taken in 1984. It’s evident in these photos the visitors were taken on a tour through the production areas of Air Survey Squadron, with Wild B8 photogrammetic plotting workstations featured in the first three photos and demonstrations of the AUTOMAP 2 production system in the following photos. The AUTOMAP 2 system was an upgrade to the AUTOMAP 1 system comprising Intergraph graphic edit workstation terminals networked to VAX 750/785 main frame computers. Unlike AUTOMAP 1, operators could display digital topographic features on monitors for editing. Successful adaptation of this system meant RASvy was at the forefront of digital mapping/cartographic systems in Australia and overseas. The system comprised Input (B8 feature extraction) Raster Scanning (digitising from compilation sheets, Graphic Edit (cartographic completion) and Plot Verification Sub Systems. CAPT Rob John was the project officer responsible for the acceptance trials and implementation of AUTOMAP 2. The system was operational from 1984 to its ‘Newheart’ upgrade in 1993. Throughout its life, the system was progressively refined with productivity gains, achieved from award winning technical development in-house by talented and innovative Army Survey Regiment personnel.This is a set of 10 photograph of a technical tour of the Army Survey Regiment at Fortuna, Bendigo, c1985. The photographs were printed on 35mm photographic proofing paper and are part of the Army Survey Regiment’s Collection. The photographs were scanned at 600 dpi. .1) - Photo, black & white, c1984, unidentified visitors, CAPT Rob John, MAJ Jim Mitchell, unidentified. .2) - Photo, black & white, c1984, unidentified visitor. .3) - Photo, black & white, c1984, unidentified visitor. .4) - Photo, black & white, c1984, unidentified SGT .5) - Photo, black & white, c1984, L to R: LTCOL Jorge Gruszka, unidentified visitors. .6) - Photo, black & white, c1984, L to R: SGT George Timmins, unidentified visitors. .7) - Photo, black & white, c1984, MAJ John Charland – US Exchange Officer. .8) - Photo, black & white, c1984, L to R: unidentified visitors and personnel, MAJ John Charland – US Exchange Officer. .9) - Photo, black & white, c1984, unidentified visitors and personnel, MAJ John Charland – US Exchange Officer in background. .10) - Photo, black & white, c1984, L to R: MAJ Bob Roche, CAPT Mick Byrne in Officers Mess..1P to .10P No personnel are identifiedroyal australian survey corps, rasvy, army survey regiment, army svy regt, fortuna, asr, air survey, automap -
 City of Moorabbin Historical Society (Operating the Box Cottage Museum)
Lights, porcelain, wall, electric light switch; Door Knob Porcelain, early 20th C
Both the Light switch and Door knob were used in Box Cottage during the late 19thC and early 20thC by the Box and Rietman families. William and Elizabeth Box purchased the two ten acre Lots of land with the Cottage in 1868 where they raised their family of 12 children and developed a flower garden producing seedlings. August and Frieda Rietman rented the Cottage 1917 with 1 acre of land and purchased it in 1935 where they raised 2 children while August established Rietman's Landscaping Pty Ltd making pressed concrete garden furniture. Porcelain is a ceramic material made by heating materials, generally including kaolin, in a kiln to temperatures between 1,200 and 1,400 °C The toughness, strength and translucence of porcelain, relative to other types of pottery, arises mainly from vitrification and the formation of the mineral mullite within the body at these high temperatures. Porcelain and other ceramic materials have many applications in engineering, especially ceramic engineering. Porcelain is an excellent insulator for use at high voltage, especially in outdoor applications, see Insulator (electricity)#Material. Examples include: terminals for high voltage cables, bushings of power transformers, insulation of high frequency antennas and many other components. Both the Light switch and Door knob were used in Box Cottage during the late 19thC and early 20thC by the Box and Rietman families. William and Elizabeth Box purchased the land with Cottage in 1868 and raised their familya) An electric light switch that would be attached to a wall. An Ivory Porcelain Base Single Light Switch with antique Brass top b) A porcelain door knob Both items used in Box Cottage early 20th Ca) On base BRITISH MADE / ENGLAND / 4 / 6959 lights, porcelain, electricity, early settlers, moorabbin, cheltenham, bentleigh, box william, box elizabeth, rietman august, rietman frieda, market gardeners, flower gardens, seedling nurseries, world war 1 1914-18, war memorials, sculpture, pottery, pressed concrete, door handles, door knobs -
Glenelg Shire Council Cultural Collection
Photograph - Photograph - Sir Rohan Delacombe in Portland for opening of the grain terminal, 8th April 1965, 1965
Port of Portland Authority archivesFront: (no inscriptions) Back: Major-General Sir Rohan Delacombe./ Governor General of Victoria./ In Portland for opening of Grain Terminal/ 8th April 1965. (pencil, top) "B" (pencil, top) 12088 (blue pen, top) PRESS/ Photographic Service/ Quote reference number/ when prdering copies/REF. NO 12490 (Purple ink stamp with pencil number, centre) 5/5 (red pen, lower centre) With the Compliments/ of. Alwyn Richards/ PHOTOGRAPHER/ "Spectator" Hamilton (purple ink stamp, lower right) No2 (pencil, lower left) Page 6 (red pen, lower right)port of portland archives, portland harbour -
 Ballarat Tramway Museum
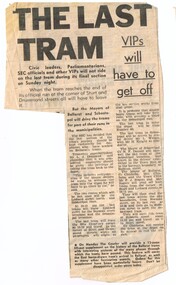
Newspaper, The Courier Ballarat, "The last tram - VIPs will have to get off", 18/09/1971 12:00:00 AM
Newspaper clipping from The Courier, Ballarat, Saturday 18/9/1971 about the details of the last trams to run in Ballarat, and that only tramway employees will be allowed to ride back to the depot from Sturt St. Notes that the Mayors of Ballarat and Sebastopol will drive the trams for part of their runs in the municipalities. Quotes tramway superintendent Mr. L. J. Denmead. Gives times the last trams were time to leave the Lydiard St North terminals, that 40 is to be the last tram, that it was to be driven by Mr. L. Walker with Mr. H. Knight as conductor. Ballarat Mayor, Cr. Chisholm was to receive the last tram at the depot. At base of item, notes that The Courier is to provide a 12 page supplement on the history of the Ballarat trams and photos. "Orders for this supplement have been particularly heavy". Second copy added 31/10/2005. Image added 2/9/15 - from a cutting donated by Joy Watson - actual cutting not collection as duplicated. In blue ink in the top right hand area of the item - 'Sat / 18/9/71'trams, tramways, closure, last tram, 40, sebastopol -
 Ballarat Tramway Museum
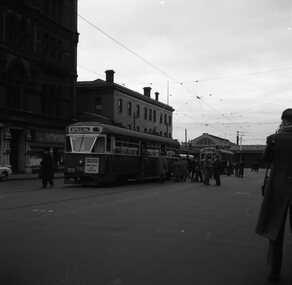
Negative - Set of 2, Geoff Grant, 25/06/1955 12:00:00 AM
Negatives No. N358 and N359 and black and white prints made by a laser printer (stored in folder ) of AETA tour (Australian Electric Traction Association) on 25/6/1955 at Spencer St. terminus. Both trams have AETA tour signs and the slogan. 980 has "Save traffic congestion, Move People not vehicles" 1618.1 - 980 and 1001 at the then new Bourke St. terminal at Spencer St. Carlyon's hotel in the background. 1618.2 - 980 and 1001 with the Mail Exchange in the background See also Reg. item 1611 for other photos at the same time. hi res scan made and image updated 23/5/2020. Two prints or copies of the photograph, 101mm square, added 1/6/03. Photo used in the Melbourne Immigration Museum's "Trammies" Exhibition Feb to May 2003. Prints made by the Immigration Museum for use in the making of the display panels. hi res scan made and image updated 23/5/2020.trams, tramways, melbourne, bourke st, spencer st, aeta tour, tram 980 tram w7 1001 -
 Melbourne Tram Museum
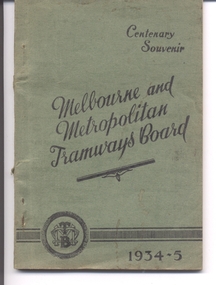
Book, Melbourne & Metropolitan Tramways Board (MMTB), "Centenary Souvenir - Melbourne and Metropolitan Tramways Board - 1934-5", 1935
Book - five sections - 80 pages, side stapled, glued within light green card covers with title "Centenary Souvenir - Melbourne and Metropolitan Tramways Board - 1934-5". Has an introduction, a preface that gives a brief history of the tramway system in Melbourne, 20 buildings and points on interest in Melbourne and how to get there, with sketches by Clive Fink, a list of electrified routes and a cable routes at the time with details of terminals and points of interest along the route. Printed by The Mail Publishers, 264 Barkly St Footscray. See Related documents for a route listing. See Reg Item 79 for a reprint version of 1967. 2nd copy added 29-8-2015 - donation of Ian Bryant. 3rd copy from the McComb Collection added 30-12-2016. Copy 4 donated by Kevin Tiernay - 11-06-2022 Pdf copy added 5/5/2019 as image i2 and images i2 to i4 removed.Has "19" in red ink on inside title page, Copy 3 - has H. S. McComb in pencil along the top of the front cover.trams, tramways, mmtb, melbourne, routes, cable trams -
 Kiewa Valley Historical Society
Timer Favag, Circa 1950
This Favag Timer apparatus was a part of the first electronic control system -(1960's), in Victoria), which worked using telephone stepping selectors to convey a change in voltage providing a regulated pulse from the control centre(Mount Beauty) to the remote Power Stations opening and closing (stop/start) of various devices at the Power Station and a return signal confirmed the action taken. Testing of this unit was carried out using a "dummy" device at the remote Power Station so as not to disrupt the power plant's operation. This timer was one of many electrical apparatus connected to the large SEC Victoria Hydro Scheme's electrical power producing generators. These generators are powered by the hydro force of "stored" water at a higher altitude. The establishment of both the NSW and Victorian Hydro Schemes was achieved from the early 1900's to the 1960's. At this point in time the need for additional power sources to quench both an industrial and domestic demand for electricity was purely an economic and not and environmental (carbon reduction) factor. This hydro scheme was instigated by "the Government of the day" as a bold move and was the major force of the World War II refugee and "technical" workforce,inclusion of skilled and unskilled, migration into the Australian environment. Although this mass "invasion" of workers with families was thought of in some circles as intrusive, the expansion of population post war years and its integration into the Australian rural sector, produced the multi- lingual multi-cultural diversity of later years.This Favag Timer was one of the crucial pieces of equipment that made it possible for the Mount Beauty Terminal Station to control the operations of these Power Stations; McKay, Clover, West Kiewa Power Stations and the Dederang Terminal Station.This aluminium and anodised "FAVAG" (pulse) timer is fastened to a base structure which comes with its own metal cover that is fastened by two metal hooks. From the top of these hooks runs a thick leather "carry" strap.The instrument, itself, a small "micro motor" at one end tape feeding spool on the other. Aluminium metal structures offer a preventative barrier against any electronic spikes from static electricity sources. There are two toggle switches to the bottom right hand side and twelve coloured "pin" connection points.There is a sliding access sleeve which exposes a circuit board.with various leads fastened on each side. In front of one of this slide are two "screw in" fuses, spare fuses are in a small envelope taped above. Circuit diagrams are etched white on black background on the top face of the main structure. At the base of the back section is a two pronged input terminal. There is a fine black rubber layer (cushioning) for the mian top cover.On the cover fastened with two rivets "FAVAG" underneath in small print "Fabrique d'appareils electriques S.A." underneathe "NEUCHATEL-SUISSE". on one end is a "STATE ELECTRICITY COMMISSION OF VICTORIA" metal label screwed on.The back label has manufacturers' type and model number.sec vic kiewa hydro scheme, alternate energy supplies, alpine population growth -
 Federation University Historical Collection
Book - Log Books, G. Beanland, Log-Books of Yarraville Laboratory, 1952-1954, 1952
Graham Beanland's logbooks for the Electrical Branch Hydro-Design Section. Beanland was later the Principal of the Ballarat School of Mines. Four foolscap books with handwritten notes. .1) includes Richmond Power Station, Midworth Statino Load Indicator Transmitter, Thomastown Experimental Line (220v), The story of Richmond, Power factor curves, dryout of 6.6. KV motor, etc .2) Pressure Tests at Mt Waverly Pump Station, Shunt capacitor Bank for Bendigo, Shepparton Main Substation, Boronia Level Crossing - Supply continuity. commissioning Warragul Main Sunstatin, Tests carried out on Sedgewick installation, Bendigo Main Substation, MMBW Instalation at McVeighs, The South-Western Story, etc .3) History of Kiewa Hydro Scheme, Kiewa Scheme Layout Plan, Kiewa No. 4 Main Transformers, Motor operatied Power-Station lift, etc (included flyers "Power From Kiewa" and "White Coal", etc .4) Newport B and C Power Station, Yarraville Maintenance Workshops, Richmond and Brusnwick Terminal Stations, Rubicon-Eildon Area, Kiewa No.3 Power Station, etc.graham beanland, electricity, kiewa power station, newport power station, yarraville, richmond terminal station, brunswick terminal station, white coal, coal, boronia level crossing lights -
 Ballarat Tramway Museum
Newspaper, State Electricity Commission of Victoria (SEC) and The Courier Ballarat, Tram Deputation and Save the trams, May. 1962
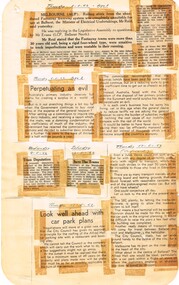
Yields information about the view of The Courier, and locals about the mooted closure of the tramway system and reporting on the proposal.Foolscap sheet of plain paper, with rounded corners, with 5 newspaper cuttings, concerning the mooted closure of the Ballarat Tram system May 1962. All from The Courier. 1 - Report 3-5-62 re the Question in the House by Tom Evans - trams unsuitable and the SEC will see that there is an appropriate bus service. 2 - "Perpetuating an evil" - 3-5-62 - about primary industries and issues with the Common Market in Europe 3 - "Tram Deputation" - 9-5-62 - planned deputation to Premier Bolte to be delayed to after his return from OS 4 - "Save the Trams" - 12-5-62 - Wendouree Progress Association, re trams and favoured an inquiry 5 - "Look well ahead with car park plans" - 17-5-62 (spread over two separate items) - proposal to roof the Alfred Hall car parking site through a Lease, re SEC letting the tracks deteriorate, a bus terminal and car park development. closure, letter to the editor, editorial, sec, car parking, alfred hall, buses, x class -
 Melbourne Tram Museum
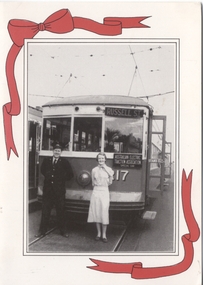
Ephemera - Christmas Card, Peter Duckett, c2000
Set of three Christmas Cards prepared by Peter and Patti Duckett and sent to Mel Elliot. Printed photo on exterior with red printed ribbons, photo corners on inside with another photo and gold block print and the Duckett's address. Photographs by Peter Duckett or from his collection. .1 - Features a photo of Patti and Driver H.N. "Sam" Serman in front of X 217, 8/6/1957 and internally a photo of Members and Friends of the AETA taking delivery of X217 at Preston Workshops. Card text notes the tram on loan to PTC and will be going to Hawthorn - possibly a c2000 card. .2 - Photos and text of the Engine Room of the Ultimo Tramway Power Station. .3 - Photos of the Sandringham - Beaumaris Tramway c1900, including the Sandringham House Private Hotel. See item 6668 for the original postcard. .4 - Photos Circular Quay c1903 and South Bondi terminal, September 1950. 2nd copy of .1 (used for 1999), .2 and .3 added 18/9/2020Inside each card is an inscription "To Dear Cynthia, Mel, David, Heather, With Love" or similar On rear of ,4 is a lable with the words "Donated by John Frost 13/4/2013 KT" .2 and .3 - has "To Dear Keith with Warm wishes" in the Greetings section.trams, tramways, aeta, x class, christmas cards, power station, horse trams, sandringham, tram 217 -
 Victorian Interpretive Projects Inc.
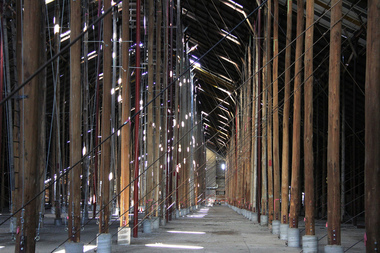
Photograph - digital, LJ Gervasoni, Murtoa Stick Shed 00031, 13/08/2011
From the Victorian Heritage Register statement of significance H0791 The Marmalake/Murtoa Grain Store, originally the No.1 Murtoa Shed, is located within the Murtoa Grain Terminal, adjacent to the grain elevator tower and railway line. The shed is 280m long, 60m wide and 19m high at the ridge with a capacity of 3.4 million bushels. The hipped corrugated iron roof of the shed is supported on approximately 600 unmilled hardwood poles set in a concrete slab floor and braced with iron tie rods. These poles are the reason for use of the term "stick shed". With its vast gabled interior and the long rows of poles the space has been likened to the nave of a cathedral. An elevator at one end took wheat from railway trucks to ridge level where it was distributed by conveyor along the length of the shed, creating a huge single mound of grain. Braced internal timber bulkheads on either side took the lateral thrust of the wheat, and conveyors at ground level outside the bulkheads took wheat back to the elevator for transport elsewhere. Wheat had been handled in jute bags from the start of the Victorian wheat industry in the mid nineteenth century. Bulk storage had been developed in North America from the early 1900s. NSW began building substantial concrete silos from 1920-21. In Western Australia, farmers' co-operatives, who had to supply their own bulk storage from 1934-5, pioneered the use of low-cost horizontal sheds of timber and corrugated iron for bulk storage. Following its establishment in 1935 the Victorian Grain Elevators Board (GEB) planned a network of 160 concrete silos in country locations, connected by rail to the shipping terminal at Geelong. By the outbreak of the Second World War there was a worldwide glut of wheat, and Australia soon had a massive surplus which it was unable to export. Only 48 silos had been established under the Victorian Silo Scheme so far, and wartime material and labour restrictions prevented progress with this scheme. The storage deficit had become an emergency by 1941 as Britain obtained its imports from North America, rather than over the lengthy and difficult shipping route from Australia. In 1941 the GEB, under chairman and general manager Harold Glowrey, proposed large temporary versions of the horizontal bulk storage sheds already in use in Western Australia. The proposal was approved by the Victorian Wheat and Woolgrowers Association, who considered the use of shed storages as a longer term proposition. After initial resistance from the Australian Wheat Board, some of whose members represented wheat bagging interests, the Commonwealth and Victorian governments agreed to split the costs, and Murtoa was chosen as a suitable site for the first emergency storage. The main contractor, Green Bros, commenced work on the No.1 Murtoa Shed in September 1941, deliveries of bulk wheat began in January 1942, and the store was full by June of the same year. In the following years the Council for Scientific and Industrial Research (later CSIRO) conducted valuable research and experiment on the impacts and control of insect pests at the Murtoa No.1 shed. With these discoveries, and the development of more effective pesticides, use of the No.1 shed and the larger No.2 shed, erected in 1942/43, continued for many years. The No.2 shed was demolished in 1975. By the 1990s, pest resistance to pesticides and requirements for both pest free and insecticide free grain rendered open storage of this type unviable. The No. 1 store was also becoming increasingly expensive to maintain, and its use was phased out from 1989.Image of the Marmalake/Murtoa Grain Store which is of historical, architectural, scientific (technical) and social significance to the State of VictoriaDigital colour image of the interior of the Marmaduke . Murtoa grain storage facility better known as the Stick Shed. The shed was constructed in World War Two to store grain. The supporting columns are trees.marmalake, murtoa grain store, wheat store, stick shed, murtoa