Showing 401 items
matching white hills gardens
-
 Ballarat Tramway Museum
Slide - 35mm slide/s, Graham Evans, Apr. 1972
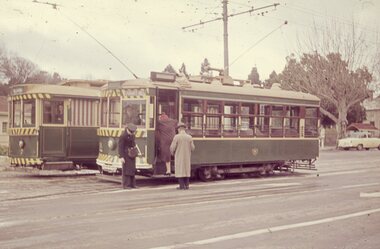
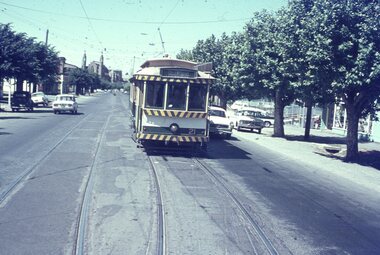
White cardboard mount, 35mm slide, from the Association of Railway Enthusiast's film strip titled "Provincial Tramway Film Strip" of a Bendigo No. 26 descending the Bendigo end of the bridge over the railway near Eaglehawk near Jobs Gully loop. Tram has the destination of Quarry Hill and has four roof advertisements. The film strip notes (Reg. Item 2560), provided the following caption details: "Bogie cars 26 drops down the Bendigo side of the bridge over the Eaglehawk railway, on the long journey to "QUARRY HILL". - Apr ' 72 (Graham Evans)" See image btm2596p.tif for high level scan of image. Stamped on base of slide "11806" and written in ink on top edge "26 Eaglehawk"tramways, trams, are, film strip, jobs gully, eaglehawk, railway bridge, tram 26 -
 Ballarat Tramway Museum
Slide - 35mm slide/s, Travis Jeffrey, c1962
Agfa plastic mount (blue base, white cover) with a photo of Bendigo 7 and possibly No. 29 in Pall Mall Bendigo, with passengers boarding the Birney tram car and the conductor observing them. The Bendigo has the destination of Quarry Hill and No. 7, North Bendigo. Photo taken c1962."BES 8" in penciltramways, trams, bendigo, charing cross, pall mall, tram 7, tram 29 -
 Ballarat Tramway Museum
Slide - 35mm slide/s, Travis Jeffrey, c1962
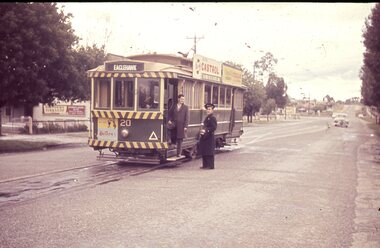
Agfa plastic mount (blue base, white cover) with a photo of Bendigo 20 at the Quarry Hill terminus. Tram has the destination of Eaglehawk and has a Castrol Oil, and another company roof advertisements, with Huttons Ham advertisement on the dash panel. Conductor and another person (enthusiast) outside the tram, driver changing ends on the inside. In the background is the premises for "Northern Terrazzo"."BES 15" in penciltramways, trams, bendigo, quarry hill, tram 20 -
 Ballarat Tramway Museum
Slide - 35mm slide/s, Travis Jeffrey, c1962
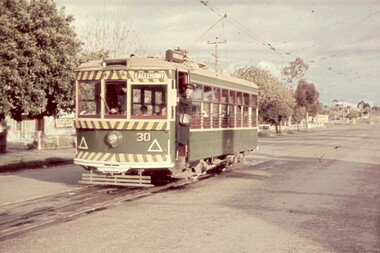
Agfa plastic mount (blue base, white cover) with a photo of Bendigo 30 at the Quarry Hill terminus. Tram has the destination of Eaglehawk . Conductor standing in the doorway for the photographer. In the background is the premises for "Northern Terrazzo"."BES 16" in penciltramways, trams, bendigo, quarry hill, tram 30 -
 Ballarat Tramway Museum
Slide - 35mm slide/s, Travis Jeffrey, c1962
Agfa plastic mount (blue base, white cover) with a photo of Bendigo 30 at Pinder's Loop, Carpenter St. Quarry Hill. Tram has the destination of Eaglehawk ."BES 17" in penciltramways, trams, bendigo, quarry hill, pinders loop, tram 30 -
 Ballarat Tramway Museum
Slide - 35mm slide/s, Travis Jeffrey, c1962
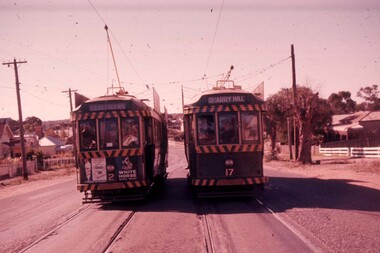
Agfa plastic mount (blue base, white cover) with a photo of Bendigo 2, with destination of Eaglehawk, crossing No. 17 at Jobs Gull loop on the Eaglehawk line. No. 17 has destination of Quarry Hill. Has a Streets Ice cream and Whitehorse Whisky advertisements on the rear panel. Photo taken c1962."BES 27" in penciltramways, trams, bendigo, eaglehawk, jobs gully, tram 2, tram 17 -
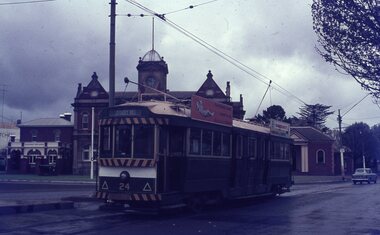 Ballarat Tramway Museum
Slide - 35mm slide/s, Travis Jeffrey, late 1960's or early 1970's
Agfa plastic mount (blue base, white cover) with a photo of Bendigo 24 at the Eaglehawk terminus, with the Eaglehawk Town Hall / Post Office in the background. Tram has the destination of Quarry Hill and roof advertisements for SEC "Everything's under control in my all electric kitchen" and one for Mamouney's Furniture Company. Photo taken late 1960's early 1970's."BES 32" in penciltramways, trams, bendigo, eaglehawk, tram 24 -
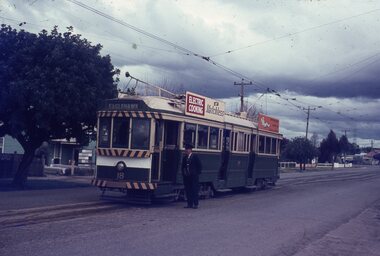 Ballarat Tramway Museum
Slide - 35mm slide/s, Travis Jeffrey, late 1960's or early 1970's
Agfa plastic mount (blue base, white cover) with a photo of Bendigo No. 18 at the Quarry Hill terminus, with the conductor standing by the front of the tramcar. Photo taken late 1960's early 1970's. No. 18 has the destination of Eaglehawk and two SEC roof advertisements, "Electric Cooking Matchless" and "Everything's fine in my all electric kitchen"."BES 38" in penciltramways, trams, bendigo, quarry hill, conductors, tram 18 -
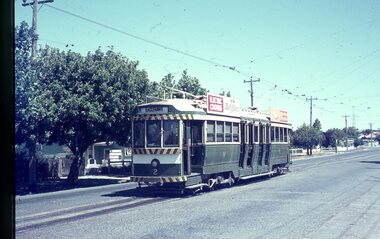
 Ballarat Tramway Museum
Slide - 35mm slide/s, Travis Jeffrey, late 1960's or early 1970's
Agfa plastic mount (blue base, white cover) with a photo of Bendigo No. 2 at Eaglehawk terminus, looking along the terminal track. Photo has the traffic island arrangements, and shows the waiting shelter on the right hand side of the photo. Photo taken late 1960's early 1970's. No. 2 has the destination of Quarry Hill and two SEC roof advertisements on the tram."BES 39" in penciltramways, trams, bendigo, eaglehawk, tram 2 -
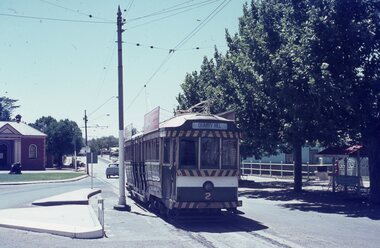
 Ballarat Tramway Museum
Slide - 35mm slide/s, Travis Jeffrey, late 1960's or early 1970's
Agfa plastic mount (blue base, white cover) with a photo of Bendigo No. 2 at Quarry Hill terminus. Photo taken late 1960's early 1970's. No. 2 has the destination of Eaglehawk and on the tram two SEC roof advertisements, "Electric Cooking Matchless" and "Everything's fine in my all electric kitchen"."BES 40" in penciltramways, trams, bendigo, quarry hill, tram 2 -
 Ballarat Tramway Museum
Slide - 35mm slide/s, Travis Jeffrey, late 1960's or early 1970's
Agfa plastic mount (blue base, white cover) with a photo of Bendigo No. 21 in the loop at Myrtle St, High St, bound for Golden Square. Photo taken late 1960's early 1970's from the window of another tram, either inbound or outbound, at the southern end of the loop. In the background is the Sacred Heart Cathedral ."BES 41" in penciltramways, trams, bendigo, quarry hill, tram 21 -
 Ballarat Tramway Museum
Slide - 35mm slide/s, Travis Jeffrey, late 1960's or early 1970's
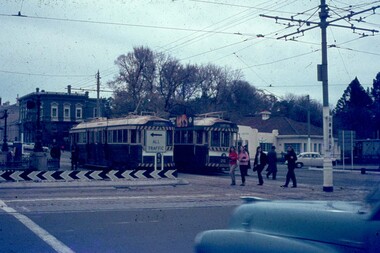
Agfa plastic mount (blue base, white cover) with a photo of Bendigo Nos. 3 and 26 at Charing Cross. The trams are bound for Eaglehawk, Quarry Hill respectively. Photo shows the traffic arrangements at Charing Cross prior to closure. Photo taken late 1960's early 1970's from the window of another tram. No. 3 has two roof advertisement racks which are empty, while No. 26 has a SEC briquettes roof advertisement."BES 48" in pencil.tramways, trams, bendigo, charing cross, tram 3, tram 26 -
 Ballarat Tramway Museum
Photograph - Black & White Photograph/s - set of 32, Eldon Hogan, 4/06/1965 12:00:00 AM
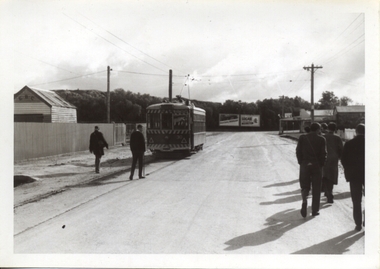
Yields information about a 1924 Jelbart Engine manufacturing display in Sturt St and the street scene and peoples clothing at the time.Set of 32 black and white photographs of an Association of Railway Enthusiasts tour to Bendigo and trams 4/7/1965. The photos are not necessarily in photographic order. .1 - 30 on the Eaglehawk terminal track, beyond the normal terminus. .2 - 30 & 29 High St Eaglehawk. .3 - ditto with a poppet head in the background. .4 - 30 at one of the crossing loops .5 - 30 at Eaglehawk terminus extension .6 - ditto. .7 - ditto .8 - cleaning out the track .9 - showing the location of the track at Eaglehawk terminus and its extension .10 - cleaning out track .11 - a portable shed adjacent to the track .12 - A view of the two Birneys travelling in the empty country. .13 - ditto .14 - 19 and 18 at Golden Square .15 - Bendigo tram depot - creek crossing .16 - Scrubber at the depot .17 - 28 and 19 at the North Bendigo terminus .18 - 18 and 30 on the Golden Sq line .19 - 28 and 19 at the North Bendigo terminus .20 - ditto. .21 - 28 and 19 near the depot entry. .22 - 28 and 30 Pall Mall .23 - 28 at North Bendigo .24 - 17 and 19 and 6 at Quarry Hill .25 - 28 and 30 Mitchell St .26 - 19, 6 and 21 Quarry Hill .27 - 19 and 6 Quarry Hill .28 - 28 and 6 at the depot entry .29 - ditto .30 - 18 and 30, Golden Sq line .31 - 25 at depot .32 - 6 and 19 Charing Cross. Photographer Eldon Hogan. Printed on Kodak Paper .33 - roll of negatives of some of the above photos - stored in box 83 as well. trams, tramways, are, bendigo, eaglehawk, quarry hill, golden square, north bendigo, tram 30, tram 29, tram 28, tram 6, tram 19, tram 25, tram 17, tram 18 -
 Ballarat Tramway Museum
Album - Photo Album, Wal Jack, NSWT Steam Trams, 1950's
Some 143 black and white photographs of steam trams in Sydney, Newcastle, Broken Hill and Maitland. Also has some photos of Toronto, Burrinjuck, Bryon Bay, and Kurri Kurri For details of each photograph and layouts see file - WJ Sydney steam trams listing - btm5004.pdfHas a strong association with Wal Jack and his collecting of tramway history/developments until 1964.Light brown folder with a red binding strip brown coloured heavy paper inside covers holding some 25 brown colour sheets of light card on which photos have been mounted using photo corners of various types, captions in white ink. trams, tramways, steam trams, sydney, newcastle, maitland, tramcars, wal jack, broken hill -
 Ballarat Tramway Museum
Photograph - Digital Image, Black & White Photograph/s, Marc Dahlstrom, c1971
Digital image from a black and white print of tram 42 running a "Special" climbing the Sturt St hill up to Lydiard St, shows the steep hill. In the background is Cooks Private Hotel, Ballarat Travel Centre, Commonwealth Bank, National Mutual Building and Alan Bros. Photo by Marc Dahlstrom c1971. 5056.1 - physical print of the same image, with the Marc Dahlstrom stamp on the rear - added 8-5-2016.On rear is the Marc Dahlstrom stamp.trams, tramways, sturt st, lydiard st, tram 42 -
 Ballarat Tramway Museum
Photograph - Digital image, c1971
Yields information about Ballarat streetscape and its trams in the closing days of the SEC tramway system.Digital image from a black and white print of tram 31 climbing the hill in Sturt St up to Lydiard St, shows the steepness of the hill. Tram has two Johnnie Walker whisky roof advertisements, a Twin Lakes sign and is showing Special. In the background are a Discount store, a Thrifty furniture van, Cooks Private Hotel, the Commonwealth Bank and the National Mutual Building. Photo by Marc Dahlstrom c1971.On rear is the Marc Dahlstrom stamp.trams, tramways, sturt st, lydiard st, tram 31 -
 Ballarat Tramway Museum
Photograph - Black & White Photograph/s, Chris Wurr, Jan. 1971
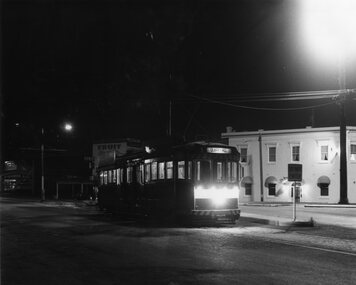
Black and White Photograph of Bendigo No. 2 at the Eagle Hawk terminus, Jan. 1971, night photograph. Tram has the destination of Quarry Hill. In the background is the Foodland Store, a Milk bar. The tram has arrived at the terminus, the trolley pole has been turned, but the headlights and dash canopy lights have yet to be turned. Tram has the destination of Quarry Hill. Photo Chris Wurr, early 1970's. "Photo by Chris Wurr" stamped on the rear. In top left hand corner, in ink "71)" and "Bendigo (SEC) Tramways / 1.1971 / Eaglehawk Terminus"trams, tramways, bendigo, eaglehawk, night photo, tram 2 -
 Ballarat Tramway Museum
Photograph - Black & White Photograph/s, Wal Jack, 12/04/1959 12:00:00 AM
Yields information about Ballarat's trams, and the City centre area and motor vehicles late 1950's.Black and white print of Bendigo 28 at the Quarry Hill terminus, 12/4/1959, photo by Wal Jack. Has a lady walking across to the tram - dressed in gloves and hat. Tram has the destination of Eaglehawk. Photo print courtesy of Port Dock Railway Museum, now the National Railway Museum. See worksheet 4311 for letter and details of prints sent to Bill Scott, 19/10/2001. Any photo credit to mention NRM Collection.On rear of copy "SEC Bendigo #28 / Quarry Hill terminus / 12/4/59 / Wal Jack photo / National Railway Museum.trams, tramways, bendigo, quarry hill, tram 28 -
 Ballarat Tramway Museum
Slide - 35mm slide/s - set of 4, Campbell Duncan, 1971 or 1972
Set of four colour slide on Agfacolour - black and white plastic mounts. .1 - Bendigo No. 3 on a Quarry Hill service .2 - Bendigo No. 5, in High St Eaglehawk, inbound to Quarry Hill. Has a former Masonic Hall? in the background - now part of the Eaglehawk Primary School. .3. - Bendigo 26, en route to Quarry Hill, on Quarry hill line? with a BP service station in the background. .4 - Bendigo 5, descending View St to Charing Cross.tramways, trams, bendigo, quarry hill, eaglehawk, view st, tram 3, tram 5, tram 26 -
 Ballarat Tramway Museum
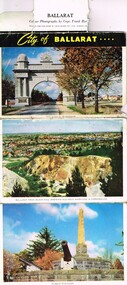
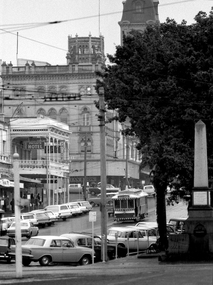
Postcard - Folder set, John Sands and Co, "City of Ballarat", c1950
Yields information about the city of Ballarat late 1940's or early 1950's through a set of photographs and has a strong association with well known photographer - Frank Hurley.Folder of postcards or photographs of the City of Ballarat, photographs by Capt. Frank Hurley, late 1940's or very early 1950's. Series of 7 colour photographs on one side and five black and whites on the other. Colour - Arch of The Avenue of Honor, Ballarat from Black Hill showing gold workings, Eureka Stockade, The Begonia Conservatory Botanic Gardens, Sturt St between Grenville St and Lydiard St, the floral clock with the Town Hall in the background, The Ballarat Hospital and Autumn in the Botanic Gardens. Has a title "City of Ballarat", with a folder tab at the top. Black and white photographs "Ballarat Monument to the Golden Age (The gold monument), Sturt St looking west from the town hall, The City Hall, Ballarat Looking NE from the City Hall with the post office in the foreground and the "The flight from Pompeii - Botanical Gardens" Printed by John Sands and Co.trams, tramways, ballarat, postcards, sturt st, town hall, floral clock, eureka, botanical gardens, hospital, post office, black hill, floral clock -
 Ballarat Tramway Museum
Slide - 35mm slide/s, Jim Rush, early 1970's
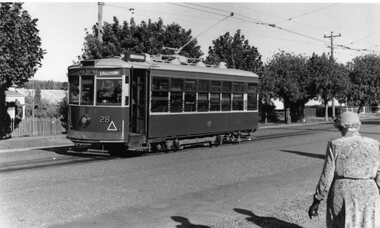
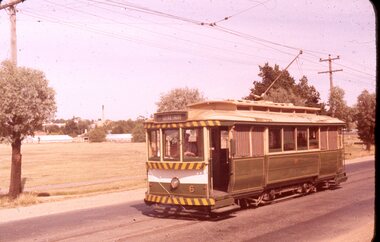
Colour 35mm slide in white cardboard mount of Bendigo 6, with the destination of Golden Square inbound in Nolan St with the White Hills Bendigo works in the background. Photo from the collection of Lilian Butler.in ink on rear "No. 6 Bendigo fleet was No. 25 Ballarat" and "Jim Rush took this slide in Nolan Street, Bendigo North"tramways, trams, bendigo, north bendigo, nolan st, tram 6 -
 Ballarat Tramway Museum
Photograph - Black & White Photograph/s, mid to late 1950's
Black and white photograph of Bendigo 25, late 1950's crossing the highway at Charing Cross and about to enter Mitchell St. Tram has the destination of Quarry Hill. In the background is City Club Hotel. On the right hand side of the photograph is a direction sign and tram stop sign. Photographer unknown - see history of object.In the rear in ink "Bendigo"trams, tramways, bendigo, charing cross, mitchell st, quarry hill, tram 25 -
 Ballarat Tramway Museum
Photograph - Black & White, Bendigo 3 climbing Mitchell St, late 1950's
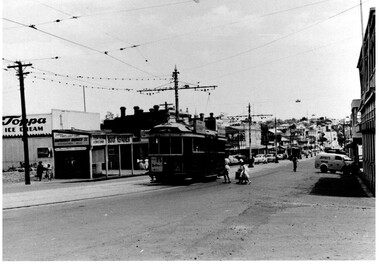
Black and White photograph, of Bendigo 3 climbing Mitchell St, near the Railway Station with the Destination of Quarry Hill. Has a Hutton's Ham ad on the front drivers panel and two rood ads. In the background are Sandhurst Dairies shop advertising Toppa Ice Cream, a boot repairer and a van marked Jeffreys Bread parked on the north side of Mitchell St. Nearing the point where the double track became single - see the signal wire insulators in the overhead. Printed on Fujichrome paper. Two copies held."TMSV Sales" stamp on rear. On rear of in ink 'HTT16 = MM N 102 = Geel 32 = BED 3"trams, tramways, bendigo, mitchell st, quarry hill, overhead, tram 3 -
 Ballarat Tramway Museum
Photograph - Black & White Photograph/s, Lloyd Rogers, 21/03/1962 12:00:00 AM
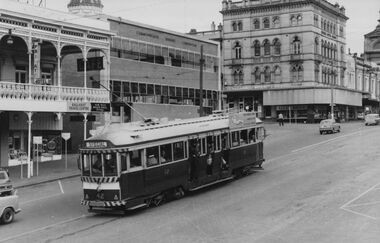
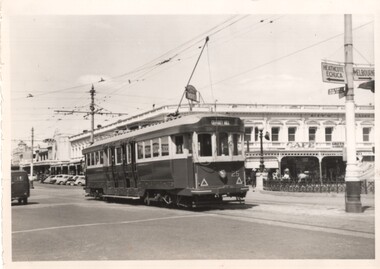
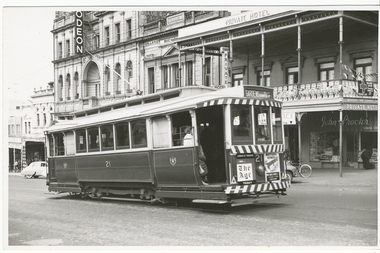
Yields information about the appearance of tram No. 21 and the Mechanics Institute in the early 1960's.Black and white photograph of Ballarat tram No. 21 climbing the Sturt St hill. Has the destination of Gardens via Drummond Nth. Dated 21/3/1962. Printed on Agfa Gevaert paper in a postcard format. The tram has an Mutual Home and The Age advertisements on the front dash panel. In the background is the Ballarat Mechanics Institute building with The Odeon sign on the front of the building and Cooks Private Hotel. Photo by Lloyd Rogers.In ink "Car 21, Sturt St, Ballarat 21/3/1962. and the number "3/25". In the top left hand corner "ex A'alide 10?"trams, tramways, sturt st, tram 21 -
 Ballarat Tramway Museum
Slide - 35mm slide/s - set of 20, Eldon Hogan, 22/05/1971 12:00:00 AM
Set of 20 35mm Agfa colour blue and white plastic mount slide - featuring photos taken during an Association of Railway Enthusiasts Tour by Eldon Hogan. Folder had the date "22/5/1971" on it. Scanned on the Canon scanner at the depot 15/12/2005 at the time of the installation of the scanner. .1 - No. 25 in Nolan St with Lake Weeroona in the background. .2 - Three Birneys at the Depot junction, 30 and 29 with Conoles Hotel, McCrae St in the background. .3 - No. 5 in front of the Shamrock Hotel, Pall Mall .4 - No. 29 in front of the Shamrock Hotel with Stonemasons sign in the background. .5 - No. 18 ditto .6 - No. 30 and another Birney at the Quarry Hill terminus .7 - No. 24 southbound High St at the Violet St intersection with a "Mine Open" sign in the foreground and the Cathedral in the background. .8 - No. 19 at the Golden Square terminus, with the Golden Square Hotel in the background. .9 - No. 29 - side on view, North Bendigo line? Thunder St? .10 - No. 30 crossing the railway overbridge, inbound from Eaglehawk with a number of photographers in the foreground. .11 - No. 29? ditto .12 - No. 5 outbound - side on view, Thunder St, North Bendigo line? .13 - No. 29 and 30 at the intersection of High St and Brazier St with Church or School hall in the background. .14 - ditto .15 - ditto .16 - No. 25 and the two Birneys at the Eaglehawk terminus. .17 - No. 29 and two other trams at ditto .18 - No. 30 and 19 adjacent to the Lake View Hotel, McCrae St .19 - No. 5 and 25 crossing on the Eaglehawk Line, Ironbark? .20 - No. 29 at Quarry Hilltramways, trams, bendigo, lake weeroona, pall mall, golden square, eaglehawk, quarry hill, tram 25, tram 30, tram 29, tram 5, tram 18, tram 19, tram 24, tram 25 -
 Ballarat Tramway Museum
Photograph - Black & White Photograph/s, Ron Hann, Jan. 1963
Yields information about the interior of Bendigo tram depot, is storage area and two Birney trams.Black and white print on laser print paper - of Bendigo 18 at the Eaglehawk terminus 1/1963. Photo by Ron Hann. Tram has a Cohn's Drink advertisement on the front dash panel, two SEC roof advertisements and the destination of Quarry Hill. In the background are a hotel and a liquor store, both advertising Melbourne Bitter. Printed on Fujifilm, Fujicolor Crystal Archive for Frontier"Has label "Reference 6/214/26 Photo by Ron Hann" and another label "Eaglehawk Bendigo 01.63"trams, tramways, eaglehawk, hotels, tram 18 -
 Ballarat Tramway Museum
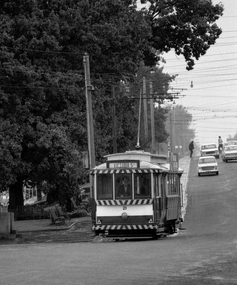
Photograph - Digital image, 1970s
Yields information about the Victoria St route and Bakery Hill.Digital image, black and white, of No. 13 climbing Bakery Hill towards Princess St on the Victoria St route, in Victoria St, with two people waiting for the tram to pass. Photo taken by Peter Bruce 1970's and 1971, prior to the closure of the Ballarat tramway system. Peter's Title of image: "No. 13 Victoria St"trams, tramways, victoria st, bakery hill, tram 13 -
 Ballarat Tramway Museum
Photograph - Digital image, Peter Bruce, "No. 14 Sturt", 1970s
Yields information about Sturt St between Lydiard St and Grenville St, part of the Victoria St route..Digital image, black and white, of No 14 descending the Sturt St hill to Grenville St, enroute to Victoria St. Photo taken by Peter Bruce 1970's and 1971, prior to the closure of the Ballarat tramway system. Peter's Title of image: "No. 14 Sturt"trams, tramways, sturt st, victoria st, tram 14 -
 Ballarat Tramway Museum
Photograph - Digital image, 1970s
Yields information about Sturt St between Grenville St and Lydiard St and the south side of the street.Digital image, black and white, of No. 13 climbing the hill between Grenville St and Lydiard St, past the City Loop with Cooks Private Hotel in the background. Photo taken by Peter Bruce 1970's and 1971, prior to the closure of the Ballarat tramway system. Peter's Title of image: "No. 13 up the hill"trams, tramways, sturt st, grenville st, city loop, tram 14 -
 Ballarat Tramway Museum
Photograph - Digital image Set of 2, 1970s
Yields information about Sturt St and the intersection with Grenville St.Digital image, black and white, two images of No. 21 at the base of the Sturt St hill before crossing Grenville St, going to Victoria St. Roof advert appears in other photos, but very hard to work out. Photo taken by Peter Bruce 1970's and 1971, prior to the closure of the Ballarat tramway system. Peter's Title of image: "No. 21 bottom Sturt St" and "No. 21 Sturt and Grenville".trams, tramways, sturt st, grenville st, tram 21