Showing 4551 items
matching tram 1
-
 Ballarat Tramway Museum
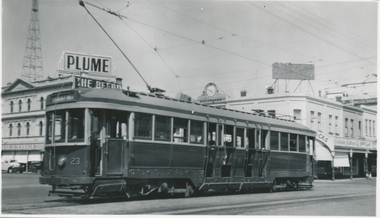
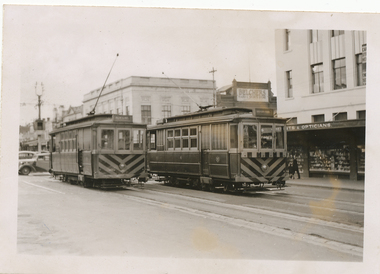
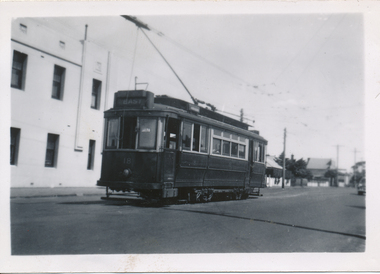
Photograph, Wal Jack, Bendigo No. 23 at Charing Cross, 3/01/1954
Photo of No. 23 at Charing Cross with the destination of Quarry Hill, photo by Wal Jack 3-1-1954. Has the Beehive in the background, a Plume petrol sign and the watchmaker's clock in the background. Printed on Ilford paper. Two prints held. See image i2 for rear of photograph. See image i3 for hi res scan of negative Yields information about Bendigo tram 23 in 1954 and Charing Cross.Black and White print contained within the Wal Jack Bendigo and Geelong Album, see Reg Item 5003 for more details. On the rear in blue ink "SEC Bendigo No 23 bogie to Quarry Hill at Fountain (Charing Cross) Bendigo 3-1-54" with Wal Jack copyright stamp in the top right hand corner and the number "T59PC" written in.trams, tramways, bendigo, charing cross, tram 23 -
 Ballarat Tramway Museum
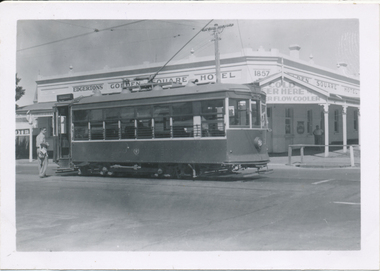
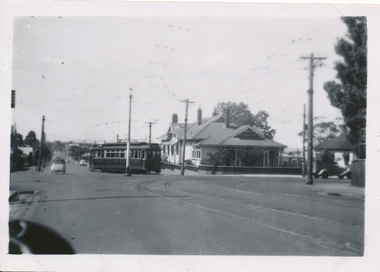
Photograph - Black & White Photograph/s, Wal Jack, 3/01/1954 12:00:00 AM
Black and White print contained within the Wal Jack Bendigo and Geelong Album, see Reg Item 5003 for more details. Photo of Bendigo Birney No. 30 at Golden Square Terminus, 3/1/1954. Has Edgerton's Golden Square Hotel in the background with date of 1857 on building corner and "Cold Beer Here and "?..er flow cooler" on the front verandah of the hotel. Note the railing around the drainage channel. i1 - scan of print in the album i2 - rear of image i3 - scan of negative at 3200dpi added 6/6/2020. On the rear in blue ink "SEC Bendigo Birney No. 30 at Golden Square terminus 3rd Jan '54" with Wal Jack copyright stamp in the top right hand corner and the number "T215" written in.trams, tramways, bendigo, golden square, birney, tram 30 -
 Ballarat Tramway Museum
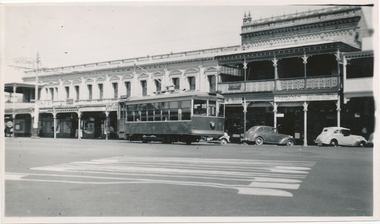
Photograph - Black & White Photograph/s, Wal Jack, 3/01/1954 12:00:00 AM
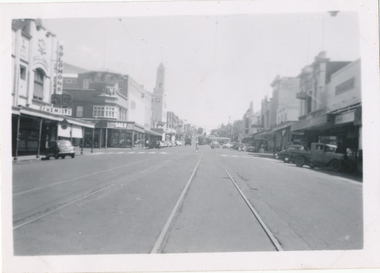
Black and White print contained within the Wal Jack Bendigo and Geelong Album, see Reg Item 5003 for more details. Photo of Bendigo Birney No.28 in High St Bendigo, 3-1-1954, Photo Wal Jack. Has in the background the City Club Hotel, Desmond's Radio Parts and a Ice cream shop and Marshalls Fruit Shop Printed on Ilford Paper. See image i2 for rear of photograph. See image i3 for hi res scan of negative On the rear in black ink "SEC Bendigo Birney 28 to Golden Square, High St Bendigo, 3-1-54", in the top left hand corner, the Wal Jack copyright stamp but with no number written in.trams, tramways, bendigo, high st, birney, tram 28 -
 Ballarat Tramway Museum
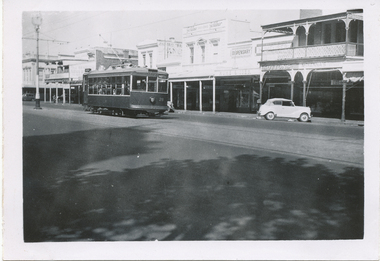
Photograph - Black & White Photograph/s, Wal Jack, 3/01/1954 12:00:00 AM
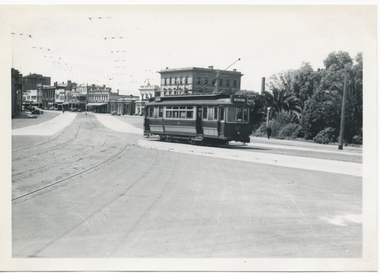
Black and White print contained within the Wal Jack Bendigo and Geelong Album, see Reg Item 5003 for more details. Photo of Bendigo Birney No. 28 in Pall Mall opposite near Post Office, Photo by Wal Jack, 3-1-54. In the background are shops for: Suttons Furniture, McKenna's, Hume & Iser Dispensary, and Gestetner Sales and Service. On the rear in blue ink "SEC Bendigo Birney No. 28 Birney ex North opposite Post Office 3-1-54" with Wal Jack copyright stamp in the top right hand corner and the number "T214" written in.trams, tramways, bendigo, pall mall, birney, tram 28 -
 Ballarat Tramway Museum
Photograph - Black & White Photograph/s, Wal Jack, 6/01/1963 12:00:00 AM
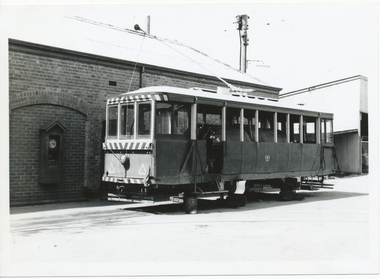
Black and White print contained within the Wal Jack Bendigo and Geelong Album, see Reg Item 5003 for more details. Photo of the Bendigo Scrubber tram with the truck removed and placed on blocks etc in the depot yard track extension. Photo by Wal Jack 6-1-1963. Has the Bundy clock to the side of the tram. Note how the trolley pole has been held down and there is a flag on the running side of the tram. Printed on Ilford Paper. i1 - scan of print in the album i2 - rear of image i3 - scan of negative at 3200dpi added 6/6/2020. On the rear in blue ink "SEC Bendigo, Scrubber on block, depot yards, 6-1-63" with Wal Jack copyright stamp in the top right hand corner and the number "T222" written in.trams, tramways, bendigo, depot, scrubber tram, sprinkler tram, sprinkler, scrubber -
 Ballarat Tramway Museum
Photograph - Black & White Photograph/s, Keith Kings, 15/09/1962 12:00:00 AM
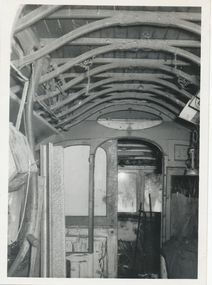
Black and White print contained within the Wal Jack Bendigo and Geelong Album, see Reg Item 5003 for more details. Photo of the interior Bendigo ESCo 9 after the body had been sold, in Thistle St, Bendigo, 15-9-1962, photo by Keith Kings. Shows the structure of the tram, very similar to the Duncan and Fraser horse tram structure. Has the D&F bell cord straps.on rear in ink "Bendigo Interior of original electric tram No. 9, rear of house in Thistle St. Flash 1/25. f22, 9 ft 15/9/62" and in the top right hand corner, the Keith Kings copyright stamp with the number "N(v)(13)" written in.trams, tramways, bendigo, esco, duncan fraser, tramcar bodies, tram 9 -
 Ballarat Tramway Museum
Photograph - Black & White Photograph/s, The Bendigonian, Jan. 2005
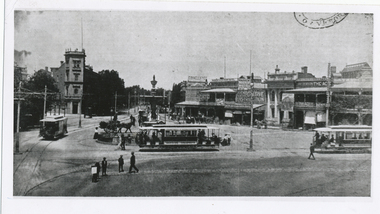
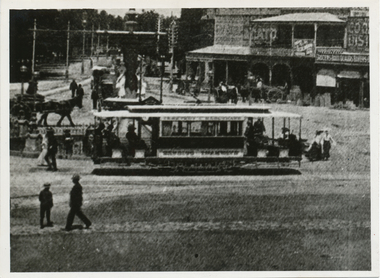
Black and White copy print contained within the Wal Jack Bendigo and Geelong Album, see Reg Item 5003 for more details. Photo of Charring cross looking from Pall Mall towards High St and the south west corner buildings in the photograph. Features three ESCo trams, 2 x two window and 1 x 3 window at the location. In the background are the buildings on the south west corner of Charing Cross, featuring an advertisement for The Age, Cooperative Distribution centre, Warrens View Point Hotel, Hamptons Newsagency and Connelly & Co. Copied by Keith Kings from The Bendigonian 3/1/1905. On rear in ink " SA776 Tramcars at Charing Cross, Note" 3 window saloon" Copied ex "The Bendigonian 3/1/1905."trams, tramways, bendigo, charing cross, esco -
 Ballarat Tramway Museum
Photograph - Black & White Photograph/s, Wal Jack, 6/01/1963 12:00:00 AM
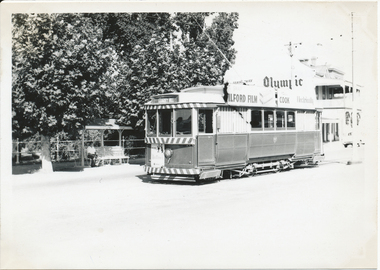
Black and White print contained within the Wal Jack Bendigo and Geelong Album, see Reg Item 5003 for more details. Photo of the Bendigo 7 at Eaglehawk 6-1-1963. Wal's album notes note that the tram ex Ballarat No. 19. The tram has the destination of Eaglehawk and has advertisements for Ilford Film and Electricity cooking on roof and Hutton's ham on rear drivers dash panel. In the background is the Park Hotel with the wall painted for Beaurepaires Olympic tyres. Printed on Ilford Paper. i1 - scan of print in the album i2 - rear of image i3 - scan of negative at 3200dpi added 6/6/2020. On the rear in blue ink "SEC Bendigo, 3rd No. 7 ex Ballarat No. 19. Eaglehawk, 6-1-63" with Wal Jack copyright stamp in the top right hand corner and the number "T1311" written in.trams, tramways, bendigo, eaglehawk, tram 7 -
 Ballarat Tramway Museum
Photograph - Black & White Photograph/s, The Bendigonian, Jan. 2005
Black and White copy print contained within the Wal Jack Bendigo and Geelong Album, see Reg Item 5003 for more details. Photo of Charring cross looking from Pall Mall towards High St and the south west corner buildings in the photograph. Features a three window ESCo. tramcar In the background are the buildings on the south west corner of Charing Cross, featuring an advertisement for The Age, Cooperative Distribution centre, Warrens View Point Hotel, Hamptons Newsagency and Connelly & Co. Copied by Keith Kings from The Bendigonian 3/1/1905. On rear in ink " SA776 Bendigo A 3 window saloon at Charring Cross" Copied ex "The Bendigonian 3/1/1905."trams, tramways, bendigo, charing cross, esco -
 Ballarat Tramway Museum
Photograph - Black & White Photograph/s, Wal Jack, 1/01/1956 12:00:00 AM
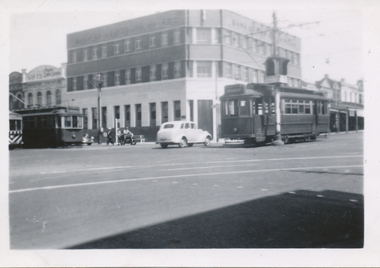
Black and White print contained within the Wal Jack Bendigo and Geelong Album, see Reg Item 5003 for more details. Photo of Geelong No. 5 and No. 4 in Ryrie St near Moorabool St. 1-1-1956, Photo by Wal Jack. In the background is Belchers Radio and Sport Store and a set of bar traffic lights. No. 5 has the destination of Newtown, and No. 4 the destination of Eastern Park. i1 - scan of print in the album i2 - rear of image i3 - scan of negative at 3200dpi added 27/6/2020.On the rear in blue ink "Geelong No. 5 to Newtown, No. 4 to Eastern Park, Ryrie St near Moorabool St, 1-1-56" with Wal Jack copyright stamp in the top right hand corner and the number "T1303" written in.trams, tramways, geelong, ryrie st, tram 5, tram 4 -
 Ballarat Tramway Museum
Photograph - Black & White Photograph/s, 8/01/1956 12:00:00 AM
Black and White print contained within the Wal Jack Bendigo and Geelong Album, see Reg Item 5003 for more details. Photo of Geelong No. 5 in Ryrie St at intersection with Moorabool St. Tram has the destination of City. In the background are Bank of New South Wales building, a set of bar lights and three other trams. Photographer not known. Dated 8/1/1956. On rear in ink "Car No. 5 on shuttle run Ryrie St to Beach on last day of running this service 8/1/56"trams, tramways, geelong, ryrie st, moorabool st, tram 5 -
 Ballarat Tramway Museum
Photograph - Black & White Photograph/s, Wal Jack, 1/01/1956 12:00:00 AM
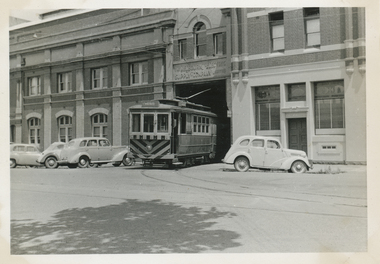
Black and White print contained within the Wal Jack Bendigo and Geelong Album, see Reg Item 5003 for more details. Photo of Geelong No. 4 standing outside the depot building with a number of cars parked outside. Photo by Wal Jack 1-1-1956. Printed on Ilford paper. i1 - scan of print in the album i2 - rear of image i3 - scan of negative at 3200dpi added 29/6/2020. On rear in ink "SEC Geelong No. 4 coming out of the depot, Corio Terrace Geelong 1-1-56". Has the Wal Jack copyright stamp in the top right hand corner with the number "T333" written in..trams, tramways, geelong, geelong depot, sec depot, corio terrace, mesco, tram 4 -
 Ballarat Tramway Museum
Photograph - Black & White Photograph/s, 8/01/1956 12:00:00 AM
Black and White print contained within the Wal Jack Bendigo and Geelong Album, see Reg Item 5003 for more details. Photo of No. 17 to Belmont (right) and No 18 to West at the intersection of Moorabool and Ryrie Streets 8-1-1956. Photographer unknown. In the background is the Bank of New South Wales Building and a gifts building. The pole in the centre has a bar traffic light. Has written in ink on the rear "Intersection Ryrie and Moorabool Sts 8/1/56, Geelong"trams, tramways, geelong, ryrie st, moorabool st, tram 17, tram 18 -
 Ballarat Tramway Museum
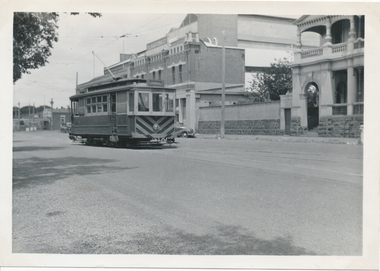
Photograph - Black & White Photograph/s Geelong 18 at West terminus, 8/01/1956
Photo of No. 18 at West, 2.30pm, last day of operations 8-1-1956. Photographer unknown - same as 5854. Tram has the destination of East. Black and White print contained within the Wal Jack Bendigo and Geelong Album, see Reg Item 5003 for more details. Two copies held. Has written in ink on the rear "No 18 at top of Packingham St (terminus) 2.30pm 8/1/56, Geelong"trams, tramways, geelong, pakington st, west, tram 18 -
 Ballarat Tramway Museum
Photograph - Black & White Photograph/s, 8/01/1956 12:00:00 AM
Black and White print contained within the Wal Jack Bendigo and Geelong Album, see Reg Item 5003 for more details. Photo of No. 18 turning out of Pakington St into Aberdeen St, last day of operations 8-1-1956. Photographer unknown - same as 5854. Shows the arrangement of the overhead and curves at this intersection. Has written in ink on the rear "No. 18 city bound from West to East, turning from Packington St into Aberdeen St 8/1/56. Next day was buses."trams, tramways, geelong, east, west, pakington st, tram 18 -
 Ballarat Tramway Museum
Photograph - Black & White Photograph/s, 8/01/1956 12:00:00 AM
Black and White print contained within the Wal Jack Bendigo and Geelong Album, see Reg Item 5003 for more details. Photo of Moorabool Street looking south from Malop St, last day of operations 8-1-1956. Photographer unknown - same as 5854. Has two trams turning at Ryrie St. In the background is the T&G building, a Chemist and Solomons. Has written in ink on the rear "Looking south along Moorabool St from Malop St."trams, tramways, geelong, moorabool st -
 Ballarat Tramway Museum
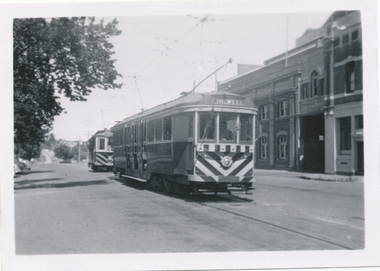
Photograph - Black & White Photograph/s, Wal Jack, 3/01/1945 12:00:00 AM
Black and White print contained within the Wal Jack Bendigo and Geelong Album, see Reg Item 5003 for more details. Photo of No. 17 from the Railway Station turning out of Railway Terrace into Mercer St. 3-1-1945. Printed on Ilford Paper. Tram has the destination of West. i1 - scan of print in the album i2 - rear of image i3 - scan of negative at 3200dpi added 30/6/2020.Has the rear in ink "SEC Geelong No. 17 from the Railway Station turning out of Railway Terrace into Mercer St. 3rd January 1945". Has the Wal Jack copyright stamp on the rear with the number T319 written in.trams, tramways, geelong, mercer st, railway station, tram 17 -
 Ballarat Tramway Museum
Photograph - Black & White Photograph/s, Wal Jack, 1/01/1956 12:00:00 AM
... of No. 5 in Corio Terrace, near the depot. Photo by Wal Jack 1/1..., near the depot. Photo by Wal Jack 1/1/1956. The tram has ...Black and White print contained within the Wal Jack Bendigo and Geelong Album, see Reg Item 5003 for more details. Photo of No. 5 in Corio Terrace, near the depot. Photo by Wal Jack 1/1/1956. The tram has destination of Chilwell. the Blakiston & Co building in the background. i1 - scan of print in the album i2 - rear of image i3 - scan of negative at 3200dpi added 27/6/2020.Has the rear in ink "SEC Geelong No. 5 Corio Terrace, January 1st 1956". Has the Wal Jack copyright stamp on the rear with the number T129 written in.trams, tramways, geelong, corio terrace, tram 5 -
 Ballarat Tramway Museum
Photograph - Black & White Photograph/s, Wal Jack, c1940
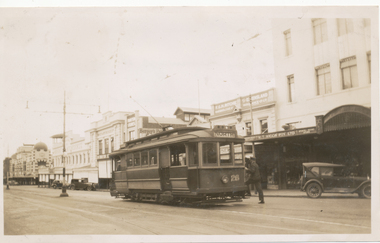
Black and White print contained within the Wal Jack Bendigo and Geelong Album, see Reg Item 5003 for more details. Photo of 26 in Moorabool St, Geelong. Tram has the destination of North. Printed on Kodak Velox paper. No date given, but c1940. In the background is building for W. T. Wiggs Pty Ltd sports store, F. G. H Ritchie Queensland Insurance and Berger's Paints On rear in ink "Geelong Tramways No. 26, Ex M&MTB made into 1 man car, 3 in service 24, 25, 26"trams, tramways, geelong, moorabool st, tram 26 -
 Ballarat Tramway Museum
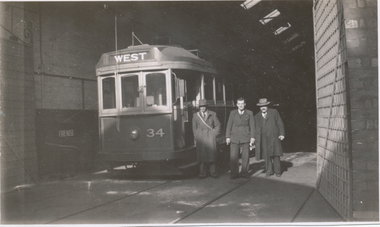
Photograph - Black & White Photograph/s, 24/06/1949 12:00:00 AM
Black and White print contained within the Wal Jack Bendigo and Geelong Album, see Reg Item 5003 for more details. Photo of Geelong No. 34 in the No. 2 shed of Geelong with Wal Jack, S. Stephens and Ken Train alongside. Tram has the destination of West. See also Reg Item 7831 for the subsequent photo. No details on photographer. On rear in ink "SEC Geelong Tys, MT bogie tram No. 34 ex MMTB standing in paint shop 24/6/49. Alongside being Messrs W. Jack, S. Stephens and K. Train" Also photo information 5.4:122, 1/25 sec @50ft."trams, tramways, geelong, depot, tram 34 -
 Ballarat Tramway Museum
Photograph - Black & White Photograph/s, 8/01/1956 12:00:00 AM
Black and White print contained within the Wal Jack Bendigo and Geelong Album, see Reg Item 5003 for more details. Photo of Geelong 35 in front of No. 5, from the Beach terminus, in Corio Terrace, last day of Service 8-1-1956 outside the depot. No. 35 has the destination of Chilwell No details on photographer. On rear in ink "No. 35 in front of No. 5 at depot enroute from Eastn Beach terminus 8/1/56"trams, tramways, geelong, depot, corio terrace, tram 35, tram 5 -
 Ballarat Tramway Museum
Photograph - Black & White Photograph/s, 8/01/1956 12:00:00 AM
Black and White print contained within the Wal Jack Bendigo and Geelong Album, see Reg Item 5003 for more details. Photo of Geelong No 31 bound for North Geelong at Railway station junction, Malop and Mercer Streets 8/1/1956. General view of junction in the area with a Olympic tyre / service station No details on photographer. On rear in ink "No.31 bound for North Geelong at Railway Stn Junc Malop and Mercer Streets 8/1/56"trams, tramways, geelong, north, railway station, malop st, mercer st, tram 31 -
 Ballarat Tramway Museum
Photograph - Black & White Photograph/s, 8/01/1956 12:00:00 AM
Black and White print contained within the Wal Jack Bendigo and Geelong Album, see Reg Item 5003 for more details. Photo of Geelong No 35 in Ryrie St, at Gheringhap St with destination of Chilwell, on the last day of service on this line. Has a bar traffic light in the photo and R. J. Stokes store. 8/1/1956. No details on photographer. On rear in ink "No.35 Chilwell bound in Ryrie St opposite Gheringhap St, Post Office Corner Geelong 8/1/56"trams, tramways, geelong, last day, ryrie st, traffic lights, tram 35 -
 Ballarat Tramway Museum
Photograph - Black & White Photograph/s, Wal Jack, 1/01/1956 12:00:00 AM
Black and White print contained within the Wal Jack Bendigo and Geelong Album, see Reg Item 5003 for more details. Photo of Geelong No 39 in Ryrie St, 1-1-1956. Photo by Wal Jack. Tram has the destination of West. In the background is the T&G building, Belchers Corner store, Miss Vic? Art Florist store. i1 - scan of print in the album i2 - rear of image i3 - scan of negative at 3200dpi added 27/6/2020. On rear in ink SEC Geelong, No. 39 (now Ballarat's 41) from East to West, Ryrie St Geelong 1-1-56". Has the Wal Jack copyright stamp in the top right hand corner with the number T1297 written in.trams, tramways, geelong, ryrie st, tram 39 -
 Ballarat Tramway Museum
Photograph - Black & White Photograph/s, Wal Jack, 1/01/1956 12:00:00 AM
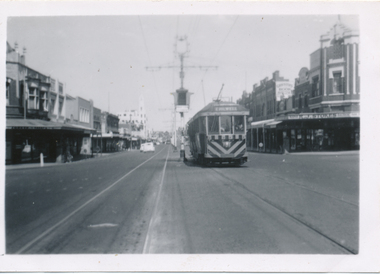
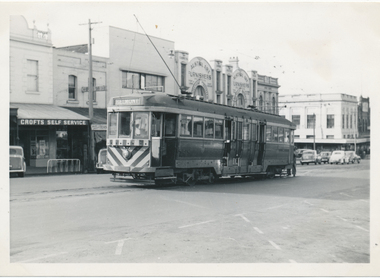
Black and White print contained within the Wal Jack Bendigo and Geelong Album, see Reg Item 5003 for more details. Photo of Geelong No 32 in Moorabool Street, 1-1-1956. Photo by Wal Jack. Printed on Ilford Paper. Tram has the destination of Belmont. In the background are Crofts Self Service, Austral Art Furnishers. i1 - scan of print in the album i2 - rear of image i3 - scan of negative at 3200dpi added 27/6/2020.On rear in ink "State Electricity Commission of Victoria, Geelong / No. 32 with yellow stripes in Moorabool St. 1-1-56". Has the Wal Jack copyright stamp in the top right hand corner with the number T1302 written in.trams, tramways, geelong, moorabool st, belmont, tram 32 -
 Ballarat Tramway Museum
Photograph - Black & White Photograph/s, Wal Jack, 1/01/1956 12:00:00 AM
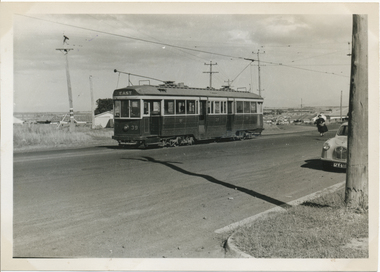
Black and White print contained within the Wal Jack Bendigo and Geelong Album, see Reg Item 5003 for more details. Photograph of Geelong tram No. 39 at the East Terminus, 1/1/1956. Photo by Wal Jack. Tram has the destination of East, with few houses directly behind the tram. Their is a lady walking towards the tram. i1 - scan of print in the album i2 - rear of image i3 - scan of negative at 3200dpi added 27/6/2020. On rear in ink SEC Geelong / No. 39 (now Ballarat No. 43) at East Geelong / Sunday 1-1-1956". Has the Wal Jack copyright stamp in the top right hand corner with the number T1301 written in.trams, tramways, geelong, east, tram 39 -
 Ballarat Tramway Museum
Photograph - Black & White Photograph/s - set of 3', Keith Kings, 26/03/1956 12:00:00 AM
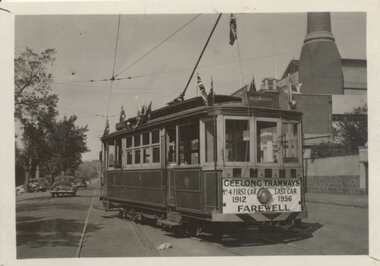
Black and White print contained within the Wal Jack Bendigo and Geelong Album, see Reg Item 5003 for more details. Set of three black and white photographs from Keith Kings of the staged closures of the Geelong tramways. .1 - Geelong No. 4 - decorated as the Last tram, has a dash sign "Geelong Tramways No. 4 first car 1912, Last car 1956 Farewell", with the destination of Belmont. Photographed with power station in the background in Corio Terrace. 26/3/1956, KSK Photo (T)(e)(8). Printed on Ilford Paper. See also Reg Item 2667 and 4388 for a colour slide version of the same photograph. .2 - ditto - about to leave the depot - KSK Photo - T(g)(3) .3 - ditto - back at the depot - KSK Photo - T(g)(8)On the rear in ink and with the Keith Kings Copyright stamp: .1 - "Geelong - 4 - decorated as Official "Last" tram -26/3/56" - (T)(e)(8). .2 - "Geelong - 4 - illuminated as last tram Sun 26/3/56" - (T)(g)(3). .3 - "Geelong - 4 - last tram, back at Depot, Sun 26/3/56" - (T)(g)(8). trams, tramways, geelong, closure, depot, last tram, tram 4 -
 Ballarat Tramway Museum
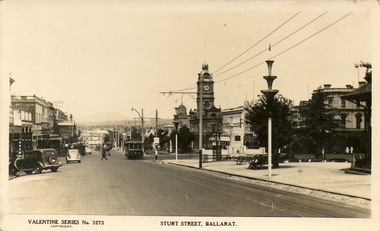
Photograph - Digital Image and Black & White Photograph/s, Valentine & Sons Publishing Co, 1938
Digital image provided by David Critchley of a postcard looking east along Sturt, north side towards Grenville St, at Doveton St. Has a detailed image of the tram. Tram has the destination of Lydiard St North. Note the decorations along the roadside for the centenary of settlement in the Ballarat district in 1938. Valentine Postcard No. 3273. .1 - large format print of the above image without the lower label. Has "Sturt St, Ballarat c1940's" along bottom edge. Print has "J75" in red ink in the top left hand corner on rear - the tram's Melbourne number.trams, tramways, sturt st, postcards, centenary, tram 14 -
 Ballarat Tramway Museum
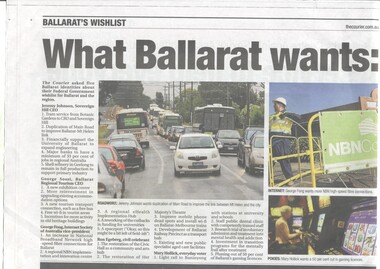
Newspaper, The Courier Ballarat, "What Ballarat wants: voters have their say", "An expensive wish list", 13/7/13 to 20/7/2013
Yields information about views of Ballarat residents about the development of Ballarat in the future and the possible use of trams - too expensive!Set of four newspaper clippings/extracts from The Courier, about what Ballarat residents would like to see in the city and letters. Story by Tim Cowie. .1 - Newspaper clipping from The Courier, 13/7/2013 - titled "What Ballarat wants: voters have their say", under the banner "Ballarat's Wishlist" looks at local identities and their wishes. Has a suggestion for a light rail line between Ballarat and Buninyong and trams in Ballarat. .2 - Newspaper clipping from The Courier, 19/7/2013 - titled "An expensive wish list", under the heading "Trams are unlikely, but sports projects could get the nod". Quotes Ms King, Ballarat MP. .3 - Opinion section of The Courier, 20/7/2013 - "Web Words", six letters about the possibility of trams in the City of Ballarat - mainly negative. .4 - The Courier on-line version of 5916.2 ballarat, ballarat revival, tourism, new tramway -
 Ballarat Tramway Museum
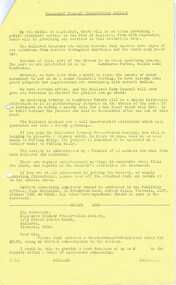
Newsletter, Ballarat Tramway Preservation Society (BTPS), "Information for Members and Interested Parties", 1971
Yields information about the formation of the BTPS in 1971 and has a strong association with those involved., Yields information about the formation of the BTPS in 1971 and has a strong association with those involved.Set of 12 documents printed for distribution to BTPS members, either before or after the formal formation of the organisation to preserve the Ballarat Tramways. All printed by the Gestetner duplication process except for 5920.9 printed by Jeffrey Zilles Ballarat. Consolidated from other items or holdings from donations into a single year set of newsletters. All produced during 1971. .1 - Invitation to Join the Ballaarat Tramway Preservation Society - for a full copy see Reg Item 4252. .2 - Information sheet No. 1 .3 - Progress report from the Publicity Officer (19th August 1971). .4 - Progress report from the Publicity Officer (September 1971) - image only from Reg Item 4251 .5 - Information to Members and Interested Parties - October 1971 - image only from Reg Item 4252 .6 - Information to Members and Interested Parties - November 1971 .7 - Information to Members and Interested Parties - December 1971 .8 - Ballarat Tramway Preservation Society - invitation to join and information. .9 - Information sheet with tram sketch in top left hand corner - printed by Jeffrey Zilles Ballarat. (2nd copy added 6/12/2019 from Donation of David Wright) 10 - Sales List .11 - Joint Statement by the Tramway Museum Society of Victoria Limited and the Ballarat Tramway Preservation Society .12 - Lake Wendouree Tramway Museum Committee - minutes of formation 18th April 1971. museums btps, closure, tmsv, publicity