Showing 2373 items matching "ballarat east"
-
 Ballarat Tramway Museum
Photograph - Digital image, Peter Bruce, "Bridge St", 1970s
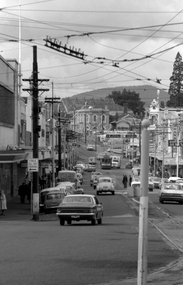
... the Bridge St landscape looking east. Trams tramways Ballarat Bridge ...Yields information about the Bridge St landscape looking east.Digital image of a view looking east along Barkly St from Grenville St showing a tram a the intersection of the Mt Pleasant and Victoria St lines (Stones Corner). Has the shops on both side of the street in view. In the far distance is the Caltex service station. Photo taken by Peter Bruce 1970's and 1971, prior to the closure of the Ballarat tramway system. Peter's Title of image: "Bridge St"trams, tramways, ballarat, bridge st -
 Ballarat Tramway Museum
Photograph - Digital image, Peter Bruce, "Cleaning the Points", 1970s
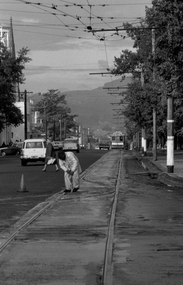
Yields information about the Bridge St landscape looking east.Digital image of a SEC track cleaner at work at the intersection of Sturt and Drummond Streets. Has a tram disappearing into the distance along Sturt St, with Mount Warrenheip in the background. Not the tram poles and tram stops. Photo taken by Peter Bruce 1970's and 1971, prior to the closure of the Ballarat tramway system. Peter's Title of image: "Cleaning the Points"trams, tramways, sturt st, drummond st, track, track cleaner -
 Ballarat Tramway Museum
Photograph - Digital image, 1970s
Yields information about the way the trams crossed Albert St Sebastopol.Digital image, black and white, of No. 41 crossing northbound in Albert St ex Sebastopol, the highway, from the west to the east side. Telephoto lens photos - shows both tracks and buildings. Photo taken by Peter Bruce 1970's and 1971, prior to the closure of the Ballarat tramway system. Peter's Title of image: "No. 41 crossing the highway"trams, tramways, albert st, sebastopol, tram 41 -
 Ballarat Tramway Museum
Photograph - Black & White Photograph/s, B. Prentice, mid to late 1974
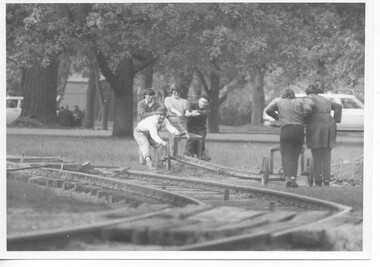
Yields information the construction of the depot fan and access track to Wendouree Parade and has a strong association with the workers in the photograph.Black and white print of the laying out of the rails that formed the access track, taken from the level crossing looking east, mid to late 1973. Featured in the photograph are Gavin Young, ? Bounds, Geoff Cargeeg, Noel Gipps. Photo by Bob Prentice.trams, tramways, depot construction, btps, trackwork -
 Ballarat Tramway Museum
Photograph - Black & White Photograph/s, The Bendigonian, Sep. 2005
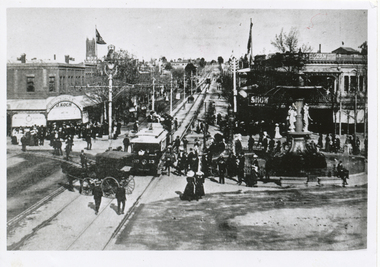
Black and White copy print contained within the Wal Jack Bendigo and Geelong Album, see Reg Item 5003 for more details. Photo of looking east along Mitchell St towards the Railway Station with tram No. 13 and a double deck trailer - has the centre poles along Mitchell St. in the photograph. In the background is a J. Koch and the Bendigo Supply Stores. Has fountain in photograph. Copied by Keith Kings from The Bendigonian 19/9/1905. On rear in ink " SA782, Bendigo, No. 13 - 3 window saloon Charing Cross. Note:- Crossover in Mitchell St.". Copied ex "The Bendigonian 19/9/1905."trams, tramways, bendigo, charing cross, horse trams, mitchell st -
 Ballarat Tramway Museum
Photograph - Black & White Photograph/s, c1928
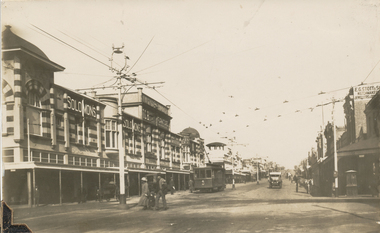
Black and White copy print contained within the Wal Jack Bendigo and Geelong Album, see Reg Item 5003 for more details. View of the intersection of Moorabool St and Malop St, photo from the North East corner. No. 4 MESCo, about 1928, heading south. Tram has the destination of Newtown. Solomons and E.G. Stott Jewellers and watchmakers buildings in the photo. Note the fire alarm, and letter box on the corner (right hand side of photo) Not known who made print. on rear in pencil "Newtown destination"trams, tramways, geelong, mesco, malop st, moorabool st, tram 4 -
 Ballarat Tramway Museum
Photograph - Black & White Photograph/s, Wal Jack, 3/01/1945 12:00:00 AM
Black and White print contained within the Wal Jack Bendigo and Geelong Album, see Reg Item 5003 for more details. Photo of Geelong No. 1 turning out of Ryrie St into Garden St 3rd January 1945, with destination of East. Photo by Wal Jack. See also Reg Item 4395 for another copy of this photograph used by W. F. Scott. Printed on Ilford Paper. i1 - scan of print in the album i2 - rear of image i3 - scan of negative at 3200dpi added 27/6/2020. On the rear in blue ink "SEC Geelong No. 1 to East, turning out of Ryrie St into Garden St 3rd January 1945" with Wal Jack copyright stamp in the top right hand corner and the number "T318" written in.trams, tramways, geelong, ryrie st, tram 1 -
 Ballarat Tramway Museum
Photograph - Black & White Photograph/s, 1940
Black and White print contained within the Wal Jack Bendigo and Geelong Album, see Reg Item 5003 for more details. Photo of Geelong No. 3 in Moorabool St. 1940. No details of photographer on rear. Tram has the destination of East. In the background is a sign for Berger Paints and F&M Ritchie? Wal's album notes provides the date of 1940. Printed on Kodak Velox Paper. On rear in ink "84 Geelong Tramways, State Electricity Commission, No. 3 One of their original trams I believe. They ride very steady and smooth. Duncan and Fraser body. The Brush Electrical Engineering Co. Ltd, Loughborough England, long wheel base truck."trams, tramways, geelong, moorabool st, tram 3 -
 Ballarat Tramway Museum
Photograph - Black & White Photograph/s, 1940
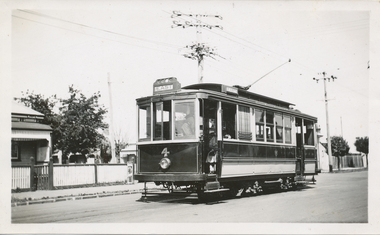
Black and White print contained within the Wal Jack Bendigo and Geelong Album, see Reg Item 5003 for more details. Photo of Geelong No. 4 at the Chilwell terminus, 1940, no details of photographer. Tram has the destination of East. A lady is seated in the front talking to the driver. Wal's album notes provides the date of 1940. Printed on "Selo" paper. On the rear in blue ink "Geelong No. 4" in ink.trams, tramways, geelong, chilwell, tram 4 -
 Ballarat Tramway Museum
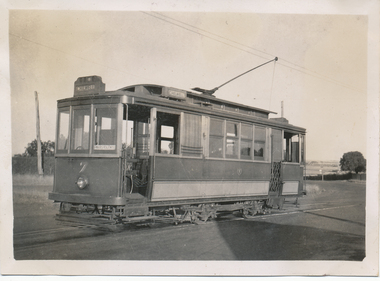
Photograph - Black & White Photograph/s, Wal Jack, 3/03/1940 12:00:00 AM
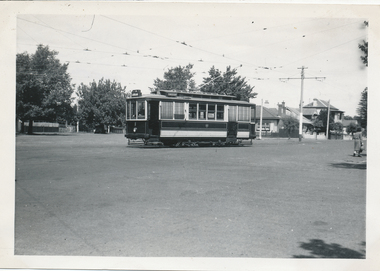
Black and White print contained within the Wal Jack Bendigo and Geelong Album, see Reg Item 5003 for more details. Photo of Geelong No. 7 at the East terminus. The tram has the destination of Chilwell. In the background are paddocks. Photo by Wal Jack 3/3/1940. Printed on Kodak paper. i1 - scan of print in the album i2 - rear of image i3 - scan of negative at 3200dpi added 6/6/2020. On rear in ink "T140 Geelong Tramways No. 7 Brush Saloon, East terminus 3-3-40. W Jack photo"trams, tramways, geelong, east, tram 7 -
 Ballarat Tramway Museum
Photograph - Black & White Photograph/s, Wal Jack, 23/06/1949 12:00:00 AM
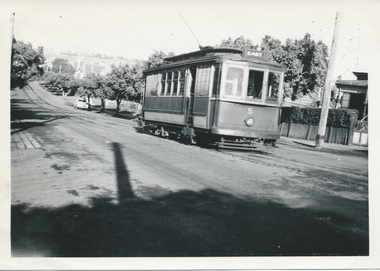
Black and White print contained within the Wal Jack Bendigo and Geelong Album, see Reg Item 5003 for more details. Photo of Geelong No. 5 from Chilwell climbing up Pakington St Hill, from Mercer St. Chilwell. Has the destination of East. Photo by Wal Jack 23-6-1949. Printed on Ilford paper. See also Reg Item 7824 for another similar photograph. i1 - scan of print in the album i2 - rear of image i3 - scan of negative at 3200dpi added 17/6/2020. On rear in ink "SEC Geelong No."5 from Chilwell climbing up Pakington St Hill, from Mercer St. Chilwell. 23-6-49" Has the Wal Jack copyright stamp in the top right hand corner with the number "T281" written in..trams, tramways, geelong, chilwell, pakington st, tram 5 -
 Ballarat Tramway Museum
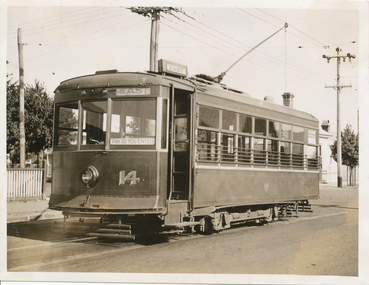
Photograph - Black & White Photograph/s, Wal Jack, 1940
Black and White print contained within the Wal Jack Bendigo and Geelong Album, see Reg Item 5003 for more details. Photo of Geelong Birney 14 at the Chilwell terminus, 1940. Wal notes it is No. 11 on the Bendigo system. The tram has the destination of East and has a "Pay as you Enter" sign on the door. i1 - scan of print in the album i2 - rear of image i3 - scan of negative at 3200dpi added 18/6/2020.On the rear in ink "Geelong Tramways No. 14 Birney Car, bought new 1924"trams, tramways, geelong, chilwell, birney, tram 14 -
 Ballarat Tramway Museum
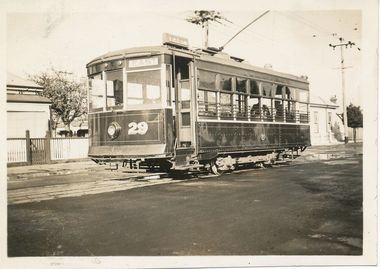
Photograph - Black & White Photograph/s, Wal Jack, Jun. 1939
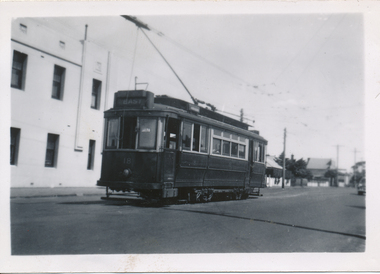
Black and White print contained within the Wal Jack Bendigo and Geelong Album, see Reg Item 5003 for more details. Photo of No.29 at the Chilwell terminus with houses behind. The tram has the destination of East. Photographer unknown, but similar handwriting on the back of the other prints such as Reg Item 5850. Printed on Kodak Velox paper. i1 - scan of print in the album i2 - rear of image i3 - scan of negative at 3200dpi added 6/6/2020. On rear in ink "Geelong Tramways No. 29 Chilwell terminus June 1939 ex Adelaide 302."trams, tramways, geelong, chilwell, tram 29 -
 Ballarat Tramway Museum
Photograph - Black & White Photograph/s Geelong 18 at West terminus, 8/01/1956
Photo of No. 18 at West, 2.30pm, last day of operations 8-1-1956. Photographer unknown - same as 5854. Tram has the destination of East. Black and White print contained within the Wal Jack Bendigo and Geelong Album, see Reg Item 5003 for more details. Two copies held. Has written in ink on the rear "No 18 at top of Packingham St (terminus) 2.30pm 8/1/56, Geelong"trams, tramways, geelong, pakington st, west, tram 18 -
 Ballarat Tramway Museum
Photograph - Black & White Photograph/s, 8/01/1956 12:00:00 AM
Black and White print contained within the Wal Jack Bendigo and Geelong Album, see Reg Item 5003 for more details. Photo of No. 18 turning out of Pakington St into Aberdeen St, last day of operations 8-1-1956. Photographer unknown - same as 5854. Shows the arrangement of the overhead and curves at this intersection. Has written in ink on the rear "No. 18 city bound from West to East, turning from Packington St into Aberdeen St 8/1/56. Next day was buses."trams, tramways, geelong, east, west, pakington st, tram 18 -
 Ballarat Tramway Museum
Photograph - Black & White Photograph/s, Leon Marshall Wood, 29/03/1948 12:00:00 AM
Black and White print contained within the Wal Jack Bendigo and Geelong Album, see Reg Item 5003 for more details. Photo of No. 24 in Aberdeen St, 29-3-1948. Wal's album notes that the tram is in the new colour (all green) scheme. Printed on Velox Paper. Tram has the destination of East. Note the "Pay as you enter" sign. Has on the rear in ink "Aberdeen St, Geelong 29-3-48" and the L. M. Wood copyright stamp.trams, tramways, geelong, aberdeen st, east, tram 24 -
 Ballarat Tramway Museum
Photograph - Black & White Photograph/s, Wal Jack, 3/01/1945 12:00:00 AM
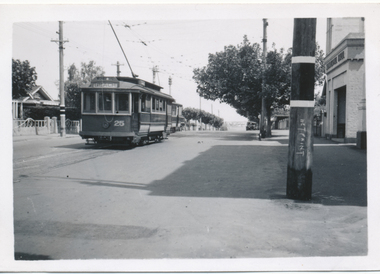
Black and White print contained within the Wal Jack Bendigo and Geelong Album, see Reg Item 5003 for more details. Photo of No. 25 and 1 at the junction between the Newtown and East lines, in Pakington St. Photo by Wal Jack 3/1/1945. City of Newtown and Chilwell offices on the right hand side. i1 - scan of print in the album i2 - rear of image i3 - scan of negative at 3200dpi added 29/6/2020. Has the rear in ink "SEC Geelong No. 25 from Beach to Newtown, No. 1 from East to Chilwell (straight down hill) Newtown Junc. Pakington St 3-1-45". Has the Wal Jack copyright stamp on the rear with the number T326 written in.trams, tramways, geelong, pakington st, newtown, east, tram 25, tram 1 -
 Ballarat Tramway Museum
Photograph - Black & White Photograph/s, 13/05/1947 12:00:00 AM
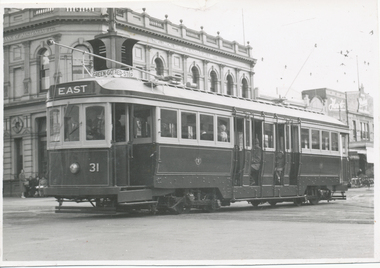
Black and White print contained within the Wal Jack Bendigo and Geelong Album, see Reg Item 5003 for more details. Photo of Car No. 31, crossing Ryrie and Moorabool Streets, first bogie to run in Geelong. Photo taken 13-5-1947. The tram has the destination of East. In the background is "The Union Bank of Australia. Limited". Above the front of the tram is a set of "Bar" traffic lights with signage "Green - Go - Red - Stop" No details on photographer. Has the Union Bank of Australia. Limited building in the background.trams, tramways, geelong, ryrie st, moorabool st, bogie trams, traffic lights, tram 31 -
 Ballarat Tramway Museum
Photograph - Black & White Photograph/s, Wal Jack, 27/06/1955 12:00:00 AM
Black and White print contained within the Wal Jack Bendigo and Geelong Album, see Reg Item 5003 for more details. Photo of Geelong No. 40 in Ryrie St, with the destination of East. Has centre poles in Ryrie St. Photo by Wal Jack 27-6-1955. i1 - scan of print in the album i2 - rear of image i3 - scan of negative at 3200dpi added 27/6/2020. On rear in ink "SEC No. 40 Ryrie St Geelong 27-6-55" Has the Wal Jack copyright stamp but no number written in.trams, tramways, geelong, ryrie st, tram 40 -
 Ballarat Tramway Museum
Photograph - Black & White Photograph/s, Wal Jack, 1/01/1956 12:00:00 AM
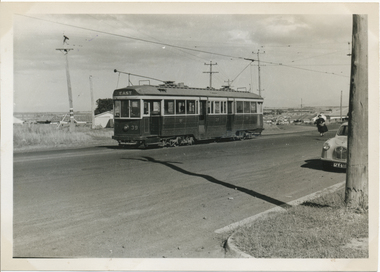
... On rear in ink SEC Geelong / No. 39 (now Ballarat No. 43... Parade Ballarat Ballarat goldfields Trams tramways Geelong East ...Black and White print contained within the Wal Jack Bendigo and Geelong Album, see Reg Item 5003 for more details. Photograph of Geelong tram No. 39 at the East Terminus, 1/1/1956. Photo by Wal Jack. Tram has the destination of East, with few houses directly behind the tram. Their is a lady walking towards the tram. i1 - scan of print in the album i2 - rear of image i3 - scan of negative at 3200dpi added 27/6/2020. On rear in ink SEC Geelong / No. 39 (now Ballarat No. 43) at East Geelong / Sunday 1-1-1956". Has the Wal Jack copyright stamp in the top right hand corner with the number T1301 written in.trams, tramways, geelong, east, tram 39 -
 Ballarat Tramway Museum
Photograph - Black & White Photograph/s - set of 6, Keith Kings, 8/01/1956 12:00:00 AM
Black and White print contained within the Wal Jack Bendigo and Geelong Album, see Reg Item 5003 for more details. Set of six black and white photographs from Keith Kings of the staged closures of the Geelong tramways. Note some of these photographs are very similar to those of Geoff Grant - See Reg Item 485 and 476i7. .1 - No. 18 last tram to East, leaving city - 8/1/1956 - KSK Photo Q(x)(6) .2 - No. 7, last tram at West at terminus - 8/1/1956 - KSK Photo Q(x)(7) - has a group of people standing in front of the tramcar. .3 - No. 6 - last tram at North terminus, with a very large group of people in front of tram. Tram has the destination of North. 4/3/1956 - KSK Photo T(b)(6). .4 - No. 18 - last tram at Newtown terminus, with a very large group of people in front of tram. Tram has the destination of Newtown. 22/1/1956 - KSK Photo R(y)(3). .5 - No. 19, last tram to Eastern Park, at terminus on second last trip, with conductor on front step. 22/1/56, KSK Photo R(y)(2). Tram has the destination of Eastern Park. .6 - No. 1 - last regular tram from Beach to Chilwell, leaving Beach terminus - KSK Photo Q(x)(5).On the rear in ink and with the Keith Kings Copyright stamp: .1 - Geelong - 18 last tam to East leaving city, Sun 8/1/56 - Q(x)(6) .2 - Geelong - 7 - last tram at West at terminus, Sun 8/1/56 - Q(x)(7) .3 - Geelong - 6 - last tram at North terminus, Sun 4/3/56 - T(b)(6) .4 - Geelong - 18 - last tram at Newtown terminus, Sun 22/1/56 - R(y)(3) .5 - Geelong - 19 - last tram to Eastern Park, at terminus on second last trip - Sun 22/1/56 - R(y)(2) .6 - 1 - last regular tram from Beach to Chilwell, leaving Beach terminus, Sun 8/1/56 - Q(x)(5)trams, tramways, geelong, closure, east, north, chilwell, beach, newtown, eastern park, last tram, tram 18, tram 7, tram 6, tram 19, tram 1 -
 Ballarat Tramway Museum
Photograph - Digital Image and Black & White Photograph/s, Valentine & Sons Publishing Co, 1938
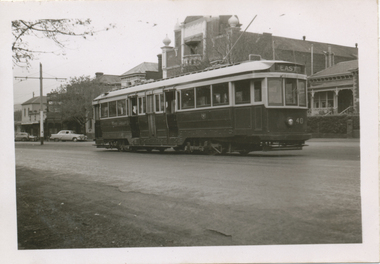
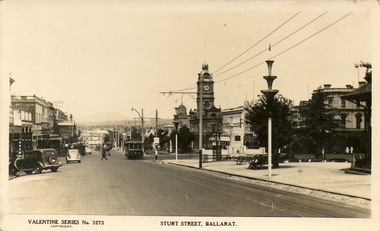
Digital image provided by David Critchley of a postcard looking east along Sturt, north side towards Grenville St, at Doveton St. Has a detailed image of the tram. Tram has the destination of Lydiard St North. Note the decorations along the roadside for the centenary of settlement in the Ballarat district in 1938. Valentine Postcard No. 3273. .1 - large format print of the above image without the lower label. Has "Sturt St, Ballarat c1940's" along bottom edge. Print has "J75" in red ink in the top left hand corner on rear - the tram's Melbourne number.trams, tramways, sturt st, postcards, centenary, tram 14 -
 Ballarat Tramway Museum
Postcard, Rose Stereograph Co, Ryrie St Geelong, 1930s
Reproduction of Rose Series postcard No. 547 of Ryrie St Geelong with tram No. 7 east bound and another tram in the distance. Photo shows the tramway centre poles. Has the old Geelong Post Office (see reference) on the left side of the image.Yields information about Ryrie St Geelong.Reproduction of Rose series postcard No. P547 trams, tramways, geelong, ryrie st, geelong post office, tram 7 -
 Ballarat Tramway Museum
Magazine, State Electricity Commission of Victoria (SECV), SEC News, May June 1953
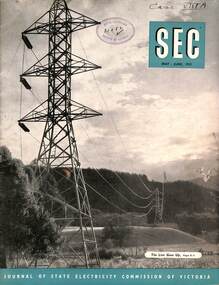
Published for the staff of the SEC, features the Kiewa Valley transmission line, North East towns and workers, industry, Bendigo Tram's Golden Jubilee, (AETA Visit, Mr George Laurens, Doug Dean, Tom Lynch and Basil Miller), electrical safety, meter reading in the country, sports, electric cooking, and sports section. In the retirements were Mr P Pithie, Senior Traffic Inspector Geelong, Mr V Pipps Depot Foreman Geelong and Mr S Watson, Geelong Senior depot clerk. On the inside cover are photos of the package power stations being installed at Geelong, Ballarat (Ballarat B) and Mildura.Demonstrates a SECV Staff magazine.Magazine, 36 pages, black and white production, centre stapled.Has RHSV stamp on the cover and "Case ViiiA" in inktramways, geelong, secv, retirements, ballarat b power station, power stations, bendigo -
 Ballarat Tramway Museum
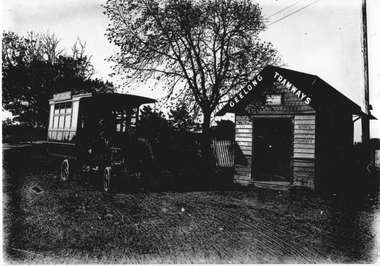
Photograph - Geelong MESCo Bus East Geelong, c1920
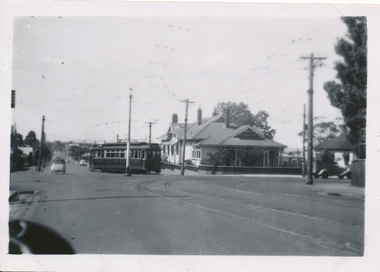
The photo shows the Melbourne Electric Supply Co. (MESCo), bus at the East Geelong terminus. MESCo operated the Geelong tram system from 1912 and opened the tram line to this location "East Geelong" in 1923. The terminus was at the Geelong Cemetery, with a wooden waiting room shelter with signage about the building being used for passengers only and prohibiting the posting of bills. The buses ran from the railway station and Moorabool St wharf from 1912 until they were replaced by trams in 1923. The bus is also seen in item 4315. Yields information about the operation of a bus by MESCo in Geelong.Black and white photograph - plain back.geelong, tramways, mesco, buses, east geelong, shelters -
 Ballarat Tramway Museum
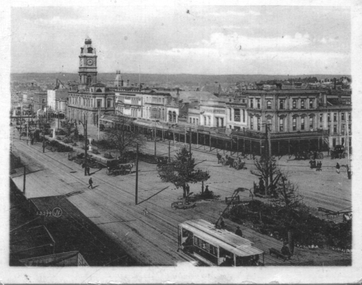
Postcard - Sturt Street looking east, Rose Stereograph Co, c1907
The photo postcard is a black and white version of a Rose Stereographic Co postcard - see item 7379, of Sturt St looking East from about Dawson St with the shops on the southern side and the Town Hall in the view. Has an ESCo tram in the bottom right-hand corner. Yields information about the appearance of Sturt St following the introduction of electric trams in 1905 and has a strong association with the work of Rose Stereograph Co.Postcard with a handwritten letter on rear. Dated 4/4/07See image 2 for details of the handwritten note on the rear. tramways, trams, sturt st, postcards, dawson st, esco -
 Ballarat Tramway Museum
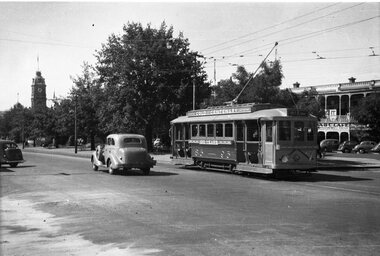
Negative, Wal Jack, 1951
Yields information about the gold tram in service.Negative and Digital image of the Wal Jack Ballarat Negative file of No. 23, as the Gold Tram No. 23 east bound in Sturt St at Dawson St, though it has the destination of Grey St Sebastopol. In the background is the ABC Cafe, selling Swallow's Ice Cream. trams, tramways, sturt st, gold tram, dawson st, tram 23 -
 Ballarat Tramway Museum
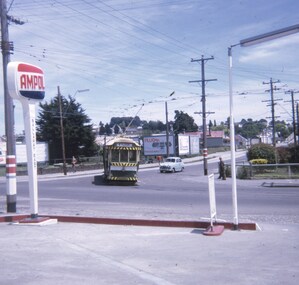
Slide - 27 mm sq slide/s - set of 2, Andrew Howlett, Bogie tram turning from Main St into Barkly St, Dec. 1968
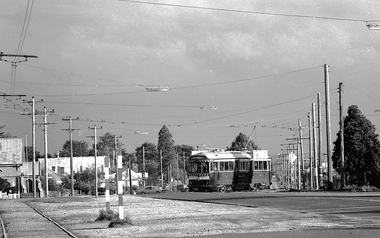
... the services in Barkly St East Ballarat. Ballarat Tramways trams Main ...Yields information about the services in Barkly St East Ballarat.Set of two Colour slides, Kodak white cardboard mount, developed Dec. 1968 of: .1 - Bogie tram turning from Main St into Barkly St, on its way to Mt Pleasant. Shows the tram stops at this location and an Ampol Service station sign. .2 - possibly the same tram, in Barkly St.ballarat, tramways, trams, main road, barkly st, mt pleasant, tram 35, ampol, main st -
 Ballarat Tramway Museum
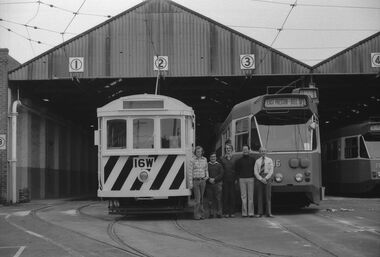
Photograph - Digital image, 28/11/1976 12:00:00 AM
Digital image of a BTPS training / qualification day held on 28/11/1976, at East Preston depot: From left: Richard Gilbert, Peter Hill, Paul Nicholson, Bruce Davey and Jack Chadwick standing between trams 16W (the only tram at the time on the MMTB network with a manual lap brake) and Z16. Peter Winspur advised 18/5/2020: Paul was an M&MTB driver at the time. Peter Hill would have been doing his first day and Jack Chadwick qualified as driver on that day along with Paul. We managed to train Peter in a few weeks as he was back on 19 December! Just in time for the summer running. Inspector Bruce Davey was the trainer/instruction/examiner driver. Image supplied by Paul Nicholson 17/5/2020. See Reg Item 7775 for a photo of just the two cars.trams, tramways, btps, training, z class trams, east preston, mmtb, tram 16w, tram 16 -
 Ballarat Tramway Museum
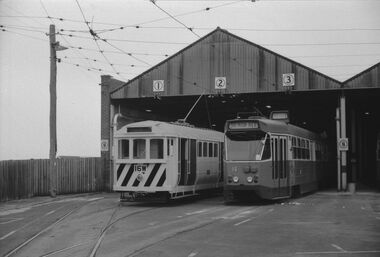
Photograph - Digital image, 28/11/1976 12:00:00 AM
Digital image of a BTPS training / qualification day held on 28/11/1976, at East Preston depot with trams 16W (the training tram) and Z 24 alongside on Nos. 2 and 3 road at the depot. Image supplied by Paul Nicholson 17/5/2020. See Reg Item 7774 for a photo of the people involved in training that day.trams, tramways, btps, training, z class trams, east preston, mmtb, tram 16w, tram 16