Showing 303 items
matching bendigo railway station
-
 Ballarat Tramway Museum
Slide - 35mm slide/s - set of 2, Peter Moses, Jan. 1969
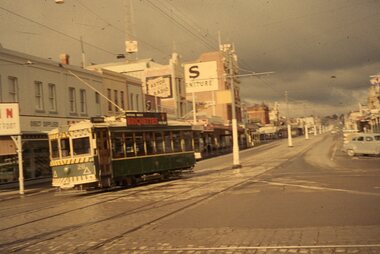
2059.1 - Photo of SEC Ballarat No.41 passing through the railway gates at Ballarat Railway Station, Lydiard St. North, with the destination of "Sebastopol". Tram has a SEC "Everything's under control in my all electric kitchen". Reid's Coffee Palace is the background. Photo shows the Ballarat Railway station clock tower, part of the train shed and the signals on the station side of the gates and another bogie tram waiting at the end of the double track in Lydiard St. for No. 41 to pass. 2059.2 - ditto, but with the two trams passing each other. The Provincial Hotel is also in the photograph. Kodak cardboard mount slide, taken by Peter Moses assumed Jan. 1969, dated only "Jan", but date lines up with Bendigo slides and type of numbering. Could be 1970.On the rear of the slides in black ink "P. Moses" along bottom left hand corner in black ink.tramways, trams, railway crossing, lydiard st, railway station, reid's coffee palace, provincial hotel, tram 41 -
 Ballarat Tramway Museum
Slide - 35mm slide/s, Wal Jack, 17/06/1962 12:00:00 AM
Bendigo, Birney No. 28 turning into Mitchell St from Pall Mall, heading for Quarry Hill. Photo taken after tram has passed, looks along Mitchell Street towards railway station, with centre of the road poles. Not well in focus. Tram has Briquettes roof ad.'SEC Bendigo, Birney No. 28 in Mitchell St. 17-6-62'tramways, trams, bendigo, mitchell st, tram 28 -
 Ballarat Tramway Museum
Slide - 35mm slide/s, Bob Wilson, Mar. 1972
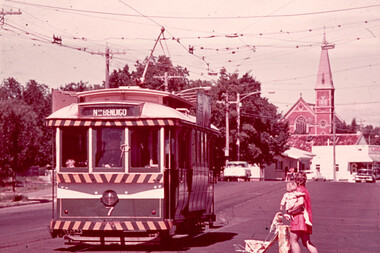
White cardboard mount, 35mm slide, from the Association of Railway Enthusiast's film strip titled "Provincial Tramway Film Strip" of Bendigo No. 7 inbound in High St. Tram has the destination of North Bendigo and is entering the Fire Station Loop. Has Golden Square Uniting Church in background. The film strip notes (Reg. Item 2560), provided the following caption details: "Despite their age and decrepitude the provincial trams provided a useful service to the end. Here No. 7 inbound from "GOLDEN SQUARE" waits for a Mother and infant to board while a pair of juvenile eyes watch from the front window. Mar. '72 (Bob Wilson)" See image btm2584p.tif for high level scan of image. Stamped on base of slide "11793" and written in ink on top edge "No. 8 Golden Square line Bendigo"tramways, trams, are, film strip, high st, fire station loop, passengers, tram 7 -
 Ballarat Tramway Museum
Slide - 35mm slide/s, Travis Jeffrey, c1961
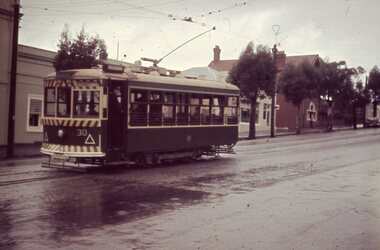
Agfa plastic mount (blue base, white cover) with a photo of Bendigo No. 30 in Mitchell St, just before start of the double track section, c1962. Photo taken during a rainy day. Tram has destination of Eaglehawk. Note SEC crewman standing by door and the passengers looking towards the gutter at the railway station stop. Apparently picking up passengers ex the train on a Sunday. See Other Information regarding a possible date of the slide."BES 1" in penciltramways, trams, bendigo, mitchell st, tram 30 -
 Ballarat Tramway Museum
Photograph - Illustration/s, Windsor Publications, Bendigo Birney 30
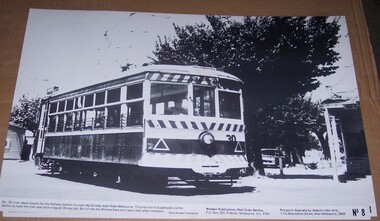
Large print illustration of SEC Bendigo Birney No. 30 ex depot running out to the Railway station on a Sunday prior to running to Eaglehawk. No. 8 of a series of illustrations. Caption notes that Birney's no longer do this job - photo possible mid to late 1960's. Photo Windsor Publications. Two copies held. Printed on heavy cardboard with a gloss sheet.On rear of copy 1, letters "TBT"trams, tramways, birney, bendigo, windsor publications -
 Ballarat Tramway Museum
Photograph - Black & White Photograph/s - set of 2, late 1920's, early 1930's
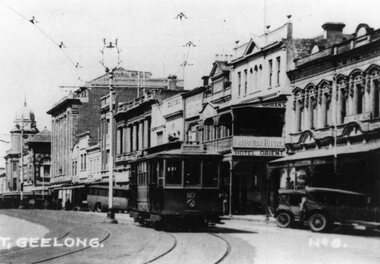
Yields information about the appearance of Geelong's Birney trams during the 1940's.Black and White Photograph of Geelong No. 10, Malop St, travelling north west to the railway station, during the late 1920s, between Gheringhap and Moorabool St. Tram has the destination of "Station", with the National Mutual, Moran's Hotel Orient in the background. Melbourne Bitter advertisement on the hotel. A number of soft top cars parked in the street. Photo probably from a postcard, has the words "T. Geelong. No. 8" along part of the bottom edge. Photo from the Peter Duckett Collection. For a close up of the tram itself see Reg Item 5822. 4335.1 - Black and White print contained within the Wal Jack Bendigo and Geelong Album, see Reg Item 5003 for more details. Added 7/8/2013. This item is the larger image of the two.On rear, stamped in black ink "Photo supplied from P.W. Duckett Collection, All Rights Reserved, 69 Howitt Rd. Nth Caulfield 3161." In hand writing on the rear "47)" in top left hand corner. In the body of the photograph "Malop St travelling NW to Station, between Gheringhap and Moorabool Sts." 4335.1 - in ink on rear. "Geelong No. 10 Original Condition, photo about 1930" and "Please Return"trams, tramways, geelong, malop st, mesco, tram 10 -
 Ballarat Tramway Museum
Photograph - Black & White Photograph/s
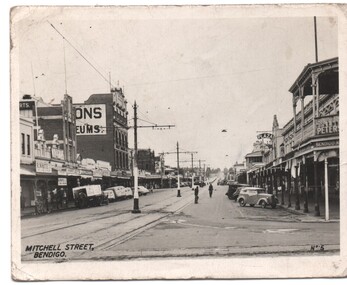
Black and white photograph, reproduced for sale, of Mitchell St Bendigo looking east towards the Railway Station. Has the title "Mitchell Street Bendigo" in the bottom left hand corner and " No. 5" in the bottom right hand corner. Shows the tramway overhead, track, centre poles. Photo early 1950's. trams, tramways, bendigo, mitchell st -
 Ballarat Tramway Museum
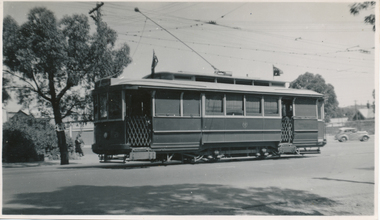
Photograph - Black & White, Bendigo 3 climbing Mitchell St, late 1950's
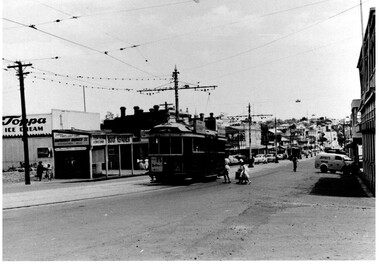
Black and White photograph, of Bendigo 3 climbing Mitchell St, near the Railway Station with the Destination of Quarry Hill. Has a Hutton's Ham ad on the front drivers panel and two rood ads. In the background are Sandhurst Dairies shop advertising Toppa Ice Cream, a boot repairer and a van marked Jeffreys Bread parked on the north side of Mitchell St. Nearing the point where the double track became single - see the signal wire insulators in the overhead. Printed on Fujichrome paper. Two copies held."TMSV Sales" stamp on rear. On rear of in ink 'HTT16 = MM N 102 = Geel 32 = BED 3"trams, tramways, bendigo, mitchell st, quarry hill, overhead, tram 3 -
 Ballarat Tramway Museum
Postcard, Pall Mall Bendigo, early 1900's
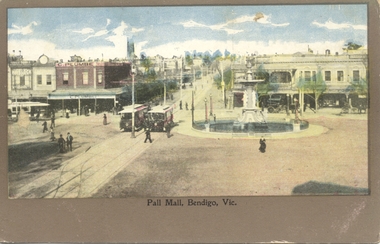
Postcard, coloured, Pall Mall Bendigo, looking east towards the Railway Station. Has three trams in the view, along with the fountain. Has C. Plumbe store on the north east corner of the intersection. Title "Pall Mall, Bendigo Vic." Note the small space for a message under the image. On rear, undivided back, with "Post card", "Address to be written on this side" and position for stamp. In the top left hand corner, has "Ian Barkla's" hand stamp. Ian Barkla stamptrams, tramways, bendigo, pall mall -
 Ballarat Tramway Museum
Slide - 35mm slide/s - set of 11, Eldon Hogan, mid 1960's to early 1970's
Set of 11 Agfa Plastic mounted slides - from the Eldon Hogan collection - possibly on an ARE Bendigo tours late 1960's or early 1970's with No. 18 Scanned on the Canon scanner at the depot 15/12/1971 at the time of the installation of the scanner. .1 - No 18 at Golden Square terminus with Billy Rodda's Golden Square Hotel in the background. .2 - ditto and the Victoria Bitter fence alongside the hotel. .3 - ditto and another single trucker. .4 - No. 18 at the Fire Station Loop, Golden Square line, with destination of Railway Station. .5 - No. 18 passing the Central Deborah mine, Violet St. Tram has a Briquette advertisement on the roof - the flaming briquettes. .6 - Another bogie tram at ditto. .7 - No. 18 and No. 6 crossing McCrae St loop near the depot junction? .8 - ditto .9 - No. 18 and a single trucker at the North Bendigo terminus. .10 - ditto .11 - with the single trucker leaving.tramways, trams, bendigo, golden square, central deborah, north bendigo, mccrae st, tram 18, tram 6 -
 Ballarat Tramway Museum
Photograph - Black & White Photograph/s, Wal Jack, 7/03/1954 12:00:00 AM
Black and White print contained within the Wal Jack Bendigo and Geelong Album, see Reg Item 5003 for more details. Photo of No. 21 in Mitchell St, near the Railway Station, 7-3-1954. Photo by Wal Jack. Printed on Ilford paper. See image i2 for rear of photograph. See image i3 for hi res scan of negative On the rear in blue ink "SEC Bendigo No 21 in Mitchell St near Rly Stn Sunday morning 7-3-54" with Wal Jack copyright stamp in the top right hand corner and the number "T67PC" written in.trams, tramways, bendigo, mitchell st, tram 21 -
 Ballarat Tramway Museum
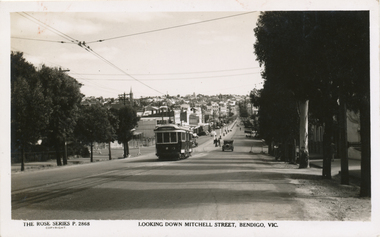
Postcard, Rose Stereograph Co, "Looking down Mitchel St Bendigo Vic"
Postcard contained within the Wal Jack Bendigo and Geelong Album, see Reg Item 5003 for more details. Rose Series Postcard No. 2868, titled "Looking down Mitchel St Bendigo Vic", from the railway overbridge. Has bogie tram No. 23 descending the hill, with the destination of Eaglehawk. Would appear the railway station entrance has been barriered off. Published by the Rose Stereograph Co. Armadale Vic, has the rose logo on the rear and a statement "A real photograph produced in Australia". No space for the stamp or address line. On rear in ink "Bogie 23" and in pencil "WJ"trams, tramways, bendigo, rose postcards, mitchell st, tram 28 -
 Ballarat Tramway Museum
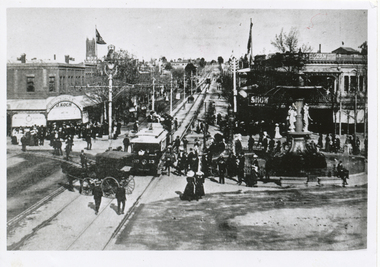
Photograph - Black & White Photograph/s, The Bendigonian, Sep. 2005
Black and White copy print contained within the Wal Jack Bendigo and Geelong Album, see Reg Item 5003 for more details. Photo of looking east along Mitchell St towards the Railway Station with tram No. 13 and a double deck trailer - has the centre poles along Mitchell St. in the photograph. In the background is a J. Koch and the Bendigo Supply Stores. Has fountain in photograph. Copied by Keith Kings from The Bendigonian 19/9/1905. On rear in ink " SA782, Bendigo, No. 13 - 3 window saloon Charing Cross. Note:- Crossover in Mitchell St.". Copied ex "The Bendigonian 19/9/1905."trams, tramways, bendigo, charing cross, horse trams, mitchell st -
 Ballarat Tramway Museum
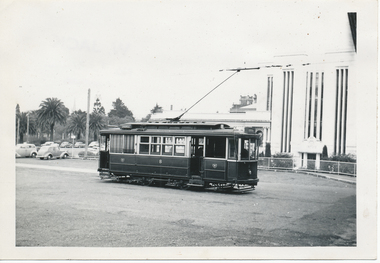
Photograph - Black & White Photograph/s, Wal Jack, 27/06/1955 12:00:00 AM
Black and White print contained within the Wal Jack Bendigo and Geelong Album, see Reg Item 5003 for more details. Photo of Geelong No. 8 at the Railway Station with the Gordon Institute buildings in the background. The tram has the destination of Chilwell. Photo by Wal Jack 27/6/1955. Printed on Ilford paper. i1 - scan of print in the album i2 - rear of image i3 - scan of negative at 3200dpi added 27/6/2020. On rear in ink "SEC Geelong No. 8 to Chilwell at Geelong Station". Has the Wal Jack copyright stamp in the top right hand corner with the number "T331" written in and the date "27 Jun 1955" stamped with a purple ink hand date stamp.trams, tramways, geelong, railway station, tram 8 -
 Ballarat Tramway Museum
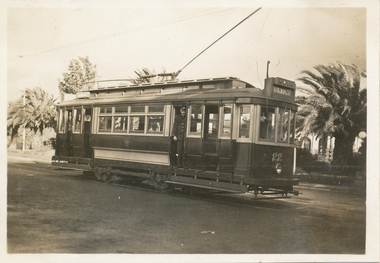
Photograph - Black & White Photograph/s, Wal Jack, Jun. 1939
Black and White print contained within the Wal Jack Bendigo and Geelong Album, see Reg Item 5003 for more details. Photo of No. 22 at the Geelong Railway Station. Photographer unknown - possibly Wal Jack - see date on Reg Item 5861. Wal's album notes dates the photo as June 1939. Printed on Kodak Velox paper. The tram has two trolley poles, the destination of Newtown. A conductor is standing in one of the doorways. i1 - scan of print in the album i2 - rear of image i3 - scan of negative at 3200dpi added 6/6/2020. trams, tramways, geelong, railway station, tram 22 -
 Ballarat Tramway Museum
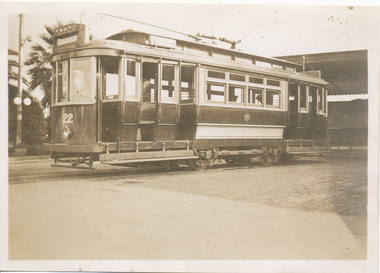
Photograph - Black & White Photograph/s, Wal Jack, Jun. 1939
Black and White print contained within the Wal Jack Bendigo and Geelong Album, see Reg Item 5003 for more details. Photo of No. 22 at the Geelong Railway Station. Photographer unknown same as 5859 - possibly Wal Jack - see date on Reg Item 5861. Wal's album notes dates the photo as June 1939. Printed on Kodak Velox paper. The tram has two trolley poles. i1 - scan of print in the album i2 - rear of image i3 - scan of negative at 3200dpi added 6/6/2020. trams, tramways, geelong, railway station, tram 22 -
 Ballarat Tramway Museum
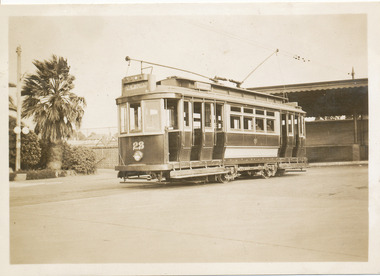
Photograph - Black & White Photograph/s, Wal Jack, Jun. 1939
Black and White print contained within the Wal Jack Bendigo and Geelong Album, see Reg Item 5003 for more details. Photo of No. 23 at the Geelong Railway Station with the station buildings in the background. Photographer unknown - handwriting is the same as other photos such as Reg item 5850.. Wal's album notes dates the photo as June 1939. Printed on Kodak Velox paper. The tram has two trolley poles and the destination of Newtown. i1 - scan of print in the album i2 - rear of image i3 - scan of negative at 3200dpi added 6/6/2020. Has the rear in ink "Geelong Tramways, No. 23 "Two man trams", built by A. Pengelley South Australia"trams, tramways, geelong, railway station, tram 23 -
 Ballarat Tramway Museum
Photograph - Black & White Photograph/s, Wal Jack, 3/01/1945 12:00:00 AM
Black and White print contained within the Wal Jack Bendigo and Geelong Album, see Reg Item 5003 for more details. Photo of No. 17 from the Railway Station turning out of Railway Terrace into Mercer St. 3-1-1945. Printed on Ilford Paper. Tram has the destination of West. i1 - scan of print in the album i2 - rear of image i3 - scan of negative at 3200dpi added 30/6/2020.Has the rear in ink "SEC Geelong No. 17 from the Railway Station turning out of Railway Terrace into Mercer St. 3rd January 1945". Has the Wal Jack copyright stamp on the rear with the number T319 written in.trams, tramways, geelong, mercer st, railway station, tram 17 -
 Ballarat Tramway Museum
Photograph - Black & White Photograph/s, 8/01/1956 12:00:00 AM
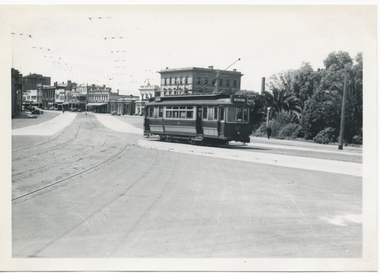
Black and White print contained within the Wal Jack Bendigo and Geelong Album, see Reg Item 5003 for more details. Photo of Geelong No 31 bound for North Geelong at Railway station junction, Malop and Mercer Streets 8/1/1956. General view of junction in the area with a Olympic tyre / service station No details on photographer. On rear in ink "No.31 bound for North Geelong at Railway Stn Junc Malop and Mercer Streets 8/1/56"trams, tramways, geelong, north, railway station, malop st, mercer st, tram 31 -
 Ballarat Tramway Museum
Photograph - Black & White Photograph/s, 11/07/1950 12:00:00 AM
Black and White print contained within the Wal Jack Bendigo and Geelong Album, see Reg Item 5003 for more details. Photo of an illuminated street sign, lamp, near Geelong Railway Station, at Mercer St corner, 11-7-1950. Photographer not known. Photo is glued into album. Sign has the words "Geelong Electric Tramways / Board tram at Curve" with a hand and finger pointing the direction to walk in.trams, tramways, geelong, signs, railway station -
 Bendigo Historical Society Inc.
Document - IAN DYETT COLLECTION: AUCTION CATALOGUE - CARTAGE CONTRACTOR'S STOCK AND PLANT
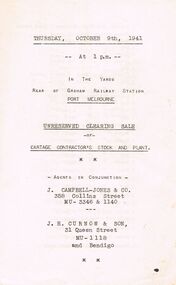
Auction catalogue for a sale of Cartage Contractor's Stock and Plant at the rear of Graham Railway Station, Port Melbourne on 9th October, 1941. Sale consisted of horses of various ages and descriptions, horse drawn vehicles and harness. Agents in Conjunction were J. Campbell-Jones & Co. and J. H. Curnow & Son.business, auctioneers, j h curnow & son pty ltd, ian dyett collection - auction catalogue - cartage contractor's stock and plant, graham railway station - port melbourne, j campbell-jones & co, j h curnow & son -
 Bendigo Historical Society Inc.
Book - MERLE HALL COLLECTION: THE ALBUM OF SANDHURST VIEWS
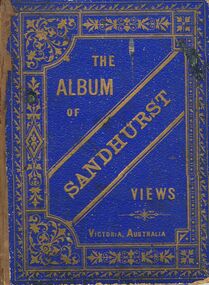
A bound book of 16 drawings B&W (lithographs?) in ''photographic'' detail of well-known Sandhurst Views - Town Hall, Mechanics Institute, Masonic Hall, Bendigo Hospital, Bendigo Benevolent Asylum, Post and Telegraph Offices, Mining Exchange, View from Post Office Tower looking East, View from Post Office Tower looking West, Central State School, Alexandra Fountain, Upper Lake,Rosalind Park, Fernery Rosalind Park, St Pauls Church, Bishop's Palace, General View - New Chum Line, Koch's ''Pioneer'' Crushing Works, Quartz Crushing batteries, Town Hall - Eaglehawk, Railway Station. Appended with two pages summarizing Sandhurst history; current councillors and officers, brief review of five places - Bendigo Hospital, Benevolent Asylum, Mechanics Institute and Free Library, School of Mines and Industries, Masonic Hall. Date is given as ''The present (1888) occupants are ....'' -
 Bendigo Historical Society Inc.
Map - Bush Fire Control Map Bendigo District
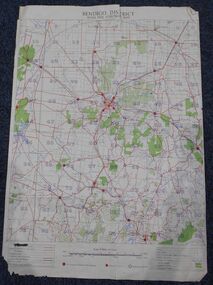
A Bush Fire Control map is a valuable tool used by emergency services and communities to respond to respond to bushfires.Cream coloured parchment map showing roads, railway lines, telephone lines, rivers, creeks and water courses. Also marked are houses, Post Offices, Police stations, bush fire brigades, water channels, swamps, marshes, dense, medium and scattered timber, aqueducts and reservoirs. Villages, districts and Towns are clearly marked. Printed in red, green, black and blue. Very clear and easy to read. Undated.bush fires, bendigo area map -
 Bendigo Historical Society Inc.
Photograph - PHOTOGRAPH. ELMORE RAILWAY STATION, 1993
... Photograph. Elmore Railway Station. Looking at Silos beside ...Photograph. Elmore Railway Station. Looking at Silos beside the line. -
 Bendigo Historical Society Inc.
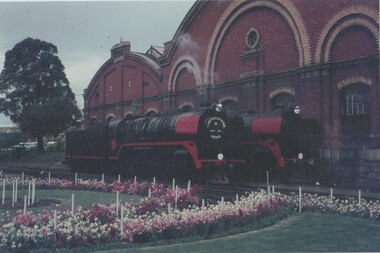
Photograph - RAILWAY COLLECTION: TWO PHOTOGRAPHS OF R761 RUN BENDIGO TO MELBOURNE
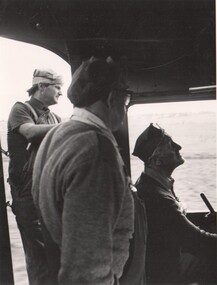
... B R761 gathering steam at Bendigo Station Photograph RAILWAY ...Two photographs of for a trial record run Bendigo to Melbourne (undated) on retirement of R761 engine A three railway staff in R761 engine cabin B R761 gathering steam at Bendigo Station -
 Bendigo Historical Society Inc.
Photograph - RAILWAY COLLECTION: VARIOUS PHOTOS OF BENDIGO LOCOMOTIVE YARD AND STATION, 1969
Various photographs of Benigo Railway Locomotive yard and staff A Bendigo locomotive yard and two engines B 1959 Bendigo Workshops cricket match,I Fisher batting C Waly Meagher, Dimmy Muldoon & Ned Breaton D Arthur Eaton, Acting Manaager Bendigo North Railways Workshop (taken between Sept & Dec 1969 -
 Bendigo Historical Society Inc.
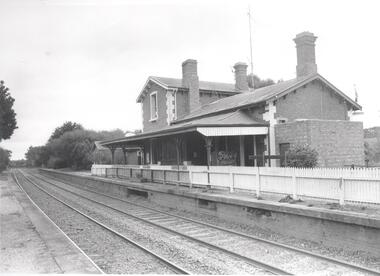
Photograph - PHOTOGRAPH. HARCOURT RAILWAY STATION
... Photograph. Harcourt Railway Station. Photograph PHOTOGRAPH ...Photograph. Harcourt Railway Station. -
 Bendigo Historical Society Inc.
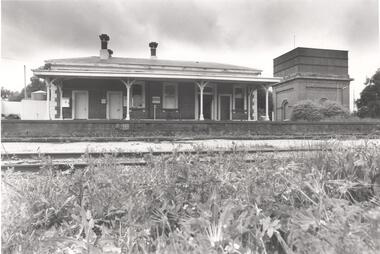
Photograph - PHOTOGRAPH. ELMORE RAILWAY STATION, 1993
... Photograph. Elmore Railway Station. Tracks in foreground. Water ...Photograph. Elmore Railway Station. Tracks in foreground. Water tower to the right of the Building. -
 Ballarat Tramway Museum
Slide - 35mm slide/s, early 1960's
Bendigo Charing Cross, looking east towards railway station, with SEC No. 7 about to depart for Eaglehawk. A Birney tram in background heading for Quarry Hill. Photo shows 'Ezywalkin' and 'Fountain Plaza' buildings, has large white with black lettering road signs on left. On centre pole in front of tram is smaller road direction signs (yellow with black letters) for Echuca, Heathcote and Melbourne. Tram has dash canopy lights, early 1960's.niltramways, trams, bendigo, charing cross, quarry hill, eaglehawk, tram 7 -
 Sunbury Family History and Heritage Society Inc.
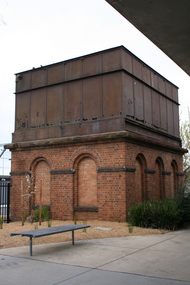
Photograph, 2001
... of the major stations along the Bendigo line. water tanks railway ...The water tank stands on Sunbury Railway station and was in use when steam trains were used along Bendigo line. After travelling 37 kms (25 miles) from Melbourne, it was necessary for the trains to replenish their water supply at Sunbury. The presence of the water tank at Sunbury Station is an indicator that it was one of the major stations along the Bendigo line. A coloured photograph of a rectangular water tower. The first level is a brick construction and the metal tank is on top of it. water tanks, railway stations, steam travel