Showing 448 items
matching great fire
-
 Flagstaff Hill Maritime Museum and Village
Ceramic - Jug, 1920-1940
Stoneware is a rather broad term for pottery or other ceramics that is fired at a relatively high temperature. A modern technical definition is a vitreous or semi-vitreous ceramic made primarily from stoneware clay or non-refractory fire clay. Whether vitrified or not, it is non-porous, it may or may not be glazed. Historically, across the world, it has been developed after earthenware and before porcelain and has often been used for high-quality as well as utilitarian wares. As a rough guide, modern earthenwares are normally fired in a kiln at temperatures in the range of about 1,000°C (1,830 °F) to 1,200 °C (2,190 °F); stoneware's at between about 1,100 °C (2,010 °F) to 1,300 °C (2,370 °F); and porcelains at between about 1,200 °C (2,190 °F) to 1,400 °C (2,550 °F). Historically, reaching high temperatures was a long-lasting challenge, and temperatures somewhat below these were used for a long time. Earthenware can be fired effectively as low as 600°C, achievable in primitive pit firing, but 800 °C was more typical. Stoneware also needs certain types of clays, more specific than those able to make earthenware, but can be made from a much wider range than porcelain. A domestic item used to store food products as glazing makes the container non-porous, often used for pickling. Or larger containers for kitchen flour. Items age is difficult to determine given the same techniques for making stoneware are in use today. Stoneware containers were made by many potteries in Australia and England. They were in common domestic use before plastics were invented around 1940 to store goods so this subject item is probably from around 1900 to the 1940s. Item's significance is difficult to determine given it is not associated with a place, person, historic event, or manufacturer. Its significance lies with its use as a domestic object giving today a view into our social past.Brown Stoneware jug with short neckThe number "1" under neck flagstaff hill, warrnambool, shipwrecked coast, flagstaff hill maritime museum, shipwreck coast, flagstaff hill maritime village, great ocean road, jug, stoneware jug, salt glaze -
 Flagstaff Hill Maritime Museum and Village
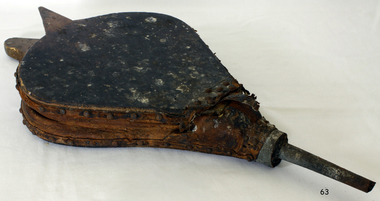
Domestic object - Bellows, Late 19th to Early 20th century
The fireplace was the main heating source for small houses before 1900, so a bellows to coax a flame from a dying fire was important. Early bellows were a bag made from the skin of a small animal and a piece of metal, usually brass, to direct the gust of air created by squeezing the bellows to fan the flames. Such bellows existed in China at least since the 5th century BC, when it was invented, and had reached Europe by the 16th century. In 240 BC, The ancient Greek inventor Ctesibius of Alexandria independently invented a double-action piston bellow used to lift water from one level to another.An item in domestic use in homes to coax a domestic fire into flame, the subject item was probably used in the late 19th to early 20th century home with open fireplaces as a domestic object. It gives a snapshot into how domestic heating was provided using wood or coal before electricity or gas came into regularly used.Bellows wood, leather and metal, parts Noneflagstaff hill, warrnambool, shipwrecked coast, flagstaff hill maritime museum, flagstaff hill maritime village, great ocean road, bellows, blacksmith bellows, fire bellows -
 Flagstaff Hill Maritime Museum and Village
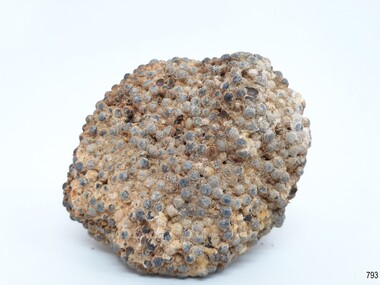
Functional object - Lead shot, Circa 1877
This artifact is a sample of small caliber lead shot recovered by Flagstaff Hill divers from the wreck of the Loch Ard in 1975. Included in her diverse and valuable cargo were 22 tons of lead shot, packed in cloth bags and wooden casks. Bulk quantities of lead shot, uniformly round balls of dull grey metal ranging from 2mm “birdshot” to 8mm “buckshot”, were routinely exported to the Australian colonies. Shot was used mostly as projectiles fired from smooth bored guns to bring down moving targets such as wild ducks and small game. It was also useful as ballast, when a dense, “pourable” weight was required to fill cavities or establish volume within a measuring container. The production of consistently round spheres of lead shot required the pouring of molten metal through a sieve and then a long drop through the atmosphere to a water filled basin for final cooling and collection. This “shot tower” process was first patented by William Watts of Bristol in 1782. His calculation of a 150 feet fall was not only to form evenly spherical droplets through surface tension, but also to provide partial cooling and solidification to each shot before they hit the water below. The value of his innovation was the minimising of indentation and shape distortion, avoiding the expense of re-smelting and re-moulding the lead. Lead shot was already being produced in Australia at the time the Loch Ard sinking in March 1878. James Moir had constructed a 157 feet circular stone shot tower near Hobart in 1870, with a peak annual production of 100 tons of lead shot sold in 28 pound linen bags. However colonial demand exceeded this source of local supply. The continued strength of the market for lead shot in the Colony of Victoria prompted substantial investment in additional productive capacity in Melbourne in the next decade. In 1882 Richard Hodgson erected the 160 feet round chimney-shaped Clifton Hill shot tower on Alexandra Parade (VHR H0709) and in 1889 Walter Coop built the 160 feet square tower-shaped Melbourne Central shot tower on La Trobe Street (VHR H0067). At its peak, the Coop Tower produced 6 tons of lead shot per week, or 312 tons per annum. History of the Loch Ard: The Loch Ard got its name from "Loch Ard" a loch that lies to the west of Aberfoyle, and the east of Loch Lomond. It means "high lake" in Scottish Gaelic. The vessel belonged to the famous Loch Line which sailed many vessels from England to Australia. The Loch Ard was built in Glasgow by Barclay, Curle & Co. in 1873, the vessel was a three-masted square-rigged iron sailing ship that measured 79.87 meters in length, 11.58 m in width, and 7 m in depth with a gross tonnage of 1693 tons with a mainmast that measured a massive 45.7 m in height. Loch Ard made three trips to Australia and one trip to Calcutta before its fateful voyage. Loch Ard left England on March 2, 1878, under the command of 29-year-old Captain Gibbs, who was newly married. The ship was bound for Melbourne with a crew of 37, plus 17 passengers. The general cargo reflected the affluence of Melbourne at the time. Onboard were straw hats, umbrellas, perfumes, clay pipes, pianos, clocks, confectionery, linen, and candles, as well as a heavier load of railway irons, cement, lead, and copper. There were other items included that were intended for display in the Melbourne International Exhibition of 1880. The voyage to Port Phillip was long but uneventful. Then at 3 am on June 1, 1878, Captain Gibbs was expecting to see land. But the Loch Ard was running into a fog which greatly reduced visibility. Captain Gibbs was becoming anxious as there was no sign of land or the Cape Otway lighthouse. At 4 am the fog lifted and a lookout aloft announced that he could see breakers. The sheer cliffs of Victoria's west coast came into view, and Captain Gibbs realised that the ship was much closer to them than expected. He ordered as much sail to be set as time would permit and then attempted to steer the vessel out to sea. On coming head-on into the wind, the ship lost momentum, the sails fell limp and Loch Ard's bow swung back towards land. Gibbs then ordered the anchors to be released in an attempt to hold their position. The anchors sank some 50 fathoms - but did not hold. By this time the ship was among the breakers and the tall cliffs of Mutton Bird Island rose behind. Just half a mile from the coast, the ship's bow was suddenly pulled around by the anchor. The captain tried to tack out to sea, but the ship struck a reef at the base of Mutton Bird Island, near Port Campbell. Waves subsequently broke over the ship and the top deck became loosened from the hull. The masts and rigging came crashing down knocking passengers and crew overboard. When a lifeboat was finally launched, it crashed into the side of Loch Ard and capsized. Tom Pearce, who had launched the boat, managed to cling to its overturned hull and shelter beneath it. He drifted out to sea and then on the flood tide came into what is now known as Lochard Gorge. He swam to shore, bruised and dazed, and found a cave in which to shelter. Some of the crew stayed below deck to shelter from the falling rigging but drowned when the ship slipped off the reef into deeper water. Eva Carmichael a passenger had raced onto the deck to find out what was happening only to be confronted by towering cliffs looming above the stricken ship. In all the chaos, Captain Gibbs grabbed Eva and said, "If you are saved Eva, let my dear wife know that I died like a sailor". That was the last Eva Carmichael saw of the captain. She was swept off the ship by a huge wave. Eva saw Tom Pearce on a small rocky beach and yelled to attract his attention. He dived in and swam to the exhausted woman and dragged her to shore. He took her to the cave and broke the open case of brandy that had washed up on the beach. He opened a bottle to revive the unconscious woman. A few hours later Tom scaled a cliff in search of help. He followed hoof prints and came by chance upon two men from nearby Glenample Station three and a half miles away. In a complete state of exhaustion, he told the men of the tragedy. Tom then returned to the gorge while the two men rode back to the station to get help. By the time they reached Loch Ard Gorge, it was cold and dark. The two shipwreck survivors were taken to Glenample Station to recover. Eva stayed at the station for six weeks before returning to Ireland by steamship. In Melbourne, Tom Pearce received a hero's welcome. He was presented with the first gold medal of the Royal Humane Society of Victoria and a £1000 cheque from the Victorian Government. Concerts were performed to honour the young man's bravery and to raise money for those who lost families in the disaster. Of the 54 crew members and passengers on board, only two survived: the apprentice, Tom Pearce, and the young woman passenger, Eva Carmichael, who lost her family in the tragedy. Ten days after the Lochard tragedy, salvage rights to the wreck were sold at auction for £2,120. Cargo valued at £3,000 was salvaged and placed on the beach, but most washed back into the sea when another storm developed. The wreck of Lochard still lies at the base of Mutton Bird Island. Much of the cargo has now been salvaged and some items were washed up into Lochard Gorge. Cargo and artifacts have also been illegally salvaged over many years before protective legislation was introduced in March 1982. One of the most unlikely pieces of cargo to have survived the shipwreck was a Minton majolica peacock- one of only nine in the world. The peacock was destined for the Melbourne 1880 International Exhibition. It had been well packed, which gave it adequate protection during the violent storm. Today the Minton peacock can be seen at the Flagstaff Hill Maritime Museum in Warrnambool. From Australia's most dramatic shipwreck it has now become Australia's most valuable shipwreck artifact and is one of very few 'objects' on the Victorian State Heritage Register.The shipwreck of the Loch Ard is of significance for Victoria and is registered on the Victorian Heritage Register ( S 417). Flagstaff Hill has a varied collection of artifacts from Loch Ard and its collection is significant for being one of the largest accumulation of artifacts from this notable Victorian shipwreck of which the subject items are a small part. The collection's objects give us a snapshot of how we can interpret the story of this tragic event. The collection is also archaeologically significant as it represents aspects of Victoria's shipping history that allows us to interpret Victoria's social and historical themes of the time. Through is associated with the worst and best-known shipwreck in Victoria's history.Lead shot; a group of mixed -sized lead shot. Small 2mm shot is embedded in a sea sediment clump of concretion. Also in the group are also 5 single 2mm shot and 4 single 4mm shot that are clean and free of sediment. The shot was recovered from the wreck of the Loch Ard.Nonewarrnambool, shipwreck coast, flagstaff hill, flagstaff hill maritime village, flagstaff hill maritime museum, shipwreck artefact, lead shot, loch ard, colonial industry, melbourne shot towers, victorian metallurgy, colonial imports -
 Flagstaff Hill Maritime Museum and Village
Equipment - Rocket set, John Dennett, ca. 1860s
This rescue line-throwing rocket set was made for the Dennett rocket system, which was used by the Rocket Rescue crews in South West Victoria from around the 1860s to the 1890s. John Dennett - John Dennett was from Carisbrooke, in the Ilse of Wight, UK. In 1826 he invented, patented and demonstrated an improved method of rocket powered, line firing rescue equipment for saving lives. The rockets had a longer range than the mortars being used, they were lighter, needed less preparation time, only needed one line for repeated shots, and fewer people were needed to move the equipment. Very favourable reports of Dennett’s rockets were received by those in charge of His Majesty’s Naval and Military services. In 1832, Dennett’s rocket-thrown line was sent out to the wreck of the ‘Bainbridge’, and was responsible for nineteen survivors coming ashore in two boatloads, along the fired line. Dennett’s rocket received national fame, and a one-year contract to supply rockets to the Coastguards. He became known as ‘Rocket Man’ and his rockets were used in rescues at least until 1890, when his son Horatio was running the business. A rocket weighing 23 lb would have a range of about 250 yards (228 metres), on average. Saving lives in Warrnambool – The coastline of South West Victoria has had over 600 shipwrecks and many lost lives; even in Warrnambool’s Lady Bay there were around 16 known shipwrecks between 1850 and 1905, with eight lives lost. In 1859 the first Government-built lifeboat arrived at Warrnambool Harbour and a shed was soon built to house it, followed in 1864 by a rocket house to safely store the Rocket Rescue equipment. In 1878 the buildings were moved to the Breakwater area, and in 1910 the new Lifeboat Warrnambool arrived with its ‘self-righting’ design. For almost one hundred years the lifeboat and rocket crews, mostly local volunteers, trained regularly to maintain and improve their skills, summoned when needed by alarms, gunshots, ringing bells and foghorns. Some became local heroes but all served an important role. By the end of the 1950s the lifeboat and rescue equipment had become obsolete. Rocket Rescue Method - The first use of a lifesaving rocket rescue system is often credited to Captain Manby and his invention of a life mortar, first used in 1808 to fire a line onto a ship to rescue lives. Henry Trengrouse’s invention of 1820 was the first to use a sky rocket’s power to throw a line, and his invention included a chair for carrying the shipwrecked victims to shore. In 1832 John Dennett invented a rocket specifically for shore to ship rescue. It had an iron case and an 8 foot pole attached and could shoot the line as far as 250 yards (about 230 metres). From the 1860s the rocket rescue apparatus was in use. It comprised a breeches buoy and traveller block that was suspended on a line and manually pulled to and from the distressed vessel carrying passengers and items. Colonel Boxer, who had invented an early line-thrower, designed a rocket in 1865 with a range from 300 to 470 yards. It was the first two-stage rocket, with two rockets placed one in front of the other in a tube that carried the rescue line. The hemp line was faked, or coiled, in a particular way in a faking box to prevent twists and tangles when fired, and the angle of firing the rocket was measured by a quadrant-type instrument on the side of the rocket machine. Schermuly invented the line-throwing pistol around 1920, which used a small cartridge to fire the rocket. Victoria’s Government adopted lifesaving methods based on Her Majesty’s Coast Guard in Great Britain, which used Colonel Boxer’s rocket apparatus rescue method. The British Board of Trade published instructions in 1850 for both the beach rescue crew and ship’s crew. It involved setting up the rocket launcher on shore at a particular angle measured by the quadrant, inserting a rocket that had a light-weight line attached, then firing it across the stranded vessel. A tally board was then sent out with instructions in four languages. The ship’s crew would haul on the line to bring out the continuous whip line and attach the whip block to a mast or sturdy part the ship. The rescue crew on shore then hauled out a heavier hawser line, which the ship’s crew fixed above the whip block. The hawser is then tightened using the block on the shore end of the whip. The breeches buoy and endless whip are then attached to the traveller block on the hawser, allowing the shore crew to haul the buoy to and from the vessel, rescuing the stranded crew one at a time. The rocket system could also be used from one ship to another.The Dennett rocket set is quite rare - there are not many examples in existence and little information is available. This Dennett's rocket set is significant for its connection with local history, maritime history and marine technology. Lifesaving has been an important part of the services performed from Warrnambool's very early days, supported by State and Local Government, and based on the methods and experience of Great Britain. Hundreds of shipwrecks along the coast are evidence of the rough weather and rugged coastline. Ordinary citizens, the Harbour employees, and the volunteer boat and rescue crew, saved lives in adverse circumstances. Some were recognised as heroes, others went unrecognised. In Lady Bay, Warrnambool, there were around 16 known shipwrecks between 1850 and 1905. Many lives were saved but tragically, eight lives were lost.A Dennett rocket set in six parts; the rocket head, three shafts (poles) and two rocket-head toting boxes. The rocket head, mounted on one of the shafts, is a long, red painted, iron tube with rounded ends and a protruding fitting around each end. The wooden rocket shafts are octagonal, with a metal sheath at the ends, carved elongated slots towards each end, and a scribed channel above the black foot. The rocket head toting boxes are thick timber, covered in fabric and painted black. They have a hinged wooden lid that slants downwards from back to front, and a metal closure. Small deliberate holes, in groups of four, on the box’s sides, indicate missing attachments, likely to have been handles. Impressed one a shaft "8"flagstaff hill maritime museum & village, flagstaff hill, maritime museum, maritime village, warrnambool, great ocean road, shipwreck, life-saving, lifesaving, rescue crew, rescue, rocket rescue, maritime accidents, shipwreck victim, rocket crew, beach rescue, line rescue, rescue equipment, rocket firing equipment, rocket rescue equipment, rocket apparatus, beach apparatus, petticoat breeches, breeches buoy, rocket house, rocket shed, lifeboat men, rocket equipment, rocket machine, rocket head, rocket launcher, rocket line, marine technology, william schermuly, line-firing pistol, line throwing gun, schermuly pistol, pistol rocket apparatus, beach rescue set, traveller, block, running block, pulley, hawser, faking, faking box, faked line, rescue boat, lifeboat, lady bay, warrnambool harbour, port of warrnambool, tramway jetty, volunteer lifesavers, volunteer crew, breakwater, lifeboat warrnambool, rocket rescue method, rocket rescue apparatus, captain manby, mortar, henry trengrouse, sky rocket, john dennett, shore to ship, colonel boxer, two-stage rocket, italian hemp, quadrant, schermuly, line-throwing pistol, line throwing cartridge, rocket apparatus rescue, stranded vessel, tally board, light line, whip line, endless whip, petticoat buoy, traveller chair, traveller block, her majesty’s coast guard, harbour board, line thrower, line throwing, beach cart, hand barrow, sand anchor, hawser cutter, life jacket, faking board, irish hand barrow, rocket head toting box, explosives, rocket shaft, rocket pole -
 Flagstaff Hill Maritime Museum and Village
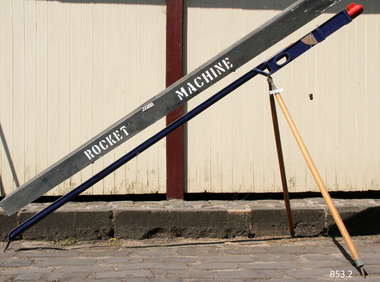
Equipment - Rocket Launcher, John Dennett, 1860s
This rocket launching machine is used in conjunction with the Dennett Rocket Set. Both are part of the rocket rescue equipment that launches the line-throwing rescue rockets. A light line is threaded through the carved holes in the 8 foot long shaft and attached to the scribed channel at the base of the shaft. The rocket head is fitted to the shaft and inserted into the machine. The machine is set at an angle determined by the person in charge of the rescue crew, and the legs and base of the machine are adjusted accordingly with the use of the quadrant, or protractor, and plumb-bob on the side of the machine. The rocket is then ignited and fired across the vessel in distress. John Dennett - John Dennett was from Carisbrooke, in the Ilse of Wight, UK. In 1826 he invented, patented and demonstrated an improved method of rocket powered, line firing rescue equipment for saving lives. The rockets had a longer range than the mortars being used, they were lighter, needed less preparation time, only needed one line for repeated shots, and fewer people were needed to move the equipment. Very favourable reports of Dennett’s rockets were received by those in charge of His Majesty’s Naval and Military services. In 1832, Dennett’s rocket-thrown line was sent out to the wreck of the ‘Bainbridge’, and was responsible for nineteen survivors coming ashore in two boatloads, along the fired line. Dennett’s rocket received national fame, and a one-year contract to supply rockets to the Coastguards. He became known as ‘Rocket Man’ and his rockets were used in rescues at least until 1890, when his son Horatio was running the business. A rocket weighing 23 lb would have a range of about 250 yards (228 metres), on average. Saving lives in Warrnambool – The coastline of South West Victoria is the site of over 600 shipwrecks and many lost lives; even in Warrnambool’s Lady Bay there were around 16 known shipwrecks between 1850 and 1905, with eight lives lost. In 1859 the first Government-built lifeboat arrived at Warrnambool Harbour and a shed was soon built to house it. In 1858 the provision of rocket and mortar apparatus was approved for lifeboat stations in Victoria, and in 1864 a rocket house was built to safely store the rocket rescue equipment. In 1878 the buildings were moved to the Breakwater area, and in 1910 the new Lifeboat Warrnambool arrived with its ‘self-righting’ design. For almost a hundred years the lifeboat and rocket crews, mostly local volunteers, trained regularly to maintain their rescue skills. They were summoned when needed by alarms, gunshots, ringing bells and foghorns. Some became local heroes but all served an important role. By the end of the 1950s the lifeboat and rescue equipment had become obsolete. Rocket Rescue Method - The Government of Victoria adopted lifesaving methods based on Her Majesty’s Coast Guard in Great Britain. It authorised the first line-throwing rescue system in 1858. Captain Manby’s mortar powered a projectile connected to rope, invented in 1808. The equipment was updated to John Dennett’s 8-foot shaft and rocket method that had a longer range of about 250 yards. From the 1860s the breeches buoy and traveller block rocket rescue apparatus was in use. It was suspended on a hawser line and manually pulled to and from the distressed vessel carrying passengers and items. In the early 1870s Colonel Boxer’s rocket rescue method became the standard in Victoria. His two-stage rockets, charged by a gunpowder composition, could fire the line up to 500-600 yards, although 1000 yards range was possible. Boxer’s rocket carried the light line, which was faked, or coiled, in a particular way between pegs in a faking box to prevent twists and tangles when fired. The angle of firing the rocket to the vessel in distress was measured by a quadrant-type instrument on the side of the rocket machine. Decades later, in about 1920, Schermuly invented the line-throwing pistol that used a small cartridge to fire the rocket. The British Board of Trade published instructions for both the beach rescue crew and ship’s crew. It involved setting up the rocket launcher on shore at a particular angle measured by the quadrant, inserting a rocket that had a light-weight line threaded through its shaft, and then firing it across the stranded vessel, the line issuing freely from the faking board. A tally board was then sent out to the ship with instructions in four languages. The ship’s crew would haul on the line to bring out the heavier, continuous whip line, then secure the attached whip block to the mast or other sturdy part the ship. The rescue crew on shore then hauled out a stronger hawser line, which the ship’s crew fixed above the whip block. The hawser was then tightened using the block on the shore end of the whip. The breeches buoy and endless whip are then attached to the traveller block on the hawser, allowing the shore crew to haul the breeches buoy to and from the vessel, rescuing the stranded crew one at a time. This rocket launcher machine is significant for its connection with local history, maritime history and marine technology. Lifesaving has been an important part of the services performed from Warrnambool's very early days, supported by State and Local Government, and based on the methods and experience of Great Britain. Hundreds of shipwrecks along the coast are evidence of the rough weather and rugged coastline. Ordinary citizens, the Harbour employees, and the volunteer boat and rescue crew, saved lives in adverse circumstances. Some were recognised as heroes, others went unrecognised. In Lady Bay, Warrnambool, there were around 16 known shipwrecks between 1850 and 1905. Many lives were saved but tragically, eight lives were lost.Rocket launcher, named a Rocket Machine, and storage box. Launcher has a long open metal channel with a spike at the base, and narrow, rectangular device, which is the line-firing rocket machine, at the top, all painted blue. Two hinged wooden legs are attached where the channel and machine meet. The side of the machine has an oval cut-out window and an attached quadrant, or protractor, with a plumb-bob on it. The quadrant has angles marked in degrees. The long protective box has white stencilled letters along the side. Its lid has three hinges and is fastened with two metal latches.On box “ROCKET MACHINE” On quadrant “10” “20” “30” “40”flagstaff hill maritime museum & village, flagstaff hill, maritime museum, maritime village, warrnambool, great ocean road, shipwreck, life-saving, lifesaving, rescue crew, rescue, rocket rescue, maritime accidents, shipwreck victim, rocket crew, beach rescue, line rescue, rescue equipment, rocket firing equipment, rocket rescue equipment, rocket apparatus, beach apparatus, petticoat breeches, breeches buoy, rocket house, rocket shed, lifeboat men, rocket equipment, rocket machine, rocket head, rocket launcher, rocket line, marine technology, william schermuly, line-firing pistol, line throwing gun, schermuly pistol, pistol rocket apparatus, beach rescue set, traveller, block, running block, pulley, hawser, faking, faking box, faked line, rescue boat, lifeboat, lady bay, warrnambool harbour, port of warrnambool, tramway jetty, volunteer lifesavers, volunteer crew, breakwater, lifeboat warrnambool, rocket rescue method, rocket rescue apparatus, captain manby, mortar, henry trengrouse, sky rocket, john dennett, shore to ship, colonel boxer, two-stage rocket, italian hemp, quadrant, protractor, schermuly, line-throwing pistol, line throwing cartridge, rocket apparatus rescue, stranded vessel, tally board, light line, whip line, endless whip, petticoat buoy, traveller chair, traveller block, her majesty’s coast guard, harbour board, line thrower, line throwing, beach cart, hand barrow, sand anchor, hawser cutter, life jacket, faking board, welsh hand barrow, rocket set -
 Flagstaff Hill Maritime Museum and Village
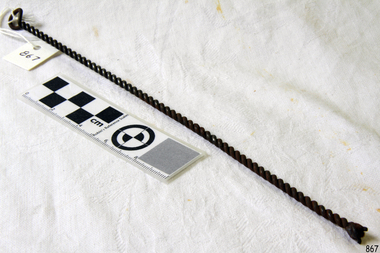
Tool - Stretching Hook
Hand forged metal tool, possibly a sailmaker's hook with the hook broken. It may be a fire iron. The twisted metal is a skill learned by a blacksmith.The item is a handmade tool, an example of the work of a blacksmith. Smiths were sought after in colonial Australia. Their trade allowed them to custom make work for the different industries necessary for survival in a new land.Sailmaker's stretching tool; long thin metal rod bent in half, with centre forming a handle or loop, and long ends twisted together to form a stem. The loose ends are formed together but appear broken.warrnambool, shipwreck coast, flagstaff hill, flagstaff hill maritime museum, flagstaff hill maritime village, tool, sailmaker's tool, fire iron, blacksmith, twisted rod, twisted wire, sailmaker's hook -
 Flagstaff Hill Maritime Museum and Village
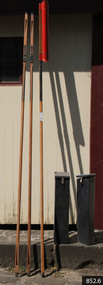
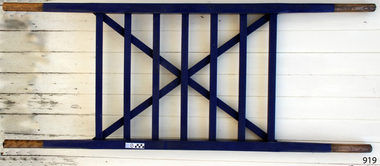
Equipment - Hand Barrow, 1860s
This hand barrow, sometimes called a Welsh hand barrow, was used to transport a load of marine rescue equipment from the beach cart to the rescue site, particularly over hilly, uneven or rough terrain. Hand barrows were in common use in the 19th century. Saving lives in Warrnambool – The coastline of South West Victoria is the site of over 600 shipwrecks and many lost lives; even in Warrnambool’s Lady Bay there were around 16 known shipwrecks between 1850 and 1905, with eight lives lost. Victoria’s Government responded to the need for lifesaving equipment and, in 1858, the provision of rocket and mortar apparatus was approved for the lifeboat stations. In 1859 the first Government-built lifeboat arrived at Warrnambool Harbour and a shed was soon built for it on the Tramway Jetty, followed by a rocket house in 1864 to safely store the rocket rescue equipment. In 1878 the buildings were moved to the Breakwater (constructed from 1874-1890), and in 1910 the new Lifeboat Warrnambool arrived with its ‘self-righting’ design. For almost a hundred years the lifesaving and rescue crews, mostly local volunteers, trained regularly to rehearse and maintain their rescue skills. They were summoned when needed by alarms, gunshots, ringing bells and foghorns. In July 1873 a brass bell was erected at Flagstaff Hill specifically to call the rescue crew upon news of a shipwreck. Some crew members became local heroes but all served an important role. Rocket apparatus was used as recently as the 1950s. Rocket Rescue Method - Rocket rescue became the preferred lifesaving method of the rescue crews, being much safer that using a lifeboat in rough seas and poor conditions. The Government of Victoria adopted lifesaving methods based on Her Majesty’s Coast Guard in Great Britain. It authorised the first line-throwing rescue system in 1858. Captain Manby’s mortar powered a projectile connected to rope, invented in 1808. The equipment was updated to John Dennett’s 8-foot shaft and rocket method that had a longer range of about 250 yards. From the 1860s the breeches buoy and traveller block rocket rescue apparatus was in use. It was suspended on a hawser line and manually pulled to and from the distressed vessel carrying passengers and items. In the early 1870s Colonel Boxer’s rocket rescue method became the standard in Victoria. His two-stage rockets, charged by a gunpowder composition, could fire the line up to 500-600 yards, although 1000 yards range was possible. Boxer’s rocket carried the light line, which was faked, or coiled, in a particular way between pegs in a faking box to prevent twists and tangles when fired. The angle of firing the rocket to the vessel in distress was measured by a quadrant-type instrument on the side of the rocket machine. Decades later, in about 1920, Schermuly invented the line-throwing pistol that used a small cartridge to fire the rocket. . The British Board of Trade regularly published instructions for both the beach rescue crew and ship’s crew. It involved setting up the rocket launcher on shore at a particular angle, determined by the Head of the crew and measured by the quadrant, inserting a rocket that had a light-weight line threaded through its shaft, and then firing it across the stranded vessel, the line issuing freely from the faking board. A continuous whip line was then sent out to the ship’s crew, who hauled it in then followed the instructions – in four languages - on the attached tally board. The survivors would haul on the line to bring out the heavier, continuous whip line with a tail block connected to it. They then secured the block to the mast or other strong part the ship. The rescue crew on shore then hauled out a stronger hawser line, which the survivors fixed above the whip’s tail block. The hawser was then tightened by the crew pulling on it, or by using the hooked block on the shore end of the whip and attaching it to a sand anchor. The breeches buoy was attached to the traveller block on the hawser, and the shore crew then used the whip line to haul the breeches buoy to and from the vessel, rescuing the stranded crew one at a time. The rescue crew wore scarlet, numbered armbands and worked on a numerical rotation system, swapping members out to rest them. This hand barrow is significant for its connection with local history, maritime history and marine technology. Lifesaving has been an important part of the services performed from Warrnambool's very early days, supported by State and Local Government, and based on the methods and experience of Great Britain. Hundreds of shipwrecks along the coast are evidence of the rough weather and rugged coastline. Ordinary citizens, the Harbour employees, and the volunteer boat and rescue crew, saved lives in adverse circumstances. Some were recognised as heroes, others went unrecognised. In Lady Bay, Warrnambool, there were around 16 known shipwrecks between 1850 and 1905. Many lives were saved but tragically, eight lives were lost.Hand barrow; a transporting device carried between two people walking one in front of the other. A wooden ladder-like frame with two handles at each end, blue painted body with unpainted handles. Seven equal-length slats are joined at equal distance between two parallel poles, and two longer slats are attached diagonally between the first and last slats as a brace. flagstaff hill maritime museum and village, flagstaff hill, maritime museum, maritime village, warrnambool, great ocean road, lady bay, warrnambool harbour, port of warrnambool, tramway jetty, breakwater, shipwreck, life-saving, lifesaving, rescue crew, rescue, rocket rescue, rocket crew, lifeboat men, beach rescue, line rescue, rescue equipment, rocket firing equipment, rocket rescue equipment, maritime accidents, shipwreck victim, rocket equipment, marine technology, rescue boat, lifeboat, volunteer lifesavers, volunteer crew, life saving rescue crew, lifesaving rescue crew, rocket apparatus, rocket rescue method, shore to ship, rocket apparatus rescue, stranded vessel, line throwing mortar, mortar, rocket rescue apparatus, line thrower, line throwing, lifeboat warrnambool, hand barrow, manual transport, welsh hand barrow -
 Flagstaff Hill Maritime Museum and Village
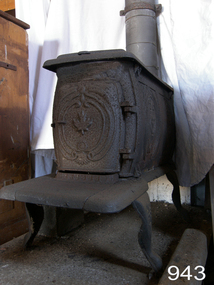
Domestic object - Stove, 1850-1890
In the industrialized world, as stoves replaced open fires and braziers as a source of more efficient and reliable heating, models were developed that could also be used for cooking, and these came to be known as kitchen stoves. The first manufactured cast-iron stove was produced at Lynn, Mass., in 1642. This stove had no grates and was little more than a cast-iron box. About 1740 Benjamin Franklin invented the “Pennsylvania fireplace,” which incorporated the basic principles of the heating stove. The Franklin stove burned wood on a grate and had sliding doors that could be used to control the draft (flow of air) through it. Because the stove was relatively small, it could be installed in a large fireplace or used free-standing in the middle of a room by connecting it to a flue. The Franklin stove warmed farmhouses, city dwellings, and frontier cabins throughout North America. Its design influenced the development of the pot-bellied stove, which was a familiar feature in some homes well into the 20th century. The first round cast-iron stoves with grates for cooking food on them were manufactured by Isaac Orr at Philadelphia, Pa., in 1800. The base-burning stove for burning anthracite coal was invented in 1833 by Jordan A. Mott. The subject item is a mid to late 19th century settlers stove probably of Canadian manufacture imported into Australia around this time. The stove gives us a social snapshot into what life must have been like for our early colonialists using this device for heating and cooking in their meagre homes. Cast iron stove with four-legs, 2 plates on top and a hinged front door. The door has been cast with a maple leaf design and the sides have a pattern cast into them.flagstaff hill, warrnambool, shipwrecked-coast, flagstaff-hill, flagstaff-hill-maritime-museum, maritime-museum, shipwreck-coast, flagstaff-hill-maritime-village, stove, domestic heating, domestic cooking, heater, cooking unit, pot belly stove, wood fired stove, wood stove -
 Flagstaff Hill Maritime Museum and Village
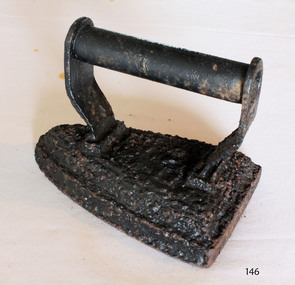
Domestic object - Clothes Iron, last quarter of the 19th century
Blacksmiths started forging simple flat irons in the late Middle Ages. Plain metal irons were heated by a fire or on a stove. Some were made of stone. Earthenware and terracotta were also used, from the Middle East to France and the Netherlands. Flat irons were also called sad irons or smoothing irons. Metal handles had to be gripped in a pad or thick rag. Some irons had cool wooden handles and in 1870 a detachable handle was patented in the US. This stayed cool while the metal bases were heated and the idea was widely imitated. Cool handles stayed even cooler in "asbestos sad irons". The sad in sad iron (or sadiron) is an old word for solid, and in some contexts this name suggests something bigger and heavier than a flat iron. Goose or tailor's goose was another iron name, and this came from the goose-neck curve in some handles. In Scotland people spoke of gusing (goosing) irons. At least two irons were needed on the go together for an effective system, one would be in use, and the other re-heating. Large households with servants had a special ironing-stove for this purpose. Some were fitted with slots for several irons, and a water-jug on top.An early domestic object that gives an insight into how the ironing of clothes was done before the electric type irons we use and take for granted today.Clothes Iron, wedge shaped, cast iron painted black with cylindrical handle small funnel through centre of handle.Noneflagstaff hill, warrnambool, shipwrecked coast, flagstaff hill maritime museum, flagstaff hill maritime village, great ocean road, iron, flat iron, laundry equipment, sad iron, domestic object -
 Flagstaff Hill Maritime Museum and Village
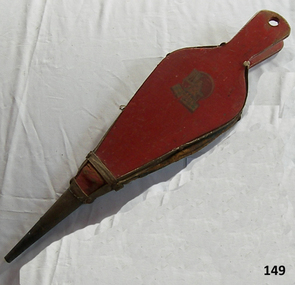
Functional object - Bellows
... Warrnambool great-ocean-road flagstaff hill warrnambool shipwrecked ...Bellows made of wood, leather and metal. Painted red with transfer of small girl on side; Goldilocks eating porridge. flagstaff hill, warrnambool, shipwrecked coast, flagstaff hill maritime museum, maritime museum, shipwreck coast, flagstaff hill maritime village, great ocean road, bellows, fire starter, home ware -
 Flagstaff Hill Maritime Museum and Village
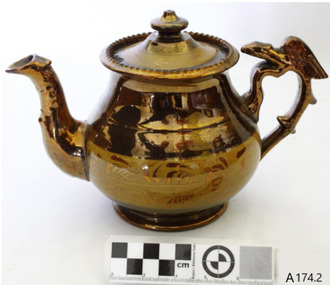
Ceramic - Teapot, First half of the 20th century
Lusterware is a type of pottery or porcelain with a metallic glaze that gives the effect of iridescence. The technique on pottery was first developed in Mesopotamia (modern Iraq) in the early 9th century. It is produced by metallic oxides in an overglaze finish, which is given a second firing at a lower temperature in a "muffle kiln", or a reduction kiln, excluding oxygen. The Lusterware effect is a final coating applied over the ceramic glaze, and fixed by a light second firing, applying small amounts of metallic compounds (generally of silver or copper) mixed with something to make it paintable (clay or ochre). This is then fired in a reducing atmosphere at a temperature high enough to "soften" the glaze from the first firing, and break down the metallic compounds, leaving a very thin ("perhaps 10 or 20 atoms thick") layer that is fused with the main glaze, but is mainly metal. Lusterware normally only uses one colour per piece, and the range is limited a "gold" derived from silver compounds was historically the most common. The process has always been expensive and rather unpredictable, always requiring two firings, and often the use of expensive materials such as silver and platinum. The very thin layer of luster is often delicate, and many types of Lusterware are easily damaged by scratching removing the metallic layer, or by contact with acids. Lusterware has therefore always been for display and occasional use, although by the 19th century it could be relatively cheap. Many pieces show the luster effect only working correctly on parts of the surface, or not at all. An item probably made in Staffordshire UK where this type of pottery was popular in the late 19th century by unknown pottery as the subject item has no marks. The teapot at this time cannot be associated with a historical event, person, or place, provenance regards manufacture is unknown, item assessed as a collection asset given it was produced before 1950.Teapot ceramic ornate copper lusterware abstract floral design handle has a protruding sculptured bird for thumb grip. Nonewarrnambool, flagstaff-hill, flagstaff-hill-maritime-museum, maritime-museum, shipwreck-coast, flagstaff-hill-maritime-village, teapot, tea set, kitchen ware, ceramic, lusterware, pottery, staffordshire uk, pottery finishes -
 Flagstaff Hill Maritime Museum and Village
Domestic object - Flat Iron, 1890-1935
Blacksmiths started forging simple flat irons in the late Middle Ages. Plain metal irons were heated by a fire or on a stove. Some were made of stone. Earthenware and terracotta were also used, from the Middle East to France and the Netherlands. Flat irons were also called sad irons or smoothing irons. Metal handles had to be gripped in a pad or thick rag. Some irons had cool wooden handles and in 1870 a detachable handle was patented in the US. This stayed cool while the metal bases were heated and the idea was widely imitated. Cool handles stayed even cooler in "asbestos sad irons". The sad in sad iron (or sadiron) is an old word for solid, and in some contexts this name suggests something bigger and heavier than a flat iron. Goose or tailor's goose was another iron name, and this came from the goose-neck curve in some handles. In Scotland people spoke of gusing (goosing) irons. At least two irons were needed on the go together for an effective system, one would be in use, and the other re-heating. Large households with servants had a special ironing-stove for this purpose. Some were fitted with slots for several irons, and a water-jug on top.An early domestic object that gives an insight into how the ironing of clothes was done before the electric type irons we use and take for granted today. Flat iron cast iron with traces of original black finish on handle. Noneflagstaff hill, warrnambool, flagstaff hill maritime museum, shipwreck coast, flagstaff hill maritime village, great ocean road, iron, flat iron, laundry, clothes ironing, sad iron, tailors goose -
 Flagstaff Hill Maritime Museum and Village
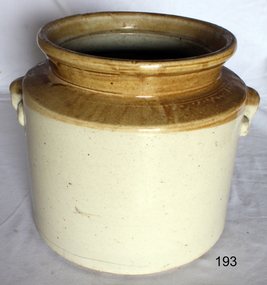
Ceramic - Stoneware Container, 1900 to 1940
Stoneware is a rather broad term for pottery or other ceramics that is fired at a relatively high temperature. A modern technical definition is a vitreous or semi-vitreous ceramic made primarily from stoneware clay or non-refractory fire clay. Whether vitrified or not, it is non-porous, it may or may not be glazed. Historically, across the world, it has been developed after earthenware and before porcelain and has often been used for high-quality as well as utilitarian wares. As a rough guide, modern earthen wares are normally fired in a kiln at temperatures in the range of about 1,000°C (1,830 °F) to 1,200 °C (2,190 °F); stoneware's at between about 1,100 °C (2,010 °F) to 1,300 °C (2,370 °F); and porcelains at between about 1,200 °C (2,190 °F) to 1,400 °C (2,550 °F). Historically, reaching high temperatures was a long-lasting challenge, and temperatures somewhat below these were used for a long time. Earthenware can be fired effectively as low as 600°C, achievable in primitive pit firing, but 800 °C was more typical. Stoneware also needs certain types of clays, more specific than those able to make earthenware, but can be made from a much wider range than porcelain. A domestic item used to store food products as glazing makes the container non-porous, often used for pickling. Or larger containers for kitchen flour. Items age is difficult to determine given the same techniques for making stoneware are in use today. Stoneware containers were made by many potteries in Australia and England. They were in common domestic use before plastics were invented around 1940 to store goods so this subject item is probably from around 1900 to the 1940s. Item's significance is difficult to determine given it is not associated with a place, person, historic event, or manufacturer. Its significance lies with its use as a domestic object giving today a view into our social past.Stoneware circular container with wide opening, brown top and off white base. Handholds moulded on each side glazed finish, cracks in base.Noneflagstaff hill, warrnambool, shipwrecked coast, flagstaff hill maritime museum, shipwreck coast, flagstaff hill maritime village, great ocean road, container, stoneware container, kitchen storage, kitchen ware -
 Flagstaff Hill Maritime Museum and Village
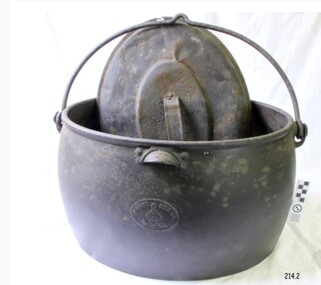
Domestic object - Cooking pot and lid, T & C Clark, 1880-1910
T & C Clark & Company Limited, based at Shakespeare Foundry, was founded in 1795 by Thomas and Charles Clark and grew to be one of the largest iron foundries in Wolverhampton. The firm was the pioneers of Enamelled Cast ironware and the founder Charles Clerk went on to became mayor of Wolverhampton in 1860 after also serving as a Councilor, Alderman, and later Chief Magistrate. The company exhibited many products at the International Exhibition of 1862 at South Kensington, alongside the gardens of the Royal Horticultural Society. The company was also awarded the silver medal for its products at the International Paris Exhibition in 1878. The company's product range included thousands of items, both domestic and industrial. T & C Clark pioneered the use of enamelled cast ironware, after taking out a patent in 1839 guaranteed to be free of lead or arsenic. In the late 1940s and 1950s the company produced acid-resisting enamelled cast iron boiling pans; steam-jacketed pans; stills; square and rectangular tanks; open and closed mixing vessels; flanged pipes; bends and tees; laboratory equipment; small scale plant; evaporating bowls; beakers; sulphonates; and glass-lined mild steel tanks for beer, mineral water, and food. The company is listed as enamelled chemical plant manufacturers in Kelly's 1962 Wolverhampton Directory, but within a few years, the company had ceased trading.The item is significant as it was used as a domestic kitchen or camp fire item used to cook food safely without the concern that the metal may contain lead or arsenic as earlier cooking utensils had. T C Clark innervates the first manufacturing process of cast iron cook ware to have enamel lining in his products to alleviate the possibility of lead or arsenic contamination of food.Oval cast iron boiler or cooking pot, with lid, pot is oval shaped lid is dented and handle buckled.Inscription on base "Clark & Co Patent", "Best Quality", "9 Gallons" and a Trade Mark of a "C" inside two triangles to side of potflagstaff hill, warrnambool, shipwrecked coast, flagstaff hill maritime museum, flagstaff hill maritime village, great ocean road, cooking pot, stew pot, food, kitchen utensil, shakespeare foundry, tc clark -
 Flagstaff Hill Maritime Museum and Village
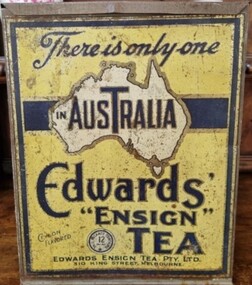
Container - Tin Tea Container, Wilson Bros, 1900-1940
The tin was made by Wilson Bros, Melbourne, for Edwards' Ensign Tea Pty Ltd, Melbourne, Victoria, Australia, 1900-1940. There was a fire at their factory in Flinders Street Melbourne on April 30, 1921 which completely destroyed the building. New premises were obtained at 310/18 King Street Melbourne in 1923. there continued to be bill board advertisements for Ensign tea at the King Street address, also regular adverts in the Argus newspaper during1942.An Australia icon during the first half of the 20th century as tea drinking was a popular past time and social activity.Container for tea with hinged lid. Label yellow with map of Australia. Lid is coming away on one hinge. "Edwards Ensign Tea" On label "Edwards Ensign Tea"flagstaff hill, warrnambool, shipwrecked coast, flagstaff hill maritime museum, maritime museum, shipwreck coast, flagstaff hill maritime village, great ocean road, tea tin, tea caddy, drink, container, wilson bros, ensign tea -
 Flagstaff Hill Maritime Museum and Village
Domestic object - Bowl, Late 19th or early 20th Century
The Process of Making Pottery Decorating, Firing, Glazing, Making, Technical There is a rhythm and flow to clay. It can’t be done all at once! Even the making process! It can take weeks to get everything done, especially if you can only work on your pottery once a week! Even though we have three hour classes, it’s often just not enough time! Here is an overview of some of the processes so you have a bit more grasp on some of the technical stuff! Step One – Design There are SO many ideas out there for making stuff in clay! From delicate porcelain jewellery, through to heavy sculptural work and everything in between. Deciding your direction is sometimes not that easy – when you first start, try everything, you will naturally gravitate to the style that you enjoy! The options and variations are endless and can get a wee bit overwhelming too! Check in with me before you start to ensure your ideas will work, what order you might do things, how you could achieve the look you are seeking and any other technical data required! Step Two – Making Clay is thixotropic. This means that as you work with it, the clay first gets sloppier and wetter, before is begins to dry in the atmosphere. For most things, you simply can’t do all parts of the project at once. An example of work order might look like: Get last weeks work out from the shelves Prepare clay for today’s work – roll your clay, prepare balls for throwing, make the first stage of a pinch pot) Clean up last week’s work and put it on the shelf for bisque firing Check that you have any glazing to do – and do enough of it that you will have time to finish your main project Do the next step of your next project – there might be a further step that can’t be complete immediately, in that case, wrap your work well and put onto the shelves. Letting your work rest for a while can really help keep your work clean and professional looking. Many things require bagging under plastic to keep it ready for work the next week – put your name on the outside of the bag so you can find your work easily. We have stickers and markers. Consider how you want to decorate your work – coloured slip can be applied at a fairly wet stage (remembering that it will make your work even wetter!). Trying to apply slip to dry clay won’t work! If you want to do sgraffito – you will need to keep the work leather hard (a state of dryness where you can still work the clay with a little effort and a little water and care). Step Three – Drying Most of the time your work can go into the rack uncovered to let it dry out for the following week. If you want to continue forming or shaping you will need to double bag your work – put your work on a suitable sized bat and put the bat in a bag so the base of the bag is under the bat, then put another bag over the top of the work and tuck the top of the bag under the bat. If you want to trim (or turn) your thrown work the following week, it should also be double bagged. If your work is large, delicate, or of uneven thicknesses, you should lightly cover your work for drying. When considering the drying process, bare in mind the weather, humidity and wind! The hotter and dryer, the faster things dry and work can dry unevenly in the shelves – this can lead to cracking – another time to lightly cover your work for drying. Step Four – Trimming and Cleaning Up Your work is dry! It is called greenware now and it is at it’s most fragile! Handle everything with two hands. I often refer to soft hands – keep everything gentle and with your fingers spread as much as possible. Try to not pick up things like plates too much, and always with both hands! Before your work can be bisque fired it should be “cleaned up”. You work won’t go into the kiln if it has sharp edges – when glazed, sharp edges turn into razor blades! Use a piece of fly wire to rub the work all over – this will scratch a little so be light handed. Use a knife or metal kidney to scrape any areas that require a bit more dynamic treatment than the fly wire offers! Finally, a very light wipe over with a slightly damp sponge can help soften and soothe all of your edges and dags! Trimming thrown work: If you are planning to trim (or turn) your thrown work (and you should be), make sure you bag it well – your work should be leather hard to almost dry for easiest trimming. Use this step to finish the work completely – use a metal kidney to polish the surface, or a slightly damp sponge to give a freshly thrown look. Wipe the sponge around the rim after trimming, and check the inside of the pot for dags! Trimming slip cast work: Usually I will trim the rims of your work on the wheel the following day to make that stage easier, however you will still need to check your work for lumps and bumps. Last but not least – check that your name is still clearly on the bottom of your work. Step Five – Bisque Firing When the work is completely dry it can go into the bisque kiln. The bisque kiln is fired to 1000°C. This process burns off the water in the clay as well as some of the chemically bound water. The structure of the clay is not altered that much at this temperature. Inside the bisque kiln, the work is stacked a little, small bowl inside a larger bowl and onto a heavy plate. Smaller items like decorations or drink coasters might get stacked several high. Consideration is paid to the weight of the stack and shape of the work. A bisque kiln can fire about one and a half times the amount of work that the glaze kiln can fire. The firing takes about 10 hours to complete the cycle and about two days to cool down. Once it has been emptied the work is placed in the glaze room ready for you to decorate! Step Six – Glazing Decorating your work with colour can be a lot of fun – and time consuming! There are three main options for surface treatment at this stage: Oxide Washes Underglazes Glazes Washes and underglazes do not “glaze” the work – It will still need a layer of glaze to fully seal the clay (washes don’t need glaze on surfaces not designed for food or liquid as they can gloss up a little on their own). Underglazes are stable colourants that turn out pretty much how they look in the jar. They can be mixed with each other to form other colours and can be used like water colours to paint onto your work. Mostly they should have a clear glaze on top to seal them. Oxides are a different species – the pink oxide (cobalt) wash turns out bright blue for instance. They don’t always need a glaze on top, and some glazes can change the colour of the wash! The glazes need no other “glaze” on top! Be careful of unknown glaze interactions – you can put any combination of glaze in a bowl or on a plate, but only a single glaze on the outside of any vertical surface! Glazes are a chemical reaction under heat. We don’t know the exact chemicals in the Mayco glazes we use. I can guess by the way they interact with each other, however, on the whole, you need to test every idea you have, and not run the test on a vertical surface! Simply put, glaze is a layer of glass like substance that bonds with the clay underneath. Clay is made of silica, alumina and water. Glaze is made of mostly silica. Silica has a melting point of 1700°C and we fire to 1240°C. The silica requires a “flux” to help it melt at the lower temperature. Fluxes can be all sorts of chemicals – a common one is calcium – calcium has a melting point of 2500°C, however, together they both melt at a much lower temperature! Colourants are metal oxides like cobalt (blue), chrome (green through black), copper (green, blue, even red!), manganese (black, purple and pink) iron (red brown), etc. Different chemicals in the glaze can have dramatic effects. for example, barium carbonate (which we don’t use) turns manganese bright pink! Other elements can turn manganese dioxide brown, blue, purple and reddish brown. Manganese dioxide is a flux in and of itself as well. So, glazes that get their black and purple colours, often interact with other glazes and RUN! Our mirror black is a good example – it mixes really well with many glazes because it fluxes them – causes them to melt faster. It will also bring out many beautiful colours in the glazes because it’s black colouring most definitely comes from manganese dioxide! Glaze chemistry is a whole subject on it’s own! We use commercial Mayco glazes on purpose – for their huge range of colour possibilities, stability, cool interactions, artistic freedom with the ability to easily brush the glazes on and ease of use. We currently have almost 50 glazes on hand! A major project is to test the interactions of all glazes with each other. That is 2,500 test tiles!!!! I’m going to make the wall behind the wheels the feature wall of pretty colours! Step Seven – Glaze (Gloss or sometimes called “Glost”) Firing Most of the time this is the final stage of making your creation (but not always!) The glaze kiln goes to 1240°C. This is called cone 6, or midrange. It is the low end of stoneware temperatures. Stoneware clays and glazes are typically fired at cone 8 – 10, that is 1260 – 1290°C. The energy requirement to go from 1240°C to 1280°C is almost a 30% more! Our clay is formulated to vitrify (mature, turn “glass-like”) at 1240°, as are our glazes. A glaze kiln take around 12 hours to reach temperature and two to three days to cool down. Sometimes a third firing process is required – this is for decoration that is added to work after the glaze firing. For example – adding precious metals and lustres. this firing temperature is usually around 600 – 800°C depending upon the techniques being used. There are many students interested in gold and silver trims – we will be doing this third type of firing soon! After firing your work will be in the student finished work shelves. Remember to pay for it before you head out the door! There is a small extra charge for using porcelain clay (it’s more than twice the price of regular clay), and for any third firing process! Once your work has been fired it can not turn back into clay for millennia – so don’t fire it if you don’t like it! Put it in the bucket for recycling. https://firebirdstudios.com.au/the-process-of-making-pottery/ The bowl is an example of kitchenware used in the 19th century and still in use today.Bowl white ceramic. Crack on side. Badly stained.Backstamp very faint and unable to be read.flagstaff hill, warrnambool, shipwrecked-coast, flagstaff-hill, flagstaff-hill-maritime-museum, maritime-museum, shipwreck-coast, flagstaff-hill-maritime-village, mixing bowl, food preparation, kitchen equipment, ceramic -
 Flagstaff Hill Maritime Museum and Village
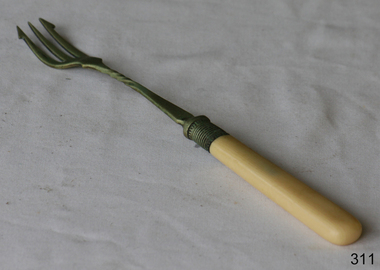
Domestic object - Fork
A toasting fork is a three pronged fork designed to be used to toast things over an open fireplace. Classically, a toasting fork could be stuck into a piece of bread and used to hold the bread in the fire, with a periodic rotation for even browning. For advanced players, it's possible to use a toasting fork to make toasted cheese sandwiches and other hot sandwiches. A typical toasting fork is made of wire, and many modern ones are telescopic, allowing people to fold the fork up or slide the handle in when not in use. This makes toasting forks easier to store and transport, while allowing people to keep their hands well clear of the fire when the fork is in use. The three slender prongs can be of varying length, depending on the design; prongs which are too long will mangle the bread, while short prongs will allow the bread to slide off, so most designers try to strike a happy medium. Before the arrival of gas and electric cook stoves, households relied on heavy duty wood and coal fired cookers, or simply open fireplaces. Such stoves required a great deal of energy and maintenance to run, so when someone wanted a quick snack, toasting something over an open fire could be much more appealing than wrestling with the cooker. Some people also undoubtedly found the experience of toasting something over an open fire to be enjoyable. https://www.delightedcooking.com/what-is-a-toasting-fork.htmIn the old days, there were no electric toasters, so the toasting fork used near an open flame proved extremely effective.Fork with three prongs with hook design on the two outside prongs. Neck features decorative twisted design and there is more decorative work in the metal near the bone handle.None. flagstaff hill, warrnambool, shipwrecked-coast, flagstaff-hill, flagstaff-hill-maritime-museum, maritime-museum, shipwreck-coast, flagstaff-hill-maritime-village -
 Flagstaff Hill Maritime Museum and Village
Domestic object - Bowl
The Process of Making Pottery Decorating, Firing, Glazing, Making, Technical There is a rhythm and flow to clay. It can’t be done all at once! Even the making process! It can take weeks to get everything done, especially if you can only work on your pottery once a week! Even though we have three hour classes, it’s often just not enough time! Here is an overview of some of the processes so you have a bit more grasp on some of the technical stuff! Step One – Design There are SO many ideas out there for making stuff in clay! From delicate porcelain jewellery, through to heavy sculptural work and everything in between. Deciding your direction is sometimes not that easy – when you first start, try everything, you will naturally gravitate to the style that you enjoy! The options and variations are endless and can get a wee bit overwhelming too! Check in with me before you start to ensure your ideas will work, what order you might do things, how you could achieve the look you are seeking and any other technical data required! Step Two – Making Clay is thixotropic. This means that as you work with it, the clay first gets sloppier and wetter, before is begins to dry in the atmosphere. For most things, you simply can’t do all parts of the project at once. An example of work order might look like: Get last weeks work out from the shelves Prepare clay for today’s work – roll your clay, prepare balls for throwing, make the first stage of a pinch pot) Clean up last week’s work and put it on the shelf for bisque firing Check that you have any glazing to do – and do enough of it that you will have time to finish your main project Do the next step of your next project – there might be a further step that can’t be complete immediately, in that case, wrap your work well and put onto the shelves. Letting your work rest for a while can really help keep your work clean and professional looking. Many things require bagging under plastic to keep it ready for work the next week – put your name on the outside of the bag so you can find your work easily. We have stickers and markers. Consider how you want to decorate your work – coloured slip can be applied at a fairly wet stage (remembering that it will make your work even wetter!). Trying to apply slip to dry clay won’t work! If you want to do sgraffito – you will need to keep the work leather hard (a state of dryness where you can still work the clay with a little effort and a little water and care). Step Three – Drying Most of the time your work can go into the rack uncovered to let it dry out for the following week. If you want to continue forming or shaping you will need to double bag your work – put your work on a suitable sized bat and put the bat in a bag so the base of the bag is under the bat, then put another bag over the top of the work and tuck the top of the bag under the bat. If you want to trim (or turn) your thrown work the following week, it should also be double bagged. If your work is large, delicate, or of uneven thicknesses, you should lightly cover your work for drying. When considering the drying process, bare in mind the weather, humidity and wind! The hotter and dryer, the faster things dry and work can dry unevenly in the shelves – this can lead to cracking – another time to lightly cover your work for drying. Step Four – Trimming and Cleaning Up Your work is dry! It is called greenware now and it is at it’s most fragile! Handle everything with two hands. I often refer to soft hands – keep everything gentle and with your fingers spread as much as possible. Try to not pick up things like plates too much, and always with both hands! Before your work can be bisque fired it should be “cleaned up”. You work won’t go into the kiln if it has sharp edges – when glazed, sharp edges turn into razor blades! Use a piece of fly wire to rub the work all over – this will scratch a little so be light handed. Use a knife or metal kidney to scrape any areas that require a bit more dynamic treatment than the fly wire offers! Finally, a very light wipe over with a slightly damp sponge can help soften and soothe all of your edges and dags! Trimming thrown work: If you are planning to trim (or turn) your thrown work (and you should be), make sure you bag it well – your work should be leather hard to almost dry for easiest trimming. Use this step to finish the work completely – use a metal kidney to polish the surface, or a slightly damp sponge to give a freshly thrown look. Wipe the sponge around the rim after trimming, and check the inside of the pot for dags! Trimming slip cast work: Usually I will trim the rims of your work on the wheel the following day to make that stage easier, however you will still need to check your work for lumps and bumps. Last but not least – check that your name is still clearly on the bottom of your work. Step Five – Bisque Firing When the work is completely dry it can go into the bisque kiln. The bisque kiln is fired to 1000°C. This process burns off the water in the clay as well as some of the chemically bound water. The structure of the clay is not altered that much at this temperature. Inside the bisque kiln, the work is stacked a little, small bowl inside a larger bowl and onto a heavy plate. Smaller items like decorations or drink coasters might get stacked several high. Consideration is paid to the weight of the stack and shape of the work. A bisque kiln can fire about one and a half times the amount of work that the glaze kiln can fire. The firing takes about 10 hours to complete the cycle and about two days to cool down. Once it has been emptied the work is placed in the glaze room ready for you to decorate! Step Six – Glazing Decorating your work with colour can be a lot of fun – and time consuming! There are three main options for surface treatment at this stage: Oxide Washes Underglazes Glazes Washes and underglazes do not “glaze” the work – It will still need a layer of glaze to fully seal the clay (washes don’t need glaze on surfaces not designed for food or liquid as they can gloss up a little on their own). Underglazes are stable colourants that turn out pretty much how they look in the jar. They can be mixed with each other to form other colours and can be used like water colours to paint onto your work. Mostly they should have a clear glaze on top to seal them. Oxides are a different species – the pink oxide (cobalt) wash turns out bright blue for instance. They don’t always need a glaze on top, and some glazes can change the colour of the wash! The glazes need no other “glaze” on top! Be careful of unknown glaze interactions – you can put any combination of glaze in a bowl or on a plate, but only a single glaze on the outside of any vertical surface! Glazes are a chemical reaction under heat. We don’t know the exact chemicals in the Mayco glazes we use. I can guess by the way they interact with each other, however, on the whole, you need to test every idea you have, and not run the test on a vertical surface! Simply put, glaze is a layer of glass like substance that bonds with the clay underneath. Clay is made of silica, alumina and water. Glaze is made of mostly silica. Silica has a melting point of 1700°C and we fire to 1240°C. The silica requires a “flux” to help it melt at the lower temperature. Fluxes can be all sorts of chemicals – a common one is calcium – calcium has a melting point of 2500°C, however, together they both melt at a much lower temperature! Colourants are metal oxides like cobalt (blue), chrome (green through black), copper (green, blue, even red!), manganese (black, purple and pink) iron (red brown), etc. Different chemicals in the glaze can have dramatic effects. for example, barium carbonate (which we don’t use) turns manganese bright pink! Other elements can turn manganese dioxide brown, blue, purple and reddish brown. Manganese dioxide is a flux in and of itself as well. So, glazes that get their black and purple colours, often interact with other glazes and RUN! Our mirror black is a good example – it mixes really well with many glazes because it fluxes them – causes them to melt faster. It will also bring out many beautiful colours in the glazes because it’s black colouring most definitely comes from manganese dioxide! Glaze chemistry is a whole subject on it’s own! We use commercial Mayco glazes on purpose – for their huge range of colour possibilities, stability, cool interactions, artistic freedom with the ability to easily brush the glazes on and ease of use. We currently have almost 50 glazes on hand! A major project is to test the interactions of all glazes with each other. That is 2,500 test tiles!!!! I’m going to make the wall behind the wheels the feature wall of pretty colours! Step Seven – Glaze (Gloss or sometimes called “Glost”) Firing Most of the time this is the final stage of making your creation (but not always!) The glaze kiln goes to 1240°C. This is called cone 6, or midrange. It is the low end of stoneware temperatures. Stoneware clays and glazes are typically fired at cone 8 – 10, that is 1260 – 1290°C. The energy requirement to go from 1240°C to 1280°C is almost a 30% more! Our clay is formulated to vitrify (mature, turn “glass-like”) at 1240°, as are our glazes. A glaze kiln take around 12 hours to reach temperature and two to three days to cool down. Sometimes a third firing process is required – this is for decoration that is added to work after the glaze firing. For example – adding precious metals and lustres. this firing temperature is usually around 600 – 800°C depending upon the techniques being used. There are many students interested in gold and silver trims – we will be doing this third type of firing soon! After firing your work will be in the student finished work shelves. Remember to pay for it before you head out the door! There is a small extra charge for using porcelain clay (it’s more than twice the price of regular clay), and for any third firing process! Once your work has been fired it can not turn back into clay for millennia – so don’t fire it if you don’t like it! Put it in the bucket for recycling. https://firebirdstudios.com.au/the-process-of-making-pottery/ This bowl is an example of kitchenware used in the 19th century and still in use today.Bowl white ceramic plain that has two sets of edging around lip. Inside bowl has plaster designed to look like cooking mixture.flagstaff hill, warrnambool, shipwrecked-coast, flagstaff-hill, flagstaff-hill-maritime-museum, maritime-museum, shipwreck-coast, flagstaff-hill-maritime-village, kitchen equipment, ceramic -
 Flagstaff Hill Maritime Museum and Village
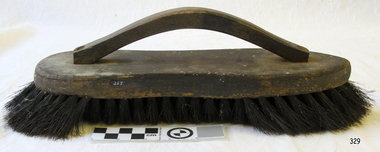
Domestic object - Brush
This stove brush is shaped to fit into grooves and crevices on a cast iron stove range and fenders. A brush like this would be used in the 19th and early 290th centuries to apply a blackening agent to the metal to clean and preserve it would be polished to make it look more attractive.This object is significant as an example of an item in common use in the 19th and early 20th centuries.Stove brush, wooden with wooden raised handle and black bristles. The bristles at the ends of the brush are longer than in the centre, and flare outwards. The brush' is rounded at one end and pointed at the other.flagstaff hill, flagstaff hill maritime museum and village, warrnambool, maritime museum, maritime village, great ocean road, shipwreck coast, cast iron stove, oven range, stove brush, blackening brush, cooking, kitchen equipment, wood fired stove -
 Flagstaff Hill Maritime Museum and Village
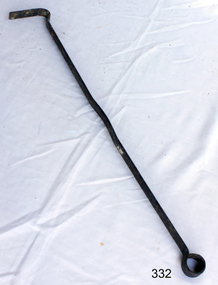
Domestic object - Fire poker
... Warrnambool great-ocean-road This fire poker is a basic design ...This fire poker is a basic design that has been used throughout the centuries to attend to a fire for cooking, heating, firing a boiler and similar domestic activities.This object is significant as an example of an item in common use in the 19th and early 20th centuries and is still in use today.Fire poker; a flat metal bar shaped with ring at one end and a right angle bend at the base. It is painted black.flagstaff hill, flagstaff hill maritime museum and village, warrnambool, maritime museum, maritime village, great ocean road, shipwreck coast, poker, fire poker, fire iron, heating, cooking, laundry, tending a fire -
 Flagstaff Hill Maritime Museum and Village
Domestic object - Bowl, J & G Meakin, Late 19th or early 20th Century
The Process of Making Pottery Decorating, Firing, Glazing, Making, Technical There is a rhythm and flow to clay. It can’t be done all at once! Even the making process! It can take weeks to get everything done, especially if you can only work on your pottery once a week! Even though we have three hour classes, it’s often just not enough time! Here is an overview of some of the processes so you have a bit more grasp on some of the technical stuff! Step One – Design There are SO many ideas out there for making stuff in clay! From delicate porcelain jewellery, through to heavy sculptural work and everything in between. Deciding your direction is sometimes not that easy – when you first start, try everything, you will naturally gravitate to the style that you enjoy! The options and variations are endless and can get a wee bit overwhelming too! Check in with me before you start to ensure your ideas will work, what order you might do things, how you could achieve the look you are seeking and any other technical data required! Step Two – Making Clay is thixotropic. This means that as you work with it, the clay first gets sloppier and wetter, before is begins to dry in the atmosphere. For most things, you simply can’t do all parts of the project at once. An example of work order might look like: Get last weeks work out from the shelves Prepare clay for today’s work – roll your clay, prepare balls for throwing, make the first stage of a pinch pot) Clean up last week’s work and put it on the shelf for bisque firing Check that you have any glazing to do – and do enough of it that you will have time to finish your main project Do the next step of your next project – there might be a further step that can’t be complete immediately, in that case, wrap your work well and put onto the shelves. Letting your work rest for a while can really help keep your work clean and professional looking. Many things require bagging under plastic to keep it ready for work the next week – put your name on the outside of the bag so you can find your work easily. We have stickers and markers. Consider how you want to decorate your work – coloured slip can be applied at a fairly wet stage (remembering that it will make your work even wetter!). Trying to apply slip to dry clay won’t work! If you want to do sgraffito – you will need to keep the work leather hard (a state of dryness where you can still work the clay with a little effort and a little water and care). Step Three – Drying Most of the time your work can go into the rack uncovered to let it dry out for the following week. If you want to continue forming or shaping you will need to double bag your work – put your work on a suitable sized bat and put the bat in a bag so the base of the bag is under the bat, then put another bag over the top of the work and tuck the top of the bag under the bat. If you want to trim (or turn) your thrown work the following week, it should also be double bagged. If your work is large, delicate, or of uneven thicknesses, you should lightly cover your work for drying. When considering the drying process, bare in mind the weather, humidity and wind! The hotter and dryer, the faster things dry and work can dry unevenly in the shelves – this can lead to cracking – another time to lightly cover your work for drying. Step Four – Trimming and Cleaning Up Your work is dry! It is called greenware now and it is at it’s most fragile! Handle everything with two hands. I often refer to soft hands – keep everything gentle and with your fingers spread as much as possible. Try to not pick up things like plates too much, and always with both hands! Before your work can be bisque fired it should be “cleaned up”. You work won’t go into the kiln if it has sharp edges – when glazed, sharp edges turn into razor blades! Use a piece of fly wire to rub the work all over – this will scratch a little so be light handed. Use a knife or metal kidney to scrape any areas that require a bit more dynamic treatment than the fly wire offers! Finally, a very light wipe over with a slightly damp sponge can help soften and soothe all of your edges and dags! Trimming thrown work: If you are planning to trim (or turn) your thrown work (and you should be), make sure you bag it well – your work should be leather hard to almost dry for easiest trimming. Use this step to finish the work completely – use a metal kidney to polish the surface, or a slightly damp sponge to give a freshly thrown look. Wipe the sponge around the rim after trimming, and check the inside of the pot for dags! Trimming slip cast work: Usually I will trim the rims of your work on the wheel the following day to make that stage easier, however you will still need to check your work for lumps and bumps. Last but not least – check that your name is still clearly on the bottom of your work. Step Five – Bisque Firing When the work is completely dry it can go into the bisque kiln. The bisque kiln is fired to 1000°C. This process burns off the water in the clay as well as some of the chemically bound water. The structure of the clay is not altered that much at this temperature. Inside the bisque kiln, the work is stacked a little, small bowl inside a larger bowl and onto a heavy plate. Smaller items like decorations or drink coasters might get stacked several high. Consideration is paid to the weight of the stack and shape of the work. A bisque kiln can fire about one and a half times the amount of work that the glaze kiln can fire. The firing takes about 10 hours to complete the cycle and about two days to cool down. Once it has been emptied the work is placed in the glaze room ready for you to decorate! Step Six – Glazing Decorating your work with colour can be a lot of fun – and time consuming! There are three main options for surface treatment at this stage: Oxide Washes Underglazes Glazes Washes and underglazes do not “glaze” the work – It will still need a layer of glaze to fully seal the clay (washes don’t need glaze on surfaces not designed for food or liquid as they can gloss up a little on their own). Underglazes are stable colourants that turn out pretty much how they look in the jar. They can be mixed with each other to form other colours and can be used like water colours to paint onto your work. Mostly they should have a clear glaze on top to seal them. Oxides are a different species – the pink oxide (cobalt) wash turns out bright blue for instance. They don’t always need a glaze on top, and some glazes can change the colour of the wash! The glazes need no other “glaze” on top! Be careful of unknown glaze interactions – you can put any combination of glaze in a bowl or on a plate, but only a single glaze on the outside of any vertical surface! Glazes are a chemical reaction under heat. We don’t know the exact chemicals in the Mayco glazes we use. I can guess by the way they interact with each other, however, on the whole, you need to test every idea you have, and not run the test on a vertical surface! Simply put, glaze is a layer of glass like substance that bonds with the clay underneath. Clay is made of silica, alumina and water. Glaze is made of mostly silica. Silica has a melting point of 1700°C and we fire to 1240°C. The silica requires a “flux” to help it melt at the lower temperature. Fluxes can be all sorts of chemicals – a common one is calcium – calcium has a melting point of 2500°C, however, together they both melt at a much lower temperature! Colourants are metal oxides like cobalt (blue), chrome (green through black), copper (green, blue, even red!), manganese (black, purple and pink) iron (red brown), etc. Different chemicals in the glaze can have dramatic effects. for example, barium carbonate (which we don’t use) turns manganese bright pink! Other elements can turn manganese dioxide brown, blue, purple and reddish brown. Manganese dioxide is a flux in and of itself as well. So, glazes that get their black and purple colours, often interact with other glazes and RUN! Our mirror black is a good example – it mixes really well with many glazes because it fluxes them – causes them to melt faster. It will also bring out many beautiful colours in the glazes because it’s black colouring most definitely comes from manganese dioxide! Glaze chemistry is a whole subject on it’s own! We use commercial Mayco glazes on purpose – for their huge range of colour possibilities, stability, cool interactions, artistic freedom with the ability to easily brush the glazes on and ease of use. We currently have almost 50 glazes on hand! A major project is to test the interactions of all glazes with each other. That is 2,500 test tiles!!!! I’m going to make the wall behind the wheels the feature wall of pretty colours! Step Seven – Glaze (Gloss or sometimes called “Glost”) Firing Most of the time this is the final stage of making your creation (but not always!) The glaze kiln goes to 1240°C. This is called cone 6, or midrange. It is the low end of stoneware temperatures. Stoneware clays and glazes are typically fired at cone 8 – 10, that is 1260 – 1290°C. The energy requirement to go from 1240°C to 1280°C is almost a 30% more! Our clay is formulated to vitrify (mature, turn “glass-like”) at 1240°, as are our glazes. A glaze kiln take around 12 hours to reach temperature and two to three days to cool down. Sometimes a third firing process is required – this is for decoration that is added to work after the glaze firing. For example – adding precious metals and lustres. this firing temperature is usually around 600 – 800°C depending upon the techniques being used. There are many students interested in gold and silver trims – we will be doing this third type of firing soon! After firing your work will be in the student finished work shelves. Remember to pay for it before you head out the door! There is a small extra charge for using porcelain clay (it’s more than twice the price of regular clay), and for any third firing process! Once your work has been fired it can not turn back into clay for millennia – so don’t fire it if you don’t like it! Put it in the bucket for recycling. https://firebirdstudios.com.au/the-process-of-making-pottery/This bowl was made by renowned pottery company J & G Meakin of England. The firm was established in the mid-1800's. The bowl is an example of kitchenware used in the 19th century and still in use today.Bowl; white ceramic, round and tapering inwards towards base. Made by J and G Meakin England.On base, 'Ironstone China Reg SOL 391413' with symbolflagstaff hill, flagstaff hill maritime museum and village, warrnambool, maritime museum, maritime village, great ocean road, shipwreck coast, mixing bowl, food preparation, j & g meakin, pottery, stoke-on-trent, kitchen equipment, ceramic -
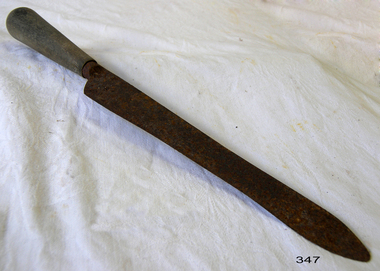 Flagstaff Hill Maritime Museum and Village
Domestic object - Knife
From the early days of our race, the knife represented one of the first and most important tools that enabled rise of our technology, military, culture, science and all other things that brought us to this point of modern civilisation. As a vital tool for survival, combat, construction and food preparation, the knife quickly became the most basic tool from which all others were born. In those ancient times, 500,000 years ago, sharpened stones started slowly evolving, becoming more and more like their modern counterpart. Before the time when fire enabled the melting of the various metals, and forging them into modern knives, their stone counterparts received several visual upgrades. Double bladed knives were most popular, and their wooden or stone hilts were decorated with animal skins and feathers. Those knives represented a great deal of pride for the warriors and elders who owned them, and that tradition continued to be practised with the arrival of the Bronze Age. The appearance of metallurgy brought the ability to create knives from softer types of metal. Even though knives from bronze did not provide durability over longer periods of time [easily dulled, and susceptible to corrosion), their sharpness and slim designed proved to be superior to any stone knife tool. As the centuries went on, iron and then steel became commonplace across the entire world. Knives created from those materials were much more durable and easier to maintain their sharpness after prolonged use. During medieval times in Europe, steel metallurgy managed to evolve knives from small single or double-bladed edges to larger sizes - swords, spears and axes. Even with all those advancements, the use of knives as an eating utensil continued to be used in some small circles. Even as early as the 15th century, wealthy circles of people started carrying personal knives, intended for double use - both eating and defending against threats. During those times the host were not obliged to provide their guest with any kind of eating utensil in addition to plates, so wealthy males used their eating knives for cutting their own meals, and the meals of nearby female guests. Slim double-bladed knives were good for cutting and piercing foods. As the use of forks became widespread in the whole of Europe by the late 17th century, most people used this kind of small knife on a regular basis (a combination of two knives, one for stabilising and other for cutting the meal). http://www.eatingutensils.net/history-of-cutlery/knife-history/The knife is one of the most important items that has enabled the development of civilisation over thousands of years.Carving knife with wooden handle and rusted slender metal blade.None.flagstaff hill, warrnambool, shipwrecked-coast, flagstaff-hill, flagstaff-hill-maritime-museum, maritime-museum, shipwreck-coast, flagstaff-hill-maritime-village, knife, kitchen equipment, dining -
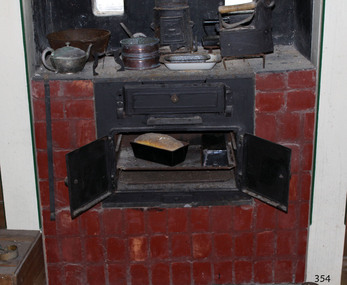 Flagstaff Hill Maritime Museum and Village
Domestic object - Stove, Cox and Rizzetti Stove Works, ca. 1918-1930s
Cast iron stoves burn solid fuel such as wood or coal, and are used for cooking and warmth. The stoves have a firebox with a grate where the fuel is burned. The hot air flows through flues and baffles that heat the stove top and the oven. Before cast iron stoves were invented, cooking and heating were carried out in outdoor open fires, and later, in fireplaces inside the home. In 1642 the first cast iron stove was manufactured in Lynn, Massachusetts, where molten cast iron was poured into a sand mould to make rectangular plates that were then joined together to make a box. Benjamin Franklin invented the more efficient Pennsylvania stove in 1744, and this efficient design is still used today. After the mid-19th century cast iron stoves were produced with burners in different positions, giving varied temperatures, so a wide variety of foods could be cooked at the same time at the most suitable heat, from slow cooking to baking scones. In contemporary times people the new wood-burning stoves had to meet the anti-pollution standards now in place to protect our environment. By the 1920s gas cookers were being introduced for domestic use, and by the 1930s electric home cookers were being offered to householders. PLANET STOVES In August 1925 the firm Cox and Rizzetti, Stove Works, and also Sydney Road, South Melbourne, advertised in the Brunswick and Coburg Leader of November 11, 1925 as "formerly with Harnwell and Sons" and as "specialists in solid cast iron Planet stoves ... which merit an inspection from builders and householders". The firm continued in business and was mentioned as sponsors in the King Island News in 1971. Harnwell and Sons was listed in the Victorian Government Gazette of 1894. It is curious that the firm was mentioned in an article in the Sunrasia Daily of June 14, 1934 titled 'Planet Stoves' as a manufacturer of Planet Stoves. This Planet No 3 stove is an uncommon example of cooking equipment used in kitchens in the early 20th century, as the firebox is above the oven rather than beside it. The cast iron combustion stove is significant as part of the evolution of domestic cooking. Previously cooking was mostly carried out in outdoors in open fires, and later in fireplaces indoors. Cast iron stoves are still used today and have additional features such as thermostats to monitor and maintain temperature, water heating pipes connected, and environmentally approved anti-pollution fittings. Stove; a compact, blackened cast iron combustion cooker, installed within a fireplace and enclosed by bricks on both sides. The upright rectangular stove has a flat top with three round, removable cook plates and a flue connected at the back. The front has three doors with round knob handles; a swing-down firebox door above a sliding ashtray, and two side-hinged oven doors above a sliding opening. Inside on the side walls are two pairs of runners. Behind the pair of doors is an oven with two pairs of rails and two removable metal shelves. The stove has cast inscriptions on the chimney flue and on the front of the right hand side stove door. The model of the stove is The Planet No 3, made in Melbourne.Chimney flue, "[within rectangle] THE / PLANET" Stove door, "(within oval) PLANET / No 3"flagstaff hill, flagstaff hill maritime museum and village, warrnambool, maritime museum, maritime village, great ocean road, shipwreck coast, stove, cast iron stove, combustion stove, wood-burning stove, wood stove, wood oven, solid fuel stove, cooker, the planet, planet, planet no. 3, kitchen equipment, baking, domestic cooking, cooking equipment, food preparation, planet stove, planet cooker, cooking range, slow combustion stove, antique, range cooker, cox and rizzetti, harnwell and sons, melbourne manufacturer -
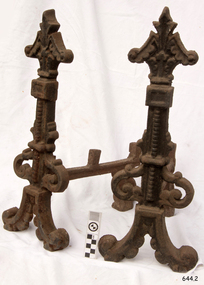 Flagstaff Hill Maritime Museum and Village
Domestic object - Firedogs
Firedogs is the common name for andirons and Chenets and have been in use since ancient Greek times. Firedogs are the decorative metal supports or stands that hold logs in a fireplace, allowing air to circulate around the fire to keep it burning, and preventing logs from rolling out of the fireplace. They are usually made of metal, cast iron or steel, but are sometimes ceramic. They have two feet joined across the front and one at the back. Some firedogs, mainly for kitchen use, were plain with forked uprights so that a bar could rest between them on which a cooking pot or a roasting spit could hang. Some firedogs are made in the likeness of animals, shields, crosses, figures and keys. This pair of firedogs are representative of the firedogs that were common to domestic use in previous centuries when home heating and cooking were only possible with open fires. Firedogs or andirons, pair of two decorative cast iron log supports for use in a fireplace hearth. flagstaff hill, warrnambool, shipwrecked-coast, flagstaff-hill, flagstaff-hill-maritime-museum, maritime-museum, shipwreck-coast, flagstaff-hill-maritime-village, fire dogs, firedogs, fire grates, log stands, domestic furniture, open fireplace equipment, andirons, chenets, domestic heating -
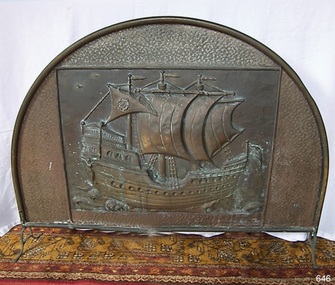 Flagstaff Hill Maritime Museum and Village
Domestic object - Fire screen
This decorative fire screen is placed in front of an open fireplace to prevent hot sparks and ash from causing damage. Open fires were common in Australia in the 19th and early 20th century, for both cooking and heating.Fire screen, crescent shaped, brass pressed sheet, with a ship motif within a rectangular area. Ship is a 3 masted sailing vessel, a Spanish galleon. Made in England, c. 1930.flagstaff hill, warrnambool, shipwrecked-coast, flagstaff-hill, flagstaff-hill-maritime-museum, maritime-museum, shipwreck-coast, flagstaff-hill-maritime-village, fire screen, fire guard, domestic item, heating, cooking -
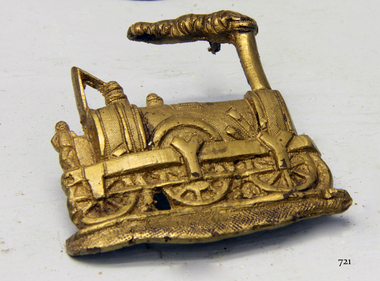 Flagstaff Hill Maritime Museum and Village
Accessory - Badge, Before 1855
The badge recovered from the Schomberg wreck is believed to depict one of the first steam engines. The engine's design by Charles Tayleur & Co. was to be produced for the Great Western Railway in England. The first nineteen of these locomotives were ordered by Isambard Kingdom Brunel for the Great Western Railway including six 2-2-2 Charles Tayleur locomotives. They were built by Charles Tayleur and Company, which later the Vulcan Foundry. The locomotives were unsuccessful and were rapidly supplemented by the Star Class locomotives ordered by Daniel Gooch once he had been appointed as the Locomotive Engineer. As built, they comprised two groups of three, the first group, was delivered in 1837. This locomotive was the first to run on the Great Western Railway when it was tested on 28 December 1837 from its shed at West Drayton. It was withdrawn in 1843 but was rebuilt as a 2-2-2T tank locomotive and returned to service in 1846, running in this form until 1868. It survived for two more years at Reading as a stationary boiler. It is named after the workshops where it was built, which themselves were named after the Roman god of fire. (Although a supposition, it is possible that the owner was a passenger on the ill-fated Schomberg and that they worked either for the Great Western Railway or the Vulcan Foundry that made the engine in the 1830s.) Wreck of the Schomberg: Schomberg was a large three-masted full-ship rigged wooden ship built in 1855 by Alexander Hall and Co in Aberdeen, Scotland for James Baines' famous Black Ball Line at £43,103. The vessel was 288 feet (88 meters) in length, with a beam of 45 feet (14 meters), a depth of 29.5 feet (8.99 meters) of 2,284 tons. The mainmast was 210 feet (64 meters) high and she carried 3.3 acres of sail. The vessel was constructed with three skins. One planked fore and aft, and two diagonally planked, fastened together with screw-threaded trunnels (wooden rails). The Schomberg is one of only three clipper wrecks in Victorian waters that operated the England to Australia run. While the other two, Empress of the Sea and Lightning, were built by the famous American shipbuilder, Donald Mac Kay. Schomberg was an attempt to build a faster ship than Mac Kay and a vessel fast enough to break the sailing record to Australia. The Schomberg sailed on her maiden voyage from Liverpool on 6 October 1855, under the command of Captain James Forbes, on its maiden voyage to Australia with a general cargo, jewellery, spirits, machinery, and 2,000 tons of iron rails and equipment intended to build the Melbourne to Geelong Railway and a bridge over the Yarra from Melbourne to Hawthorn. She also carried a cow for fresh milk, pens for fowls and pigs, plus 90,000 gallons of water for washing and drinking. She also carried 17,000 letters and 31,800 newspapers. There were approximately 473 passengers and a crew of 105. It was hoped that Schomberg would make Melbourne in sixty days, setting a record for the voyage, but light winds at the equator dashed those expectations. The ship sighted Moonlight Head in southwest Victoria on Christmas Day but through a deadly combination of wind, currents, and unmarked sand spits, the vessel gently ran aground on 26 December 1855 on a spit that juts into Newfield Bay, just east of Curdies Inlet, and the present town of Peterborough. Fortunately, the SS Queen was nearby and managed to save all passengers and crew. The steamers Keera and Maitland were dispatched to salvage the passenger's baggage and the more valuable cargo. Other salvage attempts were made, but deteriorating weather made the work impossible, and within two weeks the Schomberg's hull was broken up and the vessel abandoned. The wrecking of the Schomberg caused quite a public stir, particularly in light of the fact the vessel was supposed to be, the most perfect clipper ship ever built. Captain Forbes was charged in the Supreme Court under suspicion that he was playing cards with two female passengers below decks when his ship ran aground. Despite a protest meeting, two inquiries, and the court proceedings, he was found not guilty and cleared of all charges. In 1975, divers from Flagstaff Hill, including Peter Ronald, found an ornate communion set at the wreck. The set comprised a jug, two chalices, a plate, and a lid. The lid did not fit any of the other objects and in 1978 a piece of the lid broke off, revealing a glint of gold. As museum staff carefully examined the lid and removed marine growth, they found a diamond ring, which is currently on display in the Great Circle Gallery at the Flagstaff Hill Maritime Museum that also displays ship fittings and equipment, and personal effects. Most of the artefacts were salvaged from the wreck by Peter Ronald, former director of Flagstaff Hill.The Schomberg has historical significance as one of the first luxurious ships built to bring emigrants to Australia to cash in on the gold rush era. And is included on the Victorian Heritage Register (VHR S612). The collection of Schomberg artefacts held at Flagstaff Hill Museum is primarily significant because of the relationship between these recovered items having a high potential to interpret the story of the Schomberg and its foundering during a storm. The shipwreck is of additional historical significance for representing aspects of Victoria’s shipping history and for its association with the first passenger ship, which was designed not only to be the fastest and most luxurious of its day but foundered on its maiden voyage to Australia.Gold coloured brass badge depicting an 1840's steam engine or locomotive with the figure of a fireman standing on the back. Smoke is coming from the smokestack. The reverse has three holes, possible where a mounting pin or fastener was attached. The badge was recovered from the wreck of the Schomberg.warrnambool, flagstaff-hill, flagstaff-hill-maritime-museum, shipwreck-coast, flagstaff-hill-maritime-village, schomberg, shipwrecked-artefact, clipper ship, black ball line, 1855 shipwreck, captain forbes, ss queen, badge, charles tayleur, great western railway, vulcan foundry, isambard kingdom brunel, locomoive, brooch -
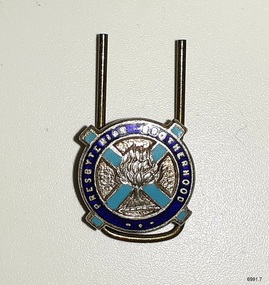 Flagstaff Hill Maritime Museum and Village
badge - Presbyterian Brotherhood badge, 1920s to 1940s
This badge is one of a set of badges collected by Dr W R Angus from the organisations in which he was involved. The set of badges is now part of Flagstaff Hill’s comprehensive W.R. Angus Collection, donated by the family of Dr W R Angus, surgeon and oculist. The badge represents the Australian Presbyterian Brotherhood. The Presbyterian church has used the burning bush logo from the 1800s. The logo describes the Biblical account of the prophet Moses, who saw the miracle of a bush on fire that did not burn and heard the voice of God giving his instructions. The light blue cross symbolises the origin of the Australian Presbyterian church, the Church of Scotland, which is Presbyterian. Its flag is blue with a white 'x' and a burning bush symbol in the centre. Dr William Roy Angus was of Scottish heritage. He sailed overseas to further his studies at Edinburgh Royal Infirmary and in 1928, was awarded FRCS (Fellow from the Royal College of Surgeons), Edinburgh, Scotland. He was e Presbyterian and treated Sunday as a Sabbath, a day of rest. He would visit three or four country patients on a Sunday, taking his children along ‘for the ride’ and visiting with him. Sunday evenings he would play the pianola and sing Scottish songs to his family. In 1928, Dr Angus was a Flying Doctor in the A.I.M. (Australian Inland Ministry) Aerial Medical Service, which was established by the Presbyterian Church in that year. The W.R. Angus Collection includes historical medical equipment, surgical instruments and material belonging to Dr Edward Ryan and Dr Thomas Francis Ryan, (both of Nhill, Victoria) and Dr Angus’ own belongings. The Collection’s history spans the medical practices of the two Doctors Ryan, from 1885-1926 plus that of Dr Angus, up until 1969. It includes historical medical and surgical equipment and instruments from the doctors Edward and Thomas Ryan of Nhill, Victoria. Dr Angus married Gladys in 1927 at Ballarat, the nearest big city to Nhill where he began as a Medical Assistant. He was also Acting House surgeon at the Nhill hospital where their two daughters were born. During World War II He served as a Military Doctor in the Australian Defence Forces. Dr Angus and his family moved to Warrnambool in 1939, where Dr Angus operated his own medical practice. He later added the part-time Port Medical Officer responsibility and was the last person appointed to that position. Both Dr Angus and his wife were very involved in the local community, including the planning stages of the new Flagstaff Hill and the layout of the gardens there. Dr Angus passed away in March 1970.This badge is significant for connecting Doctor Angus with organisations that he supported. The badge also associates Dr Angus with the history of the Presbyterian Church in Australia, showing the historic logo of the burning bush and the Scottish flag. The W.R. Angus Collection is significant for still being located at the site it is connected with, Doctor Angus being the last Port Medical Officer in Warrnambool. The Collection includes historical medical objects that date back to the late 1800s.Badge; a round badge with a blue enamel outer border in front of a light blue enamel ‘x’. A silver logo is on top of the 'X'. There is a silver inscription around the outer circle. It is the badge of the Presbyterian Brotherhood of Australia.This badge is part of a set of badges collected by Dr W R Angus. the set represents organisations that he was involved in, and is part of the W.R. Angus Collection.On the dark blue border: “PRESBYTERIAN BROTHERHOOD’ Logo [a bush on fire] a 'burning bush'flagstaff hill, warrnambool, maritime village, maritime museum, shipwreck coast, great ocean road, w.r. angus, badge, organisation badge, flagstaff hill maritime museum and village, badges, buttons, lapel badge, religious badge, denominational badge, presbyterian church, presbyterian brotherhood, hat pin, flying doctor, scottish heritage, w.r. angus collection -
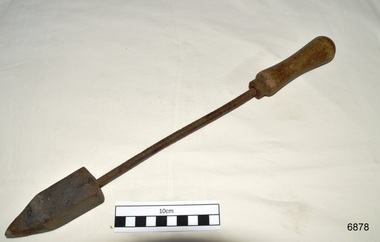 Flagstaff Hill Maritime Museum and Village
Soldering Iron, 20th century
This soldering iron is a hand tool that would have been heated before use by a gas torch or fire. The user would be likely to have another similar iron on standby and heated, ready to use, to continue the flow of work. It is used to melt solder, which is then used to join two pieces of metal. This well used soldering iron was donated to Flagstaff Hill Maritime Village by the family of Doctor William Roy Angus, Surgeon and Oculist. It is part of the “W.R. Angus Collection” includes historical medical equipment, surgical instruments and material once belonging to Dr Edward Ryan and Dr Thomas Francis Ryan, (both of Nhill, Victoria) as well as Dr Angus’ own belongings. The Collection’s history spans the medical practices of the two Doctors Ryan, from 1885-1926 plus that of Dr Angus, up until 1969. ABOUT THE “W.R.ANGUS COLLECTION” Doctor William Roy Angus M.B., B.S., Adel., 1923, F.R.C.S. Edin.,1928 (also known as Dr Roy Angus) was born in Murrumbeena, Victoria in 1901 and lived until 1970. He qualified as a doctor in 1923 at University of Adelaide, was Resident Medical Officer at the Royal Adelaide Hospital in 1924 and for a period was house surgeon to Sir (then Mr.) Henry Simpson Newland. Dr Angus was briefly an Assistant to Dr Riddell of Kapunda, then commenced private practice at Curramulka, Yorke Peninsula, SA, where he was physician, surgeon and chemist. In 1926, he was appointed as new Medical Assistant to Dr Thomas Francis Ryan (T.F. Ryan, or Tom), in Nhill, Victoria, where his experiences included radiology and pharmacy. In 1927 he was Acting House Surgeon in Dr Tom Ryan’s absence. Dr Angus had become engaged to Gladys Forsyth and they decided he further his studies overseas in the UK in 1927. He studied at London University College Hospital and at Edinburgh Royal Infirmary and in 1928, was awarded FRCS (Fellow from the Royal College of Surgeons), Edinburgh. He worked his passage back to Australia as a Ship’s Surgeon on the on the Australian Commonwealth Line’s T.S.S. Largs Bay. Dr Angus married Gladys in 1929, in Ballarat. (They went on to have one son (Graham 1932, born in SA) and two daughters (Helen (died 12/07/1996) and Berenice (Berry), both born at Mira, Nhill ) According to Berry, her mother Gladys made a lot of their clothes. She was very talented and did some lovely embroidery including lingerie for her trousseau and beautifully handmade baby clothes. Dr Angus was a ‘flying doctor’ for the A.I.M. (Australian Inland Ministry) Aerial Medical Service in 1928 . Its first station was in the remote town of Oodnadatta, where Dr Angus was stationed. He was locum tenens there on North-South Railway at 21 Mile Camp. He took up this ‘flying doctor’ position in response to a call from Dr John Flynn; the organisation was later known as the Flying Doctor Service, then the Royal Flying Doctor Service. A lot of his work during this time involved dental surgery also. Between 1928-1932 he was surgeon at the Curramulka Hospital, Yorke Peninsula, South Australia. In 1933 Dr Angus returned to Nhill and purchased a share of the Nelson Street practice and Mira hospital (a 2 bed ward at the Nelson Street Practice) from Dr Les Middleton one of the Middleton Brothers, the current owners of what previously once Dr Tom Ryan’s practice. Dr Tom and his brother had worked as surgeons included eye surgery. Dr Tom Ryan performed many of his operations in the Mira private hospital on his premises. He had been House Surgeon at the Nhill Hospital 1902-1926. Dr Tom Ryan had one of the only two pieces of radiology equipment in Victoria during his practicing years – The Royal Melbourne Hospital had the other one. Over the years Dr Tom Ryan had gradually set up what was effectively a training school for country general-practitioner-surgeons. Each patient was carefully examined, including using the X-ray machine, and any surgery was discussed and planned with Dr Ryan’s assistants several days in advance. Dr Angus gained experience in using the X-ray machine there during his time as assistant to Dr Ryan. When Dr Angus bought into the Nelson Street premises in Nhill he was also appointed as the Nhill Hospital’s Honorary House Surgeon 1933-1938. His practitioner’s plate from his Nhill surgery is now mounted on the doorway to the Port Medical Office at Flagstaff Hill Maritime Village, Warrnambool. When Dr Angus took up practice in the Dr Edward and Dr Tom Ryan’s old premises he obtained their extensive collection of historical medical equipment and materials spanning 1884-1926. A large part of this collection is now on display at the Port Medical Office at Flagstaff Hill Maritime Village in Warrnambool. In 1939 Dr Angus and his family moved to Warrnambool where he purchased “Birchwood,” the 1852 home and medical practice of Dr John Hunter Henderson, at 214 Koroit Street. (This property was sold in1965 to the State Government and is now the site of the Warrnambool Police Station. and an ALDI sore is on the land that was once their tennis court). The Angus family was able to afford gardeners, cooks and maids; their home was a popular place for visiting dignitaries to stay whilst visiting Warrnambool. Dr Angus had his own silk worm farm at home in a Mulberry tree. His young daughter used his centrifuge for spinning the silk. Dr Angus was appointed on a part-time basis as Port Medical Officer (Health Officer) in Warrnambool and held this position until the 1940’s when the government no longer required the service of a Port Medical Officer in Warrnambool; he was thus Warrnambool’s last serving Port Medical Officer. (Masters of immigrant ships arriving in port reported incidents of diseases, illness and death and the Port Medical Officer made a decision on whether the ship required Quarantine and for how long, in this way preventing contagious illness from spreading from new immigrants to the residents already in the colony.) Dr Angus was a member of the Australian Medical Association, for 35 years and surgeon at the Warrnambool Base Hospital 1939-1942, He served as a Surgeon Captain during WWII1942-45, in Ballarat, Victoria, and in Bonegilla, N.S.W., completing his service just before the end of the war due to suffering from a heart attack. During his convalescence he carved an intricate and ‘most artistic’ chess set from the material that dentures were made from. He then studied ophthalmology at the Royal Melbourne Eye and Ear Hospital and created cosmetically superior artificial eyes by pioneering using the intrascleral cartilage. Angus received accolades from the Ophthalmological Society of Australasia for this work. He returned to Warrnambool to commence practice as an ophthalmologist, pioneering in artificial eye improvements. He was Honorary Consultant Ophthalmologist to Warrnambool Base Hospital for 31 years. He made monthly visits to Portland as a visiting surgeon, to perform eye surgery. He represented the Victorian South-West subdivision of the Australian Medical Association as its secretary between 1949 and 1956 and as chairman from 1956 to 1958. In 1968 Dr Angus was elected member of Spain’s Barraquer Institute of Barcelona after his research work in Intrasclearal cartilage grafting, becoming one of the few Australian ophthalmologists to receive this honour, and in the following year presented his final paper on Living Intrasclearal Cartilage Implants at the Inaugural Meeting of the Australian College of Ophthalmologists in Melbourne In his personal life Dr Angus was a Presbyterian and treated Sunday as a Sabbath, a day of rest. He would visit 3 or 4 country patients on a Sunday, taking his children along ‘for the ride’ and to visit with him. Sunday evenings he would play the pianola and sing Scottish songs to his family. One of Dr Angus’ patients was Margaret MacKenzie, author of a book on local shipwrecks that she’d seen as an eye witness from the late 1880’s in Peterborough, Victoria. In the early 1950’s Dr Angus, painted a picture of a shipwreck for the cover jacket of Margaret’s book, Shipwrecks and More Shipwrecks. She was blind in later life and her daughter wrote the actual book for her. Dr Angus and his wife Gladys were very involved in Warrnambool’s society with a strong interest in civic affairs. He had an interest in people and the community They were both involved in the creation of Flagstaff Hill, including the layout of the gardens. After his death (28th March 1970) his family requested his practitioner’s plate, medical instruments and some personal belongings be displayed in the Port Medical Office surgery at Flagstaff Hill Maritime Village, and be called the “W. R. Angus Collection”. W.R. Angus Collection is significant for still being located at the site it is connected with, Doctor Angus being the last Port Medical Officer in Warrnambool. The collection of medical instruments and other equipment is culturally significant, being an historical example of medicine from late 19th to mid-20th century. Dr Angus assisted Dr Tom Ryan, a pioneer in the use of X-rays and in ocular surgery. Soldering iron, part of the W.R. Angus Collection. Round wooden handle, metal shank and head with pointed tip. flagstaff hill, warrnambool, shipwrecked coast, flagstaff hill maritime museum, maritime museum, shipwreck coast, flagstaff hill maritime village, great ocean road, dr w r angus, dr ryan, soldering iron, hand tool, metal work -
 Glen Eira Historical Society
Document - National Trust Register
This file contains two items relating to historic buildings in Glen Eira listed on the National Trust Registry: 1/A fax, sent to Gladys Vallati on 02/03/1995 from the National Trust of Australia listing buildings on the Trust’s registry in the Glen Eira area, as well as their addresses and status on the register (5 pages). (Additional photocopy taken for preservation purposes). 2/A typed list of buildings in the Glen Eira area (mainly Caulfield) which are on the National Trust list, including address, approximate date of construction and status on the register. Date of production of the list is unknown. (6 pages).neerim road, poplar grove, avoca grove, balaclava road, orrong road, bambra road, glen eira road, hood crescent, hawthorn road, glenferri street, glenhuntly road, glen huntly road, kambrook road, kooyong road, lirrewa grove, manor grove, north road, pearson avenue, seymour road, alma road, craddock avenue, dandenong road, lyndoch avenue, orrong crescent, hotham street, nagle avenue, inkerman street, iknerman road, sandham street, selwyn street, st. georges road, willow street, grange road, station place, railway parade, alexandra street, wood crescent, elizabeth street, halstead street, mavho street, tucker road, mckinnon road, nepean highway, wheatly road, uniting church carnegie, athole, st stephen's uniting church caulfield, st aloysius' catholic church, halstead, st mary's anglican church caulfield, caulfield town hall, anseln, the glen, woolamai, caulfield house, caulfield hospital, lirrewa, labassa, fairfield hall, bellecourt, bagatelle, myoora, rosecraddock, adam and eve - karl duldig, the family - karl duldig, caulfield primary school, septimus miller memorial chapel, brighton cemetery, hopetoun gardens, state savings bank elsternwick, anderson organ, hopetoun private hospital (melrose), rippon lea, ripponlea, burreel, o'neill college, lisbon house, elsternwick club, merkin-schutze organ, presentation convent, duldig mural - kadimah cultural centre, glenmoore, craigellachie, st james the great, glenfern, grimwade house, dacre, trinity congregational uniting church glenhuntly, alnwick, holmwood, new alexandra, joscelyne organ, smith organ, fincham organ, st george's bentleigh, mckinnon progress hall, wurlitzer organ, moorabbin town hall, christ anglican church, st mary's jubilee school, st stephen's presbyterian church, elsternwick congregational church, st mary's church of england, former metropolitan fire brigade station no. 31, st mary's jubilee church, belle court, trinity congregational church, heatherbrae, carnegie, caulfield, caulfield north, caulfield south, elsternwick, glen huntly, glenhuntly, murrumbeena, st kilda east, bentleigh, mckinnon, moorabbin, ormond, national trust of australia, national trust register, houses, churches, schools, organs, vallati gladys, mansions -
 Flagstaff Hill Maritime Museum and Village
Weapon - Cannon Ball, Victorian era
This small cannon ball was found by the donor around 1975 to 1977 when he was digging a trench to install underground cables at the Warrnambool Surfside Caravan Park' Its location is just below both Cannon Hill and the 19th century Fortifications at Flagstaff Hill Maritime Museum and Village. The ball is made of iron. Cannon balls were used as ammunition for a cannon gun and fired at a target. This cannon ball is only 8 cm round, or 4.15 inches, and is likely to have been called a 4-pounder (4-pdr). The ball was made from molten iron was poured into the small opening of a two-piece mould. The seam between the moulds sometimes left a raised ring mark on the ball, as can be seen on this ball. The ridge would have been filed to make the join smooth, sometimes leaving a slightly flat area. Six 4-powder cannons were recovered from Endeavour Reef, Queensland, in 1969. They were from Captain Cook's HMS Endeavour, thrown overboard when the ship struck a reef there in 1770. They are likely to have been mounted on deck cannon carriages on the ship. Similar 4-pounder cannons were mounted on gun carriages and used as field guns. Cannons with cannon balls as ammunition were installed at Warrnambool for protection from possible invasion in the mid-to-late 19th century and early 20th century.Cannon ball, iron, black with a pitted shiny surface. It has three flat areas and evidence of a seam around the circumference. There are remnants of a possible inscription stamped into the iron. The cannon ball is a four-pounder ball. Imperial weight is 71 oz (201.3 gms or 4.44 pounds).Remnants of an indecipherable stamp and / or red text.flagstaff hill, flagstaff hill maritime museum and village, warrnambool, maritime museum, maritime village, great ocean road, shipwreck coast, cannon ball, ammunition, cannon, fortifications, military equipment, firearm, weapon, two-piece mould, seam line, four-pounder, 4-pounder, field gun, field ammunition, gun carriage, cast cannon ball