Showing 296 items
matching tramway square
-
 City of Greater Bendigo - Civic Collection
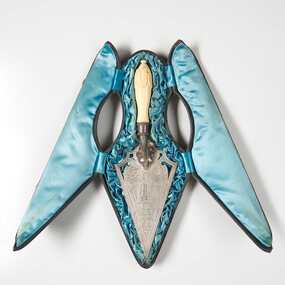
Ceremonial object - Engraved Silver Trowel, Bendigo and Eaglehawk Electric Light and Tramway Powerhouse, 1901
This trowel was presented to City of Bendigo Mayor, Simeon Ryan by Mr B. Deakin the Australian representative of the Victorian Electric Supply Company on the occasion of the laying of the foundation stone for the new power house building in Hargreaves Street, Bendigo. This power house was built to supply power to both Bendigo and Eaglehawk and the overhead power system for the tramway which ran from Quarry Hill, through the city to Eaglehawk and from Golden Square to Lake Weeroona. The building of the power house changed Eaglehawk and Bendigo as street lights were installed and houses became electrified. A report in the Bendigo Independent in 1902 reported ' Night will then be almost as brilliant as the day and people .... who live in the suburbs are to be provided with a tram service worth of the name'. (See reference A Mammoth Scheme.) The tramways closed in April 1972 after the Victorian Parliament granted the SEC an application to cease operating. Today Bendigo Trust operates the tourist trams which run along Pall Mall and welcomes over 40,000 visitors annually. The Bendigo Tramways Depot is the oldest operating tram depot in Australia and is listed on the Victorian Heritage Register. There are currently 45 trams in the fleet (13 of which operate as part of the 'Talking' Tram service).For more about the history and to tour the tramways visit www.bendigotramways.com.Triangular shaped silver engraved trowel with ivory handle (0286a). Top face of trowel is ornately engraved with floral and decorative motifs and an image of an electric tram and two power poles. Reverse has engraved text. No makers mark detected. Housed in a leather covered case (0286b), lined with ruched blue silk. Case has two brass hinges and two small brass clasps.PRESENTED / By / THE ELECTRIC SUPPLY CO / OF VICTORIA TO / SIMEON RYAN. ESQ JP. / MAYOR OF BENDIGO / ON THE OCCASION OF HIS LAYING / THE MEMORIAL STONE OF THE / BENDIGO AND EAGLEHAWK / ELECTRIC LIGHT AND TRAMWAY / POWER HOUSE / 26th JUNE, 1901/ STERLING SILVERcouncillor simeon ryan, councillor s h mc gowan, councillor john hoskins, councillor george loudon, councillor john green, councillor alfred hicks, borough of eaglehawk, borough of eaglehawk mayor, mayor loudon, city of bendigo mayor, mayor ryan, bendigo and eaglehawk tramway -
 Melbourne Tram Museum
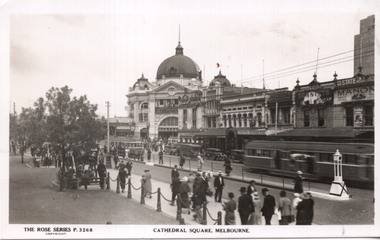
Postcard, Rose Stereograph Co, "Cathedral Square Melbourne", mid 1930s
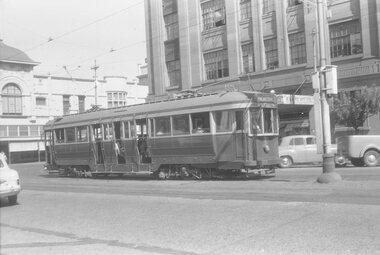
Rose Series postcard No. P 3268, titled "Cathedral Square Melbourne", with a number of W2 class trams in the view. Note the lamp on the top of the prow for the tram stop safety zone. In the view are Flinders Street railway station, Young and Jacksons hotel, Crofts Store, Hostess Showrooms, Yons Cafe with the Sennett's Ice-cream sign and Manon ladies shoes.Yields information about Swanston St. near the intersection with Flinders Lane. 1930'sPostcard - printed real photograph with Rose Stereograph Co. name on the rear. Unused.trams, tramways, w2 class, swanston st, flinders street station -
 Melbourne Tram Museum
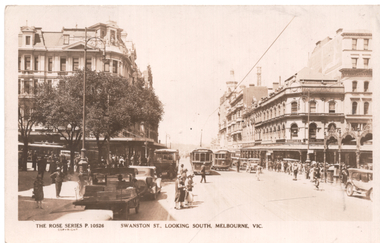
Postcard, Rose Stereograph Co, "Swanston St looking south Melbourne", c1930
Rose Series postcard No. P 10526 titled "Swanston St looking south Melbourne", from just north of Collins Stret. Trams in the view are S class No 164 and W class No 381? On the left side is a cable tram in Collins Street waiting to cross Swanston Street. An early MMTB bus is also heading south in Swanston Street with motorcycle and side car behind it. The cable tram signal is visible just to the left of the bus. This signal would continue to control all tram movements through the intersection until the insulation of modern motor traffic lights around 1929. On the left of photo is the imposing Queen Victoria building demolished in the mid 1960's to make way for the City Square. Yields information about Swanston St. at the intersection with Collins St.Postcard - printed real photograph with Rose Stereograph Co. name on the rear. Unused.trams, tramways, swanston st, s class, tram 164, cable trams, signals, w class, collins st -
 Ballarat Tramway Museum
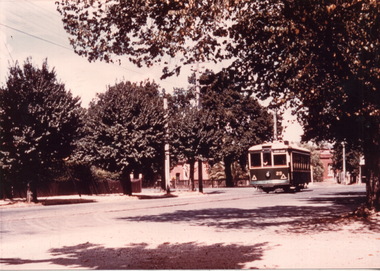
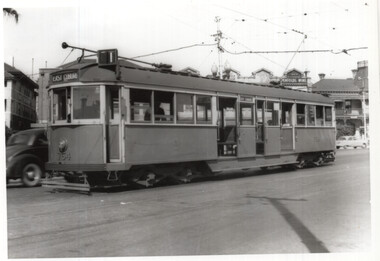
Photograph - Bendigo 29, mid 1950s
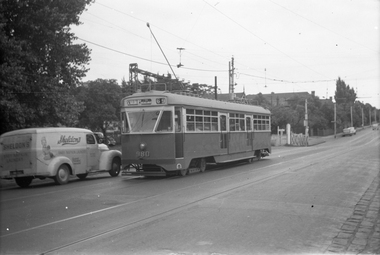
Colour print of Bendigo Birney No. 29 leaving the depot in now Tramways Ave on its way to Golden Square . The tram has large reflectorised triangles on its dash panel. Photographer and date not known.Yields information about Bendigo No. 29 and the depot lead.Colour prints - on plain papertramcars, tram 29, bendigo, birney tramcars, bendigo depot -
 Ballarat Tramway Museum
Photograph - Bendigo 2 and Birney Charing Cross, 1950s
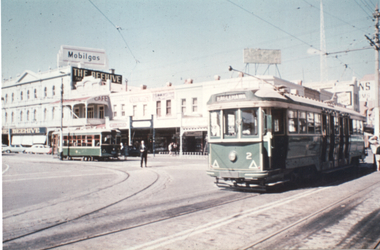
Colour print of Bendigo 2 (Eaglehawk) and a Birney (Golden Square) at Charing Cross during the mid to late 1950s. Has the Beehive buildings with Mobilgas roof advert in the background. Not known who took the photograph or date.Yields information about Charing Cross and tram 2 during the mid to late 1950s.Colour print - on plain papertramcars, tramways, bendigo, tram 2, charing cross -
 Victorian Railway History Library
Book, Southern Cross Traction, By Birney to Golden Square : the last years of Bendigo's tramway, 1973
A portrait of Bendigo's tramway system in its final yearsIll, maps, p.74.non-fictionA portrait of Bendigo's tramway system in its final yearstramways - bendigo, trams - bendigo - history -
 Melbourne Tram Museum
Negative, Wal Jack, c1950
Black and white negative, by Wal Jack, of PCC 980, south bound in Glenferrie Road, about to cross over the Kooyong Station Level crossing while running a route 69, St Kilda Beach. c1950. Alongside is a Sheldon's Baby Napkin Laundry van of Roche Street Hawthorn. trams, tramways, pcc class, glenferrie road, route 69, railway squares, level crossings, kooyong, tram 980 -
 Ballarat Tramway Museum
Photograph - Illustration, Rose Stereograph Co, "Sturt Street, Ballarat", c1913
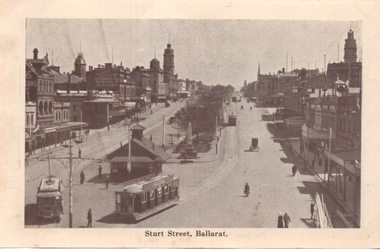
Illustration or photograph looking at the Grenville St tram terminus. One of the trams is a Sebastopol-type tram No 22. Has the large shelter in the background and another tram in the view. Taken c1913, following the introduction of the Sebastopol-type tram. From a Rose Series postcard - Rose Number 1710. Note the Mechanics Institute advertising sign on their building advertising the institute rather than a company. The 8-hour monument at the end of the central median can be seen. On the rear is an illustration of Shoppee's Square in the median strip. See item 4083 for a postcard.Yields information about the operation of ESCo trams in Sturt St and in particular the Sebastopol type.Black and white Illustration cut from a journaltramways, trams, sturt st, esco, grenville st, sebastopol type, tram 22, shoppee's square -
 Ballarat Tramway Museum
Album - Postcards & Photographs - Vic Solomons and others - Australian Tramways, Vic Solomons, 2023
Contains 184 images of postcards and photographs collected primarily by Vic Solomons of Sydney, with others from the collection of Wal Jack and Warren Doubleday. Covers almost all of Australia's tramway systems. 1 Post Card Hay St Perth Looking East No 3 Unknown Perth 2 Post Card Cars 30 & 90 both on Route 19 pass in Barrack St looking South Perth WA 1935.02.18 Perth 3 Post Card Hay St Looking East Perth WA Unknown Perth 4 Post Card William St Perth WA Unknown Perth 5 Post Card Perth from Shaftsbury Hotel Unknown Perth 6 Post Card Hay St Perth WA Looking East Unknown Perth 7 Post Card Barrack St Perth Unknown Perth 8 Post Card Murray Views No 3 High St Showing Town Hall Fremantle WA Unknown Fremantle 9 Post Card High St Fremantle WA Unknown Fremantle 10 Post Card View of Bolder City Golden Mile in the Background (Section No 1) 1908.08.20 Kalgoolie 11 Post Card Hannan St Kalgoolie 1900.08.19 Kalgoolie 12 Post Card Hannan St Kalgoolie WA (No 2) Unknown Kalgoolie 13 Post Card Intersection Hannan & Maritana Sts Kalgoolie WA Unknown Kalgoolie 14 Post Card Hannan St Kalgoolie Unknown Kalgoolie 15 Post Card Lane Street Bolder City Unknown Kalgoolie 16 Post Card Hobart Double Deck Tram Unknown Hobart 17 Post Card Macquarie St Hobart Unknown Hobart 18 Photo Liverpool Street Hobart Unknown Hobart 19 Photo Hobart 21 Unknown Hobart 20 Photo Hobart 14 in Elizabeth St Hobart Unknown Hobart 21 Post Card Macquarie St Hobart Unknown Hobart 22 Post Card Macquarie St Hobart Tas Unknown Hobart 23 Photo Double Decker Tram 3 at G.P.O. Hobart Tas No 31 Unknown Hobart 24 Post Card Double Decker Tram 19 Hobart Tas A B Series No 24 Unknown Hobart 25 Photo Hobart Municipal Tramways Tas No 95 Unknown Hobart 26 Post Card Elizabeth St Hobart Unknown Hobart 27 Post Card Elizabeth St Hobart Unknown Hobart 28 Post Card Elizabeth St Hobart Unknown Hobart 29 Post Card Elizabeth St Hobart Tas Unknown Hobart 30 Post Card HMT 21 with crew at Beach Road Terminus Unknown Hobart 31 Post Card HMT 9 & another with crew at Beach Road Terminus. Front cover photo of Destination GPO 1921.01.00 Hobart 32 Post Card Cascade Road and Mount Wellington Hobart Unknown Hobart 33 Post Card Elizabeth St Hobart Unknown Hobart 34 Post Card Elizabeth St Hobart Unknown Hobart 35 Post Card Elizabeth St Hobart 1915.04.07 Hobart 36 Post Card Macquarie St Hobart Tas Unknown Hobart 37 Post Card Macquarie St showing Post Office Hobart 1908.03.12 Hobart 38 Post Card Hobart Municipal Tramways 21 Unknown Hobart 39 Post Card Elizabeth St Hobart Tas Unknown Hobart 40 Post Card Liverpool Street Hobart Unknown Hobart 41 Post Card Electric Tram Launceston Tas 446 W J Little Photo 1919.02.08 Launbceston 42 Post Card Launceston Tram no 3 1911.08.30 Launbceston 43 Post Card Launceston Tram no 3 passes tram No 1 Unknown Launbceston 44 Post Card Tram 6 at Trevallyn a popular suburb Launceston Tasmania Unknown Launbceston 45 Post Card Tram 7 at Trevallyn Road Terminus Launceston Tasmania Unknown Launbceston 46 Post Card Tram 4 in Brisbane St Launceston Unknown Launbceston 47 Post Card Tram 9 in Brisbane St Launceston Tasmania Unknown Launbceston 48 Post Card Camerom Street Launceston Tasmania Unknown Launbceston 49 Post Card Murray Views No 15 Jetty Road Glenelg Terminus 1962-02-08 Adelaide 50 Post Card Bay Tram at Jetty Road Terminus Glenelg SA Unknown Adelaide 51 Post Card Tram 3 in King William Street Adelaide S Aust Unknown Adelaide 52 Post Card Valentine Series No 3065 The Old Horse Tram Victor Harbour Unknown Victor Harbour 53 Post Card Bourke Street Melbourne with Cable Car Looking East 1904.04.25 Melbourne 54 Post Card Opening of New Electric Tramway Elsternwick 1913-11-13 Melbourne 55 Post Card Cable trams in Clarendon St Sth Melb Unknown Melbourne 56 Post Card Pall Mall from Charing Cross Bendigo Unknown Bendigo 57 Post Card Tram 4 & 7 pass at The Fountain and Mitchell Street Bendigo Vic Rose Series P 3198 Unknown Bendigo 58 Post Card M&MTB 133 at Charing Cross bound for Eaglehawk Bendigo Vic Murray Views No 45 Unknown Bendigo 59 Post Card Pall Mall Bendigo Vic Unknown Bendigo 60 Post Card Charing Cross & Mitchell St Bendigo Trams passing 1919.00.00 Bendigo 61 Post Card Pall Mall Looking East Unknown Bendigo 62 Post Card Electric Trams and City Hotel Bendigo Vic Unknown Bendigo 63 Post Card Moorabool Street Geelong V 23 Unknown Geelong 64 Post Card Murray Views No 3 Moorabool Street Geelong Vic Unknown Geelong 65 Post Card The Rose Series P 2487 Ryrie Street Geelong Vic Unknown Geelong 66 Post Card Southern Cross Series 2696 Ryrie Stret Geelong Vic Unknown Geelong 67 Post Card The Rose Series P 1490 Ryrie Street Geelong Vic 1920-03-04 Geelong 68 Post Card Valentine Series No 1568 Lower Sturt Street Ballarat Unknown Ballarat 69 Post Card Rose Series P 1710 Sturt Street Ballarat Victoria Unknown Ballarat 70 Post Card Sturt Street Ballarat Victoria Unknown Ballarat 71 Post Card Horse Tram In Sturt Street Ballarat 1905.11.10 Ballarat 72 Post Card Sturt Street Ballarat Looking North-West Unknown Ballarat 73 Post Card Shoppes Square Sturt Street Ballarat Looking North Unknown Ballarat 74 Post Card Junction Sturt and Lydiard Streets Ballarat 1909-09-01 Ballarat 75 Post Card The Electric Supply Co Souvenir Tram Ticket No 3085of the opening of Electric System August 18 1905 1905.08.18 Ballarat 76 Post Card Sturt Street Ballarat Victoria 1907.11.25 Ballarat 77 Post Card Off to the Gardens Electric Tram Ballarat Unknown Ballarat 78 Post Card Sturt Street Ballarat 1907.04.16 Ballarat 79 Post Card Sturt Street Ballarat Looking East Electric tram with Double Deck Trailer 1911.04.17 Ballarat 80 Post Card Sturt Street Ballarat Looking East Unknown Ballarat 81 Post Card Sturt Street Ballarat Looking West 1911.03.01 Ballarat 82 Post Card Town Hall and Sturt Street Ballarat Unknown Ballarat 83 Post Card Lydiard Street Ballarat 1906.11.23 Ballarat 84 Post Card Looking North along Adelaide Street from George Street Brisbane Sidues Series No 764 Unknown Brisbane 85 Post Card Looking South along Queen Street from the Creek Street Intersection Brisbane Qld Sirues Series No 1379 Unknown Brisbane 86 Post Card George Street from near Supreme Court Brisbane Unknown Brisbane 87 Post Card Queen and Eagle Streets Brisbane 1907.07.04 Brisbane 88 Post Card Queen Street showing His Majesty’s Theatre Brisbane Unknown Brisbane 89 Post Card Queen Street Treasury Building 1908.01.20 Brisbane 90 Post Card G P O and Queen Street Brisbane Unknown Brisbane 91 Post Card Queen Street Brisbane Looking from Wharf Street Unknown Brisbane 92 Post Card Customs House Brisbane 1905.02.16 Brisbane 93 Post Card Queen St Brisbane 1905.09.16 Brisbane 94 Post Card Queen St Brisbane 1907.11.19 Brisbane 95 Post Card Treasury Buildings Brisbane Unknown Brisbane 96 Post Card Queen and Eagle Streets Brisbane Unknown Brisbane 97 Post Card The Valley Corner Brisbane Unknown Brisbane 98 Post Card Brisbane Queen Street opposite General Post Office Unknown Brisbane 99 Post Card North Quay and Milton Beach Brisbane Q Unknown Brisbane 100 Post Card Victoria Bridge Brisbane South Side 1907.08.14 Brisbane 101 Post Card Victoria Bridge Brisbane Unknown Brisbane 102 Post Card Breakfast Creek Bridge Brisbane Q Unknown Brisbane 103 Post Card Melbourne Street Station South Brisbane Queensland Unknown Brisbane 104 Post Card General Post Office Queen Street Brisbane 1955.09.23 Brisbane 105 Post Card Customs House Brisbane 1904.11.04 Brisbane 106 Post Card Queen St Brisbane 1919.11.00 Brisbane 107 Post Card Queen St Brisbane Sidues Series No 627 Unknown Brisbane 108 Post Card Creek Street Brisbane Queensland Unknown Brisbane 109 Post Card Customs House and Garden Reach Brisbane Queensland 1910.00.08 Brisbane 110 Post Card Queen and Creek Streets Brisbane 1909.06.07 Brisbane 111 Post Card Queensland National Bank andd Queen Street Brisbane Queensland Unknown Brisbane 112 Post Card Queen Street and Treasury Buildings Brisbane 0000.09.07 Brisbane 113 Post Card Queen Street showing “Courier” Buildings Brisbane Unknown Brisbane 114 Post Card Intersection George & Roma Streets Brisbane Q 1916.05.11 Brisbane 115 Post Card Adelaide Street Brisbane Q Unknown Brisbane 116 Post Card G P O Queen Street Brisbane Q Unknown Brisbane 117 Post Card Treasury Building Brisbane 1906.03-20 Brisbane 118 Post Card Queen and Eagle Streets Brisbane 1907.02.01 Brisbane 119 Post Card Queen St Brisbane Unknown Brisbane 120 Post Card Queen St Brisbane Q Unknown Brisbane 121 Post Card Victoria Bridge Brisbane 1906.07.30 Brisbane 122 Post Card An Unusual View showing Head of Queen Street Victoria Bridge & South SideSuburbs Brisbane Q Unknown Brisbane 123 Post Card Petries Bight Brisbane Q Unknown Brisbane 124 Post Card South End Victoria Bridge Brisbane Q Unknown Brisbane 125 Post Card Customs House Brisbane Unknown Brisbane 126 Post Card Photo of toastrack car circa 1910 Unknown Brisbane 127 Post Card Treasury Buildings Brisbane Unknown Brisbane 128 Post Card East Street Rockhampton with Steam Tram & trailer Unknown Rockhampton 129 Post Card Post Office Rockhampton with steam tram Unknown Rockhampton 130 Post Card East Street Rockhampton with Steam Trams Rose Series P 7154 Unknown Rockhampton 131 Post Card William Street Rockhampton Rose Series P 7156 Unknown Rockhampton 132 Post Card Central East Street Rockhampton Q with Steam Trams Unknown Rockhampton 133 Photo Sturt St Ballarat Unknown Ballarat 134 Photo Bridge Street Ballarat Unknown Ballarat 135 Post Card George St Sydney Unknown Sydney 136 Post Card Elizabeth St Sydney Unknown Sydney 137 Post Card Railway Square Unknown Sydney 138 Post Card Sydney Harbor Bridge - pending receipt 139 Post Card Kings Cross - Mowbray Series with description on rear from C Roy G Field Unknown Sydney 140 Post Card Kings Cross - Mowbray Series with description on rear from C Roy G Field Unknown Sydney 141 Post Card Central Railway Station Sydney - Rose Series P6033 1954-01-26 Sydney 142 Post card William Street Darlinghurst looking towards City - Rose Series P6602 unknown Sydney 143 Post Card Circular Quay Sydney - Rose Series P6680 Unknown Sydney 144 Post Card View at Manly NSW - Rose Series B1003 Unknown Sydney 145 Post Card Hunter St Newcastle NSW - Rose Series P7843 Unknown Newcastle 146 Post Card Bank Corner Newcastle NSW - Mowbray Series No. 155 Unknown Newcastle 147 Post Card Hunter St Newcastle NSW Unknown Newcastle 148 Post Card Criterion Hotel Hunter St Newcastle NSW Unknown Newcastle 149 Photo Horse tram at Newtown Station 1894 to 1898 - PTC photo c1894 Newtown 150 Photo Steam tram motor No 3 at Railway Square 1879 1879 Sydney 151 Photo Railway steam tram c1900 with a horse drawn double deck bus c1900 Sydney 152 Photo Steam motor 5A and doubled deck bus Unknown Sydney 153 Photo Steam motor 53A with detail notes on rear 1922 Sydney 154 Photo Cable tram set at Milsons Point ferry terminal c1900 Sydney 155 Photo Early Sydney electric car - Ocean St - Rose Bay Unknown Sydney 156 Photo George St looking souoth c1905 c1905 Sydney 157 Photo Tram 165 at Circular Quay Unknown Sydney 158 Photo Tramcar ferry or transporter at The Spit Unknown Sydney 159 Photo tram 882 George St at Marti Place, 1937 1937 Sydney 160 Photo Tram 826 Railway Sq area Unknown Sydney 161 Photo Railway Sq in background, Broadway with double decker bus and toastrack car late 1930s Sydney 162 Photo Coupled St Pitt St? - photo Ben Parle Feb. 1950 Sydney 163 Photo Electric tram No. 2 - North Sydney with side trolley pole running Unknown Sydney 164 Photo George St - Horden's Corner Unknown Sydney 165 Photo George St at Martin Place c1920 Sydney 166 Photo Castlereagh St Sydney c1928 c1928 Sydney 167 Photo Railway Sqare c1920 c1920 Sydney 168 Photo Darling St Countereweight Unknown Sydney 169 Photo Trolley bus depot Unknown Sydney 170 Photo Trolley bus No. 14 Unknown Sydney 171 Photo Newcastle Railway Station with steam tram - Wharf Road?? Unknown Newcastle 172 Photo High St West Maitland - steam tram Unknown Maitland 173 Photo High St West Maitland - steam tram Unknown Maitland 174 Post Card Argent St near tram terminal Broken Hill NSW c1900 Broken Hill 175 postcard Argent St looking south Broken Hill - with Ken Magor's notes on rear Unknown Broken Hill 176 Photo Toronto - steam tram 61A Unknown Toronto 177 Photo 124A trial run 1911? Sutherland - Cronulla line 1911 Sutherland 178 Photo 103A at a tram stop Unknown Sydney 179 Photo Cable tram set at Crows Nest terminus grip car 12, trailer 22 Unknown Sydney 180 Photo Cable tram Queens Square Sydney 1903 Sydney 181 Photo cars 2078 and 2077 Chatswood late 1950s Sydney 182 Photo car 1877 Balmain area late 1950s Sydney 183 Photo Trolley bus - Rockdale destination Late 1950s Sydney 184 Photo Broken Hill steam tram - motor 18A North Tram Unknown Broken Hill 185 Photo Millars Point Sydney NSW - ferry/tram interchange, unknown Sydney All items imaged including the rear or back where there was writing of information. All files stored on the Museum's Photo Collections directory. Demonstrates through the medium of many images, Australian tramway systems and Ballarat's place in them.Album - heavy card covers, plastic lined with postcard or 6x4 photo sleeves.australia, tramways, postcards, photographs, steam trams, horse trams, cable trams, trolley buses -
 Ballarat Tramway Museum
Negative - Tram 40 - Moorabool & Malop Streets, Laurie Gallop, early 1956
Photo shows Geelong 40 on its way to North Geelong, turning from Moorabool St into Malop St. In the background are now the National Mutual and Market Square buildings. One of a set of photos was taken between 15/2/1956 and 3/3/1956 when services operated only between Belmont and North before the final closure of the Belmont route on 25/31956 and that bogie tram 31 is not shown on the board, having gone to Ballarat on 15/2/1956 - see item 5554. See item 8213 for an article on the Geelong system by Keith Kings. Yields information about the Geelong operations toward the closure of the tram system.Black and white Negative - 120 sizetramways, geelong, moorabool st, malop st, tram 40 -
 Melbourne Tram Museum
Newspaper, The Age Newspaper, "Passengers were fare game for action group", 30-7-1976
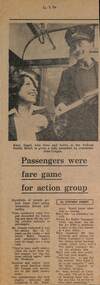
Reports on a free tram in Swanston St - hired for $350 by the group Action for Public Transport to publicise a rally in the City Square on 30-7-1976. Quotes rally organiser Rus Littleson. Has a photo of Conductor John Cregan giving passenger Kay Angel a rally phamplet. Story by Stephen Nisbet.Yields information about a rally to protest about public transport fares.Newspaper clipping - "Passengers were fare game for action group" - The Age 30-7-1976tramways, trams, melbourne, public transport, fares, rally, free tram -
 Bendigo Historical Society Inc.
Photograph - MINING IN BENDIGO COLLECTION: MINING PHOTOGRAPHS
BHS CollectionFolded paper with copies of photos of mines and various mining buildings. On the front is a view from New Chum Hill, looking south in 1890's. Pictured is the Lazarus Crushing Plant and boiler house, Lansell's '222'. Amd the new Chum Mines in the background. On the inside at the top is the New Chum Railway, Golden Square. Pictured is the mine and its buildings, two chimneys, two large wood stacks and other mines in the background. On the left, a man is standing on the side of the railway line beside the mine. The next picture is the United Hustlers and Redan Mine, west of Comet Hill State School, Sandhurst Road. It shows the mine and its buildings, chimney, ore bins, mullock heap and tramway. The middle picture is the Central Deborah, Violet Street, near Bendigo Creek, Golden Square. It shows the poppet legs, buildings and some machinery behind the large building. The large building has eight ventilators in the roof. The buildings are made of corrugated iron. The bottom left picture is the Deborah Mine, Quarry Hill. The picture shows the poppet legs on the hilltop, the buildings beside it, a square chimney behind the poppet legs and some vegetation and a peppercorn tree in the foreground. The far building also has ventilators in the roof. The picture on the right is underground at 1000 feet level in the Deborah Mine. Pictured are three men with a rock drill. On the back, at the top is a picture of a First Motion Winding Engine at Deborah - later at Central Deborah. The picture shows the engine and driver. The middle picture is the South New Moon Mine, Eaglehawk - leading mine in State in 1903. The picture shows the poppet legs, buildings, chimney and a high tramway. In the foreground is a dam. The bottom picture is Victoria Hill looking south to New Chum Hill. In the foreground is Lansell's '180' Mine and Ballerstedt's Open Cut and in the background are the 'New Chum and Victoria', 'Old Chum' and the 'North Old Chum'.photo, mining in bendigo, mining photographs, lazarus crushing plant, lansell's 222, new chum mines, new chum railway, united hustlers and redan mine, comet hill state school, central deborah, deborah mine, first motion winding engine, south new moon mine, lansell's 180, ballerstedt's open cut, new chum and victoria, old chum, north old chum, square chimney -
 Melbourne Tram Museum
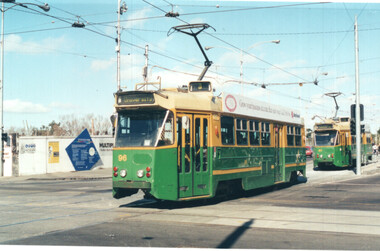
Photograph - Set of 6 colour prints of trams at Corner of Flinders and Swanston Streets, George Bishop, c1999
Set of six colour photographs of trams at the corner of Swanston and Flinders Streets. In the background can be seen the construction of the Federation Square project which commenced in 1999. 1 - Z 96 (Route 3, University) at Flinders and Swanston Streets. 2 - Z 37 (University route 5) 3 - SW6 888, City Circle, westbound. 4 - Z3 140 (East Coburg Route 1) - would appear that the car is not doing their hook turn properly 5 - B2 2037 westbound (Route 70, City Flinders St) 6 - Z 41 (Route 72, University)Yields information about the operation of Melbourne trams during the late 1990s.Set of six Colour prints printed on Kodak paperDetails of the photograph and photographer on the rear in ink.trams, tramways, z3 class, z class, tram 96, tram 37, city circle, tram 888, hook turns, tram 140, b2 class, tram 2037 -
 Melbourne Tram Museum
Photograph - W5 754 at Beaconsfield Parade terminus, Keith Kings, 3/4/1953
Photograph shows W5 754 (East Coburg Route 1) at the former Beaconsfield Parade terminus at the intersection with Fitzroy St Kilda. The photographer notes the square windscreen windows on the tram.Yields information about tram 754 in 1953 in Beaconsfield Parade.Black and white photograph - W5 754 at Beaconsfield Parade terminus photo number G(y)(7)Has details and date written on the rear.tramways, beaconsfield parade, st kilda, fitzroy st, w5 class, tram 754, route 1 -
 Melbourne Tram Museum
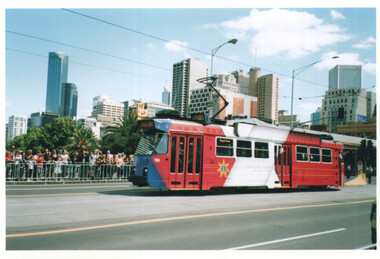
Photograph - Queen Elizabeth Royal Tram Z3 158 - set of 8, David Frost, 26-10-2011
The photos show Z3 158 dressed for the Royal Visit of 26-10-2011, to transport Queen Elizabeth II from Federation Square to Government House Drive. The 3rd photo shows the Breakdown / recovery truck R10 alongside the tram at one point. Photos also show interior posters and of it running a route 55 Domain Interchange in William St after the event. Image 9 - The Age report about the tram and the nominated driver - 25-10-2011 - Z-class a tram fit for a Queen.Provides a series of photographs of the Queen's visit to Melbourne in 2011.Set of 8 colour prints of Z3 158 as the Royal tram, printed on Kodak Royal Papertrams, tramways, royal visit, royal tram, z3 class, tram 158, princes bridge, r10, domain interchange, route 55, the age -
 Melbourne Tram Museum
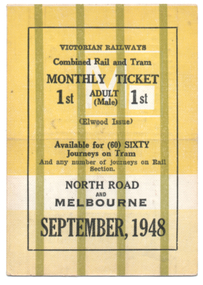
Ephemera - Rail & Tram Monthly ticket, Victorian Railways (VR), Sept. 1948
Victorian Railways Rail & Tram Monthly Periodical with conditions of travel on the inside. See reference page 124/125 and Figure 6-33. All tickets were available for 60 only tram trips, but allowed unlimited rail trips with 60 separate squares for a tram conductor to punch. This ticket is for First class travel, from North Road to Melbourne, though the rail portion only provided for first-class travel. Ticket No. 002 for September 1948. Colour of the ticket and markings varied for each month. Ticket has been cancelled with two red lines on one side.Demonstrates a Victorian Railways Rail and Tram monthly ticket for a specific section or trip on the St Kilda Brighton tramway. May have been used as a training sample.Printed card ticket, heavy card, coloured, with a crease in the middle so it could be folded.tickets, vr, vr trams, victorian railways, st kilda brighton tramway, monthy -
 Bendigo Historical Society Inc.
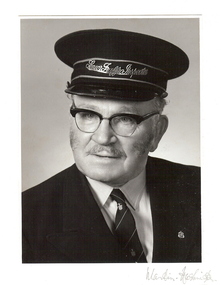
Photograph - BASIL MILLER COLLECTION: PORTRAIT OF BASIL MILLER
Basil William Bates Miller died 14/8/2001Black and white photograph of Basil Miller, Senior Traffic Inspector of Bendigo Tramways, in uniform, looking to the right. Martin Washington written in pencil, bottom right corner. Mounted on cream card. Basil left his tramways collection of photographs and documents to the Bendigo Historical Society. Mr. Arthur Penna, 78 emmett Street, Golden Square, was the executor of Basil's will.person, individual, basil miller -
 Ballarat Tramway Museum
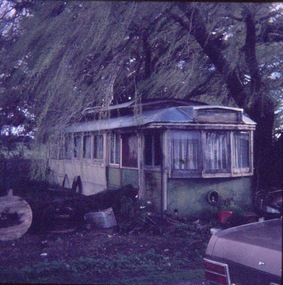
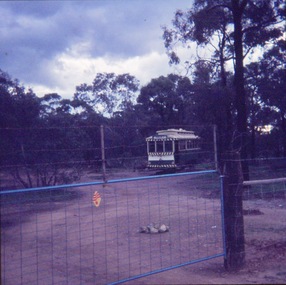
Slide - 35mm slide/s - set of 4, John Theodore, c1973
Photo of Ballarat No. 16, SEC, in a garden setting - Allendale area, c1972/3. Tram body sold by the SEC in Jan. 1956. See also Reg Item 3535 and 9624 for other photographs. See btm3929 for details of disposal.Yields information about tram 16 following its disposal and how it appeared c1973.Set of 4 Agfa blue and white plastic mounts - 27mm square slides.Various notations by John as to the slide number and the trams in pencil and ink.tramways, trams, tramcars, disposal, tramcar bodies, sale of trams, allendale, tram 16 -
 Ballarat Tramway Museum
Slide - 35mm slide/s - set of 8, John Theodore, Tram No. 32 at the Maryborough, post March 1973
Series of photos of Tram No. 32 at the Maryborough Historical and Wildlife Co-op park, after transport to the park post March 1973. Tram transported to Maryborough 3/73, see Reg Item 953. Slide 1 - after the building to cover the tram has been constructed, but not roofed. Slides 2 and 3 are prior to the shelter being built. .1 - at the park, with the frame of the building erected, has other buildings in the background. .2 - ditto, but before the frame erected. .3 - ditto, showing the short piece of track that the tram was placed on. .4 - Interior view .5 - ditto .6 - ditto .7 - ditto .8 - showing motor with a trolley pole based wedged inside. See also Reg item 6632 for another photograph of the series. Yields information about tram 32 following its disposal and how it was sheltered.Set of 8 AGFA blue and white plastic mount 35 x 23mm or 27mm square slidesVarious notations by John as to the slide number and the trams in pencil and ink.tramways, trams, disposal, maryborough, tram 32 -
 Ballarat Tramway Museum
Slide - 35mm slide/s, John Theodore, Tram 32 Maryborough Park, post March 1973
Photo of Tram No. 32 at the Maryborough Historical and Wildlife Co-op park, after transport to the park post March 1973. Tram transported to Maryborough 3/73, see Reg Item 953. Slide prior to the shelter being built. See also Reg item 6604 for other photographs of the series. Yields information about tram 32 following its disposal and how it was sheltered.AGFA blue and white plastic mount or 27mm square slide.Various notations by John as to the slide number and the trams in pencil and ink.tramways, trams, disposal, maryborough, tram 32 -
 Bendigo Historical Society Inc.
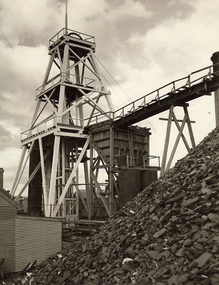
Photograph - POPPET HEAD WITH SQUARED TIMBER LEGS
Black and white photograph. Poppet head with squared timber legs, two stage landings. Wooden storage box and two vertical steel bins. Overhead tramway to mullock dump. Plateman's shed on first landing. Mullock dump. Shed. Inscriptions: on back - 'R Stanistreet', 'Hercules'. mining, surface equipment, poppet head, bendigo, mines and mining, mines, mine, mining, mining shed, poppet head -
 Ballarat Tramway Museum
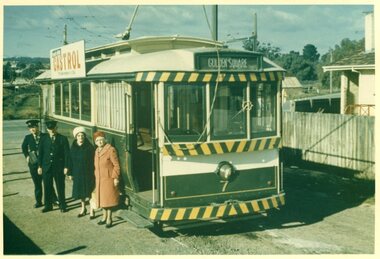
Photograph - Colour Print, Bob Lilburn, Jul. 1967
Colour print of Bendigo 7 at the North Bendigo terminus with two ladies, the conductor and driver standing alongside. The tram has a Castrol oil advert and has the destination of Golden Square Photograph from the Bob Lilburn Collection. Inscription in Bob's handwriting.On rear in ink "7 at Nth Bendigo 7/67"trams, tramways, north bendigo, tram 7 -
 Melbourne Tram Museum
Domestic object - Coaster set, Paul Stephen-Daly trading at Louchrilau Nominees Pty Ltd, c1984
Set of 4 drink coasters, with a blue felt back gold plastic front with an impression of a Melbourne tram contained within a black finished cardboard box. Each coaster has the imprint of the Melbourne Tourism logo, 150 years of Melbourne, produced for the Victoria's 150th celebrations 1984-85. Box has the Australian Made logo in gold printing. The coasters feature: Z3 class - 1980 - has a Stephen Daly trademark logo on the rear. W2 class - 1927 R Class - 1266 (Melbourne cable tram) - 1885 x 2 No. T class - 1917 Coasters finished with square corners, while those of the earlier production finished with rounded corners. Also within the box are the earlier produced coasters (see Reg Item 1835) of the A class and X class trams. Produced by Paul Stephen-Daly trading at Louchrilau Nominees Pty Ltd. No contact details See also Reg Item 1835 for another set of 5 and the A and the X class trams.trams, tramways, souvenirs, melbourne -
 Melbourne Tram Museum
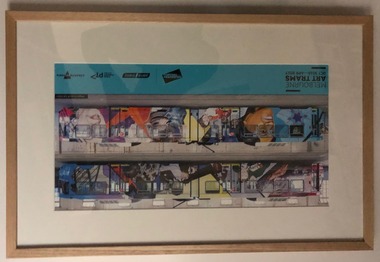
Photograph - Framed Photographs, Barkly Picture Framing, 2016
Framed Photograph of Art Tram No. 2018 for 2016-2017 for the Melbourne Art Trams Festival designed by Eve Glenn and Megan Evans. Photographed a Preston Workshops following completion of the wrapping process. Consists of square finished varnished hard wood frame, card frame cut to fit the photograph, brown tape holding a card back with string hanging cord and two black cotton dots on the bottom corners. Framed by Barkly Picture Framing 80 Sydney Road Brunswick. Has the sponsor logos of Yarra Trams, Creative Victoria, PTV and Melbourne Festival.trams, tramways, transporting art, b class, arts festival, preston workshops -
 Melbourne Tram Museum
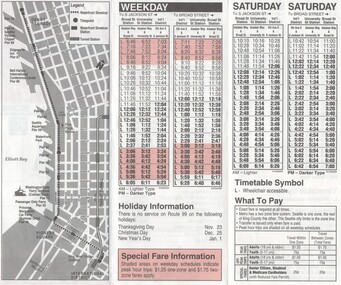
Ephemera - Timetable, King Country Metro, "99 Waterfront Street Car", Sep. 2000
Printed - 3 fold - two colour timetable for the Seattle Waterfront Pioneer Square - International District route "99 Waterfront Street Car" which used ex Melbourne W2's. Operated by King Country Metro, for period 18/9/2000 to 2/2/2001. Gives a route map, times, fares, a short history of the streetcars and contact details for customer services. Pamphlet - 3 fold detailing the tram with map and a loose or separate timetable sheet - 1992 Spring Schedule. Has W2 512 on cover, 272 on rear.trams, tramways, seattle, w2 class, timetables, tram 512, tram 272 -
 Melbourne Tram Museum
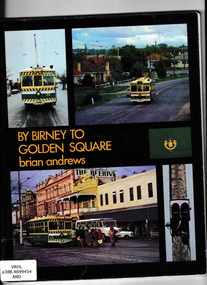
Book, Brian Andrews, "By Birney to Golden Square", 1973
Book, 78 pages including card cover, printed on gloss paper, titled "By Birney to Golden Square", written by Brian Andrews, published by Southern Cross Traction, Kensington Park SA. Sub-titled "The last years of Bendigo's tramways", 1973. Features both black and white and colour photographs, including tickets, photos along each route, Charing Cross, depot, notes on the rolling stock with an aerial photograph of Bendigo with the tram routes marked in and a fold out detailed map of Bendigo and its track layout.trams, tramways, secv tramways, bendigo, maps -
 Melbourne Tram Museum
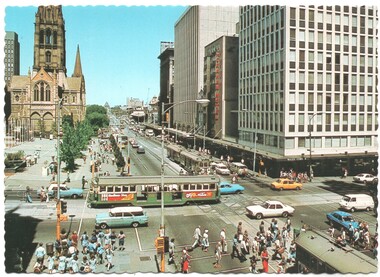
Postcard, Nu-color-Vue, looking south along Swanston St, mid 1970's
Colour postcard divided back, serrated edge, with a view from the Melbourne Town Hall portico, looking south along Swanston St towards the intersection of Bourke St. shows the city square, Wales Corner, trams and traffic in both streets. Has a W2 crossing Swanston St - W2 586? - the crossing is one of the type which composed of panels that allowed for maintenance. City Square completed to Flinders Lane early 1970, Bourke St Mall opened 1983 - photo mid 1970's Back has space for name and address, stamp and a message and title of postcard. Produced by Nu-Color-Vue. Card Number ML 209, NCV 2940.trams, tramways, postcards, swanston st, bourke st, tram 586? -
 Melbourne Tram Museum
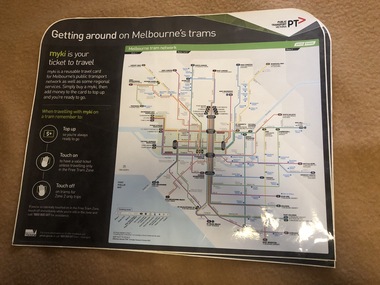
Map, Orajet, "Melbourne tram network", "Getting around on Melbourne's trams", Jan. 2015
Large plastic sheet, with an adhesive back and cover protective sheet - titled "Melbourne tram network" and "Getting around on Melbourne's trams" with PTV, Metro, Yarra Trams logos, shows fare zones, ticketing, free tram zone and information about Myki and how to use it.. Published 2015. Printed by Orajet, digital printing media. Has rounded corners along the top edge and square corners in both bottom corners. Two copies held.On rear in felt pen "Camira Orange Fine"trams, tramways, yarra trams, ptv, maps, free tram, melbourne, myki -
 Melbourne Tram Museum
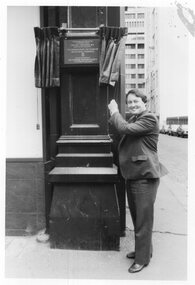
Photograph - Set of 3 Black & White Photograph/s, Keith Kings, 11/11/1985 12:00:00 AM
Set of three Photographs, Black and White, Photo of: .1 - Minister for Transport Tom Roper unveiling a plaque at the City Sq, 11/11/1985? celebrating the centenary of 100 years of Melbourne tramways. See image i1 and i2 for close up of the plaque. .2 - display of cable car 299 and grip car at the city square along with a pseudo railcar. .3 - group of four cars on display in Swanston St with Y469 on the rear.trams, tramways, 100 years of trams, tmsv, swanston st, y class, tram 469 -
 Melbourne Tram Museum
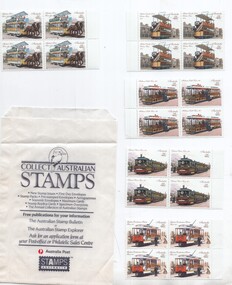
Ephemera - Stamp, Australia Post, "Australian Historic Tramways", 1989
Set of five blocks each of four tram featured stamps issued for the "Australian Historic Tramways" 11 October 1989 by Australia Post. Features a photograph of Hobart Electric trams on the inside cover, with the five stamps behind a plastic sheet. On the front is a photo of Railway Square Sydney, the rear cover has a description of the trams and of Australian tramways. Five stamps, all 41c: Adelaide Horse Tram Sydney Steam Tram Melbourne Cable Tram Hobart electric Tram Brisbane Electric Tram. See Reg Item 470, Reg Item 471 to 474 for other examples and associated materials and 510 for a Poster. Contained within an Australia Post stamp packet.trams, tramways, stamps, australia post, cable trams, horse trams