Showing 372 items
matching water glass
-
 Tatura Irrigation & Wartime Camps Museum
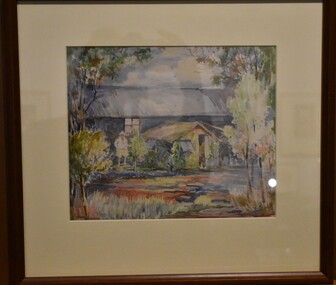
Painting - Painting - Watercolour, Musicians' Practice Room, c.1943
Painted in Camp 1 by one of the German internees, Hans Zenker, and acquired by fellow internee Wilhelm Eckles.Water colour mounted and sealed with glass front in light brown stained wooden frame. Hut with gable roofed adjunct in front, trees and grass. Man standing of to the left of the window.Hans Zenkercamp 1 internment camp, tatura, music room, camp 1 orchestra, illustrations, watercolours -
 Tatura Irrigation & Wartime Camps Museum
Painting - Painting - Water Colour, Hut 45 Tatura Camp 1
Herman Bernhard SCHMIDT e was a foundry owner in Queensland. He was interned and sent to Gaythorne internment camp for 6 months and then sent to Tatura Camp 1 until 1946 when he was released.Coloured water colour painting of a hut, number 45 on side, power pole behind hut. coloured section in front of hut. Framed in a light coloured wood and under glass. label on back "Donated by the Gunther Schmidt Family Trust" (son of Herman Bernhard Schmidt - Tatura WW2) March 2023herman bernhard schmidt, queensland foundry owner, camp 1 tatura, gunther schmidt trust, gaythorne camp queensland -
Tatura Irrigation & Wartime Camps Museum
Painting - Painting - Water Colour, Hut 45 Tatura Camp 1
Herman Bernhard SCHMIDT e was a foundry owner in Queensland. He was interned and sent to Gaythorne internment camp for 6 months and then sent to Tatura Camp 1 until 1946 when he was released.Coloured water colour painting of a hut, number 45 on side, bushes in front and side. Orange gravel road to the front and right hand side. Framed in a light coloured wood and under glass. Under the picture is TATURA 1940-194 in black ink.label on back "Donated by the Gunther Schmidt Family Trust" (son of Herman Bernhard Schmidt - Tatura WW2) March 2023herman bernhard schmidt, queensland foundry owner, camp 1 tatura, gunther schmidt trust, gaythorne camp queensland -
Tatura Irrigation & Wartime Camps Museum
Sight Glasses, 1920 - 1980
The wheel meter was enclosed in a solid metal case with a window at the top for reading through. this type of meter worked on the axle of the wheel.A piece of thick glass for covering a dethridge wheel meter(old type). Box of 50 (2 missing)victoria state rivers and water supply commission, dethridge wheel, irrigation -
Tatura Irrigation & Wartime Camps Museum
Box, Tatura Souvenirs/Royal Visit 1954, Various
Collection of 1954 Royal Visit and Tatura Souvenirs memorbillia. Newspaper - Tatura Guardian - Souvenir of Royal Visit 1954|School Souvenir booklet - Royal Visit|School booklet - Royal Visit - Red cover|School booklet - Royal Visit - Black cover|State Reception Invitation and Booklet to Jack Lowry - Royal Visit|Note Pad - Spiral bound - Royal Family|Photo of Queen arriving at Tatura Railway Station and Entry Card to Station Reserve.|China Plate - Royal Tour.|2Plastic beakers - Royal Visit|1 British Flag|1 Souvenir Royal Flag|Souvenir Royal Flag - Red Cross|Stubby holder - Tatura Waterwheel Country| Glass bowl - Photo of Tatura|Broken - Original RC Church - Jug - C. 1900| China Jug - A View of Tatura| Water Bottle - Tatura Youth Club. C.2005|2 "Get Hooked on Tatura"|3 Tatura Post Cards - C. 1990|Magnet - "Stick with Tatura - 3SR radio|TaturaBeige coloured rectangle boxlocal history, royal visit souvenirs, tatura souvenirs, civic, memento, souvenirs -
 Tatura Irrigation & Wartime Camps Museum
Painting - Painting - Watercolour, 1945
Watercolour painting done by internee Baron von Brandenstein whilst an internee in Camp 1 Tatura.small water colour painting of gum trees, blue sky and white clouds in light coloured timber frame with glass.on back: painted by Baron von Brandenstein 1945 in Tatura German Internment Camp. Signed on front left bottom - CB 1945baron von brandenstein, camp 1 art work, watercolour painting, ww2 internee art work -
 Tatura Irrigation & Wartime Camps Museum
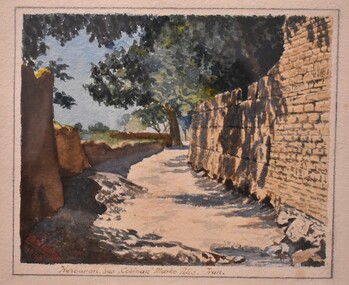
Painting - Painting - Water Colour, Franz Korbler, Kuhbanan SAS Cobinan Marko Polos Trans, 1945 - 1947
Painting by Franz Korbler. Architect/artist, born Vienna Austria, arrested Teheran Persia September 12941. Interned Loveday Camp SA and Tatura Camp Victoria 1945-1947.Water colour of lane way with brick wall on right, trees and wall on left. Painting has a silver border and a cream mat. In a gold frame with glass.Kuhbanan SAS Cobinan Marko Polos Tran in gold underneath picture.franz korbler -
 Villa Alba Museum
Photograph - Exterior cast iron pipe beside louvre window, c.1987
Built for William and Anna-Maria Greenlaw in the early 1880s, and with interiors decorated by the Paterson Bros, Villa Alba remained in private ownership until 1949. From 1950, the house was owned by a number of institutions. By 1984, the Villa Alba Preservation Society had been formed, and three years later, the Mount Royal Hospital granted a 25-year lease to Kew Council. In 2004, the title to Villa Alba was passed by the Victorian Government to The Villa Alba Museum Incorporated. The Museum, at 44 Walmer Street, Kew, is now a cultural institution committed to the collection, study and display of 19th century interior decorative finishes, and the components of 19th and 20th century interior decoration.This is one of a number of historically and aesthetically significant photos of the interiors and exterior of Villa Alba when it was still owned by the Mount Royal Hospital, showing twentieth century accretions and deterioration of the historic fabric of the building. This was a benchmark survey against which future conservation and restoration activities can be measured.In December 1987, Mockridge Stahle & Mitchell Pty Ltd Architects prepared ‘Villa Alba Survey: A Report on the fabric for Mount Royal Hospital’ of which this photograph is a part. Photo of cast iron exterior water pipes located beside a glass louvre window.villa alba museum, conservation photographs, victorian architecture, louvre windows, drain pipes -
University of Melbourne, Burnley Campus Archives
Slide - Glass slide, 1891-1905
-Diagram showing how capillary water rises in soils - in films from soil particle to soil particle. SI, soil particles.'soil, diagram, water -
University of Melbourne, Burnley Campus Archives
Slide - Glass slide, 1891-1905
Water wheel in irrigation channel. Possibly Swan Hill?irrigation, farm work -
 Creswick Campus Historical Collection - University of Melbourne
Equipment, Steam distillation unit, circa 1930
[E.J. Semmens experimented with Eucalyptus distilling during his time as principal of the VSF, this piece of equipment would have been used for teaching and research at the School and maybe linked to Semmens' research.] Detailed description of item supplied by from the International Wood Collectors Society.Steam distillation box for extraction of essential oils from wood or sawdust and leaves. Copper box and stand, bakelite fittings, cork and glass tubing. The box has a vent for releasing steam pressure and bottom drain hole to collect oils. It is raised to allow a burner to fit underneath it. forestry, forest products, semmens, edwin james -
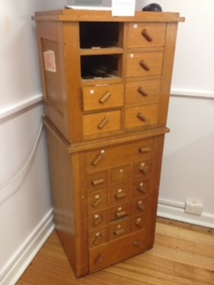
 Creswick Campus Historical Collection - University of Melbourne
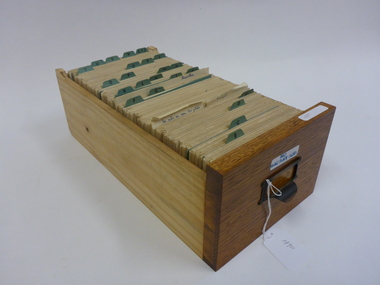
Ephemera - HED Glass Plate Index
HED (H.E. Dadswell) Glass Plate card index in wooden drawer. CSIRO.Card index -
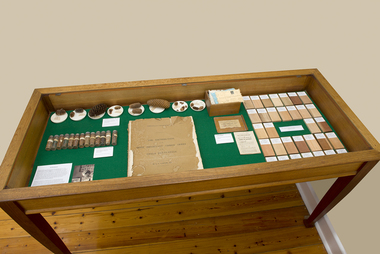 Creswick Campus Historical Collection - University of Melbourne
Furniture - Display table, 1910
2 display cases from the museum, possibly made from Victorian hardwood seasoned at Newport.Shown in old museum photosSeasoned hardwood display table with glass top.victorian school of forestry, vsf -
Creswick Campus Historical Collection - University of Melbourne
Document
Typed Copies of HED Glass slides of Australian and Island timbers correspondence from the Division of forest Products CSIRODocument -
Creswick Campus Historical Collection - University of Melbourne
Equipment
Epidiascope - glass baseEquipment -
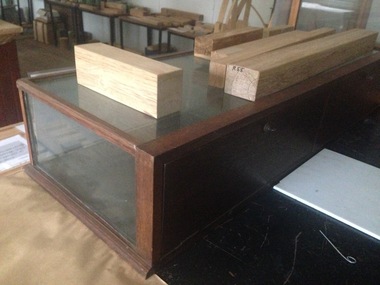 Creswick Campus Historical Collection - University of Melbourne
Equipment
Two glass display cabinets used at the School in both the Laboratory and the MuseumGlass display cases -
Creswick Campus Historical Collection - University of Melbourne
Still Image
A set of 11 display panels used by the Forest Commission of Victoria for publicityGlass display panels -
 Creswick Campus Historical Collection - University of Melbourne
Slide - Victorian School of Forestry - Glass Slide collection, Forestry glass slide collection : used for teaching and research by the Forests Commission of Victoria and at the Victorian School of Forestry, 1904-1950
A set of 952 slides in wooden drawers used by the Forest Comission of Victoria an at the VSF from thealry 1900s through to the 1950s.Glass lantern slide collection -
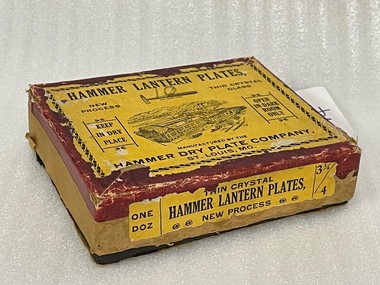 Creswick Campus Historical Collection - University of Melbourne
Slide - Australian Forestry School - glass plate slides previously held by the ANU (Australian National University), Australian Forestry School, Australian Forestry School - glass plate slides, 1965
Australian Forestry School. Handed onto the ANU in 1965. Covering: rainforests; botany; erosion; Murray River; USA Forestry services; Pine plantations; Forests Commission Victoria;Tasmania forest scenes. 500 slides in 10 wooden boxes and 16 small cardboard packets.Glass lantern slide collection - approx 600 slidesMultiple boxes of glass slides. Many are in 'Hammer Lantern Plates' slide boxes. -
Creswick Campus Historical Collection - University of Melbourne
Slide - Glass Plate Microscopic slides of wood cross sections from the Dadswell Wood Collection, H.E. Dadswell, 1950s
These are a collection of approximately 7,000 glass plate negatives of microscopic cross sections of wood and related images taken by H. E. Dadswell from the Wood Collection he curated at the CSIRO.Glass plate negatives -
Creswick Campus Historical Collection - University of Melbourne
Book, 1959
This is a Handwritten ledger of the VSF glass lantern slides, produced when Alan Eddy was principalLedger -
 Creswick Campus Historical Collection - University of Melbourne
Furniture - Glass Display Case, Victorian School of Forestry
-
 Hume City Civic Collection
Domestic object - Damping bottle top
... The top was inserted into a glass bottle filled with water... melbourne The top was inserted into a glass bottle filled with water ...The top was inserted into a glass bottle filled with water which was used to dampen starched clothes and linen before the garments were ironed. The introduction of steamirons into households meant that 'dampening bottle' became superfluous.A bottle top with a plastic hollow green rubber stopper and a rounded metal top which has small holes on the surface.laundering, ironing, starching, domestic items, george evans collection -
 Hume City Civic Collection
Domestic object - Damping bottle with top, Schweppes
The damping bottle was filled with water and used to moisten starched clothes and linen before garments were ironed. The introduction of steam irons into households in the early 1960's resulted in damping bottles becoming superfluous.A glass 'Schweppes' bottle has yellow and black graphics on it. It has been recycled and used as a damping bottle. The metal stopper has been inserted into a cork. There are spray holes on the top of the stopper. The word 'Schweppes' has been embossed around the base of the bottom.13 FL. OZ / SCHWEPPESlaundering, ironing, starching, schweppes, domestic items, george evans collection -
Clunes Museum
Functional object - LAMP - KEROSENE
LAMP - METAL BASE PAINTED BLACK, PATTERNED, BLUE GLASS KEROSENE CONTAINER, CLEAR GLASS TOPP&A MFG.CO.,CONN., MADE IN U.S.A., WATER BURY.local history, lighting, kerosene, kerosene lamp -
Clunes Museum
Furniture - KITCHEN SAFE
A KITCHEN SAFE TO STORE COOKED FOOD AND PERISHABLES. ON OCCASIONS THE LEGS STOOD IN SAUCERS OF WATER TO PREVENT ANTS GETTING INTO FOODTWO DOOR WOODEN KITCHEN SAFE WITH ZINC GAUZE PANELS TO ALLOW AIR FLOW AND KEEP INSECTS OUT. GLASS DOOR KNOBlocal history, furniture, domestic -
Stawell Historical Society Inc
Container - Realia, Gray's Aerated Water, Stawell (Logo)
... Clear Glass Bottle Gray's Aerated Water, Stawell (Logo ...Local Soft Drink Manufacturer Clear Glass BottleThis bottle is the property of T. Gray Stawell and cannot be legally be used by others -
Stawell Historical Society Inc
Painting, Will Rees, Water colour of property at Dadswells Bridge
... . In brown Frame, reflective glass Water colour of property ...Property painted was Bill & Jean (Cumming) Howards. They were beekeepers & farmers at Dadswells Bridge. Jeans father was a friend of Will Rees. Audrey's (donor) husband Bob Cummings was raised by the Howards from age of 9.Watercolour Painting by Will Rees Stawell artist. Landscape trees two buildings & sheep. Property at Dadswells Brudge. In brown Frame, reflective glassSigned by Will Reespainting, artwork -
 National Wool Museum
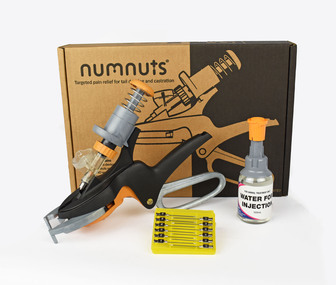
Tool - Numnuts, Numnuts, 2020
Worldwide, more than 100 million lambs are castrated, and their tails are docked each year. Numnuts is a technological innovation to improve animal welfare. It combines traditions with innovation. In the mid-1990s it was scientifically shown that the immense pain felt during castration and tail docking could be significantly reduced with the use of anaesthetic. For the next 15 years, the industry said the cost the welfare devices and development were too high. But todays ethical consumer has demanded that sheep have no more pain. Initiated in Glasgow in 2009, Numnuts took nearly a decade to develop. Here you can see five stages of development, from an early prototype to the Numnuts device farmers use today. Each phase of development took years of on-farm trails to achieve the final product. Today there is even NumOcaine, an approved local anaesthetic used by Numnuts. Using the simple elastrator ring and adding an anaesthetic injector, Numnuts delivers pain relief during tail docking and castration. In the world’s first rubber ring applicator with a pain relief delivery mechanism. Through innovation and consumer pressure the wool industry is going through a moment of rapid change.8098.1 - Numnuts tool made with stainless steel and black, orange and grey plastic. 8098.2 - Glass bottle with orange and grey plastic nozzle containing water for injection. 8098.3 - Yellow plastic case containing 12 stainless steel needles 8098.4 - 10 green plastic elastrator rings 8098.5 - Product cardboard box with the product image on the front8097.2 - on label - For animal treatment only WATER FOR INJECTION 100mL 8097.3 - On case - numnuts 12x Veterinary Hypodermic Needles On needdles - 18G 8097.5 - Numnuts targeted pain relief for tail docking and castrationnumnuts, tools, sheep, castration, docking -
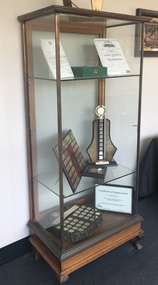
Malmsbury Historical Society
Photograph (Item), Glass & Crystal Display Purple Water Jug Set, Malmsbury ca1990
... Glass & Crystal Display Purple Water Jug Set, Malmsbury..." Glass & Crystal Display Purple Water Jug Set, Malmsbury ca1990 ...Buildings - Malmsbury Town Hall People - "Slimmon, Barb"