Showing 570 items
matching passenger service
-
 Ballarat Heritage Services
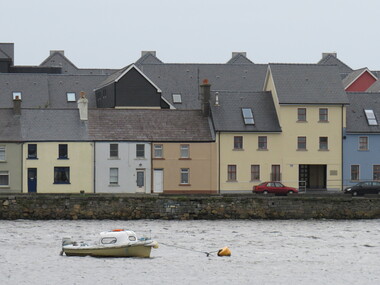
Photograph - Colour, Houses, Galway Bay, Ireland, 2016, 09/2016
Some Irish immigrants came from Galway, Ireland. Among them were Patrick Kennedy and Dennis Kinnane who emigrated as Bounty passengers on the Himalaya, arriving in the Port Phillip District in February 1842. Patrick Kennedy was the first person officially to be hanged in 1851 in the newly formed Colony of Victoria.houses, galway bay, ireland, dennis kinnane, patrick kennedy, hanging, colony of victoria, himalaya, port phillip district, kennedy, kinnane, 1842, galway -
 Ballarat Heritage Services
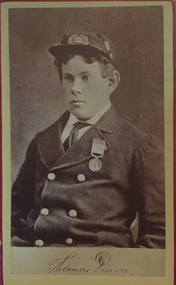
Photograph - Portrait, Thomas Pearce, survivor of the shipwreck Loch Ard, c1887, c1878
Thomas Pearce (1860?-1909) was an apprentice on the English merchant vessel the Loch Ard, which embarked for Victoria in March 1878 carrying 37 crew and 16 passengers, many from the Carmichael family. In stormy weather on 1 June 1878, just days from completing the three-month voyage, the Loch Ard wrecked against Muttonbird Island. Supported by an upturned lifeboat, the teenaged Pearce was washed ashore in a small bay, now known as Loch Ard Gorge; but when he spotted eighteen-year-old Eva Carmichael clinging to wreckage in the ocean, he swam out and struggled back to shore with her. As sole survivors of the wreck, Tom Pearce and Eva Carmichael became celebrities and posed for a number of Melbourne photographers after their recuperation. Pearce was presented with the first gold medal of the Royal Humane Society of Victoria. Popular sentiment was for a permanent union; but Eva returned to Ireland, and Pearce became a ship's captain. This photograph is in an album associated with the Fullerton Family. James Lucas Fullerton was born in Northern Ireland on 02 July 1842, and died on 23 November 1932. HIs wife Mary Carson was born on 30 May 1844 in Northern Ireland, and died on 22 April 1917. They married on 14 October 1869 at Brisbane before moving to Creswick where James Fullerton worked as a grocer. They later moved to Ballarat where they ran a grocery shiop. James and Mary had ten children, and are buried in the Ballaarat Old Cemetery. Photographic portrait of Thomas Pearce wearing the first gold medal of the Royal Humane Society of Victoria.thomas pearce, eva carmichael, loch ard shipwreck, loch ard gorge, royal human society of victoria gold medal -
 Ballarat Heritage Services
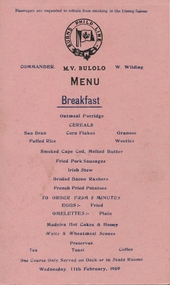
Menu, M.V. Bulolo Breakfast Menu, 1959
Dorothy, David and Elwyn Kinnane travelled on this vessel from Brisbane to Port Moresby.Pink card with blue printingPassengers are requested to refrain from smoking in the Dining Saloon. BURNS PHILP LINE Commander W Wilding ... Wednesday 11th February 1959m.v.bulolo; menu; voyage; brisbane; port moresby -
 Parliament of Victoria
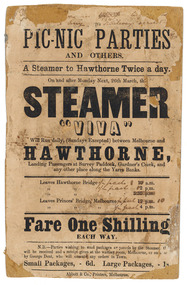
Flyer for the steamer Viva, Abbott & Co., Printers, c.1860
The "Viva" was a steamboat operated by George Dent that ran on the Yarra River between Princes Bridge and Hawthorn Bridge from 1860-1861. Printer flyer pasted onto cardboard advertising ferry services between Melbourne and Hawthorne [sic]. Corrections to ferry departure times are in black handwritten ink. Flyer has losses around edges and stains from 'blue-tack' verso. Black ink, printed recto: "PIC-NIC PARTIES/ AND OTHERS./ A Steamer to Hawthorne Twice a day./ On and after Monday Next, 26th march, the/ STEAMER/ "VIVA"/ Will Run daily, (Sundays Excepted) between Melbourne and/ HAWTHORNE,/ Landing Passengers at Survey Paddock, Gardner's Creek, and/ any other place along the Yarra Banks./ Leavers Hawthorne Bridge 10 a.m./ 2 p.m./ 5.30 p.m./ Leaves Princes' Bridge, melbourne 12 p.m./ 4 p.m./ Fare One Shilling/ EACH WAY./ N.B.-Parties wishing to send packages or parcels by the Steamer th(?).../ will be received and a receipt given at the waiting room, Melbourne, or on board.../ by George Dent, who will execute any orders in Town./ Small Packages, - 6d. Large Packages, - 1s/ Abbot & Co., Printers, Melbourne.viva steamboat, dent, george, hawthorne, yarra river, princes bridge, melbourne, survey paddock, gardner's creek -
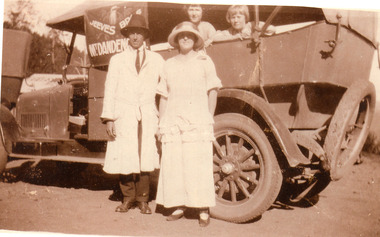 Mt Dandenong & District Historical Society Inc.
Photograph, Hubert Jeeves and Passengers with new Motorised Coach c1924, c1924
Hubert Jeeves in hat and dust coat standing with a woman in 1920s style clothing beside Jeeves Bros. motorised coach. Two girls are looking out of the coach at the camera.The coach has the insignia of a kookaburra and gum leaves with Jeeves Bros. painted in a boomerang shape with Mt Dandenong below. Hubert Jeeves, son of Ellis and Eliza Jeeves, started up his motorised coach business following his return from WW1.Sepia photograph showing a man an woman standing beside a motorised coach. Two children can be seen looking out of the vehicle.coach service, jeeves, hubert jeeves -
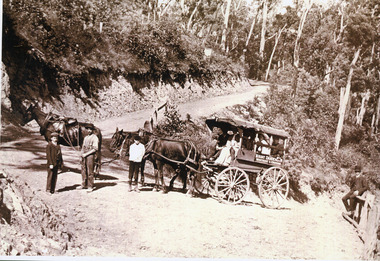 Mt Dandenong & District Historical Society Inc.
Photograph, Jeeves Coach at Devil's Elbow 1912
Three horse passenger coach with sign Mount Dandenong, Montrose & Croydon. Driver in front with woman passenger and other passengers in coach. Four males are on the road, two passengers and two workmen. (2 copies)coach service, kalorama, jeeves, devil's elbow -
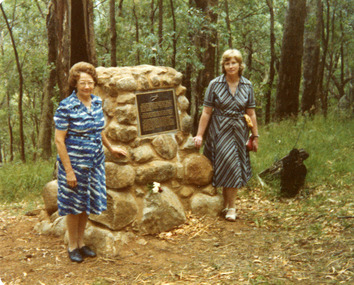 Mt Dandenong & District Historical Society Inc.
Photograph, Cairn at Kyeema Crash Site 1988, 1988
Visitors at the 1988 Service to commemorate 50th anniversary of the Kyeema Crash. LHS - friend of Miss Delphine Goddard, sister of passenger Gordon Goddard and RHS- Patricia Hogan from Mt Dandenong & District Historical Society.air crash, kyeema, cairn, mt dandenong -
 Moorabbin Air Museum
Document (Item) - Proposal to Operate Main Line and Feeder Air Services For the Carriage of Mail, Passengers and Express Submitted by Ansett Airways Limited
-
Moorabbin Air Museum
Document (Item) - Application to Operate Main Line and Feeder Air Services For the Carriage of Mail, Passengers and Express Submitted by Ansett Airways Limited
-
Moorabbin Air Museum
Document (Item) - Simon Warrender Collection See Description for details
-
 Ballarat Tramway Museum
Slide - 35mm slide/s, 3/03/1968 12:00:00 AM
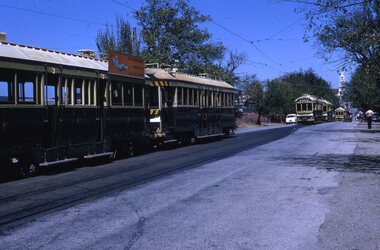
35mm colour slide - Kodak white cardboard of a line up of trams in Lydiard St North, Sunday 3/3/1968, looking towards the railway level crossing from the Seymour St loop. Has trams 41, 34, 43, 36, 40, 11, 20, 11, 39, 37 and 21 over crossing. Special service for the Vintage Train.In ink "Ballarat Sunday 3/3/68, Lydiard St North towards railway xing from loop, 41, 34, 43, 36, 40, 11, 20, 11, 39, 37 and 21 over crossing, as specials for passengers off "The Vintage Train"" and KSK stamp with number "19-1"tramways, trams, seymour st, lydiard st nth, tours, vintage train, tram 41, tram 34, tram 43, tram 36 -
 Ballarat Tramway Museum
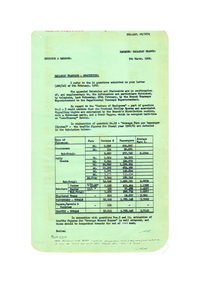
Document - Report, State Electricity Commission of Victoria (SECV), "Ballarat Tramways - Statistics", Mar. 1962
Yields detailed information about the statistics of the Ballarat Tramway system during the 1960/61 Financial year, passenger loadings, finances and tramcar operation..1 - Report titled "Ballarat Tramways - Statistics", carbon copy, dated 5/3/1962, responding to a head office letter of 6/3/1962. Compiled in association with Schedules and Statements required, in response to specific questions for compilation of reports by the SEC. Details types of passengers (Pensions, Adults, Scholars, chartered trams, passenger totals including parcels) for 1960/61. .2 - Four foolscap sheets giving details of fares and charges, route length, services, fare sections, length of fare sections, employees, trams in service, tram usage, area and population served, expenditure, revenue, loss, average fare per passenger and extra trams needed for events. Also refers to Reg Item 7932 and 7951 for the original request. All sheets have rounded corners.trams, tramways, reports, passengers, employees, fares, tramcars, routes, revenue, finances, tickets -
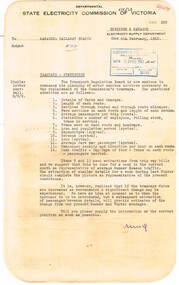 Ballarat Tramway Museum
Administrative record - Memorandum, State Electricity Commission of Victoria (SECV), "Tramways Statistics", 6/02/1962 12:00:00 AM
Yields information about preparation of tramway statistics to enable the Transport Regulation Board to plan bus replacement., Yields information about preparation of tramway statistics to enable the Transport Regulation Board to plan bus replacement.Copy of a Memorandum sent by the Melbourne office, Engineer and Manager SEC to the Manager Ballarat Branch, 6/2/1962, requesting the preparation of statistics for the Transport Regulation Board planning of the Motor Omnibus Services. Has a long list of items. Similar letter to Bendigo. Also refers to Reg Item 7930 and 7932 for the response.trams, tramways, reports, passengers, employees, fares, tramcars, routes, revenue, finances, tickets -
 Ballarat Tramway Museum
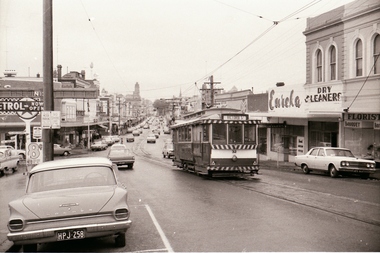
Photograph - Black and White - tram 36 Bridge St, A T Miles, 27/11/1969
Black and White - tram 36 (Victoria St), at Stones Corner, picking up 6 passengers. The man is carrying a Gladstone bag. The photo is looking west and has a Top 4 dry cleaners shop sign in the background. Taken by A T Miles 27/11/1969. The photo likely to have been taken before a 48-hour strike by SEC workers that commenced on that day. See item 8774. Yields information about services to Victoria St.Photograph - black and white print with notes on rear. A T Miles stamp and location and date notes.tramways, trams, stones corner, victoria st, bridge st, passengers -
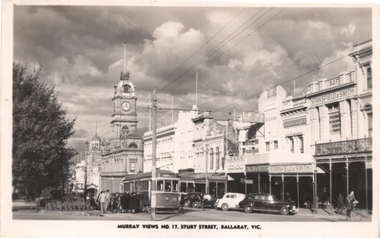 Ballarat Tramway Museum
Postcard, Murray Views, "Murray Views No. 17 Sturt Street Ballarat Vic", 1948
Photo shows the view looking east from Doveton St of the south side of Sturt St. Has bogie tram No. 15 in the view, westbound to the Gardens via Sturt St west picking up a large group of passengers. In the view are the Town Hall, Myer, Stansfield & Smith, the Block Arcade, and a Hatter and Tailor shop. Another tramcar can be seen in the view as well.Yields information about Sturt St, tram services and patronage.Postcard black and white, divided back, with a handwritten note on rear.In ink on the rear "Looking west from Doveton Street 1948" tramways, trams, sturt st, doveton st, tram 15 -
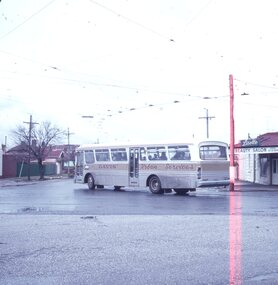 Ballarat Tramway Museum
Slide - 27 mm sq slide/s, Lilian Butler, Davis bus (tram service replacement), Oct. 1971
Yields information about the replacement bus service and the intersection of Macarthur and Drummond St North.Agfa blue and white plastic slide mount of a Davis bus (tram service replacement) turning from Macarthur St into Drummond St North. The overhead remains in position. Has a large number of passengers on the bus. In the background is the Lisette Beauty Salon. Photo from the collection of Lilian Butler. ballarat, tramways, trams, buses, davis bus lines, drummond st nth, macarthur st -
 Ballarat Tramway Museum
Negative - Set of 5, Campbell Duncan, 2/07/1971 12:00:00 AM
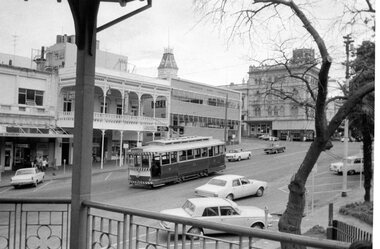
Yields information about tram operations and the street views at Stones Corner.Set of 4 photographs taken on 28/2/1971 by Campbell Duncan of trams at Stones Corner - Bridge St, Victoria St and Main Road. .1 - No. 32 leaving Bridge St, climbing Victoria St, for Victoria St. In the view are Eureka Dry Cleaners, Caltex Service Station, Stones Corner and a busy Bridge St. .2 - No. 27? City bound in Bridge St with Stones Corner buildings, K&O (Digger) Schonell Sports Cycles Electrical store, Kodak, Gear Chemist, State Savings Bank of Victoria. .3 - No. 34 for Mt Pleasant, as above and with H. Whitefield Hair Dresser shop in the view. .4 - ditto with tram at the junction and a passenger alighting. .5 - ditto with tram turning the corner for Mt Pleasant.trams, tramways, bridge st, stones corner, victoria st, tram 32 tram 27? tram 34 -
 Ballarat Tramway Museum
Photograph - Digital image Set of 10, George Coop, 1968 - 1970
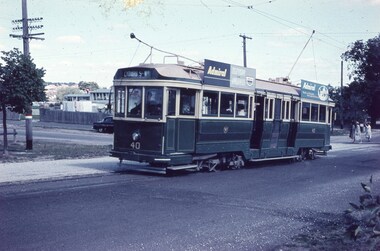
Yields information about the tram operations and the landscape views of the Sturt St median strip.Ten (10) Digital images taken by George Coop during the period 1968 - 1970, of SEC trams in Sturt St, between the City and Pleasant Streets. .1 - Tram 26 climbing the Sturt St hill to Lydiard St, with the Cook's Private Hotel, the Commonwealth Bank and the National Mutual Life building in the background. Photo taken from the Titanic Bandstand. .2 - Tram 40 Sturt St, enough to Lydiard St North just before Raglan St. Has a lady passenger by the tram stop. .3 - Tram 30 - Sturt St north side, near Armstrong St, - has a blue framing line around the photograph. .4 - Tram 39, Sturt St, near Doveton St, shows the rotunda in the median strip. .5 - Tram 18, with median step in view. .6 - Tram 31, with two Johnnie Walker whiskey roof adverts, outside the National Mutual Life building with the Alan Bros Jewellers and Golden Star Chinese Cafe in the view. .7 - Tram 31, Sturt St south side with Town Hall and the Golden City Hotel in the view. Tram has destination of Gardens via Drummond North. .8 - Tram 41 - ditto - going to Sebastopol. .9 - Tram 13, south side, Gardens via Sturt West, about , near Ripon St, with the Ampol service station in the background and about to pick up a lady passenger .10 - Tram 17, near Doveton St. Has a Twin Lakes sign and a Wilkinson Sword Razor Bladese roof advert. trams, tramways, sturt st, raglan st, passengers, doveton st, tram 26, tram 40, tram 30, tram 39, tram 18, tram 31, tram 41, tram 13, tram 17 -
 Ballarat Tramway Museum
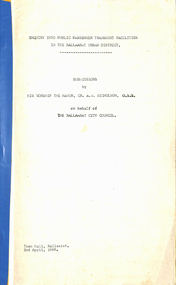
Document - Report, City of Ballaarat, "Submission to Enquiry into Public Transport Facilities in the Ballarat Urban District by A. W. Nicholson, Mayor of Ballaarat Council", Apr. 1968
Yields information about the view of the City of Ballaarat in 1968 about the possible replacement of tram service.Report or Submission - 6 Gestener printed foolscap sheets, stapled on left hand side and bound with a blue edging tape titled "Submission to Enquiry into Public Transport Facilities in the Ballarat Urban District by A. W. Nicholson, Mayor of Ballaarat Council". Dated 2 April 1968. Submission looks at the possible closure or the future of the tramway system, the SEC involvement, employment, road surface repairs, financial loss to the SEC, reduction in passengers due to car ownership. Council submitted that the tramway system should be retained and extended and that pensioner concessions should be continued. Notes that at the time 69 men on the trams, 18 at the depot and 8 on the track. If replaced by buses, supported a government owned bus provider rather than private. Document scanned - word searchable. pdftrams, tramways, closure, city of ballaarat, bus replacement, public transport, sec, finances -
 Ballarat Tramway Museum
Slide - 35mm slide/s, Keith Caldwell, 8/03/1960 12:00:00 AM
Yields information about the Lydiard St North services.Agfa colour slide, white cardboard mount, photo by Keith Caldwell on 8/3/1960 of: Tram 40 with destination of Lydiard St at the corner of ??? and >?>>>/ Tram has two Admiral TV roof advertisements. Would appear that three ladies have just got of the tram and crossing the road behind the tram.Stamped on bottom of slide "8 Mar 60". In ink "Ballarat"tramways, trams, lydiard st, tram stops, passengers, tram 40 -
 Ballarat Tramway Museum
Negative, Wal Jack, late 1930's
Yields information about Ballarat 's tram operations and Stones Corner.Negative and Digital image of the Wal Jack Ballarat Negative file of No. 17 loading passengers at Stones Corner, the intersection of Victoria St and Main St. A Caltex service station is on the right hand side and the State Savings Bank of Victoria. trams, tramways, victoria st, bridge st, main st, stones corner, tram 17 -
 Ballarat Tramway Museum
Negative, Wal Jack, late 1930's or early 1940's
Yields information about the use of the ex Adelaide tram No. 23 on tram services.Negative and Digital image of the Wal Jack Ballarat Negative file of No. 23 passing Hospital Corner in Sturt St, Gardens via Sturt St West, with a Shell garage, Malpass hairdressers, the Ballarat Model Diary and the Southern Cross Hotel in the view. The tram is well loaded with passengers.trams, tramways, sturt st, hospital corner, tram 23 -
 Ballarat Tramway Museum
Negative, Wal Jack, c1946
Yields information about the appearance of the ex Melbourne bogie trams and Hospital corner, carrying a large load of passengers.Negative and Digital image of the Wal Jack Ballarat Negative file of No. 22 turning from Sturt St into Drummond St North running a Gardens via Drummond North service. c1946. The tram is carrying many passengers. trams, tramways, drummond st nth, sturt st, hospital corner, tram 22 -
 Ballarat Tramway Museum
Slide - 35mm slide/s - set of 24, Noel Simons, 20/05/1971 12:00:00 AM
Set of 24 transparencies taken on 20/5/1971 on Kodak mounts. 1195.1 - Bendigo 19 arriving at Charing Cross en route to North Bendigo with Fountain Plaza and the City Family Hotel in the background. No. 19 has two roof ads for the SEC. -'Electricity better for cooking' and 'Everything's under control in my all electric kitchen' 1195.2 - as above, but standing at the Charing cross stop, with the Beehive Stores and other buildings along the east side of Pall Mall in the background. 1195.3 - No 21 ex Golden Square crossing View St. trackwork in front of No. 25 waiting to depart for Quarry Hill. No.21 has two roof ads (as for No.19 in 1195.1) and No.25 has one SEC roof ad and another. Ezywalkin sign in the background, and Fountain Plaza. 1195.4 - as for 1195.3, but after 21 has arrived and 25 left for Quarry Hill. Has Ezywalkin store and the Beehive store in the background. 1195.5 - No. 5 at the Eaglehawk terminus. Photo taken with a cannon in foreground looking along High St. Eaglehawk. Has shops on the west side of High St. in the background. 1195.6 - No. 5 at the Eaglehawk terminus, close up of the rear of the tram - note tow bar arrangement. Has destination of Quarry Hill. 1195.7-Nos.25 and 5 crossing at the Thorpe St. Loop, California Gully. No. 25 bound for Eaglehawk (has SEC Briquette and electric cooking roof ads) and 5 en route for Quarry Hill with a SEC and Cinzano roof ad. 1195.8 - as for 1195.7, but after trams have passed each other. Has Borough Auto Service building in the background. 1195.9 - No. 5 in Mt Korong Road, towards Bamard Street, photo taken after tram has passed photographer. 1195.10 - No. 30 at the Golden Square terminus with the Milk Bar on the right hand side of the photograph. 1195.11 - No. 30 inbound at Fire Station Loop, High St. Golden Square. Has old fire station in the background. Passengers are boarding the tramcar. 1195.12 - No. 30 in High St, bound for North Bendigo between Vine and Wattle Streets. 1195.13 - No. 5 bound for Eaglehawk waits at Iron Bark Gully Loop, at Hayes St. 1195.14 - No. 5 and No. 2 crossing at Iron Bark Gully Loop. 1195.15 - No. 5 bound for Eaglehawk leaving the Manchester Loop, Long gully. 1195.16 - No. 5 passing William Street, Long Gully en route to Eaglehawk. 1195.17 - No. 5 just before the California Gully Crossing Loop. 1195.18 - Nos. 5 and 26 crossing at California Gully crossing Loop. No. 5 heading to Eaglehawk, 26, Quarry Hill. 1195.19 - No. 5 in High St. Eaglehawk with Bob Moyle's Victoria Hotel and the TAB in the background. 1195.20 - No. 5 in High St. Eaglehawk approaching the terminus. Photo taken after the tram has passed the photographer. Has Foodland store and J. Best Fruit supply in the background, along with Eaglehawk Town Hall. 1195.21 - No. 5 at the Eaglehawk terminus, photo taken along seldom used track along High St. 1195.22 - as for 1195.22 - but at the very end of the track. 1195.23 - No. 5 en route for Quarry Hill climbs High St. Eaglehawk with the Victoria Hotel and Eaglehawk Town Hall in the background. 1195.24 - No. 5 and 25 crossing at Jobs Gully Loop. Note 25 has a black on white destination roll, while No. 5 has a white on black destination roll. Information written on in black ink and date stamped on purple ink. 1195.1 - "No. 19 arrives at Charing Cross Bendigo from Golden Square" 1195.2 - "No. 19 about to leave Charing Cross for North Bendigo" 1195.3 - "No. 25 awaiting departure for Quarry Hill, watches No. 21 arrive at Charring Cross from Golden Square" 1195.4 - "No. 21 on North Bendigo service and No. 25 on Quarry Hill run await departure at Charing Cross" 1195.5 - "No. 5 at Eaglehawk terminus" 1195.6 - "No. 5 at Eaglehawk terminus" 1195.7 - "Nos. 5 and 25 crossing at Thorpe St. Loop, California". 1195.8 - "Nos. 25 and 5 crossing Thorpe St. Loop, California Gully". 1195.9 - "No. 5 descending Mt Korong Rd. towards Bamard St." 1195.10 - "Birney car No. 30 at Golden Square terminus" 1195.11 - "Birney car No. 30 in High Street near Thistle Street (Fire Station Loop)" 1195.12 - "No. 30 in High St. between vine and Wattle Streets" 1195.13 - "No. 25 at Hayes Street Loop Iron Bark". 1195.14 - "Nos. 2 and 5 crossing at Hayes Street Loop Iron Bark" 1195.15 - "No. 5 at Manchester Loop opposite Havilah Road, Long Gully" 1195.16 - "No. 5 passing William Street, Long Gully". 1195.17 - "No. 5 at California Gully" 1195,18 - "Nos. 26 and 5 at Thorpe St. Loop, California Gully". 1195.19 - "No. 5 in High St. Eaglehawk". 1195.20 - "No. 5 approaching Eaglehawk terminus" 1195.21 - "No. 5 at Eaglehawk terminus" 1195.22 - "No. 5 at Eaglehawk terminus" 1195.23 - "No. 5 in High St. Eaglehawk" tramways, trams, bendigo, charing cross, eaglehawk, california gully, golden square, iron bark gully, jobs gully, tram 2, tram 5, tram 19, tram 21, tram 25, tram 26, tram 30 -
 Ballarat Tramway Museum
Slide - 35mm slide/s - set of 13, Noel Simons, 24/05/1971 12:00:00 AM
Set of 13 transparencies taken on 24/5/1971 on Kodak mounts. 1200.1 - No. 7 en route to Golden Square turning from Bridge St. into Nolan St. Photo taken after tram has passed photographer. Tram has a briquettes roof ad. 1200.2 - No. 21 in McCrae St. just before Nolan St. Photo taken after tram has passed photographer. 1200.3 - No. 7 in Nolan St at corner with McCrae St. Passenger boarding tram at a tram stop. 1200.4 - No 7 turning from Nolan into McCrae St. with Golden Fleece service station in background. 1200.5 - No. 7 in Thunder St en route to North Bendigo. Photo taken after tram has passed photographer. 1200.6 - No. 5 en route to Eaglehawk just after leaving Needle Loop between Long Gully and California Gully. 1200.7 - No. 5 at the start of the double track in High St. Eaglehawk. 1200.8 - No. 5 at Eaglehawk terminus showing "Depot" with Leo A Hughes Photographer advertisement on building in background. 1200.9 - No. 5 at Eaglehawk terminus. Has two SEC roof ads 'Everything's fine in my all electric kitchen' and 'Electricity best for cooking'. 1200.10 - No. 5 at Eaglehawk terminus, with canon, war memorial outside Town Hall and Leo A Hughes Photographer advertisement on building in background. 1200.11 - No. 5 in McCrae St. about to enter Arnold St. and depot. Tram showing depot, has driver changing points. 1200.12 - No. 5 in Arnold St. Photo taken looking up the centre of the access track - shows the overhead at depot junction. 1200.13 - Depot entrance with signage at depot entrance and depot building in background.Information written on in black ink and date stamped on purple ink. 1200.1 - "No. 7 entering Nolan St. from Bridge St." 1200.2 -"No. 21 in McRae St. about to turn into Nolan St." 1200.3 - "No. 7 in Nolan St. at corner of McRae St." 1200.4 - "No. 7 turning from Nolan St. into McRae St." 1200.5 - "No. 7 in Thunder St. just after turning from Caledonia St." 1200.6 - "No. 5 just after leaving Needle Loop between Long Gully and California Gully. 1200.7 - "No. 5 in High St. Eaglehawk at start of double track." 1200.8 - "No. 5 at Eaglehawk terminus" 1200.9 - "No. 5 at Eaglehawk terminus" 1200.10 - "No. 5 at Eaglehawk terminus."\ 1200.11 - "No. 5 in McCrae St. about to enter Arnold St." 1200.12 - "No. 5 in Arnold St." 1200.13 - "Entrance to Bendigo Tram Depot, No. 5 running into shed."tramways, trams, bendigo, mccrae st, north bendigo, california gully, eaglehawk, depot, tram 5, tram 7, tram 21 -
 Ballarat Tramway Museum
Slide - 35mm slide/s - set of 19, Noel Simons, 26/02/1972 12:00:00 AM
Set of 18 transparencies taken on 26/2/1972 on Kodak mounts. 1203.1 - Bendigo 5 at Eaglehawk terminus - with new traffic works. 1203.2 - No. 5 climbing the High St. hill Eaglehawk with the buildings on the east side in the photo. 1203.3 - No 2 descending the road over rail bridge at Job's Gully, heading for Quarry Hill. 1203.4 - as for 1202.3, but more side on. Tram has two SEC roof ads. 1203.5 - as for 1202.4 1203.6 - No. 26 entering Garden Gully Loop, Mt. Korong Road, Ironbark. Tram en route to Eaglehawk. Water column on right hand side of photograph. 1203.7 - No. 2 on the Eaglehawk route, Iron Bark area?, bound for Quarry Hill. 1203.8 - as for 1202.7, but photo taken after tram has past photographer. 1203.9 - No. 5 at Eaglehawk terminus, night photo. Tram has arrived at terminus, showing Quarry Hill, pole turned, but the tram lights have yet to be turned around. 1203.10 - as for 1202.9, but lights have been turned around. 1203.11 - No. 26 climbing the View St. Hill near the Commodore Hotel. Has Campbells Electrical Services building in the background. Photo taken after the tram has passed the photographer. 1203.12 - No. 7 end on photograph, at Golden Square, destination showing Golden Square - night photo. 1203.13 - number not used. 1203.14 - as for 1202.12, but partially side on, has a passenger looking out the tram. 1203.15 - as for 1202.12, but with hotel in the background. 1203.16 - No. 26 and 2 at Charing Cross, night photo. Tram 26 en route to Quarry Hill, 2 to Eaglehawk. 1203.17 - Interior photo of No. 26, at night. 1203.18 - No. 26 at the Quarry Hill terminus as night. 1203.19 - as for 1202.18, but central portion of the tramcar.Information written on in blue ink and date stamped on purple ink. 1203.1 - "No. 5 at Eaglehawk terminus" 1203.1 - "No. 5 in High St. Eaglehawk" 1203.3 - "No. 2" 1203.4 - "No. 2" 1203.5 - "No. 2" 1203.6 - "No. 26 at Garden Gully Loop Mt Korong Rd., Ironbark" 1203.7 - "No. 2" 1203.8 - "No. 2" 1203.9 - "No. 5 at Eaglehawk terminus" 1203.10 - "No. 5 at Eaglehawk terminus" 1203.11 - "No. 26 in View St. Near the Commodore Motel" 1203.12 - "No. 7 at Golden Square Terminus" 1203.14 - "No. 7 at Golden Square Terminus" 1203.15 - "No. 7 at Golden Square Terminus" 1203.16 - "Nos. 26 and 2 at Charing Cross" 1203.17 - "Interior of No. 26" 1203.18 - "No. 26 at the Quarry Hill terminus" 1203.19 - "No. 26 at the Quarry Hill terminus "tramways, trams, bendigo, eaglehawk, bridges, iron bark gully, night photo, quarry hill, golden square, tram 2, tram 5, tram 7, tram 26 -
 Ballarat Tramway Museum
Slide - 35mm slide/s - set of 25, Noel Simons, 26/02/1972 12:00:00 AM
Set of 25 transparencies taken on 26/2/1972 on Kodak mounts. 1204.1 - Bendigo No. 5 - just arrived at Manchester Loop near Havilah Road, Long Gully. Photo taken after tram has passed photographer. 1204.2 - No. 26 in Backhaus St. Long Gully passing William St, en route to Quarry Hill. Photo taken after tram has passed photographer. 1204.3 - No. 5 climbing the High St. Hill Eaglehawk, heading for Quarry Hill with the buildings on the West side of High St. in the background, including the Eaglehawk Town Hall. 1204.4 - as for 1204.3, but tram close up. 1204.5 - as for 1204.3, but after tram has passed photographer. 1204.6 - No. 5 at intersection of Mt Korong Road Ironbark and Calder Highway, with the AMPOL service 'station in the background. Photo taken after tram has passed photographer. 1204.7 - No. 26 en route to Quarry Hill shortly after leaving Needle Loop, passing William St., Long Gully. 1204.8 - No. 5 at California Gully Loop, picking up a passenger, with the shops at Long Gully in the background. Photo taken after tram has passed photographer. 1204.9 - No. 5 in Long Gully, en route to Quarry Hill. Photo taken after tram has passed photographer. 1204.10 - No. 2 at Eaglehawk terminus with the Eaglehawk Town Hall and Post Office in the background. Tram has two SEC roof ads. 1204.11 - No. 2 at Eaglehawk terminus, close up. 1204.12 - as for 1204.11, but through the park gates. 1204.13 - as for 1204.11, but with tram stop shelters in the foreground and buildings on the West side of High St in the background. 1204.14 - No. 2 in Mt. Korong Rd, midway between California Gully Loop and Needle Loop. Photo taken after tram has passed photographer. 1204.15 - No. 5 in Long Gully, en route to Quarry Hill. 1204.16 - as for 1204.15, but with trams departed loop. Has an ESSO service station in the background. 1204.17 - No. 26 leaves Charing Cross up View St.. Photo taken after tram has passed photographer. Has Armstrong Tyre Service, Cohns Drinks ad on a building and the T&G building in the background. Also Firestone ads on the tyre service building. 1204.18 - No. 5 waits at Charing Cross with the Alexandra Fountain in the background. Tram has two SEC roof ads, 'Everything s fine in my all electric kitchen' and 'Electricity Best for Cooking'. Has RACV, Colonial Mutual Life buildings in the background and the planting areas around Charing Cross gardens in the foreground. 1204.19 - No. 21 en route to North Bendigo arrives at Charing Cross, with passengers waiting to board. No. 5 in the background. In the background is the Fountain Gate Plaza building and the City Family Hotel. 1204.20 - as for 1204.19, but with No. 7 en route to Golden Square. 1204.21 - as for 1204.19, but closer up. 1204.22 - as for 1204.18 1204.23 - No. 25 in Nolan St. near the crossing of Bendigo Creek, running a special tram tour. 1204.24 - No. 25 on a special charter, in Weeroona Ave. at Cnr of Caledonia St. passing the Gas works. 1204.25 - Nos. 25 (showing Golden Square), 7 and 26 at Charing Cross. Has fountain in the background.Information written on in blue ink and date stamped on purple ink. 1204.1 - "No. 5 at Manchester Loop, near Havilah Rd. Long Gully." 1204.2 - "No. 26 in Backhaus St. Long Gully passing William St." 1204.3 - "No. 5 in High St. Eaglehawk." 1204.4 - "No. 5 in High St. Eaglehawk." 1204.5 - "No. 5 in High St. Eaglehawk." 1204.6 - "No. 5 in Mt. Korong Rd., Ironbark, passing Calder Highway Junctn." 1204.7 - "No. 26 shortly after leaving Needle Loop, passing William St., Long Gully. No. 5 cresting hill in distance." 1204.8 - "No. 5 at California Gully Loop." 1204.9 - "No. 5 in Long Gully" 1204.10 - "No. 2 at Eaglehawk terminus." 1204.11 - "No. 2 at Eaglehawk terminus." 1204.12 - "No. 2 at Eaglehawk terminus." 1204.13 - "No. 2 at Eaglehawk terminus." 1204.14 - "No. 2 in Mt. Korong Rd, midway between California Gully Loop and Needle Loop. 1204.15 - "Nos. 2 and 26 crossing at Long Gully." 1204.16 - "No. 26 leaves Long Gully loop for Eaglehawk as No. 2 pulls out of the far end towards Bendigo" 1204.17 - "No. 26 beginning the climb up View St. from Charing Cross." 1204.18 - "No. 5 at Charing Cross." 1204.19 - "No 21 arrives at Charing Cross from Golden Square while No. 5 awaits departure time for Eaglehawk." 1204.20 - "Nos. 7, 21, and 2 (behind which is No. 5) at Charing Cross." 1204.21 - "Nos. 7, 21, and 2 at Charing Cross." 1204.22 - "No. 5 at Charing Cross." 1204.23 - "No. 25 in Nolan St. near Bendigo creek crossing" 1204.24 - "No. 25 in Weeroona Ave. at cnr of Caledonia St." 1204.25 - "Nos. 25, 7, 26 and 2 (behind 26) at Charing Cross."tramways, trams, bendigo, eaglehawk, long gully, california gully, charing cross, north bendigo, tram 2, tram 5, tram 7, tram 21, tram 25, tram 26 -
Ballarat Tramway Museum
Document - Correspondence, B. Prentice, 1973
1230.1 - copy of letter sent to Neville Gower from Bob Prentice enclosing a number of documents regarding submissions and other associated documents pertaining to the operation of Bendigo's trams by the Bendigo trust. Sent on the 1st March 1973. Typed onto light blue paper. 1230.2 - 14 page photocopy (Foolscap size on heat sensitive paper) of the submission prepared by the Bendigo trust - detailing the history of trams in Bendigo, types of trams in Bendigo, selection of the route, equipment and plant required, planned development, list of trams in Bendigo, their condition and financial statements of the Bendigo Trust 1972. 1230.3 - 14 pages photocopy (Foolscap size on heat sensitive paper) Appendix II - submission details projected passengers, operational details and proposals, estimated revenue, Philosophy of operation, trams required, operating budgets, how the service could be operated - internal combustion engines, batteries, stationary engine and generator or converter station and costs associated with the options. If item to be researched, copy on more stable photocopy paper to be provided.tram, trams, bendigo, bendigo trust, tourist trams, power supply -
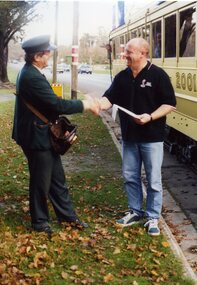 Ballarat Tramway Museum
Photograph - Colour Photograph/s - set of 4, John Phillips, 10/06/2001 12:00:00 AM
Set of four colour photographs of the 500,000th passenger on BTPS/BTM tram services on Sunday June 10, 2001. Congratulating Mr. Lou Abbruzzi is Len Millar. Photos by John Phillips. Tramcar No. 45 in background. Photo on Kodak paper. For details of the event see Fares Please! July 2000. Image btm1824i4 used in the August 2001 issue of Trolley Wire (black and white). See Fares Please! July 2001On rear of each photo "9.06.01" (actual date was Sunday 10 July) and "Photo by John Phillips" in blue ink. On rear of 1824.4 is a white sticker "Photo 29, reduce to 7 x 10.5cm" instruction for use in Trolley Wire.500, 000 passenger, btm, btps, gold tram, tram 45 -
 Ballarat Tramway Museum
Document - List, Melbourne and Metropolitan Tramways Board (MMTB), "Salute to Australia Pageant - Australia Day 1st February 1982", Jan. 1982
List of tramcars used in the Australia Day Pageant, 1982. Prepared by the MMTB, titled "Salute to Australia Pageant - Australia Day 1st February 1982", "Background details of Vintage Trams in Service" for use on 1/2/1982. Printed on both sides of pink sheet of foolscap paper, using a wax stencil and duplicator. Gives details of MMTB 214 (V), Ballarat 27, MMTB 180 (T), Bendigo 19, MMTB 104 (L) and standby tram MMTB 164 (S). Details tram number, date built, for built for, points of interest and present operator. Also lists other vintage passenger vehicle displays in Wellington Parade, abbreviations and list of significant events concerning Melbourne tramways. 2nd copy added 22/08/04 - has had bottom section of sheet torn off. Images of this item shown.australia day, mmtb, melbourne, tramcars, pageant