Showing 462 items
matching crew photo
-
 Ballarat Tramway Museum
Photograph - Digital image, Joy Waller, 19/09/1971 12:00:00 AM
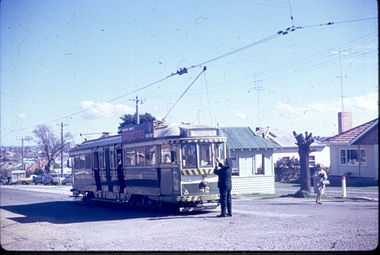
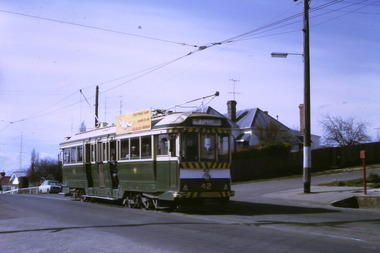
Copy of a colour slide showing Tram 42 in Lydiard Street North, at the terminus. This photo is taken from the north east looking down Lydiard Street. The conductor is adjusting the trolley pole it is preparing to head back into the city, and the destination board is reading Sebastopol. The shelter at the terminus can be seen, and there is a female passenger in hat and coat walking away from the tram. The photographer says this was taken on the last of the last tram to run in Lydiard Street in 1971. There is another photographer further down the street.trams, tramways, ballarat trams, crews, houses, last day, lydiard st nth, secv tramways, street scene, terminus, tramway closure, maximum traction, tram 42 -
 Ballarat Tramway Museum
Photograph - Digital image, Joy Waller, 19/09/1971 12:00:00 AM
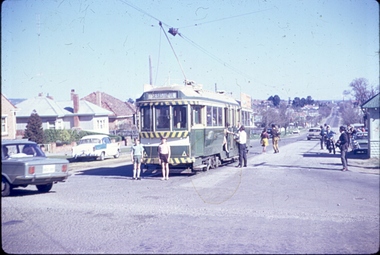
Copy of a colour slide showing Tram 42 in Lydiard Street North, at the terminus. This photo is taken from the north east looking down Lydiard Street. Two boys are standing at the rear of the tram. Has a number of people boarding the tram or standing around taking photographs.trams, tramways, ballarat trams, crews, houses, last day, lydiard st nth, secv tramways, street scene, terminus, tramway closure, maximum traction, tram 42 -
 Ballarat Tramway Museum
Photograph - Digital image, Joy Waller, 19/09/1971 12:00:00 AM
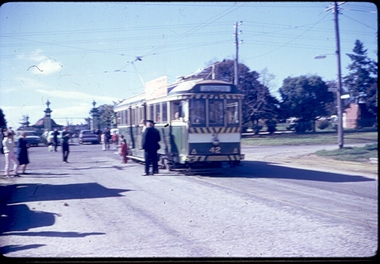
Copy of a colour slide showing Tram 42 in Lydiard Street North, at the terminus. This photo is taken from the south west looking up Lydiard Street. The cemetery gates can be seen in the background. The trolley pole it is ready to head back into the city, and the destination board is reading Sebastopol. There are children and the crew posing beside the tram for the photograph. There is a crowd of people, standing on the road near the tram, and others waiting to take photos. The photographer says this was taken of the last of the last tram to run in Lydiard Street in 1971. Photo quality is poor as the original image was blurred.trams, tramways, ballarat trams, crews, houses, last day, lydiard st nth, secv tramways, street scene, terminus, tramway closure, maximum traction, cemetery, tram 42 -
 Ballarat Tramway Museum
Photograph - Digital image Set of 11, Peter Waugh, 21/07/2015 12:00:00 AM
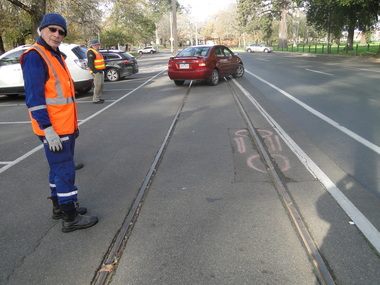
Track repairs in Wendouree Parade, June 2014. 6022.1 - Roger Gosney standing on track looking at damaged section 6022.2 - Close up of damaged section of track 6022.3 - Work crew including dog in safety vest 6022.4 - Work crew digging up road watched by the dog 6022.5 - Close up digging up road, Alan Snowball using jackhammer, Greg Robinson with spade, Roger Gosney on the far side with spade, and Barry Richardson with spade. 6022.6 - Greg Robinson in trench watched by Alan Roger, and Barry 6022.7 - Same group looking into the trench 6022.8 - Alan on hands and knees beside trench preparing for welding 6022.9 - preparing for welding, with safety screens in place. 6022.11 - Greg Robinson and Roger Gosney resting beside Wendouree Parade. (no. 10) Photo by Peter Waugh, collected for reference purposestrams, tramways, road works, btm, track repairs, wendouree parade -
 Ballarat Tramway Museum
Photograph - Digital image Set of 10, Tony Smith, 1971
Yields information about Ballarat Tramways and trams prior to the closure of the tramway system.Set of 10 digital images of Ballarat trams prior to closure, scanned from original slides by Tony Smith, 1971 prior to closure of the system. .1 - 42 in Barkly St - at top of hill, outbound to Mt Pleasant. Note the fire alarm on the right hand side of the photo. .2 - 42 and 21 crossing at Grant St Loop, Barkly St, Mt Pleasant. 42 outbound, 21 inbound. .3 - 34 and 21 crossing at Parker St Loop, with Ballarat College in the background. 42 in bound to City and Mt Pleasant, 21 showing Sturt St. West. .4 - 21, Wendouree Parade at the south end of the old parking loop. .5 - 42 and 21 crossing at Gardens Loop. 42 showing Mt Pleasant, 21 Gardens via Sturt St West. .6 - ditto .7 - 41 showing Special at intersection of Ripon St and Sturt St with a single trucker tram ex View Point waiting to turn into Sturt St. 41 has two Johnnie Walker Whiskey roof advertisements. .8 - Two single truckers - not well focused - 21? and 13? crossing at Mill St loop, has the hospital in the background. Conductor leaning out of the door on the outbound tram. .9 - 42, bogie tram and a single trucker at the City terminus (Sturt and Lydiard Sts). Has a group of SEC trammies standing alongside the tram. Has Racey's store and the SEC offices in the background. 42 has a briquettes roof advert. .10 - 34 in Sturt St, at the City terminus, with passengers getting onto the tram. Has the Town Hall, Myers store, Gemmola's Pharmacy in the background. Tram has the destination of Gardens via Drummond St. Nth. Has two trammies (crews) standing alongside the tram stop sign.trams, tramways, sturt st west, barkly st, grant st, parker st loop, sturt st, view point, ripon st, mill st loop, crews, town hall, tram 42, tram 21, tram 34, tram 41, tram 42 -
 Ballarat Tramway Museum
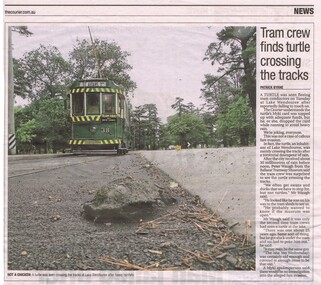
Newspaper, The Courier Ballarat, "Tram crew finds turtle crossing the tracks", 15/01/2015 12:00:00 AM
Newspaper clipping from The Courier, 15/1/2015, titled "Tram crew finds turtle crossing the tracks". Has a photo of tram 38, northbound near depot junction with the turtle, actually a tortoise, in the foreground. It was a slow news day in Ballarat! Quotes Peter Waugh, and has the story around a Myki card.btm, wendouree parade, turtle, tortoise, animals -
 Ballarat Tramway Museum
Photograph - Digital image, Kodak, c1932
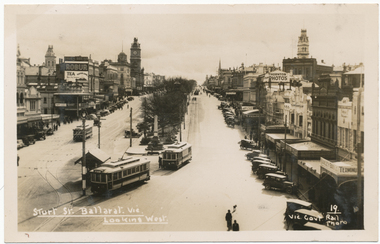
Yields information the appearance of Sturt St at Grenville St and three SEC trams about 1938.Digital image from the Wal Jack Ballarat Album of a postcard - actual printed photograph - looking east from Sturt and Grenville Sts, c1938. Has SEC tram 16 on the south side, No. 26 for Mt Pleasant and No. 20 showing Sturt St West with a crew member stepping off the tram. Printed and Published by Kodak - see rear of postcard. Has the caption "Sturt St Ballarat Vic Looking west" along the bottom left hand edge and "19 Vic Govt Rail Photo" in the bottom right hand corner. In the photograph are advertisings for Robur Tea, Davies Bread, Thornton for Photos, Malvern Star cycles, Singer and Bailey Bros." Wal's album notes dates the photo as "1938" See image i2 for rear of postcard.On rear of photo in pencil "1937".trams, tramways, sturt st, grenville st, tram 16, tram 26, tram 20 -
 Ballarat Tramway Museum
Photograph - Digital image, Late 1950's
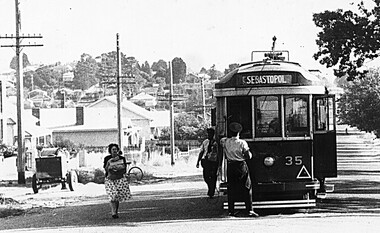
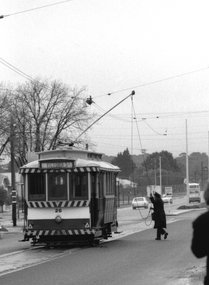
Yields information the appearance and details about SEC Tram No. 35 in the late 1950's and the activities at a terminus.Digital scan from the Ben Parle collection of SEC No. 35 at the Lydiard St Nth terminus, with the crew changing the poles and a lady with a polka dot skirt walking nearby. Photo 1950's or early 1960 prior to introduction of dash canopy lighting. Photo received with the Ben Parle slides 09/2004. trams, tramways, lydiard st nth, tram 35 -
 Ballarat Tramway Museum
Photograph - Digital image, Peter Bruce, "No. 30 Main St", 1970s
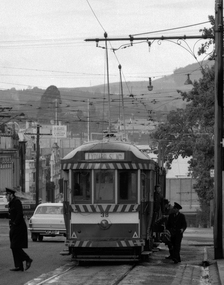
Yields information about the Main St area.Digital image, black and white, of No. 30 outbound to Mt Pleasant in Main St with a SEC crew member getting off the tram. On the right hand side is a sing for "HUB" and Dennis Swards Upholsterer. Photo taken by Peter Bruce 1970's and 1971, prior to the closure of the Ballarat tramway system. Peter's Title of image: "No. 30 Main St".trams, tramways, main st, mt pleasant, tram 30 -
 Ballarat Tramway Museum
Photograph - Digital image, Peter Bruce, "No. 38 taken at 1015", 1970s
Yields information about Sturt St City terminus and passengers and crews getting on and off the tram, after changing crews.Digital image, black and white, of No. 38 at the city terminus in Sturt St, with passengers getting off the tram and crews starting to walk across the road, probably after a change over of crews. There is another tram in front of No. 38. No. 38 has the destination of Lydiard St North. Photo taken by Peter Bruce 1970's and 1971, prior to the closure of the Ballarat tramway system. Peter's Title of image: "No. 38 taken at 1015"trams, tramways, crews, sturt st, tram 38 -
 Ballarat Tramway Museum
Photograph - Digital image, 1970s
Yields information about swinging the pole at the Victoria St terminus.Digital image, black and white, of the pole being swung by the conductor on No. 26 at the Victoria St terminus. shows the terminus arrangements and the location. Tram has the destination of Victoria St. Photo taken by Peter Bruce 1970's and 1971, prior to the closure of the Ballarat tramway system. Peter's Title of image: "Swinging the Poles"trams, tramways, victoria st, crews, trolley poles, tram 26 -
 Ballarat Tramway Museum
Photograph - Black & White Photograph/s, Wal Jack, 7/10/1939 12:00:00 AM
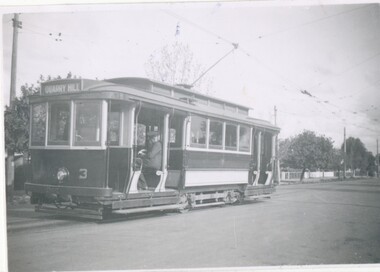
Black and White print contained within the Wal Jack Bendigo and Geelong Album, see Reg Item 5003 for more details. Photo of No. 3 at Quarry Hill 7-10-1939, has the driver sitting in the front of the tram. The tram has the destination of Quarry Hill. Photo by Wal Jack/ i1 - scan of print in the album i2 - rear of image i3 - scan of negative at 3200dpi added 6/6/2020. On the rear in blue ink "SEC Bendigo No 3 at Quarry Hill, Rly Picnic Day 7/10/39" with Wal Jack copyright stamp in the top right hand corner and the number "T193" written in.trams, tramways, bendigo, quarry hill, crews, tram 3 -
 Ballarat Tramway Museum
Photograph - Black & White Photograph/s, 1930
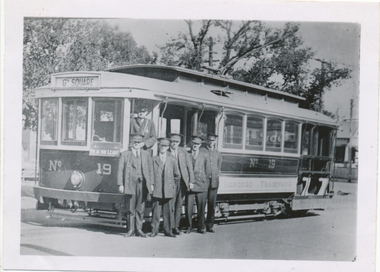
Black and White print contained within the Wal Jack Bendigo and Geelong Album, see Reg Item 5003 for more details. Photo of Bendigo tram No. 19, 1st of the ex MMTB cars to Bendigo, prior to any conversion work. Tram has "Bendigo Tramways" painted on the side of the tram, a sign at the front of the tram saying "Pay as you Leave", the destination of Golden Square. Has one conductor and five drivers? (motormen) standing alongside the front of the tram. Wal Jack has written in on the album "No. 19, 1st of ex MMTB cars at depot 1930" Peter Duckett photo or collection. On the rear in blue ink "PWD"trams, tramways, bendigo, new trams, signs, crews, tram 19 -
 Ballarat Tramway Museum
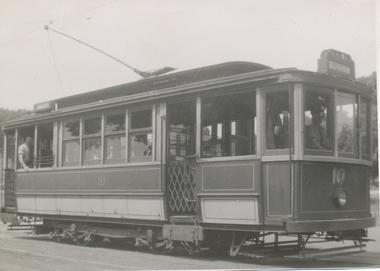
Photograph - Black & White Photograph/s, Ken Magor, Geelong 10 at Beach terminus, 26/2/1948
Yields information about Geelong tram No. 10 in 1948.Black and White print contained within the Wal Jack Bendigo and Geelong Album, see Reg Item 5003 for more details. Photo of Geelong No. 10 at the Beach terminus, 1940's. Photos by Ken Magor, Negative No. 3103. Taken on a summers day as the crew are in rolled up shirt sleeves. Two copies held - second is dated 26/2/1948.On rear in ink "SEC Geelong, No. 10 at Beach terminus" Has in bottom right hand corner Ken Magor stamp with negative number "3103" written in. In the bottom left hand corners has details of the photograph itself.trams, tramways, geelong, beach, tram 10 -
 Queenscliffe Maritime Museum
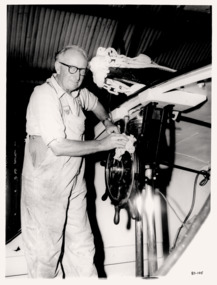
Photograph - Photograph of Mr. W (Bill) Mouchmore, B&W photo of Mr. Biil Mouchmore, 1960
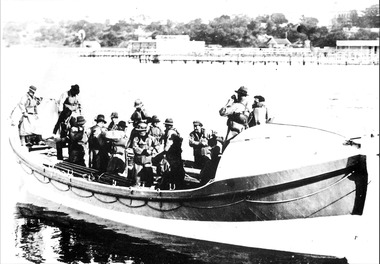
Queenscliffe life boat crew historyQueenscliffe life boat crew in 1960B&W photo of Mr. W [Bill] Mouchmore, taken in 1960Reverse " Bill Mouchmore at wheel of new (Queenscliffe) life boat 1960 Neville Bowler Age " -
 Queenscliffe Maritime Museum
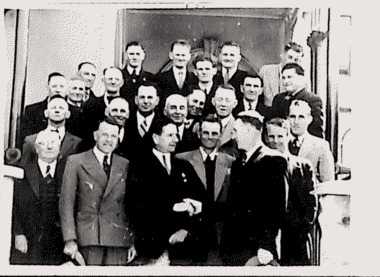
Photograph - 3 Photos of people involved in the rescue of crew from the 20t sailboat MERLAN, B&W photos of rescue team 16 Jan 1949, c1949
Lifeboat rescue crew 19491949 rescue crewSir T Maltby & guests, rescuers & crew of the MERLAN 1949, dinner.Reverse " NIL "lifeboat 'queenscliffe', lifeboat crew, football team -
 Queenscliffe Maritime Museum
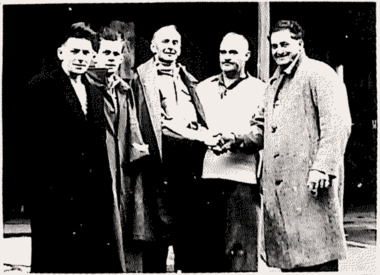
Photograph - Photo of MERLAN's rescued crew with R Shapter 1949 &MERLAN wreck lifeboat crew c1949, R Shapter with crew from MERLAN, c1949
... Photo of MERLAN's rescued crew with R Shapter 1949 &MERLAN...B&W Photo of MERLAN's rescued crew with R Shapter 1949... wreck Reverse " NIL " B&W Photo of MERLAN's rescued crew with R ...MERLAN wreck & rescued crew. 1949R Shapter & rescued MERLAN crew.B&W Photo of MERLAN's rescued crew with R Shapter 1949Reverse " NIL "lifeboat 'queenscliffe', lifeboat crew, merlan wreck -
 Queenscliffe Maritime Museum
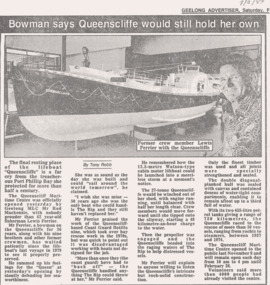
Photograph - B&W photo of lifeboat QUEENSCLIFFE, incl. Lewis Ferrier ex crew member c1987, Lifeboat QUEENSCLIFFE, incl. Lewis Ferrier c1987, c1987
Opening of Queenscliffe Maritime Centre c1987Opening of the Queenscliffe Maritime CentreNews clipping GA 2/7/1987 re Queenscliffe Maritime centre opening.Reverse " NIL "queenscliffe maritime centre -
 Queenscliffe Maritime Museum
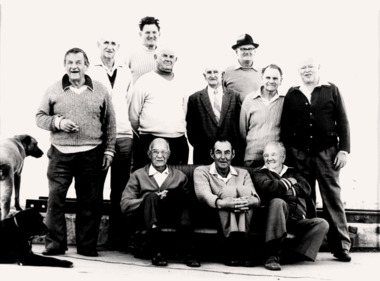
Photograph - B&W photo of lifeboat QUEENSCLIFFE former crew members c1981, Former lifeboat QUEENSCLIFFE crew, c1981, c1981
... " NIL " Former Crew of lifeboat QUEENSCLIFFE Dec 1981 b&w photo ...Past lifeboat crew Dec.1981.Queenscliffe lifeboat crew, c Dec 1981Former Crew of lifeboat QUEENSCLIFFE Dec 1981 b&w photo.Reverse " NIL "lifeboat 'queenscliffe', boat crew -
 Queenscliffe Maritime Museum
Photograph - B&W photos of lifeboat QUEENSCLIFFE, Queenscliffe lifeboat b&w photos
LifeboatsQUEENSCLIFFE lifeboat at seaB&W photo of Lifeboat QUEENSCLIFFE at sea.Reverse " crew names & Cliff Thwaites 20 Wharf St. "history -
 Queenscliffe Maritime Museum
photograph - Lifeboat Crew, Queenscliffe lifeboat crew, 1986
Lifeboat crew on a lifeboatBlack & white photo of the lifeboat Queenscliffe's crew on boardReverse - " 2nd from left Grenville Roddick, lighthouse superintendent / passengers on lifeboat were pilots for the new pilot boats, taken into the Rip by the Mr (Sam) Culliver to test the tides "historical references -
 Queenscliffe Maritime Museum
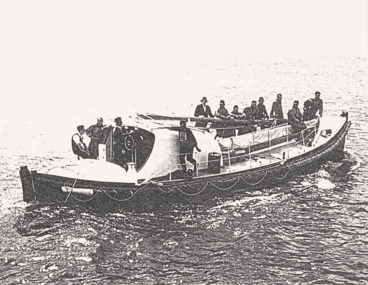
Photograph - Black & white photograph of lifeboat Queenscliffe with crew, Lifeboat at Queenscliffe, c1920
16 oared lifeboat with crew at QueenscliffeLifeboatBlack & white photo of a 16 oar lifeboat at QueenscliffeReverse - " circa 1920? - see Frank (Ferrier?) "historical references, lifeboat -
 Queenscliffe Maritime Museum
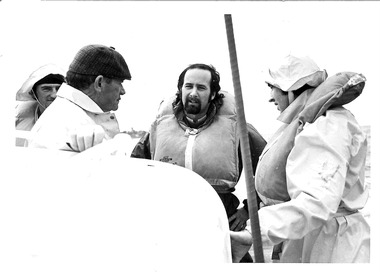
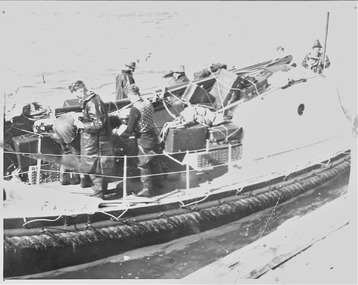
Photograph - Black & white photograph TIME crew being rescued, TIME crew on board LB Queenscliffe, unknown
ship wreck, SS TIME, lifeboat Queenscliffe, rescue crew.Rescue of crew off SS TIME wreckBlack & white photo of some of the crew off the TIME on board the LB QueenscliffeReverse - " Lifeboat Queenscliffe taking crew of(f) [wreck] stranded SS TIME. Ran on to Corsair Reefs, steering failed / Port Phillip Heards August 1949 "historical references, ss time wreck -
 Queenscliffe Maritime Museum
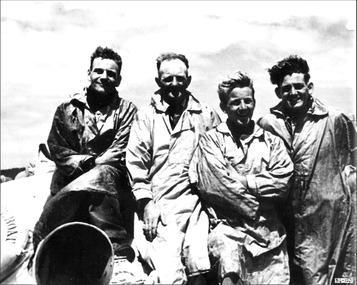
Photograph - Black & white photograph of four (4) men - lifeboat crew off the Queenscliffe, LB Queenscliffe crew members, c1942
lifeboat crewRescue of crew off SS TIME wreckBlack & white photo of four of the crew off the Lifeboat Queenscliffe c1942Reverse - " nil "historical references, ss time wreck -
 Queenscliffe Maritime Museum
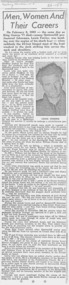
Photograph - Black & white photographs x 2 of Lewis Ferrier & Cliip from Geelong Advertiser, Men, Women & their Careers, c1943, c1960 & c2010
Lifeboat crewLifeboat Queenscliffe crew & newsBlack & white photos of L Ferrier on LB Queenscliffe + newspaper cuttingReverse - " on 157.2 - Lewis Ferrier Life Boat 1960 / Neville Bowler "The Age" - 157.3 - L Ferrier on "Queenscliffe" in the forward hatch "Black Hole of Calcutta" c1943 "historical references -
 Queenscliffe Maritime Museum
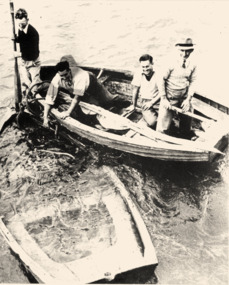
Photograph - Black & white photographs of LB Queenscliffe & sunken dinghy rescue, Queenscliffe & sunken dinghy
Lifeboat & rescue crews.Lifeboat Queenscliffe crew & sunken dinghyBlack & white photos of [a] 1986-158.1 B & W photo of sunken rescue dinghy and [b] the LB Queenscliffe heading out for practice.Reverse - " on 158.1 - L to R / Frank Ferrier, Ron Shapter, Tony Jergens, Tom Warren / sunken 14 ft dinghy used in rescue of wreck of Merlan / This sat on Lonsdale pier for a considerable time (2 years?) prior to rescue. When they put it in to rescue the dinghy commenced filling and rescue were carried out while bailing - 158.2 - Queenscliffe heading out for practice / man at stern (late Jack Ferrier) / "AKUNA' pilot vessel in background formerly German raider 'KOMET' ".historical references -
 Queenscliffe Maritime Museum
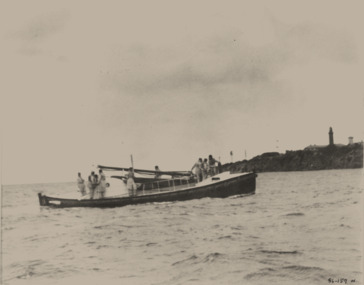
Photograph - Black & white photographs of LB Queenscliffe on practice run, Lifeboat Queenscliffe, c1937
Lifeboat & rescue crews.Lifeboat Queenscliffe & crewBlack & white photos of Lifeboat Queenscliffe on practice run.Reverse - " NIL ".historical references -
 Queenscliffe Maritime Museum
Photograph - Black & white photograph of lifeboat crews, wreck of the GANGE & newspaper clippings, Photos of lifeboat crew & the wreck GANGE c1887, c1931
... of the fishing boat ALMA c1931 Photos of lifeboat crew & the wreck GANGE ...Trading clipper shipsAustralian coastal tradeBlack & white photograph of the fishing boat ALMA c1931Reverse - " NIL ".historical references -
 Queenscliffe Maritime Museum
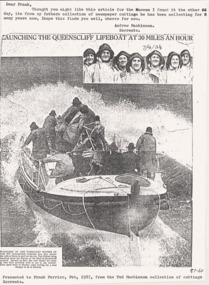
Newspaper - B & W photo & news clipping re the launching of the Queenscliffe lifeboat 7th April 1934, Queenscliffe lifeboat launching in 1934, Circa 1934
lifeboat QUEENSCLIFFE launchingFaces & names of lifeboat crew 193407 April 1934 news article re lifeboat QUEENSCLIFFE being launched.Reverse " L to R / L Wayth, L Stephens, H Todd, N Zanoni, J Nairn, S Todd, P Fitzsimmons / Mary Long / Gift from Frank Ferrier 10-02-1987 "lifeboat 'queenscliffe' -
 Bendigo Historical Society Inc.
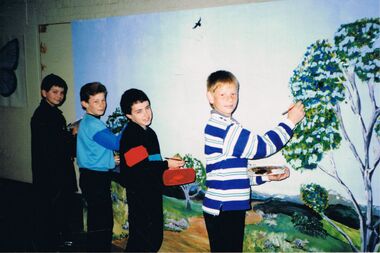
Photograph - PETER ELLIS COLLECTION: BOYS PAINTING
Colour photograph. Four boys painting scenery. Gum tree. Hills. Bird in sky. Gravel Hill Primary School. 1988 Production 'The Wallaby Track'' Back of photo reads: Damon Mlekuz LHS Designed and ran the painting crew.photo, group, four boys