Showing 316 items
matching north geelong
-
 Ballarat Tramway Museum
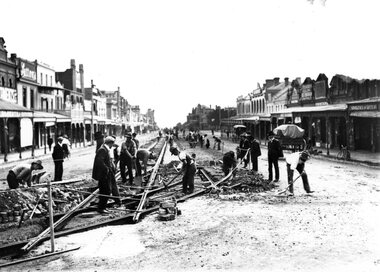
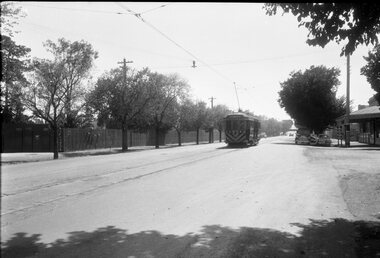
Photograph - Geelong Tramway new tracks
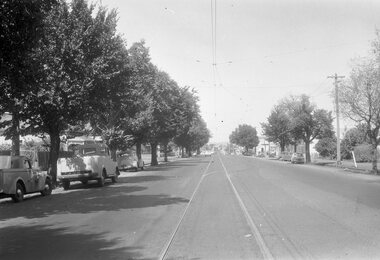
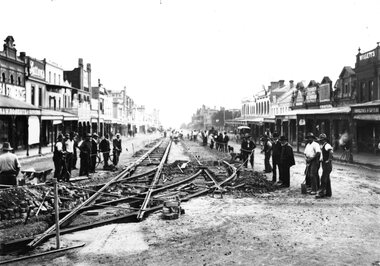
Tram tracks being laid in Moorabool St, looking north. Curved track heads into Ryrie St, 1911. See also Item 9214.Black and white print on paper.GRS710/25/1/4 and 24-4 written on the reverse in pencil. No. 1 in a circle, 25-4 and an ink 5 overwriting the pencil 4 in 24, written on the reverse in ink.geelong tramways new tracks -
 Melbourne Tram Museum
Photograph - Tram 678 crossing Geelong Road Footscray, Jim Seletto, c1960
The photograph shows an X2 class No. 678, north bound in Droop St Footscray, crossing Geelong Road with the destination of Ballarat Rd. Another tram can be seen southbound. Note the street fire alarm pillar on the right side of the photograph.Yields information about the trams in Droop St Footscray, c1960.Black and White photograph with photographer's notes on rear"678 Crossing Geelong Road" and "J Seletto photo" in ink.trams, footscray, x2 class, tram 678, droop st, geelong road -
 Bendigo Historical Society Inc.
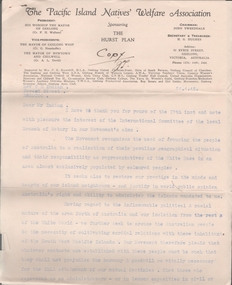
Document - Pacific Island Natives Welfare Association
The Pacific Island Natives Welfare Association was formed in Geelong in 1940. It's initial goal was to provide trade training to young men from Nauru as a move towards self-determination for the island. It was then very active in the fight against continued phosphate mining on the island and the effects of it on the local people.Three typewritten letters. The first one dated 22nd January 1945 is a report on the native labour conference held in Sydney the 1st of December 1944. The second, dated 16th March 1945 is from the Chairman of the Pacific Island Natives Welfare Association to the Minister of External Territories, the Hon E.J. Ward asking for the minister consideration to the situation of some young people from Nauru living in Geelong. The third dated 24th April 1945 is from the Chairman of the Pacific Island Natives' Welfare Association, replying to Rev. T.H. Indian, Forest Street, Bendigo, thanking him for local rotary support and outlying the aims of the association going forward. Also included a brown envelope addressed to L.J. Ellifson, Esq C/o The International Harvester Co of Australia Ltd, North Shore. Part of the Aileen and John Ellison collection.nauru, pacific island, natives welfare association -
 Linton and District Historical Society Inc
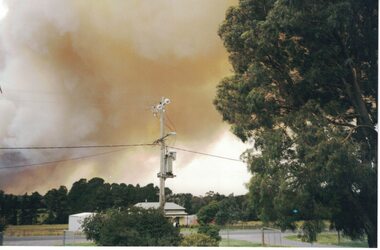
Photograph, Linton Bushfire, 1998, December 1998
Linton bushfire 1998, Snake Valley Road area, five Geelong West firefighters died in this fire.Colour photograph of bushfire smoke over Linton."Linton Fire December 2, 1998/Looking North on Skipton Road".bushfires -
 Ringwood and District Historical Society
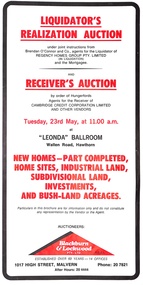
Pamphlet, Liquidator's and Receiver's Auction, Highland Boulevard, Ringwood, Victoria, and other locations - Circa 1980
Multi-fold brochure with Order of Sale list of home sites, industrial land, subdivisional land and bushland acreages being auctioned at "Leonda" Ballroom, Hawthorn, Vic., Tuesday 23rd May (year not documented, circa 1980). Brochure includes 8 homesites with handwritten sales notations for Lots 94, 99, 100, 102, 104 and 105 Highland Boulevard, Ringwood at 11.30a.m., and at 11.45a.m., 3 completed homes at Lots 86, 88 and 89 & 5 near-completed homes Lots 74, 75, 76, 77 and 79 Highland Boulevard. Auctioneers - Blackburn & Lockwood Pty Ltd., 1017 High Street, Malvern, Phone 207821 After Hours 20 4444.Liquidator's Realization Auction under joint instructions from Brendan O'Connor and Co., agents for the Liquidator of Regency Homes Group Pty. Limited (in Liquidation) and the Mortgagee. Receiver's Auction by order of Hungerfords, Agents for the Receiver of Cambridge Credit Corporation Limited and other vendors. Order of Sale property locations include Mulgrave, Ringwood, Doncaster, Portartlington, Geelong, Altona, Mooroolbark, Scoresby, Gembrook, Maidstone, Port Melbourne, Laverton, Werribee, Werribee North, and Sunshine. -
 Ballarat Tramway Museum
Album - Postcards & Photographs - Vic Solomons and others - Australian Tramways, Vic Solomons, 2023
Contains 184 images of postcards and photographs collected primarily by Vic Solomons of Sydney, with others from the collection of Wal Jack and Warren Doubleday. Covers almost all of Australia's tramway systems. 1 Post Card Hay St Perth Looking East No 3 Unknown Perth 2 Post Card Cars 30 & 90 both on Route 19 pass in Barrack St looking South Perth WA 1935.02.18 Perth 3 Post Card Hay St Looking East Perth WA Unknown Perth 4 Post Card William St Perth WA Unknown Perth 5 Post Card Perth from Shaftsbury Hotel Unknown Perth 6 Post Card Hay St Perth WA Looking East Unknown Perth 7 Post Card Barrack St Perth Unknown Perth 8 Post Card Murray Views No 3 High St Showing Town Hall Fremantle WA Unknown Fremantle 9 Post Card High St Fremantle WA Unknown Fremantle 10 Post Card View of Bolder City Golden Mile in the Background (Section No 1) 1908.08.20 Kalgoolie 11 Post Card Hannan St Kalgoolie 1900.08.19 Kalgoolie 12 Post Card Hannan St Kalgoolie WA (No 2) Unknown Kalgoolie 13 Post Card Intersection Hannan & Maritana Sts Kalgoolie WA Unknown Kalgoolie 14 Post Card Hannan St Kalgoolie Unknown Kalgoolie 15 Post Card Lane Street Bolder City Unknown Kalgoolie 16 Post Card Hobart Double Deck Tram Unknown Hobart 17 Post Card Macquarie St Hobart Unknown Hobart 18 Photo Liverpool Street Hobart Unknown Hobart 19 Photo Hobart 21 Unknown Hobart 20 Photo Hobart 14 in Elizabeth St Hobart Unknown Hobart 21 Post Card Macquarie St Hobart Unknown Hobart 22 Post Card Macquarie St Hobart Tas Unknown Hobart 23 Photo Double Decker Tram 3 at G.P.O. Hobart Tas No 31 Unknown Hobart 24 Post Card Double Decker Tram 19 Hobart Tas A B Series No 24 Unknown Hobart 25 Photo Hobart Municipal Tramways Tas No 95 Unknown Hobart 26 Post Card Elizabeth St Hobart Unknown Hobart 27 Post Card Elizabeth St Hobart Unknown Hobart 28 Post Card Elizabeth St Hobart Unknown Hobart 29 Post Card Elizabeth St Hobart Tas Unknown Hobart 30 Post Card HMT 21 with crew at Beach Road Terminus Unknown Hobart 31 Post Card HMT 9 & another with crew at Beach Road Terminus. Front cover photo of Destination GPO 1921.01.00 Hobart 32 Post Card Cascade Road and Mount Wellington Hobart Unknown Hobart 33 Post Card Elizabeth St Hobart Unknown Hobart 34 Post Card Elizabeth St Hobart Unknown Hobart 35 Post Card Elizabeth St Hobart 1915.04.07 Hobart 36 Post Card Macquarie St Hobart Tas Unknown Hobart 37 Post Card Macquarie St showing Post Office Hobart 1908.03.12 Hobart 38 Post Card Hobart Municipal Tramways 21 Unknown Hobart 39 Post Card Elizabeth St Hobart Tas Unknown Hobart 40 Post Card Liverpool Street Hobart Unknown Hobart 41 Post Card Electric Tram Launceston Tas 446 W J Little Photo 1919.02.08 Launbceston 42 Post Card Launceston Tram no 3 1911.08.30 Launbceston 43 Post Card Launceston Tram no 3 passes tram No 1 Unknown Launbceston 44 Post Card Tram 6 at Trevallyn a popular suburb Launceston Tasmania Unknown Launbceston 45 Post Card Tram 7 at Trevallyn Road Terminus Launceston Tasmania Unknown Launbceston 46 Post Card Tram 4 in Brisbane St Launceston Unknown Launbceston 47 Post Card Tram 9 in Brisbane St Launceston Tasmania Unknown Launbceston 48 Post Card Camerom Street Launceston Tasmania Unknown Launbceston 49 Post Card Murray Views No 15 Jetty Road Glenelg Terminus 1962-02-08 Adelaide 50 Post Card Bay Tram at Jetty Road Terminus Glenelg SA Unknown Adelaide 51 Post Card Tram 3 in King William Street Adelaide S Aust Unknown Adelaide 52 Post Card Valentine Series No 3065 The Old Horse Tram Victor Harbour Unknown Victor Harbour 53 Post Card Bourke Street Melbourne with Cable Car Looking East 1904.04.25 Melbourne 54 Post Card Opening of New Electric Tramway Elsternwick 1913-11-13 Melbourne 55 Post Card Cable trams in Clarendon St Sth Melb Unknown Melbourne 56 Post Card Pall Mall from Charing Cross Bendigo Unknown Bendigo 57 Post Card Tram 4 & 7 pass at The Fountain and Mitchell Street Bendigo Vic Rose Series P 3198 Unknown Bendigo 58 Post Card M&MTB 133 at Charing Cross bound for Eaglehawk Bendigo Vic Murray Views No 45 Unknown Bendigo 59 Post Card Pall Mall Bendigo Vic Unknown Bendigo 60 Post Card Charing Cross & Mitchell St Bendigo Trams passing 1919.00.00 Bendigo 61 Post Card Pall Mall Looking East Unknown Bendigo 62 Post Card Electric Trams and City Hotel Bendigo Vic Unknown Bendigo 63 Post Card Moorabool Street Geelong V 23 Unknown Geelong 64 Post Card Murray Views No 3 Moorabool Street Geelong Vic Unknown Geelong 65 Post Card The Rose Series P 2487 Ryrie Street Geelong Vic Unknown Geelong 66 Post Card Southern Cross Series 2696 Ryrie Stret Geelong Vic Unknown Geelong 67 Post Card The Rose Series P 1490 Ryrie Street Geelong Vic 1920-03-04 Geelong 68 Post Card Valentine Series No 1568 Lower Sturt Street Ballarat Unknown Ballarat 69 Post Card Rose Series P 1710 Sturt Street Ballarat Victoria Unknown Ballarat 70 Post Card Sturt Street Ballarat Victoria Unknown Ballarat 71 Post Card Horse Tram In Sturt Street Ballarat 1905.11.10 Ballarat 72 Post Card Sturt Street Ballarat Looking North-West Unknown Ballarat 73 Post Card Shoppes Square Sturt Street Ballarat Looking North Unknown Ballarat 74 Post Card Junction Sturt and Lydiard Streets Ballarat 1909-09-01 Ballarat 75 Post Card The Electric Supply Co Souvenir Tram Ticket No 3085of the opening of Electric System August 18 1905 1905.08.18 Ballarat 76 Post Card Sturt Street Ballarat Victoria 1907.11.25 Ballarat 77 Post Card Off to the Gardens Electric Tram Ballarat Unknown Ballarat 78 Post Card Sturt Street Ballarat 1907.04.16 Ballarat 79 Post Card Sturt Street Ballarat Looking East Electric tram with Double Deck Trailer 1911.04.17 Ballarat 80 Post Card Sturt Street Ballarat Looking East Unknown Ballarat 81 Post Card Sturt Street Ballarat Looking West 1911.03.01 Ballarat 82 Post Card Town Hall and Sturt Street Ballarat Unknown Ballarat 83 Post Card Lydiard Street Ballarat 1906.11.23 Ballarat 84 Post Card Looking North along Adelaide Street from George Street Brisbane Sidues Series No 764 Unknown Brisbane 85 Post Card Looking South along Queen Street from the Creek Street Intersection Brisbane Qld Sirues Series No 1379 Unknown Brisbane 86 Post Card George Street from near Supreme Court Brisbane Unknown Brisbane 87 Post Card Queen and Eagle Streets Brisbane 1907.07.04 Brisbane 88 Post Card Queen Street showing His Majesty’s Theatre Brisbane Unknown Brisbane 89 Post Card Queen Street Treasury Building 1908.01.20 Brisbane 90 Post Card G P O and Queen Street Brisbane Unknown Brisbane 91 Post Card Queen Street Brisbane Looking from Wharf Street Unknown Brisbane 92 Post Card Customs House Brisbane 1905.02.16 Brisbane 93 Post Card Queen St Brisbane 1905.09.16 Brisbane 94 Post Card Queen St Brisbane 1907.11.19 Brisbane 95 Post Card Treasury Buildings Brisbane Unknown Brisbane 96 Post Card Queen and Eagle Streets Brisbane Unknown Brisbane 97 Post Card The Valley Corner Brisbane Unknown Brisbane 98 Post Card Brisbane Queen Street opposite General Post Office Unknown Brisbane 99 Post Card North Quay and Milton Beach Brisbane Q Unknown Brisbane 100 Post Card Victoria Bridge Brisbane South Side 1907.08.14 Brisbane 101 Post Card Victoria Bridge Brisbane Unknown Brisbane 102 Post Card Breakfast Creek Bridge Brisbane Q Unknown Brisbane 103 Post Card Melbourne Street Station South Brisbane Queensland Unknown Brisbane 104 Post Card General Post Office Queen Street Brisbane 1955.09.23 Brisbane 105 Post Card Customs House Brisbane 1904.11.04 Brisbane 106 Post Card Queen St Brisbane 1919.11.00 Brisbane 107 Post Card Queen St Brisbane Sidues Series No 627 Unknown Brisbane 108 Post Card Creek Street Brisbane Queensland Unknown Brisbane 109 Post Card Customs House and Garden Reach Brisbane Queensland 1910.00.08 Brisbane 110 Post Card Queen and Creek Streets Brisbane 1909.06.07 Brisbane 111 Post Card Queensland National Bank andd Queen Street Brisbane Queensland Unknown Brisbane 112 Post Card Queen Street and Treasury Buildings Brisbane 0000.09.07 Brisbane 113 Post Card Queen Street showing “Courier” Buildings Brisbane Unknown Brisbane 114 Post Card Intersection George & Roma Streets Brisbane Q 1916.05.11 Brisbane 115 Post Card Adelaide Street Brisbane Q Unknown Brisbane 116 Post Card G P O Queen Street Brisbane Q Unknown Brisbane 117 Post Card Treasury Building Brisbane 1906.03-20 Brisbane 118 Post Card Queen and Eagle Streets Brisbane 1907.02.01 Brisbane 119 Post Card Queen St Brisbane Unknown Brisbane 120 Post Card Queen St Brisbane Q Unknown Brisbane 121 Post Card Victoria Bridge Brisbane 1906.07.30 Brisbane 122 Post Card An Unusual View showing Head of Queen Street Victoria Bridge & South SideSuburbs Brisbane Q Unknown Brisbane 123 Post Card Petries Bight Brisbane Q Unknown Brisbane 124 Post Card South End Victoria Bridge Brisbane Q Unknown Brisbane 125 Post Card Customs House Brisbane Unknown Brisbane 126 Post Card Photo of toastrack car circa 1910 Unknown Brisbane 127 Post Card Treasury Buildings Brisbane Unknown Brisbane 128 Post Card East Street Rockhampton with Steam Tram & trailer Unknown Rockhampton 129 Post Card Post Office Rockhampton with steam tram Unknown Rockhampton 130 Post Card East Street Rockhampton with Steam Trams Rose Series P 7154 Unknown Rockhampton 131 Post Card William Street Rockhampton Rose Series P 7156 Unknown Rockhampton 132 Post Card Central East Street Rockhampton Q with Steam Trams Unknown Rockhampton 133 Photo Sturt St Ballarat Unknown Ballarat 134 Photo Bridge Street Ballarat Unknown Ballarat 135 Post Card George St Sydney Unknown Sydney 136 Post Card Elizabeth St Sydney Unknown Sydney 137 Post Card Railway Square Unknown Sydney 138 Post Card Sydney Harbor Bridge - pending receipt 139 Post Card Kings Cross - Mowbray Series with description on rear from C Roy G Field Unknown Sydney 140 Post Card Kings Cross - Mowbray Series with description on rear from C Roy G Field Unknown Sydney 141 Post Card Central Railway Station Sydney - Rose Series P6033 1954-01-26 Sydney 142 Post card William Street Darlinghurst looking towards City - Rose Series P6602 unknown Sydney 143 Post Card Circular Quay Sydney - Rose Series P6680 Unknown Sydney 144 Post Card View at Manly NSW - Rose Series B1003 Unknown Sydney 145 Post Card Hunter St Newcastle NSW - Rose Series P7843 Unknown Newcastle 146 Post Card Bank Corner Newcastle NSW - Mowbray Series No. 155 Unknown Newcastle 147 Post Card Hunter St Newcastle NSW Unknown Newcastle 148 Post Card Criterion Hotel Hunter St Newcastle NSW Unknown Newcastle 149 Photo Horse tram at Newtown Station 1894 to 1898 - PTC photo c1894 Newtown 150 Photo Steam tram motor No 3 at Railway Square 1879 1879 Sydney 151 Photo Railway steam tram c1900 with a horse drawn double deck bus c1900 Sydney 152 Photo Steam motor 5A and doubled deck bus Unknown Sydney 153 Photo Steam motor 53A with detail notes on rear 1922 Sydney 154 Photo Cable tram set at Milsons Point ferry terminal c1900 Sydney 155 Photo Early Sydney electric car - Ocean St - Rose Bay Unknown Sydney 156 Photo George St looking souoth c1905 c1905 Sydney 157 Photo Tram 165 at Circular Quay Unknown Sydney 158 Photo Tramcar ferry or transporter at The Spit Unknown Sydney 159 Photo tram 882 George St at Marti Place, 1937 1937 Sydney 160 Photo Tram 826 Railway Sq area Unknown Sydney 161 Photo Railway Sq in background, Broadway with double decker bus and toastrack car late 1930s Sydney 162 Photo Coupled St Pitt St? - photo Ben Parle Feb. 1950 Sydney 163 Photo Electric tram No. 2 - North Sydney with side trolley pole running Unknown Sydney 164 Photo George St - Horden's Corner Unknown Sydney 165 Photo George St at Martin Place c1920 Sydney 166 Photo Castlereagh St Sydney c1928 c1928 Sydney 167 Photo Railway Sqare c1920 c1920 Sydney 168 Photo Darling St Countereweight Unknown Sydney 169 Photo Trolley bus depot Unknown Sydney 170 Photo Trolley bus No. 14 Unknown Sydney 171 Photo Newcastle Railway Station with steam tram - Wharf Road?? Unknown Newcastle 172 Photo High St West Maitland - steam tram Unknown Maitland 173 Photo High St West Maitland - steam tram Unknown Maitland 174 Post Card Argent St near tram terminal Broken Hill NSW c1900 Broken Hill 175 postcard Argent St looking south Broken Hill - with Ken Magor's notes on rear Unknown Broken Hill 176 Photo Toronto - steam tram 61A Unknown Toronto 177 Photo 124A trial run 1911? Sutherland - Cronulla line 1911 Sutherland 178 Photo 103A at a tram stop Unknown Sydney 179 Photo Cable tram set at Crows Nest terminus grip car 12, trailer 22 Unknown Sydney 180 Photo Cable tram Queens Square Sydney 1903 Sydney 181 Photo cars 2078 and 2077 Chatswood late 1950s Sydney 182 Photo car 1877 Balmain area late 1950s Sydney 183 Photo Trolley bus - Rockdale destination Late 1950s Sydney 184 Photo Broken Hill steam tram - motor 18A North Tram Unknown Broken Hill 185 Photo Millars Point Sydney NSW - ferry/tram interchange, unknown Sydney All items imaged including the rear or back where there was writing of information. All files stored on the Museum's Photo Collections directory. Demonstrates through the medium of many images, Australian tramway systems and Ballarat's place in them.Album - heavy card covers, plastic lined with postcard or 6x4 photo sleeves.australia, tramways, postcards, photographs, steam trams, horse trams, cable trams, trolley buses -
 Ballarat Tramway Museum
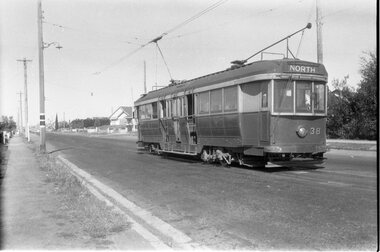
Negative - Geelong Belmont terminus tram 38, Laurie Gallop, early 1956
Photo shows Geelong No. 38 at the Belmont terminus, High Street with the return destination of North. Note the compulsory tram stop on the left-hand pole. One of a set of photos was taken between 15/2/1956 and 3/3/1956 when services operated only between Belmont and North before the final closure of the Belmont route on 25/31956 and that bogie tram 31 is not shown on the board, having gone to Ballarat on 15/2/1956 - see item 5554. See item 8213 for an article on the Geelong system by Keith Kings. Yields information about the Belmont tram terminus prior to closure.Black and white Negative - 120 sizetram stops, tramways, high st, geelong, tram 38, belmont -
 Ballarat Tramway Museum
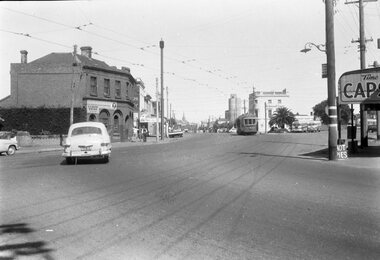
Negative - Geelong tram 36 Mercer St, Laurie Gallop, early 1956
Photo shows Geelong tram 36 outbound to North in Mercer St at Ginn St. In the background is a shop selling Franklins Lemon Swish, a four & Twenty Pie shop, Toppa Ice cream, a Coca Cola truck, a Hotel advertising Richmond Lager, three parked buses and a shop advertising hot pies. On the pole is a tram stop with a metal "CARS STOP HERE" sign. On the left-hand side of the photograph a surveyor can be seen at work.Yields information about the Geelong operations toward the closure of the tram system.Black and white Negative - 120 sizetramways, geelong, mercer st, tram 36, tram stops -
 Ballarat Tramway Museum
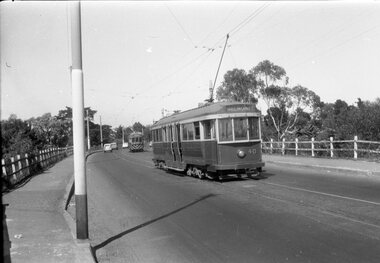
Negative - Geelong trams 33 & 40 Barwon Bridge, Laurie Gallop, early 1956
Photo shows Geelong trams 33 & 40 in Moorabool St just south of the Barwon Bridge on the long crossing loop. Based on the running board at item 8267, most likely tram No. 33. One of a set of photos was taken between 15/2/1956 and 3/3/1956 when services operated only between Belmont and North before the final closure of the Belmont route on 25/31956 and that bogie tram 31 is not shown on the board, having gone to Ballarat on 15/2/1956 - see item 5554. See item 8213 for an article on the Geelong system by Keith Kings. Yields information about the Geelong operations toward the closure of the tram system.Black and white Negative - 120 sizetramways, geelong, moorabool st, tram 33, tram 40, barwon river -
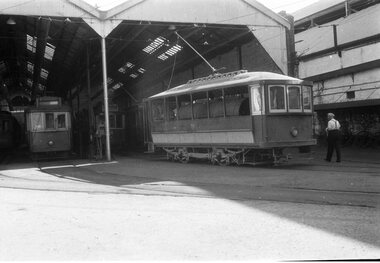 Ballarat Tramway Museum
Negative - Geelong scrubber at depot, Laurie Gallop, early 1956
The photo shows the Geelong scrubber on the front of No. 2 road with No. 16 behind and No. 19 alongside. One of a set of photos was taken between 15/2/1956 and 3/3/1956 when services operated only between Belmont and North before the final closure of the Belmont route on 25/31956 and that bogie tram 31 is not shown on the board, having gone to Ballarat on 15/2/1956 - see item 5554. See item 8213 for an article on the Geelong system by Keith Kings. Yields information about the Geelong operations toward the closure of the tram system and in particular the Geelong scrubber or track cleaning tram.Black and white Negative - 120 sizetramways, geelong, geelong depot, scrubber, geelong 16, geelong 19 -
 Ballarat Tramway Museum
Negative - Tram 40 at the North terminus, Laurie Gallop, early 1956
... Photo shows Geelong tram 40 at the North Terminus ...Photo shows Geelong tram 40 at the North Terminus, with the Pilkington glass factory behind. The tram has the destination of Belmont. One of a set of photos was taken between 15/2/1956 and 3/3/1956 when services operated only between Belmont and North before the final closure of the Belmont route on 25/31956 and that bogie tram 31 is not shown on the board, having gone to Ballarat on 15/2/1956 - see item 5554. See item 8213 for an article on the Geelong system by Keith Kings. Yields information about the Geelong operations toward the closure of the tram system and the North terminus.Black and white Negative - 120 sizetramways, geelong, geelong depot, tram 40, north -
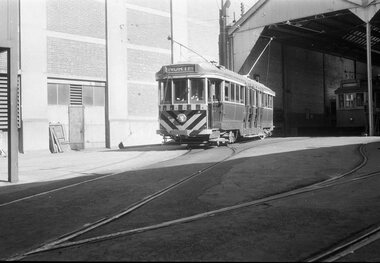 Ballarat Tramway Museum
Negative - Tram 33 Geelong depot, Laurie Gallop, early 1956
Photo shows Geelong 33 on No. 5 road at Geelong depot being driven out with the destination set to North. One of a set of photos was taken between 15/2/1956 and 3/3/1956 when services operated only between Belmont and North before the final closure of the Belmont route on 25/31956 and that bogie tram 31 is not shown on the board, having gone to Ballarat on 15/2/1956 - see item 5554. See item 8213 for an article on the Geelong system by Keith Kings. Yields information about the Geelong operations toward the closure of the tram system.Black and white Negative - 120 sizetramways, geelong, geelong depot, tram 33 -
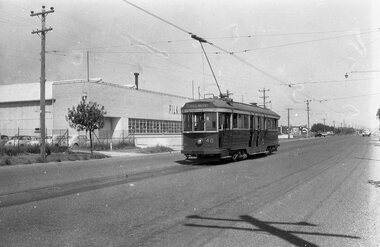
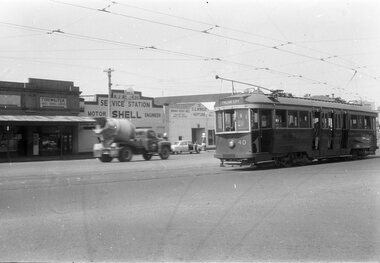 Ballarat Tramway Museum
Negative - Tram 40 - Mercer St, city end, early 1956
... Geelong tram 40 North Mercer St Black and white Negative - 120 ...Photo shows Geelong tram 40 Mercer St, city end. The tram has the destination of North. In the background is a typewriter shop, R J Reynolds? Shell service station and S G Winkler Service station with a Neptune sign. The driver has his hand on the air brake and the controller with the front driver's window open. One of a set of photos was taken between 15/2/1956 and 3/3/1956 when services operated only between Belmont and North before the final closure of the Belmont route on 25/31956 and that bogie tram 31 is not shown on the board, having gone to Ballarat on 15/2/1956 - see item 5554. See item 8213 for an article on the Geelong system by Keith Kings. Yields information about the Geelong operations toward the closure of the tram system.Black and white Negative - 120 sizetramways, geelong, tram 40, north, mercer st -
 Ballarat Tramway Museum
Negative - Tram 38 Mercer Street, Laurie Gallop, early 1956
Photo shows Tram 38 Mercer Street, near The Esplanade with the destination of Belmont. One of a set of photos was taken between 15/2/1956 and 3/3/1956 when services operated only between Belmont and North before the final closure of the Belmont route on 25/31956 and that bogie tram 31 is not shown on the board, having gone to Ballarat on 15/2/1956 - see item 5554. See item 8213 for an article on the Geelong system by Keith Kings. Yields information about the Geelong operations toward the closure of the tram system.Black and white Negative - 120 sizetramways, geelong, tram 38, mercer st -
 Ballarat Tramway Museum
Negative - Moorabool St, looking south at the Kardinia Park loop, Laurie Gallop, early 1956
Photo shows Moorabool St, looking south at the Kardinia Park loop. One of a set of photos was taken between 15/2/1956 and 3/3/1956 when services operated only between Belmont and North before the final closure of the Belmont route on 25/31956 and that bogie tram 31 is not shown on the board, having gone to Ballarat on 15/2/1956 - see item 5554. See item 8213 for an article on the Geelong system by Keith Kings. Yields information about the Geelong tram system.Black and white Negative - 120 sizetramways, geelong, moorabool st, kardinia park loop -
 Ballarat Tramway Museum
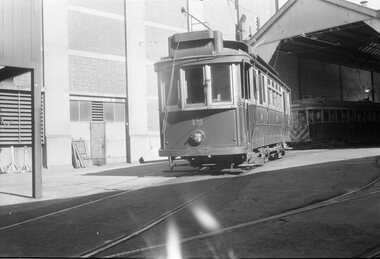
Negative - Tram 19 at Geelong Depot, Laurie Gallop, early 1956
Photo shows Tram 19 at Geelong Depot One of a set of photos was taken between 15/2/1956 and 3/3/1956 when services operated only between Belmont and North before the final closure of the Belmont route on 25/31956 and that bogie tram 31 is not shown on the board, having gone to Ballarat on 15/2/1956 - see item 5554. See item 8213 for an article on the Geelong system by Keith Kings. Yields information about the Geelong operations toward the closure of the tram system.Black and white Negative - 120 sizetramways, geelong, geelong depot, tram 19 -
 Ballarat Tramway Museum
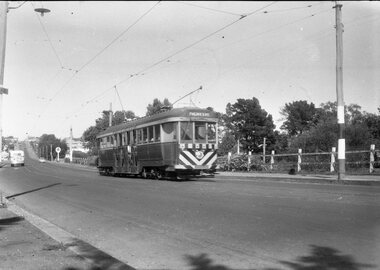
Negative - Geelong 38 and welding truck - Moorabool St, Laurie Gallop, early 1956
Photo shows Geelong 38 south bound to Belmont and welding truck - Moorabool St between Myers and McKillop Streets. The welding with the power supply from the overhead would most likely be repairing a broken joint. One of a set of photos was taken between 15/2/1956 and 3/3/1956 when services operated only between Belmont and North before the final closure of the Belmont route on 25/31956 and that bogie tram 31 is not shown on the board, having gone to Ballarat on 15/2/1956 - see item 5554. See item 8213 for an article on the Geelong system by Keith Kings. Yields information about the Geelong operations toward the closure of the tram system.Black and white Negative - 120 sizetramways, geelong, tram 38, moorabool st, welding truck, track repairs -
 Ballarat Tramway Museum
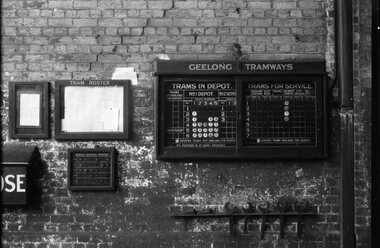
Negative - Tramcar allocation board - Geelong, Laurie Gallop, early 1956
Photo shows the Tramcar allocation board - in the Geelong depot. Shows the four bogie cars in operation or available on the day the photograph was taken. Shows that some of the Meadowbank-built trams and bogie trams had already left the depot. One of a set of photos was taken between 15/2/1956 and 3/3/1956 when services operated only between Belmont and North before the final closure of the Belmont route on 25/31956 and that bogie tram 31 is not shown on the board, having gone to Ballarat on 15/2/1956 - see item 5554. See item 8213 for an article on the Geelong system by Keith Kings. Yields information about the Geelong depot allocation board that showed the location and use of the tramcars on the day.Black and white Negative - 120 sizetramways, geelong, depot, depot allocation, tramcar allocation -
 Ballarat Tramway Museum
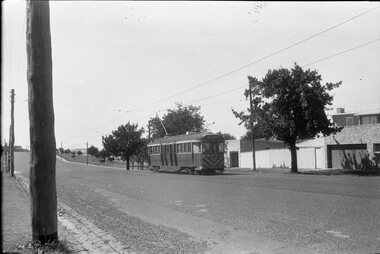
Negative - Geelong tram inbound Mercer Street, Laurie Gallop, early 1956
Photo shows a Geelong tram inbound in Mercer Street, near The Esplanade. Tram has the destination of Belmont. Based on the running board at item 8267, most likely No. 33. One of a set of photos was taken between 15/2/1956 and 3/3/1956 when services operated only between Belmont and North before the final closure of the Belmont route on 25/31956 and that bogie tram 31 is not shown on the board, having gone to Ballarat on 15/2/1956 - see item 5554. See item 8213 for an article on the Geelong system by Keith Kings. Yields information about tramway operations prior to closure of the Geelong system.Black and white Negative - 120 sizetram stops, tramways, geelong, mercer st, tram 33 -
 Ballarat Tramway Museum
Negative - Geelong tram at Balliang St loop in Moorabool St, Laurie Gallop, early 1956
... Photo shows a Geelong tram to North in Moorabool St...Photo shows a Geelong tram to North in Moorabool St ...Photo shows a Geelong tram to North in Moorabool St at the Balliang St / Forser St loop in Moorabool St. In the background is a Caltex Service station and a bus. See also item 8299 for the trailing photograph.Yields information about the Geelong operations toward the closure of the tram system.Black and white Negative - 120 sizetramways, geelong, belmont, moorabool st, crossing loop -
 Ballarat Tramway Museum
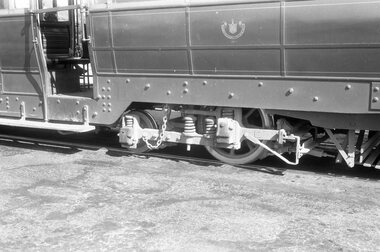
Negative - Brill 22E bogie or truck - Geelong tramcar, Laurie Gallop, early 1956
Photo shows Brill 22E Maximum Traction bogie or truck - Geelong tramcar, has the SEC logo on the side of the tramcar in the view. One of a set of photos was taken between 15/2/1956 and 3/3/1956 when services operated only between Belmont and North before the final closure of the Belmont route on 25/31956 and that bogie tram 31 is not shown on the board, having gone to Ballarat on 15/2/1956 - see item 5554. See item 8213 for an article on the Geelong system by Keith Kings. Yields information about the Geelong bogie trams.Black and white Negative - 120 sizetramways, geelong, brill 22e, maximum traction, bogie trams -
 Ballarat Tramway Museum
Negative - Geelong tram at Balliang St loop in Moorabool St, Laurie Gallop, early 1956
... Photo shows a Geelong tram to North in Moorabool St...Photo shows a Geelong tram to North in Moorabool St ...Photo shows a Geelong tram to North in Moorabool St at the Balliang St / Forser St loop in Moorabool St. Has the rail over bridge in the far distance. See also item 8298 for the approaching photo.Yields information about the Geelong operations toward the closure of the tram system.Black and white Negative - 120 sizetramways, geelong, belmont, moorabool st -
 Ballarat Tramway Museum
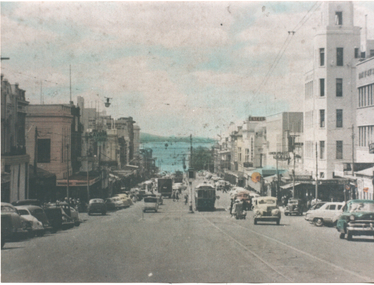
Photograph - Geelong 38 Moorabool St, early 1950s
The photograph shows SEC Geelong 38 in Moorabool St looking north to Corio Bay. Has the T&G and the Bank of NSW in the view. Photo possibly a reproduction from a postcard.Yields information about Moorabool St Geelong in the early 1950s.Colour print with plain back on Agfa paper. tramcars, trams, geelong, moorabool st -
 Ballarat Tramway Museum
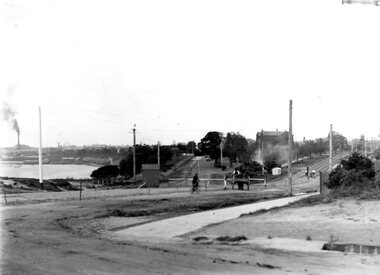
Photograph - Geelong Esplanade Tramline Construction, Melbourne Electric Supply Co. (MESCo), c.,1900-10
Shows construction of the North tramline in The Esplanade. The tracks already laid to the right are in Mercer St. (Now The Esplanade South). The photo looks SE towards the city. On the left is Corio Bay and in the distance is the power station's chimney. 1928Yields information re the building of early Geelong infrastructure.Black and white print on paper.Plate 3-3 Spare, written in ink on the back of the photograph.tramline construction, geelong esplanade, geelong mesco power station -
 Ballarat Tramway Museum
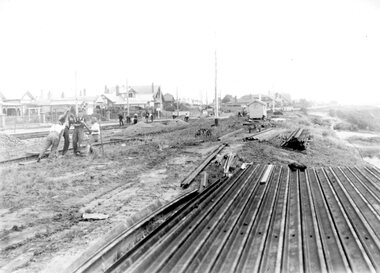
Photograph - Geelong Esplanade Tramline Construction, Melbourne Electric Supply Co. (MESCo), 1928
Construction of the North tram route along The Esplanade, looking north. New grooved rail is laid out on the slope down to Corio Bay. 1928Yields information on the development of Tramways infrastructure in Geelong.Black and white print on paper.Repeat 8-14, 24/25 - 36, written in pencil on the rear of the photograph.geelong esplanade, grooved tramway rail, corio bay -
 Ballarat Tramway Museum
Photograph - Geelong Streetscape, Melbourne Electric Supply Co. (MESCo), c.1911
Tram tracks being laid in Moorabool St., looking North. Curved track heads back into Ryrie St. 1911.Yields information re the development of commerce and tramways infrastructure in early Geelong.Black and white print on paper.8-13 written in biro on rear of photograph.tramways track development, moorabool and ryrie sts geelong -
 Melbourne Tram Museum
Album - Ron Scholten Slide Collection, Ron Scholten
Photo - see pdf file for further information. Number Brief Description RSC1 PCC 1041 at the gates of Preston Workshops on a test run without it’s trolley retriever RSC2 PCC 1041 in Glenhuntly Road on Route 67 en route to Carnegie crossing the Railway Gates at Glenhuntly Station RSC3 W2 482 stored at Malvern Depot with Olympic Park on the Destination RSC4 Cable Car Set 64 in Swanston St outside Princess Bridge Station in Bound with open top Double Deck Bus, Trak Motors ? Departing from Flinders St Station RSC5 W3 669 in St George Rd at Sumner St en route to Preston Workshops for scrapping RSC6 Cable Car in Lygon St en route to Carlton RSC7 PCC 1041 turning from St Georges Rd into Miller St to enter Preston Workshops RSC8 Flinders St Station with cable cars RSC9 PCC 1041 in strife on it’s maiden day in service. Trams on route 88 delayed in Queens Parade Clifton Hill RSC10 Flinders St at William St with Cable Cars RSC11 L 104 on the fan of the new shed at Malvern Depot on a TMSV tour RSC12 Cable Set 1 after it’s restoration at Preston Workshops on the fan near the front gate RSC13 X1 466 at a suburban terminus of the Footscray System RSC14 X2 680 at Point Ormond Terminus RSC15 An ex Launceston Tram at the outside terminus of the Penny Royal Complex Tramway in Launceston RSC16 Q 148 at Preston Workshops awaiting disposal RSC17 Elizabeth St with Cable Cars RSC18 Elizabeth and Bourke St corner outside the GPO with cable cars RSC19 Collins St with Cable Cars RSC20 A photo taken from the observation deck of the ICI building showing a view of Parliament house with a w class tram in Nicholson St RSC21 Auburn Horse car with a posed photo of all the tramwaymen employed RSC22 Cheltenham Double Deck Horsecar with a full load of passengers RSC23 City of Northcote cable trailer 3 at a terminus RSC24 City of Northcote Cable cars passing in High St Northcote RSC25 St Kilda Rd at Princes Bridge with Cable Cars RSC26 Flinders St with Cable Cars RSC27 Cable Cars RSC28 Bourke St looking towards Elizabeth St from Queen St RSC29 Cable cars in Bourke St at Elizabeth St looking East RSC30 Cable cars in Elizabeth St at the terminus at Flinders St RSC31 Cable cars in Bourke St at Swanston St looking west RSC32 Cable cars in Swanston St at Flinders St looking North RSC33 Cable cars in Collins St near Russell St RSC34 Cable cars in Elizabeth St at Bourke St RSC35 Cable cars in Collins St at Elizabeth St RSC36 Cable Cars in Swanston St at Flinders St RSC37 Cable cars in Collins St RSC38 Cable Cars RSC39 Cable cars in St Kilda Rd near Princes Bridge RSC40 Cable cars in Collins St East of Swanston St RSC41 Cable cars in Spring St outside Parliament house RSC42 K 92 in M&MTB Chocolate and cream livery but with a P&MTT Destination box on Route 14 RSC43 Thornbury depot viewed from Miller St and St Georges rd. Two W2 class cars are laying over between the peaks RSC44 Z3 201 in Met Livery passes D1 3510 in new M Tram livery. A Staff member in uniform stands in the doorway. Dandenong Rd RSC45 D1 3530 advertising Heinekin Super Golf on Route 55 in Royal Park RSC46 D1 3504 in M Tram livery on the reserved track in Matthews Ave near Essendon Airport showing Route 81 Travancore . I suspect it is a private enthusiasts charter due to the Malvern W class run number in the rear windscreen RSC47 D1 3504 on Route 64 in Dandenong Rd in M Tram Livery RSC48 D1 3504 in M Tram Livery at Airport West Terminus RSC49 D1 3504 in M Tram Livery in Union Rd outside the Showgrounds RSC50 D1 3504 at West Maribyrnong Terminus in M Tram Livery RSC51 D1 3503 in M Tram Livery in Malvern Depot RSC52 SW6 960 and VR 53 in Harbour Esplanade for the NMEL&T Co Centenary RSC53 Hawthorn Tramways Trust 32 in Harbour Esplanade for the NMEL&T Co Centenary RSC54 VR 53 & B 2042 in Harbour Esplanade for the NMEL&T Co Centenary RSC55 VR 53 & C 3016 in Harbour Esplanade for the NMEL&T Co Centenary RSC56 NMEL&T Co 13 usually V214 in Harbour Esplanade for the NMEL&T Co Centenary RSC57 NMEL&T Co 13 usually V214 at Preston Workshops for the NMEL&T Co Centenary RSC58 Hawthorn Tramways Trust Lettering on HTT 32 in Harbour Esplanade for the NMEL&T Co Centenary RSC59 Hawthorn Tramways Trust 32 in Harbour Esplanade for the NMEL&T Co Centenary RSC60 Hawthorn Tramways Trust 32in Harbour Esplanade for the NMEL&T Co Centenary RSC61 Hawthorn Tramways Trust 32 in Harbour Esplanade for the NMEL&T Co Centenary RSC62 NMEL&T Co 13 usually V214 at Preston Workshops for the NMEL&T Co Centenary RSC63 W2 516 and another on route 59 wait to shunt at Essendon Airdrome Terminus as W2 571 on route 49 departs. This was the last day of operation. RSC64 Australia’s First Electric Tram at Box Hill with Tramwaymen including H J Hilton who is in the centre RSC65 W2 484 en route to St Kilda Junction and another wait for passengers after a race meeting at Caulfield Racecourse RSC66 X1 463 on the Footscray system en route to Russell St RSC67 Geelong 35 on Chilwell Route, Formerly HTT 13, M&MTB 119, then Bendigo 1 and Ballarat 37 RSC68 P&MTT 4 on Opening Day of the system in Glenferrie Rd RSC69 Bendigo 6 in McCrae St near the Depot end route to North Bendigo RSC70 P&MTT 4 in Glenferrie on opening day of the System RSC71 Scrubber 3 stripped and awaiting scrapping at Preston Workshops RSC72 Scrubber 4 at South Melbourne Depot RSC73 Q 191 & 139 at Preston Workshops awaiting scrapping RSC74 Rail Grinder 3 at Preston Workshops as purchased from Sydney RSC75 Y 469 waits to shunt at Wattle Park Terminus as Y1 613 departs on driver training duties RSC76 VR 53 on the outside roads at Essendon Depot RSC77 W5 796 with three doors and square windows running out of Brunswick Depot in Cameron St, with a supplementary destination board showing “City via Swanston St” RSC78 W2 258 on the wheel grinder road at Brunswick depot RSC79 X2 676 on a TMSV tour, W5 817 & 836 & VR 53 on the open roads at Essendon Depot RSC80 PCC 1041 on test, passes W71035 in High St Preston RSC81 D1 class production number 7 as delivered on test in Matthews Ave RSC82 W2 383 on route 5 turning from the reserved track in Dandenong Rd into St Kilda Rd at St Kilda Junction RSC83 Z3 204 as advertising tram for Vodaphone Grand Prix running into Malvern Depot new shed RSC84 Z1 4 on test in St Georges Rd RSC85 PCC 1041 on Route 96 in Burke St near Exhibition St RSC86 Z1 3 without numbers on test turning from Miller St in St Georges Rd RSC87 Track components stored in Coldblo Rd at Malvern Depot with Z class cars adjacent RSC88 D1 3501 in M Tram Livery on Route 55 in Peel St at Franklin St RSC89 C 3001 in Yarra Trams Livery Porto 018 & D13502 in M Tram Livery on Display in Harbourside Esplanade RSC90 D1 class tram production number 7, in as delivered condition on test in Matthews Ave RSC91 D1 3503 inside Malvern Depot RSC92 SW6 955 and W6 974 in St Kilda at City Rd at Dusk RSC93 Freight Car 19 at Preston Workshops in green Livery RSC94 Rail Grinder 3 in green Livery at South Melb Per Way Yard RSC95 A SW6 class car on route 50 shunting at Elizabeth St Terminus at night, taken from Flinders St Station RSC96 W2 588 & 435 in St Kilda Rd at Batman Ave RSC97 Y1 613 in service at Wattle Park Terminus RSC98 W2 588 in Wellington Parade en-route to the City with a Grand Final Load of passengers followed closely by 384 RSC99 W2 558 on a MCG Footy Special entering the Simpson St sidings RSC100 W3 657 & an L Class in the new shed at Malvern Depot RSC101 Y1 613 in St Kilda Rd on an enthusiasts tour in St Kilda Rd south of St Kilda jun RSC102 Y1 613 on an enthusiasts tour in Clarendon St with the two extra tracks on the Viaduct under construction RSC103 W6 976 on the fan of the new shed at Malvern Depot RSC104 W7 1024 as an advertising car for Bank of NSW at the route 1 terminus at South Melb Beach RSC105 PCC 980 on route 96 in Nicholson St near North Fitzroy Depot RSC106 SW6 890 with dash canopy lighting in Market St on the opening day of William St Services RSC107 W2 444 with big numbers heads a line of footy specials in Simpson St Sidings RSC108 Cable Cars in Elizabeth St RSC109 NMEL&T co 2 with a trailer outside the power station in Mount Alexander Rd RSC110 Alf Twentyman’s cable car set in his Northcote backyard RSC111 Cable Cars in Queens Parade Clifton Hill RSC112 Cable cars in Collins St outside the Townhall RSC113 PCC 1041 at Carnegie terminus RSC114 Cable cars in Elizabeth St RSC115 Cable cars in Collins St near Swanston St RSC116 HTT 19 turns from Riversdale Rd into Camberwell Rd at Camberwell Junction RSC117 W1 419 official builders photo of first car of the class RSC118 Cable car with a full load of passengers RSC119 W1 422 illuminated for the visit of T.R.H. The Duke and Duchess of York RSC120 PCC 1041 in strife on it’s maiden day in service. Trams on route 88 delayed in Queens Parade Clifton Hill RSC121 Bendigo birney in Finn St near North Bendigo terminus RSC122 SW6 in St Kilda Rd at Domain Rd at night RSC123 All 3 of Alf Twentyman’s cable cars in his Northcote backyard RSC124 Cable trailer 256 being unloaded into the shed at Bylands RSC125 Cable grip car 1 being removed from the Melbourne Museum RSC126 Alf Twentyman's cable cars in his Northcote Backyard RSC127 Alf Twentyman's cable cars in his Northcote Backyard RSC128 Alf Twentyman's cable cars in his Northcote Backyard RSC129 Alf Twentyman's cable cars in his Northcote Backyard RSC130 W class car in Swanston St at Collins St RSC131 Y1 469, L & W3 on the run out of Glenhuntly Depot on a tour RSC132 W7 1024 as an advertising tram for Bank of NSW at Clifton Hill RSC133 W2 496 on a footy special in Simpson St Sidings RSC134 W2 as originally converted to a test car at Preston Workshops RSC135 W3 667 in Brunswick Depot with Ellen Butland at the controls RSC136 W3 669 on it’s final run at Victoria Prd & Brunswick St RSC137 W2 571 in Wellington Prd at Clarendon St with a Footy Final load of Passengers RSC138 Y1 613 shunts at Spencer St Terminus as X217 waits on Australia Day Pageant RSC139 PCC 1041 on Rt 96 in Burke St outside the Southern Cross Hotel RSC140 890 with accident damage on the outside roads at Preston Workshops c1978 RSC141 535 on Rt 4 at the old St Kilda Jun c1967 RSC142 1041 on Rt 88 turns from Bourke St into Spring St 1973 RSC143 102 on a tour at Albert Park Beach Terminus Feb 1972 RSC144 833, 835 & 834 in the shed at Malvern Depot c1976 RSC145 281 in Wellington Parade on a football very crowded special c1974 RSC146 464 Ballarat Rd 1960 RSC147 181 Explosives Fty - at Footscray Station - July 1960 RSC148 181 Williamstown Road 1960 RSC149 Cable car set at Alf Twentyman’s c1970 RSC150 X 217 at Malvern Depot c1970 RSC151 X1 465 and T181 Footscray Football ground in Barkly St. c1960 RSC152 Scrubber 5 at South Melbourne depot c1960 RSC153 X1 465 Footscray to Russell St, c1960 RSC154 X1 467 Leeds St Footscray 1960 RSC155 PMTT 4 Glenferrie Road, 1910 RSC156 S 164 at Malvern Depot c1970 RSC157 T178 Footscray c1960 RSC158 Cleaner No. 7 at South Melbourne depot c1960 RSC159 Two Y classes at Princes Bridge / Batman Ave mid 1950s RSC160 Swanston St – Nu color vue slide – M142 Demonstrates the work of Ron Scholten in photography, collection and/or production of duplicate slidesAssembled album in a black presentation folder of 160 colour slides, 8 slide sleeves, collected or produced by Ron Scholten. Many are TMSV or Windsor Publications slides. All photographs have been scanned and placed on the Museum's G drive. A list of all photographs with details has been compiled. melbourne, tramways, trams, cable trams -
 Eltham District Historical Society Inc
Audio - Audio Recording, David Taylor, Dr Andrew Lemon and Irene Kearsey - Public Records Office Victoria, 12 Aug. 2023
EDHS Newsletter No. 271 August 2023 Public Record Office Victoria (PROV) is the Archive of the State Government of Victoria. Established fifty years ago under the Public Records Act 1973, PROV at the Victorian Archives Centre in North Melbourne now holds around 106 kilometres of public records from 1836 to the present day. There are also PROV collections at Ballarat, Beechworth, Bendigo, Geelong and the University of Melbourne. Our next meeting will be about PROV and former PROV staff member Andrew Lemon, will briefly reminisce about his work there, in it’s early days. As Assistant Director Access Services at PROV, David Taylor oversees the management of, and access to, the State collection. David will be outlining PROV’s unique role in Victoria, the nature of the public records it holds and how researchers can use increasingly sophisticated online resources to discover more about their ancestors and Victorian history. Finally, our Society member Irene Kearsey will talk about her experiences as a long-time volunteer at PROV.1:21:12 duration Digital MP3 file; 27.8MBaudio recording, eltham district historical society, meeting, society meeting, eltham, david taylor, dr andrew lemon, irene kearsey, public records office victoria (prov) -
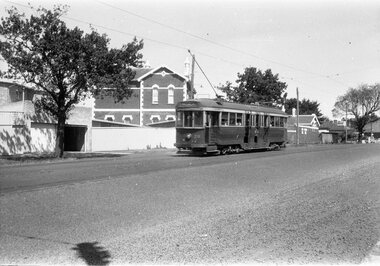
 Ballarat Tramway Museum
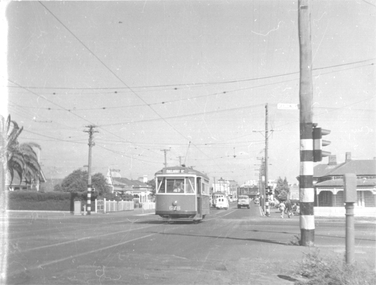
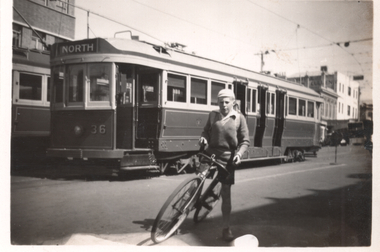
Photograph - Geelong tram 36 Moorabool St, c1948
Photo shows Geelong bogie tram No. 36 in Moorabool St with the destination of North. Another bogie tram is behind No. 36. No 36 was purchased by the SEC in 1948 from the MMTB. Based on three other photos by "CF" - c1948. The photographer has been "photobombed" by a boy on a bike.Yields information about the Geelong tram 36Black and white photograph, plain back.Has the initials "CF" in pencil on the rear. tramways, trams, geelong, railway station, tram 36 -
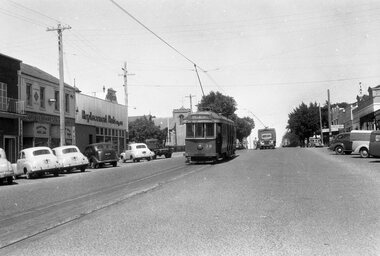
 Ballarat Tramway Museum
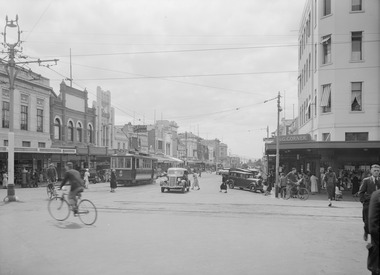
Photograph - Digital image of Geelong tram No. 2 at T&G Corner Geelong, c1938
The photograph was taken from a Victorian Railways glass negative held at the State Library of Victoria. The photo shows Geelong No. 2 in Moorabool St at the intersection with Ryrie St. The tram has the destination of North. The tram is in its modified form that provides for one-man operation. In the photo are Edments, Savoia Cafe, Commercial Bank of Australia, and the T&G building. The photo has been dated between 1935 when the tram was converted and 1939 when the bar neon traffic lights were installed at the intersection. For reference to the SLV photograph - see http://handle.slv.vic.gov.au/10381/97173. See item 9075 for a copy print. This tram is now part of the collection of the Ballarat Tramway Museum.Yields information about Geelong No.2 and the intersection of Ryrie and Moorabool Streets Geelong.Digital image of Geelong tram No. 2 in Moorabool St at the intersection with Ryrie St, c1938. geelong, geelong 2, ryrie st, moorabool st, trams, tramways, temperance & general